1
Configuring OSI Services
BayRS Version 13.00
Site Manager Software Version 7.00
Part No. 303535-A Rev 00
October 1998
4401 Great America Parkway
Santa Clara, CA 95054
8 Federal Street
Billerica, MA 01821
Copyright © 1998 Bay Networks, Inc.
All rights reserved. Printed in the USA. October 1998.
The information in this document is subject to change without notice. The statements, configurations, technical data,
and recommendations in this document are believed to be accurate and reliable, but are presented without express or
implied warranty. Users must take full responsibility for their applications of any products specified in this document.
The information in this document is proprietary to Bay Networks, Inc.
The software described in this document is furnished under a license agreement and may only be used in accordance
with the terms of that license. A summary of the Software License is included in this document.
Trademarks
ACE, AFN, AN, BCN, BLN, BN, BNX, CN, FRE, LN, PPX, and Bay Networks are registered trademarks and
Advanced Remote Node, ANH, ARN, ASN, BayRS, BayStack, BayStream, BCC, BCNX, BLNX, FN, SPEX,
System 5000, and the Bay Networks logo are trademarks of Bay Networks, Inc.
All other trademarks and registered trademarks are the property of their respective owners.
Restricted Rights Legend
Use, duplication, or disclosure by the United States Government is subject to restrictions as set forth in subparagraph
(c)(1)(ii) of the Rights in Technical Data and Computer Software clause at DFARS 252.227-7013.
Notwithstanding any other license agreement that may pertain to, or accompany the delivery of, this computer
software, the rights of the United States Government regarding its use, reproduction, and disclosure are as set forth in
the Commercial Computer Software-Restricted Rights clause at FAR 52.227-19.
Statement of Conditions
In the interest of improving internal design, operational function, and/or reliability, Bay Networks, Inc. reserves the
right to make changes to the products described in this document without notice.
Bay Networks, Inc. does not assume any liability that may occur due to the use or application of the product(s) or
circuit layout(s) described herein.
Portions of the code in this software product may be Copyright © 1988, Regents of the University of California. All
rights reserved. Redistribution and use in source and binary forms of such portions are permitted, provided that the
above copyright notice and this paragraph are duplicated in all such forms and that any documentation, advertising
materials, and other materials related to such distribution and use acknowledge that such portions of the software were
developed by the University of California, Berkeley. The name of the University may not be used to endorse or
promote products derived from such portions of the software without specific prior written permission.
SUCH PORTIONS OF THE SOFTWARE ARE PROVIDED “AS IS” AND WITHOUT ANY EXPRESS OR
IMPLIED WARRANTIES, INCLUDING, WITHOUT LIMITATION, THE IMPLIED WARRANTIES OF
MERCHANTABILITY AND FITNESS FOR A PARTICULAR PURPOSE.
In addition, the program and information contained herein are licensed only pursuant to a license agreement that
contains restrictions on use and disclosure (that may incorporate by reference certain limitations and notices imposed
by third parties).
ii
303535-A Rev 00
Bay Networks, Inc. Software License Agreement
NOTICE: Please carefully read this license agreement before copying or using the accompanying software or
installing the hardware unit with pre-enabled software (each of which is referred to as “Software” in this Agreement).
BY COPYING OR USING THE SOFTWARE, YOU ACCEPT ALL OF THE TERMS AND CONDITIONS OF
THIS LICENSE AGREEMENT. THE TERMS EXPRESSED IN THIS AGREEMENT ARE THE ONLY TERMS
UNDER WHICH BAY NETWORKS WILL PERMIT YOU TO USE THE SOFTWARE. If you do not accept these
terms and conditions, return the product, unused and in the original shipping container, within 30 days of purchase to
obtain a credit for the full purchase price.
1. License Grant. Bay Networks, Inc. (“Bay Networks”) grants the end user of the Software (“Licensee”) a personal,
nonexclusive, nontransferable license: a) to use the Software either on a single computer or, if applicable, on a single
authorized device identified by host ID, for which it was originally acquired; b) to copy the Software solely for backup
purposes in support of authorized use of the Software; and c) to use and copy the associated user manual solely in
support of authorized use of the Software by Licensee. This license applies to the Software only and does not extend
to Bay Networks Agent software or other Bay Networks software products. Bay Networks Agent software or other
Bay Networks software products are licensed for use under the terms of the applicable Bay Networks, Inc. Software
License Agreement that accompanies such software and upon payment by the end user of the applicable license fees
for such software.
2. Restrictions on use; reservation of rights. The Software and user manuals are protected under copyright laws.
Bay Networks and/or its licensors retain all title and ownership in both the Software and user manuals, including any
revisions made by Bay Networks or its licensors. The copyright notice must be reproduced and included with any
copy of any portion of the Software or user manuals. Licensee may not modify, translate, decompile, disassemble, use
for any competitive analysis, reverse engineer, distribute, or create derivative works from the Software or user manuals
or any copy, in whole or in part. Except as expressly provided in this Agreement, Licensee may not copy or transfer
the Software or user manuals, in whole or in part. The Software and user manuals embody Bay Networks’ and its
licensors’ confidential and proprietary intellectual property. Licensee shall not sublicense, assign, or otherwise
disclose to any third party the Software, or any information about the operation, design, performance, or
implementation of the Software and user manuals that is confidential to Bay Networks and its licensors; however,
Licensee may grant permission to its consultants, subcontractors, and agents to use the Software at Licensee’s facility,
provided they have agreed to use the Software only in accordance with the terms of this license.
3. Limited warranty. Bay Networks warrants each item of Software, as delivered by Bay Networks and properly
installed and operated on Bay Networks hardware or other equipment it is originally licensed for, to function
substantially as described in its accompanying user manual during its warranty period, which begins on the date
Software is first shipped to Licensee. If any item of Software fails to so function during its warranty period, as the sole
remedy Bay Networks will at its discretion provide a suitable fix, patch, or workaround for the problem that may be
included in a future Software release. Bay Networks further warrants to Licensee that the media on which the
Software is provided will be free from defects in materials and workmanship under normal use for a period of 90 days
from the date Software is first shipped to Licensee. Bay Networks will replace defective media at no charge if it is
returned to Bay Networks during the warranty period along with proof of the date of shipment. This warranty does not
apply if the media has been damaged as a result of accident, misuse, or abuse. The Licensee assumes all responsibility
for selection of the Software to achieve Licensee’s intended results and for the installation, use, and results obtained
from the Software. Bay Networks does not warrant a) that the functions contained in the software will meet the
Licensee’s requirements, b) that the Software will operate in the hardware or software combinations that the Licensee
may select, c) that the operation of the Software will be uninterrupted or error free, or d) that all defects in the
operation of the Software will be corrected. Bay Networks is not obligated to remedy any Software defect that cannot
be reproduced with the latest Software release. These warranties do not apply to the Software if it has been (i) altered,
except by Bay Networks or in accordance with its instructions; (ii) used in conjunction with another vendor’s product,
resulting in the defect; or (iii) damaged by improper environment, abuse, misuse, accident, or negligence. THE
FOREGOING WARRANTIES AND LIMITATIONS ARE EXCLUSIVE REMEDIES AND ARE IN LIEU OF ALL
OTHER WARRANTIES EXPRESS OR IMPLIED, INCLUDING WITHOUT LIMITATION ANY WARRANTY OF
MERCHANTABILITY OR FITNESS FOR A PARTICULAR PURPOSE. Licensee is responsible for the security of
303535-A Rev 00
iii
its own data and information and for maintaining adequate procedures apart from the Software to reconstruct lost or
altered files, data, or programs.
4. Limitation of liability. IN NO EVENT WILL BAY NETWORKS OR ITS LICENSORS BE LIABLE FOR ANY
COST OF SUBSTITUTE PROCUREMENT; SPECIAL, INDIRECT, INCIDENTAL, OR CONSEQUENTIAL
DAMAGES; OR ANY DAMAGES RESULTING FROM INACCURATE OR LOST DATA OR LOSS OF USE OR
PROFITS ARISING OUT OF OR IN CONNECTION WITH THE PERFORMANCE OF THE SOFTWARE, EVEN
IF BAY NETWORKS HAS BEEN ADVISED OF THE POSSIBILITY OF SUCH DAMAGES. IN NO EVENT
SHALL THE LIABILITY OF BAY NETWORKS RELATING TO THE SOFTWARE OR THIS AGREEMENT
EXCEED THE PRICE PAID TO BAY NETWORKS FOR THE SOFTWARE LICENSE.
5. Government Licensees. This provision applies to all Software and documentation acquired directly or indirectly
by or on behalf of the United States Government. The Software and documentation are commercial products, licensed
on the open market at market prices, and were developed entirely at private expense and without the use of any U.S.
Government funds. The license to the U.S. Government is granted only with restricted rights, and use, duplication, or
disclosure by the U.S. Government is subject to the restrictions set forth in subparagraph (c)(1) of the Commercial
Computer Software––Restricted Rights clause of FAR 52.227-19 and the limitations set out in this license for civilian
agencies, and subparagraph (c)(1)(ii) of the Rights in Technical Data and Computer Software clause of DFARS
252.227-7013, for agencies of the Department of Defense or their successors, whichever is applicable.
6. Use of Software in the European Community. This provision applies to all Software acquired for use within the
European Community. If Licensee uses the Software within a country in the European Community, the Software
Directive enacted by the Council of European Communities Directive dated 14 May, 1991, will apply to the
examination of the Software to facilitate interoperability. Licensee agrees to notify Bay Networks of any such
intended examination of the Software and may procure support and assistance from Bay Networks.
7. Term and termination. This license is effective until terminated; however, all of the restrictions with respect to
Bay Networks’ copyright in the Software and user manuals will cease being effective at the date of expiration of the
Bay Networks copyright; those restrictions relating to use and disclosure of Bay Networks’ confidential information
shall continue in effect. Licensee may terminate this license at any time. The license will automatically terminate if
Licensee fails to comply with any of the terms and conditions of the license. Upon termination for any reason,
Licensee will immediately destroy or return to Bay Networks the Software, user manuals, and all copies. Bay
Networks is not liable to Licensee for damages in any form solely by reason of the termination of this license.
8. Export and Re-export. Licensee agrees not to export, directly or indirectly, the Software or related technical data
or information without first obtaining any required export licenses or other governmental approvals. Without limiting
the foregoing, Licensee, on behalf of itself and its subsidiaries and affiliates, agrees that it will not, without first
obtaining all export licenses and approvals required by the U.S. Government: (i) export, re-export, transfer, or divert
any such Software or technical data, or any direct product thereof, to any country to which such exports or re-exports
are restricted or embargoed under United States export control laws and regulations, or to any national or resident of
such restricted or embargoed countries; or (ii) provide the Software or related technical data or information to any
military end user or for any military end use, including the design, development, or production of any chemical,
nuclear, or biological weapons.
9. General. If any provision of this Agreement is held to be invalid or unenforceable by a court of competent
jurisdiction, the remainder of the provisions of this Agreement shall remain in full force and effect. This Agreement
will be governed by the laws of the state of California.
Should you have any questions concerning this Agreement, contact Bay Networks, Inc., 4401 Great America Parkway,
P.O. Box 58185, Santa Clara, California 95054-8185.
LICENSEE ACKNOWLEDGES THAT LICENSEE HAS READ THIS AGREEMENT, UNDERSTANDS IT, AND
AGREES TO BE BOUND BY ITS TERMS AND CONDITIONS. LICENSEE FURTHER AGREES THAT THIS
AGREEMENT IS THE ENTIRE AND EXCLUSIVE AGREEMENT BETWEEN BAY NETWORKS AND
LICENSEE, WHICH SUPERSEDES ALL PRIOR ORAL AND WRITTEN AGREEMENTS AND
COMMUNICATIONS BETWEEN THE PARTIES PERTAINING TO THE SUBJECT MATTER OF THIS
AGREEMENT. NO DIFFERENT OR ADDITIONAL TERMS WILL BE ENFORCEABLE AGAINST BAY
NETWORKS UNLESS BAY NETWORKS GIVES ITS EXPRESS WRITTEN CONSENT, INCLUDING AN
EXPRESS WAIVER OF THE TERMS OF THIS AGREEMENT.
iv
303535-A Rev 00
Contents
Preface
Before You Begin .............................................................................................................xiii
Text Conventions .............................................................................................................xiv
Acronyms ......................................................................................................................... xv
Bay Networks Technical Publications .............................................................................xvii
How to Get Help .............................................................................................................xvii
Chapter 1
OSI Overview
OSI Basic Reference Model ...........................................................................................1-2
OSI Network Organization ..............................................................................................1-3
Level 1 and Level 2 Routing .....................................................................................1-4
Level 1 Routing ..................................................................................................1-5
Level 2 Routing ..................................................................................................1-6
OSI Network Addressing ..........................................................................................1-6
NSAP Structure .................................................................................................1-7
Allocating NSAP Addresses ............................................................................1-13
OSI Basic Routing Algorithm ........................................................................................1-17
Update Process ......................................................................................................1-18
Decision Process ...................................................................................................1-20
Forwarding Process ...............................................................................................1-21
OSI Routing Protocols ..................................................................................................1-22
Connectionless Network Service Protocol .............................................................1-22
End System to Intermediate System Routing Exchange Protocol .........................1-23
Configuration Reporting ...................................................................................1-23
Route Redirecting ............................................................................................1-24
Intermediate System to Intermediate System
Intra-Domain Routing Exchange Protocol ..............................................................1-26
Intra-Domain Routing ......................................................................................1-26
303535-A Rev 00
v
Inter-Domain Routing ......................................................................................1-28
OSI and TARP ..............................................................................................................1-28
How TARP Works ...................................................................................................1-29
TARP Packet Types ................................................................................................1-29
TARP Packet Fields ................................................................................................1-30
Originating TARP Requests ...................................................................................1-31
Finding an NSAP .............................................................................................1-31
Finding a TID ...................................................................................................1-31
Receiving TARP Requests .....................................................................................1-32
Loop Detection .......................................................................................................1-33
Chapter 2
OSI Implementation Notes
Configuring Manual Area Addresses ..............................................................................2-2
Correcting Area Partitions ..............................................................................................2-5
Configuring Static External Adjacencies ........................................................................2-7
Configuring OSI over DDN X.25 .....................................................................................2-7
Configuring DECnet IV to V Transition ...........................................................................2-8
Configuring OSI over Frame Relay .................................................................................2-8
Configuration Overview ............................................................................................2-8
Frame Relay Circuit Modes ......................................................................................2-9
Direct Access .....................................................................................................2-9
Group Access ..................................................................................................2-10
Hybrid ..............................................................................................................2-10
Mixed Access ...................................................................................................2-11
Topology .................................................................................................................2-11
Full Mesh Topology ..........................................................................................2-11
Partial Mesh Topology .....................................................................................2-12
Route Redirecting ..................................................................................................2-13
Designated Router Selection .................................................................................2-14
IS Neighbor Detection ............................................................................................2-14
Circuits per Slot ......................................................................................................2-14
Configuring OSI over ATM ............................................................................................2-14
vi
303535-A Rev 00
Chapter 3
Enabling OSI and TARP Services
Chapter 4
Editing OSI and TARP Parameters
Accessing OSI Parameters .............................................................................................4-2
Editing OSI Global Parameters .......................................................................................4-3
Editing OSI Interface Parameters .................................................................................4-12
Configuring Manual Area Addresses ............................................................................4-19
Adding a Manual Area Address .............................................................................4-19
Deleting a Manual Area Address ...........................................................................4-20
Configuring Static End System Adjacencies ................................................................4-21
Adding a Static End System Adjacency .................................................................4-22
Copying a Static End System Adjacency ...............................................................4-24
Editing a Static End System Adjacency .................................................................4-24
Deleting a Static End System Adjacency ...............................................................4-25
Configuring Static External Address Adjacencies ........................................................4-25
Adding Static External Address Adjacencies .........................................................4-26
Copying Static External Address Adjacencies .......................................................4-29
Editing Static External Address Adjacencies .........................................................4-30
Deleting Static External Address Adjacencies .......................................................4-30
Configuring Static Routes .............................................................................................4-31
Adding Static Routes ..............................................................................................4-32
Copying Static Routes ............................................................................................4-34
Editing Static Routes ..............................................................................................4-34
Deleting Static Routes ............................................................................................4-35
Editing TARP Global Parameters ..................................................................................4-35
Editing TARP Circuit Parameters ..................................................................................4-39
Configuring TARP Static Adjacencies ...........................................................................4-40
Adding a TARP Static Adjacency ...........................................................................4-40
Deleting a TARP Static Adjacency .........................................................................4-41
Configuring TARP to Ignore a Static Adjacency .....................................................4-42
Deleting a TARP Ignore Adjacency Setting ............................................................4-43
Using the Technician Interface to Send TARP Requests ..............................................4-43
Using the Technician Interface to View TARP Data Caches .........................................4-44
Deleting OSI from the Router .......................................................................................4-44
303535-A Rev 00
vii
Appendix A
IP-to-X.121 Address Mapping for DDN
IP-to-X.121 Address Mapping ....................................................................................... A-2
Overview ................................................................................................................. A-2
Background ............................................................................................................. A-3
Standard IP to X.121 Address Mapping ........................................................................ A-7
Class A .................................................................................................................... A-7
Class B .................................................................................................................... A-9
Class C .................................................................................................................. A-10
Appendix B
Site Manager Default Settings for OSI
Index
viii
303535-A Rev 00
Figures
Figure 1-1.
OSI Network Organization .......................................................................1-4
Figure 1-2.
L1 Routing within an Area and L2 Routing Between Areas .....................1-5
Figure 1-3.
Hierarchical Addressing Authority Structure ............................................1-7
Figure 1-4.
Basic NSAP Address Structure ...............................................................1-8
Figure 1-5.
GOSIP NSAP Address Format ................................................................1-9
Figure 1-6.
ANSI NSAP Address Format .................................................................1-11
Figure 1-7.
NSAP Area Address ..............................................................................1-13
Figure 1-8.
Campus Routing Domain .......................................................................1-14
Figure 1-9.
Assigning NSAP Addresses ...................................................................1-16
Figure 1-10. Router 1 Floods Area A with LSPs about the New End System ............1-19
Figure 1-11. Lowest Cost Path (Router A to B to ES) ................................................1-21
Figure 1-12. Route Redirecting ..................................................................................1-25
Figure 1-13. Static Inter-Domain Routing ...................................................................1-27
Figure 2-1.
Original Area Addresses for Area XY ......................................................2-2
Figure 2-2.
Manual Area Address 456 Assigned to All Routers in Area XY ...............2-3
Figure 2-3.
Manual Area Address 456 Assigned to Specific End Systems ................2-4
Figure 2-4.
Area XY Divided into Area X and Area Y .................................................2-5
Figure 2-5.
Routers B and C in an Area Partition Due to Improper Network Design .2-6
Figure 2-6.
Frame Relay Direct Access Mode ............................................................2-9
Figure 2-7.
Frame Relay Group Access Mode .........................................................2-10
Figure 2-8.
Frame Relay Mixed Access Modes (Direct and Group) .........................2-11
Figure 2-9.
Full Mesh Topology ................................................................................2-12
Figure 2-10. Partial Mesh in Hub and Spoke Topology ..............................................2-13
Figure 3-1.
OSI Configuration Window .......................................................................3-1
Figure 4-1.
Configuration Manager Window ...............................................................4-2
Figure 4-2.
Edit OSI Global Parameters Window .......................................................4-4
Figure 4-3.
OSI Interface Lists Window ....................................................................4-12
Figure 4-4.
OSI Static ES Adjacency List Window ...................................................4-21
Figure 4-5.
OSI Static ES Adjacency Configuration Window ...................................4-22
303535-A Rev 00
ix
x
Figure 4-6.
OSI External Address Adjacency List Window ......................................4-26
Figure 4-7.
OSI External Address Adjacency Configuration Window .......................4-27
Figure 4-8.
OSI Static Routes Window .....................................................................4-31
Figure 4-9.
Static Route Configuration Window .......................................................4-32
Figure A-1.
Class A Internet Address ........................................................................ A-4
Figure A-2.
Class B Internet Address ........................................................................ A-5
Figure A-3.
Class C Internet Address ........................................................................ A-6
303535-A Rev 00
Tables
Table 1-1.
OSI Reference Model and Common ISO Standards ...............................1-3
Table 1-2.
NSAP Address Structure (Assigned by the ICD 0005 Subdomain) .......1-10
Table 1-3.
NSAP Address Structure (Assigned by the DCC 840 Subdomain) .......1-12
Table 1-4.
Link State Packet Types .........................................................................1-18
Table 1-5.
TARP Packet Types ...............................................................................1-29
Table 1-6.
TARP Packet Fields ..............................................................................1-30
Table 2-1.
Frame Relay Modes Used for OSI IS-IS Operations ................................2-9
Table 4-1.
Suggested OSI Circuit Cost Values ......................................................4-14
Table B-1.
OSI Initial Configuration Parameters ....................................................... B-1
Table B-2.
OSI Global Parameters .......................................................................... B-1
Table B-3.
OSI Interface Parameters ...................................................................... B-2
Table B-4.
OSI Manual Area Address Parameter ..................................................... B-2
Table B-5.
OSI Static End System Adjacency Parameters ...................................... B-3
Table B-6.
OSI External Address Adjacency Parameters ........................................ B-3
Table B-7.
OSI Static Route Parameters ................................................................. B-3
Table B-8.
TARP Global Parameters ....................................................................... B-3
Table B-9.
TARP Circuit Parameters ........................................................................ B-4
Table B-10.
TARP Static Adjacency Parameters ........................................................ B-4
Table B-11.
TARP Ignore Adjacency Parameters ....................................................... B-4
303535-A Rev 00
xi
Preface
This guide describes Open Systems Interconnection (OSI) architecture and
services and what you do to start and customize OSI services on a Bay Networks®
router.
Before You Begin
Before using this guide, you must complete the following procedures. For a new
router:
•
Install the router (see the installation guide that came with your router).
•
Connect the router to the network and create a pilot configuration file (see
Quick-Starting Routers, Configuring BayStack Remote Access, or Connecting
ASN Routers to a Network).
Make sure that you are running the latest version of Bay Networks BayRS™ and
Site Manager software. For information about upgrading BayRS and Site
Manager, see the upgrading guide for your version of BayRS.
303535-A Rev 00
xiii
Configuring OSI Services
Text Conventions
This guide uses the following text conventions:
angle brackets (< >)
Indicate that you choose the text to enter based on the
description inside the brackets. Do not type the
brackets when entering the command.
Example: If the command syntax is:
ping <ip_address>, you enter:
ping 192.32.10.12
bold text
Indicates text that you need to enter and command
names and options.
Example: Enter show ip {alerts | routes}
Example: Use the dinfo command.
brackets ([ ])
Indicate optional elements in syntax descriptions. Do
not type the brackets when entering the command.
Example: If the command syntax is:
show ip interfaces [-alerts], you can enter either:
show ip interfaces or show ip interfaces -alerts.
italic text
Indicates file and directory names, new terms, book
titles, and variables in command syntax descriptions.
Where a variable is two or more words, the words are
connected by an underscore.
Example: If the command syntax is:
show at <valid_route>
valid_route is one variable and you substitute one value
for it.
xiv
screen text
Indicates system output, for example, prompts and
system messages.
Example: Set Bay Networks Trap Monitor Filters
separator ( > )
Shows menu paths.
Example: Protocols > IP identifies the IP option on the
Protocols menu.
303535-A Rev 00
Preface
Acronyms
303535-A Rev 00
AAI
administrative authority identifier
ACSE
association control service element
AFI
authority and format identifier
ANSI
American National Standards Institute
ARP
Address Resolution Protocol
ASN.1
abstract syntax notation
CLNP
Connectionless Network Protocol
CLNS
connectionless network service
CSNP
Complete Sequence Number Packet
DCA
Defense Communication Agency
DCC
data country code
DCE
data circuit-terminating equipment
DDN
Defense Data Network
DFI
domain format identifier
DLCI
data link connection identifier
DSP
domain specific part
DTE
data terminal equipment
ES-IS
end system to intermediate system
FDDI
Fiber Distributed Data Interface
FTAM
File Transfer and Access Management
GOSIP
Government OSI Protocol
GSA
General Services Administration
HDLC
High-level Data Link Control
ICD
international code designator
IDI
initial domain identifier
IDP
initial domain part
IEEE
Institute of Electrical and Electronic Engineers
xv
Configuring OSI Services
xvi
ILI
Intelligent Link Interface
IP
Internet Protocol
IS-IS
intermediate system to intermediate system
ISO
International Organization for Standardization
ITU-T
International Telecommunication Union Telecommunication Standardization Sector (formerly
CCITT)
L1
Level 1
L2
Level 2
LAN
local area network
LDB
loop detection buffer
LSP
link state packet
MAC
media access control
MIB
management information base
MOM
maintenance operations module
MOP
Maintenance Operations Protocol
NSAP
network service access point
OSI
Open Systems Interconnection
PDN
Public Data Network
PDU
protocol data unit
PPP
Point-to-Point Protocol
PSNP
partial sequence number packet
PVC
permanent virtual circuit
RFC
Request for Comments
RIP
Routing Information Protocol
SNAP
Subnetwork Access Protocol
SNMP
Simple Network Management Protocol
SNPA
subnetwork point of attachment
TARP
TID Address Resolution Protocol
TCP
Transmission Control Protocol
303535-A Rev 00
Preface
TID
target identifier
VT
virtual terminal
Bay Networks Technical Publications
You can now print Bay Networks technical manuals and release notes free,
directly from the Internet. Go to support.baynetworks.com/library/tpubs/. Find the
Bay Networks product for which you need documentation. Then locate the
specific category and model or version for your hardware or software product.
Using Adobe Acrobat Reader, you can open the manuals and release notes, search
for the sections you need, and print them on most standard printers. You can
download Acrobat Reader free from the Adobe Systems Web site,
www.adobe.com.
You can purchase Bay Networks documentation sets, CDs, and selected technical
publications through the Bay Networks Collateral Catalog. The catalog is located
on the World Wide Web at support.baynetworks.com/catalog.html and is divided
into sections arranged alphabetically:
•
The “CD ROMs” section lists available CDs.
•
The “Guides/Books” section lists books on technical topics.
•
The “Technical Manuals” section lists available printed documentation sets.
Make a note of the part numbers and prices of the items that you want to order.
Use the “Marketing Collateral Catalog description” link to place an order and to
print the order form.
How to Get Help
For product assistance, support contracts, or information about educational
services, go to the following URL:
http://www.baynetworks.com/corporate/contacts/
Or telephone the Bay Networks Technical Solutions Center at:
800-2LANWAN
303535-A Rev 00
xvii
Chapter 1
OSI Overview
This chapter provides a general overview of OSI networking and describes how
OSI routing services for Bay Networks routers work. It includes information
about the following topics:
•
OSI basic reference model
•
OSI network organization
•
Level 1 and Level 2 routing
•
Network addressing
•
Link-state routing algorithm
•
Routing protocols
•
OSI and TARP
Note: This guide uses the terms intermediate system and router
interchangeably.
303535-A Rev 00
1-1
Configuring OSI Services
OSI Basic Reference Model
OSI is a nonproprietary distributed processing architecture. The International
Organization for Standardization (ISO) developed OSI to provide communication
standards. These standards allow computer systems from different vendors to
communicate.
The OSI basic reference model combines a structured computer system
architecture with a set of common communication protocols. It comprises seven
layers. Each layer provides specific functions or services and follows the
corresponding OSI communication protocols to perform those services.
OSI is an “open system” architecture. Peer-to-peer common layers between
systems abolish the vendor-specific restrictions imposed by other architectures.
The principles of the OSI layering scheme include the following:
•
Similar services are on the same layer.
•
Services provided by lower layers are transparent to the layers above it.
•
The lower the layer, the more basic the services it provides.
•
The higher layers build upon the services offered by the layers below them.
OSI services for Bay Networks Version 7.60 and later software are United States
Government OSI Protocol (GOSIP) Version 2.0 compliant. In addition, Bay
Networks router software provides support for the first three layers of the ISO/
CCITT (now ITU-T) recommended set of standards for international open
systems support and vendor interoperability. These layers are physical, data link,
and network.
Table 1-1 lists some of the most common ISO standards implemented by OSI.
1-2
303535-A Rev 00
OSI Overview
Table 1-1.
OSI Reference Model and Common ISO Standards
Application Layer
8571 File Transfer and Access Management (FTAM)
8649 OSI Association Control Service Element (ACSE)
9040 Virtual Terminal Protocol (VT)
Presentation Layer
8822 OSI connection-oriented and connectionless presentation services
8824 Abstract Syntax Notation One (ASN.1)
9576 OSI connectionless protocol to provide connectionless service
8326 Session service definitions
8327 Session layer protocols
Session Layer
Transport Layer
8072 Transport service definition, both connection and connectionless
8073 Transport connection-oriented protocol definition
8602 Transport definition for connectionless-mode protocol
Network Layer
8473 Connectionless-mode network service
9542 End System to Intermediate System routing exchange protocol
10589 Intermediate System to Intermediate System routing exchange protocol
Data Link Layer
Physical Layer
8802 Local area network standards (mostly derived from IEEE standards)
8471 HDLC balanced, link address information
8886 Data link service definition for OSI
9314 Fiber Distributed Data Interface (FDDI)
9543 Synchronous transmission quality at DTE/DCE interface
9578 Communications connectors used in LANs
OSI0001A
OSI Network Organization
An OSI network is made up of end systems and intermediate systems (routers)
that are organized hierarchically.
•
303535-A Rev 00
End systems originate and receive data. They do not perform any routing
services. Examples of end systems on a network include workstations, file
servers, and printers.
1-3
Configuring OSI Services
•
Intermediate systems originate and receive data, as well as forward (route)
data. The Bay Networks OSI router is an intermediate system.
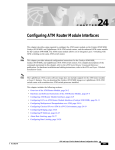
End systems and intermediate systems are divided administratively into separate
routing areas. A collection of areas that are under the control of a single
administration and operate common routing protocols is a routing domain.
A network manager defines the boundaries of routing domains. An entire group of
routing domains that are under one administrative authority (for example, a
company or a university) is an administrative domain (Figure 1-1).
Administrative Domain
Routing Domain
Area
End Systems
and
Routers
OSI0002A
Figure 1-1.
OSI Network Organization
Level 1 and Level 2 Routing
In an OSI network, the router runs Connectionless-mode Network Service
(CLNS) and transfers data in a connectionless (packet) format using the
Connectionless Network Protocol (CLNP). The router routes data through the
network, using:
1-4
•
Level 1 (L1) routing for routing data within an area
•
Level 2 (L2) routing for routing data between areas
303535-A Rev 00
OSI Overview
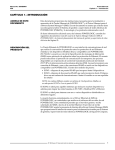
You can configure a Bay Networks router running OSI to function as an L1 router,
an L2 router, or an L1/L2 router (Figure 1-2).
Area A
Routing Domain
Area B
Key
L1 Routing
L2 Routing
End System
L1 Router
L1/L2 Router
OSI0003A
Figure 1-2.
L1 Routing within an Area and L2 Routing Between Areas
Level 1 Routing
An L1 router exchanges data with systems located within its area and forwards
packets destined for a different area or domain to the nearest L1/L2 router for
processing.
303535-A Rev 00
1-5
Configuring OSI Services
Level 2 Routing
Level 2 routing exchanges data with systems located in a different area. In
addition, L2 routing forwards data externally between routing domains, as long as
you statically define an external link.
To support routing between areas, every area must contain at least one router
configured to support L2 routing services.
OSI Network Addressing
The OSI addressing scheme is based on the hierarchical structure of the OSI
global network. A unique Network Service Access Point (NSAP) address identifies
each system within an OSI network. The NSAP address specifies the point at
which the end system or intermediate system performs OSI network-layer
services.
The complete set of NSAP addresses contained within the OSI network is the
global network addressing domain. This domain is divided into subsets called
network addressing domains (which can be further divided into various
subdomains). A network addressing domain is a set of NSAP addresses regulated
by the same addressing authority. The addressing authority is the administration
responsible for allocating unique NSAP addresses to OSI networks.
Each addressing authority operates independently of other authorities at the same
level. An addressing authority for a higher domain can authorize the addressing
authorities for its subdomains to assign NSAP addresses (Figure 1-3). The
subdomain specifies the format of the NSAP addresses allocated to the network.
Two of the addressing authorities that administer NSAP addresses for OSI
networks in the United States are the United States General Services
Administration (GSA), which allocates NSAPs that are intended primarily for
government use), and the American National Standards Institute (ANSI).
1-6
303535-A Rev 00
OSI Overview
Global Network Addressing Domain
Domain Addressing Authority A
Domain Addressing Authority B
Subdomain
Addressing
Authority A.1
Subdomain
Addressing
Authority A.2
Subdomain
Addressing
Authority B.1
Subdomain
Addressing
Authority B.2
NSAP
NSAP
NSAP
NSAP
OSI0004A
Figure 1-3.
Hierarchical Addressing Authority Structure
NSAP Structure
The basic NSAP address structure reflects the hierarchical assignment of NSAPs
throughout the global network addressing domain. NSAP addresses must be
globally unique. They can be up to 20 bytes long and contain two basic parts: the
Initial Domain Part (IDP) and the Domain Specific Part (DSP) (Figure 1-4).
303535-A Rev 00
1-7
Configuring OSI Services
IDP
AFI
IDI
DSP
Key
IDP
AFI
IDI
DSP
Initial Domain Part
Authority and Format Identifier
Intitial Domain Identifier
Domain Specific Part
OSI0005A
Figure 1-4.
Basic NSAP Address Structure
The IDP consists of an Authority and Format Identifier (AFI) and an Initial
Domain Identifier (IDI). The AFI is 1 octet in length and specifies the format of
the IDI, the network addressing authority responsible for allocating values to the
IDI, and the abstract syntax of the DSP.
The IDI is variable in length. It specifies the addressing authority responsible for
allocating values to the DSP and the subdomain from which they come. The
authority identified by the IDI determines the structure and semantics of the DSP.
For example, if you register your OSI network with the GSA, it will probably
assign your network to the ISO International Code Designator (ICD) 0005
subdomain. The DSP portion of the NSAP addresses allocated from this
subdomain follows the GOSIP Version 2 structure illustrated in Figure 1-5.
1-8
303535-A Rev 00
OSI Overview
IDP
octets
DSP
AFI
IDI
DFI
AAI
Rsvd
RDI
Area
ID
S
1
2
1
3
2
2
2
6
1
Key
IDP
DSP
AFI
IDI
DFI
AAI
Initial Domain Part
Domain Specific Part
Authority and Format Identifier
Initial Domain Identifier
Domain Format Identifier
Administrative Authority Identifier
Rsvd
RDI
Area
ID
S
Reserved
Routing Domain Identifier
Area Identifier
System Identifier
NSAP Selector
OSI0006A
Figure 1-5.
GOSIP NSAP Address Format
The AFI for these NSAP addresses is 47, which shows that the network belongs to
an ICD subdomain. The IDI is 0005, specifying the ICD 0005 subdomain, which
is reserved for use by the U.S. government. The Domain Format Identifier (DFI) is
80, specifying that the DSP portion of NSAP is in GOSIP format. (Currently, the
only DSP format defined by the ICD 0005 subdomain is that defined by GOSIP.)
The Administrative Authority Identifier (AAI) portion of these NSAP addresses is
a globally unique number assigned by the ICD 0005 subdomain. It identifies the
network within the ICD 0005 subdomain, where the NSAP resides, and the
authority responsible for organizing the network into routing domains and areas.
Note that the authority specified by the AAI assigns values to the Routing Domain
ID, Area ID, System ID, and NSAP Selector portions of the NSAP address.
Table 1-2 describes the contents of each field for this type of NSAP address.
303535-A Rev 00
1-9
Configuring OSI Services
Table 1-2.
NSAP Address Structure (Assigned by the ICD 0005
Subdomain)
Field
Value
Meaning
AFI
47
Identifies the subdomain as ICD. Specifies the syntax of the
DSP as binary octets.
IDI
0005
Indicates that the subdomain is ICD 0005.
DFI
80
Specifies that the format of the DSP is GOSIP.
AAI
variable
Identifies the network within the ICD 0005 subdomain where
the NSAP resides, and the authority responsible for organizing
the network into routing domains and areas.
RSVD
0000
Indicates that this field is reserved.
RDI
variable
Specifies the routing domain where the NSAP resides
(assigned by the authority identified in the AAI field).
Area
variable
Identifies the local area where the NSAP resides (assigned by
either the authority identified in the AAI field or the local
administrative authority that the AAI authority has delegated to
this routing domain).
ID
variable
Specifies the system where the NSAP resides (assigned by
the local area administrator that a higher authority has
delegated to this area).
S
0 or 1
Selects the transport layer entity the system uses. This entity
is specified in the ID field.
Similarly, if you register your OSI network with ANSI, it is assigned to the ISO
Data Country Code (DCC) 840 subdomain. Currently, the structure of the DSP
portion of NSAP addresses allocated by the DCC 840 subdomain is not
standardized. However, the most recent proposal suggests a structure identical to
that specified by GOSIP, with the Administrative Authority Identifier field
replaced by an Organization Identifier field (Figure 1-6).
1-10
303535-A Rev 00
OSI Overview
IDP
octets
DSP
AFI
IDI
DFI
ORG
Rsvd
RDI
Area
ID
S
1
2
1
3
2
2
2
6
1
Key
IDP
DSP
AFI
IDI
DFI
Initial Domain Part
Domain Specific Part
Authority and Format Identifier
Initial Domain Identifier
Domain Format Identifier
ORG
Rsvd
RDI
Area
ID
S
Organization Identifier
Reserved
Routing Domain Identifier
Area Identifier
System Identifier
NSAP Selector
OSI0007A
Figure 1-6.
ANSI NSAP Address Format
The AFI for these NSAP addresses is 39, which shows that the network is
registered with ANSI and belongs to a DCC subdomain. The IDI is 840,
specifying the DCC 840 subdomain, which is reserved for use by networks
located in the United States. The DFI is not standardized and is assigned by the
DCC 840 subdomain.
The Organization (ORG) Identifier portion of the NSAP address is a globally
unique number that is assigned by the DCC 840 subdomain. It identifies the
network within the DCC 840 subdomain where the NSAP resides and the
authority responsible for organizing the network into routing domains and areas.
(The Organization Identifier serves the same purpose as the Administrative
Authority portion of an NSAP address assigned by the ICD 0005 subdomain; refer
to Table 1-2.) Table 1-3 describes the contents of each field for this type of NSAP
address.
303535-A Rev 00
1-11
Configuring OSI Services
Table 1-3.
NSAP Address Structure (Assigned by the DCC 840
Subdomain)
Field Name Value
Meaning
AFI
39
Identifies the subdomain as DCC 840. Specifies the
syntax of the DSP as binary octets.
IDI
840
Indicates that the subdomain is DCC 840.
DFI
variable
Identifies the format of the DSP. The subdomain identified
in the IDI specifies this value.
ORG
variable
Specifies the network within the DCC 840 subdomain,
where the NSAP resides, and the authority responsible for
organizing the network into routing domains and areas.
Rsvd
0000
Indicates that this field is reserved.
RDI
variable
Identifies the routing domain where the NSAP resides
(assigned by the authority identified in the ORG field).
Area
variable
Specifies the local area where the NSAP resides
(assigned by either the authority identified in the ORG field
or the local administrative authority that the ORG authority
has delegated to this routing domain).
ID
variable
Identifies the system where the NSAP resides (assigned
by the local area administrator that a higher authority has
delegated to this area).
S
0 or 1
Selects the transport layer entity the system uses. This
entity is specified in the ID field.
The IDP and the first part of the DSP (called the high-order part of the DSP) are
the NSAP’s area address. The area address identifies the area in an OSI network
where an NSAP resides (Figure 1-7).
1-12
303535-A Rev 00
OSI Overview
IDP
AFI
IDI
DSP
DFI
AAI
or
ORG
Rsvd
RDI
Area
ID
S
Area Address
Key
IDP
DSP
AFI
IDI
DFI
AAI
Initial Domain Part
Domain Specific Part
Authority and Format Identifier
Initial Domain Identifier
Domain Format Identifier
Administrative Authority Identifier
ORG
Rsvd
RDI
Area
ID
S
Organization Identifier
Reserved
Routing Domain Identifier
Area Identifier
System Identifier
NSAP Selector
OSI0008A
Figure 1-7.
NSAP Area Address
When a router receives a packet, it examines the contents of the packet’s NSAP
destination area address fields. The router compares its own NSAP area addresses
with the NSAP destination address contained in the packet’s header. If they match,
then the destination system is in that router’s area. If the addresses do not match,
then the destination system is located in a different area and the router must route
the packet outside the local area, using L2 routing services.
Allocating NSAP Addresses
To demonstrate how NSAP addresses are allocated, Figure 1-8 shows a sample
OSI network set up on a college campus in the United States. To obtain and
allocate NSAP addresses for the OSI network, the network administrator did the
following:
1.
Divided the campus OSI network into areas
The administrator divided the campus OSI network into areas A, B, and C.
These three areas make up the campus routing domain.
303535-A Rev 00
1-13
Configuring OSI Services
2.
Assigned identifiers to the campus routing domain and local areas as
follows:
Campus Routing Domain Identifier = 0001
Area A Identifier = 0001
Area B Identifier = 0002
Area C Identifier = 0003
Routing Domain 0001
Area A
Ar ea B = 0002
Area B = 0002
= 0001
To External GOSIP
OSI Network...
Ar
ea C
C ==0003
Area
0003
Key
L1/L2 Router
End System
OSI0009A
Figure 1-8.
Campus Routing Domain
3.
1-14
Registered the campus network with the addressing authorities
303535-A Rev 00
OSI Overview
Because Area A and Area B are not linked to any areas outside of the campus
routing domain, the administrator obtained NSAP addresses for Area A and
Area B simply by registering the campus network with ANSI. ANSI assigned
the network to the DCC 840 subdomain, which in turn assigned an
organization identifier of 113527 to the network.
Area C, however, is linked to an external domain that is operated by the
federal government. So besides registering the network with ANSI, the
administrator also registered the network with the GSA (to receive NSAP
addresses in GOSIP format for those systems residing in Area C). The GSA
assigned the network to the ICD 0005 subdomain, which in turn assigned an
Administrative Authority Identifier of 00004e to the network.
4.
Assigned full NSAP addresses to the routers and end systems in Area A,
Area B, and Area C
After receiving the organization ID for the campus network from the DCC
840 subdomain, the administrator assigned full NSAP addresses to the routers
and end systems in Area A and Area B (Figure 1-9). Note that the DSP
portion is structured according to DCC 840 subdomain standard format.
303535-A Rev 00
1-15
Configuring OSI Services
DSP
IDP
NSAP for
router
in Area A
39
840
81
113527
0000
0001
0001
AFI
IDI
DFI
ORG
Rsvd
RDI
Area
AAAAAAAAAAAA
01
ID
S
Area address
IDP
NSAP for
router
in Area B
DSP
39
840
81
113527
0000
0001
0002
AFI
IDI
DFI
ORG
Rsvd
RDI
Area
BBBBBBBBBBBB
01
ID
S
Area address
DSP
IDP
NSAP for
router
in Area B
47
0005
80
00004e
0000
0001
0003
AFI
IDI
DFI
AAI
Rsvd
RDI
Area
CCCCCCCCCCCC
ID
01
S
Area address
OSI0010A
Figure 1-9.
Assigning NSAP Addresses
Similarly, after receiving the AAI for the campus network from the ICD 0005
subdomain, the administrator assigned a full NSAP address to the router and end
systems in Area C. The DSP portion is structured according to ICD 0005
subdomain standard format.
1-16
303535-A Rev 00
OSI Overview
OSI Basic Routing Algorithm
The OSI routing algorithm is based on link state information. Each OSI router
periodically generates link state packets (LSPs) that describe the status of all of
the router’s immediate or adjacent data links. The router propagates these link
state packets throughout the network. It also compiles a database of the link state
information from every router and uses it to calculate the paths to all reachable
destinations in the domain.
The OSI routing algorithm uses these three processes:
•
Update
In response to changes in network topology, routers transmit and receive
LSPs. Each time a router receives an LSP, the router uses it to update its link
state database with the new link state information.
•
Decision
Each router calculates the shortest paths from itself to all other systems that it
can reach, using information it retrieves from its link state database. It then
stores the paths in a forwarding database.
•
Forwarding
When the router receives a CLNP packet, it forwards the packet to the next
hop specified in its forwarding database.
303535-A Rev 00
1-17
Configuring OSI Services
Update Process
In an OSI network, every router must decide which systems it can reach directly. It
finds out the identity and reachability of its immediate or adjacent neighbors and
adds an assigned link cost. The router then uses this information to construct an
LSP.
LSPs describe what the router knows about the network topology. Depending on
its configuration, the router generates different types of LSPs (Table 1-4). L1
routers generate only L1 LSPs; L1/L2 routers generate both L1 and L2 LSPs.
Table 1-4.
Router Type
Link State Packet Types
Generates
LSP Type
Describing
Sent to
The links to all dynamically learned L1
routers and end systems in the local
area that are reachable over the
broadcast subnetwork.
All L1 routers within
the area
L1 designated
router
L1 pseudonode
L1 router
L1 non-pseudonode The links to the L1 designated router
and static links.
L2 designated
router
L2 pseudonode
L2 router
L2 non-pseudonode The links to the L1/L2 designated
router and static external links.
All L1 routers within
the area
The links to all L1 and L1/L2 routers in All L1/L2 routers
the domain that are reachable over the within the domain
broadcast subnetwork and any routes
to external domains.
All L1/L2 routers
within the domain
In addition, on broadcast subnetworks, the subnetwork itself is conceptually
viewed as a node (called a pseudonode) in the OSI network. One router on the
subnetwork is elected as the designated router for the pseudonode. The designated
router is responsible for creating and transmitting an LSP on behalf of the
pseudonode. Thus, the designated router generates a pseudonode LSP. By
generating a single LSP that represents the pseudonode, the router reduces the
amount of link state information that traverses the subnetwork.
The L1 designated router and the L2 designated router for a subnetwork are
elected independently. If there is only a single L1 or L1/L2 router on a LAN
segment, it becomes the designated L1 or L2 router by default.
1-18
303535-A Rev 00
OSI Overview
Note: A Bay Networks router can have multiple OSI interfaces to separate
subnetworks. You can configure the interfaces independently so that the router
can act as the designated router for some subnetworks, but not for others.
OSI routers generate LSPs periodically and also when there is a change in the
network topology. For example, in Figure 1-10 a new end system is added to Area
A. Router 1 generates an L1 LSP and floods it to all other L1 routers in the area.
Each router that receives the LSP uses it to update its link state database, then
floods it out all interfaces except for the one that it was received on.
Area A
To other L1 routers in Area A...
2
3
1
Key
End System
L1 Router
New End System
LSP Path
OSI0011A
Figure 1-10.
Router 1 Floods Area A with LSPs about the New End
System
Similarly, if a new L1/L2 router is added to the network, L1/L2 routers flood both
L1 and L2 LSPs throughout the domain. When an L1/L2 router receives a new
LSP, it updates its corresponding L1 or L2 link state database with the new
information. The router then forwards the LSP on all links except the one that it
was received on. Note that the L1/L2 routers that support both types of traffic
maintain separate L1 and L2 link state databases.
303535-A Rev 00
1-19
Configuring OSI Services
The router refers to its link state databases when deciding the shortest path
between itself and all other routers it can reach.
Decision Process
During the decision process, the OSI router uses the link state database
information that it has accumulated during the update process to
•
Define a set of paths to every reachable destination in the domain.
•
Calculate the shortest path to each destination.
•
Record the identity of the first hop on the shortest path to each destination into
a forwarding database.
The router uses a shortest path first (SPF) algorithm to define the set of paths to a
destination. The router does not define “shortest” in terms of distance. The OSI
router defines the shortest path as the lowest-cost path based on the relative cost
(metric) of routing a packet along each path.
Every circuit on the OSI network receives a default cost. You can assign a new
relative cost to a circuit as needed. During the decision process, the OSI router
calculates the total path cost of forwarding a packet along each possible path
toward the destination. The total path cost is the sum of the costs of the circuits
that make up the path. The router chooses the lowest-cost path.
Note: When you configure the Bay Networks OSI router, you can change the
default cost metric assigned to OSI interfaces. For example, you can assign a
high cost to limit the use of a certain low-speed interface. See the section
“Editing OSI Interface Parameters” in Chapter 4 for instructions.
When deciding among multiple paths to a destination, the router will choose the
path that is assigned a lower path cost over one assigned a higher cost, even if the
lower-cost path is longer in the number of hops. For example, in Figure 1-11 the
lowest-cost path from router A to destination ES is the path through router B (cost
of 15) rather than the direct path (cost of 20).
1-20
303535-A Rev 00
OSI Overview
( A to B to ES) = 15
B
A to B cost = 5
B to ES cost = 10
A
ES
Direct A to ES cost = 20
OSI0012A
Figure 1-11.
Lowest Cost Path (Router A to B to ES)
Once the router determines the lowest-cost path to a destination, it stores the
identity of the corresponding adjacent router into its forwarding database. The
adjacent router is the next hop on the path toward the destination.
The router executes the decision process separately for each routing level and
keeps separate forwarding databases for L1 and L2 routing. It uses the L1 link
state database to calculate the L1 forwarding database, which describes the
shortest paths to destination systems located in the same area. If a router also
routes L2 traffic, it uses its L2 link state database to create an L2 forwarding
database, which describes the shortest paths to other destination areas.
The OSI router bases its routing decisions on the most current network topology;
its link state database is updated every time the network changes.
Forwarding Process
The OSI router begins the forwarding process after it receives a packet. First, it
examines the destination address contained in the packet to determine whether the
packet requires L1 routing or L2 routing. It then refers to the corresponding
forwarding database for information about where to forward the packet:
•
303535-A Rev 00
If the router is an L1 router and the packet’s destination address is within the
local area, the router checks its L1 forwarding database and forwards the
packet to the next hop along the path to the destination. If the destination
address is not local, the router checks its forwarding database for the location
of the nearest L1/L2 router in the area. It then forwards the packet to the next
hop along that path.
1-21
Configuring OSI Services
•
When an L1/L2 router receives a packet, it checks its L2 forwarding database
to see which L1/L2 router is the next hop on the path to the destination area. It
then forwards the packet to that L1/L2 router. It continues to forward the
packet between L1/L2 routers until the packet arrives at its destination area, at
which point it will be routed (using L1 routing) to its destination system.
The Bay Networks OSI router also supports source routing and record route
options. That is, if a packet has a statically entered path in the optional field of the
packet header, the router forwards the packet toward the next hop. The record
route function records the paths followed by a packet as it traverses a series of
routers.
OSI Routing Protocols
This section summarizes the following OSI routing protocols that the Bay
Networks OSI router uses at the networking level:
•
ISO 8473 Connectionless-mode Network Service Protocol (CLNP), which
defines the data packet format procedures for the connectionless transmission
of data and control information
•
ISO 9542 End System to Intermediate System Routing Exchange Protocol,
which defines how end systems and intermediate systems exchange
configuration and routing information to facilitate the routing and relaying
functions of the network layer
•
ISO 10589 Intermediate System to Intermediate System Routing Exchange
Protocol, which defines how L1 and L2 routing work
Connectionless Network Service Protocol
Connectionless Network Service Protocol (ISO 8473) is the network layer
protocol that specifies the procedures for the connectionless transmission of data
and control information from one network system to a peer network system using
CLNP packets.
An OSI router processes each CLNP packet it receives independently and does not
require an established network connection. A router bases its decision on how to
process a CLNP packet solely on the information found in the packet header. The
header information tells the router whether the packet has reached its destination
or requires additional processing.
1-22
303535-A Rev 00
OSI Overview
A router partitions a CLNP packet into two or more new packets (segments) if the
size of the packet is greater than the maximum size supported by the outbound
network. The values contained in the header fields of the segmented packets are
identical to those contained in the original packet (except for the segment length
and checksum fields). The router sends the partitioned packets out on the network.
When all of the packet segments finally arrive at the destination system, the
system reconstructs the original packet before sending it up to the next layer for
further processing.
To control data misdirection and congestion throughout the network, CLNP
includes a lifetime control function. The originating system can assign a specific
lifetime value (in units of 500 milliseconds) to the lifetime field of the packet
header before sending the system the packet out onto the network. Every system
that receives the packet decrements its lifetime. If the lifetime value reaches 0
before the packet reaches its destination system, the packet is dropped.
A system also discards a packet if its checksum is incorrect, if the destination
address is unknown, or if the network is too congested to process the packet.
CLNP includes an error reporting option that, when enabled, sends an error report
data packet back to the originating system whenever a data packet is lost or
discarded.
End System to Intermediate System Routing Exchange Protocol
The End System to Intermediate System Routing Exchange Protocol (ISO 9542)
defines the way end systems (computers, etc.) and intermediate systems (routers)
on the same subnetwork exchange configuration and routing information. (See
“Intermediate System to Intermediate System Intra-Domain Routing Exchange
Protocol” later in this chapter for information about communication between
routers.)
Configuration Reporting
The ISO 9542 configuration report function allows end systems and routers that
are attached to the same physical network (subnetwork) to dynamically discover
each other’s identity by periodically generating and exchanging Hello packets.
The Hello packet exchange process tells the router which NSAPs it can access.
303535-A Rev 00
1-23
Configuring OSI Services
End systems generate Hello packets that contain the end system’s subnetwork
address, and specify which NSAPs the end system services. When a router
receives an end system Hello packet, it extracts the configuration information
from the packet (matching the subnetwork address with the corresponding
NSAPs) and stores it in its routing information base. Routers generate Hello
packets that contain the router’s own subnetwork address. When an end system
receives a router Hello packet, the end system extracts the router’s subnetwork
address and stores it in its own routing information base.
Two types of timers control how often Hello packets are exchanged: a
configuration timer and a holding timer. The configuration timer, which is
maintained by each individual system, determines how often a system reports its
availability or any change in its configuration to the other systems attached to the
same subnetwork. The holding timer, which is a value set by the originating
system, is contained in the holding time field of a Hello packet. It specifies how
long a receiving system should retain the configuration information before it is
flushed from the routing information base.
Route Redirecting
The ISO 9542 route redirection function allows routers to inform end systems of
the most desirable route to a particular destination either
•
Through a different router, or
•
Directly to an end system on the same subnetwork
After the router forwards a data packet to the next hop toward the destination end
system, the router checks to see whether a more direct route exists. The router
determines whether the next hop is
1-24
•
The destination system, and whether it is attached to the same subnetwork as
the originating system (Figure 1-12, Example 1)
•
Another router that is connected to the same subnetwork as the originating
end system (Figure 1-12, Example 2)
303535-A Rev 00
OSI Overview
Example 1.
Destination system is on
the same subnetwork
D
O
Example 2.
Next hop is another router
on the same subnetwork
O
Or iginal Path
O
Or iginal Path
D
Preferred path
D
O
Preferred path
D
Key
O = Originating End System
D = Destination System
= End System
= Router
OSI0013A
Figure 1-12.
Route Redirecting
If the next hop is either a destination system or another router on the same
subnetwork, then there is a better path (one that does not traverse the router) to the
destination. The router constructs a redirect (RD) packet, which contains the
following information:
303535-A Rev 00
•
Destination address of the original packet
•
Subnetwork address of the preferred next hop
•
Network entity title of the next hop, unless it is the destination end system
•
Holding Timer and Maintenance, Security, and Priority options
1-25
Configuring OSI Services
The router sends the RD packet back to the originating end system, which has the
option of using the RD packet to update its routing information base with the more
direct route.
Intermediate System to Intermediate System Intra-Domain Routing
Exchange Protocol
The Intermediate System to Intermediate System Intra-Domain Routing Exchange
Protocol (ISO 10589) defines the way in which intermediate systems (routers)
within a routing domain exchange configuration and routing information. It works
with ISO 8473 and ISO 9542 to define how routers can communicate and route
packets within and between areas.
Intra-Domain Routing
Intra-domain routing functions within a single routing domain. The domain may
consist of various types of subnetworks that have been administratively divided
into separate routing areas.
Under this protocol, L1 routers keep track of the routing that occurs within their
own areas. Thus, each L1 router must know the topology of its local area,
including the location of all other routers and end systems (from LSP and Hello
packets that are exchanged throughout the network). Note that an L1 router does
not need to know the identity of those systems residing outside of its local area,
because it forwards all packets destined for other areas to the nearest L1/L2 router.
Similarly, each L1/L2 router must know the topology of the other L1/L2 routers
located in the domain and the addresses that are reachable through each L1/L2
router (again, through LSPs and Hello packets). The set of all L1/L2 routers is a
type of “backbone” network for interconnecting all areas in the domain. Note that
an L1/L2 router that supports L1 routing also needs to know the topology within
its local area.
1-26
303535-A Rev 00
OSI Overview
For example, when an L1 router receives a data packet, it compares the destination
area address in the packet with its own area address. If the destination area address
is different, then the packet is destined for another area and needs to be routed
using L2 routing. The router forwards the packet to the nearest L1/L2 router in its
own area, regardless of what the destination area is. The L1/L2 router then
forwards the packet to a peer L1/L2 router that is the next hop on the path to the
destination system. The packet will continue to be routed between L1/L2 routers
until it reaches its destination area, where it will be forwarded (using L1 routing)
to the destination end system.
Figure 1-13 illustrates intra-domain routing within Domain A and Domain B.
Within Domain A, for example, intra-domain routing occurs within each area and
between areas 1 and 2.
Routing Domain A
Routing Domain B
Area 4
Area 2
Area 3
Area 1
Area 5
Key
Inter-domain Routing
Intra-Domain Routing
End System
L1 Router
L1/L2 Router
L1/L2 Bordering Router
OSI0014A
Figure 1-13.
303535-A Rev 00
Static Inter-Domain Routing
1-27
Configuring OSI Services
Inter-Domain Routing
Inter-domain routing is possible when paths to other domains are statically
defined. To enable inter-domain routing, you must manually enter the set of
reachable address prefixes into each L1/L2 router that is linked to an external
domain. (Such routers are called bordering routers.) The address prefixes describe
which NSAP addresses are reachable over that L1/L2 router’s external link. The
next time the L1/L2 routers in the domain exchange LSPs, they become aware of
the existence of the reachable external addresses and update their link state
databases with this information.
As traffic is routed throughout the network, a router directs packets to a bordering
router if the leading bytes of the destination addresses match the statistically
defined reachable address prefixes. The bordering router then transmits the packet
out of the domain. The next domain assumes responsibility for routing the packet
to its final destination.
Inter-domain routing is strictly between L1/L2 routers.
Figure 1-13 demonstrates inter-domain routing between Domain A and Domain
B. For example, the L1/L2 bordering router receives a packet from within Domain
A and forwards it to the L1/L2 bordering router in Domain B.
OSI and TARP
OSI uses the TID Address Resolution Protocol (TARP) to map OSI network
service access point (NSAP) Level 3 addresses to target identifier (TID)
addresses. It is similar to the DNS protocol that IP uses, where names are
converted to IP addresses.
A TID is a name that applies to an entire router. It can be any text string, up to 40
characters long, and is similar to a UNIX host name. OSI addresses also apply to
an entire router. An OSI NSAP address consists of the domain address, area
address, the router ID, and a value called the N selector, which is always 00. It can
be up to 13 bytes long.
TARP locates either the OSI NSAP address of a particular TID address or the TID
address of a particular OSI NSAP address.
1-28
303535-A Rev 00
OSI Overview
How TARP Works
TARP resolves the NSAP-to-TID mapping by flooding requests that network
management stations originate throughout the OSI domain. When a request
reaches the network entity that owns the requested TID or NSAP, that entity sends
a response that contains its NSAP and TID back to the originator. When the
management station obtains the address it requested, it can proceed with its
operation, such as polling the device for alarms.
The router’s role is to propagate the requests throughout the network, forwarding
them to Level 1 or Level 2 adjacencies, as appropriate.
TARP Packet Types
TARP has five types of packets (Table 1-5).
Table 1-5.
303535-A Rev 00
TARP Packet Types
Packet Type
Function
Type 1
Request for the OSI NSAP address that maps to the TID address that
the request packet supplies. Type 1 requests are only flooded within
the originating network entity’s routing area (Level 1 adjacencies).
Type 2
Same request as Type 1, but the requests are flooded throughout the
OSI domain (both Level 1 and Level 2 adjacencies).
Type 3
Response to either a Type 1, Type 2, or Type 5 request. This response
is sent directly to the originator of the request.
Type 4
Notification of a change made to either the TID or NSAP address of a
network entity. Type 4 packets are flooded throughout the OSI domain.
Type 5
Request for the TID that maps to the OSI NSAP address included in
the request packet. Because the destination NSAP is known, the
request is sent directly to the network entity.
1-29
Configuring OSI Services
TARP Packet Fields
Each TARP packet includes the following fields (Table 1-6):
Table 1-6.
1-30
TARP Packet Fields
Name
Length
in Bytes Description
tar_lif
2
TARP lifetime (hops). If the network entity receives a TARP
packet with a tar_lif field equal to 0, it discards the packet.
Before forwarding a TARP packet, a receiving device
decrements this field by 1. If the field then has a value of 0, the
device can drop the packet rather than forwarding it to a
recipient that will drop it.
tar_seq
2
TARP sequence number. The originating network entity
assigns a sequence number to each packet that it originates.
For each new packet, the sequence number increments by 1.
tar_pro
1
Protocol Address Type. This field must have a value of FE.
tar_tcd
1
TARP type code. The type of TARP packet.
tar_tln
1
Target TID length. The number of octets present in the tar_tor
field.
tar_oln
1
Originator TID length. The number of octets present in the
tar_tor field.
tar_pln
1
NSAP length. The number of octets in the tar_por field.
tar_ttg
N
Target TID.
tar_tor
N
Originator TID.
tar_por
N
NSAP of originator.
303535-A Rev 00
OSI Overview
Originating TARP Requests
For the router to act as a TARP client, it must be able to originate all five types of
packets. The router maintains a data cache that contains the results of TARP
requests it has made and generates a Type 3 response to Type 1 or Type 5 packets.
The router also generates TARP requests via Technician Interface commands.
Before they send out a TARP request, the TARP entities check the TARP data
network’s caches for a mapping and send out the request only if they do not find
one. Because the main purpose of the Bay Networks implementation of TARP is
to forward TARP packets, the router originates TARP requests for debugging
purposes only, and so sends out requests whether or not there is a match in the
data cache.
Finding an NSAP
If you use the -f option with the Technician Interface tarp pkt command on the
router, you can learn the NSAP of a particular TID. The router sends a Type 1
packet to all Level 1 OSI adjacencies, and the T1 timer is set. If T1 expires before
the router receives a response, it sends a Type 2 request to all Level 1 and Level 2
OSI adjacencies, and the T2 timer is set. If T2 expires before the router receives a
response, the T4 timer is started, and an error recovery procedure begins. When
the T4 timer expires, the router generates a second Type 2 request, and the T2
timer starts again. If T2 expires before the router receives a response, the router
reports back to the application that the TID could not be resolved.
Finding a TID
To learn the TID of a particular NSAP, the router sends a Type 5 packet. Because
it knows the destination NSAP, it does not flood the request out all adjacencies. It
sends the Type 5 request directly to that NSAP, and starts the T3 timer. If the T3
timer expires before the router receives a response, the router reports back to the
application that the NSAP could not be resolved.
303535-A Rev 00
1-31
Configuring OSI Services
Receiving TARP Requests
After OSI processes an inbound OSI packet and determines that it is a TARP
packet, the TARP software examines the packet. If the tar_lif field has a value of
0, it discards the packet. If the tar_pro field has a value other than FE, it discards
the packet. It performs the loop detection procedure on the tar_seq field. If the
packet passes all these checks, TARP then checks to see whether the packet is for
itself as follows:
1-32
•
If the tar_tcd field has a value of 1 or 2 and the tar_ttg field is the router’s
TID, the request is for this router. It responds with a Type 3 packet.
•
If the tar_tcd field has a value of 3, it is either for this router or it could be a
Type 3 response packet to another router. The router checks to see whether it
has any outstanding requests of Type 1, 2, or 5 that match this response. If so,
it removes the request from the queue of outstanding requests that it has sent
and creates an entry in the TARP data cache for the NSAP-TID pair that the
response describes. If not, it drops the packet.
•
If the tar_tcd field has a value of 4, the router processes and floods it to its
adjacencies. It checks the TARP data cache for an entry that matches the TID
in the tar_tor field. If found, it updates the TID-NSAP pair in the data cache
with the new information. Then it floods the Type 4 packet to all of its Level 1
and Level 2 adjacencies, except the one that sent the packet, and resets the
sequence number of this packet.
•
If the tar_tcd field has a value of 5, it is a request for this router’s TID. The
router responds with a Type 3 packet or by forwarding a Type 5 packet to
another router.
•
If none of the above cases is true, the router forwards the packet to its
appropriate adjacencies.
303535-A Rev 00
OSI Overview
Loop Detection
To prevent TARP storms and recursive loops in a looped topology, TARP
maintains a loop detection buffer (LDB) that keeps a record of the last sequence
number received from a particular NSAP. It checks each TARP protocol data unit
(PDU) that it receives against any corresponding entry in the loop detection
buffer.
If it finds no match:
•
It processes the packet and adds a new entry to the loop detection buffer.
•
It checks the tar_seq field. If the value is 0, it starts a timer set to the value of
the TARP LDB timer. When this timer expires, the entry is removed.
If there is a match, TARP compares the tar_seq value in the received packet with
the value in the LDB entry.
303535-A Rev 00
•
If the packet’s tar_seq value is nonzero and is lower than the value in the
buffer, it discards the packet.
•
If the packet’s tar_seq value is greater than the value in the buffer, TARP
processes the packet and assigns this tar_seq value to the buffer.
•
If the packet’s tar_seq value is 0 and the TARP LDB timer is running, TARP
discards the packet. If the timer is not running, the tar_seq remains 0 and the
TARP LDB timer is started.
1-33
Chapter 2
OSI Implementation Notes
This chapter contains information about configuring Bay Network routers with
special network considerations. Before you implement the enabling (Chapter 3)
and general configuration (Chapter 4) procedures, review the following sections in
this chapter for information that might affect your network:
303535-A Rev 00
•
Configuring manual area addresses
•
Correcting area partitions
•
Configuring static external adjacencies
•
Configuring OSI over DDN X.25
•
Configuring DECnet IV to V Transition
•
Configuring OSI over frame relay
•
Configuring OSI over ATM
2-1
Configuring OSI Services
Configuring Manual Area Addresses
Manual area addresses are synonymous area addresses configured on the same
intermediate system. You may want to configure manual area addresses when
more than one addressing authority can assign addresses to the routing domain, or
to allow a routing domain to be reconfigured during operation.
A manual area address is a second (or third) area address configured for systems
residing in a single area. When used appropriately, the manual area address
feature can make network management easier.
For example, consider the OSI network shown in Figure 2-1. All routers and end
systems belong to the area XY. This area was originally assigned the area address
123. The network administrator plans to divide the area into two smaller, more
manageable areas: area X and area Y.
Area XY
123
123
123
123
123
123
123
123
123
123
Key
End System
L1 Router
L1/L2 Router
OSI0015A
Figure 2-1.
Original Area Addresses for Area XY
Taking advantage of the manual area address feature, the administrator can:
1.
2-2
Assign the area address 456 to all routers within area XY (Figure 2-2).
303535-A Rev 00
OSI Implementation Notes
Area XY
123
456
123
123
123
456
123
456
123
123
456
123
123
123
456
Assign manual area address
456 to all routers in XY
Key
End System
L1 Router
L1/L2 Router
OSI0016A
Figure 2-2.
2.
Manual Area Address 456 Assigned to All Routers in Area XY
Assign the area address 456 to those end systems that will eventually
belong to area Y when area XY is divided (Figure 2-3).
Unchanged end systems are still able to communicate using the originally
assigned area address 123, so this can be done gradually.
303535-A Rev 00
2-3
Configuring OSI Services
Area XY
123
456
123
123
456
123
123
456
456
123
456
456
456
123
456
Assign manual area address
456 to specific end systems
Key
End System
L1 Router
L1/L2 Router
OSI0017A
Figure 2-3.
3.
Manual Area Address 456 Assigned to Specific End Systems
Finally, to divide area XY completely, delete area address 456 from those
routers that will remain in area X, and delete area address 123 from those
routers that will be part of the new area Y.
Because the end systems in both area X and area Y have already been
assigned corresponding area addresses, they do not need to be reconfigured,
and the division is complete (Figure 2-4).
2-4
303535-A Rev 00
OSI Implementation Notes
Area Y
Area X
123
123
123
123
456
456
456
456
456
456
Delete 456 from
routers in X
Delete 123
from routers in Y
Key
End System
L1 Router
L1/L2 Router
OSI0018A
Figure 2-4.
Area XY Divided into Area X and Area Y
See “Configuring Manual Area Addresses” on page 4-19 for instructions on how
to configure manual area address parameters.
Correcting Area Partitions
An area is partitioned when one or more nodes cannot communicate with other
nodes in the area either directly or indirectly at Level 1. Partitions happen through
improper network design or when one or more links fail in an area. (Area partition
repair as specified in ISO 10589 Intermediate System to Intermediate System
Routing Exchange Protocol is currently not supported by this implementation of
OSI.) See Chapter 1 for information on the role of areas and Level 1 and 2 routing
in OSI network organization.
303535-A Rev 00
2-5
Configuring OSI Services
Figure 2-5 demonstrates an improper network design.
Area 490130
Router A
ES 2
ES 1
Router C
Router B
Area 490050
Partition 1
Area 490050
Partition 2
OSI0022A
Figure 2-5.
Routers B and C in an Area Partition Due to Improper Network Design
In this hub and spoke topology, Router A in Area 490130 recognizes two separate
routes to Area 490050. Routers B and C do not have a Level 1 link between them;
therefore, each is in a different partition of the area. They cannot exchange Level 1
information and neither one knows about end systems in the other partition. If
Router A sends a packet to an end system in Area 490050, it may choose Router B
in Partition 1 as the lowest-cost route. If the packet is intended for an end system
attached to Router C, Router B will reject the packet, because it does not know
about the end system in Partition 2.
One solution is to modify the topology by creating a link between Routers B and
C. Another solution is to create another area for Router C or B; the routers could
then use Level 2 routing to communicate.
2-6
303535-A Rev 00
OSI Implementation Notes
Configuring Static External Adjacencies
A static external adjacency links an L1/L2 router to an address in an external
domain to route traffic between the domains. To configure one, you must
•
Configure external routing support on each interface that connects the L1/L2
router to an external domain.
You do this by setting the Routing Level parameter in the OSI Interface List
window to an external option (External, L2 External, or L1 and L2 External).
See the section “Editing OSI Interface Parameters” in Chapter 4 for details.
•
Manually enter the set of reachable address prefixes into each L1/L2
bordering router that is linked to an external domain.
The address prefixes describe which NSAP addresses are reachable over that
L1/L2 router’s external link. See the section “Configuring Static External
Address Adjacencies” in Chapter 4 for details.
Configuring OSI over DDN X.25
The X.25 Defense Data Network (DDN) provides end-to-end connectivity
between a router and remote Data-Circuit Terminating Equipment (DTE) devices
that support X.25 DDN Standard Service. Internet Protocol (IP) uses DDN service
to transmit IP datagrams over the X.25 network.
Each network interface that connects to the X.25 network uses an X.121 address.
(For additional information about the X.25 network and X.121 addresses, see
Configuring X.25 Services.)
If you want to run OSI over DDN X.25, you must:
303535-A Rev 00
•
Configure IP over an X.25 DDN circuit. See Configuring IP Services for
details.
•
Convert the remote IP address to an X.121 address. You use the converted
address as the Subnetwork Point of Attachment (SNPA) for a static end
system adjacency or a static external address adjacency. (See Chapter 4 for
details on the SNPA parameter and Appendix A for details on address
conversion.)
2-7
Configuring OSI Services
Configuring DECnet IV to V Transition
You can only access the DECnet IV to V Transition parameters using OSI. To
enable the DECnet IV to V Transition feature, you must configure at least one
DECnet interface on the router. See Configuring DECnet Services for
information about the DECnet IV to V Transition feature.
Configuring OSI over Frame Relay
Frame relay is a high-speed, shared-bandwidth, wide-area networking protocol.
Frame relay performs only basic processing on each packet, allowing frame relay
networks to operate at high speeds with few delays but with little error detection.
See Configuring Frame Relay Services for general information about the protocol.
Configuration Overview
If you want to run OSI over frame relay, you must
1.
Configure a frame relay circuit using Site Manager.
See Configuring Frame Relay Services for frame relay configuration
information.
2.
Configure OSI to operate over frame relay.
See Chapter 3 for initial OSI configuration information.
3.
Customize frame relay and OSI for your network’s circuit mode and
topology.
See the following sections for information on running OSI over frame relay
based on the circuit mode and topology of your network.
4.
2-8
In direct access mode, repeat Steps 1 through 3 for each permanent
virtual circuit (PVC). See the “Direct Access” section in this chapter.
303535-A Rev 00
OSI Implementation Notes
Frame Relay Circuit Modes
The Bay Networks implementation of OSI over frame relay operates as a
subnetwork in either of these two types of Intermediate System to Intermediate
System (IS-IS) operation modes:
•
Point-to-Point
•
Broadcast
The OSI router implements these IS-IS operation modes over frame relay circuits.
Table 2-1 lists the frame relay modes used for IS-IS operations.
Table 2-1.
Frame Relay Modes Used for OSI IS-IS Operations
Frame Relay Mode
IS-IS Operation Mode
Direct access
Point-to-Point
Group access
Broadcast
Hybrid
Broadcast
Direct Access
In direct access mode, OSI treats a PVC as a point-to-point connection. OSI views
each PVC as an individual network interface. In direct access mode, you configure
each frame relay PVC manually and configure the OSI protocol to run over it.
Figure 2-6 shows direct access mode with each PVC configured as a separate OSI
interface.
See Configuring Frame Relay Services for information about configuring PVCs.
Frame Relay Network
PVC 1
PVC 2
Interface 1 = PVC 1
Interface 2 = PVC 2
OSI0019A
Figure 2-6.
303535-A Rev 00
Frame Relay Direct Access Mode
2-9
Configuring OSI Services
OSI point-to-point operation over frame relay uses circuit bandwidth more
efficiently than OSI broadcast operation. It also complies with the ISO standards
for point-to-point operation. However, point-to-point operation uses
proportionally more memory resources on the router per PVC than broadcast
operation.
Group Access
In group access mode, OSI treats each frame relay network interface as a single
access point to the subnetwork. DLCIs on the subnetwork are treated like MAC
addresses on actual broadcast media. A router broadcasts an OSI packet on a
particular frame relay circuit over all known PVCs on that circuit. OSI assumes
that all systems on the subnetwork will receive a broadcast packet.
Figure 2-7 shows group access mode with multiple PVCs on a single subnetwork
configured on the same interface.
Frame Relay Network
PVC 1
PVC 2
Interface 1 = PVC 1
PVC 2
OSI0027A
Figure 2-7.
Frame Relay Group Access Mode
Group access works best in either full mesh environments, or partial mesh
environments set up in a hub and spoke topology, where communication between
systems that are not directly connected to one another goes through the hub.
In planning OSI over frame relay in group mode, note the following information
about hybrid and mixed access circuit modes and network topology.
Hybrid
For OSI, hybrid frame relay circuit mode is the same as group access.
2-10
303535-A Rev 00
OSI Implementation Notes
Mixed Access
You can mix both group and direct access mode in a configuration as long as you
do not violate the group access restrictions. Figure 2-8 shows mixed access mode
on a designated router with PVC 1 configured in direct access mode on Interface
1, and PVC 2 and PVC 3 configured in group access mode on Interface 2.
Mixed modes PVCs
Designated
router
PVC1
PVC2
PVC3
Interface 1 = PVC1
Direct access mode
Interface 2 = PVC2
PVC3
Group access mode
Frame Relay Network
OSI0023A
Figure 2-8.
Frame Relay Mixed Access Modes (Direct and Group)
Topology
Consider the following issues in implementing OSI over group access mode frame
relay circuits in a full or partial mesh topology.
Full Mesh Topology
Full mesh topology in OSI over frame relay means that all routers are connected
to each other with PVCs (Figure 2-9). Using group access mode in a full mesh
topology models the frame relay network as a LAN.
303535-A Rev 00
2-11
Configuring OSI Services
Designated
Router
All routers connected with PVCs
OSI0020A
Figure 2-9.
Full Mesh Topology
If a router fails or the link to the frame relay network fails, the topology remains
full mesh. If a PVC fails, however, the network changes from a full mesh to a
partial mesh topology. This can introduce connectivity problems in the resulting
network. For example, if a non-designated router loses a PVC to the designated
router, it will attempt to elect another designated router. Since the other systems
are still in contact with the active designated router, the link state databases of the
routers will not be synchronized, which could result in connectivity problems
between systems.
Partial Mesh Topology
If you use a partial mesh topology with group access mode, you need to arrange
the network in a hub and spoke topology with the designated router as the hub
(Figure 2-10).
2-12
303535-A Rev 00
OSI Implementation Notes
Spoke routers
Hub (designated)
router
Hub and spokes
connected with PVCs
Frame Relay Network
Figure 2-10.
OSI0021A
Partial Mesh in Hub and Spoke Topology
A PVC that goes down will only cause communication failure between the hub
(designated router) and the spoke on the PVC. However, in a partial mesh
topology, losing the hub router causes all communication links on the subnetwork
to fail.
Route Redirecting
When you configure OSI over frame relay, the Redirect Enable/Disable parameter
appears in the OSI Interface Lists window. (See Chapter 4 for the Redirect
parameter description.) Redirects specify whether an OSI interface sends a
redirect packet (ES-IS message) back to the originating system, informing it of a
more direct path to a destination system. This function is valid in a full mesh
topology because all systems can communicate directly.
Redirects are invalid when running OSI over frame relay in group access mode in
a hub and spoke topology, because the spoke systems cannot communicate
directly with each other.
Set the Redirect Enable/Disable parameter to Disabled when operating OSI over
frame relay in group mode in a hub and spoke topology. Accept the default value,
Enabled, in full mesh topologies.
303535-A Rev 00
2-13
Configuring OSI Services
Designated Router Selection
OSI over group access frame relay uses the highest system ID for designated
router selection. This feature is needed to break a tie when the designated router
priority is the same for two or more routers on a subnetwork. Normally, the IS-IS
specification in OSI calls for the comparison of local SNPA addresses in breaking
ties in designated router elections, but frame relay interfaces do not have a local
SNPA address. See the “Update Process” section of Chapter 1 for more
information about designated routers.
IS Neighbor Detection
Two-way connectivity checking in adjacency establishment does not operate in
OSI over group mode frame relay. Normally, two intermediate systems on an OSI
broadcast subnetwork report each other in their LAN Hello packets. An IS must
see its own subnet address in a LAN Hello packet from a neighbor to form an
active adjacency. A local subnet address does not exist on a frame relay interface,
so this function is not used.
Circuits per Slot
A maximum of 48 OSI interfaces per slot are supported.
Configuring OSI over ATM
Asynchronous transfer mode (ATM) is a connection-oriented, cell-based
technology that relays traffic across a Broadband Integrated Services Digital
Network (B-ISDN). ATM provides a cost-effective way of transmitting voice,
video, and data across a network. For complete instructions on configuring ATM,
see Configuring ATM Services.
To run OSI over ATM:
1.
Using Site Manager, configure ATM.
Follow the instructions in Configuring ATM Services for adding a service
record for PVCs. For OSI, you must:
2-14
•
Set the Data Encapsulation Type parameter to LLC/SNAP or NLPID.
•
Set the Virtual Connection Type parameter to PVC.
303535-A Rev 00
OSI Implementation Notes
2.
Configure OSI.
See Chapter 3 for initial OSI configuration information.
3.
303535-A Rev 00
Create at least one PVC by setting the VPI Number and VCI Number
parameters.
2-15
Chapter 3
Enabling OSI and TARP Services
This chapter describes how to enable OSI and TARP by specifying values for
required parameters only and accepting default values for all other parameters of
these services.
To configure OSI and TARP, you must first create and save a configuration file.
For information about working with configuration files, see Configuring and
Managing Routers with Site Manager.
To enable OSI and TARP services:
1.
In the Configuration Manager window, select a link or net module.
The Add Circuit window opens.
2.
Click on OK.
The Select Protocols window opens.
3.
Select OSI (and TARP, if you are enabling it) and click on OK.
The OSI Configuration window opens (Figure 3-1).
Figure 3-1.
303535-A Rev 00
OSI Configuration Window
3-1
Configuring OSI Services
4.
Specify the router ID.
See the Router ID (hex) parameter description on page 3-3.
5.
If necessary, specify the area address.
See the Area Address (hex) parameter description on page 3-4.
6.
Click on OK.
A window prompts:
Do you want to edit the OSI interface details?
7.
8.
Click on Cancel.
•
If you selected OSI only in the Select Protocols window, OSI services are
now enabled with default parameter values. To customize any of these
values, see Chapter 4.
•
If you selected both OSI and TARP in the Select Protocols window, the
TARP Parameters window opens. Go to step 8.
In the TARP Parameters window, specify the target ID for the router.
To configure TARP, you must provide a target ID (TID) for the first circuit
you configure. See the Target Identifier parameter description on page 3-5.
9.
Click on OK.
The Edit OSI Interface window opens.
10. Click on OK.
OSI and TARP services are now enabled with default parameter values. To
customize any of these values, see Chapter 4, “Editing OSI and TARP
Parameters.”
3-2
303535-A Rev 00
Enabling OSI and TARP Services
This section describes OSI configuration parameters.
Parameter:
Router ID (hex)
Default:
None
Options:
Any valid 6-byte system ID
Function:
Instructions:
Identifies the router within its local area. The system ID is the ID portion
of the router’s NSAP address. (For information about NSAP addresses,
see “OSI Network Addressing” on page 1-6.)
You specify the router ID only the first time you configure an OSI
interface. Site Manager uses this router ID for any additional OSI
interfaces you configure. Enter a system ID in hexadecimal format. The
router ID must be exactly 6 bytes long. If the ID is not 6 bytes long, add
leading zeros.
Note the following guidelines:
MIB Object ID:
303535-A Rev 00
•
Every router in a domain must have a unique system ID. Using the
router’s MAC address as its system ID meets this requirement.
•
If this router is located in an area that also supports DECnet Phase IV
end systems, the system ID must be within the DECnet Phase IV legal
range (that is, 0x1 to 0x3ff hexadecimal).
1.3.6.1.4.1.18.3.5.6.1.6
3-3
Configuring OSI Services
Parameter:
Area Address (hex)
Default:
0x490040
Options:
Any valid OSI area address entered in hexadecimal notation that is
between 3 and 13 bytes long
Function:
Instructions:
MIB Object ID:
Identifies the local area in the routing domain where the router resides.
If you registered your OSI network with an addressing authority, the area
address also reflects the location of the router in the global addressing
domain. Enter the entire area address portion of the NSAP address
allocated to your network as follows:
•
Check with your administrative authority to determine the NSAP
addresses that have been allocated to your OSI network.
•
Enter the entire area address portion of the NSAP address that reflects
the location of the router, including the routing domain and area
portions that identify where in the local network the router resides.
Either you or your administrative authority should provide the
identifiers for the local routing domain and area portions of the
address.
•
If you have not registered your OSI network with an addressing
authority, then you can accept the default area address (0x490040).
1.3.6.1.4.1.18.3.5.6.13.1
Note: You must assign the same area address to all routers residing in the
same local area. You must assign different area addresses to routers that reside
in different areas.
3-4
303535-A Rev 00
Enabling OSI and TARP Services
This section describes the required TARP global parameter.
Parameter:
Target Identifier
Default:
None
Options:
Any text string from 4 to 40 characters (spaces not allowed)
Function:
Instructions:
MIB Object ID:
303535-A Rev 00
Identifies the router. The target ID is the value that OSI TARP maps to the
NSAP address.
Enter the name that identifies this router.
1.3.6.1.4.1.18.3.5.6.14.4
3-5
Chapter 4
Editing OSI and TARP Parameters
After you enable an OSI interface, you can use Site Manager to edit OSI
parameters and customize OSI services.
This chapter describes how to:
303535-A Rev 00
•
Access OSI parameters.
•
Edit OSI global parameters.
•
Edit OSI interface parameters.
•
Configure manual area addresses.
•
Add, edit, or delete static end system adjacencies.
•
Add, edit, or delete static external address adjacencies.
•
Add, edit, or delete static routes.
•
Edit TARP global parameters.
•
Edit TARP circuit parameters.
•
Configure TARP static adjacencies.
•
Send TARP requests using the Technician Interface.
•
View TARP data caches using the Technician Interface.
•
Delete OSI globally from the Bay Networks router.
4-1
Configuring OSI Services
Accessing OSI Parameters
You access all OSI parameters from the Configuration Manager window (Figure
4-1). Refer to Configuring and Managing Routers with Site Manager for details
about accessing this window.
Figure 4-1.
Configuration Manager Window
To customize the router software for OSI services, you can edit any of these types
of OSI parameters:
•
Global
•
Interface
•
Manual area address
•
Static adjacency
•
Static route
•
TARP
For each OSI and TARP parameter, this chapter describes the default setting, all
valid setting options, the parameter function, instructions for setting the
parameter, and the MIB object ID.
4-2
303535-A Rev 00
Editing OSI and TARP Parameters
The Technician Interface lets you modify parameters by issuing set and commit
commands that specify the MIB object ID. This process is equivalent to
modifying parameters using Site Manager. For more information about using the
Technician Interface to access the MIB, refer to Using Technician Interface
Software.
Caution: The Technician Interface does not verify that the value you enter for
a parameter is valid. Entering an invalid value can corrupt your configuration.
Editing OSI Global Parameters
To edit the OSI global parameters:
1.
Select Protocols > OSI > Global in the Configuration Manager window
(refer to Figure 4-1).
The Edit OSI Global Parameters window opens (Figure 4-2).
303535-A Rev 00
4-3
Configuring OSI Services
Figure 4-2.
Edit OSI Global Parameters Window
2.
Edit the parameters, using the descriptions that follow as a guide.
3.
Click on OK to save your changes and exit the window.
Site Manager returns you to the Configuration Manager window.
Parameter:
Enable
Default:
Enable
Options:
Enable | Disable
Function:
Instructions:
MIB Object ID:
4-4
Enables or disables OSI routing on the router.
Set to Disable only if you want to globally disable OSI routing on all
interfaces on which it is configured.
1.3.6.1.4.1.18.3.5.6.1.2
303535-A Rev 00
Editing OSI and TARP Parameters
Parameter:
Router Type
Default:
Level 1 and Level 2
Options:
Level 1 | Level 1 and Level 2
Function:
Specifies whether the router functions as an L1 router (Level 1) or an L1/
L2 router (Level 1 and Level 2).
An L1 router can support only Level 1 routing within its own area. An
L1/L2 router can support Level 1 routing, Level 2 routing between areas,
and external routing between domains.
You can further define the type of traffic that router supports by editing
the interface parameters. For example, if you want a certain interface to
route only Level 2 traffic, then you designate the individual interface as an
L2 interface (see “Editing OSI Interface Parameters” on page 4-12 for
instructions).
Instructions:
MIB Object ID:
Select the appropriate router type.
1.3.6.1.4.1.18.3.5.6.1.5
Note: To support routing between areas, you must specify at least one L1/L2
router per area. However, each L1/L2 router can serve only a single area.
Parameter:
Router ID (hex)
Default:
The router ID set when you initially enabled OSI services
Options:
Any valid 6-byte system ID
Function:
Identifies the router within its local area.
The system ID is the ID portion of the router’s NSAP address. (See “OSI
Network Addressing” on page 1-6 for more information.)
Instructions:
MIB Object ID:
303535-A Rev 00
You set the router ID when you initially enable OSI services in the OSI
Configuration window (see Chapter 3, “Enabling OSI and TARP
Services”). If necessary, enter a new 6-byte system ID in hexadecimal
format. If the system ID is not 6 bytes, add leading zeroes. Since every
router in a domain must have a unique system ID, using a router’s MAC
address for its system ID ensures this requirement.
1.3.6.1.4.1.18.3.5.6.1.6
4-5
Configuring OSI Services
Parameter:
Load Balancing
Default:
False
Options:
True | False
Function:
Specifies whether the router should balance the data traffic flow over two
equal-cost paths to the same destination.
Load balancing keeps one path from becoming overloaded, while taking
advantage of the bandwidth available on an additional path. The paths
must be of equal cost.
Instructions:
MIB Object ID:
Parameter:
1.3.6.1.4.1.18.3.5.6.1.7
Max # Area Addresses
Default:
63
Options:
1 to 1000
Function:
Instructions:
MIB Object ID:
Parameter:
Specifies the maximum number of local areas in the domain.
Unless there are more than 63 areas in the router’s domain, accept the
default value, 63.
1.3.6.1.4.1.18.3.5.6.1.8
Max # End Systems
Default:
512
Options:
1 to 4000
Function:
Instructions:
MIB Object ID:
4-6
To enable load balancing, reset this parameter to True.
Specifies the maximum number of end systems contained within this
local area.
Unless there are more than 1023 end systems in the local area, accept the
default value, 512.
1.3.6.1.4.1.18.3.5.6.1.9
303535-A Rev 00
Editing OSI and TARP Parameters
Parameter:
Max # L1 Intermediate Systems
Default:
15
Options:
1 to 1000
Function:
Instructions:
MIB Object ID:
Parameter:
Specifies the maximum number of Level 1 OSI routers contained within
this local area.
Unless there are more than 15 Level 1 OSI routers in this local area,
accept the default value, 15.
1.3.6.1.4.1.18.3.5.6.1.10
Max # L2 Intermediate Systems
Default:
63
Options:
1 to 1000
Function:
Instructions:
MIB Object ID:
Parameter:
Specifies the maximum number of L1/L2 OSI routers contained within
this local area.
Unless there are more than 63 L1/L2 OSI routers in this local area, accept
the default value, 63.
1.3.6.1.4.1.18.3.5.6.1.11
Max # External Addresses
Default:
1
Options:
1 to 500
Function:
Instructions:
MIB Object ID:
303535-A Rev 00
Specifies the number of external domain addresses imported into the local
domain.
If you do not have any links to external domains, then accept the default
value, 1. Otherwise, enter the maximum number of external domains
linked to the local domain.
1.3.6.1.4.1.18.3.5.6.1.12
4-7
Configuring OSI Services
Parameter:
IS Checksum
Default:
Enable
Options:
Enable | Disable
Function:
Instructions:
MIB Object ID:
Parameter:
Enables or disables the generation of a nonzero checksum for IS packets.
To allow checksum processing, accept the default value, Enable.
1.3.6.1.4.1.18.3.5.6.1.13
L1 LSP Password
Default:
None
Options:
Any text string, 8 characters maximum
Function:
Assigns a password to the Level 1 link state packets (LSP), partial
sequence number packets (PSNP), and complete sequence number
packets (CSNP) that the router (L1 or L1/L2) generates and accepts.
The router uses LSP information to make routing decisions, and PSNP
and CSNP information to make sure that its LSP database is up to date.
You use the L1 LSP password as a security device for restricting the
routing of data. If you add a password to LSPs from a router, only routers
with the password accept and exchange LSPs. To restrict routing, you
assign identical L1 LSP passwords to all routers located in the area
through which you wish to route data. When the OSI router floods Level 1
LSPs through the area, only those routers with the same password accept
the LSPs.
Instructions:
MIB Object ID:
4-8
If you do not want to assign an L1 LSP password to this router, then leave
this field blank. If you assign an L1 LSP password to this router, then you
must assign the same L1 LSP password to every router in the area with
which this router communicates.
1.3.6.1.4.1.18.3.5.6.1.14
303535-A Rev 00
Editing OSI and TARP Parameters
Parameter:
L2 LSP Password
Default:
None
Options:
Any text string, 8 characters maximum
Function:
Assigns a password to the Level 2 link state packets (LSP), partial
sequence number packets (PSNP), and complete sequence number
packets (CSNP) that the router (L1/L2) generates and accepts.
The router uses LSP information to make routing decisions, and PSNP
and CSNP information to make sure that its LSP database is up to date.
You use the L2 LSP password as a security device for restricting the
routing of data. If you add a password to LSPs from a router, only routers
with the same password accept and exchange LSPs. To restrict routing,
you assign identical L2 LSP passwords to all routers located in the
domain through which you wish to route data. When the OSI router
floods Level 2 LSPs through the area, only those routers that have been
assigned the same password accept the LSPs.
Instructions:
MIB Object ID:
If you do not want to assign an L2 LSP password to this router, then leave
this field blank. If you assign an L2 LSP password to this router, then you
must assign the same L2 LSP password to every router in the domain with
which this router communicates.
1.3.6.1.4.1.18.3.5.6.1.15
Note: If you set the Router Type parameter for this router to Level 1 only, then
the router ignores this parameter.
303535-A Rev 00
4-9
Configuring OSI Services
Parameter:
Area Address (hex)
Default:
0x490040
Options:
Any area address entered in hexadecimal format that is between 3 and 13
bytes long
Function:
Instructions:
MIB Object ID:
Identifies the local area in the routing domain where the router resides.
If you have registered your OSI network with an addressing authority,
then the area address will also reflect the location of the router in the
global addressing domain. Enter the entire area address portion of the
NSAP address allocated to your network as follows:
•
Check with your administrative authority to determine the NSAP
addresses that have been allocated to your OSI network.
•
Enter the entire area address portion of the NSAP address that reflects
the location of the router, including the routing domain and area
portions that identify where in the local network the router resides.
Either you or your administrative authority should provide the
identifiers for the local routing domain and area portions of the
address.
•
If you have not registered your OSI network with an addressing
authority, then you can accept the default area address of 0x490040.
1.3.6.1.4.1.18.3.5.6.13.1
Note: You must assign the same area address to all routers residing in the
same local area. You must assign different area addresses to routers that reside
in different areas.
Parameter:
Default:
1024
Options:
1 to 4000
Function:
Specifies the maximum number of end systems per slot that the router can
learn about dynamically through the exchange of Hello packets.
Instructions:
Unless the area in which this router resides contains more than 1024 end
systems, accept the default value, 1024.
MIB Object ID:
4-10
Max # Learned End Systems
1.3.6.1.4.1.18.3.5.6.1.28
303535-A Rev 00
Editing OSI and TARP Parameters
Parameter:
Max # Learned L1 Intermediate Systems
Default:
64
Options:
1 to 4000
Function:
Instructions:
MIB Object ID:
Parameter:
Specifies the maximum number of L1 routers per slot that this router can
learn about dynamically through the exchange of Hello packets.
Unless the area in which this router resides contains more than 64 L1
intermediate systems, accept the default value, 64.
1.3.6.1.4.1.18.3.5.6.1.29
Max # Learned L2 Intermediate Systems
Default:
64
Options:
1 to 4000
Function:
Specifies the maximum number of L2 routers per slot that the router can
learn about dynamically through the exchange of Hello packets.
Instructions:
Unless the domain in which this router resides contains more than 64 L2
routers, accept the default value, 64.
MIB Object ID:
Parameter:
1.3.6.1.4.1.18.3.5.6.1.30
CLNP Source Route Support
Default:
Enable
Options:
Enable | Disable
Function:
Instructions:
MIB Object ID:
303535-A Rev 00
Enables or disables the processing of source routing options in CLNP
packets.
Set to Disable if this router requires GOSIP v2 support.
1.3.6.1.4.1.18.3.5.6.1.38
4-11
Configuring OSI Services
Editing OSI Interface Parameters
To edit an OSI interface:
1.
Select Protocols > OSI > Interfaces in the Configuration Manager
window (refer to Figure 4-1).
The OSI Interface Lists window opens (Figure 4-3). It displays all interfaces
on which OSI is enabled.
Figure 4-3.
OSI Interface Lists Window
2.
Click on an interface to select it.
3.
Edit the parameters, using the descriptions that follow as a guide.
Use the scroll bar to scroll through the list of parameters for the interface.
4.
4-12
Implement your changes by clicking on Apply.
303535-A Rev 00
Editing OSI and TARP Parameters
5.
Exit the window by clicking on Done.
Site Manager returns you to the Configuration Manager window.
Note: When you reconfigure an interface in dynamic configuration mode, OSI
restarts on that interface.
Parameter:
Enable
Default:
Enable
Options:
Enable | Disable
Function:
Instructions:
MIB Object ID:
Parameter:
Enables OSI routing on this interface.
Disable only if you want to disable OSI routing on this interface.
1.3.6.1.4.1.18.3.5.6.3.2
Routing Level
Default:
Level 1 and Level 2
Options:
Level 1 | Level 2 | Level 1 and Level 2 | External | L2 External | L1 and L2
External | ES-IS-only
Function:
Instructions:
Specifies the type of traffic that is routed over this interface.
Select the routing level that matches the level of traffic you want to route
on this interface.
Note that if you set the global Router Type parameter to Level 1, then you
can only route Level 1 traffic on this interface. See “Editing OSI Global
Parameters” on page 4-3 for instructions on setting the global Router
Type parameter.
If this interface will route traffic between domains, then select an option
that includes External. In addition, you must statically define the external
adjacencies with which this router communicates. See “Configuring
Static External Address Adjacencies” on page 4-25 for instructions.
MIB Object ID:
303535-A Rev 00
1.3.6.1.4.1.18.3.5.6.3.5
4-13
Configuring OSI Services
Parameter:
L1 Default Metric
Default:
20
Options:
1 to 63
Function:
Specifies the default metric (relative cost) of routing Level 1 traffic over
this interface.
OSI determines path costs on the basis of the sum of the individual circuit
costs. The cost that you assign to a particular circuit typically reflects the
speed of the transmission medium. Low costs reflect high-speed media,
while high costs reflect slower media. Refer to Table 4-1 for a list of
suggested OSI circuit costs.
The OSI router always selects the interfaces with the lowest cost when
defining a path, so assigning each interface a cost is, in effect, a way of
assigning it a priority.
Instructions:
MIB Object ID:
If you do not want this interface to route Level 1 traffic on a regular basis,
assign it a high cost. Otherwise, accept the default, 20.
1.3.6.1.4.1.18.3.5.6.3.6
Table 4-1.
4-14
Suggested OSI Circuit Cost Values
Speed
Cost
Speed
Cost
100 Mb/s
1
64 Kb/s
54
16 Mb/s
19
56 Kb/s
55
10 Mb/s
20
38.4 Kb/s
56
4 Mb/s
21
32 Kb/s
57
1.54 Mb/s
45
19.2 Kb/s
58
1.25 Mb/s
48
9.6 Kb/s
59
833 Kb/s
49
7.2 Kb/s
60
625 Kb/s
50
4.8 Kb/s
61
420 Kb/s
51
2.4 Kb/s
62
230.4 Kb/s
52
1.2 Kb/s
63
125 Kb/s
53
303535-A Rev 00
Editing OSI and TARP Parameters
Parameter:
L2 Default Metric
Default:
20
Options:
1 to 63
Function:
Specifies the relative cost of routing Level 2 traffic over this interface.
OSI determines path costs on the basis of the sum of the individual circuit
costs. The cost that you assign to a particular circuit typically reflects the
speed of the transmission medium. Low costs reflect high-speed media,
while high costs reflect slower media. Refer to Table 4-1 for a list of
suggested OSI circuit costs.
The OSI router always selects the interfaces with the lowest cost when
defining a path, so assigning each interface a cost is, in effect, a way of
assigning it a priority.
Instructions:
MIB Object ID:
Parameter:
If you do not want this interface to route Level 2 traffic on a regular basis,
assign it a high cost. Otherwise, accept the default, 20.
1.3.6.1.4.1.18.3.5.6.3.7
L1 Designated Router Priority
Default:
64
Options:
1 to 127
Function:
Specify which L1 router becomes the L1 designated router for the LAN
segment. (See “Update Process” on page 1-18 for more information about
the designated router.)
You can control which L1 router becomes the L1 designated router for the
LAN segment by assigning a priority value to each L1 router. Then, the
L1 router assigned the highest priority becomes the L1 designated router
for that LAN segment.
If all routers have the same priority, then the L1 router with the highest
MAC address becomes the L1 designated router for the LAN segment.
Instructions:
MIB Object ID:
303535-A Rev 00
If you want this L1 router to become the L1 designated router for the
LAN segment, then assign it the highest priority value among L1 routers
on the LAN.
1.3.6.1.4.1.18.3.5.6.3.8
4-15
Configuring OSI Services
Note: If the network is synchronous (for example, point-to-point or X.25),
then the routers on each end of the connection must have different values for
this parameter, or it is ignored. This applies only to Bay Networks standard
point-to-point and X.25 point-to-point service. It does not apply to a
synchronous circuit running Point-to-Point Protocol (PPP) or X.25 PDN or
DDN service.
Parameter:
L2 Designated Router Priority
Default:
64
Options:
1 to 127
Function:
Specifies which L2 router becomes the L2 designated router for the LAN
segment. (See “Update Process” on page 1-18 for information about
designated routers.)
You can control which L2 router becomes the L2 designated router for the
LAN segment by assigning a priority value to each L2 router. Then, the
L2 router assigned the highest priority becomes the L2 designated router
for that LAN segment.
If all routers have the same priority, then the L2 router with the highest
MAC address becomes the L2 designated router for the LAN segment.
Instructions:
MIB Object ID:
4-16
If you want this L2 router to become the L2 designated router for the
LAN segment, then assign it the highest priority value among L2 routers
on the LAN.
1.3.6.1.4.1.18.3.5.6.3.9
303535-A Rev 00
Editing OSI and TARP Parameters
Parameter:
IIH Hello Timer
Default:
8
Options:
2 | 4 | 8 | 15 | 30 | 60 | 120 | 300 | 600 | 1800 | 2400 | 3600
Function:
Instructions:
MIB Object ID:
Parameter:
The IIH (intermediate to intermediate Hello) timer specifies in seconds
how often other routers need to send ISH (intermediate system Hello)
messages to this router. This router includes this value in the intermediate
system Hello messages it sends to the other routers.
Accept the default value, or select any valid option.
1.3.6.1.4.1.18.3.5.6.3.10
ISH Hello Timer
Default:
30
Options:
2 | 4 | 8 | 15 | 30 | 60 | 120 | 300 | 600 | 1800 | 2400 | 3600
Function:
Instructions:
MIB Object ID:
Parameter:
The ISH (intermediate system Hello) timer specifies the interval in
seconds between LAN Hello messages transmitted across the interface
between a router (L1 or L1/L2) and an end system in the local area.
Accept the default value, or select any valid option.
1.3.6.1.4.1.18.3.5.6.3.11
ESH Configuration Timer
Default:
600
Options:
2 | 4 | 8 | 15 | 30 | 60 | 120 | 300 | 600 | 1800 | 2400 | 3600
Function:
Instructions:
MIB Object ID:
303535-A Rev 00
The ESH (end system Hello) configuration timer specifies in seconds how
often end systems need to send system Hello messages to this router. This
value is included in the intermediate system Hello messages the router
sends to end systems.
Accept the default value, or select any valid option.
1.3.6.1.4.1.18.3.5.6.3.12
4-17
Configuring OSI Services
Parameter:
Default:
None
Options:
Any text string, 8 characters maximum
Function:
Instructions:
MIB Object ID:
Parameter:
Assigns a password to the interface. A router will route packets only to
those routers that have been assigned the same circuit password. The
circuit password is carried to other routers when intermediate systems
exchange Hello packets. If a router discovers that another router has a
different password, it will not route traffic to that router. Therefore, to
communicate, adjacent routers on either end of a point-to-point
connection must have the same circuit password.
To assign a circuit password, enter a text string.
1.3.6.1.4.1.18.3.5.6.3.13
IIH Hold Time Multiplier
Default:
3
Options:
1 to 5
Function:
Instructions:
MIB Object ID:
Parameter:
You set a multiplier value to extend the hold time set in the intermediate to
intermediate Hello packets transmitted on this interface. Setting a value
multiplies the IIH Hello Timer parameter by this factor.
Set to the appropriate value.
1.3.6.1.4.1.18.3.5.6.3.64
ISH Hold Time Multiplier
Default:
3
Options:
1 to 5
Function:
Instructions:
MIB Object ID:
4-18
Circuit Password
You set a multiplier value to extend the hold time set in the intermediate
system Hello packets transmitted on this interface. Setting a value
multiplies the ISH Hello Timer parameter by this factor.
Set to the appropriate value.
1.3.6.1.4.1.18.3.5.6.3.65
303535-A Rev 00
Editing OSI and TARP Parameters
Parameter:
Redirect Enable/Disable
Default:
Enable
Options:
Enable | Disable
Function:
Specifies whether an OSI interface sends a redirect packet back to the
originating system, informing it of a more direct path to a destination
system.
You should disable redirects when they are inappropriate for particular
media and topology combinations. For example, if you are operating OSI
over a frame relay circuit configured for group access and the underlying
topology is hub and spoke, you should disable redirects because the
systems cannot communicate directly with each other.
Instructions:
MIB Object ID:
Set this parameter to Disable to prevent redirect packets from being sent
over the OSI interface.
1.3.6.1.4.1.18.3.5.6.3.66
Configuring Manual Area Addresses
Manual area addresses are synonymous area addresses configured on the same
intermediate system (router). You may want to configure manual area addresses
when more than one addressing authority can assign addresses to the routing
domain, or to allow a routing domain to be reconfigured during operation.
Adding a Manual Area Address
To add a manual area address:
1.
Select Protocols > OSI > Manual Area Address in the Configuration
Manager window (refer to Figure 4-1).
The OSI Area Address Configuration window opens. It lists all defined
manual area addresses. If you did not add any manual area addresses, none are
listed.
2.
Click on Add.
The OSI Area Address Configuration Add window opens.
3.
303535-A Rev 00
Enter an area address, using the parameter description that follows as a
guide.
4-19
Configuring OSI Services
4.
Click on OK.
The OSI Area Address Configuration window displays the new address.
5.
Repeat steps 2 through 4 to add additional manual area addresses.
6.
Click on Done.
Parameter:
Area Address
Default:
None
Options:
Any valid OSI area address in hexadecimal notation from 3 to 13 bytes
long
Function:
Instructions:
MIB Object ID:
Specifies a synonymous area address configured on the same intermediate
system.
Enter an area address in hexadecimal notation.
1.3.6.1.4.1.18.3.5.6.13.1
Deleting a Manual Area Address
To delete a manual area address:
1.
Select Protocols > OSI > Manual Area Address in the Configuration
Manager window (refer to Figure 4-1).
The OSI Area Address Configuration window opens. It lists all defined
manual area addresses.
2.
Select the address that you want to delete from the list.
3.
Click on Delete.
The manual area address is no longer listed.
4-20
4.
Repeat steps 2 and 3 to delete additional addresses.
5.
Click on Done.
303535-A Rev 00
Editing OSI and TARP Parameters
Configuring Static End System Adjacencies
You must define a static end system adjacency with any end system serviced by a
router that 1) resides in the same area as the OSI router, 2) is reachable over a
single interface, and 3) does not have ISO ES-IS 9542 enabled.
To configure a static end system adjacency:
1.
Select Protocols > OSI > Interfaces in the Configuration Manager
window (refer to Figure 4-1).
The OSI Interface Lists window opens (refer to Figure 4-3).
2.
Click on Static ES Adjacencies.
The OSI Static ES Adjacency List window opens (Figure 4-4). It lists all
defined static end system adjacencies. If you did not add any end system
adjacencies, none will be listed.
Figure 4-4.
OSI Static ES Adjacency List Window
Continue to the following sections to add, copy, edit, or delete static end system
adjacencies.
303535-A Rev 00
4-21
Configuring OSI Services
Adding a Static End System Adjacency
To add a static end system adjacency:
1.
Click on Add in the OSI Static ES Adjacency List window (refer to
Figure 4-4).
The OSI Static ES Adjacency Configuration window opens (Figure 4-5).
Figure 4-5.
OSI Static ES Adjacency Configuration Window
2.
Define the static end system parameters, using the descriptions that
follow as a guide.
3.
Click on OK.
The End System Adjacency List window displays the new adjacency you
defined.
4.
4-22
Repeat steps 1 through 3 to add additional static end system adjacencies.
303535-A Rev 00
Editing OSI and TARP Parameters
Parameter:
Enable
Default:
Enable
Options:
Enable | Disable
Function:
Instructions:
MIB Object ID:
Enables the end system adjacency as defined by the ESID and SNPA
parameters.
The default, Enable, appears after you add a static end system adjacency
in the OSI Static ES Adjacency window.
1.3.6.1.4.1.18.3.5.6.5.1.2
Parameter:
ESID
Default:
None
Options:
Any valid 6-byte end system ID
Function:
Instructions:
MIB Object ID:
Parameter:
Specifies the end system ID (ESID) of the adjacent end system.
Enter the 6-byte end system ID assigned to the adjacent end system in
hexadecimal format.
1.3.6.1.4.1.18.3.5.6.5.1.3
SNPA
Default:
None
Options:
Depends on the circuit type (see Instructions)
Function:
Instructions:
MIB Object ID:
303535-A Rev 00
Specifies an SNPA for the adjacent end system.
Enter the SNPA for the adjacent end system:
•
If this circuit is an X.25 PDN circuit, then enter any valid X.121
address in decimal format.
•
If this circuit is an X.25 DDN circuit, then enter a valid X.121 address
for the remote router in decimal format.
•
If this circuit uses PPP, then leave this field blank.
•
If this circuit is of any other type, then enter any valid MAC address.
1.3.6.1.4.1.18.3.5.6.5.1.5
4-23
Configuring OSI Services
Note: To enter a valid X.121 address for an X.25 DDN circuit, you must
convert the remote IP address to an X.121 address. (See Appendix A,
“IP-to-X.121 Address Mapping for DDN,” for the conversion algorithm.)
Copying a Static End System Adjacency
To copy a static end system adjacency:
1.
Click on the adjacency that you want to copy from the list in the OSI
Static ES Adjacency List window (refer to Figure 4-4).
2.
Click on Copy.
3.
Specify the ESID parameter for that adjacency.
4.
Click on OK.
The OSI Static ES Adjacency List window displays the new adjacency you
copied.
5.
Repeat steps 1 through 4 to copy additional static end system adjacencies.
6.
Click on Done.
Editing a Static End System Adjacency
To edit a static end system adjacency:
4-24
1.
Select the adjacency that you want to edit from the list in the OSI Static
ES Adjacency List window (refer to Figure 4-4).
2.
Edit the static adjacency parameters that you want to change.
3.
Click on Apply to implement your changes.
4.
Repeat steps 1 through 3 to edit additional static adjacencies.
5.
Click on Done.
303535-A Rev 00
Editing OSI and TARP Parameters
Deleting a Static End System Adjacency
To delete a static end system adjacency:
1.
Select the adjacency that you want to delete from the list in the OSI Static
ES Adjacency List window (refer to Figure 4-4).
2.
Click on Delete.
The static end system adjacency is no longer listed.
3.
Repeat steps 1 and 2 to delete additional adjacencies.
4.
Click on Done to exit the window.
Configuring Static External Address Adjacencies
You configure static external adjacencies to enable interdomain routing (routing
between domains).
To configure a static external address adjacency:
1.
Select Protocols > OSI > Interfaces in the Configuration Manager
window (refer to Figure 4-1).
The OSI Interface Lists window opens (refer to Figure 4-3).
2.
Click on External Address Adjacency.
The OSI External Address Adjacency List window opens (refer to Figure
4-6). It lists all defined external address adjacencies. If you did not add any
adjacencies, none will be listed.
303535-A Rev 00
4-25
Configuring OSI Services
Figure 4-6.
OSI External Address Adjacency List Window
Note: To configure static external address adjacencies for the OSI interface,
set the Routing Level parameter in the OSI Interface Lists window to an option
that includes External (for example, Level 2 and External).
Continue to the following sections to add, remove, copy, or edit external address
adjacencies from this window.
Adding Static External Address Adjacencies
To add a static external address adjacency:
1.
Click on Add in the OSI External Address Adjacency List window (refer
to Figure 4-6).
The OSI External Address Adjacency Configuration window opens (Figure
4-7).
4-26
303535-A Rev 00
Editing OSI and TARP Parameters
Figure 4-7.
OSI External Address Adjacency Configuration Window
2.
Define the static external address adjacency parameters, using the
descriptions that follow as a guide.
3.
Click on OK to implement your changes and exit the window.
The OSI External Address Adjacency List window displays the new
adjacency you defined.
4.
Repeat steps 1 through 3 to add additional adjacencies.
Parameter:
Enable
Default:
Enable
Options:
Enable | Disable
Function:
Instructions:
MIB Object ID:
303535-A Rev 00
Enables the external adjacency defined by the SNPA parameter.
The default, Enable, appears after you add a static external address
adjacency in the OSI External Address Adjacency Configuration window.
1.3.6.1.4.1.18.3.5.6.4.2
4-27
Configuring OSI Services
Parameter:
External Address (hex)
Default:
None
Options:
Any valid address
Function:
Instructions:
MIB Object ID:
Parameter:
Specifies the destination address of the external adjacency.
Enter the address assigned to the external adjacency in hexadecimal
format.
1.3.6.1.4.1.18.3.5.6.4.5
SNPA
Default:
None
Options:
Depends on the circuit type (see Instructions)
Function:
Instructions:
MIB Object ID:
Specifies an SNPA for the adjacent end system.
Enter the SNPA for the adjacent end system as follows:
•
If this circuit is an X.25 PDN circuit, then enter a valid X.121 address
for the remote router in decimal format.
•
If this circuit is an X.25 DDN circuit, then enter a valid X.121 address
for the remote router in decimal format.
•
If this circuit uses PPP, then leave this field blank.
•
If this circuit is of any other type, then enter any valid MAC address.
1.3.6.1.4.1.18.3.5.6.4.6
Note: To enter a valid X.121 address for an X.25 DDN circuit, you must
convert the remote IP address to an X.121 address. (See Appendix A,
“IP-to-X.121 Address Mapping for DDN,” for the conversion algorithm.)
4-28
303535-A Rev 00
Editing OSI and TARP Parameters
Parameter:
External Address Metric
Default:
20
Options:
1 to 63
Function:
Specifies the relative cost of using this interface to reach the external
adjacency.
If there are multiple interfaces configured to the same external adjacency,
the OSI router will route all external domain traffic using the interface
that has been assigned the lowest external address metric.
Instructions:
If you only have a single link to the external adjacency, or have no
preference regarding which interface is used to access the external
domain, accept the default value.
If there are multiple interfaces configured to the same external adjacency,
and you want this interface to be used regularly, then assign it the lowest
external address metric. Similarly, assign it a high cost if you do not want
it to be used regularly.
MIB Object ID:
1.3.6.1.4.1.18.3.5.6.4.7
Copying Static External Address Adjacencies
To copy a static external address adjacency:
303535-A Rev 00
1.
Select the adjacency that you want to copy from the list in the OSI
External Address Adjacency List window (refer to Figure 4-6).
2.
Click on Copy.
3.
Specify the external address for the new adjacency.
4.
Click on Save.
5.
Repeat steps 1 through 4 to copy additional adjacencies.
4-29
Configuring OSI Services
Editing Static External Address Adjacencies
To edit a static external address adjacency:
1.
Select the adjacency that you want to edit from the list in the OSI
External Address Adjacency List window (refer to Figure 4-6).
2.
Edit the static external address adjacency parameters.
3.
Click on Apply to implement your changes.
4.
Repeat steps 1 through 3 to edit additional adjacencies.
Deleting Static External Address Adjacencies
To delete a static external address adjacency:
1.
Select the adjacency that you want to delete from the list in the OSI
External Address Adjacency List window (refer to Figure 4-6).
2.
Click on Delete.
The static external address adjacency is no longer listed.
4-30
3.
Repeat steps 1 and 2 to delete additional adjacencies.
4.
Click on Done to exit the window.
303535-A Rev 00
Editing OSI and TARP Parameters
Configuring Static Routes
You configure static routes when you want to control which path the router uses to
route OSI traffic.
To configure a static route, select Protocols > OSI > Static Route in the
Configuration Manager window (refer to Figure 4-1). The OSI Static Routes
window opens (Figure 4-8). It lists all static routes that are defined. If you did not
add any static routes, none will be listed.
Figure 4-8.
303535-A Rev 00
OSI Static Routes Window
4-31
Configuring OSI Services
Adding Static Routes
To add a static route:
1.
Click on Add in the OSI Static Routes window (refer to Figure 4-8).
The Static Route Configuration window opens (Figure 4-9).
Figure 4-9.
Static Route Configuration Window
2.
Specify the static route parameters, using the descriptions that follow as a
guide.
3.
Click on OK to implement your changes.
The OSI Static Routes window displays the new static route you defined.
4.
Parameter:
Enable
Default:
Enable
Options:
Enable | Disable
Function:
Instructions:
MIB Object ID:
4-32
Repeat steps 1 through 3 to add additional static routes.
Enables or disables the selected static route.
To disable the static route, set to Disable.
1.3.6.1.4.1.18.3.5.6.2.1.2
303535-A Rev 00
Editing OSI and TARP Parameters
Parameter:
Destination NSAP Address (hex)
Default:
None
Options:
Any valid NSAP address
Function:
Instructions:
MIB Object ID:
Parameter:
Specifies the NSAP address of the destination end system.
Enter the address assigned to the destination end system in hexadecimal
format.
1.3.6.1.4.1.18.3.5.6.2.1.4
Route Type
Default:
None
Options:
End System | Area | External Domain
Function:
Instructions:
MIB Object ID:
Parameter:
Specifies the route type.
Select the route type for this static route.
1.3.6.1.4.1.18.3.5.6.2.1.6
Next Hop IS NSAP Address (hex)
Default:
None
Options:
Any valid NSAP address
Function:
Instructions:
MIB Object ID:
Specifies the NSAP address of the intermediate system that is the next
hop on the path to the destination end system.
Enter the address assigned to the next-hop intermediate system in
hexadecimal format.
1.3.6.1.4.1.18.3.5.6.2.1.5
Note: The next hop that you specify for this parameter must be an
intermediate system with which this router has a dynamic or static adjacency.
303535-A Rev 00
4-33
Configuring OSI Services
Parameter:
Default Route Metric
Default:
20
Options:
1 to 1023
Function:
Specifies the default metric (relative cost) of routing Level 1 traffic over
this interface.
The OSI router always selects the circuit with the lowest cost when
defining a path, so assigning each circuit a cost is, in effect, a way of
assigning it a priority.
Instructions:
MIB Object ID:
If you do not want to use this interface to route Level 1 traffic on a regular
basis, assign it a high cost. Otherwise, accept the default, 20.
1.3.6.1.4.1.18.3.5.6.2.1.7
Copying Static Routes
To copy a static route:
1.
Select the static route that you want to copy from the list in the OSI Static
Routes window (refer to Figure 4-8).
2.
Click on Copy.
3.
Specify the static route parameters.
4.
Click on OK.
The OSI Static Routes window displays the new static route.
5.
Repeat steps 1 through 4 to copy additional static routes.
6.
Click on Done.
Editing Static Routes
To edit a static route:
4-34
1.
Select the static route that you want to edit from the list in the OSI Static
Routes window (refer to Figure 4-8).
2.
Edit the static route parameters.
3.
Click on Apply to implement your changes.
4.
Repeat steps 1 through 3 to edit additional static routes.
303535-A Rev 00
Editing OSI and TARP Parameters
5.
Click on Done.
Deleting Static Routes
To delete a static route:
1.
Select the static route that you want to delete from the list in the OSI
Static Routes window (refer to Figure 4-8).
2.
Click on Delete.
The static route is no longer listed.
3.
Repeat steps 1 and 2 to delete additional static routes.
4.
Click on Done.
Editing TARP Global Parameters
To edit TARP global parameters:
1.
Select Protocols > OSI > Tarp > Global in the Configuration Manager
window (refer to Figure 4-1).
The Edit TARP Global Parameters window opens.
2.
Edit the parameters, using the descriptions that follow as a guide.
3.
Click on OK to save your changes and exit the window.
You return to the Configuration Manager window.
Parameter:
Enable
Default:
Enable
Options:
Enable | Disable
Function:
Instructions:
MIB Object ID:
303535-A Rev 00
Enables or disables TARP on this interface.
If you want to use TARP on the interface, accept the default. Otherwise,
choose Disable.
1.3.6.1.4.1.18.3.5.6.14.2
4-35
Configuring OSI Services
Parameter:
Default:
None
Options:
Any text string from 4 to 40 characters (spaces not allowed)
Function:
Instructions:
MIB Object ID:
Parameter:
Identifies the router. The target ID is the value that OSI TARP maps to the
NSAP address.
Enter the name that identifies this router.
1.3.6.1.4.1.18.3.5.6.14.4
Tarp Originate
Default:
Enable
Options:
Enable | Disable
Function:
Instructions:
MIB Object ID:
Parameter:
Specifies whether the router can originate TARP packets for this interface.
The only reason for the router to originate TARP packets is for debugging
purposes. A router can forward TARP packets even if it cannot originate
TARP packets.
If you want the router to originate TARP packets, accept the default.
Otherwise, choose Disable.
1.3.6.1.4.1.18.3.5.6.14.5
Pkt Lifetime
Default:
25
Options:
1 to 100
Function:
Instructions:
MIB Object ID:
4-36
Target Identifier
Specifies the maximum number of hops that a TARP packet that this
router originates can make.
Choose a value within the valid range, or accept the default value.
1.3.6.1.4.1.18.3.5.6.14.6
303535-A Rev 00
Editing OSI and TARP Parameters
Parameter:
Start Sequence Number
Default:
1
Options:
1 to 65535
Function:
Instructions:
MIB Object ID:
Parameter:
Each TARP packet that the router originates has a sequence number that
increments by one for each packet sent.
Choose the number that you want the router to use for the first packet.
1.3.6.1.4.1.18.3.5.6.14.7
Tarp Data Cache
Default:
Enable
Options:
Enable | Disable
Function:
Instructions:
MIB Object ID:
Parameter:
Specifies the Level 1 database of the TID-to-NSAP mappings that the
router learns from requests it originates. When it receives a response, the
TARP software stores the new entry in the data cache. The only reason to
disable this parameter is to conserve resources.
Accept the default, or choose Disable.
1.3.6.1.4.1.18.3.5.6.14.10
Tarp L2 Data Cache
Default:
Enable
Options:
Enable | Disable
Function:
Instructions:
MIB Object ID:
303535-A Rev 00
Specifies the Level 2 database of the TID-to-NSAP mappings. This cache
functions as a proxy to store mappings at remote sites. If the router
receives a request that is not for it, but that is in the Level 2 cache, it
responds to the request instead of flooding the request to all of its
adjacencies.
Accept the default, or choose Disable.
1.3.6.1.4.1.18.3.5.6.14.11
4-37
Configuring OSI Services
Parameter:
Default:
15
Options:
1 to 3600
Function:
Instructions:
MIB Object ID:
Parameter:
Specifies the number of seconds that the router waits for a response to a
Type 1 request it originated.
Accept the default, or choose another value.
1.3.6.1.4.1.18.3.5.6.14.12
Tarp T2 Timer
Default:
25
Options:
1 to 3600
Function:
Instructions:
MIB Object ID:
Parameter:
Specifies the number of seconds that the router waits for a response to a
Type 2 request it originated.
Accept the default, or choose another value.
1.3.6.1.4.1.18.3.5.6.14.13
Tarp T3 Timer
Default:
40
Options:
1 to 3600
Function:
Instructions:
MIB Object ID:
4-38
Tarp T1 Timer
Specifies the number of seconds that the router waits for a response to a
Type 5 request it originated.
Accept the default, or choose another value.
1.3.6.1.4.1.18.3.5.6.14.14
303535-A Rev 00
Editing OSI and TARP Parameters
Editing TARP Circuit Parameters
To edit TARP circuit parameters:
1.
Select Protocols > OSI > Tarp > Circuits in the Configuration Manager
window (refer to Figure 4-1).
The TARP Interface Lists window opens.
2.
Edit the parameters, using the descriptions that follow as a guide.
3.
Click on Done to save your changes and exit the window.
You return to the Configuration Manager window.
Parameter:
Enable
Default:
Enable
Options:
Enable | Disable
Function:
Instructions:
MIB Object ID:
Parameter:
Enables TARP on this circuit. For TARP to operate properly, OSI must
also be configured on this circuit.
To use TARP on the circuit, accept the default, Enable.
1.3.6.1.4.1.18.3.5.6.15.1.2
Circuit Propagate Pkts
Default:
Enable
Options:
Enable | Disable
Function:
Instructions:
MIB Object ID:
303535-A Rev 00
Specifies whether this circuit can forward TARP packets.
If you want this circuit to forward TARP packets, accept the default,
Enable.
1.3.6.1.4.1.18.3.5.6.15.1.5
4-39
Configuring OSI Services
Parameter:
Circuit Originate Pkts
Default:
Enable
Options:
Enable | Disable
Function:
Instructions:
MIB Object ID:
Specifies whether this circuit can originate TARP packets.
If you want this circuit to originate TARP packets, accept the default,
Enable.
1.3.6.1.4.1.18.3.5.6.15.1.6
Configuring TARP Static Adjacencies
If you want the router to forward TARP packets to specific NSAP addresses, you
must configure TARP static adjacencies.
Adding a TARP Static Adjacency
To add a TARP static adjacency:
1.
Select Protocols > OSI > Tarp > ADJ TARP in the Configuration
Manager window (refer to Figure 4-1).
The TARP Static Adjacencies window opens. It lists all defined TARP static
adjacencies. If you did not add any static adjacencies, none are listed.
2.
Click on Add.
The Static Adjacencies Configuration window opens.
3.
Set the Static Adjacent NSAP Address parameter.
Enter the address in hexadecimal format, including a 00 NSEL value at the
end of the NSAP address.
4.
Click on OK.
The TARP Static Adjacencies window opens.
5.
Click on Done.
You return to the Configuration Manager window.
4-40
303535-A Rev 00
Editing OSI and TARP Parameters
Parameter:
Enable
Default:
Enable
Options:
Enable | Disable
Function:
Enables the adjacency specified by the Static Adjacent NSAP Address
parameter.
Instructions:
The default, Enable, appears after you add a static adjacent NSAP
address.
MIB Object ID:
1.3.6.1.4.1.18.3.5.6.17.1.2
Parameter:
Static Adjacent NSAP Address
Default:
None
Options:
Any valid NSAP address
Function:
Links the router to a specific NSAP address to which it forwards TARP
packets.
Instructions:
Enter the address in hexadecimal format, including a 00 NSEL value at
the end of the NSAP address.
MIB Object ID:
1.3.6.1.4.1.18.3.5.6.17.1.3
Deleting a TARP Static Adjacency
To delete a TARP static adjacency:
1.
Select Protocols > OSI > Tarp > ADJ TARP in the Configuration
Manager window (refer to Figure 4-1).
The TARP Static Adjacencies window opens.
2.
Click on the static adjacency address that you want to delete.
3.
Click on Delete.
4.
Click on Done.
You return to the Configuration Manager window.
303535-A Rev 00
4-41
Configuring OSI Services
Configuring TARP to Ignore a Static Adjacency
To configure TARP to ignore a defined static adjacency:
1.
Select Protocols > OSI > Tarp > ADJ Ignore in the Configuration
Manager window (refer to Figure 4-1).
The TARP Ignore Adjacencies window opens.
2.
Click on Add.
The Ignore Adjacencies Configuration window opens.
3.
Set the Ignore Adjacent NSAP Address parameter.
Enter the address in hexadecimal format, including a 00 NSEL value at the
end of the NSAP address.
4.
Click on OK.
The TARP Ignore Adjacencies window opens.
5.
Click on Done.
You return to the Configuration Manager window.
Parameter:
Enable
Default:
Enable
Options:
Enable | Disable
Function:
Instructions:
MIB Object ID:
4-42
Enables the router to ignore the static adjacency specified by the Ignore
Adjacent NSAP Address parameter.
Select Enable or Disable.
1.3.6.1.4.1.18.3.5.6.18.1.2
303535-A Rev 00
Editing OSI and TARP Parameters
Parameter:
Ignore Adjacent NSAP Address
Default:
None
Options:
Any valid NSAP address
Function:
Instructions:
MIB Object ID:
Specifies the adjacency that you want the router to ignore for purposes of
forwarding TARP packets.
Enter the address in hexadecimal format, including a 00 NSEL value at
the end of the NSAP address.
1.3.6.1.4.1.18.3.5.6.18.1.3
Deleting a TARP Ignore Adjacency Setting
To delete a TARP Ignore Adjacency setting:
1.
Select Protocols > OSI > Tarp > ADJ Ignore in the Configuration
Manager window (refer to Figure 4-1).
The TARP Ignore Adjacencies window opens.
2.
Click on the ignore adjacency NSAP address that you want to delete.
3.
Click on Delete.
4.
Click on Done.
You return to the Configuration Manager window.
Using the Technician Interface to Send TARP Requests
To request that the router originate a TARP packet, you use the Technician
Interface tarp pkt command. This command accepts the following arguments:
303535-A Rev 00
-t <type>
Specifies the type of TARP packet to send (1, 2, 4, or 5).
-i <TID>
TID to include in the request. Valid only for Type 1, Type 2, and Type 4
packets. The request is for the NSAP that maps to this TID.
-n <NSAP>
NSAP to include in the request. Valid only for Type 4 or Type 5 packets.
The request is for the TID that maps to this NSAP.
-f
Enables you to find an NSAP by going through a timer sequence (see
“Finding an NSAP” on page 1-31).
4-43
Configuring OSI Services
Using the Technician Interface to View TARP Data Caches
The following commands display TARP data caches:
tarp ldb
Displays the loop detection buffer entries.
tarp tdc
Displays the TARP data cache.
Deleting OSI from the Router
To delete the OSI routing protocol from all router circuits on which it is currently
enabled:
1.
Select Protocols > OSI > Delete OSI in the Configuration Manager
window (refer to Figure 4-1).
A window prompts:
Do you REALLY want to delete OSI?
2.
Click on OK.
The Configuration Manager window appears. OSI is no longer configured on
the router.
If you examine the Configuration Manager window, you see that the
connectors for circuits on which OSI was the only protocol enabled are no
longer highlighted. You must reconfigure the circuits for these connectors.
See Configuring and Managing Routers with Site Manager for details on
configuring circuits.
4-44
303535-A Rev 00
Appendix A
IP-to-X.121 Address Mapping for DDN
This appendix describes how to convert an IP address to an X.121 address if you
are configuring OSI over DDN X.25. You enter this converted address when you
add a static end system adjacency or a static external address adjacency (see
“Configuring Static End System Adjacencies” on page 4-21 and “Configuring
Static External Address Adjacencies” on page 4-25).
This appendix includes:
•
An overview of the IP address classes
•
Address conversion methods
•
Examples of address conversions
Note: The information in this appendix was taken from RFC 1236, IP to
X.121 Address Mapping.
303535-A Rev 00
A-1
Configuring OSI Services
IP-to-X.121 Address Mapping
This section defines a standard way of converting IP addresses to CCITT (now
ITU-T) X.121 addresses and is the recommended standard for use on the Internet,
specifically for the Defense Data Network (DDN). This section provides
information for the Internet community. It does not specify an Internet standard.
Overview
The Defense Communication Agency (DCA) has stated that “DDN specifies a
standard for mapping Class A addresses to X.121 addresses.” Additionally, DCA
has stated that Class B and C IP-to-X.121 address mapping standards “are the
responsibility of the administration of the Class B or C network in question.”
Therefore, there is no defined standard way of converting Class B and Class C IP
addresses to X.121 addresses.
This is an important issue because currently there is no way for administrators to
define IP-to-X.121 address mapping. Without a single standard, in a multivendor
network environment there is no assurance that devices using IP and DDN X.25
will communicate with each other.
The IP-to-X.121 address mapping of Class B and Class C IP addresses shall be
implemented as described below. This translation method is a direct expansion of
the algorithm described in MIL-STD: X.25, “DDN X.25 Host Interface
Specification.”* The translation method described in this appendix is totally
independent of IP subnetting and of any masking that may be used in support of IP
subnetting.
*MIL-STD: X.25 “Defense Data Network X.25 Host Interface Specification,” Defense Communications
Agency, BBN Communications Corporation, 1983 December, Volume 1 of the DDN Protocol Handbook
(NIC 50004). Also available on-line at the DDN NIC as NETINFO:X.25.DOC.
A-2
303535-A Rev 00
IP-to-X.121 Address Mapping for DDN
Background
All Internet hosts are assigned a four-octet (32-bit) address composed of a
network field and a local address field (also known as the REST field*); refer to
Figures A-1 through A-3. Two basic forms of addresses are provided: (1) physical
addresses, which correspond to the node number and DCE port number of the
node to which the DTE is connected and (2) logical addresses, which are mapped
transparently by DCE software into a corresponding physical network address.
To provide flexibility, Internet addresses are divided into three primary classes:
Class A, Class B, and Class C. These classes allow for a large number of small
and medium-sized networks. The network addresses used within the Internet in
Class A, B, and C networks are divided between Research, Defense, Government
(Non-Defense), and Commercial uses.
As described in the MIL-STD: X25, an IP address consists of the ASCII text
string representation of four decimal numbers separated by periods, corresponding
to the four octets of a 32-bit Internet address. The four decimal numbers are
referred to in this appendix as network (n), host (h), logical address (l), and
Interface Message Processor (IMP) or Packet Switch Node (PSN) (i). Thus, an
Internet address may be represented as n.h.l.i (Class A), n.n.h.i (Class B), or
n.n.n.hi (Class C). Each of these four numbers will have one, two, or three
decimal digits and will never have a value greater than 255. For example, in the
Class A IP address 26.9.0.122, n = 26, h = 9, l = 0, and i = 122.
*MIL-STD: 1777 “Internet Protocol,” 1983 August, Volume 1 of the DDN Protocol Handbook (NIC 50004).
303535-A Rev 00
A-3
Configuring OSI Services
The different classes of Internet addresses* are illustrated:
Class A:
•
The highest-order bit is set to 0.
•
7 bits define the network number.
•
24 bits define the local address.
•
This allows up to 126 Class A networks.
•
Networks 0 and 127 are reserved.
n
0
Network
7 bits
h
l
i
Local Address
24 bits (rest field)
OSI0024A
Figure A-1.
Class A Internet Address
*Kirkpatrick, S., M. Stahl, and M. Recker, Internet Numbers, RFC 1166, DDN NIC, July 1990.
A-4
303535-A Rev 00
IP-to-X.121 Address Mapping for DDN
Class B:
•
The two highest-order bits are set to 1-0.
•
14 bits define the network number.
•
16 bits define the local address.
•
This allows up to 16,384 Class B networks.
n
10
n
h
i
Network
Local Address
14 bits
16 bits (rest field)
OSI0025A
Figure A-2.
303535-A Rev 00
Class B Internet Address
A-5
Configuring OSI Services
Class C:
•
The three highest-order bits are set to 1-1-0.
•
21 bits define the network number.
•
8 bits define the local address.
•
This allows up to 2,097,152 Class C networks.
n
110
n
n
Network
21 bits
h
i
Local Address
8 bits (rest field)
OSI0026A
Figure A-3.
Class C Internet Address
The fourth type of address, Class D, is used as a multicast address. The four
highest-order bits are set to 1-1-1-0.
Note: No addresses are allowed with the four highest-order bits set to 1-1-1-1.
These addresses, called Class E, are reserved.
MIL-STD: X.25 states that “All DDN addresses are either twelve or fourteen BCD
(binary-coded decimal) digits in length.” The last two digits are referred to as the
subaddress and are not used on the DDN. The subaddress is carried across the
network without modification. Its presence is optional. Therefore, a DTE may
generate either twelve or fourteen BCD X.121 address, but must accept both 12
and 14 BCD X.121 addresses.
A-6
303535-A Rev 00
IP-to-X.121 Address Mapping for DDN
Standard IP to X.121 Address Mapping
This section describes the algorithm that you use to convert IP addresses to X.121
addresses. Note that h is always listed as greater than or less than the number 64.
This number is used to differentiate between PSN physical and logical host port
addresses. Note that at the time of this writing, the DDN does not make use of the
PSN’s logical addressing feature, which allows hosts to be addressed
independently of their physical point of attachment to the network.
The following describes Class A, B, and C IP address to DDN X.25 address
conversion.
Class A
To convert a Class A IP address to a DDN X.25 address:
For h < 64:
If the host field (h) is less than 64 (h < 64), the address corresponds to the
following DDN X.25 physical address:
ZZZZ F III HH ZZ (SS)
Where
•
ZZZZ = 0000
•
F = 0 because the address is a physical address
•
III is a three-decimal-digit representation of i, right-adjusted and padded
with leading zeros if required
•
HH is a two-decimal-digit representation of h, right-adjusted and padded
with leading zeros if required
•
ZZ = 00 is optional
•
(SS) is an optional subaddress field that is ignored in the DDN; this field
is either left out or filled with zeros
The address 26.9.0.122 corresponds to the DDN X.25 physical address
000001220900.
303535-A Rev 00
A-7
Configuring OSI Services
Example
IP Address
26.29.0.122
Format
n.h.l.i
DDN X.25 Physical
Address Format
ZZZZ
F
III
HH
ZZ
(SS)
X.121 Address
0000
0
122
29
00
00
For h > or = 64:
If the host field (h) is greater than or equal to 64, the address corresponds to
the following DDN X.25 physical address:
ZZZZ F RRRRR ZZ (SS)
Where
•
ZZZZ = 0000
•
F = 1 because the address is a logical address
•
RRRRR is a five-decimal-digit representation of the result r of the
calculation:
r = h* 256 + i (note that the decimal representation of r will always
require five digits)
•
ZZ = 00
•
(SS) is optional
The address 26.83.0.207 corresponds to the DDN X.25 logical address
000012145500.
A-8
303535-A Rev 00
IP-to-X.121 Address Mapping for DDN
Example
IP Address
26.80.0.122
Format
n.h.l.i
DDN X.25 Physical
Address Format
ZZZZ
F
RRRRR
ZZ
(SS)
X.121 Address
0000
1
20602
00
00
Where r = h * 256 + i
Class B
For Class B IP addresses, the h and i fields will always consist of 8 bits, each
taken from the REST field of the Internet address. The mapping follows the same
rules as Class A.
Examples
For h < 64:
IP Address
137.80.1.5
Format
n.n.h.i
DDN X.25 Physical
Address Format
ZZZZ
F
III
HH
ZZ
(SS)
X.121 Address
0000
0
005
01
00
00
For h > or = 64:
303535-A Rev 00
IP Address
137.80.75.2
Format
n.n.h.i
A-9
Configuring OSI Services
DDN X.25 Physical
Address Format
ZZZZ
1
RRRRR
ZZ
(SS)
X.121 Address
0000
1
19202
00
00
Where r = h * 256 + i
Class C
For Class C IP addresses, the h and i fields will always consist of
4 bits, each taken from the REST field of the Internet address. The mapping
follows the same rules as for Class A.
Example
For h < 64:
IP Address
192.33.50.19
Format
n.n.n.h.i
n.n.n.
h
i
.0001
.0011
1
3
subnet 1
submask 3
DDN X.25 Physical
Address Format
ZZZZ
F
III
HH
ZZ
(SS)
X.121 Address
0000
0
003
01
00
00
Note: The mapping of X.121 address for Class C networks for h > 64 is not
applicable because the h field can never exceed 15.
A-10
303535-A Rev 00
Appendix B
Site Manager Default Settings for OSI
This appendix contains the Site Manager default parameter settings for OSI and
TARP. Use the Configuration Manager to edit the Site Manager default settings.
Table B-1.
OSI Initial Configuration Parameters
Parameter
Default
Router ID (hex)
None
Area Address (hex)
0x490040
Table B-2.
OSI Global Parameters
Parameter
Default
Enable
Enable
Router Type
Level 1 and Level 2
Router ID (hex)
Router ID set at initial configuration
Load Balancing
False
Max # Area Addresses
63
Max # End Systems
512
Max # L1 Intermediate Systems
15
Max # L2 Intermediate Systems
63
Max # External Addresses
1
IS Checksum
Enable
L1 LSP Password
None
(continued)
303535-A Rev 00
B-1
Configuring OSI Services
Table B-2.
Parameter
Default
L2 LSP Password
None
Area Address (hex)
0x490040
Max # Learned End Systems
1024
Max # Learned L1
Intermediate Systems
64
Max # Learned L2
Intermediate Systems
64
CLNP Source Route Support
Enable
Table B-3.
OSI Interface Parameters
Parameter
Default
Enable
Enable
Routing Level
Level 1 and Level 2
L1 Default Metric
20
L2 Default Metric
20
L1 Designated Router Priority
64
L2 Designated Router Priority
64
IIH Hello Timer
8
ISH Hello Timer
30
ESH Configuration Timer
600
Circuit Password
None
IIH Hold Time Multiplier
3
ISH Hold Time Multiplier
3
Redirect Enable/Disable
Enable
Table B-4.
B-2
OSI Global Parameters (continued)
OSI Manual Area Address Parameter
Parameter
Default
Area Address
None
303535-A Rev 00
Site Manager Default Settings for OSI
Table B-5.
OSI Static End System Adjacency Parameters
Parameter
Default
Enable
Enable
ESID
None
SNPA
None
Table B-6.
OSI External Address Adjacency Parameters
Parameter
Default
Enable
Enable
External Address (hex)
None
SNPA
None
External Address Metric
20
Table B-7.
OSI Static Route Parameters
Parameter
Default
Enable
Enable
Destination NSAP Address (hex)
None
Route Type
None
Next Hop IS NSAP Address (hex)
None
Default Route Metric
20
Table B-8.
TARP Global Parameters
Parameter
Default
Enable
Enable
Target Identifier
None
Tarp Originate
Enable
(continued)
303535-A Rev 00
B-3
Configuring OSI Services
Table B-8.
Parameter
Default
Pkt Lifetime
25
Start Sequence Number
1
Tarp Data Cache
Enable
Tarp L2 Data Cache
Enable
Tarp T1 Timer
15
Tarp T2 Timer
25
Tarp T3 Timer
40
Table B-9.
TARP Circuit Parameters
Parameter
Default
Enable
Enable
Circuit Propagate Pkts
Enable
Circuit Originate Pkts
Enable
Table B-10.
TARP Static Adjacency Parameters
Parameter
Default
Enable
Enable
Static Adjacent NSAP Address
None
Table B-11.
B-4
TARP Global Parameters (continued)
TARP Ignore Adjacency Parameters
Parameter
Default
Enable
Enable
Ignore Adjacent NSAP Address
None
303535-A Rev 00
Index
A
administrative domain, 1-4
configuring OSI
considerations, 2-1
initial, 3-1
over ATM, 2-14
over frame relay, 2-8 to 2-14
ANSI, 1-6
configuring TARP, 3-1
area address
configuring, 3-4
described, 1-12
Connectionless Network Service Protocol, 1-4, 1-22,
4-11
acronyms, xv
address conversion, IP to X.121, A-1
addressing authority, 1-6
area address, manual
configuration example, 2-2
configuring, 4-19
deleting, 4-20
area partition, 2-5
Connectionless Network Protocol, 1-4
conventions, text, xiv
cost metric, 1-20, 4-14
D
areas, 1-4
defaults for OSI parameters, B-1
ATM, 2-14
B
Defense Data Network (DDN)
configuring OSI over X.25, 2-7
converting IP addresses to X.121 addresses, A-2
Broadband Integrated Services Digital Network
(B-ISDN), 2-14
designated router
described, 1-18
selection in OSI over frame relay, 2-14
broadcast mode, frame relay, 2-9
detection of loops for TARP, 1-33
domain specific part, 1-7
C
circuit costs, 1-20, 4-14
E
circuit modes, frame relay, 2-9
educational services, xvii
Circuit Originate Pkts parameter (TARP), 4-40
Enable parameter
Ignore Adjacency, 4-42
OSI global, 4-4
OSI interface, 4-13
TARP circuit, 4-39
TARP global, 4-35
TARP static adjacency, 4-41
Circuit Propagate Pkts parameter (TARP), 4-39
circuits, 2-14
class of Internet address, A-3
configuration reports, 1-23
configuration timer, 1-24
enabling OSI and TARP, 3-1
303535-A Rev 00
Index-1
End System to Intermediate System Routing Exchange
Protocol, 1-23 to 1-26
I
end systems, 1-3, 1-6
Ignore Adjacent NSAP Address parameter (TARP),
4-43
external domain, 2-7
external routing level, 2-7
implementation notes, 2-1
inter-domain routing, 1-28
F
forwarding router process, 1-21
frame relay, 2-8 to 2-14
G
global parameters
Area Address, 3-4, 4-10
CLNP Source Route Support, 4-11
editing, 4-3 to 4-11
Enable, 4-4
IS Checksum, 4-8
L1 LSP Password, 4-8
L2 LSP Password, 4-9
Load Balancing, 4-6
Max # Area Addresses, 4-6
Max # End Systems, 4-6
Max # External Addresses, 4-7
Max # L1 Intermediate Systems, 4-7
Max # L2 Intermediate Systems, 4-7
Max # Learned End Systems, 4-10
Max # Learned L1 Intermediate Systems, 4-11
Max # Learned L2 Intermediate Systems, 4-11
Router ID, 4-5
Router Type, 4-5
interface parameters
Circuit Password, 4-18
editing, 4-12 to 4-18
Enable, 4-13
ESH Configuration Time, 4-17
IIH Hello Timer, 4-17
IIH Hold Time Multiplier, 4-18
ISH Hello Timer, 4-17
ISH Hold Time Multiplier, 4-18
L1 Default Metric, 4-14
L1 Designated Router Priority, 4-15
L2 Default Metric, 4-15
L2 Designated Router Priority, 4-16
Redirect Enable/Disable, 4-19
Routing Level, 4-13
Intermediate System to Intermediate System
Intra-Domain Routing Exchange Protocol
inter-domain routing and, 1-28
intra-domain routing and, 1-26 to 1-27
intermediate systems, 2-9
Internet Protocol (IP), 2-7, A-2
intra-domain routing, 1-26
ISO standards, 1-2
L
Government OSI Protocol (GOSIP) Version 2.0, 1-2,
1-8
Level 1 routing, 1-5, 1-21, 2-6
GSA, 1-6
Level 2 routing, 1-21, 2-6
lifetime control function, 1-23
H
Hello packet exchange, 1-23
holding timer, 1-24
link state database, 1-20, 2-12, 4-8, 4-9
link state packet, 1-18 to 1-19
M
hub and spoke topology, frame relay, 2-12
hybrid circuit mode, frame relay, 2-10
Index-2
manual area address
configuration example, 2-2
configuring, 4-19
deleting, 4-20
303535-A Rev 00
mixed access circuit mode, frame relay, 2-11
N
neighbor detection, 2-14
network addressing domain, 1-6
NSAP address
area address, 1-12 to 1-13
authority and format identifier (AFI), 1-8
defined, 1-6
domain specific part (DSP), 1-7
finding with TARP, 1-31
initial domain identifier (IDI), 1-8
initial domain part (IDP), 1-7
O
OSI
accessing parameters, 4-2
addressing authority, 1-6
administrative domain, 1-4
areas, 1-4
basic reference model, 1-2
configuring over DDN X.25, 2-7, A-1
conversion algorithm for X.121 address, A-7 to
A-10
defaults, B-1
deleting from the router, 4-44
enabling on a circuit, 3-1
end systems, 1-6, 1-23
external domain, 1-28, 2-7
forwarding database, 1-21
intermediate systems, 1-23, 1-26
level 1 routing, 1-5, 1-21
level 2 routing, 1-6, 1-21
link state database, 1-20 to 1-21
link state packet (LSP), 1-18 to 1-19
lowest cost path, 1-20
manual area address
configuring, 4-19
described, 2-2
network addressing domain, 1-6
network organization, 1-3 to 1-16
network overview, 1-1
Network Service Access Point (NSAP) address, 1-6
to 1-15
over ATM, 2-14
303535-A Rev 00
OSI (continued)
over frame relay, 2-8 to 2-14
packet segmentation, 1-23
path costs, 4-14
reachable address prefixes, 1-28, 2-7
routing algorithm
decision process, 1-17, 1-20 to 1-21
forwarding process, 1-17, 1-21 to 1-22
update process, 1-17 to 1-20
routing domain, 1-4
routing protocols, 1-22 to 1-28
static end system adjacency
adding, 4-22
configuring, 4-21 to 4-25
copying, 4-24
deleting, 4-25
editing, 4-24
static external address adjacency
adding, 4-26
configuring, 4-25 to 4-30
copying, 4-29
deleting, 4-30
editing, 4-30
static external adjacencies, 2-7
static route
adding, 4-32
configuring, 4-31 to 4-35
copying, 4-34
deleting, 4-35
editing, 4-34
OSI parameters
editing global, 4-3 to 4-11
editing interface, 4-12 to 4-18
global
Area Address, 3-4, 4-10
CLNP Source Route Support, 4-11
Enable, 4-4
IS Checksum, 4-8
L1 LSP Password, 4-8
L2 LSP Password, 4-9
Load Balancing, 4-6
Max # Area Addresses, 4-6
Max # End Systems, 4-6
Max # External Addresses, 4-7
Max # L1 Intermediate Systems, 4-7
Max # L2 Intermediate Systems, 4-7
Max # Learned End Systems, 4-10
Max # Learned L1 Intermediate Systems, 4-11
Index-3
OSI parameters (continued)
global (continued)
Max # Learned L2 Intermediate Systems, 4-11
Router ID, 4-5
Router Type, 4-5
interface
Circuit Password, 4-18
Enable, 4-13
ESH Configuration Time, 4-17
IIH Hello Timer, 4-17
IIH Hold Time Multiplier, 4-18
ISH Hello Timer, 4-17
ISH Hold Time Multiplier, 4-18
L1 Default Metric, 4-14
L1 Designated Router Priority, 4-15
L2 Default Metric, 4-15
L2 Designated Router Priority, 4-16
Redirect Enable/Disable, 4-19
Routing Level, 4-13
static end system adjacency
Enable, 4-23
ESID, 4-23
SNPA, 4-23
static external address adjacency
Enable, 4-27
External Address, 4-28
External Address Metric, 4-29
SNPA, 4-28
static route
Default Route Metric, 4-34
Destination NSAP Address, 4-33
Enable, 4-32
Next Hop IS NSAP Address, 4-33
Route Type, 4-33
P
partial mesh topology, frame relay, 2-12
partition area, 2-5
password, 4-8, 4-9, 4-18
path costs, 1-20, 4-14
Pkt Lifetime parameter (TARP), 4-36
point-to-point mode, frame relay, 2-9
Port Number parameter, 4-20
product support, xvii
pseudonode, 1-18
Index-4
publications, Bay Networks, xvii
R
record route options, 1-22
redirection, 1-24, 2-13, 4-19
relative cost, 1-20
Router ID parameter, 3-3
routing domain, 1-4
routing process, 1-21
routing protocols, 1-22
S
sending TARP requests, 4-43
shortest path first algorithm, 1-20
source routing, 1-22
Start Sequence Number parameter (TARP), 4-37
Static Adjacent NSAP Address parameter (TARP),
4-41
static end system adjacency
adding, 4-22
configuring, 4-21 to 4-25
copying, 4-24
deleting, 4-25
editing, 4-24
static end system adjacency parameters
Enable, 4-23
ESID, 4-23
SNPA, 4-23
static external address adjacency
adding, 4-26
configuring, 2-7, 4-25 to 4-30
copying, 4-29
deleting, 4-30
editing, 4-30
static external address adjacency parameters
Enable, 4-27
External Address, 4-28
External Address Metric, 4-29
SNPA, 2-7, 4-28
static route
adding, 4-32
configuring, 4-31 to 4-35
303535-A Rev 00
static route (continued)
copying, 4-34
deleting, 4-35
editing, 4-34
static route parameters
Default Route Metric, 4-34
Destination NSAP Address, 4-33
Enable, 4-32
Next Hop IS NSAP Address, 4-33
Route Type, 4-33
support, Bay Networks, xvii
T
Tarp T1 Timer parameter, 4-38
Tarp T2 Timer parameter, 4-38
Tarp T3 Timer parameter, 4-38
TARP, enabling, 3-1
technical publications, xvii
technical support, xvii
text conventions, xiv
TID (target identifier)
defined, 1-28
finding using TARP, 1-31
TID Address Resolution Protocol (TARP), 1-28
timers, 1-24, 4-17
target identifier (TID)
defined, 1-28
finding using TARP, 1-31
topology
and area partitions, 2-6
frame relay, 2-11
Target Identifier parameter (TARP), 3-5, 4-36
total path cost, 1-20
TARP circuit parameters
Circuit Originate Pkts, 4-40
Circuit Propagate Pkts, 4-39
Enable, 4-39
TARP circuits, enabling or disabling, 4-39
Tarp Data Cache parameter, 4-37
TARP global parameters
editing, 4-35
Enable, 4-35
Pkt Lifetime, 4-36
Start Sequence Number, 4-37
Target Identifier, 4-36
Tarp Data Cache, 4-37
Tarp L2 Data Cache, 4-37
Tarp Originate, 4-36
Tarp T1 Timer, 4-38
Tarp T2 Timer, 4-38
Tarp T3 Timer, 4-38
V
viewing TARP data caches, 4-44
X
X.121 address conversion algorithm, A-7 to A-10
X.25 network, 2-7
Tarp L2 Data Cache parameter, 4-37
Tarp Originate parameter, 4-36
TARP packet fields, 1-30
TARP packet types, 1-29
TARP requests
originating, 1-31, 4-43
receiving, 1-32
TARP static adjacencies, adding or deleting, 4-40
303535-A Rev 00
Index-5