1
BCM Rls 6.0
CallPilot Manager & Mailboxes
Task Based Guide
CallPilot Manager & Mailboxes
Copyright © 2010 Avaya Inc.
All Rights Reserved.
Notices
While reasonable efforts have been made to ensure that the information in this document is complete and accurate
at the time of printing, Avaya assumes no liability for any errors. Avaya reserves the right to make changes and
corrections to the information in this document without the obligation to notify any person or organization of such
changes.
Documentation disclaimer
Avaya shall not be responsible for any modifications, additions, or deletions to the original published version of
this documentation unless such modifications, additions, or deletions were performed by Avaya. End User agree to
indemnify and hold harmless Avaya, Avaya’s agents, servants and employees against all claims, lawsuits, demands
and judgments arising out of, or in connection with, subsequent modifications, additions or deletions to this
documentation, to the extent made by End User.
Link disclaimer
Avaya is not responsible for the contents or reliability of any linked Web sites referenced within this site or
documentation(s) provided by Avaya. Avaya is not responsible for the accuracy of any information, statement or
content provided on these sites and does not necessarily endorse the products, services, or information described or
offered within them. Avaya does not guarantee that these links will work all the time and has no control over the
availability of the linked pages.
Warranty
Avaya provides a limited warranty on this product. Refer to your sales agreement to establish the terms of the
limited warranty. In addition, Avaya’s standard warranty language, as well as information regarding support for
this product, while under warranty, is available to Avaya customers and other parties through the Avaya Support
Web site: http://www.avaya.com/support
Please note that if you acquired the product from an authorized reseller, the warranty is provided to you by said
reseller and not by Avaya.
Licenses
THE SOFTWARE LICENSE TERMS AVAILABLE ON THE AVAYA WEBSITE,
HTTP://SUPPORT.AVAYA.COM/LICENSEINFO/ ARE APPLICABLE TO ANYONE WHO DOWNLOADS,
USES AND/OR INSTALLS AVAYA SOFTWARE, PURCHASED FROM AVAYA INC., ANY AVAYA
AFFILIATE, OR AN AUTHORIZED AVAYA RESELLER (AS APPLICABLE) UNDER A COMMERCIAL
AGREEMENT WITH AVAYA OR AN AUTHORIZED AVAYA RESELLER. UNLESS OTHERWISE
AGREED TO BY AVAYA IN WRITING, AVAYA DOES NOT EXTEND THIS LICENSE IF THE
SOFTWARE WAS OBTAINED FROM ANYONE OTHER THAN AVAYA, AN AVAYA AFFILIATE OR AN
AVAYA AUTHORIZED RESELLER, AND AVAYA RESERVES THE RIGHT TO TAKE LEGAL ACTION
AGAINST YOU AND ANYONE ELSE USING OR SELLING THE SOFTWARE WITHOUT A LICENSE. BY
INSTALLING, DOWNLOADING OR USING THE SOFTWARE, OR AUTHORIZING OTHERS TO DO SO,
YOU, ON BEHALF OF YOURSELF AND THE ENTITY FOR WHOM YOU ARE INSTALLING,
DOWNLOADING OR USING THE SOFTWARE (HEREINAFTER REFERRED TO INTERCHANGEABLY
AS "YOU" AND "END USER"), AGREE TO THESE TERMS AND CONDITIONS AND CREATE A
BINDING CONTRACT BETWEEN YOU AND AVAYA INC. OR THE APPLICABLE AVAYA AFFILIATE
("AVAYA").
Copyright
Except where expressly stated otherwise, no use should be made of the Documentation(s) and Product(s) provided
by Avaya. All content in this documentation(s) and the product(s) provided by Avaya including the selection,
arrangement and design of the content is owned either by Avaya or its licensors and is protected by copyright and
other intellectual property laws including the sui generis rights relating to the protection of databases. You may not
modify, copy, reproduce, republish, upload, post, transmit or distribute in any way any content, in whole or in part,
including any code and software. Unauthorized reproduction, transmission, dissemination, storage, and or use
without the express written consent of Avaya can be a criminal, as well as a civil offense under the applicable law.
Third Party Components
Certain software programs or portions thereof included in the Product may contain software distributed under third
party agreements ("Third Party Components"), which may contain terms that expand or limit rights to use certain
portions of the Product ("Third Party Terms"). Information regarding distributed Linux OS source code (for those
Products that have distributed the Linux OS source code), and identifying the copyright holders of the Third Party
Components and the Third Party Terms that apply to them is available on the Avaya Support Web site:
http://support.avaya.com/Copyright.
Trademarks
The trademarks, logos and service marks ("Marks") displayed in this site, the documentation(s) and product(s)
provided by Avaya are the registered or unregistered Marks of Avaya, its affiliates, or other third parties. Users
are not permitted to use such Marks without prior written consent from Avaya or such third party which may own
the Mark. Nothing contained in this site, the documentation(s) and product(s) should be construed as granting, by
implication, estoppel, or otherwise, any license or right in and to the Marks without the express written permission
of Avaya or the applicable third party. Avaya is a registered trademark of Avaya Inc. All non-Avaya trademarks
are the property of their respective owners.
2
NN40011-016 Issue 1.2 BCM Rls 6.0
CallPilot Manager & Mailboxes
Downloading documents
For the most current versions of documentation, see the Avaya Support. Web site: http://www.avaya.com/support
Contact Avaya Support
Avaya provides a telephone number for you to use to report problems or to ask questions about your product. The
support telephone number is 1-800-242-2121 in the United States. For additional support telephone numbers, see
the Avaya Web site: http://www.avaya.com/support
Copyright © 2010 ITEL, All Rights Reserved
The copyright in the material belongs to ITEL and no part of the material may
be reproduced in any form without the prior written permission of a duly
authorised representative of ITEL.
NN40011-016 Issue 1.2 BCM Rls 6.0
3
CallPilot Manager & Mailboxes
Table of Contents
CallPilot Manager & Mailboxes ........................................ 6
Overview .......................................................................................... 6
Required Information ....................................................................... 6
PC Requirements ............................................................................ 7
Flow Charts ...................................................................................... 8
CallPilot Initialisation ..........................................................................................8
CallPilot Manager System-Wide Settings ..........................................................8
Basic Mailbox Set Up .........................................................................................9
Quick Install Wizard ....................................................................... 10
CallPilot Quick Install Settings .........................................................................14
Accessing CallPilot Manager via Element Manager ...................... 15
Accessing CallPilot Manager from Internet Explorer ...................... 19
System timeout .............................................................................. 21
CallPilot Manager Interface............................................................ 21
System Properties............................................................................................22
System Properties Settings .............................................................................24
Class of Service ............................................................................. 26
Editing a Class of Service ................................................................................26
Class of Service Settings .................................................................................29
Installing Mailboxes ....................................................................... 30
Adding a Subscriber Mailbox ......................................................... 30
Subscriber Mailbox Settings ............................................................................32
Recording Mailbox Names using CallPilot Manager ...................... 36
Adding Many Mailboxes ................................................................. 37
Add Many Mailboxes Settings .........................................................................38
Initialising a Mailbox ....................................................................... 39
Recording Primary or Alternate Greetings ..................................... 40
Viewing and Changing Existing Mailboxes .................................... 40
Other Mailbox Types ...................................................................... 41
System Administrator Mailbox .........................................................................41
General Delivery Mailbox .................................................................................41
Guest Mailboxes ..............................................................................................42
4
NN40011-016 Issue 1.2 BCM Rls 6.0
CallPilot Manager & Mailboxes
Information Mailboxes ......................................................................................42
Creating an Information Mailbox ......................................................................43
Advanced Mailbox Features ........................................... 45
Selecting Primary or Alternate Greetings ....................................... 45
Personal Greetings ........................................................................ 46
Assigning a Target Attendant......................................................... 47
Off-Premise Notification ................................................................. 47
Outbound Transfer ......................................................................... 49
Group Lists .................................................................................... 50
Fax Answering ............................................................................... 54
Fax Properties Settings ...................................................................................56
Dialling Translation ........................................................................ 56
Examples of Dialling Translation Table Entries ...............................................57
Dialing Translation Properties ..........................................................................57
Dialling Translation Table ................................................................................60
Mailbox Manager ........................................................................... 62
Change Password............................................................................................66
Off Premise Notification ...................................................................................66
Outbound Transfer ...........................................................................................69
Message Forwarding .......................................................................................70
Message Forwarding Settings .........................................................................70
Greetings and Spoken Name ..........................................................................72
Personal Attendant ..........................................................................................74
Fax ...................................................................................................................74
Call Forward .....................................................................................................75
Find Me/Follow Me...........................................................................................75
Silent Record a Call ....................................................................... 76
Silent Record a Call and the Mailbox Class of Service. ..................................77
Adding an External Network Location for the Silent Record a Call Facility. ....80
Voicemail Feature Codes............................................................... 83
Avaya Documentation Links .......................................... 84
NN40011-016 Issue 1.2 BCM Rls 6.0
5
CallPilot Manager & Mailboxes
CallPilot Manager & Mailboxes
Overview
CallPilot Manager is a web-based application that you use to set up and
administer CallPilot applications.
CallPilot standard features include:
Voicemail
Automated Attendant
Custom Call Routing (CCR)
Fax Answering
CallPilot options include:
Contact Center
Fax
Unified Messaging
Message Networking
This guide leads you through the basic set up, administration, and operation
of CallPilot Manager and the creation of CallPilot Mailboxes (Voicemail). The
Fax Answering function is also described in this guide.
There are separate guides for Automated Attendant, Custom Call Routing
(CCR), Contact Center, Fax Messaging, Unified Messaging and Message
Networking.
Required Information
Before commencing installation it would be useful to determine Voicemail
requirements. Useful information would be:
6
Number of Subscriber mailboxes required, and which extensions they
will be assigned to.
Number of Guest mailboxes required.
Number of Information mailboxes required.
Whether or not the General Delivery mailbox will be used.
Class of Service requirements for mailboxes users.
Any viable Group List application.
Requirement for Fax Answering.
NN40011-016 Issue 1.2 BCM Rls 6.0
CallPilot Manager & Mailboxes
PC Requirements
Computer requirements
The computer you use to run CallPilot Manager must have:
Windows XP Professional SP3, Windows Vista Business, Ultimate, or
Enterprise (32-bit or 64 bit versions), or Windows 7.
64 MB RAM, 10 MB disk space minimum.
screen resolution of 1024 X 768 pixels.
Browser requirements
CallPilot Manager supports these browsers:
Internet Explorer 6.0, 7.0, and 8.0 (set IE to Check for newer versions:
every visit to the page)
Note: CallPilot Manager is designed specifically for Internet Explorer use.
Some formatting may be lost or degraded if using other browsers e.g. Firefox.
NN40011-016 Issue 1.2 BCM Rls 6.0
7
CallPilot Manager & Mailboxes
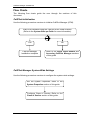
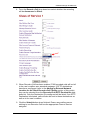
Flow Charts
The following flow charts guide the user through the sections of this
document.
CallPilot Initialisation
Use the following procedure overview to initialise CallPilot Manager (CPM).
Was CPM initialised using the CallPilot Quick Install Wizard?
(Refer to the System Start-up Guide for more information).
Yes
No
CallPilot Manager
Installation complete
Refer to the Quick Install Wizard and
Accessing CallPilot Manager sections
of this guide
CallPilot Manager System-Wide Settings
Use the following procedure overview to configure the system-wide settings.
Set the System Properties: Refer to the
System Properties section of this guide.
Configure Class of Service: Refer to the
Class of Service section of this guide.
8
NN40011-016 Issue 1.2 BCM Rls 6.0
CallPilot Manager & Mailboxes
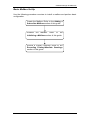
Basic Mailbox Set Up
Use the following procedure overview to install a mailbox and perform basic
configuration.
Create the Mailbox: Refer to the Adding a
Subscriber Mailbox section of this guide.
Initialise the Mailbox: Refer to the
Initialising a Mailbox section of this guide.
Record a Primary Greeting: Refer to the
Recording Primary/Alternate Greetings
section of this guide.
NN40011-016 Issue 1.2 BCM Rls 6.0
9
CallPilot Manager & Mailboxes
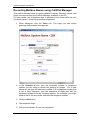
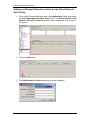
Quick Install Wizard
The Quick Install Wizard appears the first time that CallPilot Manager is
accessed on the Business Communications Manager (BCM). The primary
function of the Quick Install Wizard is to set the region.
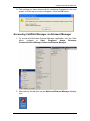
1. To access the Business Element Manager application from the Start
Menu,
navigate
to
Start,
Programs,
Avaya,
Business
Communications Manager, Business Element Manager.
2. Alternatively, double-click on the Business Element Manager desktop
icon.
10
NN40011-016 Issue 1.2 BCM Rls 6.0
CallPilot Manager & Mailboxes
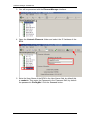
3. You will be presented with the Element Manager interface.
4. Open the Network Elements folder and select the IP Address of the
BCM.
5. Enter the User Name of the BCM in the User Name field, by default this
is nnadmin. Then enter the Password in the Password field, by default
the password is PlsChgMe!. Click the Connect button.
NN40011-016 Issue 1.2 BCM Rls 6.0
11
CallPilot Manager & Mailboxes
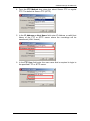
6. A warning screen will appear, read the warning and click OK.
7. You will be presented with the Element Manager interface.
12
NN40011-016 Issue 1.2 BCM Rls 6.0
CallPilot Manager & Mailboxes
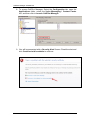
8. To access the Quick Install Wizard for CallPilot Manager: Select the
Configuration tab, open the Applications folder, select the Voice
Messaging Contact Center link, and then click Launch CallPilot
Manager.
9. You will be presented with a Security Alert Screen. Read the alert and
click Continue to this website to continue.
NN40011-016 Issue 1.2 BCM Rls 6.0
13
CallPilot Manager & Mailboxes
10. On Launching CallPilot Manager for the first time through the Element
Manager Interface the CallPilot wizard will appear.
11. Once open, configure the settings as required:
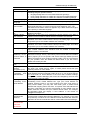
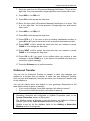
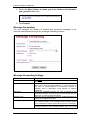
CallPilot Quick Install Settings
Attribute
Attendant DN
PrimaryUI Style
Primary Language
From line
To Line
Number of rings
Description
The extension number of the Operator or the Attendant assigned to CallPilot
The mailbox user interface to be displayed on the handsets. If you select
NVM, the mailbox user interface uses Norstar Voice Mail voice and text
prompts. If you select CallPilot, the mailbox user interface uses CallPilot voice
and text prompts.
The language used as the primary language for the mailboxes
The line number of the first line in the range of lines you want Auto Attendant
to answer
The line number of the last line in the range of lines you want Auto Attendant
to answer.
The number of rings you want Auto Attendant to wait before answering lines.
Note: It is recommended that you DO NOT assign lines to the Auto-Attendant
at this stage. Refer to the CallPilot Auto-Attendant Guide for instruction on
how to configure the Auto-Attendant.
12. Click the Install button.
14
NN40011-016 Issue 1.2 BCM Rls 6.0
CallPilot Manager & Mailboxes
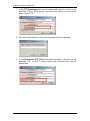
13. The settings you have entered will be verified as illustrated on the next
screen, and the log on screen will appear. Click the OK button.
Accessing CallPilot Manager via Element Manager
1. To access the Business Element Manager application from the Start
Menu,
navigate
to
Start,
Programs,
Avaya,
Business
Communications Manager, Business Element Manager.
2. Alternatively, double-click on the Business Element Manager desktop
icon.
NN40011-016 Issue 1.2 BCM Rls 6.0
15
CallPilot Manager & Mailboxes
3. You will be presented with the Element Manager interface.
4. Open the Network Elements folder and select the IP Address of the
BCM.
5. Enter the User Name of the BCM in the User Name field, by default this
is nnadmin. Then enter the Password in the Password field, by default
the password is PlsChgMe!. Click the Connect button.
16
NN40011-016 Issue 1.2 BCM Rls 6.0
CallPilot Manager & Mailboxes
6. A warning screen will appear, read the warning and click OK.
7. You will be presented with the Element Manager interface.
NN40011-016 Issue 1.2 BCM Rls 6.0
17
CallPilot Manager & Mailboxes
8. To access CallPilot Manager: Select the Configuration tab, open the
Applications folder, select the Voice Messaging / Contact Center
link, and then click to Launch CallPilot Manager.
9. You will be presented with a Security Alert Screen. Read the alert and
click Continue to this website to continue.
18
NN40011-016 Issue 1.2 BCM Rls 6.0
CallPilot Manager & Mailboxes
10. The Main Menu of CallPilot Manager will be launched.
Accessing CallPilot Manager from Internet Explorer
CallPilot Manager can also be accessed directly from Internet Explorer. This
method of access is an alternative if you cannot gain access via Element
Manager.
1. Open Internet Explorer. In the address bar enter http://<IP Address of
BCM>/CallPilotManager.
2. If you are presented with the Certificate Error window, click Continue
to this website (not recommended).
NN40011-016 Issue 1.2 BCM Rls 6.0
19
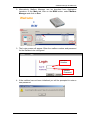
CallPilot Manager & Mailboxes
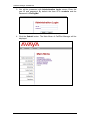
3. You will be presented with Administration Login screen. Enter the
user ID and password. By default the User ID is nnadmin and the
Password is PlsChgMe!.
4. Click the Submit button. The Main Menu of CallPilot Manager will be
displayed.
20
NN40011-016 Issue 1.2 BCM Rls 6.0
CallPilot Manager & Mailboxes
System timeout
A CallPilot Manager session times out after 10 minutes of inactivity. This is a
security feature that prevents unauthorized access to the system.
If your session times out, the login page appears and a message that says
that the session has timed out. You must log on to continue programming
CallPilot.
If the system times out while you are working on a page, any settings that you
have not entered on the system by pressing the Submit button are not
entered. You must log on to CallPilot Manager and re-enter this programming.
The default CallPilot Managers user id is: nnadmin default password
PlsChgMe!
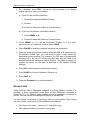
CallPilot Manager Interface
Returns to main
Menu (shown)
Opens Online Help
Logout of
CallPilot
Manager
Click a link to
display its contents
and options in the
Center frame
NN40011-016 Issue 1.2 BCM Rls 6.0
21
CallPilot Manager & Mailboxes
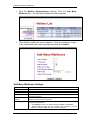
System Properties
Accessing System Properties allows you to set the system-wide CallPilot
Voicemail settings.
1. From the Main menu above, click the System Properties link. The
System Properties page appears. The Voice Mail version is displayed.
22
NN40011-016 Issue 1.2 BCM Rls 6.0
CallPilot Manager & Mailboxes
2. Configure the System Properties as required, and click Submit.
NN40011-016 Issue 1.2 BCM Rls 6.0
23
CallPilot Manager & Mailboxes
System Properties Settings
Attribute
Voice Mail Version
Max Outcalling
Channels
Enable Voice Mail
Enable Group List
Enable Trivial
Password
Checking
Group List Leading
Digit
Minimum Message
Length
Enable External
Initialisation
Make Directory
Available
Enable General
Delivery Mailbox
Enable Redirect
DN
Enable Network
Transfers
24
Description
The Voicemail Version of the CallPilot Manager system
The maximum number of channels used for calls generated by voicemail,
e.g. Off-Premise Notification, Outbound Transfer, & Mailbox Reply feature.
Do not type a value that is higher than 50% of your available channels.
The limit ensures that there are enough channels to accept incoming calls
from outside callers and subscribers. The default number of voice
channels assigned for outcalling is 1. If you have Multimedia Contact
Center installed on your system, set the Max Outcalling Channels to a
value higher than 1. Also, to ensure that the Outcalling Channels do not
consume all the available voice ports, set the minimum number of voice
ports to a number higher than the Outcalling Channels.
If you enable voicemail, callers who call an extension that does not answer
or is busy transfers directly to the extension’s mailbox. If you clear the
Enable Voice Mail check box:
External Callers cannot leave messages in mailboxes. Callers are
returned to the Automated Attendant to make another choice.
Callers can leave messages through Custom Call Routing, Feature
980, and Feature 986.
Callers can send and receive messages using Feature 981.
Subscribers can record and send messages from their mailbox to other
CallPilot mailboxes
If you clear the Enable Group List check box, you cannot set up Group
Lists and need not reserve a digit in your numbering plan for the Group
List Leading Digit.
Select the Enable Trivial Password Checking check box to enable Trivial
Password Checking. Trivial password checking prevents unauthorized
login to mailboxes. The feature does not allow a mailbox subscriber to
have a password that is considered trivial.
This digit is used as the prefix for Group Lists during addressing. You
cannot create mailboxes with numbers that start with this digit. The default
setting for the Group List Leading Digit is 9. For example, if you assign as
9 the Group List leading digit, 901 to 999 is your range for Group Lists.
In the Minimum Message Length box type a value between 500-3000
milliseconds (0.5 seconds to 3 seconds) for the shortest allowable
message length. The default is 3 seconds (3000 milliseconds).
The default for this check box is not selected. If you do not enable external
initialisation subscribers can initialise their mailboxes only from a local
extension. This prevents unauthorized access to mailboxes.
If you clear the check box, access to the Company Directory is removed
from the Automated Attendant.
Default is selected. If you clear the check box, callers who cannot transfer
to an attendant are returned to the Auto Attendant or disconnected,
according to the Return to AA setting.
If you do not regularly check the General Delivery Mailbox, clear the check
box.
If redirect DN is enabled, voicemail uses the original dialled number when
it receives a redirected call. A call is redirected if a set that is call
forwarded on busy to another location does not answer the call. The call
returns to the original site for call answering. Select this check box only on
the advice of support personnel.
The Enable Network Transfers check box is not selected by default. If you
do not select this check box CallPilot will transfer only local extensions. If
you use a Centralized Auto Attendant on an MCDN network, you can
enable network transfers to local and remote extensions on your system.
Examples of transfers that are when callers enter an extension while in the
Auto Attendant or press 0 during a call answering session
NN40011-016 Issue 1.2 BCM Rls 6.0
CallPilot Manager & Mailboxes
Attribute
Enable Bilingual
Primary Language
Alternate
Language
Canadian
Pronunciation
Directory Search
By
Enable CallPilot
User Interface
Name Prefix
Special Prefix
Primary UI Style
Outgoing
SMTP
Mail/Proxy server,
Account Name, &
Password
Outgoing
SMTP
Port
Outgoing
SMTP
requires
encryption (TLS)
Enable Message
Forwarding User
Administration
Message
Forwarding “From”
email address
Maximum Find
Me/Follow Me
Sessions
Description
If you clear this check box alternate language prompts are not available.
Disabling bilingual operation affects:
language designations for Automated Attendant greetings
voice prompt selections for callers who use the Automated Attendant
voice prompt selections for callers who transfer to mailbox greetings
Prompting occurs in this language.
The alternate language cannot be the same as the primary language.
Select the Canadian Pronunciation check box if you want voice prompts
that include the letter "z" to be pronounced "zed" instead of "zee". The
Canadian Pronunciation check box appears only if North American English
is the primary or alternate language.
Allows Directory searching by select first name, last name or both. The
default is last name.
Select this if you want to let subscribers choose Norstar Voice Mail or
CallPilot as their mailbox handset interface. Default is not selected.
The default is 11. If CallPilot User Interface is enabled, this value must be
specified, and cannot conflict with the Group List leading digit. This value
is ignored if you do not enable CallPilot User Interface.
The default is 19. If CallPilot User Interface is enabled, this value must be
specified, and cannot conflict with the Group List leading digit. This value
is ignored if you do not enable CallPilot User Interface.
Select NVM or CallPilot as the primary User Interface (mailbox options)
style. Enable CallPilot User Interface must be enabled to allow the
CallPilot option to be selected
Enter the IP address of the Email server on your network (e.g. your
Microsoft Exchange Server). Alternatively some Internet Service Providers
(ISP’s) require you to use specific mail servers with login details (Account
Name & Password) when sending outgoing emails. If this is a requirement
for your provider, enter the details into these fields. If you are unsure,
please check with your ISP.
This defaults to port 25, but you can change this by typing into this field.
This option allows a level of security between the entered mail server, and
the client (your mobile device). Again, if unsure please check with your
network provider for more details.
This option is selected by default. This allows local users to change the
email address that the forwarded emails will go to. If you uncheck this box
you must enter an email address in the local user’s mailbox settings,
configured in Mailbox Manager (this cannot be changed by the local user
and becomes a read only field).
This is optional, and blank by default. If required, in the Message
Forwarding “From” E-Mail Address box, type your e-mail address for
sending outgoing Email. If you have entered your ISP’s mail server or
proxy server details, you may also have been given a default email
address that outgoing mail is sent from. If required, enter that address into
this field. If left blank, the service will generate an entry based upon the
BCM’s extension number and your network domain name. For example,
all forwarded email will display a sent address in the format of:
[email protected]
The Maximum Find Me/Follow Me Sessions affects the amount of Virtual
Terminal DNs created within Element Manager. For example, if the value
20 (sessions) is entered in to the Maximum Find Me/Follow Me Sessions
field then 20 Virtual Terminal DNs will be created within Element Manager.
Disable Find
Me/Follow Me
FMC user
passwords
NN40011-016 Issue 1.2 BCM Rls 6.0
25
CallPilot Manager & Mailboxes
Class of Service
Class of Service (COS) values reduce the amount of programming required
when you add a mailbox. Instead of entering values for several features, you
can select the COS appropriate for a particular mailbox.
Class of Service settings control the features and functions a mailbox owner
has access to. For example, you can define; how long messages remain in
mailboxes, whether a mailbox owner can use Outbound Transfer, at what
interval mailbox passwords have to be changed.
There are 16 Class of Service templates (1-16) available. These tables have
pre-set values, however you can change individual values within these tables
to meet the needs of your company. Each mailbox will have a Class of
Service template assigned when it is created, which can be changed at any
time. Different mailbox users on the same system can have different Class of
Service settings.
Editing a Class of Service
1. Click the Mailbox Administration heading. Click the Class of Service
link.
26
NN40011-016 Issue 1.2 BCM Rls 6.0
CallPilot Manager & Mailboxes
2. The Class of Service page appears. Click the Change link for the Class
of Service you want to change.
NN40011-016 Issue 1.2 BCM Rls 6.0
27
CallPilot Manager & Mailboxes
3. The Class of Service page appears for the Class of Service you
selected. Configure the Class of Service as required.
4. Click the Submit button.
28
NN40011-016 Issue 1.2 BCM Rls 6.0
CallPilot Manager & Mailboxes
Class of Service Settings
Attribute
Name
Max Mailbox Msg Time
Max Message Length
Message Retention Period
Max Greeting Length
Enable Off-premise Message
Notification/Remote Notification
Retry Intervals
Max Number of Attempts
Enable Outbound Transfer
Max Incorrect Password
Attempts
Password Expiry
Enable Networking
Enable Personal Target
Attendant
Record-a-call
Recorded Call SFTP Destination
Prompt Language
Description
The name of the Class of Service, for example. Admin.
The name and the Class of Service number are shown
when you select a Class of Service during mailbox
administration. The name can be a maximum of 16
alphanumeric characters and cannot contain blank
spaces.
The total message time available to a mailbox. The
maximum message time is 180 minutes. Mailboxes have
a Never Full mailbox feature that lets a caller leave a
message in a “full” mailbox. The message is stored in the
mailbox, but cannot be accessed until a saved message
is deleted.
The maximum length of an incoming message. Message
length is from 1 to 60 minutes.
The number of day’s messages is saved in a mailbox.
Message retention period is from one to 365 days or 0 =
indefinitely.
The maximum length of a mailbox greeting. Greeting
length is from 1 to 30 minutes.
Redirects messages to another extension, telephone
number or pager. Dialling restrictions that apply to outdial
lines apply to Off-premise Message Notification.
For Off-premise Message Notification, the minutes
between attempts to notify the recipient of a new or
urgent message. The retry interval is from 1 to 120
minutes.
For Off-premise Message Notification, the number of
attempts the system makes to notify the recipient of a
new or urgent message. The number of attempts is from
1 to 20.
Lets a caller who reaches a mailbox transfer to an
external telephone number or an extension.
The maximum number of incorrect password attempts
before a mailbox owner is locked out of their mailbox. The
incorrect password attempts are from 4 to 20.
The maximum length of time a mailbox password is
active. The password expiry is from 1 to 365 days or 0 =
never expires.
If the Message Networking option is installed, lets callers
send messages to different mailboxes at various sites on
a communication network.
Lets subscribers set up a Personal Target Attendant. If
not, callers are directed to the Target Attendant that is
specified in the Greeting Table.
Lets a subscriber record calls using Record A Call
(Feature 989). If your jurisdiction does not permit this
feature set this setting to No for all Classes of Service.
Records a call and stores it in your mailbox. This feature
also stores the message in a network location if one is
specified in the Class of Service to which the subscriber
mailbox belongs or in the agent's parameters
This option appears only if Intelligent Contact Center
(ICC) keycode is installed. The administrator can select
an SFTP destination previously configured under Voice
Messaging
CallPilot is available in two languages. If you select
bilingual operation, Classes of Service 1, 3, 5, 7, 9, 11,
NN40011-016 Issue 1.2 BCM Rls 6.0
29
CallPilot Manager & Mailboxes
Attribute
User Interface Style
Enable Message Forwarding
Enable Find Me/Follow Me
Enable Find Me/Follow Me User
Configuration
Max Find Me/Follow Me Calls
per set
Description
13, 15 use the Primary Language, and Classes of Service
2, 4, 6, 8, 10, 12, 14, 16 use the Alternate Language.
The user interface used for the mailbox. There are two
mailbox UI choices: Norstar Voice Mail (NVM) and
CallPilot (CP). This option determines have a mailbox
owner navigates their mailbox options.
Tick this box to enable the Message Forwarding feature in
this
Tick this box to enable the Find Me/Follow Me feature in
this Class of Service entry.
This setting, if enabled, allows FM/FM users to configure
their FM/FM settings in Mailbox Manager. If disabled, an
administrator will have to configure settings in CallPilot
Manager.
The quantity of simultaneous calls that the Find Me
\Follow Me feature will support from an extension.
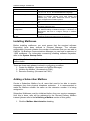
Installing Mailboxes
Before installing mailboxes, you must ensure that the required software
Keycode(s) have been entered in Element Manager. The software
authorization Keycode dictates the number of mailboxes that you can add to
CallPilot. On Business Communications Manager you can have a maximum of
1,000 mailboxes. For information concerning enabling software Keycodes,
refer to the System Startup Guide.
Note: Only Subscriber (& Guest) mailboxes require Keycodes on a per
mailbox basis.
There are three main phases involved in configuring a mailbox:
1. Create the Mailbox. (Accessed via CallPilot Manager).
2. Initialise the Mailbox. (Accessed via F981).
3. Record a Greeting. (Accessed via F981).
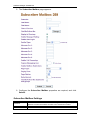
Adding a Subscriber Mailbox
Create a Subscriber Mailbox for all users that need to be able to receive
messages from their physical telephone extension. It is recommended to
make the Mailbox number the same as the extension number it is being
assigned to.
Subscriber Mailboxes must be initialised before they can receive messages.
Until this is done, calls will be redirected to the General Delivery Mailbox
instead (please refer to the Initialising a Mailbox section of this guide).
1. Click the Mailbox Administration heading.
30
NN40011-016 Issue 1.2 BCM Rls 6.0
CallPilot Manager & Mailboxes
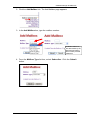
2. Click the Add Mailbox link. The Add Mailbox page appears.
3. In the Add Mailbox box, type the mailbox number.
Available Mailboxes,
are determined by the
Keycode purchased
and currently created
mailboxes
4. From the Mailbox Type list box, select Subscriber. Click the Submit
button.
NN40011-016 Issue 1.2 BCM Rls 6.0
31
CallPilot Manager & Mailboxes
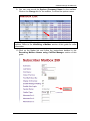
5. The Subscriber Mailbox page appears.
6. Configure the Subscriber Mailbox properties as required, and click
Submit.
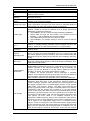
Subscriber Mailbox Settings
Attribute
Extension
Last Name
First Name
32
Description
The extension that the mailbox will be assigned to. It is generally good
practice to match the mailbox number to the extensions number.
Last name of the mailbox owner.
First name of the mailbox owner.
NN40011-016 Issue 1.2 BCM Rls 6.0
CallPilot Manager & Mailboxes
Attribute
Class Of Service
Find Me/ Follow
Me
Display in
Directory
Enable Message
Waiting
Enable Auto Login
Outdial Type
Alternate Ext 1,2,
3, 4, 5
Enable Call
Screening
Express
Messaging Line
(Fax Only)
Enable Mailbox
Restrictions
Park & Page
Description
Class of Service assigned to the mailbox.
Click Change to add/edit any of the Find Me/ Follow Me schedules or
external number entries.
Clear this if you do not want the mailbox owner’s name to appear in the
Company Directory.
Clear this if you do not want message notification to appear on the
mailbox owner’s telephone display.
Auto-Login speeds up the login process for subscribers. With AutoLogin, subscribers can log on from their primary or alternate telephone
without having to enter their mailbox number or password.
This setting provides an external access resource for certain mailbox
features. Outdial is required for features such as Reply, Off-Premise
Notification, Outbound Transfer etc.
Select None if you do not want to assign outdialing capabilities
Select Line and type the line number. Line numbers must be
between 1 - 999 for BCM450 and 1-332 for BCM50.
Select Pool and type the line pool number or letter.
Select Route if, for example routing is used to access a PRI line
pool.
Allows the designated extension direct access to the mailbox, in
addition to Message Waiting Indication when messages are left in the
mailbox. Maximum of 5 Alternate Extension for a single mailbox.
Select this to assign screened transfers (via the Auto-Attendant) to the
mailbox owner
Any calls to this line will be immediately transferred to the mailbox. Note
that if you enter an Express Messaging Line (e.g. a Target Line), that
line cannot appear/ring at any extension. Also, the Voicemail (F985) DN
should be set as the Prime set for that line (see Telephony Services,
Lines).
If the mailbox will use Express Messaging Line, enabling this option
stops the greeting being played to calls to the Express Messaging Line,
making the fax call quicker.
You can control how a subscriber accesses a mailbox. If you select the
Enable Mailbox Restrictions check box, a subscriber cannot log in to the
mailbox externally. If the subscriber attempts to log in externally, the
prompt "You are not allowed to use this feature. Exiting the system,
goodbye.” is played. The system disconnects the caller.
In addition, an internal subscriber cannot administer a restricted
mailbox. If the subscriber presses 8, the prompt "You are not allowed to
use this feature" plays and the subscriber returns to the main
Menu. Mailbox restrictions are applicable only to subscriber mailboxes.
With Park and Page, external callers can press 6 to page a mailbox
subscriber while they listen to the subscriber’s personal greeting or
record a message. When the caller presses 6, the system parks the call
and pages to paging zone or overhead paging system, or both and the
caller hears “One moment, please.” The caller cannot interrupt this
prompt by pressing DTMF. The page is repeated based on the mailbox
configuration until the parked call is picked up or the park timeout
occurs, at which point the caller is returned to the mailbox and hears the
subscriber’s personal greeting. The call is parked as long as there are
not already 25 calls parked. If the call cannot be parked, the caller hears
“The person you have called is not available” followed by the
subscriber’s mailbox greeting. While a call is parked the caller hears a
hold tone or music on hold, depending on the system configuration. The
call is paged to the appropriate paging zone or overhead speaker
system, or both. If the page is unsuccessful because the paging facility
is busy with another page, the system waits five seconds and retries the
page every five seconds until the paging facility is available or the call
park timeout expires, whichever occurs first. If the call park timeout
NN40011-016 Issue 1.2 BCM Rls 6.0
33
CallPilot Manager & Mailboxes
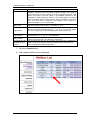
Attribute
Page Type
Paging Zone
Page Retries
Retry Interval
Find Me/Follow Me
disabled for Hunt
Groups
Description
expires first, the caller hears “The person you have called is not
available” followed by the subscriber’s mailbox greeting. If the page is
unsuccessful for any other reason, the call is un-parked and the caller
hears “The person you have called is not available” followed by the
subscriber’s mailbox greeting. While a call is being paged, the system
plays the mailbox spoken name and park string, for example “John Doe,
101.” The park string is played in the standard voice prompts, or
customized digits, if you recorded them.
Select the required paging type facility. The choices are Internal Zone,
Overhead Paging, Both or None. The default is none.
Select the Paging Zone to which the paging announcement will be
played. The zones available are zone 1, 2, 3, 4, 5, 6 or All. The default
is 1. If the paging type is overhead paging this setting is ignored.
Select the number of page retries to be played to the Page Zone from
the box select 0, 1, 2, 3, 4 or 5. The default is 1.
The retry interval is the number of seconds between paging retries. The
range is 5-300 seconds. The default is 15 seconds.
If a Find Me/Follow Me user is a member of a Hunt Group, enabling this
option will stop Hunt Group calls at the FM/FM user’s extension from
being forwarded to FM/FM destinations.
7. Click the Submit button.
8. The created mailbox will be displayed.
34
NN40011-016 Issue 1.2 BCM Rls 6.0
CallPilot Manager & Mailboxes
9. You can now record the Spoken (Company) Name for the mailbox.
Click on the Change link for the mailbox, to record the spoken name.
Note: The spoken (Company) name can also be recorded when initialising a
mailbox. Refer to the Initialising a Mailbox section of this guide for more
information.
10. Click on the Voice link and follow the instructions detailed in the
Recording Mailbox Names using CallPilot Manager section of this
guide.
NN40011-016 Issue 1.2 BCM Rls 6.0
35
CallPilot Manager & Mailboxes
Recording Mailbox Names using CallPilot Manager
This section describes how to record mailbox Company Directory names, and
Group List names using the CallPilot Manager interface on the PC.
For best results, use a telephone that is attached to the same switch as your
voicemail system. Avoid using wireless telephones.
1. When displayed, click the Voice link. The page you can record
greetings and prompts from appears.
2. In the Connect to box, type the extension number or telephone
number you are using to record the greeting or prompt. For a local
extension, just type the extension number. For a telephone number that
is not a local extension, type the sequence of digits that dial the
telephone number from the voicemail system. For example, you might
need to dial 9, the area code, and then the telephone number.
3. Click the Dial button.
4. The telephone rings.
5. Pick up the handset. Do not use Handsfree.
36
NN40011-016 Issue 1.2 BCM Rls 6.0
CallPilot Manager & Mailboxes
6. After the tone, record your prompt.
7. After you finish recording your prompt, click the Stop button.
8. To listen to the prompt, click the Play button or to save the recording,
click the Save button.
Note: Do not forget to click Save before replacing the receiver, otherwise the
recording will be lost.
9. Click the Close button and replace your telephone handset.
Adding Many Mailboxes
You can save time by creating multiple mailboxes when you set up CallPilot
for the first time, or when you need to add a large number of mailboxes to
your system. Adding many mailboxes creates Subscriber mailboxes for the
range of extensions that you define. You must use extensions that are not
already assigned to mailboxes.
To make the most effective use of adding multiple mailboxes, identify people
who need a non-standard Subscriber mailbox. Create these mailboxes
individually. Use Add Many Mailboxes to add the remaining mailboxes.
The mailboxes created using Add Many Mailboxes have the following
characteristics:
The mailbox number is the same as the extension number.
The mailboxes have the same settings for Class of Service, Call
Screening, Message Waiting, Outdialing and Display in Directory.
The mailbox name is taken from the extension names assigned on your
system.
If extension names are not programmed, the mailbox number is used.
Note: A mailbox is not created if:
A mailbox with the same number already exists.
The extension is used by another mailbox.
The extension is identified as a CallPilot voice port.
There is no phone associated with the extension connected to the
system. You must have a phone connected to the system for each
mailbox you create.
NN40011-016 Issue 1.2 BCM Rls 6.0
37
CallPilot Manager & Mailboxes
1. Click the Mailbox Administration heading. Click the Add Many
Mailboxes link. The Add Many Mailboxes screen appears.
2. The Add Many Mailboxes screen appears. Enter the mailboxes ranges
to be created and other required parameters and click Submit.
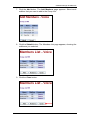
Add Many Mailboxes Settings
Attribute
From Extension
To Extension
Class Of Service
Display in Directory
Enable Message
Waiting
Outdial Type
38
Description
The first extension that the mailbox will be assigned to.
The last extension that the mailbox will be assigned to.
Class of Service assigned to the mailbox.
Clear this if you do not want the mailbox owner’s name to appear in the
Company Directory.
Clear this if you do not want message notification to appear on the
mailbox owner’s telephone display.
Outdial is required for features such as Reply, Off-Premise Notification,
Outbound Transfer etc.
select None if you do not want to assign outdialing capabilities
Select Line and type the line number. Line numbers must be
between 1-999 for BCM 450 and 1-332 for BCM 50.
NN40011-016 Issue 1.2 BCM Rls 6.0
CallPilot Manager & Mailboxes
Attribute
Enable Call
Screening
Description
Select Pool and type the line pool number or letter.
Select Route if, for example routing is used to access a PRI line
pool.
Select this to assign screened transfers (via the Auto-Attendant) to the
mailbox owner
Note: After creating Mailboxes using this method, you may wish to set
individual mailbox settings, such as Name, Auto-login, Alt Extension etc.
Initialising a Mailbox
A Subscriber mailbox must be initialised by the mailbox owner before it can
receive voice messages. Until a mailbox is initialised, it cannot receive voice
messages and any calls that are directed to it are re-routed to the General
Delivery Mailbox. Tell subscribers that they will have to change their mailbox
password as soon as they initialise their mailbox.
Initialising a mailbox involves:
Changing the default mailbox Password to a new user Password.
Recording the mailbox owner’s name in the Company Directory.
1. On a handset, press F981.
2. Log on by following the voice prompts. The default Mailbox password is
0000.
3. You will be prompted in the display to change your password “Must
change pswd”.
4. Enter a new password from 4 to 8 digits long that does not start with
“0”, and press OK or #.
5. Re-enter your new mailbox password and press OK or #.
6. At the tone, record your name in the Company Directory. It is
recommended to include your mailbox number in the recording, For
example, “Pat Smith, mailbox 5813.”
7. Press OK or # to end the recording.
8. Press OK or # to accept the recording or press PLAY or 1 to listen to
the recording or press RETRY or 2 to re-record your name.
9. Press the Release key to end the session.
NN40011-016 Issue 1.2 BCM Rls 6.0
39
CallPilot Manager & Mailboxes
Recording Primary or Alternate Greetings
Only a Primary mailbox greeting is necessary, but you can record an Alternate
mailbox greeting for times when you are out of the office, such as holidays. If
you do not record any mailbox greetings, your Company Directory name
recording plays to callers who reach your mailbox, followed by the standard
system mailbox prompt.
1. On a handset, press F981. Follow the voice prompts or the display
button options to open your mailbox.
2. Open the Greeting options menu
a) If you use the CallPilot interface, press 82.
b) If you use the Norstar Voice Mail interface:
i. Press ADMIN or 8.
ii. Press GREET or 2.
3. Press REC or 1.
4. Press PRIME or 1 to record the Primary greeting or press ALT or 2 to
record the Alternate greeting.
If you are changing a greeting, the current greeting starts to play. If this is
the first time you are recording a greeting, 'Not recorded' appears briefly.
5. Press YES or 1 and record you’re greeting at the tone.
6. Press OK or # to end the recording.
7. Press OK or # to accept the recording or press PLAY or 1 to listen to
the greeting or press RETRY or 2 to re-record the greeting.
8. Press the Release key to end the session.
Note: Voicemail initialisation procedures are also outlined in the Voice
Messaging Quick Reference cards for both the CallPilot and Norstar
interfaces. The reference cards are available from the documentation section
of the BCM’s Documentation web page, and also the BCM CD.
Viewing and Changing Existing Mailboxes
Once mailboxes have been created they can be viewed and changed in
CallPilot Manager by clicking on the Mailbox Administration main heading.
From here you can Change existing mailbox settings, Delete mailboxes, view
an Activity report for the last 7 days and use the Reset Password option.
40
NN40011-016 Issue 1.2 BCM Rls 6.0
CallPilot Manager & Mailboxes
Other Mailbox Types
System Administrator Mailbox
The System Administrator Mailbox:
is reserved for the System Administrator.
is created automatically when the system is initialised.
is where you can send Broadcast Messages from, to all
Subscriber mailboxes.
Only the System Administrator can access the System Administrator Mailbox.
Remember to check this mailbox for messages.
The default Class of Service for the System Administrator Mailbox is 7. You
can change the Class of Service any time.
General Delivery Mailbox
The General Delivery Mailbox is your company mailbox. It is created
automatically when the system is initialised for the first time. The General
Delivery Mailbox stores messages from callers when the Operator is not
available, or from callers who use a rotary dial telephone. Usually the
Receptionist or designated Operator checks for messages in the General
Delivery Mailbox.
NN40011-016 Issue 1.2 BCM Rls 6.0
41
CallPilot Manager & Mailboxes
The default Class of Service for the General Delivery Mailbox is 1. You can
change the Class of Service any time. The General Delivery Mailbox can
receive messages before it is initialised, but you must initialise it before you
can retrieve messages from it.
Guest Mailboxes
A Guest mailbox is a Subscriber mailbox without a primary extension. Create
Guest mailboxes for people who do not have an operating extension but
require a mailbox. A Guest mailbox must be initialised by the mailbox owner
before it can receive voice messages.
Guest mailboxes can provide a temporary employee with CallPilot services,
give clients access internal messaging and call routing, and let customers
leave telephone orders.
When you create Guest mailboxes, assign mailbox numbers that begin with
the same digit. This identifies the mailbox type. Create Guest mailbox
numbers that begin with a digit that is different from the Subscriber mailbox
numbers. For example, if Subscriber mailbox numbers start with two,
Guest mailboxes can start with the number four.
Note: To create a Guest Mailbox, follow the same procedure as for
Subscriber mailboxes, however you do not need to enter an extension
number.
Information Mailboxes
Information mailboxes play an informative message to callers who access it.
An Information mailbox must be initialised before it can play an information
message. Callers cannot leave messages in Information mailboxes.
Information mailboxes do not have operating extensions.
They are
maintained by the System Administrator or a mailbox owner, who would be
responsible for setting the password and maintaining the greeting. The
greeting is the message played to callers.
42
NN40011-016 Issue 1.2 BCM Rls 6.0
CallPilot Manager & Mailboxes
Information Mailboxes can be accessed by callers via a CCR tree, or by
transfer from an extension (use F986).
Creating an Information Mailbox
1. Click the Mailbox Administration heading.
2. Click the Add Mailbox link. The Add Mailbox page appears.
3. In the Mailbox box, type the mailbox number.
4. From the Mailbox Type list box, select Information. Click the Submit
button.
5. The Information mailbox screen appears. Configure the Information
Mailbox as required (Last/First Name, Class of Service, Display in
Directory).
NN40011-016 Issue 1.2 BCM Rls 6.0
43
CallPilot Manager & Mailboxes
6. Click the Submit button.
7. You should now initialise the mailbox (refer to the Initialising a
Mailbox section of this guide).
8. When you have initialised the mailbox. Logon to the mailbox. Enter
F981 on a telephone handset.
a. If the display shows “Log” enter the mailbox number and
password and press “ok” or “#”.
b. If the display states “Pswd” press the * Key, then enter the
mailbox number and password then press #.
9. Press Rec, and follow the prompts to record the message.
44
NN40011-016 Issue 1.2 BCM Rls 6.0
CallPilot Manager & Mailboxes
Advanced Mailbox Features
This section details features, functions, and operations that may not be
necessary in all situations.
Selecting Primary or Alternate Greetings
If you record a Primary and an Alternate mailbox greeting, you must choose
which greeting plays. If you do not choose a greeting, the Primary mailbox
greeting plays automatically.
If you choose the Alternate mailbox greeting, you must set whether the
mailbox accepts messages. If you choose 'Yes' your mailbox receives
messages in the normal way. If you choose No, messages cannot be left in
the mailbox.
The Alternate mailbox greeting takes precedence over all other greetings. If a
caller presses a button to fast forward the message, they hear a voice prompt
that says this is a special greeting. If a caller presses a button to send a fax,
the fax goes to the General Delivery Mailbox, not your personal mailbox.
If you choose the Alternate mailbox greeting, remember to change back to the
Primary mailbox greeting at the appropriate time.
To choose the Primary or the Alternate greeting to play to callers, use a
telephone handset:
1. On a handset, press F981. Follow the voice prompts or the display
button options on your telephone to open your mailbox.
2. Open the Greeting options menu
a) If you use the CallPilot interface, press 82.
b) If you use the Norstar Voice Mail interface:
i. Press ADMIN or 8.
ii. Press GREET or 2.
3. Press CHOOSE or 2 to select a greeting.
4. Press PRIME or 1 to select the Primary greeting and go to step 6 or
press ALT or 2 to select the Alternate mailbox greeting.
5. If you choose the Alternate mailbox greeting, you are asked whether
the mailbox can accept messages. Press CHNG or 1 to toggle from
yes to no or press OK or # to accept.
6. Press the Release key to end the session.
NN40011-016 Issue 1.2 BCM Rls 6.0
45
CallPilot Manager & Mailboxes
Personal Greetings
If your company subscribes to a CLID service, you can record a Personalised
mailbox greeting.
A Personalised mailbox greeting plays only for a person calling from the
telephone number that you designate. For the Personalised mailbox greeting
to play, the telephone number you enter must match the caller’s phone
number exactly.
You can record up to three Personalised mailbox greetings, but you can
assign each greeting to only one telephone number.
The Personalised greeting would normally take precedence over any other
greetings, except where you have chosen to not accept messages when an
Alternate greeting is selected. In this case the Alternate greeting takes
precedence over any other greeting, including Personalised mailbox
greetings.
1. On a handset, press F981. Follow the voice prompts or the display
button options on your telephone to open your mailbox.
2. Open the Greeting options menu
a) If you use the CallPilot interface, press 82.
b) If you use the Norstar Voice Mail interface:
i. Press ADMIN or 8.
ii. Press GREET or 2.
3. Press REC or 1.
4. Press PERS or 3 to record a Personalised mailbox greeting.
5. Enter a Personalised greeting number of 1, 2, or 3.
6. Press CHNG or 1.
7. Enter the phone number (maximum 10 digits) that you are assigning
the Personalised mailbox greeting to. Press OK or # to accept the
phone number.
8. At the tone, record the greeting and press OK or # to end the
recording.
9. Press OK or # to accept the recording or press PLAY or 1 to listen to
the greeting or press RETRY or 2 to rerecord the greeting.
10. Press the Release key to end the session.
46
NN40011-016 Issue 1.2 BCM Rls 6.0
CallPilot Manager & Mailboxes
Assigning a Target Attendant
You can assign a Target Attendant to answer calls transferred from your
mailbox. The default Target Attendant for your mailbox is the CallPilot
Operator. The Target Attendant can be assigned to any valid extension.
After you assign your Target Attendant, a caller who reaches your mailbox
can press 0 to speak with the Target Attendant.
Remember to tell callers in your greetings that if they need assistance they
can press 0 to speak to the Operator, for example, “Please press 0 to speak
to my assistant.”
1. On a handset, press F981. Follow the voice prompts or the display
button options to open your mailbox.
2.
a) If you use the CallPilot interface:
i) Press 80 to open the Company Directory.
ii) Press ASST or 1 to open the Target Attendant menu.
b) If you use the Norstar Voice Mail interface:
i) Press ADMIN or 8.
ii) Press 5 to open the Target Attendant menu.
3. Press CHNG or 1 to change the Target Attendant. The Atdt ext: oper
prompt shows that the current attendant is the CallPilot operator.
4. Enter the extension number of the new Target Attendant or press
OPER or 0 to change the Target Attendant to the CallPilot Operator.
The display shows the extension you entered.
5. Press the Release key to end the session.
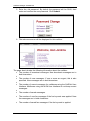
Off-Premise Notification
You can program CallPilot to call you at a phone number, an extension, or a
pager when you have a message.
If you program CallPilot to call you at a phone, you are prompted to enter your
password before you can listen to your messages.
You can receive notification of a message at a maximum of five different
destination numbers.
NN40011-016 Issue 1.2 BCM Rls 6.0
47
CallPilot Manager & Mailboxes
If the destination type is Phone, you must assign start and stop times so that
you are there to receive the call. The start and stop times apply to all five
notification numbers.
The recipient of an Off-premise Message Notification call hears the following
voice prompt: “Message for (name of mailbox owner). To log on press 1. If
you have received this call by mistake, please press 2.”
NOTE: To enable Off-Premise Notification the following must be checked:
Outcalling Channels are configured in System Properties (refer to the
System Properties section of this guide).
The Mailbox owner is allowed to use this feature, as defined in Class of
Service (refer to the Class of Service section of this guide).
Outdial is set up for the Mailbox (refer to the Adding a Subscriber
Mailbox section of this guide).
To set up Off-premise Message Notification to a phone number:
1. On a handset, press F981. Follow the voice prompts or the display
button options to open your mailbox.
2.
a) If you use the CallPilot interface:
i) Press 85 to open the Mailbox Tools.
ii) Press NOTIF or 2 to open the Off-premise Message Notification
menu.
b) If you use the Norstar Voice Mail interface:
i) Press ADMIN or 8.
ii) Press 6 to open the Off-premise Message Notification menu.
3. Press ADMIN or 1 to set up Off-premise Message Notification.
4. Press PHONE or 1 to choose a phone number destination.
5. Enter the destination phone number and press OK or #. The
destination phone number is a maximum of 30 digits.
6. Press OK or # to accept the destination phone number. Depending on
the Mailbox Outdial type, you may need to enter a digit before the
destination phone number. For example, if a PRI pool is accessed by
pressing 9 (i.e. by use of Call Routing) then this digit will need to be
entered before the destination phone number. This does not apply for
regular line pools, as the pool is specified in the Mailbox Outdial
settings.
48
NN40011-016 Issue 1.2 BCM Rls 6.0
CallPilot Manager & Mailboxes
7. Enter the start time for Off-premise Message Notification. This is a fourdigit field. You must precede a single-digit hour and minute with a zero.
8. Press AM or 1 or PM or 2.
9. Press OK or # to accept the start time.
10. Enter the time when Off-premise Message Notification is to stop. This
is a four digit field. You must precede a single-digit hour and minute
with a zero.
11. Press AM or 1 or PM or 2.
12. Press OK or # to accept the stop time.
13. Press YES or 1 if you want to set up another destination number or
press NO or # if you do not want to set up another destination number.
14. Press NEXT or # to accept the start time that you entered or press
CHNG or 1 to change the start time.
15. Press NEXT or # to accept the stop time that you entered or press
CHNG or 1 to change the stop time.
16. Press OK or # if you want to be notified when you receive a new
message or press CHNG or 1 if you want to be notified only when you
receive an urgent message.
17. Press the Release key to end the session.
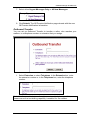
Outbound Transfer
You can set up Outbound Transfer to transfer a caller who reaches your
mailbox to a number that you assign. A caller can use Outbound Transfer
from any tone dial telephone, and you can direct your Outbound Transfer calls
to any telephone.
You can tell callers about this feature in your greetings. Remember to tell
them what number to press to transfer:
If you use the Norstar Voice Mail interface, tell callers to press 7.
If you use the CallPilot interface, tell callers to press 9.
Note: To enable Outbound Transfer the following must be checked:
Outcalling Channels are configured in System Properties (refer to the
System Properties section of this guide).
The Mailbox owner is allowed to use this feature, as defined in Class of
Service (refer to the Class of Service section of this guide).
Outdial is set up for the Mailbox (refer to the Adding a Subscriber
Mailbox section of this guide).
NN40011-016 Issue 1.2 BCM Rls 6.0
49
CallPilot Manager & Mailboxes
1. On a handset, press F981. Follow the voice prompts or the display
button options to open your mailbox.
2.
a) If you use the CallPilot interface:
i) Press 80 to open the Mailbox Options.
ii) Press 9.
iii) Press 3 to open the Outbound Transfer menu.
b) If you use the Norstar Voice Mail interface:
i) Press ADMIN or 8.
ii) Press 8 to open the Outbound Transfer menu.
3. Press ADMIN or 1 to set up Outbound Transfer or if you have
previously set up Outbound Transfer press CHNG.
4. Press PHONE to select an external phone as the destination.
5. Enter the destination phone number and press OK or #. Depending on
the Mailbox Outdial type, you may need to enter a digit before the
destination phone number. For example, if a PRI pool is accessed by
pressing 9 (i.e. by use of Call Routing) then this digit will need to be
entered before the destination phone number. This does not apply for
regular line pools, as the pool is specified in the Mailbox Outdial
settings.
6. Press OK or # to accept the destination number.
7. Press CHNG or 1 to turn Outbound Transfer on.
8. Press QUIT or *
9. Press the Release key to end the session.
Group Lists
Group Lists are lists of Mailboxes assigned to a Group Mailbox number. For
example, a Sales department might have all their Mailboxes assigned to
Group List 901. If a Mailbox owner wishes to send a message to everyone in
“Sales”, they will record a message and send it to mailbox 901.
You can create a maximum of 99 Group Lists on your system. Each Group
List can contain a maximum of 300 mailboxes and requires:
50
The Group List name – maximum 16 characters long.
The mailbox numbers to include in the group.
NN40011-016 Issue 1.2 BCM Rls 6.0
CallPilot Manager & Mailboxes
After you create a Group List, you can change the mailboxes included in the
list, record a new list name, view the Group List, or delete the Group List.
During system installation, a number from 0 to 9 (default 9) is assigned as the
Group List leading digit. The default Group List numbers are 901 to 999. If the
leading digit is 5, the Group List numbers are 501 to 599. Group List numbers
are three digits long.
A mailbox must be initialised before you can add it to a Group List.
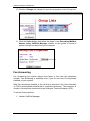
1. From the Main CallPilot Manager Main menu, click the Group Lists
link. The Group Lists page appears.
2. If the Fax option is installed, select either Fax or Voice as the type of
Group List you are adding. Click the Add button. The created Group
List is added to the list.
NN40011-016 Issue 1.2 BCM Rls 6.0
51
CallPilot Manager & Mailboxes
3. Click on the Change link. The Group List Properties page appears.
4. In the Display Name box, type the new Group List name.
5. Click the Submit button. The Group Lists page appears.
6. Click the Members link. The Members List page appears.
52
NN40011-016 Issue 1.2 BCM Rls 6.0
CallPilot Manager & Mailboxes
7. Click the Add button. The Add Members page appears. Select each
mailbox that you want to add to the Group List.
8. Click the Submit button. The Members List page appears, showing the
mailboxes you selected.
9. Click the Close button.
NN40011-016 Issue 1.2 BCM Rls 6.0
53
CallPilot Manager & Mailboxes
10. Click the Change link followed to view the properties for the Group List.
11. Click the Voice button and follow the steps in the Recording Mailbox
Names using CallPilot Manager section of this guide to record a
spoken Group List name from your computer.
Fax Answering
Fax Answering lets outside callers send faxes to the main site telephone
number. Fax Answering is available even if you do not have Fax Keycodes
installed on your system.
With Fax Answering enabled, a fax call that is directed to the Auto Attendant
or CCR is automatically transferred to a specified extension. The extension is
usually a fax machine connected via an Analogue Terminal Adapter (ATA).
To set the Fax properties:
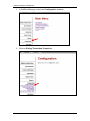
1. Launch CallPilot Manager.
54
NN40011-016 Issue 1.2 BCM Rls 6.0
CallPilot Manager & Mailboxes
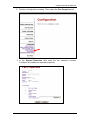
2. Click the Configuration heading. Then select the Fax Properties link.
3. In the System Extension field enter the fax extension number.
Configure any additional required properties.
NN40011-016 Issue 1.2 BCM Rls 6.0
55
CallPilot Manager & Mailboxes
Note: If the Fax Messaging/ Fax Suite keycode have not been enabled, you
will only see the System Extension field.
4. Click the Submit button.
Fax Properties Settings
Attribute
System extension
System Name
Number of Retries
Retry Interval
Cover Page
Description
The system fax extension lets callers use the auto send feature on their
fax machines to send faxes to the CallPilot system. The Automated
Attendant recognizes the fax tone and transfers fax calls to the system
extension fax machine for printing. The system extension must be a
valid extension. The system extension is not assigned by default.
Connect the fax machine to an Analog Telephone port on the system.
The system extension is available even if no Fax options are installed
at your site. The other properties are available only if you have installed
the corresponding fax options.
Allows you to name the extension if required (i.e. Fax Line) up to 16
characters long.
Depicts how many retry attempts are acceptable, should the Fax fail to
send. The value can be from 0-99 and the default is 3.
Enter the delay period in between send attempts. This value can be 160 minutes, and the default is 10 minutes.
Stipulate whether a cover page is required. The options are:
No cover page: does not attach a cover page to Faxes.
Default cover page: attaches a generic cover page to any Faxes.
Custom cover page: allows you to attach a custom cover page to your
faxes.
Dialling Translation
It may be necessary to configure the CallPilot Dialling Translation table to
allow a CallPilot user to reply to messages in their mailbox, which have been
left by external callers. Dialling Translation relates to the mailbox message
Reply feature only.
Note: In order for a mailbox user to be able to reply to a message from an
external caller, the mailbox has to be configured with an Outdial method.
Refer to the Subscriber Mailbox Settings section of this guide for more
information concerning Outdial settings.
Note: The Reply feature can only be used to contact external callers if Caller
ID has been presented to the BCM (and therefore CallPilot). If the message in
the mailbox does not have an attached Caller ID, CallPilot cannot dial the
caller.
56
NN40011-016 Issue 1.2 BCM Rls 6.0
CallPilot Manager & Mailboxes
Examples of Dialling Translation Table Entries
A Dialling Translation Table entry consists of an Input value and a
corresponding Output value. It may be necessary to alter the Caller ID number
associated to a mailbox message, so that CallPilot can reach the caller.
Example 1 – BCM Uses Call Routing
If the BCM uses Call Routing to access external lines, then CallPilot must be
instructed to use the routing digit(s) (destination code(s)) to access the
external lines. For example, if the BCM uses the Destination Code “9” to
access external lines, this should be entered into the Dialing Translation table
as follows:
Input = 0, Output = 90
The above assumes that all Caller ID numbers are supplied with a preceding
0. This may vary dependant on the Telephony region.
Example 2 – Reply to a Mobile Phone Caller via a Landline
Instead of replying to a mobile phone on their mobile phone, it is possible to
instruct CallPilot to dial the caller’s landline. The Dialing Translation table
entry could be as follows:
Input = 0773 256 4312, Output = 0151 426 2580
The above example assumes that the mailbox Outdial method is set to Line or
Pool, i.e. no routing (Destination Code) digits are required.
Dialing Translation Properties
Before configuring the Dialing Translation Table entries, it is necessary to
configure the Dialing Translation Properties. At the very least, the Enable
Reply Translation feature should be enabled to allow CallPilot to use the
Dialing Translation when a mailbox owner replies to a message.
Use the following procedure to set the Dialing Translation Properties.
NN40011-016 Issue 1.2 BCM Rls 6.0
57
CallPilot Manager & Mailboxes
1. In CallPilot Manager, select the Configuration heading.
2. Click on Dialing Translation Properties.
58
NN40011-016 Issue 1.2 BCM Rls 6.0
CallPilot Manager & Mailboxes
3. Configure the Dialing Translation Properties and click Submit.
Dialling Translation Properties Settings
Attribute
Long Distance
Access Code
Area Code
Access Code
Enable Reply
Translation
Description
This prefix, if specified, is removed from any numbers entered by the
subscriber if it is not needed to make the call. This simplifies the
creation of the Dialling Translation Table. For North America, set the
long distance access code to 1. The default for this parameter is none.
The field for this parameter is a maximum of 1 digit.
If the phone number entered appears to be missing an area code, an
area code is prefixed to the number. The area code is considered
missing if the number has fewer than 10 digits. The default for this
parameter is none. The field for this parameter is a maximum of 6 digits.
If this parameter is set to none, no area code is prefixed to the
telephone number.
In North America, the access code is usually 9. This number is prefixed
to all numbers after Translation to access the local telephone network. If
your system is attached directly to CO lines, set the Access Code to
none. The default for this parameter is none.
Enable this to allow CallPilot to use Dialling Translation. If this is not
enabled, mailbox owners will have to manually trim the supplied Caller
ID number to be able to Reply to the message.
NN40011-016 Issue 1.2 BCM Rls 6.0
59
CallPilot Manager & Mailboxes
Dialling Translation Table
Use the following procedure to make entries in the Dialling Translation Table.
1. In CallPilot Manager, select the Configuration heading.
2. Click on Dialling Translation Table.
60
NN40011-016 Issue 1.2 BCM Rls 6.0
CallPilot Manager & Mailboxes
3. Click on Add to make an entry in the table.
4. Enter an Input value and a corresponding translated Output value, and
click Submit.
5. The entry will appear in the table. Feature Codes.
NN40011-016 Issue 1.2 BCM Rls 6.0
61
CallPilot Manager & Mailboxes
Mailbox Manager
Mailbox Manager is a Web based application that can be utilised to manage
your CallPilot mailbox online.
You can control Subscriber mailboxes, Information mailboxes, Skillset
mailboxes, General Delivery mailbox, and System Administrator mailbox
through Mailbox Manager. If you try to access other types of mailboxes, you
receive a warning message.
Mailbox Manager can help users manage most of their mailbox functions and
settings and it even allows users to select, change and record greetings over
the network without having to be at their office.
Once users log in to their mailbox on the network, they are presented with
choices for any changes they may wish to make.
The easy-to-use, browser-based interface makes setting up and making
changes to features (like Off Premise Message Notification) simple: users just
point and click on the options they want and type in the information.
1. Mailbox Manager can be accessed by entering the following in the
address bar of your web browser:
62
https://<BCMIPaddress or Host Name>/MailboxManager
NN40011-016 Issue 1.2 BCM Rls 6.0
CallPilot Manager & Mailboxes
2. Alternatively, Mailbox Manager can be launched from Application
Launcher. In the Main tab, click on the BCM button, select Mailbox
Manager and click on Run.
3. The Login screen will appear. Enter the mailbox number and password
for the mailbox to be configured.
Mailbox
Number
Mailbox
Password
4. If the mailbox has not been initialised you will be prompted to enter a
new password.
NN40011-016 Issue 1.2 BCM Rls 6.0
63
CallPilot Manager & Mailboxes
5. Enter the old password. By default the password will be 0000, then
enter and confirm the new password. Click Submit.
6. The welcome screen will be displayed for this mailbox.
The page also includes the following information about the mailbox:
The number of broadcast messages. New broadcast messages are in
bold characters.
The number of new messages. If one or more are urgent, this is also
specified. New messages are in bold characters.
The number of unsent messages for mailboxes using the CallPilot User
Interface. Mailboxes using the NVM User Interface do not keep unsent
messages.
The number of saved messages.
64
The number of new fax messages if the fax keycode was applied. New
fax messages are in bold characters.
The number of saved fax messages if the fax keycode is applied.
NN40011-016 Issue 1.2 BCM Rls 6.0
CallPilot Manager & Mailboxes
If an extension is specified for the mailbox, but no telephone set is
associated with the extension, a warning message is presented: "There
does not appear to be a telephone set associated with your extension.
Please contact your system administrator."
If the telephone is currently forwarded, a warning message is
presented: "Your telephone set is currently forwarded."
If the alternate greeting is selected, you see the message: "Your
alternate greeting is currently selected."
If messages are not accepted (along with the alternate greeting being
selected), you see the message: "Messages are NOT being accepted."
If the mailbox is full, you receive a warning: "Your mailbox is full.
Please erase those messages that are not needed."
If Off Premise Notification is enabled, this message appears: "You can
use the Off Premise Notification to be notified at a location different
from your telephone set when you receive a new or an urgent
message".
If Outbound Transfer is enabled this message appears: "You can use
the Outbound Transfer to allow your callers to reach you at a
destination different from your telephone set by the press of a key".
You can change the following features by clicking on the associated link:
NN40011-016 Issue 1.2 BCM Rls 6.0
65
CallPilot Manager & Mailboxes
Change Password
You can change the default mailbox password or change your chosen
password.
Off Premise Notification
You can set up Off Premise Notification so CallPilot calls you at a phone
number, an extension, or a pager when you have a message.
66
NN40011-016 Issue 1.2 BCM Rls 6.0
CallPilot Manager & Mailboxes
1. Click
Add
to
enter
an
Off
Premise
Notification
destination.
2. Select Extension, and enter the extension number in the Extension
box, or Select Pager and enter the pager number in the Pager box.
Note: If you need a telephone number or a pager number to be one of your off
premise notification destinations, the mailbox will require an out dialling
capability.
3. In the Pager String box, enter the pager string. The combined length
of the pager number and pager string cannot exceed 29 characters.
Alternatively, select Telephone to be notified at an external
telephone/mobile, and enter the telephone number in the Telephone
box.
Note: If you do not have outdialling capabilities for the mailbox to access
external lines or routes, the destination must be another extension number. If
you have outdialling capabilities, you can choose an extension, a pager, or
another telephone as a destination.
NN40011-016 Issue 1.2 BCM Rls 6.0
67
CallPilot Manager & Mailboxes
Note: When you set up Off Premise Notification, you can add special
characters to the destination number. Special characters are pauses or other
dialing instructions that you can add if they are required to access the network
or a destination number. Two of these characters are “P” (or p) and “D” (or d).
A “P” is a four second pause and a “D” is a pause to recognize dial tone and is
two seconds in length. For example, 9P5554726. The 9 is for an external
number, the P is a four second pause, and 5554726 is the external phone
number.
4. Click Submit.
5. Select the Turn notification on check box.
6. In the Start Time box, enter the start time for the Off Premise
Notification. Enter the time in the HH:MM format. For example, 06:15.
Select either AM or PM. These buttons do not appear if your system
uses a 24-hour clock. In the End Time box, enter the end time for the
Off Premise Notification. Enter the time in the HH:MM format. For
example 11:30.
68
NN40011-016 Issue 1.2 BCM Rls 6.0
CallPilot Manager & Mailboxes
7. Select either Urgent Messages Only or All New Messages.
8. Click Submit. The Off Premise Notification page reloads with the new
Off Premise Notification information.
Outbound Transfer
You can set up Outbound Transfer to transfer a caller, who reaches your
mailbox, to a telephone number or extension that you assign.
1. Select Extension or select Telephone. In the Extension box, enter
the extension number or in the Telephone box, enter the telephone
number.
Note: If callers need to be transferred to an external telephone number,
please ensure that out-dialling capability is enabled for the mailbox.
NN40011-016 Issue 1.2 BCM Rls 6.0
69
CallPilot Manager & Mailboxes
2. Select the Allow Callers to reach you at the Outbound Destination
you specified check box.
3. Click Submit.
Message Forwarding
You can configure the system to forward any voicemail messages to an
external email address through the message forwarding feature.
Message Forwarding Settings
Attribute
Description
Enable Message Forwarding
You must tick this box to enable the Message Forwarding
service.
Depending on the CallPilot Manager configuration, users will
either see a read only Email address, or a field where they
can enter an Email address for forwarding purposes. If
available, enter a destination e-mail address for mailbox
messages.
Select the attachment type(s) you wish to receive in the
forwarded message, ensuring that your Email device can play
WAV files, or view TIF files as required.
Select the type of messages to forward, All New Messages or
just the ones flagged as Urgent.
None - (default) the original message remains unchanged in
your CallPilot mailbox. The Message Waiting Indicator (MWI)
on your telephone remains lit (announcing the new message).
Mark as read when received by the recipient - the original
message remains in your CallPilot mailbox. After your e-mail
Email Address
Attachment
Message Type
Original Message
70
NN40011-016 Issue 1.2 BCM Rls 6.0
CallPilot Manager & Mailboxes
Current Signature
Remove Current Signature
server receives the forwarded e-mail message, the MWI on
your telephone goes out. This option works only if the e-mail
server to which the message is forwarded supports delivery
status notifications.
Mark as read when opened by the recipient - the original
message remains in your CallPilot mailbox. After you open
the forwarded e-mail message, the MWI on your telephone
goes out. This option works only if the e-mail server to which
the message is forwarded supports read receipt capability.
Delete when received by the recipient - after your e-mail
server receives the forwarded e-mail message, the original
message is deleted from your CallPilot mailbox and the MWI
on your telephone goes out. This option works only if the email server to which the message is forwarded supports
delivery status notifications.
Delete when opened by the recipient - after you open the
forwarded e-mail message, the original message is deleted
from your CallPilot mailbox and the MWI on your telephone
goes out. This option works only if the e-mail server to which
the message is forwarded supports read receipt capability.
This field displays your e-mail signature, allowing you to
automatically atach this to the forwarded e-mail message.
When you leave a message (for another Message Forwarding
user) your signature is attached to the message that is sent to
their e-mail address (as a .Txt file). You could add your
contact details to a signature, making it easier for others to
get in touch once they have recieved your message.
The default setting is None. You can enter your e-mail
signature in the Add Signature Line text box.
A signature can be a maximum of 1024 characters long, and
spread across several lines of text if required.
This is an optional field.
This option only appears if you have previously stored a
signature.
For more information on Message Forwarding, please refer to the Message
Forwarding Guide.
NN40011-016 Issue 1.2 BCM Rls 6.0
71
CallPilot Manager & Mailboxes
Greetings and Spoken Name
You can record the mailbox name, primary and alternate greetings, and up to
three personalized greetings.
1. The Voice button can be selected against the greeting that you wish to
record. From this page the greetings can be recorded or imported.
72
NN40011-016 Issue 1.2 BCM Rls 6.0
CallPilot Manager & Mailboxes
2. Enter the extension number or the telephone number of the phone set
you want to use to record, then press Dial.
3. When the phone set rings, pick up the handset. Press the Record
button. You can start recording after you hear the tone.
4. When you have finished recording, press the Stop button.
5. To save it, press the Save button.
6. To import a pre-recorded file, enter the name of the file including its
path (or Browse to the file), then press the Send button. You can
import .wav and 711 files.
NN40011-016 Issue 1.2 BCM Rls 6.0
73
CallPilot Manager & Mailboxes
Personal Attendant
You can configure your voice mail to direct calls to the system attendant
(default) or personal attendant when a caller is instructed to press 0 from your
mailbox greeting.
1. Select Extension and enter the extension number or select System
Attendant. Click Submit.
Fax
If the fax messaging keycode is applied you can pre-set a destination where
your faxes are printed.
1. Select Extension and enter the extension number or select Telephone
and enter the telephone number.
Note: If you need the fax pre-set destination to be an external telephone
number, please ensure that out dialling capability is allowed for the mailbox.
2. Click Submit.
74
NN40011-016 Issue 1.2 BCM Rls 6.0
CallPilot Manager & Mailboxes
Call Forward
You can forward your telephone to automatically direct calls to your mail box.
1. Select the Forward Calls To Voicemail check box.
2. If you forward your telephone to voice mail, you can have the option to
display caller information on your screen when the call goes to voice
mail. Select the Display Caller Information check box, if required.
This allows you to select which calls you want to retrieve with F987.
3. Click Submit.
Find Me/Follow Me
Find Me/Follow Me allows calls received on your desk phone to be broadcast/
forwarded to external telephone numbers.
NN40011-016 Issue 1.2 BCM Rls 6.0
75
CallPilot Manager & Mailboxes
There are two tables displayed on the Find Me/Follow Me page:
Schedule List; defines the times when the Find Me/Follow Me feature
should be active on the BCM.
External Destination List; allows 5 individual destination numbers to
be entered, each associated to a specific schedule or the “Always”
schedule, whereby the destination number will always be rung when
the primary phone is rung.
For more information on this feature, please refer to the Find Me/Follow
Guide.
Silent Record a Call
Silent Record a Call enables a mailbox user to enter a feature code (F989)
and record the current telephone conversation they are having with another
party. The recording can be announced along with a recording tone, or silent
recording can be invoked.
Note: Silent Record a Call is a call recording method with distinct
configuration and usage procedures to the Professional Call Recording
feature. Professional Call Recording is not described in this guide. Please
refer to the Professional Call Recording Guide for more information on this
feature.
1. To determine whether silent or non-silent record call is utilised login to
Element Manager and select the Configuration tab and open the
Telephony folder followed by Global Settings folder and select
Advanced Feature Settings link. The Silent Monitor settings will be
displayed on the right of the screen.
76
NN40011-016 Issue 1.2 BCM Rls 6.0
CallPilot Manager & Mailboxes
a. Silent - Choose Silent if you the recording to take place without
a recording tone to play.
b. Non silent - Choose Non silent if you want the Agent and the
Caller to hear a conference tone when recording is due to
commence.
Note: This is a global setting that will also affect Hunt Group Monitoring. Refer
to the Telephony Services Guide for more information.
Within the mailbox Class of Service there are options available for the
record call facility. The options include settings that determine whether the
recording is Announced or Silent. If Announced is selected the caller
and mailbox owner will hear an audible prompt to state that recording will
take place. If Silent is selected then no recording prompt will be played.
There are also options within Element Manager to determine where the
recorded call will be saved. As an alternative to saving the recording in the
mailbox itself, the recording can be saved to a centralised SFTP
destination. When an SFTP folder is defined as a storage location on the
network, these storage locations must be on an SCP server. The BCM
supports OpenSSH 3.7.
Silent Record a Call and the Mailbox Class of Service.
1. To view the options for the Silent Record a Call facility select the
Class of Service to which the mailbox will be assigned.
2. Select the Change link. In this example Class of Service 1 has been
selected.
NN40011-016 Issue 1.2 BCM Rls 6.0
77
CallPilot Manager & Mailboxes
3. The Class of Service will be displayed.
78
NN40011-016 Issue 1.2 BCM Rls 6.0
CallPilot Manager & Mailboxes
4. From the Record a Call drop down box select whether the recording
will be Announced or Silent.
5. When Record-a-Call has been enabled, F989 recorded calls will be left
in the user’s mailbox as a standard message. If SFTP destinations
have been configured (refer to the Adding an External Network
Location for the Silent Record-a-Call Facility section of this guide)
they can be selected from the Recorded Call SFTP Destination dropdown list. Only the Destination IDs configured will be listed. If an SFTP
Destination is selected, calls will also be sent to these destinations as
well as in the user’s mailbox.
6. Click the Submit button when finished. Ensure any mailbox owner
wishing to use Record-a-Call has the appropriate Class of Service
assigned.
NN40011-016 Issue 1.2 BCM Rls 6.0
79
CallPilot Manager & Mailboxes
Adding an External Network Location for the Silent Record a
Call Facility.
1. From within Element Manager open the Applications folder and select
the Voice Messaging/Contact Center link. The Silent Record a Call
Network Storage Locations settings will be displayed on the right of
the screen.
2. Click the Add button.
3. The Add Network Location dialog box will be displayed.
80
NN40011-016 Issue 1.2 BCM Rls 6.0
CallPilot Manager & Mailboxes
4. From the FTP Method drop down box select Secure FTP or regular
FTP. The default is Secure FTP (SFTP).
5. In the IP Address or Host Name field enter IP Address or valid Host
Name of the FTP or SFTP server where the recordings will be
transferred (.WAV format).
6. In the FTP User field enter the user name that is required to login to
the specified FTP or SFTP server.
NN40011-016 Issue 1.2 BCM Rls 6.0
81
CallPilot Manager & Mailboxes
7. In the FTP Password field enter the password required to login to the
specified FTP or SFTP server. Note that this setting is not required
when using SFTP.
8. You will be prompted to confirm the password you have entered.
9. In the Destination FTP Folder field enter the folder / directory on the
specified FTP or SFTP server where the recorded files will be
transferred.
82
NN40011-016 Issue 1.2 BCM Rls 6.0
CallPilot Manager & Mailboxes
10. The destination will now be added to the SFTP Dest Table as a
Destination ID. The Destination ID (e.g. 1 or 2) can be selected when
configuring SFTP in Class of Service.
Voicemail Feature Codes
This table shows the Voicemail feature codes that can be used at a handset.
Feature code name
Leave Message
Open Mailbox
Dialpad
buttons
F980
F981
Operator Settings
CallPilot Administration
Call Forward
CallPilot extension
Transfer
Interrupt
F982
F983
F984
F985
F986
F987
Name Dialling
Record a Call
F988
F989
Description
Leaves a message in a mailbox. No password is required.
Opens your mailbox to play your messages and to access mailbox
options.
Access to Operator Settings
Access to CallPilot Manager Programming via a handset
Forwards incoming calls to your mailbox
Displays the CallPilot extension number on your phone.
Transfers calls to a mailbox on the CallPilot system.
Intercepts a caller who is listening to your mailbox greeting or
leaving a message.
Lets you dial calls by searching the Company Directory.
Records a call and stores it in your mailbox.
NN40011-016 Issue 1.2 BCM Rls 6.0
83
CallPilot Manager & Mailboxes
Avaya Documentation Links
84
CallPilot Manager Set Up and Operation Guide
CallPilot Programming Record
Quick Reference Card (NVM interface)
Quick Reference Card (CP interface)
Quick Reference Card (NVM interface) – Remote Users
Quick Reference Card (CP interface) – Remote Users
Find Me/Follow Me – Administration Guide
Find Me/Follow Me – User Guide
NN40011-016 Issue 1.2 BCM Rls 6.0