1
Avaya 3100 Mobile Communicator - Web UI
User Guide
Avaya 3100 Mobile Communicator
Release 3.1
Document Status: Standard
Document Number: NN42030-110
Document Version: 04.04
Date: July 2010
© 2009– 2010 Avaya Inc.
All Rights Reserved.
Notices
While reasonable efforts have been made to ensure that the information in this document is complete and accurate at the time of printing,
Avaya assumes no liability for any errors. Avaya reserves the right to make changes and corrections to the information in this document
without the obligation to notify any person or organization of such changes.
Documentation disclaimer
Avaya shall not be responsible for any modifications, additions, or deletions to the original published version of this documentation
unless such modifications, additions, or deletions were performed by Avaya. End User agree to indemnify and hold harmless Avaya,
Avaya’s agents, servants and employees against all claims, lawsuits, demands and judgments arising out of, or in connection with,
subsequent modifications, additions or deletions to this documentation, to the extent made by End User.
Link disclaimer
Avaya is not responsible for the contents or reliability of any linked Web sites referenced within this site or documentation(s) provided by
Avaya. Avaya is not responsible for the accuracy of any information, statement or content provided on these sites and does not necessarily
endorse the products, services, or information described or offered within them. Avaya does not guarantee that these links will work all
the time and has no control over the availability of the linked pages.
Warranty
Avaya provides a limited warranty on this product. Refer to your sales agreement to establish the terms of the limited warranty. In
addition, Avaya’s standard warranty language, as well as information regarding support for this product, while under warranty, is
available to Avaya customers and other parties through the Avaya Support Web site: http://www.avaya.com/support
Please note that if you acquired the product from an authorized reseller, the warranty is provided to you by said reseller and not by Avaya.
Licenses
THE SOFTWARE LICENSE TERMS AVAILABLE ON THE AVAYA WEBSITE, HTTP://SUPPORT.AVAYA.COM/LICENSEINFO/
ARE APPLICABLE TO ANYONE WHO DOWNLOADS, USES AND/OR INSTALLS AVAYA SOFTWARE, PURCHASED FROM
AVAYA INC., ANY AVAYA AFFILIATE, OR AN AUTHORIZED AVAYA RESELLER (AS APPLICABLE) UNDER A
COMMERCIAL AGREEMENT WITH AVAYA OR AN AUTHORIZED AVAYA RESELLER. UNLESS OTHERWISE AGREED TO
BY AVAYA IN WRITING, AVAYA DOES NOT EXTEND THIS LICENSE IF THE SOFTWARE WAS OBTAINED FROM ANYONE
OTHER THAN AVAYA, AN AVAYA AFFILIATE OR AN AVAYA AUTHORIZED RESELLER, AND AVAYA RESERVES THE
RIGHT TO TAKE LEGAL ACTION AGAINST YOU AND ANYONE ELSE USING OR SELLING THE SOFTWARE WITHOUT A
LICENSE. BY INSTALLING, DOWNLOADING OR USING THE SOFTWARE, OR AUTHORIZING OTHERS TO DO SO, YOU,
ON BEHALF OF YOURSELF AND THE ENTITY FOR WHOM YOU ARE INSTALLING, DOWNLOADING OR USING THE
SOFTWARE (HEREINAFTER REFERRED TO INTERCHANGEABLY AS "YOU" AND "END USER"), AGREE TO THESE
TERMS AND CONDITIONS AND CREATE A BINDING CONTRACT BETWEEN YOU AND AVAYA INC. OR THE
APPLICABLE AVAYA AFFILIATE ("AVAYA").
Copyright
Except where expressly stated otherwise, no use should be made of the Documentation(s) and Product(s) provided by Avaya. All content
in this documentation(s) and the product(s) provided by Avaya including the selection, arrangement and design of the content is owned
either by Avaya or its licensors and is protected by copyright and other intellectual property laws including the sui generis rights relating
to the protection of databases. You may not modify, copy, reproduce, republish, upload, post, transmit or distribute in any way any
content, in whole or in part, including any code and software. Unauthorized reproduction, transmission, dissemination, storage, and or
use without the express written consent of Avaya can be a criminal, as well as a civil offense under the applicable law.
Third Party Components
Certain software programs or portions thereof included in the Product may contain software distributed under third party agreements
("Third Party Components"), which may contain terms that expand or limit rights to use certain portions of the Product ("Third Party
Terms"). Information regarding distributed Linux OS source code (for those Products that have distributed the Linux OS source code),
and identifying the copyright holders of the Third Party Components and the Third Party Terms that apply to them is available on the
Avaya Support Web site: http://support.avaya.com/Copyright.
Trademarks
The trademarks, logos and service marks ("Marks") displayed in this site, the documentation(s) and product(s) provided by Avaya are the
registered or unregistered Marks of Avaya, its affiliates, or other third parties. Users are not permitted to use such Marks without prior
written consent from Avaya or such third party which may own the Mark. Nothing contained in this site, the documentation(s) and
product(s) should be construed as granting, by implication, estoppel, or otherwise, any license or right in and to the Marks without the
express written permission of Avaya or the applicable third party. Avaya is a registered trademark of Avaya Inc. All non-Avaya
trademarks are the property of their respective owners.
Downloading documents
For the most current versions of documentation, see the Avaya Support. Web site: http://www.avaya.com/support
Contact Avaya Support
Avaya provides a telephone number for you to use to report problems or to ask questions about your product. The support telephone
number is 1-800-242-2121 in the United States. For additional support telephone numbers, see the Avaya Web site: http://
www.avaya.com/support
Contents
Contents
Welcome . . . . . . . . . . . . . . . . . . . . . . . . . . . . . . . . . . . . . . . . . . . . . . . . . . . . . . . . . . . . . . . . 5
Your Avaya 3100 Mobile Communicator - Web UI . . . . . . . . . . . . . . . . . . . . . . . . . . . . . . . . 5
New in this Release . . . . . . . . . . . . . . . . . . . . . . . . . . . . . . . . . . . . . . . . . . . . . . . . . . . . . . . . 5
Features . . . . . . . . . . . . . . . . . . . . . . . . . . . . . . . . . . . . . . . . . . . . . . . . . . . . . . . . . . . . . 5
Other changes . . . . . . . . . . . . . . . . . . . . . . . . . . . . . . . . . . . . . . . . . . . . . . . . . . . . . . . . . 5
Avaya 3100 MC - Web UI overview . . . . . . . . . . . . . . . . . . . . . . . . . . . . . . . . . . . . . . . . . . . . 6
Getting started . . . . . . . . . . . . . . . . . . . . . . . . . . . . . . . . . . . . . . . . . . . . . . . . . . . . . . . . . . . 7
Enterprise requirements . . . . . . . . . . . . . . . . . . . . . . . . . . . . . . . . . . . . . . . . . . . . . . . . . . . . . 7
Hardware requirements . . . . . . . . . . . . . . . . . . . . . . . . . . . . . . . . . . . . . . . . . . . . . . . . . . . . . 7
Languages . . . . . . . . . . . . . . . . . . . . . . . . . . . . . . . . . . . . . . . . . . . . . . . . . . . . . . . . . . . . . . . 7
Licensing . . . . . . . . . . . . . . . . . . . . . . . . . . . . . . . . . . . . . . . . . . . . . . . . . . . . . . . . . . . . . . . . 7
Configuring the Avaya 3100 MC - Web UI . . . . . . . . . . . . . . . . . . . . . . . . . . . . . . . . . . . . . 9
Accessing the Avaya 3100 MC - Web UI . . . . . . . . . . . . . . . . . . . . . . . . . . . . . . . . . . . . . . . . 9
Prerequisites . . . . . . . . . . . . . . . . . . . . . . . . . . . . . . . . . . . . . . . . . . . . . . . . . . . . . . . . . . 9
Accessing the Avaya 3100 MC - Web UI . . . . . . . . . . . . . . . . . . . . . . . . . . . . . . . . . . . . 9
Adding a phone number or device . . . . . . . . . . . . . . . . . . . . . . . . . . . . . . . . . . . . . . . . . . . . 11
Adding a phone number . . . . . . . . . . . . . . . . . . . . . . . . . . . . . . . . . . . . . . . . . . . . . . . . 11
Setting up a route schedule . . . . . . . . . . . . . . . . . . . . . . . . . . . . . . . . . . . . . . . . . . . . . . . . . 12
Setting up a route schedule . . . . . . . . . . . . . . . . . . . . . . . . . . . . . . . . . . . . . . . . . . . . . . 12
Basic functions . . . . . . . . . . . . . . . . . . . . . . . . . . . . . . . . . . . . . . . . . . . . . . . . . . . . . . . . . 13
Logging on to the Web UI . . . . . . . . . . . . . . . . . . . . . . . . . . . . . . . . . . . . . . . . . . . . . . . . . . 13
Prerequisites . . . . . . . . . . . . . . . . . . . . . . . . . . . . . . . . . . . . . . . . . . . . . . . . . . . . . . . . . 13
Logging on to the Web UI . . . . . . . . . . . . . . . . . . . . . . . . . . . . . . . . . . . . . . . . . . . . . . . 13
Exiting the application . . . . . . . . . . . . . . . . . . . . . . . . . . . . . . . . . . . . . . . . . . . . . . . . . . . . . 15
Making calls . . . . . . . . . . . . . . . . . . . . . . . . . . . . . . . . . . . . . . . . . . . . . . . . . . . . . . . . . . . . . 15
Making a call . . . . . . . . . . . . . . . . . . . . . . . . . . . . . . . . . . . . . . . . . . . . . . . . . . . . . . . . . 15
Making a call from the History or Search Results screen . . . . . . . . . . . . . . . . . . . . . . . 15
Recently Made Calls . . . . . . . . . . . . . . . . . . . . . . . . . . . . . . . . . . . . . . . . . . . . . . . . . . . . . . 16
Reviewing a list of Recent Calls . . . . . . . . . . . . . . . . . . . . . . . . . . . . . . . . . . . . . . . . . . 16
Searching the corporate directory . . . . . . . . . . . . . . . . . . . . . . . . . . . . . . . . . . . . . . . . . . . . 16
Searching the corporate directory . . . . . . . . . . . . . . . . . . . . . . . . . . . . . . . . . . . . . . . . . 16
Adding more devices . . . . . . . . . . . . . . . . . . . . . . . . . . . . . . . . . . . . . . . . . . . . . . . . . . . . . . 17
Adding more devices . . . . . . . . . . . . . . . . . . . . . . . . . . . . . . . . . . . . . . . . . . . . . . . . . . . 17
Activating call routing . . . . . . . . . . . . . . . . . . . . . . . . . . . . . . . . . . . . . . . . . . . . . . . . . . . . . . 19
Activating call routing . . . . . . . . . . . . . . . . . . . . . . . . . . . . . . . . . . . . . . . . . . . . . . . . . . . 19
Working with voice mail . . . . . . . . . . . . . . . . . . . . . . . . . . . . . . . . . . . . . . . . . . . . . . . . . . . . 19
Checking voice mail . . . . . . . . . . . . . . . . . . . . . . . . . . . . . . . . . . . . . . . . . . . . . . . . . . . . 19
Avaya 3100 Mobile Communicator - Web UI User Guide
3
Contents
Retrieving voice mail . . . . . . . . . . . . . . . . . . . . . . . . . . . . . . . . . . . . . . . . . . . . . . . . . . . 19
Configuring voice mail . . . . . . . . . . . . . . . . . . . . . . . . . . . . . . . . . . . . . . . . . . . . . . . . . . 19
Mobile Do Not Disturb mode . . . . . . . . . . . . . . . . . . . . . . . . . . . . . . . . . . . . . . . . . . . . . 19
Enabling Do Not Disturb mode . . . . . . . . . . . . . . . . . . . . . . . . . . . . . . . . . . . . . . . . . . . 19
Disabling Do Not Disturb mode . . . . . . . . . . . . . . . . . . . . . . . . . . . . . . . . . . . . . . . . . . . 20
Mid Call features . . . . . . . . . . . . . . . . . . . . . . . . . . . . . . . . . . . . . . . . . . . . . . . . . . . . . . . . . 20
Placing a call on hold . . . . . . . . . . . . . . . . . . . . . . . . . . . . . . . . . . . . . . . . . . . . . . . . . . . 20
Releasing a call from hold . . . . . . . . . . . . . . . . . . . . . . . . . . . . . . . . . . . . . . . . . . . . . . . 20
Placing a call on hold and making another call . . . . . . . . . . . . . . . . . . . . . . . . . . . . . . . 20
Canceling a call . . . . . . . . . . . . . . . . . . . . . . . . . . . . . . . . . . . . . . . . . . . . . . . . . . . . . . . 20
Swapping two calls . . . . . . . . . . . . . . . . . . . . . . . . . . . . . . . . . . . . . . . . . . . . . . . . . . . . 21
Executing a consultative transfer . . . . . . . . . . . . . . . . . . . . . . . . . . . . . . . . . . . . . . . . . . 21
Executing a blind transfer . . . . . . . . . . . . . . . . . . . . . . . . . . . . . . . . . . . . . . . . . . . . . . . 21
Executing a consultative conference . . . . . . . . . . . . . . . . . . . . . . . . . . . . . . . . . . . . . . . 21
Blind conference . . . . . . . . . . . . . . . . . . . . . . . . . . . . . . . . . . . . . . . . . . . . . . . . . . . . . . 21
Acronyms . . . . . . . . . . . . . . . . . . . . . . . . . . . . . . . . . . . . . . . . . . . . . . . . . . . . . . . . . . . . . . 23
4
NN42030-110 Avaya 3100 Mobile Communicator 3.1 Standard 04.04
July 2010
Welcome
Welcome
This section contains the following topics:
•
“Your Avaya 3100 Mobile Communicator - Web UI” on page 5
•
“New in this Release” on page 5
•
“Avaya 3100 MC - Web UI overview” on page 6
Your Avaya 3100 Mobile Communicator - Web UI
Operating in your mobile Web browser, you can use the Avaya 3100 Mobile Communicator - Client Web
User Interface (Avaya 3100 MC - Client Web UI) to access enterprise telephony features using the Avaya
3100 Mobile Communicator solution.
Note: The Avaya 3100 MC - Web UI panes you see on your device may differ from the illustrations in
this document, due to variations in the way devices display data.
New in this Release
The following sections detail what’s new in Avaya 3100 Mobile Communicator - Web UI User Guide
(NN42030-110) in Avaya 3100 Mobile Communicator Release 3.1.
Features
This release contains information about the following:
•
“Activating call routing” on page 19
Other changes
The image files are updated. The new images show the Web UI on a BlackBerry device.
Revision history
July 2010
Standard 04.04. This document is issued to support Avaya 3100 Mobile Communicator Release
3.1. Editorial changes were made.
November 2009
Standard 04.03. This document is issued to support Avaya 3100 Mobile Communicator Release
3.1. Technical updates were made.
November 2009
Standard 04.02. This document is issued to support Avaya 3100 Mobile Communicator Release
3.1. Route Schedule configuration and Do Not Disturb activation were updated.
October 2009
Standard 04.01. This document is issued to support Avaya 3100 Mobile Communicator Release
3.1.
Avaya 3100 Mobile Communicator - Web UI User Guide
5
Welcome
March 2009
Standard 03.02. This document is issued to support Avaya 3100 Mobile Communicator Release
3.0. Changes were made to technical content.
March 2009
Standard 03.01. This document is issued to support Avaya 3100 Mobile Communicator Release
3.0.
Avaya 3100 MC - Web UI overview
With Avaya 3100 MC - Web UI, you can perform the following tasks:
•
Associate a single number-your office extension-with all of your outbound phone calls.
•
Answer office calls on your mobile device or any defined device.
•
Search for people in the corporate directory.
•
See whether you have new voice mail messages in your mailbox.
•
Statically redirect your incoming calls to an alternate contact number such as your home phone or
another number.
•
Force all calls to voice mail using the Do Not Disturb option.
•
Communicate using of the following methods:
•
•
dial a number
•
select a contact from corporate search result
Available outbound call modes:
• Call-me-First—In this mode, your calls are set up in two stages. First, the system calls you at the
location of your choice. After you answer, the system calls the other party
•
Available telephony features (support varies by network):
6
•
call hold and retrieve
•
call mute
•
supervised and unsupervised call transfer
•
call swap
•
caller ID/caller name display (information varies by network)
•
conference call
NN42030-110 Avaya 3100 Mobile Communicator 3.1 Standard 04.04
July 2010
Getting started
Getting started
This section contains the following topics:
•
“Enterprise requirements” on page 7
•
“Hardware requirements” on page 7
•
“Licensing” on page 7
Enterprise requirements
The Avaya 3100 Mobile Communicator - Web User Interface (Avaya 3100 MC - Web UI) requires the
following applications at the enterprise site:
•
Avaya 3100 Mobile Communicator Gateway
•
Avaya Communication Server 1000 (Avaya CS 1000) Release 5.5 programmed with an account for
each user
Hardware requirements
The Avaya 3100 MC - Web UI supports the following minimum requirements:
•
Mobile devices with:
•
a color screen
•
a web browser
•
a minimum screen size of 160 X 120.
Web page rendering is dynamically optimized for higher resolution formats.
•
Personal computer with a Web browser
The Avaya 3100 MC - Client Web UI was tested using the default browsers on the following platforms:
•
Microsoft Windows Mobile 6.0 and 6.1
•
Windows Internet Explorer
•
RIM BlackBerry
•
Nokia
•
Apple iPhone
•
Opera
Languages
English is the only supported language.
Licensing
Provided that there is sufficient capacity on the system, the first time you log in to the system you receive a
license to use the Avaya 3100 MC - Web UI. You retain this license regardless of your status on the
network (logged in or out). Only the system administrator has the authority to revoke your license and
make it available for another user.
Avaya 3100 Mobile Communicator - Web UI User Guide
7
Getting started
8
NN42030-110 Avaya 3100 Mobile Communicator 3.1 Standard 04.04
July 2010
Configuring the Avaya 3100 MC - Web UI
Configuring the Avaya 3100 MC - Web UI
This section describes how to configure the Avaya 3100 Mobile Communicator - Web User Interface
(Avaya 3100 MC - Web UI) and how to add a phone number or device.
Note: Avaya 3100 MC - Client Web UI provides enterprise mobility features using the existing web
browser on client devices. You are not required to install new client software to use Web UI.
The following topics are discussed:
•
“Accessing the Avaya 3100 MC - Web UI” on page 9
•
“Adding a phone number or device” on page 11
Accessing the Avaya 3100 MC - Web UI
You can use any computer (desktop PC or laptop) or your mobile device to access the Avaya 3100 MC Web UI.
Prerequisites
•
Obtain the following from your administrator:
— the Avaya 3100 MC - Web UI Uniform Resource Locator (URL)
— your user ID and password
Accessing the Avaya 3100 MC - Web UI
1. On your computer or mobile device, open a web browser.
2. In the URL box, type the Avaya 3100 MC - Web UI URL provided by your administrator.
Examples:
http://mc3100.customerxyz.com:8080/mp
https://mc3100.customerxyz.com:8443/mp
The Login page appears.
3. Enter your ID and password provided by your system administrator.
Contact your administrator if you enter your ID and password correctly but cannot log on.
Avaya 3100 Mobile Communicator - Web UI User Guide
9
Configuring the Avaya 3100 MC - Web UI
4. Optionally, select the This is a shared device/browser check box to automatically log a user off the
Avaya 3100 MC - Web User Interface when a Web session times out or is closed.
5. Click Sign In. The initial setup page appears with the following message: You have no phone numbers
configured yet.
Note: The initial setup page appears only after you log on for the first time or if you delete all the
phone numbers associated with your Avaya 3100 MC - Web UI account.
6. For future ease of use, bookmark this URL.
10 NN42030-110 Avaya 3100 Mobile Communicator 3.1 Standard 04.04
July 2010
Configuring the Avaya 3100 MC - Web UI
Adding a phone number or device
After you access the Avaya 3100 MC - Web UI for the first time, you receive a prompt to add a phone
number or device.
Adding a phone number
1. Click Settings to add the initial phone number or device. The Settings pane appears.
2. Click Add a new device.
3. In the Device Name box, type a unique name for the new phone number or device.
Avaya 3100 Mobile Communicator - Web UI User Guide
11
Configuring the Avaya 3100 MC - Web UI
4. In the Number box, type the phone number associated with the device name.
Note: The format for the phone number must match the format for your enterprise infrastructure. If you
are unsure of the format for your enterprise, contact your administrator.
5. Click Save.
6. Your voicemail service number is assigned a default value by your administrator. If your voicemail
service number is different from the default, or you are instructed to change this number by your
administrator, enter the voicemail service number and click Save.
Setting up a route schedule
You can optionally set up a route schedule so that at specific times you receive calls on a specific phone or
device.
When call routing is selected, time periods that are not configured in the route schedule automatically
receive Do Not Disturb mode. When in Do Not Disturb mode, you cannot place outgoing calls from the
Avaya 3100 MC - Web UI without reconfiguring Advanced Call Routing.
Setting up a route schedule
1. From the Settings page, click Use Advanced call routing.
2. Click the Add a route schedule link.
The Add new routing rule pane appears.
3. Create a rule.
a. Select one of the preconfigured devices from the Send calls to list.
b. Enter the time in the From and To boxes. Use 24-hour format or 12-hour format with am or pm
suffix.
Examples: 23:59, 2359, 11:59pm, 1159pm
c.
Place a check mark beside the days that this rule should be active.
4. Click Save.
You can create more than one schedule. For example, you might want one schedule for your normal
working hours, and a second schedule for regular meetings or appointments.
If you create more than one schedule, the schedule may overlap with another schedule. Sort your
schedules in priority order, so that the more important schedule is higher in the list.
12 NN42030-110 Avaya 3100 Mobile Communicator 3.1 Standard 04.04
July 2010
Basic functions
Basic functions
This section contains the following topics:
•
“Logging on to the Web UI” on page 13
•
“Exiting the application” on page 15
•
“Making calls” on page 15
•
“Recently Made Calls” on page 16
•
“Searching the corporate directory” on page 16
•
“Adding more devices” on page 17
•
“Activating call routing” on page 19
•
“Working with voice mail” on page 19
•
“Mobile Do Not Disturb mode” on page 19
•
“Mid Call features” on page 20
Logging on to the Web UI
Complete this procedure to log on to the Avaya 3100 Mobile Communication - Web User Interface (Avaya
3100 MC - Web UI).
Prerequisites
•
Obtain the following from your administrator:
— the Avaya 3100 MC - Web UI URL
— your user ID and password
Logging on to the Web UI
1. On your computer or mobile device, open a web browser.
2. Click the bookmark that you previously created.
OR
In the URL box, type the Avaya 3100 MC - Web UI URL provided by your administrator.
For example, http://mc3100.customerxyz.com:8080/mp
Avaya 3100 Mobile Communicator - Web UI User Guide
13
Basic functions
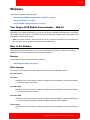
3. Press Enter. The Login page appears.
Figure 1: Login page
4. In the ID box, type your SIP ID.
5. In the Password box, type your password.
6. Select the This is a shared device/browser check box to automatically log you off the Avaya 3100
MC - Web UI when the Web session times out or is closed.
14 NN42030-110 Avaya 3100 Mobile Communicator 3.1 Standard 04.04
July 2010
Basic functions
7. Click Sign In. The home pane appears.
Exiting the application
1. Go to the Home panel of the Avaya 3100 MC - Web UI.
2. Select Menu, Quit.
Avaya recommends that you exit from the Avaya 3100 MC - Web UI before you shut off your device.
Making calls
After you log on to the Avaya 3100 MC - Web UI, you can make calls.
Making a call
1. On the Home page, check the contents of the Calls go to field.
If the Calls go to field specifies Do Not Disturb, see “Mobile Do Not Disturb mode” on page 19.
2. In the box to the right of the telephone icon, type the number to dial.
3. Click Call. The Home page lists the status of the call.
4. Answer the incoming call on the computer or your mobile device. You hear the far end ringing until
your party (or their voice mail) answers the call.
Making a call from the History or Search Results screen
You can make a call from the History or Search Results screens. When you start from these screens, you
receive more options for placing the call.
Avaya 3100 Mobile Communicator - Web UI User Guide
15
Basic functions
1. From the History screen, click a hyper linked telephone number.
OR
From the Search Results Detail screen, click a hyper linked telephone number.
2. On the Confirmation screen, click Call.
Recently Made Calls
The Avaya 3100 MC - Web UI keeps track of recently made calls from the device and displays a maximum
of five entries on the Main pane.
When the link to recent calls is selected, a list of the last 20 calls made from the device is displayed.
Reviewing a list of Recent Calls
1. On the Main pane, select the Recently Made Calls link.
The Recently Made Calls pane appears.
2. Recent calls are displayed as a link. Select the link for a number to start a call.
3. Select Menu, Quit to exit the application.
Searching the corporate directory
To search the corporate directory, complete this procedure.
Searching the corporate directory
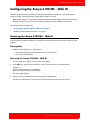
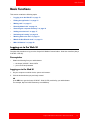
1. On the Home page, in the box located to the right of the magnifying glass icon, type a name (first or
last) or search string.
Figure 2: Home page
16 NN42030-110 Avaya 3100 Mobile Communicator 3.1 Standard 04.04
July 2010
Basic functions
2. Click Search. The search results appear on the Directory Search page.
The search results include all contacts where the first or last name match the entered search string. If
no matches are found, the following message appears: Nothing found.
3. Up to 25 entries appear on the screen. If there are more than 25 entries, click the right arrow (>) to
navigate forward in the list to the additional entries. Use the left arrow (<) to navigate backward in the
list.
4. Select an entry in the list. The details screen shows the list of numbers for that person, and you can
click a number to dial the person.
5. To search again, in the box at the top of the page, modify or delete the previous search criteria and
enter new search criteria, and then click New Search.
Adding more devices
Add more phone numbers or devices where you can be reached.
Adding more devices
1. On the Home pane, click Settings.
Avaya 3100 Mobile Communicator - Web UI User Guide
17
Basic functions
2. Click the new link. The Add a new device pane appears.
3. In the Device Name box, type a unique name.
4. In the Number box, type a number that is reachable from within your enterprise infrastructure.
Note: The format for the phone number must match the format for your enterprise infrastructure. If you
are unsure of the format for your enterprise, contact your administrator.
5. Click Save. The Settings pane appears listing the device.
18 NN42030-110 Avaya 3100 Mobile Communicator 3.1 Standard 04.04
July 2010
Basic functions
Activating call routing
Activate call routing to select a device as the default device for all incoming calls to your enterprise
extension. You can select only one device at a time as your default device. For information on setting up a
Route schedule, see “Setting up a route schedule” on page 12.
Activating call routing
1. From the Home page, click Settings.
2. On the Settings page, select the device that you want for your default device.
Working with voice mail
You can use your Web UI with your Enterprise voice mail system.
Checking voice mail
1. On the Home pane, click Refresh. The Home page refreshes and one of the following messages
appear:
— Voicemail: No messages
— Voicemail: New messages
Retrieving voice mail
1. On the Home pane, click the Voicemail: New messages link.
2. Answer the incoming call. You are connected to your Enterprise voicemail system.
3. Enter your PIN when prompted.
Configuring voice mail
The voice mail service number is provided by your administrator. You can change the service number if
requested to do so by your administrator.
1. On the Home pane, select Settings.
The voice mail service number is displayed at the bottom of the Settings pane.
2. Choose the new voicemail service number from the drop down menu, and click Save.
Mobile Do Not Disturb mode
To stop calls from being sent to your mobile device, enable Do Not Disturb mode. When your device is in
Do Not Disturb mode, you cannot place calls from the Avaya 3100 MC - Web UI.
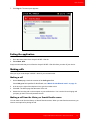
Enabling Do Not Disturb mode
1. On the Home pane, click Settings. The Settings pane appears.
2. On the Settings pane, select Send Calls to, Do not disturb.
3. Click Save.
Avaya 3100 Mobile Communicator - Web UI User Guide
19
Basic functions
Disabling Do Not Disturb mode
1. On the Home pane, click Settings. The Settings pane appears.
2. On the Settings pane, select Send Calls to, and then select your telephone number.
3. Click Save.
Mid Call features
While in an active enterprise call, you can invoke the following features:
•
“Placing a call on hold” on page 20
•
“Releasing a call from hold” on page 20
•
“Placing a call on hold and making another call” on page 20
•
“Canceling a call” on page 20
•
“Swapping two calls” on page 21
•
“Executing a consultative transfer” on page 21
•
“Executing a blind transfer” on page 21
•
“Executing a consultative conference” on page 21
•
“Blind conference” on page 21
Ensure that you know the system prefix. By default, the prefix is *.
Placing a call on hold
While on a call, you can place a call on hold.
1. To place a call on hold, press <prefix>6#.
Releasing a call from hold
You can release a call that you placed on hold.
1. To release a call on hold, press <prefix>7#.
Placing a call on hold and making another call
After you place a call on hold, you can place another call.
1. To hold a call and dial another, press <prefix>1<number to dial>#.
Canceling a call
You can cancel a call. For example, if you place a call on hold and make a second call, you can cancel the
second call.
1. To cancel a call, press <prefix>2#.
20 NN42030-110 Avaya 3100 Mobile Communicator 3.1 Standard 04.04
July 2010
Basic functions
Swapping two calls
You can swap two calls. For example, if you have a call on hold and are on a second call, you can place
the second call on hold and make the first call active.
1. To swap two calls, press <prefix>3#.
Executing a consultative transfer
You can consult with a third-party during a call and then transfer the call to the third-party.
1. To execute a consultative transfer, press <prefix>1<number to dial>#.
2. Consult with the third party.
3. To transfer the call, press <prefix>4#.
Executing a blind transfer
You can transfer a call directly to a third-party.
1. To execute a blind transfer, press <prefix>1<number to dial>#.
2. While the third party is ringing, press <prefix>4# to transfer.
Executing a consultative conference
You can consult with a third-party while on a call and then conference in the third party.
1. To execute a consultative conference, press <prefix>1<number to dial>#.
2. Consult with the third party.
3. To conference, press <prefix>5#.
Blind conference
You can directly conference in a third party.
1. To execute a blind conference, press <prefix>1<number to dial>#.
2. While the third party is ringing, press <prefix>5# to conference in.
Avaya 3100 Mobile Communicator - Web UI User Guide
21
Basic functions
22 NN42030-110 Avaya 3100 Mobile Communicator 3.1 Standard 04.04
July 2010
Acronyms
Acronyms
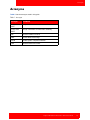
Table 1 lists the acronyms used in this guide.
Table 1: Acronyms
Acronym
Full Name
Avaya 3100
MCC
Avaya 3100 Mobile Communicator - Client
Avaya 3100
MCG
Avaya 3100 Mobile Communicator Gateway
SIP
Session Initiation Protocol
PBX
Private Branch Exchange
PSTN
Public System Telephone Network
URL
Uniform Resource Locator
Avaya 3100 Mobile Communicator - Web UI User Guide
23


![MC3100 Series Regualtory Guide [English] (P/N 72-124293](http://vs1.manualzilla.com/store/data/006151726_1-09b74da6e93171f99865574312a18d6c-150x150.png)