1
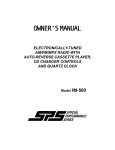
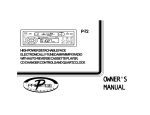
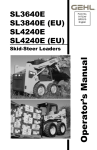
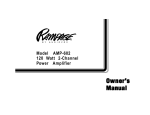
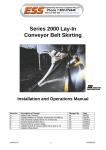
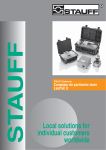
P-15
ELECTRONICALLY-TUNEDAM/FM/MPXRADIO
WITHSTEREOCASSETTEPLAYER
ANDQUARTZCLOCK
OWNER'S
MANUAL
OPERATING INSTRUCTIONS
1
ON-OFF SWITCH/VOLUME CONTROL
Rotate this knob clockwise to turn the radio on. Continue rotation until the desired volume level is obtained. Rotate the knob
fully counter-clockwise to turn the unit off.
3
LEFT/RIGHT BALANCE CONTROL
Rotate this knob to the left or right to obtain the desired balance
between left and right speakers. A detent click can be felt at the
center of rotation.
4
FRONT/REAR FADER CONTROL
2
TONE CONTROL (PUSH)
Rotate this knob to the left or right to fade the sound between
Push this knob in and rotate it clockwise to emphasize treble
response, counter-clockwise to emphasize bass response. A
detent click can be felt at the center of rotation. The knob will
automatically return to the outer position (volume control) when
released.
the front and rear speakers in 4 speaker installations. A detent
click can be felt at the center of rotation. When used in conjunction with the Left/Right Balance Control , you have full 4way stereo balance capability. In 2 speaker installations, rotating the Fader Control will have no effect on the speaker output.
-1-
3
5
AM/FM BAND SELECTOR (AM/FM)
Each time this button is pressed, the radio band is changed.
The indication “AM1”, “AM2”, “FM1”, “FM2”, or “FM3” will appear on the display panel according to your selection.
6
MANUAL UP/DOWN TUNING
To manually select a radio station frequency, rotate the knob to
the right. The radio will advance one frequency step higher. To
tune downward, rotate the knob to the left. Holding the knob in
either position for longer than 0.5 seconds will cause the radio
to tune rapidly in the selected direction.
7
AUTOMATIC SEEK TUNING
Pressing this button will activate the Automatic Seek Tuning
function. The radio will seek the next available station in the
Up tuning direction and stop at that frequency. The Seek function can be stopped by pressing the button again or activating
any other tuning function.
8
LOCAL/DISTANT SELECTOR (LOC)
This feature is used to select the strength of the signals at which
the radio will stop during Automatic Seek Tuning. Pressing the
button will select the Local setting (“LOC” will appear on the
display panel) and only strong (local) stations will be received.
Pressing the button again will select the Distant setting (“LOC”
will disappear from the display panel) and the radio will stop at
a wider range of signals, including weaker (more distant) stations.
9 PRE-SET
SCAN TUNING (PS)
AUTO-STORE TUNING (AS)
During radio operation, press this button momentarily to scan
the 6 stations pre-set into the memories of the band in use. The
unit will stop at each pre-set station for 5 seconds before continuing to the next pre-set station (the pre-set number on the
display panel will flash during Pre-Set Scan operation). Press
the button again momentarily to stop the Pre-Set Scan operation and remain on the selected frequency.
Pressing the button for longer than 2 seconds will activate the
Auto-Store Tuning, which will automatically scan the band in
use and enter strong stations into the pre-set memory positions
for that band. After entering the stations in the memories, the
unit will automatically begin scanning the pre-sets for 5 seconds
each so they may be heard. Press the pre-set button of the
desired station or use any other tuning function to stop the scanning function. If you have already set the pre-set memories of
that band to your favorite stations, activating the Auto-Store feature will erase those stations and enter the new strong stations.
The feature is most useful when traveling in a new area where
you are not familiar with the local stations.
-2-
bl
STATION PRE-SET MEMORIES
To set any of the 6 pre-set memory buttons, use the following
procedure:
1. Turn the unit on and select the desired band.
2. Select the first station to be pre-set using the Manual
Up/Down
or Automatic Seek
Tuning functions.
3. Press the pre-set button to be set and continue to hold the
button in. The volume will momentarily mute and then return
and the pre-set number will appear on the display panel. The
station is now set into the memory of that pre-set button and
can be re-called by momentarily pressing the button.
4. Repeat the above procedure for the remaining 5 pre-sets on
the band in use and for the other 4 bands of the unit.
6
7
bm
LIQUID CRYSTAL DISPLAYPANEL
The Liquid Crystal Display (LCD) panel displays the frequency,
time and activated functions.
NOTE: It is a characteristic of LCD panels that, if subjected to
cold temperatures for an extended period of time, they
will take longer to illuminate than under normal conditions and the visibility of the numbers on the display
may decrease. The LCD read-out will return to normal
when the temperature increases to a normal range.
bn
CASSETTEDOOR
Hold the cassette with the exposed tape edge to the right, and
NOTE: Observe cassette operation cautions in Care and Maintenance section of this manual.
bo
FAST-FORWARD/EJECT BUTTON
This button performs two functions. To eject a cassette, simply
depress the button fully then release. The cassette will eject
and radio operation will resume.
To fast-forward the tape, depress the button half-way in to the
locked position. To stop fast-forward and resume normal tape
playback, depress the button slightly and release. Do not press
fully in or the cassette will be ejected.
NOTE: Never leave a cassette engaged in the player when not
in use. Doing so can cause damage to the cassette
and/or mechanism of the unit. Always press the eject
button and remove the cassette before leaving the vehicle.
bp
CD/AUXILIARY INPUT SELECTOR (CD)
An auxiliary input jack is provided on the rear of this unit to
accept the audio from an additional source such as a portable
CD player. Connect the audio output from the source unit to the
cable at the rear of the chassis using an appropriate audio patch
cable (available at most radio supply stores). To select play of
the source connected to the input jack, press the CD/Auxiliary
Input Selector button. The indication “Cd” will appear on the
display panel and the input connected to the unit will now operate through the audio system of the radio. Use the volume,
balance and tone controls of the radio to adjust the sound as
desired.
insert into the tape door. Depress fully until the cassette is engaged and begins playing. When the cassette reaches the end
of play, the unit will automatically change over to radio operation.
-3-
bq
TIME/FREQUENCY SELECTOR (T/F)
During radio or CD/Auxiliary Input operation, press this button to
call the time display on the incorporated quartz clock. Pressing
the button again or activating any tuning function (during radio
operation) will return to frequency or “Cd” display.
During tape operation, the time display will always be shown.
SETTING THE CLOCK
1. Switch the vehicle ignition “on” and radio “off” (time display will show on the LCD panel).
bq
2. Press and hold the Time/Frequency Selector (T/F)
button. At the same time, turn the Manual Tuning
Control
to the left to adjust the hours (including “AM” or “PM” indication) or to the right to adjust the
minutes.
6
3. After setting the correct time, release the Time/Frequency Selector.
-4-
SPECIFICATIONS
Size:
7" W
x 2" H x 5 1/2" D
178 mm x 50 mm x 140 mm
12 volts DC, negative ground
14 watts maximum
(7 watts x 2 channels)
Common-ground type design for 4 speaker use.
May also be used with 2 speakers.
Compatible with 4-8 ohm speakers
AM:
530 - 1,710 KHz. (10 KHz. step)
FM:
87.5 - 107.9 MHz. (200 KHz. step)
AM:
20 uv.
FM:
1.5 uv.
Operating Voltage:
Output Power:
Output Wiring:
Output Impedance:
Tuning Range:
Sensitivity:
FM Stereo Separation:
Tape Frequency Response:
Tape S/N Ratio:
Wow & Flutter:
30 dB
50-10,000 Hz.
50 dB
0.25% WRMS
*Specifications are subject to change without notice.
-5-
CARE AND MAINTENANCE
The radio portion of your new sound system does not require any maintenance. We recommend you keep this manual for
future reference of the many features found in this unit.
As with any cassette player, the cassette section of this sound system does require a minimum of maintenance to keep it
in good working condition. The following simple care and maintenance suggestions should be followed to prevent
malfunctions of the cassette system.
CASSETTE CARE:
1. Purchase a cassette cleaning kit from your local retail store. Use it! At least every 20 to 30 hours of operation you must
clean the cassette mechanism. A dirty cassette player will have a poor sound.
2. Do not use cassettes that exceed 45 minutes of play on each side.
3. Do not insert a cassette that appears to be broken, twisted or dirty or with loose or torn labels on it.
4. Always keep your cassettes away from direct sunlight or exposure to sub-freezing conditions. If a cassette is cold, allow
it to warm up before use.
5. Do not keep a cassette in the player when not in use.
6. Before inserting a cassette in the player, check that the tape is tightly wound on the reels. Take up any excess slack using
a pencil to turn the drive hub in the cassette (see diagram below).
-6-
12 MONTH LIMITED WARRANTY
Applies to automotive radios, radio/tape players, radio/CD players,
CD changers, power amplifiers, equalizers and accessories.
AUDIOVOX CORPORATION (the Company) warrants to the original retail purchaser of this product that should this product or any part thereof,
under normal use and conditions, be proven defective in material or workmanship within 12 months from the date of original purchase, such
defect(s) will be repaired or replaced with new or reconditioned product (at the Company's option) without charge for parts and repair labor.
To obtain repair or replacement within the terms of this Warranty, the product is to be delivered with proof of warranty coverage (e.g. dated
bill of sale), specification of defect(s), transportation prepaid, to an approved warranty station or the Company at the address shown below.
This Warranty does not extend to the elimination of externally generated static or noise, to correction of antenna problems, to costs incurred
for installation, removal or reinstallation of the product, or to damage to tapes, compact discs, speakers, accessories, or vehicle electrical
systems.
This Warranty does not apply to any product or part thereof which, in the opinion of the Company, has suffered or been damaged through
alteration, improper installation, mishandling, misuse, neglect, accident, or by removal or defacement of the factory serial number/bar code
label(s). THE EXTENT OF THE COMPANY'S LIABILITY UNDER THIS WARRANTY IS LIMITED TO THE REPAIR OR REPLACEMENT
PROVIDED ABOVE AND, IN NO EVENT, SHALL THE COMPANY'S LIABILITY EXCEED THE PURCHASE PRICE PAID BY PURCHASER
FOR THE PRODUCT.
This Warranty is in lieu of all other express warranties or liabilities. ANY IMPLIED WARRANTIES, INCLUDING ANY IMPLIED WARRANTY
OF MERCHANTABILITY, SHALL BE LIMITED TO THE DURATION OF THIS WRITTEN WARRANTY. ANY ACTION FOR BREACH OF ANY
WARRANTY HEREUNDER INCLUDING ANY IMPLIED WARRANTY OF MERCHANTABILITY MUST BE BROUGHT WITHIN A PERIOD OF
30 MONTHS FROM DATE OF ORIGINAL PURCHASE. IN NO CASE SHALL THE COMPANY BE LIABLE FOR ANY CONSEQUENTIAL OR
INCIDENTAL DAMAGES FOR BREACH OF THIS OR ANY OTHER WARRANTY, EXPRESS OR IMPLIED, WHATSOEVER. No person or
representative is authorized to assume for the Company any liability other than expressed herein in connection with the sale of this product.
Some states do not allow limitations on how long an implied warranty lasts or the exclusion or limitation of incidental or consequential damage
so the above limitations or exclusions may not apply to you. This Warranty gives you specific legal rights and you may also have other rights
which vary from state to state.
U.S.A. : AUDIOVOX CORPORATION, 150 MARCUS BLVD., HAUPPAUGE, NEW YORK 11788
1-800-645-4994
CANADA : CALL 1-800-645-4994 FOR LOCATION OF WARRANTY STATION SERVICING YOUR AREA
AUSTRALIA : AUDIOVOX PACIFIC PTY LTD., DOYLE AVENUE, UNANDERRA, NSW 2526
(042) 718-555
NEW ZEALAND : AUDIOVOX PACIFIC PTY LTD., UNIT B, 6 HENDERSON PLACE, PENROSE, AUCKLAND
(09) 645-720
© 1998 Audiovox Corp., Hauppauge, N.Y. 11788
Printed in China
Form. No. 128-4240E
Form No. 128-5254