1
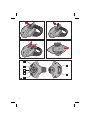
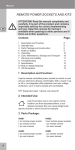
English
AUDIOVOX
NPSWR
Owner's manual and mounting instructions
WWW.Audiovox.com
128-7272
1.
2.
1
7
2
3
4
6
5
2
English
Notes on operating instructions
The icons below used in this operating instructions have the following meaning:
Safety instructions and warnings contain important information for the safe use of the
unit. Failure to observe this information may result in a risk of damage or injury. Therefore,
please observe this information with particular care.
IMPORTANT INFORMATION
When driving straight ahead the Steering Wheel Remote Control must under no
circumstances obstruct the drivers sight on the following pilot lights and controls:
Pilot lights of turning indicator, high beam, rear fog lamp, fog lamp, brakes, Airbag, ABS,
ESP and the speedometer.
Use only the parts included with the unit to ensure proper installation. The use of
unauthorised parts can cause malfunctions.
Scope of delivery
Before starting installation check scope of delivery. The complete mounting kit contains:
1 1 Remote control
2 1 High Performance Lithium Battery CR2 (3 V)
3 Foam rubber pad
4 Instructions for use and installation instruction
5 Service leaflet
General
With the NPSWR you easily can control both the Color and Monochrome Naviga tion Systems. The RCS 4000 is used exclusively for the Integrated Navigation Radios.
Function
The Steering Wheel Remote Control transmits its infrared commands in the direction
of the driver. A big part of the infrared light is reflected towards the device to be con trolled.
The function of the remote control can be affected by the follo wing influences:
– mounting position of the Steering Wheel Remote Control,
– blocking-out of the IR emitting apertures by fingers,
– unfavourable mounting position of the infrared receiver (for example monitor
and/or radio),
– infrared light absorptive clothing of the driver (bad reflection of the infrared light),
– sitting position of the driver,
– design and material of the vehicle interior (in particular the panelling),
– light and/or strong solar radiation (particularly at convertibles),
– shading of the IR link through hands, arms, legs (for example if the device to be
controlled is built-in very deeply in the dashboard) or other objects.
3
Selecting mounting position
The Steering Wheel Remote Control is designed for
left-hand drive vehicles and can be installed in all steering wheels with an outer diameter from 280 mm to
380 mm and a thickness from 25 mm to 35 mm. The remote control should be installed between the 1 o'clock
and 5 o'clock position in the steering wheel. The local
traffic and registration regulations of the country in
which the vehicle is licensed have to be observed:
1 o'clock
Mounting
position
5 o'clock
A
The Steering Wheel Remote Control must not be mounted in the inflation area of the
Airbags. Possible injury can occur if not observed.
A
The Steering Wheel Remote Control must not hinder the steering process during driving
under any circumstances!
A
When driving straight ahead the Steering Wheel Remote Control must not obstruct the
drivers sight on the following system warning lights and instruments:
System warning lights for flashing indicators, high beam, rear fog lamp, fog headlamps,
brakes, Airbag, ABS, ESP and the speedometer.
Mounting the Steering Wheel Remote Control, fig. 1 - 3
1. Open the locking lever on the rear of the remote control.
2. Hold the remote control inside the steering wheel and guide the strap under the
locking lever (fig. 1).
3. Tighten the strap slightly and then press it with the perforation firmly into the matching
catches at the locking lever (fig. 2).
4. Close the locking lever (1.) and then push it in the direction of the +/- buttons (2.),
(fig. 3).
5. Release the locking lever. Now the lever should engage firmly through the tension of
the strap.
If the locking lever should not engage, or the remote control should not fit firmly
enough at the steering wheel, please repeat steps 3. - 5.
6. If required cut the remaining part of the strap above the locking lever.
Note: In order to improve adhesion in the case of steering wheels of large internal
diameter, the foam rubber pad supplied with the unit can be bonded to the battery
compartment lid of the remote control before installation.
Controls
Mode selection, fig. 5a
The NP
PSWR will only operate Audiovox Navigation Systems.
The slide switch 3 at the outer side of the remote control must be switched to "N".
☞
Switch to “N” to be able to control Navigation Systems.
Note: With some Navigation Systems you have to activate the “Steering wheel remote
control” option in the system settings menu to control the system with the Steering
Wheel Remote Control. You find information on that in the instructions for use of the
respective device.
With some Navigation Systems the supplied remote control must be taken out of the
holder so that the system reacts to the Steering Wheel Remote Control.
4
English
Key functions
NPSWR, fig. 5a
Key
1
Navigation mode (N) Function
Press briefly: RPT
.
Repeating a voice message
Press longer: ALT-R
.
Plan an alternative route
2
Cursor keys:
Move the cursor in menus
3
Mode switch Navigation / Audio
4
OK: Confirming a selection.
5
Press briefly: MAP
.
For systems with map display:
Toggle between Menu and map display
Press longer: MENU
.
Jump to main menu
6
Decrease volume
7
Increase volume
Replacing battery of the remote control, fig. 4
In order to ensure proper functioning of the steering wheel remote control in the
vehicle, it is essential that only CR 2 type batteries are used, which are heat-resistant up to
100 °C according to the battery manufacturer’s specifications.
You have to replace the battery of the remote control, if the device to be controlled
no longer responds to key presses even under favorable circumstances or the device
to be controlled indicates a weak battery.
Remove the remote control from the steering wheel. For this purpose first push the
locking lever towards the +/– buttons and then lift it.
Push the battery compartment lid on the back of the remote control in direction of
the arrow and open the battery compartment.
Remove the discharged battery.
5
☞
☞
☞
Insert a new Lithium battery “CR2” type. Pay attention to correct polarity (marked
in the compartment).
Close the battery compartment.
Reattach the remote control to the steering wheel.
Notes:
In many countries used batteries may not be disposed of with your household waste.
Please determine how to dispose of used batteries according to local regulations.
Troubleshooting
In rare instances, your Steering Wheel Remote Control may not function the way you
expect it to. Before calling for service please read the operating instructions and go
through the following check list; it may be possible to easily remedy an apparent malfunction.
Symptoms
Navigation Systems
Possible cause / remedy
System does not or not always react to key
presses on the remote control.
Battery of the remote control is discharged.
• Replace the battery with a new one of the same type (CR 2).
See section “Replacing battery of the remote control”.
Interference of the IR receiver built in the Navigation Monitor by strong
solar radiation into the vehicle.
• If possible try to find a more suitable position for the remote control on
the steering wheel.
IR-link covered by fingers, arm or subjects.
After the first press on OK the system does
no longer react on the Steering Wheel
Remote Control.
Audio mode selected:
• Set Mode switch on the Remote Control to “N”.
Steering Wheel Remote Control is not “registered” to the Navigation
System.
• Activate “Steering Wheel Remote Control” option in the System
Settings menu of your Navigation System.
Supplied remote control is still placed in its holder.
• Remove remote control of the Navigation System from its holder.
• Set Mode switch on the Remote Control to “N”.
• Activate “Steering Wheel Remote Control” option in the System
Settings menu of your Navigation System.
Service
For Tech Service, call Audiovox at 1 800 225-6074.
Subject to technical modifications and errors.
6