1
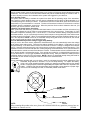
Model AA-930
Two Button Code Learning
Remote Alarm With Shock Sensor
Installation & Operating Manual
What Is Required For This Installation:
1) A working knowledge of automotive mechanical and electrical systems.
2) Electric Drill, 1/8” Drill Bit and (2) # 8 x 3/4” Sheet Metal Screws: To drill the mounting holes and secure
the Siren Assembly to the vehicle.
3) Electrical Tape: For insulating your wiring connections.
4) (4) 6” Cable Ties: For routing the harness under the hood and inside the vehicle’s underdash area.
Installation Of The Major Components:
Installation Of The Major Components:
Siren:
Mount the Siren/Control Module in the engine compartment. The assembly should not be mounted within 8”
of any hot surface. Also consideration should be made to keep the unit away from any moving parts, such
as the steering shaft or knuckle, as this will interfere with safe operation of the vehicle. Use the siren
bracket as a template and mark the two mounting holes with a pencil or scribe. Drill the two holes with a
1/8” drill bit and secure the siren assembly to the location with two #8 screws.
Wiring:
RED FUSED WIRE: + 12 VDC CONSTANT BATTERY SOURCE
Connect the red fused wire to a + 12 VDC constant battery source capable of supplying 5 amps of current. This
wire provides power to the main alarm module.
BLACK WIRE: CHASSIS GROUND
Connect this wire to a solid, metal part of the vehicle’s chassis.
Do not confuse this wire with the thin black antenna wire that exits the control module independently.
Code Learning:
In case the transmitter is lost, or you require additional transmitters, the code of the transmitter must be
programmed into the receiver before it is capable of responding to the new or additional transmitters. Please
perform the following procedure:
a) With the system disarmed, disconnect then reconnect power to the alarm module, the siren will emit 3 chirp
tones indicating the unit is ready to accept programming of up to 3 transmitters.
b) Within 8 seconds, press any button of the transmitter to be programmed.
NOTE: If no transmitter button is activated the unit will exit the program mode. Also, any time the program
mode is entered and any transmitter is activated, all other transmitters will be erased. During the program
sequence, you must have all transmitters present to be programmed that you wish to operate and activated
one at a time during the program sequence. Each transmitter activated will cause the siren to chirp, once for
the first, twice for the second, and three times for the third. If a fourth is attempted to be programmed, the first
will be erased and the fourth will move the other two forward in the program.
Arming The System:
With the system disarmed, press the arm/disarm button once. The siren will chirp once and the LED will begin
to flash, and the engine starter will be disabled. 5 seconds after the chirp, the system will be completely
armed. During the armed mode, the unit can be triggered by shock/vibration, or a change in voltage such as
the interior light turning on.
Arming With The Two Stage Shock Sensor Bypassed:
With the system disarmed, press the arm/disarm button once, the siren will chirp once. Within 5 seconds,
press button 2 one time. The siren will emit one short chirp indicating the system is set and will be fully armed
in 5 seconds with the shock sensor bypassed for one arming cycle. In this mode, the system cannot be
triggered by the shock sensor. The only means of triggering is the voltage drop sensor.
Arming With The Voltage Sensor Bypassed:
With the system disarmed, press the arm/disarm button once, the siren will chirp once. Within 5 seconds,
press button 2 two times. The siren will emit one long chirp indicating the system is set and will be fully armed
in 5 seconds with the voltage sensor is bypassed. In this mode, the system cannot be triggered by a change
in voltage. The only means of triggering is the shock sensor.
In The Triggered Mode:
When the system is armed, if the voltage drops, or a strong vibration is presented to the protected vehicle, the
unit will trigger. When triggered, the siren will sound for 30 seconds then reset and continue to protect your
vehicle. During the triggered mode, the unit can be reset by disarming with the transmitter or by use of the
override method described later in this manual.
Disarming The System:
With the system armed, press the arm/disarm button once, the siren will chirp two times indicating the system
is disarmed. The LED will turn off and the starter disable relay will be enabled allowing the vehicle to start. If
the siren chirped four times, this indicated that the system was triggered in your absence.
Panic And Car Finder:
The system offers the ability to activate the system from within the full operating range of the transmitter.
This is useful in a panic situation where you may want to call attention to the vehicle to attract attention, or in
a crowded parking lot to locate your vehicle. To activate the Panic/Car Finder Mode, press and hold the Arm/
Disarm button of your transmitter for 3 seconds. The siren will sound and continue for 30 seconds or until the
arm/disarm button is activated a second time. When the panic/car finder mode is allowed to time out, (30
seconds), the unit will enter the armed mode.
Adjusting The Shock Sensor Sensitivity:
Within 10 seconds after disarming, press and hold both buttons of the transmitter until the unit emits a long
chirp. This indicates the unit is ready to accept adjustments of the shock sensor. Press button 2 of the
transmitter to adjust the sensitivity level. The low tone, # 1, is the most sensitive setting, the highest tone # 8
is the least sensitive. As you cycle through the tones, hit the bumper or strong metal part of the vehicle to test
the threshold level of the sensor. When you are satisfied with the setting, press the arm/disarm button once to
lock in the adjustment. NOTE: If there is no transmitter activity during this mode for 20 seconds, the unit will
exit the program mode and return to the disarmed mode.
The Unit Automatically Enters Voltage Trigger Delay Setting:
Once you lock in the shock sensor adjustment, described above, the unit automatically enters the voltage
sensor trigger delay setting mode. There are two settings available for this feature. Press button 2 once to
change the setting. If the siren emits one tone, the unit is set to react to a change in voltage 8 seconds after
arming. If the siren emits two tones, the unit is set to react to a change in voltage 4 minutes after arming. This
adjustment is useful for vehicles with after fans or delayed lighting circuits that remain on for a period more than
8 seconds after the vehicle is turned off and the door is closed. In these situations the unit should be set to two
chirps, trigger capable 4 minutes after arming. If the vehicle has no after fan, or delayed lighting system, then
the unit can be set for 1 chirp, trigger capable 8 seconds after arming. After your selection is made, press the
arm/disarm button one time to lock in the setting. NOTE: If there is no transmitter activity during this mode for
20 seconds, the unit will exit the program mode and return to the disarmed mode.
Transmitter:
The two transmitters provided with your unit have a small 12 volt battery that will require replacement if the
transmitter range seems to decrease, or if the unit stops working. To replace the battery,
using a coin or flat screwdriver blade, carefully pry apart the transmitter case top from bottom
shown. Properly dispose of the discharged battery and replace with a GP-23 or equivalent 12V
battery. Carefully snap the two transmitter halves together paying attention to proper alignment so as not to damage the LED, or transmitter printed circuit board.
NOTE:
Before returning this product to the store, please call 1-800-645-4994 for any questions you may have on
installation or customer service.
128-6499