1
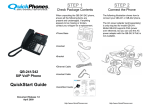
QA-341/342
WiFi Phone
User Manual
Product Release 1.1
Document Release 2.2
January 2009
Preface
1. Regulatory Information FCC Regulation
This model phone complies with part 15 of the FCC Rules. Operation is subject to the condition that this device does
not cause harmful interference.
This device complies with Part 15 of the FCC Rules. Operation is subject to the following two conditions: (1) this
device may not cause harmful interference and (2) this device must accept any interference received, including
interference that may cause undesired operation.
This equipment has been tested and found to comply with the limits for a Class B digital device, pursuant to Part 15
of the FCC Rules. These limits are designed to provide reasonable protection against harmful interference in a residential
installation.
This equipment generates uses and can radiate radio frequency energy and, if not installed and used in accordance
with the instructions, may cause harmful interference to radio communications.
However, there is no guarantee that interference will not occur in a particular installation if this equipment does
cause harmful interference to radio or television reception, which can be determined by turning the equipment off and
on, the user is encouraged to try to correct the interference by one or more of the following measures:
Reorient or relocate the receiving antenna.
Increase the separation between the equipment and the receiver.
Connect the equipment to an outlet on a circuit different from that to which the receiver is connected.
Consult the dealer or an experienced radio/TV technician for help.
Changes or modifications not expressly approved by the party responsible for compliance could void the user's
authority to operate the equipment.
The antenna(s) used for this transmitter must not be co-located or operating in conjunction with any other antenna
or transmitter.
This EUT is in compliance with SAR for general population uncontrolled exposure limits in ANSI/IEEE C95.1-1999
and has been tested in accordance with the measurement methods and procedures specified in OET Bulletin 65
Supplement C.
2. European regulation
Products with the CE mark comply with the Radio & Telecommunication Terminal Equipment Directive
(1999/5/EEC), the Electromagnetic Compatibility Directive (89/336/EEC) and the Low Voltage Directive (73/23/EEC) - as
amended by Directive 93/68/ECC - issued by the Commission of the European Community.
Compliance with these directives implies conformity to the following European Standards:
1999/5/EEC Radio & Telecommunication Terminal Equipment Directive (R&TTE) EN 301 511
Specific Absorption Rate (SAR) Standard: EN50360, EN 50361
73/23/EEC Low Voltage Directive (LVD) Standard: EN 60950:2000
89/336/EEC Electromagnetic Compatibility (EMC-Directive) Standard: EN301489-1/7
The manufacturer cannot be held responsible for modifications made by the user and the consequences thereof,
which may alter the conformity of the product with the mark.
3. RF exposure regulation (SAR)
This model phone meets the government's requirements for exposure to radio waves. This phone is designed and
manufactured not to exceed the emission limits for exposure to radio frequency (RF) energy set by the Federal
Communications Commission of the U.S. Government.
The FCC has granted an Equipment Authorization for this model phone with all reported SAR levels evaluated as
in compliance with the FCC RF exposure guidelines. SAR information on this model phone is on file with the FCC and
can be found under the Display Grant section of http://www.fcc.gov/oet/fccid after searching on FCC ID: Q3MMIP200
For body worn operation, this phone has been tested and meets the FCC RF exposure guidelines for use with an
accessory that contains no metal and positions the handset a minimum of 1.5 cm from the body. Use of other
enhancements may not ensure compliance with FCC RF exposure guidelines. If you do not use a body- worn accessory
and are not holding the phone at the ear, position the handset a minimum of 1.5 cm from your body when the phone is
switched on.
© 2009, ATI Applied Technology, LLC. All rights reserved. Prepared in the United States of America. QuickPhones is a trademark of ATI Applied Technology,
LLC, in the United States and/or other countries.
i
Table of Contents
1 OVERVIEW ..................................................................................................................................1
Package Contents ...........................................................................................................................1
2 PRODUCT DESCRIPTION ........................................................................................................2
Inserting the Battery.......................................................................................................................4
Installing the Belt Clip ...................................................................................................................4
Removing the Belt Clip..................................................................................................................4
Charging Your WiFi Phone ...........................................................................................................5
3 GETTING STARTED ..................................................................................................................6
Setting the Access Point (AP) ........................................................................................................6
Setting the SIP Profile....................................................................................................................8
Setup Complete ..............................................................................................................................9
4 MENU ..........................................................................................................................................11
DISPLAY SCREEN ..........................................................................................................................11
MAIN MENU ..................................................................................................................................12
Phonebook....................................................................................................................................12
Call Log........................................................................................................................................13
Phone Settings..............................................................................................................................14
Select AP......................................................................................................................................19
AP Find ........................................................................................................................................19
Select Profile ................................................................................................................................19
Information...................................................................................................................................20
WPS Registration .........................................................................................................................20
5 OPERATION ..............................................................................................................................21
MAKING A CALL ...........................................................................................................................21
ANSWERING A CALL .....................................................................................................................22
CALL OPTIONS ..............................................................................................................................22
6 SPECIFICATIONS.....................................................................................................................24
ii
Chapter 1 Overview
1 Overview
This WiFi Phone enables you to make VoIP phone calls through IEEE 802.11 b/g (WiFi) wireless networks. Read this user
manual carefully to learn how to operate this product and take advantage of its features.
Package Contents
When unpacking the WiFi phone, ensure all the following items are present and undamaged. If anything appears to be
missing or broken, contact your dealer for a replacement.
WiFi Phone
QA-341/342 WiFi phone
Charging Cradle*
Handset battery charger
*(QA-342 only)
Belt Clip
Can be used to clip the phone
after installation
Lithium-ion Battery
AC Power Adapter
QuickStart Guide
For QA-341/342 WiFi phone use
only, rechargeable.
Can be plugged directly into the
phone or plugged into the
charging cradle to charge the
phone.
Basic information for initial setup
of WiFi phone.
© 2009, ATI Applied Technology, LLC. All rights reserved. Prepared in the United States of America. QuickPhones is a trademark of ATI Applied Technology,
LLC, in the United States and/or other countries.
1
Chapter 2 Product Description
2 Product Description
This chapter describes the phone features and other accessories to familiarize you with the functions of your QA-341/342.
No.
Item
Description
1
Speaker
Transmits voice output
2
Charger Status
Indicates charger status:
• Off—charger off
• Red—charger on
3
LCD Display Screen
112 x 64 pixel monochrome graphics display with backlight
4
Navigation Key
Navigates through menus
Left— select Profile; decrease volume during a call
Right— call log; increase volume during a call
Up—show dialed numbers
Down—Phonebook
5
Right Soft key
Displays the Phonebook
Clears input / cancel or Mute during a call
6
Power/End Key
Power on or power off
End conversation; exit (back)
Enter numbers and text
Change text output in text mode. For example: AB, ab, 12, Ab.
Press and hold to enable key lock
7
Numeric Keys
8
Pound Key
9
USB Jack
Connects mini USB / charger jack
10
Charging Pad
Contacts for the charging cradle
2
Chapter 2 Product Description
11
Microphone
Receives voice input
Star Key
Enter symbols in text mode
Press and hold to mute ring tone
13
Call Key
Dial manually entered or Phonebook numbers
Show call history
During a Call, sends ‘Flash’ to PBX (Call Hold, Transfer, etc.)
Press and hold for 2 seconds will start WPS search
14
Left Soft key
Select a menu or submenu
Confirm menu option
12
15
Speaker Volume
Use to increase or decrease volume during a call
16
Belt Clip Gap
Use to hold the belt clip
17
Speaker
Transmits voice output (hands-free mode) or plays ring tone
18
Battery Compartment
Contains the Lithium-ion battery.
© 2009, ATI Applied Technology, LLC. All rights reserved. Prepared in the United States of America. QuickPhones is a trademark of ATI Applied Technology,
LLC, in the United States and/or other countries.
3
Chapter 2 Product Description
Inserting the Battery
To insert the battery into your QA-341/342, perform the following steps:
1.
Slide off the battery compartment cover.
2.
Insert the battery as shown, making sure the battery labels are facing up.
3.
Replace the battery compartment cover until it clicks into place.
Installing the Belt Clip
1.
Fit the belt clip lock into the gap on one side of the phone.
2.
Then fit the belt clip lock into the gap on the other side of the phone. A click sound will be heard to
indicate belt is locked into place.
Removing the Belt Clip
Gently pull the fitted lock from one side of the phone to release the belt clip.
4
Chapter 2 Product Description
Charging Your Phone
To directly charge your phone using the provided AC power adapter, do the following:
1.
Connect one end of the AC power adapter cable to the port at the bottom of the phone.
2.
Plug the AC power adapter into the electrical outlet.
To charge your phone using the charging cradle, do the following:
1.
Plug the USB jack of the AC power adapter into the cradle, and insert the cable wire into the rib to help
hold the cable.
2.
Plug the AC power adapter into the wall socket, and place your phone on the cradle for charging to begin.
Note: 1. Charge the battery for six hours before using your QA-341/342 WiFi phone for the first time.
2. The phone is turned on automatically when charging begins.
3. When the phone is charging, the charging LED lights red.
© 2009, ATI Applied Technology, LLC. All rights reserved. Prepared in the United States of America. QuickPhones is a trademark of ATI Applied Technology,
LLC, in the United States and/or other countries.
5
Chapter 3 Getting Started
3 Getting Started
This QA-341/342 WiFi phone has a built-in Setup Wizard for setting up the phone. It will guide you step-by-step from
wireless AP (access point) setup to SIP (session initiation protocol) account setup.
Note: The Setup Wizard can only be seen the first time the phone starts up after a master reset, but the individual steps
required for setup can be accessed at any time through the phone’s menu.
Setting the Access Point (AP)
STEP 1. When the phone is powered on for the first time, it guides you to search for a wireless network. Press
the Ok soft key to start.
STEP 2. There are three possible methods for connecting to a wireless network:
Pushbutton WPS (WiFi protected setup)
or
PIN Mode WPS
or
Manual
(AP Setup Method 1) Using Pushbutton WPS
When you see the display as illustrated in step 2 above, push the WPS button on your access point.
The phone displays the following screen:
6
Chapter 3 Getting Started
After connecting to the wireless network’s access point, the setup wizard proceeds to the Create
SIP Profile step. See “Setting the SIP Profile” below.
(For more information, see “WPS Registration” on page 20.)
(AP Setup Method 2) Using PIN Mode WPS
To setup using PIN mode, press the PIN Mode soft key shown in step 2 above.
1. Get the PIN code from the phone’s display, and enter it at your wireless access point. Refer to the
documentation for your wireless access point for instructions on entering the PIN code.
2. Press the Ok soft key. The phone displays the following screen:
3. Press the Select soft key.
4. After connecting to the wireless network’s access point, the setup wizard proceeds to the Create SIP
Profile step. See “Setting the SIP Profile” below.
5. (For more information, see “WPS Registration” on page 20.)
(AP Setup Method 3) Manual Setup
To setup manually, press the Manual soft key shown in step 2 above.
1.
2.
The phone starts searching for an AP.
The phone displays the available networks. Use the navigation key to scroll to
highlight your AP, and press the Select soft key.
© 2009, ATI Applied Technology, LLC. All rights reserved. Prepared in the United States of America. QuickPhones is a trademark of ATI Applied Technology,
LLC, in the United States and/or other countries.
7
Chapter 3 Getting Started
Note: The network icons indicate the type of security required to connect. Refer to the table below:
Icon
Description
WPA(s) passkey/passphrase is required to connect.
WEP passkey is required to connect
No passkey required.
3.
4.
5.
6.
Enter the access point’s security passkey using the keypad on your phone. (Ask your
network administrator for the passkey if one is required.)
When passkey confirmation is complete, the following screen appears:
Press the Yes soft key to connect. The phone proceeds to the Create SIP Profile
module. See “Setting the SIP Profile” below.
(For more information, see “AP Find” on page 19.)
NOTE: When you configure a new access point on the phone, the default setting for acquiring an IP address is
DHCP (meaning the phone’s IP address is assigned by your network’s DHCP server).
If you need to set a static IP address for your phone with respect to a particular access point: From the phone’s
main screen, select Menu->Phone Settings->AP Settings->(scroll to your AP)->Options->IP Settings>Static and enter the IP address information provided by your network administrator.
Setting the SIP Profile
After connecting to a wireless network, you can now create a SIP profile. Unless you are using the phone in P2P (peer-topeer) mode, you will need a SIP profile in order to register with your network’s phone system.
8
Chapter 3 Getting Started
1.
Press the Ok soft key to continue.
2.
Contact your network administrator for the information needed to configure your SIP profile.
3.
If you need to set up a profile later: From the phone’s main screen, select Menu->Phone Settings->Profile
Settings->New Profile
Setup Complete
Once setup is complete, press the "Ok" soft key to start using your phone.
© 2009, ATI Applied Technology, LLC. All rights reserved. Prepared in the United States of America. QuickPhones is a trademark of ATI Applied Technology,
LLC, in the United States and/or other countries.
9
Chapter 4 Menu
4 Menu
Display Screen
The illustration below shows an overview of the layout of the display screen and its icons.
The display screen elements are described in the table below:
No.
Indicator
Description
1
WiFi signal
Displays the WiFi signal strength.
2
Key lock mode
Indicates the keypad is locked.
3
Quiet mode
Indicates the system ring tone volume is set to its lowest level.
4
Battery
charge level
The presence of all the four bars indicates that the battery is fully charged. Charging
is indicated by an animated charging bar.
5
Connection mode
Displays the current connection mode. “P2P” indicates Peer-to-peer mode. If using a
SIP profile, the profile name will be displayed here.
6
Standby logo
This logo is displayed when the phone is connected to a wireless network.
7
Time
Displays the time.
8
Date
Displays the date.
9
Menu soft key
Press the left soft key to access the Menu.
10
Name Soft key
Press the right soft key to access the Phonebook.
© 2009, ATI Applied Technology, LLC. All rights reserved. Prepared in the United States of America. QuickPhones is a trademark of ATI Applied Technology, LLC,
in the United States and/or other countries.
11
Chapter 4 Menu
Main Menu
From the Menu, you can access various configuration settings and preferences.
1.
From the phone’s main screen, press the Menu soft key to access the main menu.
2.
Scroll through the menu options using the navigation key.
3.
To choose a menu setting, press the Select soft key.
4.
Press the Power/End key to go back to the previous level of the menu.
When you access the menu, the display screen shows the menu and the soft key items. Soft key items vary depending on
the menu options.
Phonebook
Your Phonebook can hold up to 50 contacts which you can access quickly from the main screen by pressing the right soft
key.
You can search for a specific entry by typing the first letters of the required entry.
Adding Contacts
To add a contact to the Phonebook, perform the following steps:
1.
Press the Options soft key to enter Options submenu.
2.
Select New Entry.
3.
Enter the name of the contact in the Name field.
4.
Press the down key to select type of entry.
5.
Use the navigation key to scroll to either SIP, No, or IP, and then press the down key to enter value.
6.
Enter the value of selected entry type.
7.
Press the Save soft key to save contact.
Note: You can only save one entry type per contact.
12
Chapter 4 Menu
Modifying a Contact
To modify a contact, perform the following steps:
1.
Select the contact to modify.
2.
Press the Options soft key to display menu.
3.
Select Edit.
4.
Edit the necessary information.
5.
Press the Save soft key to save settings.
Deleting Contacts
To delete a contact, perform the following steps:
1.
Select the contact to delete.
2.
Press the Options soft key to display menu.
3.
Select whether to:
•
•
4.
Delete: Delete selected contact.
Delete All: Delete all contacts in the Phonebook.
A confirmation message appears, press the Yes soft key to confirm delete or the No soft key to cancel.
Call Log
Your phone stores information about all calls received, missed or dialed. The lists are stored and displayed from the newest
to the oldest entries. The oldest entries are deleted as new entries are added.
Received Calls
The Received Calls list consists of all answered calls.
Missed Calls
The Missed Calls list consists of the calls that are not answered.
Dialed Calls
The Dialed Calls list consists of the most recent numbers dialed.
To go to desired call entry, use the navigation pad then press the Select soft key. Options are displayed on the menu:
•
Details: Display the type, time, and date of the selected entry.
•
Save: Save the selected entry to the Phonebook.
•
Delete: Delete the selected entry from the current Call Log.
•
Delete All: Delete all entries from the current Call Log.
•
Dial: Dial the selected entry.
Use the left soft key to confirm the action.
© 2009, ATI Applied Technology, LLC. All rights reserved. Prepared in the United States of America. QuickPhones is a trademark of ATI Applied Technology, LLC,
in the United States and/or other countries.
13
Chapter 4 Menu
Phone Settings
Phone Settings menu allows you to configure general handset settings as well as to reset the QA-341/342 WiFi phone to
factory defaults or upgrade the firmware.
Language
The Language menu allows you set the on screen display language of your QA-341/342. Options are as follows:
•
English
•
French
•
Korean
•
Chinese
•
Japanese
•
German
•
Spanish
•
Russian
Select from the list of languages then press the Select soft key.
Note: Menu languages other than English are only prototypes, and some translations are missing.
Ring Settings
The Ring Settings menu allows you to configure the ring tone and volume settings of your phone.
Tone
To set a ring tone, perform the following steps:
1.
From the Ring Settings submenu, select Tone.
2.
Select the desired tone: Simple ring (default) or Wav ring.
3.
Press the Select soft key.
Volume
To set the ring volume, perform the following steps:
1.
From the Ring Settings submenu, select Volume.
2.
Use the navigation keys to increase or decrease the ring volume. When the ring volume is set to its lowest
level, the Quiet Mode icon will be displayed on the phone’s main screen.
3.
Press the Save soft key.
14
Chapter 4 Menu
Time/Date
The Time/Date menu allows you to set the date and time of your phone. It has the following submenus:
•
Set Time: To set the correct time.
•
Time Format: To select the time display format.
•
Set Date: To set the correct date.
•
Date Format: To select among the date display format options.
Profile Settings
Create new profiles or edit existing ones using the Profile Settings menu.
To create or modify a profile, perform the following steps:
1.
Select New Profile to create a new profile, or select an existing profile that you wish to modify.
2.
Press the Select soft key.
3.
Select the options to enter the necessary information:
•
Edit SIP: To enter the SIP User name, Password, Display name.
•
Edit Domain. To enter Domain, and Domain port.
•
Edit Out Proxy: To enter the SIP Out Proxy and Domain Port of the profile.
•
Edit STUN: To enter the SIP STUN Server and STUN Port of the profile.
•
Edit Expire Time: To enter SIP Expire Time (in seconds).
Note: Default value “20” means the SIP expire time is set to 20 seconds.
Inputting “0” means the SIP expire time is set to 3600 seconds.
4.
Select other options:
•
Save: Save the settings by entering the name for the new profile settings.
•
Save As: Save and apply the settings to a selected profile.
•
Delete: Delete the selected profile.
•
Set Active: Activate the selected profile.
Audio Settings
The Audio Settings menu allows you to enable or disable optional audio features. To do this, perform the following steps:
1.
Select the audio options:
•
Keypad Tone: Check/Uncheck to enable/disable keypad tone.
•
Range Warning: Check/Uncheck to enable/disable range warning tone.
•
Battery Low: Check/Uncheck to enable/disable battery low warning tone.
2.
Press the Check / Uncheck soft key to enable or disable the function.
3.
Press the Ok soft key to save and apply changes.
Display Settings
The Display Settings menu allows you to set the display name and backlight duration time.
Handset Name
Select this submenu option to enter the desired name to display on the phone’s main screen.
1.
Enter the desired display name.
2.
Press the Save soft key to save.
Note: Press the
key to toggle between character text formats.
Backlight Duration
Select this submenu option to set the time duration (in seconds) for the backlight to remain on after the keypad is
inactive. Note: Longer backlight duration settings will decrease battery life.
© 2009, ATI Applied Technology, LLC. All rights reserved. Prepared in the United States of America. QuickPhones is a trademark of ATI Applied Technology, LLC,
in the United States and/or other countries.
15
Chapter 4 Menu
1.
Select the duration option: 10s, 15s, 25s, or 45s.
2.
Press the Select soft key.
AP Settings
Use the AP Settings menu to set the default access point, or configure IP and security settings for a particular access point.
To configure the AP settings, perform the following steps:
1.
Select the available network.
2.
Press the Default soft key to set selected AP as default.
3.
Press the Options soft key to modify selected AP settings.
•
IP Settings: Select DHCP or configure Static settings including IP Address, Subnet Mask, Gateway
Address, and DNS Address.
•
Security Settings: Enter the Security protocol. The key options are WPA Passphrase, WPA Key,
WEP64 Key, WEP64 Passphrase, WEPl28 Key, and WEP128 Passphrase
•
Delete: Delete the selected AP.
Master Reset
Use the Master Reset menu to restore the phone settings to its factory defaults. WARNING: This function will erase your
phonebook, SIP profiles, stored AP’s, and all other stored user settings.
1.
When Master Reset option is selected, a warning message appears to prevent accidental deletion of your
settings.
2.
Press the Yes soft key to continue reset, or press the No soft key to cancel.
Firmware Upgrade
Your phone supports firmware upgrades as they become available from the vendor. Please follow these instructions
carefully. Skipping steps or performing steps out of order may result in upgrade failure.
To upgrade your firmware, perform the following steps:
(Note: To check what version of firmware is currently installed on your WiFi phone, see Step 4 below.)
Step 1, You Will Need:
1.
2.
3.
4.
5.
6.
7.
8.
Your QuickPhones QA-341 or QA-342 WiFi phone.
One USB to mini-USB cable.
A PC running Windows XP or Windows Vista.
The USB drivers that Windows needs to communicate with your WiFi phone (files MIP.INF and MIP.SYS).
The MIP Upgrade Tool, which is a small program that will load the firmware file onto your WiFi phone (files
DFUENGINE.DLL and MIPDFUTOOL.EXE).
The firmware file for your WiFi phone (file 51200-25-2-00C.DFU)
To prepare, unZIP all the required files to a convenient location on your PC.
Please close any open applications running on the PC while upgrading your WiFi phone, including any anti-virus
or security programs.
Step 2, Installing the USB Drivers:
(Note: If you have used this PC to upgrade the firmware in your WiFi phone before, and the USB drivers are already
installed on the PC, then you can skip Step 2 and proceed to Step 3.)
1.
2.
Ensure that your QA-34x WiFi phone is turned on.
Connect the smaller plug on the USB to mini-USB cable to the mini-USB/charger jack at the bottom of your WiFi
phone.
16
Chapter 4 Menu
3.
4.
5.
6.
7.
8.
9.
Connect the larger plug on the USB to mini-USB cable to an available USB port on your PC (the red charging LED
on your WiFi phone should light up when both ends of the cable are connected).
Press the “Menu” softkey on your WiFi phone.
Use the navigation key to scroll down to “Phone Settings” and press the “Select” softkey.
Use the navigation key to scroll down to “Firmware Upgrade” and press the “Select” softkey.
Your WiFi phone’s screen should display “Phone must be connected to computer. Phone will now power down.”
Press the “Continue” softkey. Your WiFi phone should turn off, and it should remain turned off while you are
installing the USB drivers.
After a moment, Windows should prompt you with a dialog box indicating that it has found a new hardware
device. Follow the on-screen instructions to install the USB driver. IMPORTANT: Do not let Windows search for
the driver. Manually locate the correct driver yourself. Use the Windows dialog boxes to browse to the location on
your PC where you unzipped the MIP.INF and MIP.SYS files and select “OK” or “Next”. If Windows displays a
warning that the driver is unsigned, tell it to go ahead with the installation.
After a few moments, Windows should indicate that the installation of the USB driver is complete.
Step 3, Updating the Firmware:
1.
2.
If the mini-USB cable is connected to the bottom of your WiFi phone, disconnect it. (The red charging light
on your WiFi phone should turn off.)
Turn on your WiFi phone, and allow it to finish starting up (your WiFi phone should have been powered
down in Step 2.7 above).
© 2009, ATI Applied Technology, LLC. All rights reserved. Prepared in the United States of America. QuickPhones is a trademark of ATI Applied Technology, LLC,
in the United States and/or other countries.
17
Chapter 4 Menu
3.
Reconnect the smaller plug on the USB to mini-USB cable to the mini-USB/charger jack at the bottom of your
WiFi phone.
4. Connect the larger plug on the USB to mini-USB cable to an available USB port on your PC if it is not still
connected from Step 2.3 (the red charging LED on your WiFi phone should light up when both ends of the
cable are connected).
5. Press the “Menu” softkey on your WiFi phone.
6. Use the navigation key to scroll down to “Phone Settings” and press the “Select” softkey.
7. Use the navigation key to scroll down to “Firmware Upgrade” and press the “Select” softkey.
8. Your WiFi phone’s screen should display “Phone must be connected to computer. Phone will now power
down.” Press the “Continue” softkey. Your WiFi phone should turn off, and it should remain turned off
while you are upgrading the firmware.
9. Start the program MIPDFUTOOL.EXE from the location where you unzipped it to in Step 1.7 above.
10. Windows should display the “MIP Device Firmware Upgrade” program screen.
11.
12.
13.
14.
15.
Click the “Browse” button.
Browse to the location where you unzipped the file 51200-25-2-00C.DFU.
Select the file 51200-25-2-00C.DFU and click “Open”.
Click the “Download” button.
The firmware update program will load the new firmware file onto your WiFi phone. The process may take
several minutes. The WiFi phone will remain turned off while the file is loading (this is normal).
16. The program will notify you when the upgrade is complete, and it should restart your WiFi phone. Close the
program, and disconnect the USB to mini-USB cable.
Step 4, Verification (optional):
1.
2.
3.
4.
5.
Turn on your WiFi phone.
Press the “Menu” softkey.
Use the Navigation key to scroll down to “Information” and press the “Select” softkey.
Use the Navigation key to scroll down to “Firmware:”
The firmware revision displayed should be “51200.25.2.00c”.
18
Chapter 4 Menu
Select AP
Use the Select AP menu to connect to an existing AP.
1.
When you select Select AP option, the phone lists the available networks.
2.
Select the desired network.
3.
Press the Connect soft key to connect.
AP Find
You can scan the local area for a WiFi access point. To scan for an AP, perform the following steps:
1.
When you select the AP Find option, the phone starts searching for access points and the display shows
Searching…
2.
The list of available connections is shown. Use the navigation key to scroll to the desired selection, and press
the Select soft key.
3.
If required, enter the necessary security information.
Note: The network icons indicate the type of security required to connect. Refer to the table below:
Icon
Description
WPA passkey is required to connect.
WEP passkey is required to connect
No passkey required.
Select Profile
Use the Select Profile menu to select from existing profiles or to delete profiles that are no longer required.
1.
Use the navigation key to scroll to a profile.
2.
Press the Select soft key to activate the profile or press the Delete soft key to delete the profile.
© 2009, ATI Applied Technology, LLC. All rights reserved. Prepared in the United States of America. QuickPhones is a trademark of ATI Applied Technology, LLC,
in the United States and/or other countries.
19
Chapter 4 Menu
Information
The Information screen displays the current IP address, current access point, currently selected SIP profile, Firmware
version, and MAC address.
To display the information page, select the Information option from the main menu.
WPS Registration
The QA-341/342 supports two implementations of WPS (WiFi Protected Setup). WPS offers an alternative to manually
configuring the security settings needed to connect to a particular access point. The phone supports both the Pushbutton
method and the PIN method:
Pushbutton Method
When you select Pushbutton from the WPS Registration menu, the following screen appears.
While this screen is displayed on the phone, push the WPS Registration button on your wireless access point to begin
registration.
PIN Method
When you select PIN from the WPS Registration menu, the phone will display a PIN number. You need to enter this
number at your wireless access point to begin registration.
Note: You can also start WPS Registration from the phone’s main screen by pressing and holding the Call key for two
seconds.
20
Chapter 5 Operation
5 Operation
Making a Call
Dialing with the Keypad
1.
Enter the telephone number with the keypad. If you enter an incorrect digit, press the Clear soft key to erase
the incorrect digit.
2.
When you press any number key on the keypad, the main screen displays three kinds of call options.
3.
Use the navigation key to select the dial method (SIP, No, or IP), and then enter the number.
4.
Press the Call key to make the call.
5.
Press the End key to end the call.
SIP URL / ID Digit Dialing
1.
When entering SIP URL /ID digit, use the Star key
select basic symbols; Press the Pound key
to select and insert symbols; Press 1 repeatedly to
repeatedly to select input mode (ab/AB//12/Ab).
NOTE: This function has no effect when the phone is operating in P2P (Peer-to-peer) mode.
IP Address Dialing
You can also make a call to a particular IP address. Use the navigation key and the number keys to enter the IP address.
Looking up a Number from the Phonebook
You can call your contacts using the phonebook. To make a call from the phonebook, follow the steps below:
2.
Access the phone book using one of the following options, starting from the phone’s main screen:
a.
Push the right soft key (Name).
b.
Push the “down” navigation key.
c.
Push the left soft key (Menu), and select Phonebook.
3.
Scroll through the list until you find the contact you want to call.
4.
Select the entry you want to make the call, and press the Call key to make the call.
Redialing a Phone Number
To quickly dial a number that you have dialed recently, do the following:
1.
2.
Access the dialed call log using one of the following options, starting from the phone’s main screen:
a.
Push the “up” navigation key.
b.
Push the “right” navigation key, and select Dialled Calls.
c.
Push the left soft key (Menu). Then select Call Log, and Dialled Calls.
Select the entry you want to make the call, and press the Call key to make the call.
Making a Call by Different SIP Profile
The QA-341/342 can store up to four separate SIP profiles. To change the currently selected SIP profile, do the following:
1.
Access the Select Profile screen using one of the following options, starting from the phone’s main screen:
a.
Push the “left” navigation key.
b.
Push the left soft key (Menu). Then select Select Profile.
© 2009, ATI Applied Technology, LLC. All rights reserved. Prepared in the United States of America. QuickPhones is a trademark of ATI Applied Technology, LLC,
in the United States and/or other countries.
21
Chapter 5 Operation
2.
Use the navigation key to scroll to the desired SIP profile (or “Peer to Peer”), and press the Select soft key.
The phone will re-register using the selected SIP profile. You can also delete SIP profiles from this menu if needed.
Answering a Call
When the phone rings, you may choose to answer or reject the call.
To answer the call
There are three ways to answer a call:
1.
Press the Call key to answer.
2.
Press the Answer soft key.
3.
When the phone is being charged, removing it from the cradle or the USB jack will answer the call
automatically.
To reject the call
There are two ways to reject a call:
1.
Press the End key to reject.
2.
Press the Reject soft key.
Call Options
Mute
While having a conversation, press the Mute soft key to mute. The display will show “Muted.” The other party will not
hear anything you say, but you can still hear the other party. Press the Unmute soft key to unmute.
Speakerphone
While having a conversation, press the left soft key (Spkr on) to activate the speakerphone. The display will show a speaker
icon, and audio will emit from the speaker on the back instead of the regular speaker on the front. The normal microphone
on the front of the phone is still used to pick up your voice. Press the left soft key again (Spkr off) to deactivate the
speakerphone.
Volume
While having a conversation, you can adjust the speaker volume in three ways:
1.
Use the “left” and “right” navigation keys.
2.
Use the “up” and “down” navigation keys.
3.
Use the speaker volume keys on the side of the phone.
Quiet Ring
Press and hold the Star key for two seconds to activate Quiet mode. The display will show the Quiet mode icon, and the
ring volume will be set to its lowest level. Press and hold the Star key again for two seconds to turn off Quiet mode.
Lock
Press and hold the Pound key for two seconds to lock the keypad. This prevents the phone from being activated by
accidental key presses. To unlock, press and hold the Pound key again.
22
Chapter 5 Operation
Flash
While having a conversation, pressing the Call key will send a DTMF Flash (via RTP) to your PBX (Private Branch
Exchange) system. This can be used to initiate a call Hold, Conference, or Transfer in accordance with how these functions
are supported and implemented by your PBX. These functions will work on your WiFi phone in that same way that they
would for an ordinary analog phone connected to your network through an ATA (Analog Telephony Adapter).
© 2009, ATI Applied Technology, LLC. All rights reserved. Prepared in the United States of America. QuickPhones is a trademark of ATI Applied Technology, LLC,
in the United States and/or other countries.
23
Chapter 6 Specifications
6 Specifications
Call Features
IEEE 802.11 b/g
Ultra Long Talking Time and Standby Time: 10
Hours Talking Time / 7 days Standby Time
(with latest AP Support)
Multi Language MMI Support
WPS (WiFi Protected Setup) for Easy WiFi AP
Connection
Hardware Overview
Phone Features
LCD Display: 112 * 64 pixel monochrome
graphics display with white LED backlight
IEEE 802.11b/g
Handset Receiver / Hands-free Speaker
Microphone
Battery 3.7v 1200 mAh
Charging by USB adapter or by Cradle
Power supply inputs AC 100 ~ 240V outputs DC
USB Jack Adapter 5V 500ma
Dial by IP / SIP URI / SIP ID
Call Flash (RFC 2833 Flash)
Upper SIP Registrations- Up to 4 Accounts
Multi-Language MMI Selection
Ring Tone (simple / wav)
Call history (Incoming/Outgoing/Missed calls)
Phonebook (Phonebook Search)
Time/Date
AP Search
AP Profiles – Up to 4 Profiles
Out of Range / Low Battery warning
IEEE 802.11 b/g
Build-in Speakerphone
WMM / WMM Power Save
Indicator (Battery / WiFi Signal)
NAT Transversal
Firmware Upgrade over USB
STUN Client
Charging over USB
RTP
Quick Setup Wizard
Quiet mode
Key Lock
Volume Control
VoIP Protocol
SIP v2.0 (RFC 3261)
DTMF (RFC 2833)
VoIP Codec
G.711 (a-Law, u-Law)
Network Features
Security
Keys
Security (WEP 64/128, WPA, WPA2)
WPS (WiFi Protected Setup)
Voice Process Features
Numeric Key 0 ~ 9, * , #
Two function keys
Call progress tones
4-way navigation key
DTMF tones in RTP
Call key
Comfort noise generation
End key (Power key)
Echo cancellation
Volume Keys
Adaptive jitter buffer
Packet loss concealment
Noise Suppression
24
QuickPhones has made every effort to ensure that these instructions are both accurate and user-friendly. If you have
suggestions to help us improve this document further, please tell us at [email protected]
Thank you.
© 2009, ATI Applied Technology, LLC. All rights reserved. Prepared in the United States of America. QuickPhones is a trademark of ATI Applied Technology, LLC,
in the United States and/or other countries.
25