1
GBS 117
(5-91)
AT&T
AT&T 518-600-109
Issue 1 May 1991
PARTNER™ Plus Communications System
Release 2
System Planner
Graphics AT&T © 1988
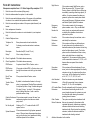
Form A1 Instructions:
Night Service
If the customer wants Night Service, enter x.
When the person at Ext. 10 turns on Night
Service, phones in the Night Service Group ring
immediately (overriding normal ring options). In
addition, if a system password has been programmed, system users cannot place outside
calls, except Emergency Telephone numbers
and Marked System Speed Dial numbers.
Emergency
Telephone
Number List
If the customer wants a list of emergency
phone numbers, enter x. They can be dialed
at any time by any extension with access to
an outside line, regardless of restrictions
placed on the phone.
Facsimile
Extensions
If the customer has any fax machines, enter x
and identify their extensions.
Hotline
Extensions
If the customer will have any hotline phones,
for each phone enter the extension and its
destination extension (the extension that wil ring
when the hotline phone is used). The hotline
phone must be a standard touch-tone or rotary
phone, and should have no outside lines
assigned to it. We recommend hotline phones
not be connected to extensions 10, 16, 22, or 28
because these are power failure transfer
extensions.
Doorphone
Extensions
If the customer will have doorphones (2 maximum), enter x’s where appropriate, then identify
extensions to ring. Any extension with a phone
can be rung, but the doorphone itself cannot be
on Ext. 10, 11, 16, 17, 22, 23, 28, or 29.
Auto Attendant
Extensions
Enter the extensions any auto attendants
(AAs) will be connected to (any extension
except 10, 16, 22, or 28 is acceptable).
Salesperson completes Items 1–10. Sales Support Rep completes 11-13.
1.
Enter the name of the customer (billing name).
2.
Enter the address where the system is to be installed.
3.
Enter the name and telephone number of the person at the installation
site who is to be contacted with questions about the installation.
4.
Enter the name and phone number of the person (and alternate) to be
trained.
5.
Enter salesperson information.
6.
Enter the features the customer is most interested in (most important
first).
7.
Outside Telephone Lines
Telephone No.
Enter phone number of each outside line.
New?
If ordering a new line and number is unknown,
enter x.
Description
Describe line (800, Local, FX, etc.).
Rotary?
If line is rotary dial, enter x.
8.
Check if applicable. Fill in blanks where necessary.
9.
Check if applicable. Fill in blanks where necessary.
PBX/Centrex
If system is behind PBX or Centrex, enter x.
PBX/Centrex
dial-out code
If the system is behind PBX or Centrex, enter x and
the digit the customer must dial to get an outside
line.
Recall Timer
Duration
If the system is behind Centrex, enter x.
Transfer Return
Rings
By default, a transferred call returns to the originator (or a programmed Transfer Return extension)
if not picked up within 4 rings. Possible settings are
0–9 rings (0 rings = “no return”). If the customer
wants a setting other than 4, enter x and the
preferred number of rings.
AA Transfer Return Directly underneath each AA extension, indicate
Extensions
the extension that should get calls the AA
cannot transfer because the extension or route
the caller dials (after hearing the recorded
greeting) does not answer.
Outside Conference If the customer wants to prevent all users from
conferencing together more than one outside
Restriction
party, enter x.
No toll-call prefix
If dialing a “0” or “1” to make toll calls is NOT
required, enter x.
System Password
If the customer wants a 4-digit system password,
enter x. Whoever knows the password can place
any type of call at any time, regardless of dialing
restrictions placed on the extension.
Other Transfer
Return Extensions
10.
The system normally returns transferred calls
that are not answered to the extension that
originated the transfer. Indicate any originating
extensions that should not receive returning
transferred calls. Directly under the originating
extension, indicate the extension where the
transferred calls should go instead.
Additional information for the installer.
PARTNER™ Plus Release 2 System Planner
AT&T
GBS 117
(5-91)
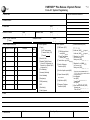
Form A1: System Programming
1. Customer Name
6. Features Customer Most Interested In
2. Installation Address
3. Contact Name
Phone
(
)
4. Person to be Trained
5. Sold by
Alternate’s Name
–
Phone
(
)
–
Phone
(
)
–
Salesperson’s Name
[ ] AT&T Sales Force
Phone
[ ] Dealer:
(
8. Check if applicable:
7. Outside Telephone Lines {#104}
Line
Telephone Number
New?
Description
1
Rotary?
{#201}
)
–
9. Check if applicable:
❑ Paging
❑ PBX/Centrex {#721}
❑ AT&T paging system
❑ Customer-owned (CPE)
❑ Zones (#
)
❑ PBX/Centrex dial-out
code {#106}
❑ Hotline ext. {#603}:
Hotline ext. {#603}:
❑ Recall Timer Duration
(Centrex) {#107}
❑ *Doorphone 1 ext. {#604}:
❑ Transfer Return rings {#105}
Alerting exts. {#606}:
❑ Music On Hold
2
❑ Standard Tip/Ring Phone(s)
[Central Tel Programming: set
Automatic Line Selection (ALS)
to Intercom first]
❑ Fax Machine(s)
3
4
❑ Answering Machine(s)
5
❑ Auto Attendant(s)
6
❑ Outside Conference
Restriction {#109}
❑ No toll-call prefix required {#402}
❑ System Password {#403}
❑ Doorphone(s)
7
8
❑ IROB protector(s)
❑ Night Service {#503}
❑ UPS
❑ Emergency Telephone
Number List {#406}
❑ Extra Alert(s)
❑ Facsimile extensions {#601}:
❑ Other Equipment
[ALS: Intercom Only]
❑ *Doorphone 2 ext. {#605}:
[ALS: Intercom Only]
Alerting exts. {#606}:
*Doorphones cannot be on ext. 10, 11, 16,
17, 22, 23, 28, or 29. Any extension can be
a doorphone alert ext.
❑ Auto Attendant
exts. {#607}:
Transfer Return
exts. {#306}:
❑ Other Transfer Return exts. {#306}:
Originating ext.:
Trans. Ret. ext.:
10. Notes
11. Installation Date
12. Order Nos.
13. Sales Support Rep.
to ring ext.:
to ring ext.:
Telephone No.
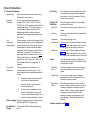
Form A2 Instructions:
14. Extension Assignments
Name/Location
Enter name and location (room number or other
description) for each extension.
Equipment
Connected
Enter devices connected to each extension
(examples: MLC-6, MLS-6, MLS-12, MLS-12D,
MLS-34D, Fax, AM for answering machine, ROT for
standard rotary phone, TT for touch-tone, AA for
Auto Attendant). Customer will need a 267F2
bridging adapter when two devices share an
extension jack (two adapters packaged with each
206 module).
Line
Assignment/
Ringing Options
Line Access
Restrictions
For each extension, show the lines assigned to it by
indicating whether each line will ring Immediatety (I),
have a Delayed ring (D), or Not ring (N). If the line
should appear on a button different from default
assignment, indicate the desired new line button
assignment. For example: if Line 3 should ring
after a delay on first button above the left [ Intercom ]
button (the first line button is the default button
assignment for Line 1), under Line 3 show “1/D.” A
blank indicates the line is not assigned to the
extension.
If any line assigned to an extension is to be
restricted, show how by entering an O, I or N. A
blank indicates all calls are generally permitted on
the line.
O
Outgoing calls only—can place calls, but
can receive only transferred calls.
I
Incoming calls only—can only receive
calls, cannot place calls.
N
No access to line—line appears on the
phone but cannot place or receive calls
(can only receive transferred calls). This is
useful for monitoring call activity on the line.
Display Language Check the appropriate column for extensions with
MLS-34D and MLS-120 display phones.
No Abbreviated
Ringing
If the user does NOT want Abbreviated Ringing,
enter x.
Auto Privacy
If the extension is to have Automatic Privacy, enter x.
This prevents other extensions with the same line
from joining in on calls at this extension. Useful for
fax and modem extensions.
Outgoing Call
Restrictions
Check the appropriate column(s) to show dialing
restrictions and overrides.
Inside Only
User can only make intercom calls to others on the
system.
Local Only
User can only make intercom and local outside calls
(no toll calls).
Unrestricted
User can make any type of call.
Disallowed List
One or more lists of Disallowed Telephone Numbers
(form C) will apply to this extension. The user will not
be able to place calls to numbers on those lists.
Allowed List
One or more lists of Allowed Telephone Numbers
(form C) will apply to this extension. The user will be
able to place calls to specified numbers on those lists.
Groups
Check the appropriate column(s) to indicate the
extensions to be included in the Call Pickup, Calling,
and Night Service groups.
Call Pickup
Group
An outside call ringing at an extension in the group
can be answered at any other extension in the
system.
Calling Group
A user can ring or page a group of extensions
simultaneously. The user is connected to the first
extension in the group to answer.
Night Service
Group
When the person at Extension 10 turns on Night
Service, incoming calls ring all phones in the group
immediately, regardless of normal ring options. In
addition, if there is a system password, phones in
the group cannot place outside calls without
entering the password, except Emergency Telephone Numbers or Marked System Speed Dial
Numbers.
Customer completes forms B–D.
PARTNER™ Plus Release 2 System Planner
AT&T
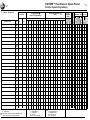
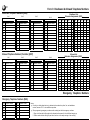
Form A2: System Programming
14. Extension Assignments
Line Assignment {#301}/
Ringing Options ■
(Central Tel Programming)
Equipment
Connected
Line
Name/Location
Ext.
#1
10
O
MLS-34D
#2
1
2
3
4
Line
5
6
7
8
1
2
3
4
5
11
12
13
14
15
16
O
17
18
19
20
21
22
O
23
24
25
26
27
28
O
29
30
31
32
33
*
o
PFT
Must have an AT&T MLS-34D or MLS-12D display phone
for programming
Power failure transfer extension–standard phone
required for operation during power failure.
Display
Language
{#303}
Line Access Restrictions
{#302}
■ Line Ringing Options:
I = Immediate Ring
D = Delayed Ring
N = No Ring
Blank = Line not assigned
Line Access Restrictions:
O = Outgoing Calls Only
I = Incoming Calls Only
N = No Access to Line
Blank = No restrictions
6
7
8
Outgoing Call
Restrictions {#401}
GBS 117
(5-91)
Groups
Customer Information—System Design and Training
Who Will Design My System?
■ When you purchase your PARTNER™ Plus system, your salesperson will help you determine the best way to set up your system.
Based on this discussion, your salesperson will complete the System Programming forms in this Planner (forms A1 and A2).
■ To indicate how you want to further customize your system and telephones, please complete the rest of the forms in the Planner
sometime before installation. Easy-to-follow instructions are provided on facing pages.
We suggest you complete the forms in pencil. If you need help completing them, please call our 24-hour Helpline at 1 800 628-2888.
Please keep the completed forms in a safe place. Record any future programming changes on the form—if programming is
inadvertently cleared, the forms can be used to reprogram the system.
How Will I Be Trained?
■ The technician who installs your system will be your trainer. You will be trained at your place of business by the technician on the day
your system is installed and programmed.
■ Your technician will:
■
demonstrate how to handle calls and use the system’s features,
■
demonstrate how to program features and Auto Dial numbers onto telephones,
■
demonstrate how to change the programming for the system and telephones, and
■
explain how to use the documentation (the Quick Reference cards, and the Installation and Use guide).
How Can I Prepare For Training?
■ Our experience shows that training works best if you can dedicate 30–60 minutes of UNINTERRUPTED time for training on installa-
tion day, preferably in a quiet place away from distractions.
■ Please designate one person and an alternate to participate in the training. The person(s) you select will then train the rest of your
staff.
This training will ensure that you take maximum advantage of your new AT&T system. Thank you for your participation.
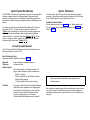
System Speed Dial Numbers
The PARTNER Plus system can memorize a list of up to 60 frequently called
telephone numbers, referred to as System Speed Dial numbers, which
everyone on the system can use. With System Speed Dialing, employees
don’t need to remember changes in telephone numbers, and dialing is much
quicker.
You assign a 2-digit code for each System Speed Dial number. This code
ranges from 20 to 79. To dial a number, you press three buttons: the
[ Feature ] button followed by the 2-digit code. For example, suppose your
staff frequently calls Acme Supplies and you assign Acme’s telephone
number to code 20. To call Acme simply press [ Feature ][ 2 ][ 0 ]. If Acme
moves, or the phone number changes, you progam the new telephone
number and dial the same way, [ Feature ][ 2 ][ 0 ].
System Extensions
To call each other, users of the system will need to know each other’s
extensions. They will also need to know the extensions in the Call Pickup
Group, Calling/Paging Group, and Night Service Group.
Form B Instructions (bottom):
All the information you need is on form A-2, in the “Name/Location” and
“Groups” columns. Simply transpose the information from form A-2 to the
bottom of form B.
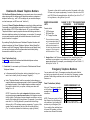
Personal Speed Dial Numbers
Up to 20 Personal Speed Dial Numbers can be stored for personal use at
each user’s extension, codes 80 to 89.
Form B Instructions (top):
Record your Speed Dial numbers on the top of form B.
Name and
Telephone
Number Column
Enter the telephone numbers and names.
Include area codes.
The maximum length of a telephone number is 20
digits or special characters. Special characters are:
P
R
S
T
✱ Column
Pause 1.5 seconds
Recall—switchhook flash for PBX/Centrex features
Stop the dialing sequence
Touch-tone digits to follow (for rotary lines only)
If you want users to be able to call a particular System
Speed Dial number, regardless of any dialing restrictions placed on their extensions, you can “mark” the
number so it can be dialed at all times. Mark the
number by entering a star ( ✱ ) in this column.
(Personal Speed Dial Numbers cannot be marked.)
Please have System Speed Dial numbers ready when the
technician arrives.
After installation, please photocopy this form and distribute a copy to everyone using the system. They should keep this form near their phones for
reference when placing calls. An extra blank form is in the Installation and
Use guide.
AT&T
To Dial
Form B: Speed Dial Numbers
●
On MLS- or MLC-model telephone, press [ Feature ] + Code
●
On standard touch-tone telephone, press [ # ] + Code while receiving intercom dial tone.
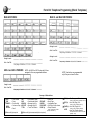
System Speed Dial Numbers
Code
Name/Company
✱
Personal Speed Dial Numbers
Telephone Number
Code
Name/Company
✱
Telephone Number
Code
Name/Company
✱
Telephone Number
Code
Name/Company
Telephone Number
20
60
40
80
21
41
61
81
22
62
82
42
23
63
43
83
24
64
44
84
25
65
45
85
26
66
46
86
27
67
47
87
28
68
88
48
29
69
49
89
30
50
70
90
31
71
51
91
32
72
52
92
33
73
93
53
34
74
54
94
35
75
95
55
36
76
96
56
37
77
97
57
38
78
98
58
39
99
79
59
✱
You can dial System Speed Dial codes with a ( ✱ ) at any time, regardless of dialing restrictions placed on your extension. System Speed Dial numbers are programmed by the
System Manager (report problems and suggested revisions to your System Manager). To program Personal Speed Dial numbers, see the Quick Reference card.
System Extensions
To call another extension
Ext
Name
●
On MLS- or MLC-model telephone, press [ Intercom ] + Ext
Call
Pickup
Group*
Calling/
Paging
Group*
Night
Service
Group*
Ext
Name
Call
Pickup
Group*
●
On standard telephone, dial Ext while receiving intercom dial tone
Calling/
Paging
Group*
Night
Service
Group*
Ext
▲ 10
18
26
11
19
27
12
20
28
13
21
29
14
22
30
15
23
31
16
24
32
17
25
33
✱ An “X” in the column means the extension is a member of the Call Pickup Group, Calling/Paging Group, or Night Service Group.
▲ System Manager's extension.
Name
Call
Pickup
Group*
Calling/
Paging
Group*
Night
Service
Group*
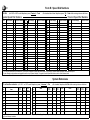
Disallowed & Allowed Telephone Numbers
With Disallowed Telephone Numbers you can prevent users who can normally
make outgoing calls from dialing specific telephone numbers or categories of
telephone numbers (e.g., calls to 976 exchanges for pre-recorded messages,
such as horoscopes, and 900 area code “chat lines”).
Conversely, Allowed Telephone Numbers are exceptions to dialing restrictions.
For example, you might disallow (prevent) the dialing of 976 telephone numbers,
but allow dialing of 976-1212 for weather reports. Or, you can use Allowed
Telephone Numbers to permit people at extensions with dialing restrictions to
dial certain telephone numbers, local exchanges, or area codes. For example,
you may want people at normally toll-restricted extensions to be able to call
specific customers or suppliers.
By combining Dialing Restrictions and Disallowed Telephone Numbers with
selected exceptions (via Allowed Telephone Numbers, Marked Speed Dial
Numbers, and a list of Emergency Telephone Numbers you will specify later),
you can control outgoing call traffic and associated costs without placing
unreasonable constraints on your staff.
Form C Instructions (top):
Use form C to create lists of disallowed and allowed telephone numbers,
and to assign the lists to extensions.
1. Create lists. You can create up to 4 lists each of Disallowed and Allowed
Telephone Numbers.
■
In the space under the List number, write in a description, if any, you
want to use to identify the list (for example, “Suppliers”).
■
Under “Telephone Number” write the area codes, local exchanges, or
complete telephone numbers appropriate for that list (maximum 12 digits
per telephone number). Write complete telephone numbers exactly as
they would be dialed out of your system, including area codes with
leading 0's or 1's.
NOTE: To prevent or allow certain categories of telephone numbers
requires programming more than one version of the telephone number
into the system. The number of versions depends on whether or not you
need to dial a leading digit for long distance. For example, if you normally
must dial a 0 or 1 for long distance, to prevent both local and longdistance calls to 976 exchanges requires programming 7 versions of the
number. See the example on the top of the next column (left box).
(The ! is a wildcard character that matches any single digit dialed.)
To prevent or allow calls to specific area codes (for example, calls to the
900 area code) requires programming 2 versions of the area code: 0900
and 1900. Follow the examples below—the left box if you dial a “0” or “1”
for long distance, or the right box if you don't.
EXAMPLE DISALLOWED
LISTS
DIALING “0” OR “1” FOR LONG DISTANCE
IS REQUIRED
IS NOT REQUIRED
Prevent calls to
976 Exchanges
900 Area Code
011 Foreign Countries
Item Telephone Number
01 976
02 ✱ 0976
03 ✱ 1976
●
●
●
✱
These entries are necessary
only in states where dialing “0”
or “1” is required for toll calls
within the state (example: in
NJ, which has two area codes,
a person in 201 who wants to
call 609 must dial a “1” first).
04
05
06
07
08
09
10
0!1!976
0!0!976
1!1!976
1!0!976
0900
1900
011
Item
01
02
03
04
05
Telephone Number
976
!0!976
!1!976
900
011
06
07
08
09
10
2 . Assign Lists. In the “Extension Assignments” box, assign the lists to the
extensions in your system, in any combination, by placing an “X” in the
appropriate columns. For example, you could assign List 1 and 2 to Ext. 11,
but only List 1 to Ext. 12.
Emergency Telephone Numbers
You can create a list of up to 10 emergency numbers that can be dialed at
any time by any extension with access to an outside line. Emergency numbers
override all other dialing restrictions, and can even be dialed when Night
Service is on.
Form C Instructions (bottom):
EXAMPLE EMERGENCY LIST
List up to 10 emergency numbers
on the bottom of form C. See the
example to the right of these
instructions.
NOTE: There are a variety of factors
that influence the effectiveness of
call restrictions. Avoid putting 800
numbers in your Emergency List.
If you need to allow restricted users
to access 800 numbers, put those
numbers in an Allowed List instead.
Item
Telephone Number
01 911
02 611 (local phone company service)
03 555-2345 (Boss's home)
04 555-4567 (auto club)
05 555-1357 (company doctor)
AT&T
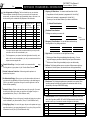
Form C: Disallowed & Allowed Telephone Numbers
Disallowed Telephone Numbers {#404}
List 1
List 2
List 3
Disallowed List
Extension Assignments {#405}
List 4
Ext
Entry Telephone Number
01
02
03
04
05
06
07
08
09
10
Entry Telephone Number
01
02
03
04
05
06
07
08
09
10
Entry Telephone Number
01
02
03
04
05
06
Entry Telephone Number
01
02
03
04
05
06
07
08
09
10
07
08
09
10
List 1
List 2
List 3
Entry Telephone Number
01
02
03
04
05
06
01
02
03
04
05
06
07
08
09
10
07
08
09
10
Entry Telephone Number
List 4
01
02
03
04
05
06
07
08
09
10
Entry Telephone Number
01
02
03
04
05
06
07
08
09
10
List 4
Ext
List 1
List 2
List 3
List 4
List 3
List 4
Allowed List
Extension Assignments {#408}
Ext
Entry Telephone Number
List 3
22
23
24
25
26
27
28
29
30
31
32
33
Allowed Telephone Numbers (Overrides) {#407}
List 1
List 2
10
11
12
13
14
15
16
17
18
19
20
21
List 1
List 2
List 3
List 4
10
11
12
13
14
15
16
17
18
19
20
21
Ext
List 1
List 2
22
23
24
25
26
27
28
29
30
31
32
33
Emergency Telephone Numbers
Emergency Telephone Numbers {#406}
Entry Telephone Number
01
02
03
04
05
Entry Telephone Number
06
07
08
09
10
Notes:
■
Consult your local phone directory to determine the numbers for police, fire, and ambulance
service, because “911” is not available everywhere.
■
When programming emergency numbers and/or making test calls to emergency numbers:
1. Stay on the line and briefly explain to the dispatcher the reason for the call before hanging up.
2. Perform such activities during off peak hours, such as in the early morning or late evening.
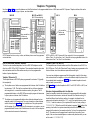
Telephone Programming
Use forms D1 and D2 to record the features and Auto Dial numbers for the programmable buttons of MLS-series and MLC-6 phones. Telephone buttons that can be
programmed depend on the type of phone, as shown below:
MLS-34D
MLS-12D and MLS-12
(MLS-12 has no display)
Programmable
buttons
Any unused line
buttons are
programmable
MLC-6
MLS-6
Any unused line
buttons are
programmable
NOTE: Standard touch-tone, rotary, cordless, and feature phones cannot be programmed
as described here.
NOTE: An MLS-6 or MLC-6 phone with 4 lines assigned to it has no programmable
buttons. That is, if it only has lines 1 and 2, the phone has two programmable buttons—the
buttons where “Line 3” and “Line 4” would have been.
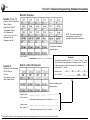
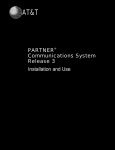
Form D1 Instructions (Standard Templates)
Template 2 (MLS-12 or MLS-12D)
This form has two standard templates, one for an MLS-34D telephone and the
other for an MLS-12D or MLS-12 telephone. These standard templates show how
dial code features and Auto Dial numbers can be put on the programmable
buttons of system telephones.
This template shows dial-code features and Auto Dial numbers for an MLS-12 or
MLS-12D phone. The Do Not Disturb and Privacy features are programmed on the
first two buttons, since those features require buttons with lights.
Template 1 (Extension 10)
This template shows an MLS-34D phone programmed for extension 10 (typically
the receptionist).
■
■
The top three rows of buttons are programmed with Intercom Auto Dial buttons
for extensions 11–28. This lets the receptionist dial any of those extensions
with a single touch, or see which extensions are busy at a glance. The 24
programmable buttons on the MLS-34D are enough to program all extensions
in your system as Intercom Auto Dial buttons.
The bottom row of programmable buttons show dial-code features that are
especially useful for the receptionist. For more information on these features,
see the instructions for form D2, or the Installation and Use guide provided
with the system. (If you have more than 18 extensions in your system, you can
program additional Intercom Auto Dial buttons on this row, to let the receptionist have one-touch access to all extensions.)
If you want any telephones programmed like this template, simply list their extension numbers under the template, or if you prefer different setups for phones, fill in
the completely blank templates on form D2. (If this standard template is close to
what you need, you can edit it.)
NOTE: Form D2 provides blank templates for MLS-12 or MLS-12D, MLS-6 or MLC-6, and
MLS-34D phones.
Extension Assignments/Automatic Line Selection
Under the template, indicate the extensions to be programmed like the template.
Directly under each extension, indicate its Automatic Line Selection setting, if it
should be different from the factory setting—for example, to indicate that an
extension should select outside lines 1, 2, 3, and 4, then select Intercom, enter
“1 2 3 4, I” under the extension. (On a system with 8 lines, the factory setting is
“1 2 3 4 5 6 7 8, I.”) When the user lifts the handset or presses [ Spkr ] without first
pressing a line button, the system automatically selects the first available line
assigned to the extension (for example, when line 1 is busy, the system selects
line 2). The extension can be programmed to select lines in any order (for example, if the user has a standard phone or makes mostly intercom calls, you can
set the order to “I, 1 2 3 4 5 6 7 8”).
AT&T
Form D1: Telephone Programming (Standard Templates)
MLS-34D Telephone
Template 1* (Ext. 10)
●
●
●
●
●
Intercom Auto Dial Numbers
Group Paging
Night Service On/Off
Loudspeaker Paging
Fax Management
NOTE: This standard template is
recommended for extension 10,
typically the receptionist’s extension.
(indicate fax machine extension)
●
●
Message Light On
Message Light Off
Unused line buttons are
programmable
Auto. Line Sel.:
Factory setting is “Outside lines 1, 2, 3, 4, 5, 6, 7, 8; Intercom”
Template 2*
●
●
●
●
●
MLS-12 or MLS-12D Telephone
Outside Auto Dial Numbers
Do Not Disturb
Privacy
Save Number Redial
Last Number Redial
Example
To assign the template to Exts. 11, 12, 15, and 16 (exts. 11 and
12 to have factory-set Automatic Line Selection, exts. 15 and 16
to be programmed to select the Intercom first, followed by
outside lines 2, 1, and 4):
Assign to exts.:
Auto. Line Sel.:
Unused line buttons are
programmable
Assign to exts.:
Auto. Line Sel.:
Factory setting is “Outside lines 1, 2, 3, 4, 5, 6, 7, 8; Intercom”
Assign to exts.:
Auto. Line Sel.:
Factory setting is “Outside lines 1, 2, 3, 4, 5, 6, 7, 8; Intercom”
✱
Descriptions of these and other programmable features (with suggested abbreviations) are on the reverse side of this form.
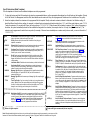
Form D2 Instructions (Blank Templates):
Fill in the templates to indicate how the individual telephones are to be programmed:
1. To show the features and Auto Dial numbers to be stored on programmable buttons, put the appropriate abbreviations from the list below on the templates. (Except
for Do Not Disturb, Fax Management, and Auto Dial, these features can be used even if they are not programmed. Details are in the Installation and Use guide.)
2. Under the template, indicate the extensions to be programmed like the template. Directly under each extension, indicate its Automatic Line Selection setting, if it
should be different from the factory setting—for example, to indicate that an extension should select outside lines 1, 2, 3, and 4, then select Intercom, enter “1 2 3 4,
l” under the extension. (On a system with 8 lines, the factory setting is “1 2 3 4 5 6 7 8, I.”) When the user lifts the handset or presses [ Spkr ] without first pressing a
line button, the system automatically selects the first available line assigned to the extension (for example, when line 1 is busy, the system selects line 2). The
extension can be programmed to select lines in any order (for example, if the user has a standard phone or makes mostly intercom calls, you can set the order to “I,
1 2 3 4 5 6 7 8”).
DND
PRIV
EXHOLD
DROP
RECALL
LNR
SNR
MSG-ON
MSG-OFF
TT-EN
NIGHT-SVC
Do Not Disturb. Prevents calls from ringing on your phone. Outside callers hear
ringing, and intercom (inside) callers get a busy signal.
Privacy. Prevents other phone users with the same line from joining your
telephone conversations.
Exclusive Hold. Guarantees that your call remains private when you place it on
hold. Prevents others with access to the line from picking up the call.
Conference Drop. Allows the last outside party you add to a conference call to
be dropped from the conference, without disconnecting the other parties. (For a
Centrex system, use the Centrex code instead.)
Recall. Sends a precisely-timed switchhook flash through the system. When
you are using the handset, Recall gives you a dial tone without your having to
depress the switchhook. Also used to access PBX/Centrex features that require
a flash operation.
Last Number Redial. Redials the last outside number you dialed, with one touch.
Save Number Redial. Saves an outside telephone number into temporary
memory for later one-touch redialing. Useful when you will need to redial a
number but want to make other calls before redialing.
Message Light On. Lights up the Message light at a specific extension with an
MLS-model phone. You press MSG-ON, then you dial that extension. Its
message light will go on.
Message Light Off. Works the same way as Message Light On, except the light
goes off.
Touch-Tone Enable. If you have a rotary line, allows you to use phone services
such as “Bank-by-Phone” that require dialing touch-tone digits. After you place
the call to the service and are asked to enter touch-tone digits, press TT-EN to
change the rest of the digits you dial during the call to touch-tone.
Night Service On/Off. If your system is programmed with Night Service, the MLS120 or MLS-34D telephone at Ext. 10 has a Night Service button to turn the feature
on and off (users at other extensions cannot program Night Service onto their
phones). The Night Service button is always the second lighted programmable
button (see template 1 on form D1). Once a Night Service button has been
assigned, other features cannot be programmed onto that button.
Button with lights required
GRP-CALL
GRP-PAGE
LOUDSPK
PICKUP-GRP
PICKUP-(x)
FAX-(x)
EXT-(x)
PAGE-(x)
AUTO-(x)
Group Call. Simultaneously rings all extensions in the Calling Group
(see form A2). You are connected to the first extension to answer.
Group Page. Simultaneously voice signals (pages) all extensions in the
Calling Group that have MLS-model telephones.
Loudspeaker Page. If an optional paging system is connected to your
system, you can make announcements over its loudspeaker with one touch.
Call Pickup Group–Answer. From your phone, picks up an outside call
ringing at any extension assigned to the Call Pickup Group (form A2). For
example, if you are Ext. 11, and Ext. 30 (which is in the group) rings, you
can pick up the call ringing at Ext. 30 from your phone by pressing
PICKUP-GRP. Your extension does not need to be in the Call Pickup Group.
Useful when the ringing line is not assigned to your phone.
Pickup Extension. From your phone, picks up an outside call ringing at the
extension you specify on the template. For example, to pick up Ext. 11, enter
PICKUP-11. Helpful for officemates who want to pick up calls for each other.
Fax Management. Allows you to transfer calls to the fax machine with one
touch. Also, if you program on a button with lights, allows you to see when the
fax machine is busy, and when it is having trouble and not answering (e.g.,
when it is out of paper). On the template, indicate the extension the fax
machine is on. For example, to program a button for the fax machine on
Ext. 12, enter FAX-12.
Auto Dial (Ring)–Extension Number. Programs another extension onto a
button, so you can dial it with one touch. If you program a button with lights,
you can also see when the extension is busy and when it is transferring a call
to you. For example, to program Ext. 15 onto a button, enter EXT-15 on the
template.
Auto Dial (Page)–Extension Number. Programs the intercom number for an
extension with an MLS-model phone onto a button, so you can voice-signal
(page) the extension with one touch. (This feature cannot be used to page
extensions that have standard or MLC-6 phones.) If you program a button with
lights, you can also see when the extension is busy and when it is transferring
a call to you. For example, to program a button to page Ext. 15, enter PAGE15 on the template.
Auto Dial–Outside Telephone Number. Programs an outside telephone
number onto a button, so you can dial the number with one touch. On the
template, put the name or telephone number (the abbreviation AUTO is not
necessary).
Button with lights recommended (but not required)
Note: Although standard single-line touch-tone, rotary, cordless, and feature phones cannot be programmed, you can use some of the
features in the above list with these standard phones by pressing [ # ] and a 2-digit code. Details are in Installation and Use guide.
AT&T
Form D2: Telephone Programming (Blank Templates)
MLS-34D PHONES:
MLS-12 and MLS-12D PHONES:
Assign to exts.:
Auto. Line Sel.:
Factory setting is “Outside lines 1, 2, 3, 4, 5, 6, 7, 8; Intercom”
Assign to exts.:
Assign to exts.:
Auto. Line Sel.:
Factory setting is “Outside lines 1, 2, 3, 4, 5, 6, 7, 8; Intercom”
Auto. Line Sel.:
Factory setting is “Outside lines 1, 2, 3, 4, 5, 6, 7, 8; Intercom”
MLS-6 and MLC-6 PHONES:
NOTE: An MLS-6 or MLC-6 phone with 4 lines
assigned to it has no programmable buttons.
NOTE: Line buttons are programmable
only if they are not used for lines.
Assign to exts.:
Auto. Line Sel.:
Factory setting is “Outside lines 1, 2, 3, 4, 5, 6, 7, 8; Intercom”
Summary of Abbreviations
DND
PRIV
EXHOLD
DROP
RECALL
= Do Not Disturb
= Privacy
= Exclusive Hold
= Conference Drop
= Recall
Button with lights required
LNR
SNR
MSG-ON
MSF-OFF
TT-EN
= Last Number Redial
= Save Number Redial
= Message Light On
= Message Light Off
= Touch-Tone Enable
GRP-CALL
GRP-PAGE
LOUDSPK
PICKUP-GRP
PICKUP-(x)
Button with lights recommended (but not required)
=
=
=
=
=
Group Call
Group Page
Loudspeaker Page
Call Pickup Group-Answer
Pickup Extension
where (x)=extension number
[example: PICKUP-11]
FAX-(x)
= Fax Management Extension
EXT-(x)
= Auto Dial (Ring)—Ext.
where (x)=fax extension [example: FAX-11]
where (x)=ext. [example: EXT-10]
PAGE-(x) = Auto Dial (Page)—Ext.
where (x)=ext. [example: PAGE-10]
AUTO
= Auto Dial—Outside Number
Put telephone number or name on template
[example: John]
Instructions
We suggest using this form as a training aid, to communicate to your
staff how their extensions are programmed in the system. To avoid
completing an entire form for each user, first use one form to fill in
information that applies to everyone, photocopy enough of them for each
user, and finally complete the individual forms.
All the information you need is already shown on forms A1, A2, and C,
in the System Planner, and the instructions below tell you where to find
the information in the Planner.
Line Assignments
and Ringing
Line...
■
Form A2: Check box next to each line
assigned to this extension.
No Abbreviated
Ringing
Form A2: Check appropriate
boxes that apply to this extension.
Automatic Privacy
Call Pickup Group
Calling/Paging
Group
Form A2: Check box if extension is in
any of these groups.
Outgoing Call
Restrictions
Form A2: Check appropriate
boxes that apply to this extension.
Form C: Either show the numbers assigned to this extension,
or photocopy form C and check
“see separate list.”
Description...
■
Form A1, Section 7: If you wish, describe the
line (with a telephone number, etc...).
Allowed, Disallowed,
and Emergency Phone
Numbers
Use line only to...
■
Form A2 (Line Use Restrictions): Check the
appropriate box for any restricted line.
Night Service
Form A1, section 9: if your system
has Night Service and a System
Password, check the first box. If your
system has Night Service, but no
System Password, check the second
box.
Hotlines
Form A1, section 9: If your system
has any hotline phones or doorphones, check boxes and complete
charts. If you wish, include a description (for example, “copy room”).
Ringing...
To call out...
Transfer Return
Rings
■
■
O =
Place Calls (“Outgoing Calls Only”)
I
=
Answer Calls (“Incoming Calls Only”)
N
=
Pick Up Held/Transferred Calls (“No
Access to Line”)
Form A2 (Line Ringing Options): Check
appropriate box if any of the lines are
Delayed Ring (D) or No Ring (N).
Doorphones
Form A1, sections 7 and 9: If any line is
Centrex or PBX, enter the dial-out code
(example: “9”).
Form A1, section 9: Enter Transfer Return
Rings. If there is no entry on form A1, enter a
“4” (the factory setting).
Transfer Return
Extensions
Form A1, section 9: Enter Transfer Return
Extension. If there is no entry on form A1, leave
blank.
Outside Conference
Restriction
Form A1, section 9: If checked on form A1,
check the box on this form.
Automated
Attendants
Form A1, section 9: If any auto
attendants will be connected to the
system, indicate their extensions. Also
indicate each auto attendant’s Transfer Return extension—that is, the
extension to get calls the auto attendant cannot transfer because the
extension or route the caller dials
does not answer.
AT&T
Ext.:
EXTENSION PROGRAMMING INFORMATION
Line Assignments and Ringing. The lines checked are on your extension.
Unless otherwise indicated on the chart, you can use the line to make and
answer calls, your phone will start ringing immediately when a call comes in on
the line, and to get an outside dial tone just press an idle line button.
Line
❑
❑
❑
❑
❑
❑
❑
❑
Description
Ringing: the line will...
You can use line only to...
Not
Place
Answer See Line Start Ringing
Calls Status** after 20 sec delay Ring
Calls*
❑ Outgoing Call Restrictions. You cannot make these kinds of calls:
❑ Long-distance toll calls (extension is programmed for “Local Only”)
❑ Outside calls (extension is programmed for “Inside Only”)
However you can call these numbers if you have an outside line:
❑ Allowed Phone Numbers
To call
out first
dial...
1
PARTNER™ Plus Release 2
Communications System
❑ see
separate list
❑ Disallowed Phone Numbers
Following are numbers you cannot call:
2
3
4
❑ see
separate list
5
❑ Emergency Phone Numbers. You can dial these numbers at any
time, regardless of any dialing restrictions:
6
7
8
*
You cannot receive regular inside or outside calls, but you can join calls,
and calls on the line can be transferred to you.
**
The line appears on your phone, line button lights show line activity, and
calls on the line can be transferred to you; but you cannot access the line
to place or answer regular calls.
Transfer Return Rings. If a call you transfer is not answered within
it will ring back at a) your phone or b) the Transfer Return Extension.
rings,
❑ Outside Conference Restriction. Conferencing outside parties is not
permitted on this system.
❑ No Abbreviated Ringing. When you are on a line when another call comes in,
your phone will ring repeatedly until the call is picked up or the caller hangs up.
(If box is not checked, your phone will ring once, and the light next to the line
button will flash repeatedly.)
❑ Automatic Privacy. Others on the same line cannot join your calls. If you want
the ability to let others join in when you want them to, program Privacy on a
programmable button. (See p. 4, Quick Reference card.)
❑ Call Pickup Group. You are in this group. An outside call ringing at your phone
can be answered by any other extension. (See p. 6, Quick Reference card.)
❑ Calling/Paging Group. You are in this group. Anyone on the system can ring or
page all extensions in your group simultaneously. If you pick up first, you will be
connected to the call. (See p. 6, Quick Reference card.)
❑ Night Service. Your extension is in the Night Service Group.
❑ After hours all lines will ring immediately when calls come in. You can
only dial Emergency numbers or Marked System Speed Dial numbers.
❑ After hours all lines will ring immediately, and you can dial normally.
❑ Hotlines. The following hotlines are on our system. When someone picks up
the handset of a hotline phone, the extension shown will ring automatically.
Ext.
Rings Ext.
Description
❑ Doorphones. The following doorphones are connected to our system. When
someone presses the button at a doorphone, the extensions shown will ring
automatically, with unique DING-DONG ringing.
Ext.
Description
Rings Exts. (up to 5)
❑ Auto Attendants. A device is at these extensions to automatically answer and
route calls. If you have an MLS-12D or MLS-34D phone and the auto attendant
transfers a call to you, the extension number will appear on the display.
Ext.
Description
Transfer Return Ext.