1
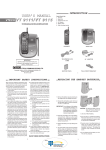
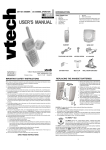
© 1998 Philips Consumer Communications L.P. All rights reserved.
Printed in China. 848233334 Issue 1AT&T
Part 2
Fold open this manual for information about
this telephone’s installation and operation.
Please read Part 1 — Important Product
Information, included in this package.
User’s Manual
for Cordless Telephone 9110
2
INSTALLATION
Puts a caller on hold.
Belt Clip—
Slide over the
back of the handset
until it snaps
firmly in place.
Handset
Volume Control
MUTE/LOW BATT
indicator goes on when
battery needs to be charged,
or the Mute function has
been activated.
PHONE indicator
goes on while you
are on a call.
Makes a call.
Headset Jack
Ends a call.
Access
Call Waiting or
other services.
Speed dial your
first memory dial
number.
Temporary Tone
Accesses memory
dialing numbers.
Redials last
call made.
Programs a number
in memory or
changes ringer type.
Mute
2
INSTALLATION
Standard power outlet
Power cord
Telephone line cord
Telephone jack
Strain relief hook
Power jack
1 Setting up the Cordless
Telephone 9110.
• Choose an area near an electrical outlet and a telephone jack.
• The outlet should not be
controlled by a wall switch.
2 Connect the telephone line cord.
• Insert one end of the telephone
line cord into the jack at the
rear of the base unit. Plug the
other end into a telephone jack.
Make sure the plugs snap
securely into place.
3 Connect the power cord.
• Plug the AC power adapter into
a standard electrical outlet and
the DC connector into the
power jack located at the
rear of the base unit.
• Wrap the power cord around the
strain relief hook on the bottom
of the base unit (see illustration).
The strain relief hook helps
protect the power cord from
accidentally being removed.
CAUTION: Use only the AC power
adapter supplied with this telephone.
This is a Class 2 AC adapter, specifically designed for use with the 9110.
NOTE: Connect power to the base
unit before placing the handset in
the cradle.
4 Set the dial mode switch.
If you have touch tone service on
your phone line, set the switch
located on the bottom of the base
to TONE. If you have rotary
service, set the switch to PULSE.
5 Install the handset battery.
• Remove the handset battery
cover by pressing the
indentation on the handset
battery cover and sliding the
cover downward.
Telephone jack
Slots
Base unit
Slots
Tabs
Reversible base
Clips
Thicker end
• Place the handset battery pack
in the compartment. Make sure
the metal contacts on the
underside of the battery are
aligned with the charging
contacts in the handset battery
compartment.
• Replace the handset battery
cover by sliding it on its track
up and over the handset battery
compartment until it snaps
firmly in place.
6 Charge the handset batteries
before use.
Place the handset in the base unit
cradle either in the face up or face
down position. Make sure that the
1
IN USE/CHARGE light on the
base is on. The handset battery
must be charged a minimum of
6 hours before using your phone
for the first time. The batteries
recharge automatically whenever
the handset is placed in the base
unit cradle.
7 Check for dial tone.
After the batteries are charged,
pick up the handset and press
. The PHONE indicator
should light up, and you should
hear a dial tone. If not, see “IN
CASE OF DIFFICULTY" in this
manual.
INSTALLATION
continued
CAUTION:
1 Never install telephone wiring
during a lightning storm.
2 Never install telephone jacks in
wet locations unless the jack is
specifically designed for wet
locations.
3 Never touch uninsulated telephone
wires or terminals unless the telephone line has been disconnected
at the network interface.
4 Use caution when installing or
modifying telephone lines.
Wall Mounting
1 Choose a spot where the
telephone wall jack is near an
electrical outlet.
This phone requires a modular
telephone jack and a standard
electrical outlet (120V AC).
2 Remove the reversible base.
The reversible base is designed for
both table and wall mount installations. The telephone comes with
the reversible base installed in the
table mount position. To wall
mount this telephone you will
need to remove the reversible base
and position it so that the thicker
end is toward the front of the
telephone (see illustration on
previous page). You can remove
the reversible base by depressing
the clips on each side of the base
while gently lifting upwards.
3 Reattach the reversible base.
• Insert the tabs of the reversible
base into the slots on the
bottom of the telephone base.
• Gently press the thicker end of
the reversible base until it snaps
firmly in place.
4 Connect the telephone line cord.
• Using the short telephone line
cord supplied, insert one end of
the telephone line cord into the
telephone jack on the rear of
the telephone base.
• Feed the remaining line cord to
the rectangular opening by
pressing the line cord into the
grooves of the reversible base
leaving at least 3 inches free.
Plug the line cord into the
standard wall jack.
5 Connect the power cord.
Plug the power cord into the jack
on the back of the base. Plug the
AC adapter into an electrical outlet.
6 Mount the telephone to the
wall jack.
Position the telephone base so the
mounting studs on the wall jack fit
into the reversible base. Slide the
telephone down on the mounting
studs until the phone locks in place.
TELEPHONE OPERATION
Making a Call
1 Press
on the handset and
wait for the PHONE indicator to
go on.
2 When you hear a dial tone, dial
the number.
NOTE: When another extension
is in use on the same line, and the
Cordless Telephone 9110 is in
standby mode, the PHONE
indicator on the handset will flash.
The IN USE/CHARGE indicator will
not function when the handset is out
of range.
Answering a Call
If the handset is in the base:
NOTE: The IN USE/CHARGE
indicator will increase intensity with
the incoming ring.
1 Lift the handset.
2 The PHONE indicator goes on and
the call will be connected.
If the handset is away from the
base:
NOTE: The IN USE/CHARGE
indicator will flash with each
incoming ring.
Press any key on the handset (except
, volume control or
). This
is very useful in a dark environment;
you do not have to fumble around
looking for the
key to answer
the call.
3
Ending a Call
If you are near the base:
Place the handset in the base.
If you are away from the base:
Press
.
Volume Control
The Volume Control allows you to
increase or decrease the loudness of
an incoming voice.
Handset Receiver Volume Control
(located on the left side of the
handset)
1 To increase the sound level, press
the
key.
2 To decrease the sound level, press
the
key.
TELEPHONE OPERATION
continued
Special Telephone Services
If you subscribe to special local
telephone company services like
Call Waiting or Call Forwarding,
you can access them by pressing
whenever you would press
the switchhook on a regular phone.
IMPORTANT: If you are using the
Hold feature to switch to another
extension, you must first place the
call on Hold. After the extension
phone has been picked up, release
the Hold feature and press
on
the 9110 to resume your conversation
on the extension phone.
Redial
To redial the last number dialed from
the handset:
1 Press
.
2 Wait for the PHONE indicator to
go on and for a dial tone.
3 Press
.
The last number you called is stored
in the redial memory until you dial
another number.
Advanced AutoSelect Feature
The Cordless Telephone 9110’s
advanced AutoSelect feature will
automatically select the clearest
channel, even during a conversation.
During automatic channel change
your conversation may be interrupted
for about 1 second while the unit
scans and selects a new channel.
Mute
Mute allows you to hear your caller
but prevents the caller from hearing
you.
1 Press
.
2 The MUTE/LOW BATT indicator
will light to indicate the Mute
feature is activated.
3 To continue your conversation,
press
again.
Ringer Mute
Press
on the handset during
incoming ringing to disable the
ringer for the duration of the call.
Hold
The Hold feature allows you to keep
a call on the line while you step
away from the phone or while you or
someone else takes the call on an
extension phone.
1 Press
.
2 The PHONE indicator will blink
slowly to indicate the call is on
hold.
3 To release Hold, press
again.
Temporary Tone
If you have dial pulse (rotary)
service, this feature allows you
to enter codes or tones needed to
operate answering machines, or use
electronic banking services, calling
cards, and other special services.
This feature will operate most special
services; however, some services
may actually require a touch tone
line. To be sure, ask the company
that provides the special service.
NOTE: If you have touch tone
service, you do not need to use the
Temporary Tone feature.
To use temporary tone dialing:
1 Dial the call normally.
2 Press
.
3 Enter numbers or symbols
required.
4 End the call normally (Temporary
Tone is automatically shut off).
4
Programming the Ringer Type
The handset ringer is capable of four
different types of ringing tones. The
following sections detail how to
change the different tones and to
turn off the ringer on the handset.
To program, the handset must be
.
To select a different ringer type do
the following:
1 Press
.
2 Press .
3 Press a key ( - ) to select a
ringer type.
4 Press
.
Turning Off the Ringer
To turn off the ringer on the handset,
do the following:
1 Press
.
2 Press .
3 Press
to turn off the ringer.
4 Press
.
To turn ringer on again, see
“Programming the Ringer Type.”
Checking the Ringer
To check the ringer which is currently
programmed, do the following:
1 Press
.
2 Press .
3 Press
again to check the ringer.
4 Press
.
Page/Handset Locator
This feature is useful if you misplace
the handset.
To locate the handset using the
Handset Locator feature:
1 Press
.
2 A repeating paging tone is
sounded at the handset for
approximately 30 seconds.
To cancel the Handset Locator
feature:
Press
on the handset or press
on the base.
MEMORY
Memory Features
This telephone can store 21 telephone
numbers, each up to 20 digits long.
Numbers will remain stored in
memory unless you erase or change
them by entering other numbers.
Programming a Number
into Memory
Make sure the handset is
.
1 Press
. The PHONE indicator will blink to indicate that you
are in the programming mode.
2 Enter a number button (00-20).
3 Enter the phone number
(up to 20 digits).
4 Press
to store the phone
number to the key you selected.
The phone now exits programming mode and emits a tone.
NOTE: If programming is unsuccessful, the unit will generate an error tone.
NOTE: You may choose to store
emergency numbers in memory
locations. The manufacturer assumes
no responsibility for customer
reliance upon this memory feature.
Quick Memory Dialing
The
key gives you one button
access to the speed dial number
stored in memory location “00.” This
may be a frequently dialed friend,
business, or emergency number, such
as 911.
There are two ways to dial using the
key.
1 Press
.
2 Press
. The phone number
stored in memory location “00”
will be automatically dialed.
— OR —
1 The handset must be
.
2 Press
. The phone number
stored in memory location “00”
will be automatically dialed after a
2-second delay.
Dialing a Number Stored in Memory
1 Press
to get a dial tone.
2 Press
.
3 Press the number button (00-20)
you assigned to that phone number.
For example, to dial the phone
number you assigned to button
“06,” press
,
,
.
IN USE/CHARGE Indicator
When the handset is in the base
cradle, the IN USE/CHARGE
indicator increases intensity with
each ring of the incoming call. When
the handset is not in the base, the
IN USE/CHARGE indicator flashes
steadily. After the call is answered,
the IN USE/CHARGE indicator will
remain lit until the end of the call.
Memory Card
There is a memory card with an
erasable surface located on the telephone base unit to record the names
or telephone numbers for the first 10
(locations 01-10) numbers stored in
these memory locations.
NOTE: The 9110 has a total of
21 memory locations (number
locations 00-20).
Programming a Pause Into a Memory
Dial Phone Number
If your phone is connected to a PBX
(switchboard) you may have to dial
a special number (e.g., 9) to get an
outside line. When programming a
number into memory, store the
access number and a pause into the
number sequence. The pause will
allow the switchboard enough time to
give you an outside line dial tone.
To insert a pause in a stored number,
press the
key. This inserts a
2-second pause after that digit. To
insert a longer pause, press the
key two or more times. Each time
you hear another beep, it makes the
pause 2 seconds longer.
For example, to store 9, PAUSE,
555-1234: Press ,
.
Then press
.
NOTE: Each pause you program
is counted as a digit. You can
program up to 20 digits in each
memory location.
Changing or Replacing a
Stored Number
You can change or replace a stored
number by storing a new number in
its place.
Spare Battery Charger
(under Memory Card)
Memory Card
Base Antenna
POWER indicator goes on
when the base power
adapter is plugged into an
electrical outlet.
IN USE/CHARGE
Indicator—see
description above
SPARE BATTERY indicator goes on when you are
charging a spare battery.
Page/Handset Locator
5
BATTERIES
About the Handset Batteries
You will know the batteries need
charging when:
• The phone beeps two times when
you press
to answer or
make a call.
• The MUTE/LOW BATT indicator
on the handset flashes.
• The phone does not respond when
you press
and the PHONE
indicator does not go on.
Charging the Handset Batteries
Place the handset in the base so the
IN USE/CHARGE indicator goes on.
The batteries will be fully charged in
6 hours. Once the batteries are fully
charged, you need only put the
handset in the base when the
MUTE/LOW BATT indicator flashes.
If it is more convenient for you to do
so, you can leave the handset in the
base all the time. It is impossible to
overcharge the batteries.
If the batteries don’t charge
properly:
If you get a low-battery signal even
after 6 hours of charging, the
battery should be replaced.
CAUTION: To reduce the
risk of fire or injury to
persons or damage to the telephone,
read and follow these instructions
carefully.
• Use only Replacement Battery
3470.
• Do not dispose of the battery
in a fire. The cell might explode.
Check with local codes for special
disposal instructions.
• Do not open or mutilate the
battery. Released electrolyte is
corrosive and may cause damage
to the eyes or skin. It may be toxic
if swallowed.
• Exercise care in handling batteries
in order not to short the battery
with conducting materials such
as rings, bracelets, and keys. The
battery or conductor may overheat
and cause harm.
• Charge the battery provided with
or identified for use with this
product only in accordance with
the instructions and limitations
specified in this manual.
• Observe proper polarity orientation
between the battery and battery
charger.
1
2
3
4
5
Replacing the Battery Pack
Remove the battery compartment
cover on the handset by pressing
on the indentation and sliding the
cover downward.
Lift out the old battery pack.
Place the new battery pack in the
compartment. Make sure the
metal contacts on the underside
of the battery are aligned with the
charging contacts in the battery
compartment.
Replace the cover by sliding it
on its track up over the battery
compartment until it snaps firmly
in place.
The new batteries must be charged
before using your telephone. Place
the handset in the base unit and
allow it to charge for 6 hours. The
telephone may operate before that
but, for best performance, let the
batteries charge fully.
Power Reserve
The Cordless Telephone 9110 has the
ability to provide back-up power to
the telephone base in the event of a
power failure. For this feature to
work, it is necessary to have a fully
charged spare battery (PURCHASED
SEPARATELY) installed in the base
unit Spare Battery Charger (located
under the directory card on the telephone base unit). If a power failure
or interruption occurs, the Cordless
Telephone 9110 will automatically
6
switch into the Power Reserve mode.
When operating in the Power
Reserve mode, the phone’s features
and functions should operate normally until the spare battery charge has
been depleted. When power is
restored to the telephone base unit,
the phone will automatically switch
back to its normal operating mode.
IMPORTANT: The amount of time
the Cordless Telephone 9110 will
operate during a power failure will
vary depending on use and spare
battery charge level.
Spare Battery Charger
The Cordless Telephone 9110 is
equipped with a spare battery charger
built into the base unit. The spare
battery charger allows you to always
have a charged battery available,
should your handset battery
discharge during normal use.
To install the Spare Battery Pack
(PURCHASED SEPARATELY):
1 Open the base unit battery
compartment.
2 Place the spare battery pack in
the battery compartment. Make
sure the metal contacts on the
underside of the battery are
aligned with charging contacts
in the battery compartment.
3 Replace the battery compartment
cover.
4 When the battery is installed
properly, the SPARE BATTERY
indicator on the base unit will be
illuminated.
5 The spare battery will be fully
charged after 16 hours. Please
note that the SPARE BATTERY
indicator will always be illuminated when a spare battery is installed.
BATTERIES
continued
Battery Case
Charging Contacts
Battery Case Cover
Battery Pack
Spare Battery
Charger
Charging
Contacts
SPARE BATTERY
indicator
7
IN CASE OF DIFFICULTY
If you have difficulty operating
this phone, try the suggestions
below. If you still have trouble, call
1 800 722-9125.
If the phone does not work at all,
check these items first:
• Make sure the power cord is
plugged into an outlet not
controlled by a wall switch.
• Make sure the telephone line cord
is plugged firmly into the base and
the telephone jack.
• Make sure the base antenna is
upright.
• If the phone does not beep when
you press
, the batteries
might need recharging.
• If the MUTE/LOW BATT
indicator is on, the batteries
need recharging.
• Make sure the battery pack is
installed correctly.
• If you have dial pulse service on
your telephone line, the Dial Mode
Switch must be set to PULSE.
If you hear noise or interference
when using the phone:
The advanced AutoSelect feature of
the phone should normally minimize
any interference. In some situations,
however, you might notice some
noise or interference when using the
phone. Follow the suggestions below.
• Make sure the base antenna is
upright.
• You may be out of range. Move
closer to the base.
• Household appliances plugged
into the same circuit as the base
can sometimes cause interference.
Try moving the appliance or the
base to another outlet.
• The layout of your home or office
may be limiting the operating
range. Try moving the base to
another location—preferably on an
upper floor.
If the phone does not ring when
you receive a call:
• Make sure the ringer is turned on.
If you are away from the base,
make sure the base antenna is
upright.
• Make sure the telephone line cord
is connected firmly to the base and
the telephone jack. Make sure the
power cord is plugged in.
• You may be too far from the base.
Move closer to the base.
• You may have too many extension
phones on your telephone line to
allow all of them to ring. Try
unplugging some of the other
phones.
If you hear other calls while using
the phone:
• Disconnect the base from the telephone jack, and plug in a regular
telephone. If you still hear other
calls, the problem is probably in
your wiring or local service. Call
your local phone company.
If you hear noise in the handset,
and the buttons don’t work:
• Make sure the power cord is
plugged in, and make sure the
base antenna is upright.
8
If you are unable to operate special
telephone services or other equipment requiring touch tone signals:
• If you have dial pulse (rotary) service, press
on the handset
before entering information (see
“Temporary Tone”).
• The tones generated by this
phone may not be long enough
to activate some services or
equipment. You might need to
use a different touch tone phone.
If you have difficulty entering
numbers into Memory:
• Review “Programming a Number
into Memory” to make sure you
are pressing the correct sequence
of buttons.
• If the number is more than 20
digits long, make sure you follow
the instructions for “Programming
a Number into Memory.”
Make sure you have followed all
the instructions in this booklet.
If you continue to have problems,
call 1 800 722-9125.