1
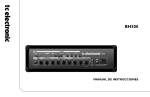
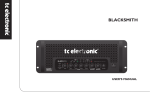
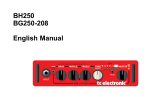
BH500
User’s manual
Read these instructions.
Keep these instructions.
Heed all warnings.
Follow all instructions.
Do not use this apparatus near water.
Clean only with dry cloth.
Do not block any ventilation openings. Install in accordance with the manufacturer’s
instructions.
8 Do not install near heat sources such as radiators, heat registers, stoves, or other
apparatus (including amplifiers) that produce heat.
9 Do not defeat the safety purpose of the polarized or grounding-type plug. A
polarized plug has two blades with one wider than the other. A grounding type plug
has two blades and a third grounding prong. The wide blade or the third prong are
provided for your safety. If the provided plug does not fit into your outlet, consult an
electrician for replacement of the obsolete outlet.
10Protect the power cord from being walked on or pinched particularly at plugs,
convenience receptacles, and the point where they exit from the apparatus.
11Only use attachments/accessories specified by the manufacturer.
12
Use only with the cart, stand, tripod, bracket, or table specified by the
manufacturer, or sold with the apparatus. When a cart is used, use
caution when moving the cart/apparatus combination to avoid injury from
tip-over.
Warning!
• To reduce the risk of fire or electrical shock, do not expose this equipment to
dripping or splashing and ensure that no objects filled with liquids, such as vases,
are placed on the equipment.
• This apparatus must be earthed.
• Use a three wire grounding type line cord like the one supplied with the product.
• Be advised that different operating voltages require the use of different types of line
cord and attachment plugs.
• Check the voltage in your area and use the correct type. Please refer to the
following table:
13Unplug this apparatus during lightning storms or when unused for long periods of
time.
14Refer all servicing to qualified service personnel. Servicing is required when the
apparatus has been damaged in any way, such as power supply cord or plug is
damaged, liquid has been spilled or objects have fallen into the apparatus, the
apparatus has been exposed to rain or moisture, does not operate normally, or has
been dropped.
• This equipment should be installed near the socket outlet and disconnection of the
device should be easily accessible.
• To completely disconnect from AC mains, disconnect the power supply cord from
the AC receptacle.
• The mains plug of the power supply shall remain readily operable.
• Do not install in a confined space.
• Do not open the unit – risk of electric shock inside.
1
2
3
4
5
6
7
Voltage Line plug according to standard
110-125V
UL817 and CSA C22.2 no 42.
220-230V
CEE 7 page VII, SR section 107-2-D1/IEC 83 page C4.
240V
BS 1363 of 1984. Specification for 13A fused plugs and switched and un-switched socket outlets.
Caution:
You are cautioned that any change or modifications not expressly approved in this
manual could void your authority to operate this equipment.
Service
• There are no user-serviceable parts inside.
• All service must be performed by qualified personnel.
a
EN
Important Safety Instructions
EMC
EMC/EMI
This equipment has been tested and found to comply with the limits for a Class B
Digital device, pursuant to part 15 of the FCC rules.
These limits are designed to provide reasonable protection against harmful
interference in residential installations. This equipment generates, uses and can
radiate radio frequency energy and, if not installed and used in accordance with the
instructions, may cause harmful interference to radio communications. However,
there is no guarantee that interference will not occur in a particular installation. If this
equipment does cause harmful interference to radio or television reception, which can
be determined by turning the equipment off and on, the user is encouraged to try to
correct the interference by one or more of the following measures:
• Reorient or relocate the receiving antenna.
• Increase the separation between the equipment and receiver.
• Connect the equipment into an outlet on a circuit different from
that to which the receiver is connected.
• Consult the dealer or an experienced radio/TV technician for help.
For Customers in Canada:
This Class B digital apparatus complies with Canadian ICES-003.
Cet appareil numérique de la classe B est conforme à la norme NMB-003 du Canada.
b
table of contents
INtroduction
EN
Table of Contents........................................................ 3
Introduction.................................................................. 4
Quick Setup Guide...................................................... 5
operation
Front Panel.................................................................. 6
Rear Panel................................................................ 12
Miscellaneous............................................................ 13
Appendix
Signal Flow................................................................ 15
Technical Specifications............................................ 16
3
Introduction
Congratulations on the purchase of your new BH500 head!
We welcome you as a player in the TC bass pocket.
BH500 is a significant addition to our already extensive range of bass products and as the other members of the bass family it
represents the next step in bass amplification rendering a simple, yet powerful combination of great bass sound and function, mixed
with extraordinary technology behind its traditional fascia.
BH500 is loud and proud. With its Active Power Management™, we have effectively designed an amp that gives you all the character
of a tube amp while delivering 500 Watts of undiluted power.
BH500 has traditional tone controls but also includes ground-breaking features giving the amp a personality and sound all of its own.
TubeTone™ emulates all of the characteristics of a traditional tube circuit to deliver an unparalleled and rich playing experience, while
SpectraComp™ gives you the best in studio quality compression in a live situation. With its “per string” compression, SpectraComp™
delivers more bite and punch than any other compressor, in any other bass amp system.
With Tweeter Tone™ we have re-defined the Tweeter level control and taken it to the next level, offering a smoother and more musical
HF control.
BH500 is the ideal head for the road, studio and rehearsal. With its balanced out, headphones out and rehearse inputs, it caters for
any thinkable bass application.
With three on-board user memories you can quickly swap sounds mid gig - an instant solution for recalling your favorite sonic
combinations, or for recalling carefully prepared settings, that perfectly match each of the basses you bring on the road.
Finally a system that delivers everything that you need and more in a single amp.
Please note: We reserve the rights to change the contents of this
manual at any time. The latest manual revision can always be
downloaded from www.tcelectronic.com. If you need additional
information and support, be sure to visit the TC Support Portal:
www.tcelectronic.com/support
4
Quick Setup Guide
EN
If you just can’t wait…
Here are a few quick steps to get you playing within minutes.
Unpacking
• Unpack your BH500 head.
• The box should contain the following items:
– BH500 Head (230V or 115V version)
– Power Cable
– RCA to mini jack cable
– Manual
• Inspect all items for signs of transit damage. In the unlikely
event of this having occurred, inform the carrier and supplier.
• Keep all the packaging if damage has occurred, as this will
show evidence of excessive handling force.
• It is also a good idea to keep the packaging for future
transportation.
Setting up
• Connect the Speaker output to a cabinet
• Connect the power cable to an outlet with correct voltage
according to the label on the amps rear panel
• Connect your bass to the input jack on the front panel
• Adjust the input gain using the GAIN knob
• Adjust the output volume using the MASTER knob
• Play!
Be sure to check www.tcelectronic.com for latest news about
BH500 and other TC products.
5
Operation – Front Panel
1 – INPUT
You can connect an active or passive bass to this ¼” input
jack. The BH500 input stage is designed to adapt to any type of
pickup.
2 – GAIN & PEAK LED
The input gain should be set to the highest possible level without
overloading the input stage. To find the correct setting, simply
plug in your bass, play and turn up the GAIN knob until the
PEAK LED occasionally lights up. Then reduce the gain slightly.
When set, simply turn up the MASTER volume knob to start
playing.
6
3 – SPECTRACOMP
Turn the knob to adjust the amount of SpectraComp™
compression.
SpectraComp™ uses a so-called spectral or multi-band
approach to compression, allowing for individual compression of
the low, mid and high frequency bands. Multiband compression
allows a significantly smoother and more transparent
compression without killing dynamics or tone.
SpectraComp™ is an advanced compressor, optimized to get
the best from a bass signal. If you want to learn more about
what is going on behind the scenes, please read the following
section “SpectraComp in Depth”.
operation – front panel
Auto Make-up Gain
As compression by nature reduces the loudest parts and peaks
of the signal, you may feel that many conventional compressors
“eat” the level of your signal, resulting in a lower output volume.
SpectraComp™ automatically compensates for compression
gain reduction, giving you an even output volume.
Spectral Compression vs. Full Band Compression
Virtually any compressor used for bass guitars on the market
is based on the “full band” principle. This means that the
compressor will respond to the full (20 Hz to 20 kHz) frequency
range and apply the same compression over the whole range.
From the low E (or B) string to the G string: The electric
bass has a very wide dynamic range. When using standard
compressors, the low E string will – due to its higher energy –
control when and how the compressor responds to and shapes
the entire signal. The typical result is that either the G string is
not compressed at all or that – just when the G string starts to
sound right – the low E string is compressed too strongly. In
other words: You are constantly dealing with a tight and difficult
compromise.
With Spectral Compression, the BH500 head uses a different
approach that allows for independent compression of the Low,
Mid and High frequency areas. This way, the right amount
of compression is added to the individual strings of your
bass, resulting in a smoother and much more transparent
compression.
EN
SpectraComp in Depth
Gain Reduction / Compression Meter
When using SpectraComp™, the compression meter (16)
indicates how much compression is applied to the signal.
4/5/6/7 – TONE Controls
The BH500 has four tone controls: Bass, Lo-mid, Hi-mid and
Treble. These controls have been tuned carefully to address four
relevant bass frequency areas, and should allow you to dial in
your sound with ease.
Tone Controls Center Frequencies:
Center Freq: 100 Hz (Gain: +15/-24 dB)
Center Freq: 335 Hz (Gain: +15/-24 dB)
Center Freq: 900 Hz (Gain: +15/-24 dB)
Center Freq: 1600 Hz @ Gain: -24 to 0 dB
4000 Hz @ Gain 0 to +15 dB
7
operation – front panel
8 –TWEETERTONE™
Many heads and cabinets include a so-called “L pad” HF control
on the back side of the cabinet. This control normally sets the
level of the tweeter in the cabinet and is generally used to adjust
the level of high frequencies.
TweeterTone is a far more intuitive and much better way of
adjusting the high frequency content. By using TweeterTone,
you do not simply turn the tweeter up and down in level – you
also get a much more musical and pleasant HF adjustment. And
instead of having to fumble around on the back of the cabinet,
you can simply use the TweeterTone knob right there on the
front panel.
Finally, TweeterTone is stored as part of your presets. This
allows you to adjust the level of HF with the rest of your sound
and thus go from a round and warm vintage sound to a sparkling
and crisp slap setting – simply by hitting a preset switch.
9 – TUBETONE
Most transistor designs have tried to replicate the tube sound
using a single small pre-amp tube. Generally, they fail as they
don’t take into account the crucial characteristics of the full
pre-amp and power amp sections – both of which are essential
to the sound.
Tubetone™ allows you to alter the “personality” and sound of
your BH500. The effects you can achieve range from a small
touch of classic tube amp response and character through
obvious, but pleasant “tube attitude” to highly overdriven.
Contrary to many tube simulations, Tubetone™ recreates both
8
the entire preamp section (located before the tone control
section) and the power amp section (located after the tone
controls). Not only does this give you the most realistic and
flexible recreation of the actual tube sound and response, the
BH500 tone controls also allows you to alter the behavior and
character of Tubetone™ the way you would on an actual tube
amp.
The TUBETONE knob adjusts the amount of both the preamp
and the power-amp tube simulation.
10 – MASTER (Volume)
Use the MASTER level knob to set the overall output level of the
amp. The master level also controls the level of the headphone
output. Note that master volume is not stored with presets.
11 – AUX IN (REHEARSE)
The AUX IN is a stereo auxiliary input. Any signal present on
the AUX IN phone jacks is played back through the PHONES
output. This allows you to play along with a rehearsal track
when checking out new stuff or when practicing to the beat of a
operation – front panel
12 – PHONES (MUTING)
This is a ¼” connector for headphones. With a mild speaker filter
applied to the bass sound, our studio quality headphone amp
caters for a great headphone sound.
The headphone output also plays back any signal connected
to the AUX IN (“Rehearsal”) input jack found on the rear panel
of the BH500. This feature allows you to play along with e.g.
an MP3 player (e.g. an iPod®), a signal from a computer
sound-card or any other audio source playing background tracks
– this is excellent for rehearsing or checking out new tracks
without disturbing the neighbors.
when you play on stage, or to connect your amp to a recording
device when you are in the studio.
EN
metronome click.
The included “Mini jack to RCA” cable allows you to use iPod®,
iPhone® or any other consumer playback device as a source for
rehearsing.
To determine where in the signal chain the signal for the
balanced output should be tapped, use the PRE/POST switch
located right beside the BALANCED OUT jack.
The BH500’s MUTE button mutes the balanced output
(as well as the speaker and headphones outputs). This
means that you can tune up with no sound in your own
rig or in the PA – provided, of course, that you use the
BH500’s balanced output instead of a conventional
line-driver.
15 – ON LED
This LED indicates when power is on.
The headphone volume is controlled by the MASTER level knob.
When a set of headphones is connected to the PHONES jack,
the BH500’s speaker out is disabled. This is a very convenient
feature when you need a “silent mode”, e.g. at night.
16 – COMPRESSION METER and TUNER Indication
The compression meter indicates the amount of applied
compression. When TUNE Mute (18) is active, the five LEDs
indicate which string you are tuning.
13 – PRE/POST SWITCH
This switch determines whether the balanced line-driver output
provides the pre- or post-processed signal.
See the signal flow diagram later in this manual for details.
17 – TUNING INDICATION
The BH500 tuner allows easy tuning of 4 or 5 string basses. The
Tuner is active when the TUNER button is pressed.
14 – BALANCED OUT
Use the BALANCED OUT XLR to connect the BH500 to the PA
The five LEDs indicate which string you are currently tuning.
When the two LEDs above the arrows are both lit, your bass is
in tune.
9
operation – front panel
Example:
“A” string played – pitch too low – tune up
“A” string played – pitch too high – tune down
“A” string played – in tune – do nothing
18 – TUNE MUTE Button and LED
To tune silently, press the MUTE button. The red LED indicates
that the mute function is active. The MUTE button not only
mutes the speaker and headphones outputs, but also the
balanced output. This way you can tune up with no sound going
to your own rig or to the PA.
10
19 – CONTOUR
The CONTOUR button provides a predefined EQ curve in an
instant. Hit the CONTOUR button to scoop out the mid range.
Two different scope grades are available.
20 – MEMORY 1/2/3
The BH500 features three user memories which allow you to
store and recall your favorite settings.
Storing settings is extremely simple:
– Dial in the settings that you like.
– Press and hold one of the MEMORY buttons for
approximately two seconds.
– When all three MEMORY LEDs are flashing, your settings
have been stored.
– To recall a memory setting, simply press the corresponding
MEMORY button once.
What is stored?
Apart from the Master volume and Tune mute status, any
parameter that is dialed in via the front panel knobs plus
“Contour” is stored.
Why memory settings?
Even though a lot of bass players tend to play with the same
sound most of the time, many players use several basses,
playing styles, and pickup settings. These and other factors
require adapting amp settings. We figured that it would be handy
to simply push one button instead of fiddling with several knobs.
operation – front panel
Knob Positions vs. Current Settings
When you go from one memory setting to another, or when you
switch from WYSIWYG mode to any of the three memory settings,
the position of the knobs may not reflect the current sound.
position is far from the current memory setting.
– When the LEDs flash quickly, this indicates that the knob
position is close to the current memory setting.
– When the LEDS are lit steadily, this indicates that the knob
position matches the values stored in the current memory
setting.
EN
WYSIWYG (What You See Is What You Get) or Memory Mode
Although the three memory locations are a convenient feature
that you most likely will learn to appreciate, BH500 also features a
“WYSIWYG” mode where you can rely 100% on the position of the
front panel controls.
Entering WYSIWYG mode is simple. Just press the MEMORY
button of the currently active preset. When no MEMORY LED is lit,
WYSIWIG mode is selected.
When the left LED is flashing, the knob position is lower than the
current memory setting. When the right LED is flashing, the knob
position is higher than the current memory setting.
1. When you touch a knob, the parameter instantly changes to
the knob position.
2. Although the position of the knob now reflects the sound you
hear, it may still differ from the position/value stored with the
current preset. This is indicated by the two arrow LEDs in the
Compression/Tuner section.
– When these LEDs flash slowly, this indicates that the knob
11
operation – REAR panel
SPEAKER OUT
Use the SPEAKER OUT connector for connecting the BH500
to your speaker cabinets. The type of plug is Speakon and you
MUST use speaker cables. Do NOT use instrument cables!
TC Electronic Bass cabinets
• BH500 can run any combination of up to three TC Electronic
8 Ohm cabinets.
•
MAINS IN – Power Input & POWER Switch
Make sure that the voltage of the power grid you are connecting
to matches the version of the BH500 you are using.
The 115V model can handle voltages between 100 V and 120 V.
The 230V model can handle voltages between 220 V and 240 V.
The ground pin of the power supply unit must be
connected in order to avoid voltage differences between
e.g. the PA and the BH500.
1
2
1
1
Where a TC Electronic 4 Ohm cabinet is used, the following configurations can be used:
x
x
x
x
4
4
4
4
Ohm
Ohm
Ohm + 1 x 8 Ohm
Ohm + 2 x 8 Ohm
Other Brand cabinets
1 x 4 Ohm
1 x 8 Ohm
2 x 8 Ohm
For additional information please refer to our speaker
configuration guide at:
www.tcelectronic.com/cabconfig
12
Ventilation
Be sure not to cover the BH500 cooling grid!
Insufficient ventilation may cause the amplifier’s temperature to
increase to critical values.
Protection Modes
The BH500 is equipped with an intelligent protection system,
ensuring that the amp does not suffer or malfunction if operated
wrongly or in extreme environments.
General Protection Mode
When the BH500 switches to Protection mode, the MUTE LED
is lit while the first two and last two Compression LEDs light up
in turn.
Protection mode is invoked when (for whatever reason) a short
circuit situation occurs.
A short circuit would typically occur in the situation where:
- you use a non-TC cabinet with a jack connection
- connect using a Speakon to jack cable
- plug/un-plug the jack going in to the cabinet while the amp is turned on.
In Protection mode, the speaker outputs are shut off to prevent
speaker damage. However, the balanced output passes audio
even in Protection mode.
To remedy the problem, try turning off the BH500 for a minute
and then back on again. If the LED pattern described here
shows again, you will have to send the BH500 to a qualified
service center for inspection.
Heat Protection Mode
When the BH500 switches to Heat Protection mode, the
PEAK and MUTE LEDs are lit while the first two and last two
Compression LEDs light up in turn.
Heat Protection is invoked if the amplifier is used in an
environment that is too hot, or if proper ventilation is not
ensured.
Proceed as follows:
– Turn off the amplifier.
– Solve the issues.
– Allow the amplifier to cool off for a few minutes.
– Turn on the amplifier again.
13
EN
MIscellaneous
MIscellaneous
Temperature alignment
Protection mode can also be invoked if operating temperature
is below 10 degrees Celsius or above 50 degrees Celsius, or if
the amplifier is switched on immediately after being moved from
a cold environment to an environment at room temperature.
Please leave sufficient time for temperature alignment before
switching on the amplifier.
14
EN
appendix – signal flow
15
appendix – Technical specifications
Input Section
Input connector
1/4” jack
Speaker output
Neutrik Speakon™
Input impedance
1 MOhm / 100 pF
Balanced output
Balanced XLR, Pre/Post Pre-amp
Gain range
-96 to 36dB
Bal. Out Max.
+2dBu
Bal. Out Optimal Load
Tone control
Impedance
600 Ohm
Bass
Center Freq: 100Hz (Gain: +15/-24dB)
Rehearsal input
RCA, Left/Right input, fits to iPod ®
Low Mid
Center Freq: 335Hz (Gain: +15/-24dB)
Operating/Storage
High Mid
Center Freq: 900Hz (Gain: +15/-24dB)
Temperature:
0° C to 50° C / -30° C to 70° C
Treble
Center Freq: 1600Hz @ Gain: -24 to 0dB; 4000Hz
Humidity:
Max. 90 % non-condensing
@ Gain 0 to +15dB
Dimensions
462 x 135 x 380 mm / 18.7” x 5.4” x 15.0”
Tweeter Tone
0 to 10, L-PAD Cabinet Recreation
Weight
13 kg / 29 pounds
Tube Tone
0 to 10, Tube amp Recreation
Finish
Tolex covered. Handcrafted wooden box
Spectra Comp
3 band Spectral Compression
User Memories
3 memory locations storing all front panel controls
except Mute & Master Level
Tuner
Bass Tuner, “On” when muted
Tuning range
B0 (30.87Hz) to G4 (392.00Hz)
Mute
Mutes speaker out, Phones out and Balanced out
Master Level /
Headphones Output
Studio quality headphone amp
HP Out Impedance
40 to 600 Ohm
Mains supply
100 - 120V~ or 220 - 240V~ 50/60Hz (65W @ 1/8
of Max. Output)
Power rating
16
500w (1000w Peak)
Due to continuous development, these
specifications are subject to change without notice.
P/N: E60525011