1
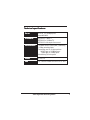
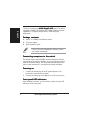
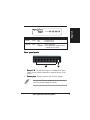
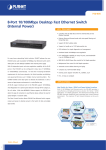
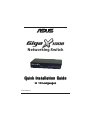
®
Networking Switch
Quick Installation Guide
In 10 Languages
First Edition V1
Contents
English ........................................................ 4
2
ASUS GigaX1008 Networking Switch
Technical specifications
Ports
8 RJ-45 10/100Mbps ports
Auto-MDI/MDIX
Standards
IEEE 802.3 10Base-T
IEEE 802.3u 100Base-TX
IEEE 802.3x full-duplex flow control
Performance
1K Media Access Control (MAC) addressing
1.6Gbps switching fabric
Forwarding rate for 64-byte packets:
148,810 pps to 100Mbps ports
14,880 pps to 10Mbps ports
Non-blocking full-wire speed
Power
9 VAC/1A
EMI
FCC Class B/CE Mark B/VCCI-B/CCC/C-TICK
ASUS GigaX1008 Networking Switch
3
English
Thank you for buying the A S U S G i g a X 1 0 0 8 switch! The switch
integrates 100Mbps Fast Ethernet and 10Mbps Ethernet network
capabilities in a compact design ideal for small workgroup
applications.
Package contents
8-port 10/100Mbps Fast Ethernet switch
AC power adapter
Quick installation guide
If any of the items is damaged or missing, contact
your retailer immediately.
Connecting computers to the switch
This switch features auto-MDI/MDIX crossover detection function
and provides plug-and-play capability, so you can plug the network
cable to the switch directly. The switch automatically detects the
type of cable attached to it, and adjusts the speed and duplex.
Powering on
1.
Connect the female plug of the AC power adapter to the
power port on the switch rear panel.
2.
Connect the male plug of the adapter to an AC power source.
Front panel LED indicators
After installing the switch, you can check its status from the LED
indicators on the front panel.
4
ASUS GigaX1008 Networking Switch
English
English
LINK/ACT
LED
Color
Status
Description
POWER
Green
LINK/ACT
Green
ON
OFF
ON
BLINKING
The switch is on.
The switch is off.
Link is established.
Link is established, and data is being
transmitted or received.
Rear panel ports
1
2
1.
Ports 1-8
8. The switch has eight 10/100Mbps RJ-45 ports
where you can connect computers or network devices to the
switch.
2.
P o w e r p o r tt. This port connects the AC power adapter.
Use only the AC power adapter that came with the
switch to prevent damage to the unit.
ASUS GigaX1008 Networking Switch
5
6
ASUS GigaX1008 Networking Switch