1
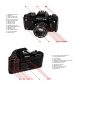
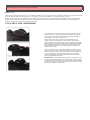
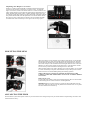
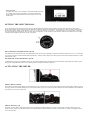
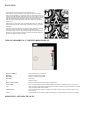
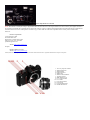
Quick Help/Reference Manual
Note: This manual is created just aiming to support the Pentax LX users who has lost his original manual or for those who has just bought a used unit in
the secondary used market. We would still advise anyone who wishes to acquire a complete official manual either from Jebsen & Jebsen, local distributor
for Pentax cameras or write to Asahi Optical Co Ltd for a copy. Creator of this site will not be responsible for the accuracy of the content within.
In the US:
Pentax Corporation
35 Inverness Drive East
Post Office Box 6509
Englewood, Colorado 80155-6509
(800) 877-0155, (303) 799-8000
[email protected]
Website: http://www.pentax.com
In Japan:
Pentax Optical Co Ltd
Website: http://www.pentax.co.jp/
Pentax, Pentax LX, Asahi Optical, Asahiflex and other trade names mentioned in this site are registered trademarks of the respective companies.
1.
2.
3.
4.
5.
6.
7.
8.
9.
10.
11.
12.
13.
14.
Two-way exposure counter
Shutter button lock
Shutter button
Rapid wind lever
Shutter dial
Shutter-cocked indicator
Aperture window
Multi-function lever
Lever release button
Lever index
Lens release button
Lens mount
Lens alignment index
Instant return mirror
15. Shutter speed index
16. Hotshoe
17. Film rewind crank
18. Film rewind crank/
Back cover release knob
19. Grip mount socket
20. Accessory lug
21. Distance scale
22. Focusing ring
23. Depth-of-field scale
24. Aperture/Distance index
25. Aperture scale
26. Aperture ring
27. Auto flash contacts
28. X-synch terminal
29. FP terminal
30. Exposure compensation dial
31. ASA dial lock release
32. ASA index
33. ASA window
34. Exposure compensation index mark
35. Dial lock release button
36. Finder release lever
37. Data back contacts
38. Memo holder
39. Eyepiece accessory slots
40. Viewfinder eyepiece
41. Back cover
42. Film chamber
43. Film rewind shaft
44. Film guide rail
45. Shutter curtains
46. Watch data film blind
47. Film blind thumb screw
48. Diopter adjustment screw
49. Sprocket
50. Film take-up spool
51. Back cover release pin
52. Back cover release lug
53. Film pressure plate
54. Rubber grip
55. Automatic advance contacts
56. Auto film rewind coupling
57. Base plate
58. Battery chamber cap
59. Tripod socket
60. Film transport relay pin
61. Film rewind/Multiple exposure button
62. Film transport rate control coupling
63. Film transport coupler
64. Rim of back cover
Batteries
Inserting the Batteries
The electronic systems of your Pentax LX operate on two 1.5-volt mini
batteries which are packed separately with your camera. To insert the
batteries, first remove the battery chamber cap at the base of the camera by
inserting the edge of a coin and turning in the direction of the arrow. Place the
two batteries in the chamber as shown making sure the positive (+) sides face
up.
Replace the chamber cap and tighten securely.
Battery Check
After inserting the batteries it is often helpful to make a quick check to see if
batteries are inserted properly and the camera's electrical systems are
functioning. To check battery voltage, activate the camera's metering system
by pressing the shutter button partway and observe the viewfinder LED
shutter speed display. The shutter speed LED will glow continuously if
normal voltage is being supplied.
Low Battery Warning
When batteries become weak the viewfinder shutter speed LED will begin to
flicker. Although all electronic systems will continue to function accurately
until the display goes out completely, both batteries should be replaced
promptly to ensure uninterrupted operation of the camera's electronic
exposure controls.
Operating the Camera Without Batteries
When the LED shutter speed display no longer lights, batteries are dead. However, the LX camera incorporates an electro-mechanical shutter system
which allows the photographer to continue taking pictures over a broad range of shutter speeds even when the batteries no longer function due to
exhaustion or temporary failure from temperature extremes. Should battery failure occur while shooting within the camera's mechanical shutter speed
range (i.e., from 1/2000 second to "X") no interruption of camera operation will take place. However, should batteries fail while operating in the
"Automatic" exposure mode or within the electronically controlled shutter speed range (from 1/60 second to 4 seconds) the mirror will automatically lock
up as a warning.
To continue picture-taking, simply turn the shutter speed dial to any of the mechanically operated settings (1/2000 second to "X").
NOTE: Should you wish to save the exposure being made when the mirror lock-up occurred, before changing the shutter speed dial, first cover the lens
with the lens cap. Then, release the mirror as described above and press the film rewind/multiple exposure button at the base of the camera. Advance the
film and take the picture.
IMPORTANT NEVER THROW USED BATTERIES INTO FIRE OR EXCESSIVE HEAT TO PROTECT AGAINST EXPLOSION. ALWAYS
KEEP BATTERIES OUT OF THE REACH OF CHILDREN.
Battery Care
Under normal operating conditions, the two 1.5-volt alkaline mini-batteries in your camera will last several months. Should batteries require replacement,
replace BOTH at the same time with equivalent 1.5 volt alkaline or silver oxide mini-batteries (Eveready S76, Mallory S76E, etc.)
Keeping a spare set of batteries on hand can help you avoid the inconvenience of battery failure during busy picture-taking sessions, especially when
shooting in cold climates where failure due to extreme temperatures is not uncommon. Protect your camera from leakage by removing the batteries
whenever the camera will not be in use for long periods of time.
ATTACHING THE VIEWFINDER
Your Pentax LX is a complete System 35mm SLR which offers you an
exceptionally wide variety of interchangeable viewfinders (see page 46).
Once you have selected the viewfinder best suited your picture-taking
needs, attach it to the camera body as follows:
Remove the protective body cap by moving the finder release lever
counter-clockwise and sliding the cap away from the camera body as
shown. Carefully remove the protective cap from the finder and align the
finder with the body, making sure both units are seated properly. Slide the
kinder toward the front of the camera body until it locks firmly in place.
When attaching the finder, it's a good idea to jiggle it to make sure it is
locked securely in place.
To remove the finder on the camera for attaching a new finder, move the
finder release lever counter-clockwise and carefully remove the existing
finder by sliding it away from the camera body slowly and smoothly. Do
not move too quickly to avoid dropping the finder on your working
surface and damaging it. Place the protective finder cap on the finder to
protect it against dust and scratches.
IMPORTANT: Avoid touching the glass surfaces of the finder, eyepiece
and camera body when attaching or removing the finder to protect against
possible damage from fingerprints, dust, grit and grease. When absolutely
necessary, use a blower or camel's hair brush to remove loose dust or grit
and ensure the brightest, cleanest image.
Adjusting The Diopter Correction
Pentax FA-1 and FA-2 Interchangeable Viewfinders feature built-in diopter
correction for the focusing convenience of eyeglass weartrs. To adjust the
degree of correction, first move the finder release lever counter-clockwise and
gently slide the finder away from the body until the diopter adjustment screw is
visible. With the finder in this position, carefully bring the camera up to your
eye and look at split-image center spot in the center of the viewfinder. Using the
tool packed with the finder, turn the adjustment screw until the border lines of
the center spot come in sharp and crisp. Remove the tool and slide the finder
toward the front of the camera body to once again lock it securely in place.
MOUNTING THE LENS
After removing the rear lens and body caps, hold the camera firmly in your left hand
and align the red dot A on the camera body with the red dot B on the lens. Insert the
lens into the body chamber until it seats against the lens mount and turn it clockwise
until it locks into place with an audible click. In dim light situations where it becomes
difficult to see the red dots, align the raised white node C on the lens barrel with the
lens release D by touch and continue mounting the lens as described.
When mounting longer lenses such as telephoto or zoom focal lengths, it's a good idea
to rest the camera body in the palm of the left hand. This procedure provides a better
balance and more convenient handling during the mounting operation.
WHEN CHANGING LENSES OUTDOORS WITH FILM IN THE
CAMERA, TAKE THE ADDED PRECAUTION OF AVOIDING DIRECT
SUNLIGHT.
Removing the Lens
To remove the lens, hold the camera in the left hand and press the Lens release button
D while turning the lens counter-clockwise with the right hand.
IMPORTANT: If it becomes necessary to put the lens down without the rear lens
cap in place, make sure the lens rests only with the front element down. Never put the
lens down with the front element up.
ADVANCING THE FILM
The film advance system and exposure counter of your new Pentax LX are designed to provide you with the utmost in rapid winding convenience and
frame indication accuracy.
1. Shutter Cocked Indicator
When the shutter has been cocked for the next exposure, the shutter cocked indicator turns red as a reminder. The Indicator returns to clear when the
shutter has been fired.
2. Two-Way Exposure Counter
The LX exposure counter is a sequential type which advances one frame each time the rapid wind lever or film transport is activated. The scale is indexed
from "0" to "36" with frames "12," "20," "24" and "36" marked in red. The counter also operates in reverse when rewinding the film and disengages
when making multiple exposures to ensure frame indication accuracy. It automatically resets to "0" when the back cover is opened.
Rapid Wind Lever
The LX features a single-stroke 120 rapid wind lever which advances the film and cocks the shutter. A 250 stand-off position is provided for rapid
winding ease and comfort.
LOADING THE FILM
•To avoid unnecessary delays when loading the film, before starting it's a good idea to set the shutter dial to one of the faster manual settings, e.g.
1/2000th second. If you must load film with the dial set to '`Automatic," remove the lens cap and aim the camera towards a bright light source to avoid
excessively long shutter speeds when advancing the film.
•Open the camera back by lifting up sharply on the film rewind knob. Insert the film cartridge in the film chamber and lock the cartridge in place by
returning the film rewind knob to its original position.
• Drew the film leader across the back and insert it into any of the white needles in the film take-up spool. Make sure the film is engaged properly on the
spool by inserting the leader at least the width of one perforation.
•Wind the film by alternately advancing the rapid wind lever and firing the shutter release button until both top and bottom sprockets engage the film
perforations. When you are sure the film has engaged properly, close the back cover and wind the film rewind crank in the direction of the arrow to take
up any slack.
•Continue advancing the film until the exposure counter registers "1." You can be sure the film is moving properly through the camera by checking to see
that the film rewind knob rotates each time the rapid wind lever is advanced.
SETTING THE FILM SPEED/MEMO HOLDER
To set the film speed, press the ASA dial lock release and turn the dial
until the ASA number of the film being used is opposite the index mark.
To ensure accuracy, make sure the dial locks only in the click-stop
positions. The chart below represents the index markings on the LX film
speed scale.
MEMO HOLDER
For added convenience, your LX features a film memo holder which acts
as a reminder of the film type and number of exposures loaded in the
camera. Simply tear off the end of the film carton and insert it into the
holder frame.
SETTING THE SHUTTER DIAL
To set your Pentax LX for automatic exposure control, rotate the shutter dial until the word "Automatic" locks into place opposite the index mark as
shown. When manual control is desired, press the shutter dial lock release and turn the dial until the speed setting you wish to use aligns with the index at
the click-stop position. Indices on the dial from "2 o o o" to "2" represent fractions of a second (i.e., 1/2000th second to 1/2 second) while "1" through
"4S" represent full second increments. The "X" index setting corresponds to 1 /75th second for synchronization with electronic flash units not providing
"dedicated" flash capability with the LX camera (see page41).
Electronically-Controlled Shutter Speeds
Your Pentax LX provides electronically-controlled stepless shutter speeds in the "Automatic't mode from 1/2000th second down to 125 sec. (At ASA 100,
f/1.2) and electronically-controlled manual shutter speeds from 1 /60th second to 4 full seconds. These speeds are not functional without batteries or when
battery failure occurs.
Mechanically-Controlled Shutter Speeds
At shutter speed settings from 1/2000th second to "X" and at the "B" (Bulb) setting, the shutter operates mechanically without the need for battery power.
These speed settings should be used in the event battery failure interrupts normal camera operation.
ACTIVATING THE METER
Shutter Release Button
The feather-touch shutter release button of your Pentax LX also serves as the meter "on" switch. By pressing the shutter release lightly, both the exposure
metering system and viewfinder LED display are activated and remain on up to 25 seconds. At the end of that time, the meter and display will automatically
turn off to prevent excessive battery drain.
Shutter Release Lock
The Pentax LX has a built-in shutter lock which protects you against accidentally making an exposure or activating the exposure metering system. To
operate the lock, simply move the shutter lock lever towards the shutter speed dial until the two white dots align at the "L" setting. To disengage the lock,
reverse the procedure.
FOCUSING
The Pentax LX comes equipped with the standard SC-21
split-image/microprism focusing screen which provides a split-image
center spot surrounded by a microprism collar on a matte field. The SC-21
is fully interchangeable with eight other focusing screen models to provide
focusing versatility capable of meeting almost any picture-taking need (see
page 49) When using the split-image center spot simply turn the lens
focusing ring until the broken image in the center spot in the viewfinder
aligns as one.
When using the microprism collar surrounding the center spot, rotate the
lens focusing ring until the "shimmering" effect in the collar area seems to
d isappear.
The matte field is quite handy for focusing in rapidly changing conditions
where there simply isn't time to use either the split-image spot or
microprism collar or for focusing with long telephoto lenses having small
apertures. To focus, turn the focusing ring on the lens until the image on
the matte field appears sharp and crisp.
THE STANDARD FA-1 VIEWFINDER DISPLAY
Aperture Window
Displays f/stop set on camera lens.
Red Flag
Exposure compensation warning.
Blue Flag
Indicates position of shutter dial.
Red LED
Indicates lit.
A
Indicates control.
Shutter Speed Scale
Represents shutter speeds as they appear on shutter dial.
Green LEDs
Glows to indicate meter selection of hand-holdable speeds from 1/2000th second to 1/30th second.
"X"
Electronic flash synchronization. Red LED glows to indicate automatic flash synchronization and flash
ready with Pentax dedicated flash units.
Yellow LEDs
Glows to indicate meter selection of speeds slower than 1/30th second as reminder to open lens, use
tripod or flash.
LT, B
In manual, indicates "B" shutter setting; Red LED glows to indicate long time exposure in automatic.
SHOOTING AUTOMATICALLY
Whenever time is limited and light is changing rapidly, you're sure to find
the automatic exposure control capabilities of the Pentax LX a useful and
welcome feature. Because the LX incorporates a direct off-the-film plane
light measurement system, readings are made continuously to,,ensure
uncanny accuracy even under the most difficult lighting conditions. For
macrophotography and portraiture where depth of-field control is
extremely critical, the aperture-preferred system of automation provides
the maximum in flexibility, ease of operation and convenience. The LX is
equally responsive, however, in fast action situations where by simply
opening the lens to its widest aperture, the camera automatically selects the
fastest possible shutter speed lighting will allow to capture those fleeting
moments.
To operate the Pentax LX in the automatic exposure control mode, first
rotate the shutter dial until the word "Automatic" locks in place opposite
the index mark. Set the lens f/stop you desire on the camera lens and
activate the metering system by pressing lightly on the shutter release
button. The LX will then read the amount of light striking the film plane,
select the precise shutter speed required for a proper exposure from the
continuously variable range of 1/2000th second down to 125 seconds
during normal temperatures. The approximate speed selected is indicated
on the viewfinder display. Speed selected by the camera can be changed
by merely selecting a different f/stop or by using the exposure
compensation dial (see page 24). To take the picture, press down firmly
and smoothly on the shutter release button.
SHOOTING AUTOMATICALLY
A red LED will glow next to the "A" index on the viewfinder scale to indicate
overexposure. When this occurs, stop your lens down or change to manual exposure
control to obtain acceptable exposures.
A red LED will glow next to the "LT, B" index on the scale when there is insufficient
light for a proper exposure or when the camera has selected a time exposure longer than
4 seconds in the automatic mode.
Green LEDs are used along the shutter speed scale between 1 /2000th and 1 /30th
second to indicate hand-holdable speeds.
Yellow LEDs are used along the shutter speed scale between 1/1 5th second and 4
seconds as a slow speed warning and reminder to use a tripod or supplemental lighting,
or to change the lens to a wider aperture setting.
IMPORTANT. Should you accidentally press the shutter release with the lens cap on or in the dark while the shutter dial is set to "Automatic," an
excessively long exposure will result. To re-set the camera, move the dial to one of the manual speed settings and return it to the "Automatic" position
before resuming shooting.
USING THE EXPOSURE COMPENSATION DIAL
Although the center-weighting of your LX camera's metering system is designed to provide accurate exposure measurement under the majority of lighting
conditions, when using the camera in the automatic mode you may find that a degree of exposure adjustment is desirable. This is particularly true in scenes
with extremely contrasty backgrounds or foregrounds, or where special creative effects can enhance the overall quality of the photograph. The exposure
compensation dial allows you to make these adjustments quickly and easily.
ALWAYS SET THE EXPOSURE COMPENSATION DIAL BACK TO THE 1X POSITION BEFORE RETURNING TO NORMAL AUTOMATIC
OPERATION.
The dial, located beneath the film rewind knob, permits you to override the automatic exposure setting by a full +2 EV (i.e., two full f/stops over or
underexposure) in 1/3 increments. The dial is in. dexed at 4X (2 f/stops increase), 2X (one f/stop increase), 1/4X (2 f/stops decrease' and 1/2X (one f/
stop decrease) with click stops at each 1/3 increment.
Normal Position: For normal automatic exposure control, make sure the dial is set to the "1X" position. The Dial locks firmly in this position to prevent
accidental movement.
When the dial is off the "1X" index, a red flag will appear in the upper right-hand side of the camera viewfinder as a reminder.
1X
4X
1X
1/2 X
BACKLIT SUBJECTS: When shooting a subject against a bright background such as a window, bright sky, sand or snow, the camera meter will tend
to underexpose the subject. To compensate, press the dial lock release and change the dial towards the 2X or 4X position depending on the degree of
additional exposure desired.
FRONTLIT SUBJECTS: When your subject is spotlighted against a dark background such as on a stage, the meter will tend to overexpose subject
details creating a washed-out appearance. To compensate, press the dial lock release and change the dial towards the 1/2X or 1/4X position depending on
what degree of underexposue is necessary or desirable.
EXPOSURE COMPENSATION RANGE
While the range of the exposure compensation dial is sufficient to allow exposure compensation at all film speeds featured in the camera's film speed
range, with extremely fast and extremely slow films, compensation is not available for the plus and minus settings indicated by the black dots below.
FILM SPEED
EXPOSURE COMPENSATION
ASA 6
•
•
1X
1/2X
1/4X
ASA 12
•
2X
1X
1/2X
1/4X
ASA 25 ~ 800
4X
2X
1X
1/2X
1/4X
ASA 1600
4X
2X
1X
1/2X
•
ASA 3200
4X
2X
1X
•
•
MANUAL EXPOSURE CONTROL
In the manual exposure mode your Pentax LX provides rapid response through-the-lens metering
combined with an extensive manual shutter speed range from 1/2000th second to 4 full seconds.
To set the LX for manual exposure control, press the shutter dial lock release and move the dial
from the "Automatic" position. The shutter speed selected by the dial will be displayed in the
camera viewfinder by a blue flag at the right-hand side of the scale.
Metering With Pre-set Aperture
In situations where depth of field is critical, it's a good idea to pre-set the aperture when metering.
Once you've turned the lens aperture ring until the desired f/stop appears in the viewfinder aperture
window, activate the meter and viewfinder display by pressing the shutter release lightly. To set
the correct shutter speed for a proper exposure, rotate the shutter dial until the blue flag algins with
the speed recommended by the meter via the glowing LED. A red LED at the top or bottom of the
scale indicates that the f/stop-speed combination is out of the camera's metering range and should
be changed accordingly.
Metering With Pre-set Shutter Speed
When fast action ca'ls for pre-setting the shutter speed, rotate the shutter dial until the blue flag in
the viewfinder aligns with the shutter speed index desired. Activate the viewfinder display by
lightly pressing the shutter release and rotate the aperture ring until the LED along the shutter speed
scale aligns with the pre-selected speed. A red LED at the top or bottom of the scal¢ indicates that
the speed-P/stop combination is out of the camera's metering range and should be changed
accordingly.
METER COUPLING RANGE
The IDM (Integrated Direct Metering) system of your Pentax LX assures superbly accurate exposure readings over a broad range of shutter speed/film
speed combinations. The working EV range of the IDM metering system for both manual and automatic exposures is reflected in the reference chart above.
With ASA 100 film at f/1.4, for example, the manual coupling range extends from EV 1 (1 sec. at f/1.4, 2 sec. at f/2) through EV 19 (1/2000th sec. atf/16,
1/1000th sec. atf/22). In the automatic mode with ASA 100 film and an f/1.2 lens, it extends all the way from EV -6.5 through EV 20 (125 sec. at f/1.2 1/2000th sec. at f/22 under normal temperatures and humidity).
Although the meter coupling ranges for the respective manual and automatic exposure modes change in relation to film speed, you can calculate what the
working EV range would be at other film speeds by mentally adjusting the position of the frame of the chart which defines the coupling range for the mode
in question. The red frame defines the manual meter coupling range and moves vertically along the righthand film speed index; the green frame defines the
lower limits of the coupling range for automatic exposures and moves horizontally along the left-hand film speed index. The boundaries of the red frame
should be disregarded when determining the coupling range for automatic exposures; at the higher end of the EV scale, meter coupling is provided for all
available film-speed/shutter-speed/f-stop combinations during automatic exposure operation.
UNLOADING THE FILM
When the last frame on the film cassette has been exposed you will feel resistance when trying
to operate the rapid wind lever. Do not force the lever to avoid tearing the film from the cassette
spool.
To rewind the filrn, press the film rewind button at the base of the camera, lift the film rewind
crank as shown and turn it in the direction of the arrow until tension on the crank lessens. The
two-way exposure counter allows you to double check to make sure the film has rewound
properly into the cassette before opening the camera back.
After rewinding, lift up sharply on the film rewind knob to open the camera back and remove
the film cassette for processing.
AVOID DIRECT LIGHT WHEN UNLOADING THE FILM.
USING THE SELF-TIMER/DEPTH OF FIELD PREVIEW/MIRROR LOCK
Your Pentax LX features a Multi-Function Lever which is used to operate the self-timer, preview depth
of field and lock up the mirror. The lever operates as follows:
Self-Timer
The LX self-timer provides a variable 4 to 10 second delay of the shutter release. Press the lever release
button and turn the multi-f'unction lever counter-clockwise to set the timer delay. After making sure the
shutter is cocked, press the shutter release button to activate the timer run. The timer can be cancelled
before the start of its run by returning the lever to its original position. Once you press the shutter
release button, it can no longer be cancelled.
Depth of Field Preview
To preview depth of field, move the multi-function lever clockwise towards the lens mount. The lens
diaphragm will then stop down to shooting aperture allowing you to see the area of acceptable
sharpness in the camera viewfinder.
Mirror Lock
The mirror of the LX can be locked up to minimize vibration in close-up and photomacrography by
simply pressing the lever release button and moving the multi-function lever clockwise towards the lens
r~ount. It is not necessary to lock up the mirror for motor drive photography. To release the mirror
lock, press the lever release button again.
Your Pentax LX allows you to make multiple exposures quickly and easily. After taking the first exposure, simply press the film rewind/multiple exposure
button at the base of the camera to disengage the film transport mechanism and exposure counter. Advance the rapid wind lever to cock the shutter, adjust
the exposure as required and press the shutter release to take the second exposure. Press the rewind/multiple exposure button once again for each
additional exposure on the same frame.
The random access feature of the LX camera's twoway exposure counter enables you to produce multiple exposures on any frame as long as the film has
not been wound off the take-up spool. As an exlirnple, let's say after reaching frame 15 you decide to double expose the image on frame 10. To do so,
1. Push the film rewind/multiple exposure button.
2. Lift the film rewind crank and wind the film back until the 9 index appears in the exposure counter window.
3. Cover the lens with the lens cap, advance the rapid wind lever, set the shutter dial to a manual speed to avoid long exposures and press the shutter
release button.
4. Advance the rapid wind lever until the "10" appears in the exposure counter window and make the second exposure.
If you wish to make double exposures on the remaining frames, or again on the same frame, you must press the film rewind/multiple exposure button once
again for each additional exposure. To return to the original frame without exposing the images already on film, cover the lens with the lens cap and
advance the rapid wind lever until the 15 index appears in the exposure counter window. You will return to the original position on the frame within a
0.2mm tolerance.
USING A TRIPOD/TIME EXPOSURES AT "B"
Using a Tripod
The tripod socket at the base of the LX camera is designed to accept standard tripod
threads having a depth no greater than 5.5mm (0.22 in.). To prevent any possibility
of damage to the camera's internal mechanisms, do not use tripods with longer
mounting screws and always avoid overtightening.
Tripod Spacer
To ensure proper tripod mounting when using lenses having a large diameter, insert
the SPacer Ring which comes packed with the camera between the camera base and
tripod platform.
Time Exposures at "B"
Although time exposures are possible in both the automatic and manual mode, use
the "B" (Bulb) shutter speed setting to make long exposures in extremely low light
levels for special creative effects. At this setting the shutter remains open as long as
the shutter release button is depressed. When shooting at "B," always mount your
camera to a tripod or other stable support and use a cable release whenever possible
to minimize camera vibration. For exposures longer than several minutes, a locking
cable release is recommended.
INFRARED PHOTOGRAPHY
Because black & white infrared film records light rays which focus
differently than light in the visible spectrum, when shooting it is necessary
to adjust the focusing ring accordingly. After focusing normally on the
subject, note the subject-camera distance on the lens distance scale and
turn the focusing ring until that distance setting aligns with the orange
infrared index mark.
In the top photo, the lens is focused at infinity (i) for normal photography;
in the bottom photo it has been adjusted for infrared photography by
moving the infinity mark to the orange infrared index.
NOTE: Compensation is not required when using infrared
color films.
DEPTH OF FIELD SCALES
Depth of field is the area in acceptable sharpness in front of and behind the subject in focus at a particular f/stop setting. Depth of field can be checked
visibly by activating the depth-of-field preview while looking through the camera viewfinder. If more precise information is required, however, the depth
of field scales engraved on most camera lenses provide a convenient means of determining the approximate distances.
The numbers engraved on either side of the depth of field scale represent f/stops. To read the scale, look at the distance scale of the lens opposite the index
marks on the depth of field scale representing the f/stop set on the aperture ring. For example, in the photograph the lens is focused on a subject 5 meters
away. At f/4 the depth of field is from approximately 4 to 7 meters. At f/5.6, the depth would be increased from approximately 3.6 meters to 7.9 meters.
DEPTH OF FIELD TABLES
Dist. scale
f/1.4
f/2
f/2.8
f/4
f/5.6
f/8
f/11
f/16
f/22
0.45m
0.447
~ 0.453
0.446
~ 0.454
0.445
~ 0.455
0.443
~ 0.458
0.440
~ 0.461
0.436
~ 0.466
0.430
~ 0.472
0.422
~ 0.482
0.413
~ 0.496
0.6m
0.595
~ 0.605
0.593
~ 0.608
0.590
~ 0.611
0.586
~ 0.615
0.580
~ 0.622
0.572
~ 0.631
0.562
~ 0.644
0.546
~ 0.667
0.529
~ 0.696
1m
0.984
~ 1.017
0.977
~ 1.024
0.969
~ 1.034
0.956
~ 1.049
0.939
~ 1.070
0.915
~ 1.103
0.887
~ 1.148
0.844
~ 1.231
0.798
~ 1.349
1.6m
1.557
~ 1.645
1.539
~ 1.666
1.516
~ 1.694
1.483
~ 1.737
1.441
~ 1.799
1.383
~ 1.901
1.316
~ 2.047
1.219
~ 2.348
1.120
~ 2.855
2m
1.932
~ 2.073
1.904
~ 2.106
1.869
~ 2.152
1.818
~ 2.224
1.754
~ 2.329
1.667
~ 2.506
1.569
~ 2.771
1.430
~ 3.386
1.294
~ 4.545
3m
2.846
~ 3.172
2.785
~ 3.252
2.708
~ 3.365
2.599
~ 3.550
2.468
~ 3.832
2.294
~ 4.351
2.109
~ 5.242
1.861
~ 7.978
1.631
~ 21.588
5m
4.579
~ 5.506
4.420
~ 5.757
4.225
~ 6.128
3.962
~ 6.786
3.659
~ 7.922
3.284
~ 10.585
2.911
~ 18.301
2.450
~i
2.061
~i
15m
11.712
~ 20.868
10.707
~ 25.077
9.609
~ 34.313
8.329
~ 76.783
7.075
~i
0.572
~i
0.562
~i
0.546
~i
0.529
~i
i
52.938
~i
37.070
~i
26.491
~i
18.557
~i
13.268
~i
9.300
~i
6.776
~i
4.672
~i
3.410
~i
Dist. scale
f/1.4
f/2
f/2.8
f/4
f/5.6
f/8
f/11
f/16
f/22
1.55'
1.540'
~ 1.560'
1.536'
~ 1.564'
1.531'
~ 1.570'
1.523'
~ 1.573'
1.512'
~ 1.590'
1.497'
~ 1.608'
1.478'
~ 1.631'
1.447'
~ 1.670'
1.413'
~ 1.721'
1.9'
1.884'
~ 1.916'
1.878'
~ 1.923'
1.869'
~ 1.932'
1.856'
~ 1.946'
1.839'
~ 1.965'
1.815'
~ 1.995'
1.785'
~ 2.033'
2.101'
~ 1.737'
1.684'
~ 2.188'
2.5'
2.471'
~ 2.530'
2.459'
~ 2.543'
2.443'
~ 2.560'
2.419'
~ 2.587'
2.388'
~ 2.624'
2.343'
~ 2.681'
2.290'
~ 2.756'
2.206'
~ 2.892'
2.114'
~ 3.075'
3'
2.957'
~ 3.045'
2.939'
~ 3.064'
2.915'
~ 3.091'
2.880'
~ 3.131'
2.835'
~ 3.187'
2.769'
~ 3.275'
2.692'
~ 3.393'
2.573'
~ 3.609'
2.445'
~ 3.911'
6'
5.814'
~ 6.198'
5.738'
~ 6.287'
5.640'
~ 6.410'
5.499'
~ 6.604'
5.322'
~ 6.882'
5.078'
~ 7.347'
4.802'
~ 8.027'
4.406'
~ 9.500'
4.012'
~ 12.205'
8'
7.667'
~ 8.364'
7.533'
~ 8.530'
7.361'
~ 8.763'
7.118'
~ 9.137'
6.818'
~ 9.690'
6.414'
~ 10.660'
5.973'
~ 12.190'
5.361'
~ 16.047'
4.778'
~ 25.969'
12'
11.252'
~ 12.856'
10.960'
~ 13.262'
10.593'
~ 13.845'
10.087'
~ 14.824'
9.485'
~ 16.370'
8.706'
~ 19.414'
7.898'
~ 25.319'
6.845'
~ 51.597'
5.906'
~i
25'
21.905'
~ 29.122'
20.802'
~ 31.339'
19.495'
~ 34.884'
17.817'
~ 42.020'
15.986'
~ 57.817'
13.855'
~ 132.990'
11.882'
~i
9.611'
~i
7.827'
~i
i
173.686'
~i
121.623'
~i
86.915'
~i
60.884'
~i
43.530'
~i
30.514'
~i
22.231'
~i
15.329'
~i
11.188'
~i
"DEDICATED" AUTOMATIC FLASH UNITS
The Pentax AF-200S and AF-160 Automatic Electronic Flash Units are fully compatible
with the LX camera's automatic shutter speed flash synchronization and viewfinder flash
ready light features. When the flash unit is turned "ON" with the camera's shutter dial set at
"Automatic" and the flash unit set for auto flash operation, the shutter automatically
synchronizes at "X" (1/75th second) and the "X" indicator inside the viewfinder glows
when the flash unit reaches full charge
NOTE: Dedicated flash is also offered with the above two units with the shutter dial set to
"X." The AF-200S also features flash exposure override. When the viewfinder indication
for the camera's metering system is between 1/30th second and 4 seconds (occasionally
1/60th second, due to stepless metering) flash synchronization is automatically obtained;
when faster speeds are indicated, however, non-flash exposure system overrides flash,
preventing overexposure. (This feature is not offered with the AF-1 60).
Quick Reference Guide
AF-400T
AF-280T
AF-200S
AF-160
TTL Measurement
X
X
-----
OTHER FLASH UNITS
Visible check
X
X
-----
Visible Ready
X
X
X
X
Auto FIash Synch
X
X
X
X
Your LX camera is designed to accept a wide array of flash models using
either the built-in hotshoe of the standard FA-1 Viewfinder or the
synchronization terminals at the front of the camera body. The "X"
terminal is for synchronization of electronic flash or F-type and MF-type
bulbs; the "FP" terminal for synchronization with focal plane bulbs.
The LX system offers you the unique option of synchronization even with
non-dedicated electronic flash units with the shutter dial set at
"Automatic." In addition, manual speeds from "X" through "B" may be
used. On "Automatic" the synchronization range is between 1/30th second
and 4 seconds. Do not use "Automatic" for flash when the viewfinder
indicates a faster speed or the complete frame will not be exposed; be sure
to take precaution against picture blur when long exposures are indicated.
The chart below represents the usable synchronizations with both
electronic flash and bulb-type flash units
Shutter speed
Electronic
flash
1/2000 1/1000 1/500 1/125
X
1/60
1/30
1/15
1/8
1/4
1/2
1
2S
4S
Auto speeds
Manual speeds
Usable speeds
FP-type bulbs
F-type, MF-type bulbs
CASE AND STRAP
Attaching the Strap
The strap which accompanies your LX can be used in two ways. Before attaching the strap, press the twin tab of the fastener (Tab A) with the edge of a
coin until the single tab (Tab B) protrudes.
To Carry the Camera Horizontally
When carrying the camera around your neck or when using the Standard Eveready Case, first attach one of the strap fasteners to either Accessory Lug C or
D and press Tab B with a coin until Tab A protrudes, thereby locking the fastener to the lug. Repeat with the other fastener.
To Carry the Camera Vertically
When you wish to carry the camera shoulder style, unlock the fastener attached to Accessory Lug C by pressing Tab B until Tab A protrudes. Then,
remove the fastener and attach it to Accessory Lug E.
IMPORTANT: Before carrying the camera by the strap, jiggle the fasteners back and forth while pulling on the strap to make sure that the fastener is
locked securely to the accessory lug. If not locked properly, the strap couJd come off and damage your camera.
CASE
The standard Eveready Case for your LX features a half-moon lock as added protection against coming open while carrying the camera. To remove the
case front cover, turn the cover a full 180° as shown so that the fastener unlocks, and separate.
CAUTION: Do not try to remove the front cover without first turning it so that the fastener unlocks (this could weaken or break the fastener).
GRIPS
Accessory Grip A
Accessory Grip B
The Pentax LX system includes different types of accessory grips.
Accessory Grip B is hand-contoured for added balance and handling
convenience. For more precise requirements, the Accessory Grip A can be
shaped to meet the photographer's individual needs using a whittling knife
or similar instrument and sandpaper to smooth out the rough edges. To
attach either grip, first place the grip over the accessory lug C making sure
the screw aligns with the socket at the bottom front of the camera F.
Tighten the screw using a screwdriver or coin.
USING SCREW-MOUNT TAKUMAR LENSES
Super-Takumar and SMC Takumar screw-mount lenses can be attached to your Pentax LX
by using the Pentax Mount Adaptor K. When using this accessory, however, the automatic
diaphragm of the lens will no longer function and meter readings must be made with the
lens apertuPe stopped down.
Mounting The Adaptor
After attaching the Adaptor K to the lens until it seats firmly in place, align the red dot on
the Adaptor with the red dot on the camera's lens mount. Insert the lens and rotate the
adaptor/lens combination clockwise about 1/4 turn until in clicks into place. The Mount
Adaptor K is now fully engaged and screw-mount lenses can be interchanged freely
without further adjustments.
Removing The Adaptor
After removing the lens, press the adaptor release A with your thumbnail or a pointed
object such as a ballpoint pen. Turn the Mount Adaptor K counter-clockwise until you feel
it release and remove it from the lens mount. Please note that the lens release button B
serves no function when using this adaptor.
LX INTERCHANGEABLE VIEWFINDERS
CHANGING THE FOCUSING SCREEN
To change the LX Focusing Screen, use the pincette supplied with your
new focusing screen. Insert the head of the pincette against the top plate of
the mount so that the two ear-like tabs rest again,st the indentation in the
plate as illustrated. Then, gently lift upward on the handle of the pincette
until the focusing screen frame drops down.
CAUTION: Move the pincette very carefully. If the screen doesn't release
immediately, do not exert excessive pressure: a slip could damage either
the focusing screen or mirror surface.
Squeeze the handle of the pincette and very carefully sandwich the tab of
the focusing screen between the two sections of the head. Lift the screen
out of the frame and place it in the container for protection.
To install the new focusing screen: Pick up the screen by the tab with the
pincette as described above and place it on the focusing screen frame with
the tab on the right hand side as shown. Push the frame back to its original
position until it locks in place.
IMPORTANT: Only handle the screen with the pincette and hy the tah
only. Never wipe screen surfaces with clothing or a cloth to avoid
damage. Remove dust particles with a blower or camel's hair brush.