1
Quick Start Guide
UDM-0102 Endeleo Multi-Format Distribution Mini-Hub
Overview
UDM-0102 Specifications (Cont.)
The UDM-0102 Endeleo Multi-format Distribution Mini-Hub (FG-UDM-0102) is
designed for small installations with long video/audio cable runs (FIG. 1).
ETHERNET port (RJ-45)
Serial port (RJ-12)
Power Socket:
2.1mm barrel-style DC power socket (female)
Operating Environment: • 35°F - 95°F (5°C - 35°C)
• Max. relative humidity - 85% (non-condensing)
Status LED
Dimensions (HWD):
Power LED
Active input (A/B) LED
Source
Select
button
1.60 lb. (730 g)
Certifications:
• CE
• FCC part 15 Class A
Included Accessories:
Power Supply, 24VDC, 750 mA with cable (FG-UDM-PS)
Other AMX Equipment:
•
•
•
•
•
Preset buttons (1/2)
RJ-45 port for connection
to an UDM-RX01/02 Receiver
RCA Audio
Left and Right (A)
SPDIF female
Digital Audio
connector (A)
RCA Audio
Left and Right (B)
1.61" x 8.63" x 3.66" (40.89 mm x 219.08 mm x 93.04 mm)
Weight:
IRTX ports
HD15 to S-Video Cable (FG-UDM-SVID01)
HD15 to 3x RCA Breakout Cable (FG-HD15RCA3F)
RS232 DB9/RJ12 Connection Cable (FG-RS01)
UDM-RX02 Multi-Format Receiver (FG-UDM-RX02)
UDM-RC10 Multi-Format IR Engineering Remote
Control (FG-UDM-RC10)
• IR01 IR Emitter Module (FG-IR01)
• IR03 External IR Receiver Module (FG-IR03)
Audio & Video Formats/Resolutions/Distance
Audio & Video Formats/Resolutions/Distance
SPDIF female
Digital Audio
connector (B)
Class
Format
Name
Distance (m)
Distance (ft.)
Composite
720x480
NTSC
700
2300
720x756
PAL
700
2300
720x480
480p
700
2300
720x756
576p
700
2300
Compatibility
1280x720
720p
200
650
The UDM-0102 is compatible for use with the UDM-RX02 (FG-UDM-RX02) receiver.
1920x1080
1080i
150
500
Product Specifications
1920x1080
1080p
120
400
640x480
VGA
200
650
800x600
SVGA
200
650
1024x768
XGA
200
650
1280x1024
SXGA
150
500
1600x1200
UXGA
120
400
HD15 female connector (A)
IRRX port
HD15 female connector (B)
Power connector
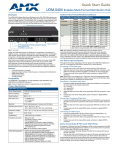
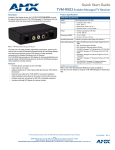
FIG. 1 UDM-0102 Hub - Front and Rear panel components
UDM-0102 Specifications
Power Requirements:
Component
VGA
24VDC @ .75A
Front Panel Components
Ethernet (RJ-45) port: Provides 10 BaseT network connectivity
Serial (RJ-12) port
(labelled “10101”):
LEDs:
Enables an administrator to control the various functions
to the UDM-0102 from a command line prompt and
terminal connection. Requires a DB9-to-RJ12 adapter
cable (FG-RS01) to connect to a PC.
The front LEDs are grouped by control type and are
labeled according to their corresponding port (connector)
numbers on the rear of the unit.
• Power - device is receiving power
• A - Source A is currently selected
• B - Source B is currently selected
• Status - changes from red to green when it receives a
valid UDP command, and returns to red after 30
seconds if it has not received anything.
A/V Source Input Connectors
There are 2 sets of input connectors to the rear panel of the UDM-0102, labelled A and
B (see FIG. 1) that allow the UDM-0102 to connect to A/V source devices.
Connecting a VGA Video Input
SELECT (A/B)
Pushbutton:
Pushbutton switches between Source A / Source B.
Connect one end of a VGA cable to the source device’s VGA output port.
Attach the other end of the cable to the appropriate VIDEO IN connection
(A or B) on the UDM. For example, connect to the Video In connection on Input
A of the Hub.
3.
Connect any audio to the analog (RCA) audio connectors or digital (SPDIF)
connector.
Note: Ensure Input A is configured as a “VGA Input” and named appropriately within
the “Inputs” section of the Configuration software. Also ensure the correct Audio Type
(Analog L/R or S/PDIF) is selected for the relevant input.
PRESETS (1/2)
Pushbuttons:
Two pushbuttons execute user-defined presets.
1.
UDM (RJ-45) port:
Provides audio/video transport as well as control via Cat5,
Cat5e or Cat6 to a UDM-RX02 Receiver.
Rear Panel Connectors:
Source Inputs (A, B):
1.
2.
Connecting a Composite Video Input
2.
Two sets of input connectors for A/V source devices
(labelled A and B):
• VIDEO IN: HD-15 input connector (female) - supports
VGA, Component, S-Video and Composite formats.
• Analog Audio: Left (white) and Right (red) stereo RCA
input connectors (female).
• Digital Audio: SPDIF (female) input connector.
IRTX Ports:
Two 3.5mm stereo IR Transmitter output ports allow up to
two IR-controlled devices (such as a DVD or VCR player)
to be controlled via optional wired IR emitters.
IRRX Port:
3.5mm stereo input port, allows connecting an IR receiver
to allow learning IR commands.
3.
Connect the UDM-HD15RCA3F Breakout Cable (FG-HD15RCA3F, not
included) to the source device’s Composite output ports:
•A1 = red RCA
•A2 = green RCA
•A3 = blue RCA
Attach the other end of the cable to the appropriate VIDEO IN connection
(A or B) on the UDM.
Connect any audio to the analog (RCA) audio connectors or digital (SPDIF)
connector.
Connecting a Component Video Input
1.
2.
3.
Connect the UDM-HD15RCA3F Breakout Cable (FG-HD15RCA3F, not
included) to the video source device’s Component video output connectors
(Red, Green and Blue).
Attach the other end of the cable to the appropriate VIDEO IN connection
(A or B) on the UDM.
Connect any audio to the analog (RCA) audio connectors or digital (SPDIF)
connector.
Connecting an S-Video Input
1.
2.
3.
Connect the UDM-SVID01 HD-15 to SVideo cable (FG-UDM-SVID01, not
included) to the video source’s S-Video connection.
Attach the other end of the cable to the appropriate VIDEO IN connection
(A or B) on the UDM.
Connect any audio to the analog (RCA) audio connectors or digital (SPDIF)
connector.
Device Connectivity (IRTX Ports)
FIG. 3 Network Settings
A maximum of 2 Devices such as DVD players or VCRs can be connected to the
UDM Hub and controlled through the Browser software or via a remote control.
1.
Connect an Endeleo IR Emitter Module (FG-IR01) to the relevant IRTX port at
the rear of the Hub.
2.
Run the other end of the IR Emitter to the device’s IR sensor and attach the
bud to the device’s sensor by removing the cover of the reverse side of the
bud.
IR commands for each device on the system have to be learned by the Hub in order
to function properly. Refer to the Protocols and IR section of the UDM-0102
Instruction guide on how to learn a device’s IR commands.
Restoring Hub Configuration and Connections on Power Up
IR Receiver (IRRX) Port
The IR RX port has two purposes:
•It is used for devices utilizing Passthrough Mode.
•Also used for learning and creating new IR protocols.
Refer to the UDM-0102 Endeleo Multi-Format Distribution Mini-Hub Operation/
Reference Guide (available online at www.amx.com) for details.
Connecting a UDM-RX02 Receiver to the UDM Hub
1.
2.
3.
Connect a standard Cat5/6 cable to the port marked UDM on the UDM Hub.
Connect the other end of the Cat5/6 cable to the “UDM Hub” port on the UDMRX02.
When the power is switched on 2 LEDs will be visible at the Hub port – Amber
(phantom power enabled) and Green (UDM-RX02 connected to Hub port).
To ensure the configuration settings for the Hub are retained each time the hub
boots, ensure the Restore configuration on power up and Restore connections on
power up options (at the bottom of the Setup page) have been enabled (FIG. 4).
FIG. 4 Restoring configuration on power up
Note: Failure to select the Restore Configuration and Connection options will mean
the Hub configuration and connections will need to be re-configured if the Hub is
reset.
Hub Reset
To reset the Hub, Click the Reset Hub button (FIG. 4).
Note: A power down of the Hub is required to complete the reset procedure.
Input Configuration
The options on the Inputs page allow you to specify the video types and audio
sources being presented to each input port and where appropriate renaming these.
1.
Select the Inputs link at the top of the Status page to invoke the Input Configuration page (FIG. 5).
Configuration Overview
Each UDM Hub can be configured for the correct network environment. It is also
possible to configure each Hub for the correct date and time. Configuration options
are available via the UDM Hub’s built-in Browser Interface. Refer to the UDM-0102
Endeleo Multi-Format Distribution Mini-Hub Operation/Reference Guide for
information on input configuration, user control, passthrough mode, video
compensation, date/time configuration, creating scheduled events and scheduled
presets
FIG. 5 Input Configuration page
Connecting to the UDM-0102
2.
1.
2.
3.
With the TCP/IP address configured, connect the UDM-0102 to your network
equipment (switch, hub, or serial port) - or if required use an Ethernet Crossover cable to connect your PC directly.
Enter the IP address into the address field within a browser window.
The default IP address of the UDM-0102 is 192.168.0.96.
To connect to the UDM-0102, a password is required (FIG. 2).
3.
Use the Type drop-down menus to select the appropriate Input Type for each
input).
•For VGA, Component, S-Video, and Composite inputs, only one connection is
possible per input port.
•If the Input Type is Composite, then the screen will refresh and enable the
administrator to name each of the 3 available composite sources separately.
Name the input Type(s) appropriately.
Configuring Audio Types For Inputs
Audio types (Analog L/R or S/PDIF) can be configured for each Input. To configure
audio for individual Inputs;
1.
Select the Inputs option from the available options at the top of the Status
page.
2.
Select the appropriate Audio type Analog L/R or S/PDIF.
•If “Composite” is selected as the Input type, only one audio source will be
available.
•Ensure audio has been connected from the Input to the rear of the hub.
Ensure the connections are sound and fixed correctly.
Manually Switching Sources
FIG. 2 Endeleo Login screen
4.
•The username should be left blank.
•The password is admin.
•The password is case sensitive.
On initial connection, the Status page is displayed.
Network Configuration
Hubs can be configured for the network environment using the Setup page.
Note: The UDM-0102 does not support DHCP. Always configure a static IP Address.
1.
Specify the following network options for the Hub:
a. Hub IP Address, Subnet Mask and Default Gateway;
b. UDP Port (default = 2008)
c. Hub name (maximum of 30 characters).
2.
Click on Update to save the new settings to the Hub (FIG. 3).
Note: All changes are immediate - once the IP address of the hub has been changed
redirect the web browser to the changed address.
The UDM-0102 supports 2 AV input sources that can be switched manually. To
switch the inputs at the device, press the SELECT pushbutton on the front of the
device.
Manually Executing Presets
The UDM-0102 supports a total of 2 presets.
1.
Select the AV input source (1 or 2), via the SELECT pushbutton.
2.
Select either PRESET 1 or PRESET 2 to execute.
Powering The UDM-0102 On/Off
•Powering on the Hub: Insert the barrel connector of the power supply into
the power connector on the UDM.
•Powering off the Hub: Remove the barrel connector of the power supply
from the power connector on the UDM.
Additional Documentation
Refer to the UDM-0102 and UDM-RX02 Multi-Format Distribution Hub and Receiver
Operation/Reference Guide (available online at www.amx.com) for detailed
information on configuring the Hub, UDM receivers and source devices.
For full warranty information, refer to the AMX Instruction Manual(s) associated with your Product(s).
11/07
©2007 AMX. All rights reserved. AMX and the AMX logo are registered trademarks of AMX.
AMX reserves the right to alter specifications without notice at any time.
3000 RESEARCH DRIVE, RICHARDSON, TX 75082 • 800.222.0193 • fax 469.624.7153 • technical support 800.932.6993 • www.amx.com
93-UDM-0102 REV: C