1
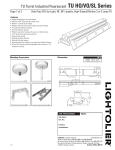
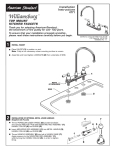
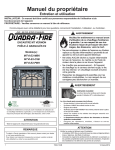
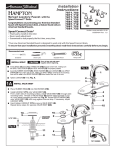
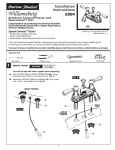
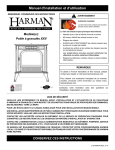
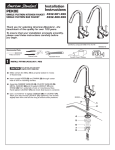
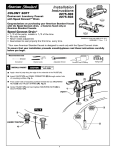
Installation
Instructions
3770
TM
BAR SINK FAUCETS
Thank you for selecting American-Standard...
the benchmark of fine quality for over 100 years.
To ensure that your installation proceeds smoothly-please read these instructions carefully before you begin.
1
INSTALL FAUCET
CAUTION
Certified to comply with ANSI A112.18.1M
U.S. Patent No. 5,819,789
M968935 Rev. 1.1
Turn off water at
main supply.
Insert faucet SHANKS (2) through holes of Sink.
Note: Putty is not required unless mounting surface is uneven.
Place FAUCET (1) in position on Sink.
Assemble and tighten LOCKNUTS (3) from underside of Sink.
2
1
PUTTY
(IF REQUIRED)
SINK
3
HAND TIGHTEN
2
INSTALLATION OF OPTIONAL METAL LEVER HANDLES
(Supplied with Faucet)
2
Thread PORCELIAN LEVER HANDLE (2) counter-clockwise
and remove INDEX BUTTON with MOUNTING ROD ASSEMBLY (1),
HANDLE COLLAR (4) and O-RING (5).
3
Insert MOUNTING ROD ASSEMBLY (1) into METAL HANDLE (3),
HANDLE COLLAR (4) and O-RING (5).
Thread HANDLE ASSEMBLY (6) into ball of HANDLE BASE (7).
Apply pressure to the MOUNTING ROD ASSEMBLY (1)
while turning the HANDLE COLLAR (4), in order to tighten
firmly.
1
6
7
4 5
3
MAKE WATER SUPPLY CONNECTIONS
NOTE: FLEXIBLE SUPPLIES OR BULL-NOSE RISERS MUST BE
PURCHASED SEPARATELY.
1
1
Connect water supply to FAUCET SHANKS (1) with 1/2" IPS FLEXIBLE
SUPPLIES (2) or 3/8" O.D. BULL-NOSE RISERS (3).
Use adjustable wrench to tighten connections. Do not over tighten.
Be careful not to kink copper supply when bending. Use tubing
cutter to cut to proper length.
2
COUPLING NUT
3
FERRULE
4
5
TEST INSTALLED FITTING
With HANDLES (1) in OFF position, turn on WATER
SUPPLIES (2) and check all connections for leaks.
Remove AERATOR (3).
Operate both HANDLES to flush water lines thoroughly.
Replace AERATOR (3).
SERVICE
90˚
STOP
WASHER
To change direction of handle rotation,
proceed as follows:
Turn valve to OFF position.
Pull out INDEX CAP and remove
HANDLE SCREW.
Remove SPRING CLIP.
SPRING
Lift STOP WASHER, turn 90˚ and replace.
CLIP
Replace SPRING CLIP.
Replace ADAPTER, HANDLE, SCREW, and INDEX CAP.
AERATOR may accumulate dirt causing distorted and
reduced water flow. Remove AERATOR and rinse clean.
If spout drips, operate handles several times from OFF
to ON position. Do not force - handles turn only 90˚.
1
3
1
ALIGN HANDLES
1
Pull out INDEX CAP (1) and remove
HANDLE SCREW (2), HANDLE (3)
and ADAPTER (4).
3
Push ADAPTER (4) on VALVE STEM (5).
Find correct position of HANDLE (3) by
adjusting male teeth on ADAPTER (4) to
female teeth on HANDLE (3).
2
4
5
Replace HANDLE SCREW (2) and push
in INDEX CAP (1).
2
6
CARE INSTRUCTIONS:
DO: SIMPLY RINSE THE PRODUCT CLEAN WITH CLEAR WATER. DRY WITH A SOFT COTTON FLANNEL CLOTH.
DO NOT: CLEAN THE PRODUCT WITH SOAPS, ACID, POLISH, ABRASIVES, HARSH CLEANERS, OR A CLOTH WITH
A COARSE SURFACE.
M968935 Rev. 1.1