1
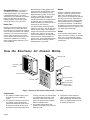
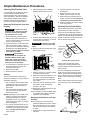
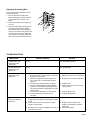
• Maintenance
• Operation
• Service
Electronic
Air
Cleaner
Owner’s
Use and
Care
n
tio r
ra Ai
ilt ic tem
l F on ys
ua tr S
D lec ner
E a
le
C
OPER
ATING
LIGHT
MAINTENANCE/REPLACEMENT SCHEDULE
Fan ON (Continuous)
Conditions
Cleanable
Pre-Filter
Collector Cells
Fan AUTO
Dusty
Normal
Dusty
Normal
14-30
Days
30-60
Days
30-45
Days
45-90
Days
1-2
Months
3
Months
3
Months
6
Months
For maximum efficiency, the air cleaner cells and the pre-filter
should be inspected and cleaned on a regular basis.
The Maintenance Schedule is dependent on the amount of air
passing through the filter as well as the amount of dust (pollen,
smoke, etc.) in the air. This schedule shows estimated time
periods and may be increased or decreased based on actual
conditions.
32-5032-03
02/03
Home Care
Most staining and soiling problems are
caused by these minute particles. These
particles are so tiny that they are only
slightly affected by gravity, and can stick
as easily to a wall as to the floor. The
soiling of fabrics and the dull film on
mirrors and windows are caused by these
tiny particles. With your Electronic Air
Cleaner operating, you should not have to
clean them as often as before.
Keeping your home furnishings clean is
easier when the air is clean. Most of the
dust and grime you must remove is drifting
in the air. With your Electronic Air Cleaner
operating in your home’s environmental
system, walls, windows, mirrors, draperies, and furniture stay cleaner longer. You
should have a reduction in the soiling
effect of these pollution particles on your
home furnishings.
A small percentage of the larger visible
particles in your home, such as large dust
and lint, are too heavy to stay adrift long
enough to be returned to the Electronic Air
Cleaner. They settle out on horizontal
surfaces and will have to be picked up by
dusting as before, though perhaps not
quite so often. These visible dust particles
represent a small percentage of all the
drifting particles in your home.
Congratulations - Your Electronic
Air Cleaner is a modern, economical
indoor pollution fighter. You should notice
a marked improvement in your indoor
atmosphere as your Electronic Air Cleaner
begins removing those tiny airborne
pollution particles, such as dust, pollen,
and smoke from the air in your home.
Smoke
Smoke is comprised of submicroscopic
particles. Collectively, these particles
make up the familiar blue haze we all
know. In dense concentration the particles
form layers and can stay suspended on
the air currents for hours. These particles
will eventually settle out as a dulling film
on mirrors and windows. Your Electronic
Air Cleaner can remove nearly all of these
particles before they have a chance to soil
your home and its furnishings.
Pollen
Pollens are also drifting particles, some
which can be seen, but many are invisible
to the eye. Your Electronic Air Cleaner
removes almost all of the pollen particles
circulated to it.
How the Electronic Air Cleaner Works.
Electronic Cell
Air Cleaner
Cabinet
Power Door
Electronic Cell
Power Pack
Pre-Filter
1/4 Turn Latch
(Lock Position)
1/4 Turn Latch
(Unlock Position)
Figure 1. Electronic Air Cleaner Cabinet with 1” Pre-Filter
Components
A. The cabinet is installed into the return
ductwork of your air conditioning
system.
B. The Power Door located on the front of
the Cabinet, contains the electronic
components that provide power for the
Air Cleaner and allows the removal of
the Electronic Cells and Pre-filter when
Page 2
cleaning is required. The On/Off switch
and indicator light are located on the
front panel of the Power Pack. The
power cord plugs into the receptacle
below the ON/OFF switch.
C. The Pre-filter catches large dust
particles and lint before they reach the
Electronic Cells.
D. The Electronic Cells contain the
ionizing grids and collecting plates
which electronically remove the dirt,
pollen, and smoke particles from the
air passing through them.
How It Works
The air in your home is circulated through
your heating and/or cooling system,
maintaining the temperature at a comfortable level. At the same time, the circulated
return air is passing through the Electronic
Air Cleaner. Millions of small dirt particles
such as smoke and pollen, most of them
so small as to be invisible, are carried by
the returning air to the Electronic Air
Cleaner.
To familiarize you with the operation of the
Electronic Air Cleaner, here is a brief
description of how “drift-dirt” is removed
from the air electronically.
4. As the air carries these charged
particles into the collector section of
the Electronic Cells, they are magnetically drawn against metal plates by the
action of the powerful electrical field.
This process is comparable to a
magnet attracting iron filings.
5. These particles cling to the metal
plates and the now filtered air passes
on to the fan compartment of your
conditioning air system before being
recirculated through your house.
Pre-Filter
Dirty Air In
1. Drift particles in your home are carried
to the Air Cleaner through the return air
ductwork of your conditioning air
system.
2. Lint, feathers, animal hair, and other
large particles are trapped by the prefilter.
3. Most of the drifting particles are too
small to be captured by the pre-filter
and pass into the ionizing field of the
Electronic Cells where they are
electrically charged.
,,
,,
,
Ionizing Wires
Electronic Air Cleaner Operation.
Fan & Filter Operation
Indicator Lights
Your Air Cleaner only operates when air is
circulating through the unit; consequently,
it operates only when the furnace or air
conditioner fan operates. Your Air Cleaner
can do more for you if the fan operates
continuously. Most thermostats have a
switch that will permit continuous fan
operation. However, it must be understood
that continuous fan operation will increase
operating expense somewhat.
Your Electronic Air Cleaner has a green
light on the front of the power pack that will
be ON when the Electronic Air Cleaner is
operating. This light should be ON
whenever the fan is running and the switch
is turned “ON’. If the fan stops running, or
power to the Air Cleaner has been
disrupted, the light will go out and remain
off until the power has been reapplied.
Operation
On/Off Switch & Indicator Light
Your Electronic Air Cleaner has an air flow
sensor that will provide power to the
electronic cells when your conditioning air
system fan is on. For fully automatic
operation, just turn the switch on the front
of the Power Pack “ON”. The Air Cleaner
will be on whenever the fan runs.
Green Light
Power Switch
6. As additional “drifting dirt" particles are
generated in your home, or infiltrated
from outdoors, they are also carried to
the Electronic Air Cleaner where they
are collected.
7. Because particles collected on the
cells are so small, the cells may not
appear dirty. The cells should be
cleaned according to the maintenance
schedule.
1. With power turned on at the circuit
breaker and the system blower off,
push the air cleaner ON-OFF switch to
the “ON” position. The green light will
turn ON for approximately ten seconds,
then turn OFF.
2. With the blower running, the green light
will be ON to indicate that the air
cleaner is operating. An arcing or
“snapping” sound may be heard
occasionally. This is normal, and the
unit is operating properly.
3. When the blower stops, the green light
will turn OFF.
Ionizing Section
Collecting Section
Electronic Cell
Clean Air Out
Collecting Plates
Arcing (Snapping Or Popping)
Do not be concerned if the Air Cleaner
snaps or pops intermittently. These
sounds are caused by large particles
entering the cleaner. Should this continue
to the point of irritation, clean the pre-filter
if dirty and remove the Electronic Cells
and clean them according to the directions. Arcing (snapping and popping) may
also occur when an Electronic Cell is still
wet after washing or when it is very dirty.
An increase in the frequency of the
snapping noise may indicate that the cells
need cleaning. If Arcing Persists When
the Cells are Clean And Dry, Consult
Your Installing Or Servicing Contractor.
Page 3
Simple Maintenance Procedures.
Cleaning The Electronic Cells
For peak efficiency, the Electronic Cells in
your Air Cleaner should be washed
regularly (between one and six months).
This is necessary to remove the deposits
of dirt particles collected while running.
Experience will be the best indicator of
how often the cells should be washed.
4. After the detergent has completely
dissolved, put the cells in to soak.
Removing The Electronic Cells And
Pre-filter
Cleaning The Air Flow Switch
During normal maintenance, the air flow
sensor tube may require cleaning to
remove any accumulated dirt and dust.
! CAUTION To reduce the risk of
electrical shock, disconnect power
to the Air Cleaner before performing maintenance or service.
1. At the thermostat, place the system
switch to OFF and the fan switch to
AUTO to assure that the air system will
not turn on while cleaning.
2. Push the Electronic Air Cleaner power
switch to the “OFF” position. Unplug
power cord at the wall before removing
the Electronic Cells. If you are not
familiar with this equipment, contact
your installer or dealer.
5. Soak the cells and pre-filter for 15 to 20
minutes; slosh up and down, or around
several times, and remove.
! CAUTION Be careful not to scald
hands and arms when using very hot
water.
6. Rinse the cells and pre-filter with a fine
lower pressure spray.
! CAUTION High voltage is
present within the air cleaner for
operation. Before removing the
power door, wait at least 15 seconds to allow the power pack and
electronic cells to discharge.
3. Turn the latches on the power door 1/4
turn (open position) to unlock and
remove the power door.
4. Remove the Pre-filter.
5. Slide the Electronic Cells out.
Soaking
The dirt on the Electronic Cells can be
removed by soaking in a strong solution of
dishwasher detergent.
1. Use a container large enough to hold
the Electronic Cells, such as a large
plastic dishpan, trash container, or
laundry tub.
2. Use an automatic dishwasher detergent in hot water. All major brands
worked well in tests.
NOTE: Depending on the minerals in the
water in your area, some brands of
dishwasher detergent may form a
precipitate of scum. If a noticeable
scum floats to the surface, try another
brand of detergent.
3. Pour into the container about 3/4 cup
of detergent per cell. A bit more if the
container is much larger than the cell.
Pour in enough very hot water to
cover the cells.
Page 4
2. Insert the Pre-filter in the channel
provided for it.
3. Replace the power door. Turn the
latches 1/4 turn to secure the door.
4. Restore all power previously disconnected - See Item #2 under Removing
The Electronic Cells And Pre-filter
5. Push the Electronic Air Cleaner switch
to the “ON” position.
To clean the tube, gently push a soft pipe
cleaner into the tube above and below the
printed circuit board. Gently blow into the
tube to remove loosened dirt.
Clean above and
below circuit
board in
air flow
tube.
Cleaning the Ionizing Wires
Ionizing wires may become coated
causing loss of cleaning ability by the
collecting cell and should be cleaned, at
least, annually.
7. Soak the cells (only) in clean hot water
for another 5 to 15 minutes.
8. Remove the cells and let drain for 15 to
20 minutes. If the water draining from
the cells feels slippery, the cells need
more rinsing.
9. Inspect the cells for cleanliness. If any
dirt remains, repeat the washing
procedure until clean.
10. Replace the cells and pre-filter into the
Air Cleaner when dry.
NOTE: If washing must be repeated, this is
an indication that washing should be
performed more frequently.
Replacing The Electronic Cells And
Pre-filter
NOTE: A guide key in the Air Cleaner
cabinet will allow the Electronic Cells to
fit into the cabinet in only one position with the arrow pointing in the direction
of airflow.
1. Position cells correctly and slide them
into place.
The thin ionizing wires are sharp and
fragile. Use care when wiping the wires
with the pencil eraser to avoid personal
injury or broken wires. If an Ionizing wire
breaks, refer to “Replacing An Ionizing
Wire”.
Using a pencil eraser, wipe each ionizing
wire, exercising care to avoid damage to
them.
Ionizing
Wire
Pencil
Eraser
Pencil
Eraser
Ionizing
Wire
Replacing An Ionizing Wire
If an ionizing wire should break, it can be
replaced as follows:
1. Remove all pieces of broken wire.
Make sure supports at each end are in
good condition and not bent out of
shape.
2. Hook the new wire onto the support at
one end.
3. Hold your finger against the support at
the other end and hold the ionizing
wire between thumb and forefinger as
shown or use needle nose pliers. Press
on spring and on wire loop until it slips
over the end of the support. Make sure
wire is securely anchored at each end.
Support
Ionizing
Wire
TROUBLESHOOTING
INDICATION
•
•
•
•
•
•
•
•
•
•
•
•
SERVICE CHECKS
ACTION
On/Off switch “ON”
Green light “OFF”
Blower Off
None
Normal Standby Operation.
On/Off switch “ON”
Green light “ON”
Blower On
None
Normal Operation.
On/Off switch “ON”
Green light “OFF”
Blower On
AC Power is not being supplied to air cleaner.
1. Check that power cord is properly connected to
power pack and to outlet.
2. Check for voltage at air cleaner outlet box. If
none, check fuse or circuit breaker at power
input line.
3. Check that fuse in power pack is not blown
4. Check for shorted collecting cell by installing
power door with collecting cells removed and
only pre-filter installed. If green light turns ”ON"
cell is shorted.
5. Check for dirt or blockage in air sensor tube.
6. Check that pre-filter is installed and not
damaged.
On/Off Switch “ON”
Green light flickering
Blower On
1. Check for dirty collecting cells. Check cells for any
foreign object that might be lodged between plates
of cell.
2. Check cells for broken ionizing wires, cracked
insulator, or bent plates.
3. All ionizing wires must be completely clean with no
dust build-up on wires.
1. Make proper power cord connections.
2. Replace fuse or reset circuit breaker.
3. Replace Fuse.
4. Wash cells. If short is not corrected,
call for service.
5. Clean air sensor tube.
6. Replace damaged filter
1. Remove cells and wash thoroughly.
2. Replace broken ionizing wires.
Replace cell if insulator cracked or
plates bent.
3. Clean ionizing wires.
Page 5
LIMITED WARRANTY
ELECTRONIC AIR CLEANER
*FE
(PARTS ONLY)
This limited warranty is extended by American Standard Inc., to the original purchaser and to any succeeding owner of
the real property to which the Electronic Air Cleaner is originally affixed, and applies to products purchased and retained
for use within the U.S.A. and Canada.
If any part of your Electronic Air Cleaner fails because of a manufacturing defect within five years from the date of the
original purchase, Warrantor will furnish without charge the required replacement part. Any local transportation, related
service labor, mechanical filters and diagnosis calls are not included.
This limited warranty does not cover failure of your Electronic Air Cleaner if it is damaged while in your possession,
damage caused by unreasonable use of the Electronic Air Cleaner and/or damage from failure to properly maintain
the Electronic Air Cleaner as set forth in the Use and Care manual (see Proper Maintenance section).
This limited warranty applies to product installed on or after 10/1/2001 where product is manufactured after 1/1/2000.
This limited warranty is not retroactive to any installations prior to 10/1/2001 or on product produced before 2000.
THE LIMITED WARRANTY AND LIABILITY SET FORTH HEREIN ARE IN LIEU OF ALL OTHER
WARRANTIES AND LIABILITIES, WHETHER IN CONTRACT OR IN NEGLIGENCE, EXPRESS
OR IMPLIED, IN LAW OR IN FACT, INCLUDING IMPLIED WARRANTIES OF
MERCHANTABILITY AND FITNESS FOR PARTICULAR USE, AND IN NO EVENT SHALL
WARRANTOR BE LIABLE FOR ANY INCIDENTAL OR CONSEQUENTIAL DAMAGES.
Some states do not allow limitations on how long an implied limited warranty lasts or do not allow the exclusion or
limitation of incidental or consequential damages, so the above limitation or exclusion may not apply to you. This limited
warranty gives you specific legal rights, and you may also have other rights which vary from state to state.
Parts will be provided by our factory organization through an authorized service organization in your area listed in the
Yellow Pages. If you wish further help or information concerning this limited warranty, contact:
American Standard Inc.
Troup Highway
Tyler, TX 75711-9010
Attention: Manager, After Sales Support
GW-633-1802
*(First letter may be preceded by an “A” or “T”)
37-5857C
0307
Page 6