Transcript
®
Back-UPS ES
500
User’s Guide
®
w w w.apc.com
1
2
Place and Power On
1
2
3
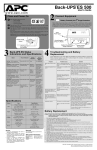
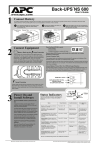
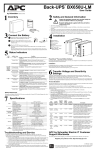
Place the Back-UPS ES to avoid:
• Direct sunlight
• Excessive heat
• Excessive moisture
Connect Equipment
Battery Powered plus
Surge Protection
These outlets are powered whenever the Back-UPS ES is switched on. During a power
outage or other utility problem (brownouts, over-voltages), these outlets are powered
for a limited time by the Back-UPS ES. Plug a computer and monitor into these
outlets. Once the equipment is connected to the Back-UPS ES, power on the
connected equipment.
Plug the Back-UPS ES 500 power cord directly into a wall outlet; not into a surge
protector or power strip.
Press the On / Off button to power the unit on. The indicator next to the On/Off button
will illuminate green to confirm the Back-UPS ES is on and ready to provide
protection.
Note: The Back-UPS ES must charge for 12 hours to ensure full runtime. The unit
charges whenever it is connected to utility power and is switched on.
IMPORTANT: It is recommended that you DO NOT turn on your monitor until the
UPS has been powered on and has completed self-test (approximately 16 seconds).
Surge Protected Only
Input
Power Cord
Battery Powered plus
Surge Protection
Circuit Breaker
(Press to Reset)
Power On/Off
Pushbutton
Surge Protected Outlet
This outlet provides protection from surges no matter if the Back-UPS is switched on
or off. Plug a printer, fax machine, scanner, or other peripheral that does not need
battery power during a power failure into this outlet.
Back-UPS 500 ES
3
Back-UPS ES Status Indications and
Specifications
Status
Visual Indication
On Line - UPS is supplying
conditioned utility power to the
load
On Battery - UPS is supplying
battery power to the load
connected to the Battery outlets
Low Battery Warning - UPS is
supplying battery power to the
load connected to the Battery
outlets and the battery is near
exhaustion
Overload Shutdown - During
On Battery operation a battery
power supplied outlet overload
was detected.
Audible
Indication
Power On LED - ON
None
Power On LED - ON
(off during beep)
Alarm
Terminates
When
Not Applicable
Beeping 4
times every
30 seconds
UPS transfers
back to On Line
operation, or
when UPS is
turned off.
Power On LED Rapid
UPS transfers
Flashing
beeping (1
back to On Line
second
operation, or
intervals)
when UPS is
turned off.
Power On LED - OFF Constant tone UPS turned off
with the power
switch.
Sleep Mode - During On Battery Power On LED - OFF Beeping once
operation the battery power has
every 4
been completely exhausted and
seconds
the UPS is waiting for utility
power to return to normal.
UPS transfers
back to On Line
operation, or
when UPS is
turned off.
Self-Test in progress
Power On LED - On
None
Not Applicable
Self-Test failed (need service)
Power On LED flashing 2 times per
second
Short beeping
2 times every
2 seconds for
1 minute
repeated
every 5 hours
When unit is
turned off or
enters backup
mode or passes
self-test. The
user should
contact APC for
service options.
UPS Power
On Indicator
Power On/Off
Switch
Specifications
Feature
Item
Specification
Voltage / Frequency
Input
220 VAC / 57-63 Hz
Low Voltage Transfer
180 VAC
High Voltage Transfer
260 VAC
UPS Capacity (3 battery powered
outlets)
Output
500 VA / 300 Watts
Surge Capacity (all 4 outlets)
5 Amps
Voltage (on battery)
220 Vrms +8/-8%
Frequency (on battery)
Surge
Protection
60 Hz +/- 1 Hz
Transfer Time (ms)
8 ms typical, 10 ms max.
AC Surge Protection
450 Joules
Telephone Surge Protection
AC Input Protection
None
Circuit Breaker Switch
Battery Type
Battery
Sealed Lead Acid
Recharge Time
10-12 Hours
Average Life Span
Physical
2-4 Years
Net Weight
Size
3.6 kg (7.9 lb)
29.79 cm x 18.3 cm x 8.49 cm
(11.73 in x 7.2 in x 3.34 in)
Service
Warranty
1. Consult the Troubleshooting table above to
eliminate common problems.
2. If problems persist, contact APC Technical
Support; please be prepared to provide: date of
purchase, model number and serial number (on
bottom of UPS).
3. Please be prepared to troubleshoot the problem
over the phone. If this is not successful, and the
unit is still under warranty, the Technical Support
Representative will provide all necessary
information to return the unit for replacement.
The standard warranty is 2 years from the
date of purchase.
APC Contact Information
APC Philippines
Website
Online Technical
Support
990-1410A Copyright © 2003 American Power Conversion
+63 2 637 5456 (5642)
http://www.apc.com
http://support.apc.com
4
Troubleshooting and Battery Replacement
Use the table below to solve minor Back-UPS installation or operation problems. Consult APC
Online Technical Support or call APC Technical Support for assistance with problems that cannot
be solved using the table below.
Back-UPS ES will not turn
on.
Battery is discharged and utility
power is not available at the wall
outlet.
Ensure power is available at the wall outlet. If the
Back-UPS ES will not turn on, contact APC Technical
Support (see APC Contact Information).
No power available at the
Surge Protection outlet.
Surge Protection outlet has been
overloaded or the circuit breaker
has “tripped”.
Reduce the amount of equipment plugged into Surge
Protection outlets. Check the circuit breaker and reset
the breaker by pushing it fully inward.
Connected equipment loses
power.
Utility power not available at the
wall outlet.
Ensure that the fuse or circuit breaker for the wall
outlet is not tripped, and that the wall switch
controlling the outlet (if any) is in the ON position.
Equipment is connected to the
“Surge Protection” outlet.
Ensure that the equipment you want to stay powered
during a power failure is plugged into the “Battery
Powered plus Surge Protection” outlets and NOT the
“Surge Protection Outlet”.
The Back-UPS ES is overloaded. Make sure that the equipment plugged into the outlets
of the unit are not overloading the capacity of the unit.
Try removing some of the equipment and see if the
problem continues.
PowerChute plus software has
performed a shutdown due to a
power failure.
The Back-UPS ES is operating normally.
The Back-UPS ES has exhausted The Back-UPS ES can only operate on battery power
its available battery power.
for a limited amount of time. The unit will eventually
turn off when the available battery power has been
used. Allow the unit to recharge for 16 hours before
continuing use of the unit.
Connected equipment does not
The output waveform is designed for computers and
accept the step-approximated
computer-related equipment. It is not designed for use
sine waveform the Back-UPS ES. with motor-type equipment.
The Back-UPS ES may require
service.
Contact APC Technical Support for further
troubleshooting (see APC Contact Information).
The On Line indicator is lit
and the Back-UPS ES is
beeping four times every 30
seconds.
The Back-UPS ES is using
battery.
The Back-UPS ES is operating normally and using
battery power. Once On Battery, you should save your
current work, power down your equipment, and turn
the unit OFF. Once normal power is restored, you may
turn the unit back ON and power your equipment.
The Power On indicator
flashes once per second and
the Back-UPS ES beeps
once per second at the same
time.
Battery capacity is low (about 2
minutes of use remaining).
The Back-UPS ES is about to shut off due to a low
battery charge condition! When the unit beeps once
every second, the battery has about 2 minutes of power
remaining. Immediately power down your computer
and turn the unit OFF. When normal power returns, the
unit will recharge the battery.
Inadequate runtime.
The battery is not fully charged.
Allow the unit to charge by leaving it plugged into the
wall at least 16 hours.
Battery is near the end of useful
life.
As a battery ages, the amount of runtime available will
decrease. Batteries also age prematurely if the BackUPS ES is placed near excessive heat.
You can replace the battery by ordering one at our
website: www.apc.com.
Battery Replacement
Battery replacement must be performed by qualified service personnel using the following procedures:
Caution: A battery can present a risk of electrical shock and high short circuit current. The following precautions
should be observed when working on batteries: Remove watches, rings, or other metal objects. Use tools
with insulated handles.
1. Disconnect all equipment plugged into the Back-UPS.
2. Turn off the Back-UPS and disconnect it from the wall outlet.
3. Lay the Back-UPS on a flat, stable surface with the wall mounting holes facing upward.
4. Loosen fully, the four screws which secure the rear cover to the Back-UPS.
5. Lift the rear cover straight up and off of the Back-UPS. To avoid losing the screws, do not invert the rear cover.
Do not touch the printed circuit board or the outlets.
6. Disconnect the red wire from the battery terminal by grasping the black portion of the wire and pull straight back from
the connector.
7. Grasp the battery and rotate it 90 degrees (stand it upright).
8. Disconnect the black wire from the battery terminal by grasping the black portion of the wire and pull straight back
from the connector.
Caution: Do not dispose of the battery in a fire. The battery may explode. Do not open or mutilate the battery.
Released electrolyte is harmful to the skin and eyes. It may be toxic.
9. Recycle or dispose of the old battery in accordance with local requirements, or return it to APC to ensure proper
recycling.
10. Unpack and inspect the replacement battery. Ensure the replacement battery is not cracked or leaking. If the battery is
damaged, contact APC Customer Service.
11. Set the replacement battery in the Back-UPS with the terminals facing upward.
12. Connect the black wire to the negative (-) terminal of the battery.
13. Lay the replacement battery into the Back-UPS chassis. Ensure the black wire is not pinched under the battery.
14. Connect the red wire to the positive (+) terminal of the battery. Ensure the red wire is fully in the battery enclosure.
15. Place the rear cover on the Back-UPS chassis and tighten the four screws loosened in step 4.
16. Plug the Back-UPS into the wall outlet, press the Power pushbutton on the Back-UPS to turn it on, and allow the
battery to charge for 16 hours.
17. Plug equipment to be protected into the Back-UPS and resume normal operation.
APC, Back-UPS and PowerChute are registered trademarks of American Power Conversion
All other trademarks are property of their respective owners.