1
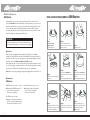
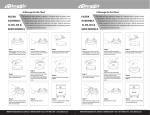
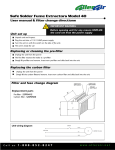
FILTER ASSEMBLY- 600
D, DX
Step 1
Step 2
Step 3
Turn Power Off and
unplug receptacle.
Gently grasp wheels.
Lay unit upside down.
With a #2 Philips screw driver,
remove the four screws from the
bottom of the unit.
Step 4
Step 5
Remove only one of the white, felt,
donut-shaped gaskets from the
inside of the purifier body.
Insert the carbon filter (either a
Model 600 D Carbon or a Model 600
DX Carbon) into the unit.
Remove base by gently pulling on
the wheels.
Step 6
Replace the gasket that had been
removed in STEP 4.
Model 600 Series
Operation and Maintenance Manual
Step 7
Place lid back to its proper position
by aligning the arrow with the rear
seam.
Step 8
Replace the four screws
Step 9
Turn the unit back onto its wheels.
It is now ready for immediate use.
AllerAir Industries Inc. Toll free: 1-888-852-8247 / Fax: 1-877-688-3939 www.allerair.com
AllerAir Industries Inc.
REPLACING FILTER ASSEMBLY- 600
600 Series
Series
Congratulations, you are moments away from fresher, cleaner indoor air.
Your new AllerAir unit will combat many of the chemicals, gases, odors and
particles responsible for poor indoor air quality, and in turn, health concerns
such as allergies, asthma, sick building syndrome and multiple chemical
sensitivity. As with any air cleaner, proper maintenance of your unit is a vital
part of keeping it operating at peak efficiency.
WARNING !
Before removing the top or bottom of the unit for any
reason, always unplug the cord from the power supply.
Step 1
Step 2
Turn Power Off and
unplug receptacle.
With a #2 Philips screw driver,
remove the four screws from the
bottom of the unit.
Step 3
Step 5
Step 6
First remove the HEPA filter by
placing thumbs on the inner side of
the filter.
Than remove the Carbon filter by
placing thumbs on the inner side of
the filter.
Then pull up gently until totally out.
Then pull up gently until totally out.
Lay unit upside down.
Gently grasp wheels.
Operation:
Most 600 units are shipped fully assembled and ready for use with the
exception of the D & DX models which ship with their large carbon filters in
a separate box. This is done to safeguard your unit during shipping. To insert
the filter, refer to the Filter Assembly-600 D, DX diagram.
Please plug units into a 120V-15amp outlet. For best results, situate your unit
close to your sitting, sleeping or work area. The units equiped with a variable
speed control -Turn knob to the right to adjust to your safistactionNote: Please save your packaging. Original packaging will be required for all
Step 4
Remove base by gently pulling on
the wheels.
Maintenance:
600 Series
HEPA Filter (Model 600
HEPA 2" or HEPA 3")
Change the HEPA filter every 3 - 5
years or after a noticeable
decrease in air quality.
Carbon Filter (Model 600 Carbon Filter)
Change the carbon filter after 2
years or after a noticeable
decrease in air quality.
Pre-Filter (Model 600 Prefilter)
Change or vacuum the pre-filter
every 2 - 4 months depending on
the dust level in the area of use.
July 23, 2007
Step 9
Step 7
Step 8
Replace filters with new ones then
reassemble by inserting the Carbon
filter first then the HEPA filter.
Place lid back to its proper position
by aligning the arrow with the rear
seam.
With a screw driver, place 4
screws back into their positions.
Gently return the unit into
upright position.