1
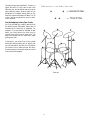
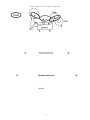
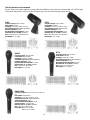
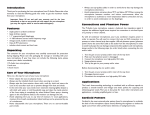
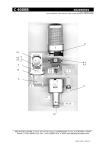
Micing the
Drum Set
INTRODUCTION:
In the modern studio there is no more complex job for the engineer than micing the drum set. Musically, the drum set and
bass form the rhythmic underpinning of any jazz, pop or rock musical performance. In the final mix, it can be in the background, foreground or well out front, depending on the needs of the music.
The job for the engineer at the tracking stage of album production is to store the necessary sonic elements, both stereo and
mono, that will allow the mix engineer to put together a coherent rhythmic sound structure for all possible options that the
artist and producer may want to experiment with as the album project approaches completion.
The tracking engineer must have a good knowledge of the drum set and how a drummer goes about setting it up. It’s not all
that simple; a drummer may take a good bit of time setting up his instruments and may damp the various drum heads to minimize ringing. It is rare for a drummer to come into a studio and be up and running in a few minutes. At a rehearsal, possibly -- but not for a recording session. The artistry of an accomplished drummer is truly awesome. The really good ones show
a degree of independence of feet and hands rivaling that of a pipe organ virtuoso.
You will find that the drummer is often the first musician to arrive at the studio, often a couple of hours ahead of starting
time. This extra time is essential in setting up the drums and making sure that all spurious resonances and extraneous noises have been worked out of the system.
The drummer should maintain eye contact with the other players and not be shunted off to a distant drum cage or isolation
booth. For certain kinds of music the drum set will have to be isolated with goboes, but the drummer should never feel out
of contact with the other musicians. There are of course exceptions, and many a drummer has played alone in a big studio,
adding his tracks to pre-existing bass and other supporting tracks, often taking advantage of the acoustics of a large empty
space.
THE BASIC MAKEUP OF THE DRUM SET:
Although the actual instruments and their arrangement will vary from player to player, the drum set will have the following basic elements:
Kick Drum: The kick drum is played with the right foot using a spring-loaded pedal. There may be heads (the striking surface) on both sides of the kick drum, but some players use a single head. Another variation is the use of a full head on the
playing side, with a head on the opposite side that has a medium sized hole in it, providing a limited degree of tuning of
the inner cavity. The larger the drum and lighter the tension on the heads, the lower the pitch will be. Some players go for
a higher pitched, highly damped sound while others prefer a lower pitched sound. In either case the player will most likely want the sound to be fairly well damped so that it will not overhang and possibly interfere with the bass line.
Snare Drum: The snare is played by both hands using a pair of sticks or light metal brushes against the head in a circular
motion. The “snares” themselves are actually multiple sets of thick gut or metal strings that rest against the bottom head of
the drum, and they give the characteristic “burr” to the sound of the instrument when it is struck. They can be disengaged,
in which case the sound of the drum is like that of a high-pitched tom.
Hi-hat cymbals: The hi-hat assembly is made up of a pair of face-to-face cymbals, one on top of the other. A pedal operated with
the left foot varies their separation slightly, and the drummer plays them with a stick in his right hand while holding the cymbal
pair by their edges lightly with his left hand. The sound is light and very articulate for off-beat rhythmic patterns, since it reflects
movements and positions of both hands.
The toms: The toms (officially known as tom-toms) are one-sided drums, slightly deeper in size and pitch than the snare
drum, which are placed left to right behind the snare and high-hat and over the kick drum. They are normally tuned low,
mid and high, but without definite pitch. As a rule, there are three of them, but some players may add a fourth.
The cymbals: There are usually three cymbals arranged at the upper level of the set and directly above the toms. They
have various names: the crash cymbal is large and is used for musical accents; the ride cymbal, usually higher pitched, is
used in continuous passages, and a sizzle cymbal, with small metal pins loosely fitted on its periphery, is used for light passages where an increased degree of high frequency “shimmer” is desired. Cymbals are among the most expensive items in
a drum set. Many excellent ones are made in near-eastern countries, such as Turkey, where the art has been handed down
in families for many generations.
2
This, in short, is a description of a typical modern drum set. Figure 1 shows what it looks like from the viewpoint of the
audience.
Figure 1
In this White Paper we will discuss micing the drum set largely from the point of view of AKG’s highly regarded studio mics.
We also want to introduce a new family of low-cost dynamic microphone models that are so good you’d think they were
condensers! These are the models D440, D550 and D660; along with the D770, D880 and D112, they are ideal for the
home studio and music reinforcement on stage. They all have high overload margins in the 145 to 150 dB, which is essential in drum micing.
BASIC MICING STRATEGY:
At the most fundamental level we have a microphone on the kick drum and an overhead (OH) pair of mics picking up the
entire set in stereo. Many a jazz recording, mixed direct-to-stereo, has been made with this setup. If you are doing this, we
suggest the following options:
Micing the Kick Drum:
There are several important choices to make. Many experienced engineers prefer to use a tried and true dynamic microphone rather than a more recent condenser model. The reason is this: placed close to the head of the kick drum the microphone will pick up sound pressures that are extremely high. The overload characteristics of a dynamic mic can be more forgiving than those of a condenser. Also, since the dynamic goes into distortion more gently, the actual sound of slight nonlinearities might actually be a desirable thing.
3
In the old days the AKG D12 dynamic was one of
the mainstays of kick drum micing; today, the
D112 is the modern version of that microphone.
With its carefully engineered bass resonance chamber the D112 can handle any kick drum with ease.
If you want to use a condenser with ultrawide low
frequency capability, we suggest the C4000B, with
its 0.5% THD overload point of 145 dB. Figure 2
shows the difference between a dynamic and a condenser at or near the onset of distortion. The
dynamic has more residual distortion than the condenser, but the condenser goes into gross distortion
at a point where the dynamic may still be producing only moderate amounts of distortion.
Another big decision is where to put the microphone. Since a cardioid microphone is nearly
always used, there will be a good bit of low frequency boost due to proximity effect. Suggested
mic positions are shown in Figure 3. If the microphone is close to the middle (position 1), you will
get a sound that has perhaps too much low end
and not enough articulation. As the microphone is
moved progressively offcenter, the sound will have
more articulation, since
you will be picking up less
fundamental sound from
the head. Stop well short
of the edge, keeping a distance of about 4 to 5 inches. The actual distance of
the mic to the head will
normally be in the range
from 5 to about 2 inches.
Figure 2
Figure 3
Under some conditions, you may find it useful to put up a second kick mic, recording both on separate tracks, of course. A
good combination here would be a dynamic on one track and a condenser on the other.
The Overhead Pair:
Pick these mics carefully, since they provide the largest part of the sonic stage you are looking for. Studio engineers usually
pick the best condenser cardioids they have. For the most natural response we suggest a pair of C391’s or C480’s with their
ultralinear high frequency response. If you want a slightly brighter sound, use a pair of AKG large diaphragm condensers set
in their cardioid position. Another good choice is the C1000S. Its included presence booster creates a frequency rise in the
5 to 9 kHz range that guarantees you’ll get a sound that will cut gently through a complex mix, even when the drummer
is playing softly. For the home studio or on-stage the D440, D550 and D660 are excellent alternatives, with their broad high
frequency boost in the 8 kHz range.
The best position for the OH pair is often found about 6 to 8 inches over the player’s head. The mics should always be cardioids or hypercardioids in order to hold down studio leakage, and should be pointed outward from each other and down
toward the hi-hat on the left side and the large tom on the right side.
The spacing between the OH pair is fairly critical. If they are close (within one foot), the sound stage you get will be tight
with good delineation but with limited stereo spread. As you move the mics from 1 to 2 to 3 (keeping their target aiming
4
directions on the hi-hat and big tom), the sound
will “open up” and will seem wider on the reproduced stereo stage. Details here are shown in
Figure 4.
By the way, good drummers often know more
about drum micing than many engineers think
they do -- at least they know what has worked
well for them in the past. Listen to them; they may
be able to save you a lot of time.
Putting it on Tape:
Figure 4
So far we’ve only used four microphones (counting 2 on the kick drum), and if you are in a tracking session, each one should go to its own track dry and unprocessed for
later mix-down. Alternatively, if you are doing a direct-to-stereo recording, keep in mind that any processing you do cannot
be undone easily.
In the monitor mix, take advantage of stereo by spreading the OH mics from, say, just a little left of center to far right. This
will give a clear picture of the drum set occupying the right half of the reproduced stereo stage, and this effect will be more
pleasing if you have placed your OH mics to position 3 in Figure 4. With the OH mics arrayed like this you will have the
entire left half of the stereo stage to place other instruments, such as the piano, which are miced in stereo. By all means
place the kick drum in the center of the stereo stage. This is where it historically has been -- and where most listeners expect
it to be. An overall view of the drum set with the four microphones is shown in Figure 5.
Figure 5
5
If you’re going straight to stereo you will also have to make some processing decisions for the drum tracks. Avoid any reverberation; you probably won’t need it since there is enough overhand in the basic sound itself.
A final point regarding recording levels: Mics that are close-in on a drum set will usually be sampling very high level sound
fields. With most of the newer microphones you won’t have to use the internal microphone pad, but you should carefully
trim down the console mic input sections, just to make sure that you still have sufficient headroom at all times.
A More Complex Pickup:
Another common technique is to focus the pickup by micing both the hi-hat and snare drum individually. The additional
microphones are often added to provide more sonic choices during mixdown.
Micing the Hi-hat:
Figure 6 shows a view of the hi-hat set. Note that the two
cymbals have room to pivot slightly about their suspension
points, as indicated by the curved lines, and the mic must
be outside this range. Avoid placing the mic along the edge
of the cymbals in their rest position, since this may produce some strange sounding cancellations. The microphone should be placed above the hi-hat set as shown, and
it should always be located on the side away from the
drummer. We recommend a small format condenser cardioid because of its ability to pick up fast transient responses in the high frequency range. The C1000S, C391B or
C480 B-CK61 will work nicely. Any of the Blue Line cardioids will work nicely, as will the new C430 or C451 B.
The D550 or D660 can also be used on the hi-hat.
Micing the Hi-hat and Cymbals:
Figure 6
Micing the Snare Drum:
Figure 7 shows a small instrument microphone attached
to the rim of the drum. This microphone is small enough
that it goes virtually unnoticed by the drummer, and yet picks up the sound of the drum accurately. The AKG MicroMic model
C418 is ideal for this application. The C418 is a very small
condenser model with a 1% overload point at 131 dB, more
than enough for the job. Its sensitivity is 4 mV/Pa, so it will
Micing the Snare Drum and Toms:
need little further padding to prevent overloading the console’s input section. Its low frequency response has been
gently rolled off in the far-field so that close-in pickup will
be natural through the boosting of bass frequencies caused
by close micing (proximity effect). There is also a broad
high frequency boost in the 10 to 15 kHz range for added
presence in complex musical passages. The C418 was
designed specifically for percussion instrument micing.
However, some condensers may not be able to handle the
high sound pressures produced by drums. For this reason,
dynamic microphones such as the D440, D660 or D770
are often used. A second microphone on the bottom head
will add a new dimension to your snare sounds. But,
remember that you must reverse the phase of the bottom
mic because the bottom head travels outward as the top
head is driven inward.
As with all other mics used with the drum set, mount it on
the far side, away from the drummer, and make absolutely
sure that it is in a position so that there is never a chance
that the drummer will accidentally strike it while playing.
Figure 7
6
Putting it on Tape:
Our microphone count is now up to six, so if you are tracking, lay down one mic per tape track, again, without processing.
In your monitor mix, or if you are making a direct-to-stereo recording, carefully pan the two new elements into the stereo
soundstage at positions that match their actual positions in the drum set as seen from the front.
Going for Broke -- Micing the Whole Set:
Occasionally you will come across a job where the producer and drummer want everything to be miced. This is fairly commonplace in high-level music reinforcement, where musical details can get lost in large performance venues. In recording,
it doesn’t happen that often, but may be needed for an extended solo passage where drums will be added later.
The normal procedure here is to lay down a so-called “scratch track,” which is played by the drummer and is used for sync
purposes later. It will not appear in the final mix. Then, either on spare tracks or on another tape machine running in sync,
the drummer will play alone in the studio with a suitable monitor mix on phones. The studio will normally be bare, and additional spot mics will be placed on the cymbals (three mics) and on the toms (three mics). Mic the toms as you did the snare.
The studio will normally be adjusted to be somewhat more live than usual, and additional mics (perhaps four more) will be
used to pick up room sound. These “house” mics can be dynamics or condensers. Finally, another OH stereo pair will be
placed another 2 feet or so above the basic OH pair.
With the drum set we have been using here, this will bring the total mic (and track) count up to 18:
1. Primary OH pair:
2
2. Secondary OH pair: 2
3. Cymbals:
3
4. Toms:
3
5. Hi-hat:
1
6. Snare:
1
7. Kick drum:
2
8. Room mics:
4
Note that there are four stereo pair here: two OH pairs and two house pairs. The definition of a stereo pair is this: if you
pull up only a stereo pair, panning it left and right, you will hear a continuum of sound along the stereo stage from left to
right. These are vital ingredients and cannot be concocted later on from any of the mono tracks you have laid down. They
will come in very handy later on in the mixing process.
7
The setup, as we have described it, is shown in
Figure 8A and B. Do we have to stop here?
Obviously not; we can add as many mics as we
have remaining tracks. Another useful one to
add would be a cardioid looking down on the
head of the snare at a distance of about 8 to 10
inches -- but far enough back so as not to bother the drummer.
Global micing in a live studio, front view:
Can We Subgroup to Save Tape Tracks:
Yes, if you proceed very carefully and think out
the whole process. Remember, stereo pairs of
channels are the best way to subgroup. For
example, if you anticipate a shortage of tape
tracks, you could sub-mix the three mics on
cymbals, thus picking up an extra track. The
same could be done on the three toms, again
picking up a track.
In doing this, you might think of the cymbal
stereo pair and tom stereo pair as “layers” that
you can later add to the basic mix. But before
you commit to this, make sure that the drummer and producer hear exactly what you intend
to do, and that they agree!
Figure 8A
8
Global micing in a live studio, plan view:
Figure 8B
9
The Microphones we Recommend:
We will show you the basic response curves and directional data for the microphones recommended in this White Paper.
They have all earned their merits in studios throughout the world. Good drumming and good micing!
D440
D550
Frequency Range: 60Hz to 20kHz
Polar Pattern: Cardioid
Sensitivity: 2.5mV/Pa (–52dBV re 1V/Pa)
Equivalent Noise Level: 18dB-A (DIN45412)
Electrical impedance: ≤600Ω
Recommended load impedance: ≥2,000Ω
Maximum SPL for 1% THD: 147dB SPL
Size: 3.35x4.09x1.81 in. (85x104x46mm)
Net Weight: 5.2 oz. (148g)
Frequency Range: 20Hz to 20kHz
Polar Pattern: Cardioid
Sensitivity: 2.5mV/Pa (–52dBV re 1V/Pa)
Equivalent Noise Level: 18dB-A (DIN45412)
Electrical impedance: ≤600Ω
Recommended load impedance: ≥2,000Ω
Maximum SPL for 1% THD: 147dB SPL
Size: 4.76x4.09x1.81 in. (121x104x46mm)
Net Weight: 7.2 oz. (203g)
D770
D660S
Frequency Range: 60Hz to 20kHz
Polar Pattern: Cardioid
Sensitivity: 1.8mV/Pa (–75dBV)
Equivalent Noise Level: 22dB-A (DIN45412)
Electrical impedance: ≤600Ω
Recommended load impedance: ≥2,000Ω
Maximum SPL for 1% THD: 147dB SPL
Size: 7.13x1.97 in. (181x50mm)
Net Weight: 10.4 oz. (295g)
Frequency Range: 70Hz to 20kHz
Polar Pattern: Hypercardioid
Sensitivity: 2.0mV/Pa (–54dBV)
Equivalent Noise Level: 20dB-A (DIN45412)
Electrical impedance: ≤500Ω
Recommended load impedance: ≥1,200Ω
Maximum SPL for 1% THD: 140dB SPL
Size: 7.13x1.97 in. (181x50mm)
Net Weight: 8.5 oz. (240g)
D880/D880S
Frequency response: 60 to 20 kHz (20 to 20 kHz @ 1
cm)
Polar pattern: Supercardioid
Sensitivity: 2.5 mV/Pa: (-52 dB re 1 V/Pa)
Equivalent Noise Level: 22dB-A (DIN45412)
Electrical Impedance: ≤600Ω
Recommended load impedance: ≥2000 Ω
Output connector: 3-pin male XLR
Maximum SPL for 1% THD: 147dB SPL
Size: 7.13x1.97 in. (181x50mm)
Net weight: D880: 10.4 oz (295g)
D880S: 10.5 oz. (298g)
10
C418
D112
Frequency Range: 50Hz to 20kHz
Polar Pattern: hypercardioid
Sensitivity: 2.5mV/Pa
Equivalent Noise Level: 34dB-A (DIN45412)
Electrical Impedance: 200Ω
Recommended load impedance: ≥1,000Ω
Maximum SPL for 1% THD: 131dB
Frequency Range: 20Hz to 17kHz
Polar Pattern: cardioid
Sensitivity: 1.8mV/Pa (–75dBV)
Equivalent Noise Level: 73dB (A)
Electrical Impedance: 210Ω
Recommended load impedance: ≥600Ω
Maximum SPL for 0.5% THD: Outside
measurement range
Size: 5.9x2.8x4.5 in. (150x70x115mm)
Net Weight: 13.4 oz. (380g)
Power Requirement: 9–52V
Size: 3x1.4 in. (75x35mm) including clamp
Net Weight: 2.3 oz. (62g)
C1000S
C480B
Frequency Range: 50Hz to 20kHz
Polar Patterns: cardioid, hypercardioid with PPC 1000
mounted
Sensitivity: 6mV/Pa (–44.4dBV)
Equivalent Noise Level: 21dB-A
Electrical Impedance: 200Ω
Recommended load impedance: ≥2,000Ω
Maximum SPL for 1% THD: 137dB
Power Requirement: 9–52V (acc. to DIN 45596)
or internal 9 V battery)
Size: 1.3x8.6 in. (34x220mm)
Net Weight: 11.3 oz. (320g)
Frequency Range: 20Hz to 20kHz
Polar Pattern: cardioid
Sensitivity: 40/20/6.3mV/Pa (-28/-34/-44dBV)
Equivalent Noise Level: 13/11/17dB-A
Electrical Impedance: 150Ω
Recommended load impedance: >2,000Ω
Maximum SPL for 1% THD: 134/140/144dB
Power Requirement: 48V phantom power to DIN 45596
Size: 0.8x6.9 in. (21x173mm)
Net Weight: 4.9 oz. (140g)
with PPC 1000 attached
11
AKG Acoustics, U.S. • 914 Airpark Center Drive • Nashville • TN 37217 • Tel: (615) 620-3800 • Fax: (615) 620-3875
Visit our Web Site at www.akg.com