Transcript
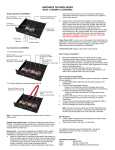
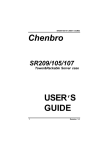
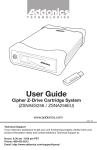
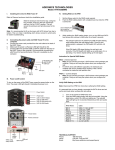
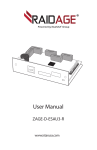
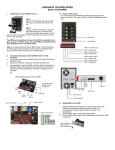
ADDONICS TECHNOLOGIES Model: CCM35MK1-E & CCM35MK2-E Reset switch – Under certain applications, the RESET button enables the adding and removing of hard drives without restarting the system. Single CipherChain-e (CCM35MK1-E) Host SATA port (Connect to SATA host) Disable reset switch jumper Following is an example of such an application: a. When the cipher key is removed from the CipherChain-e that is connecting an eSATA drive to a SATA port that supports hot swap, pressing the reset switch will turn off the CipherChain-e, clear the key code and remove the drive icon. b. 4-pin floppy power connection Device eSATA port (Connect to eSATA device) Cipher keyhole Reset switch Power LED HDD LED one CipherChain and one CipherChain-e (CCM35MK2-E) Likewise when an eSATA hard drive is plug into the CipherChain-e first with out a cipher key then the cipher key is inserted into the cipher keyhole, pressing the RESET button will initialized the drive. Note that if the new hard drive is not encrypted or the Cipher key does not match what is on the encrypted hard drive, it will show up as an unallocated drive under the drive management screen and no drive icon will show up in My Computer folder. So it is very important to make sure that the correct Cipher key is used on the hard drive. Proceeding to initialize the hard drive will erase all the data beyond any possibility of recovery. Note: Whenever the eSATA cable is disconnected from the CipherChaine, with the cipher key still inserted into the cipher keyhole this action will turn off the CipherChain-e, clear the key code and remove the drive icon on the system. 1. For two SATA devices Host SATA port 2 (Connect to 2nd SATA host) Host SATA port 1 (Connect to 1st SATA host) Device SATA port 1 (Connect to 1st SATA device) Green Power LED: In order to turn on the power to the CipherChain-e, the cipher key must be inserted prior to power on the system or resetting the CipherChain-e. If the power LED does not light up, the system will not detect the hard drive connected to the CipherChain-e. Yellow Power LED: Lights up when there is drive activity. 4-pin floppy power connection Basic Hardware Installation 1. 2. 3. Reset switch HDD LED Device eSATA port (Connect to eSATA device) Power LED Cipher keyhole 2. For daisy-chaining to increase encryption security Host SATA port (blue color) (Connect to SATA device) Device eSATA port (Connect to eSATA device) Note: The cipher keys for the two CipherChains can be of same or different code. Disable reset switch jumper – By default, CipherChain-e reset switch is enabled. To disable reset, remove the jumper. Disabling the reset switch is recommended if the CipherChain-e is connected to a boot drive or nonhotswap SATA controller card. Mount the CipherChain-e into the 3.5” drive bay on PC case. Using the provided floppy Y-power cable connect the CipherChain-e 4-pin floppy power connector to the system’s power supply. Connect the Host SATA port on the CipherChain-e to the onboard SATA port of the motherboard or an add-in SATA controller card using a SATA cable. How to operate the CipherChain-e: Note: Hot swapping refers to the ability to plug and unplug the component without rebooting. 1. Insert the AES 256-bit cipher key into the cipher keyhole on the CipherChain-e. 2. For SATA port that supports hotswap. With the system powered on, turn on the eSATA storage device. For SATA port that does not support hotswap. External storage must be connected to CipherChain-E. Power on the system and eSATA storage device at the same time. 3. Observed that the green Power LED should light up. If it does not, re-insert the cipher key and re-power the devices or reset the CipherChain-e. 4. For new drive, go to the operating system’s management utility to partition, format and mount the encrypted drive. 5. Go to File Manager and view the encrypted drive. Note: You may remove the cipher key from the CipherChain-e once the CipherChain-e is powered on. All the files being transferred into the drive are still encrypted even if the cipher key is removed. Best Practices: Create a label to identify the eSATA storage device and the Cipher key used to encrypt the device. Always keep a spare master key in a safe place. TECHNICAL SUPPORT Phone: 408-453-6212 Hours: 8:30 am - 6:00 pm PST Email: http://www.addonics.com/support/query/