1
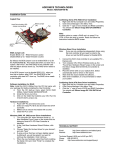
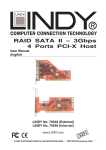
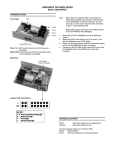
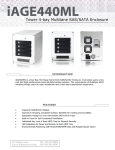
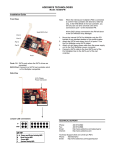
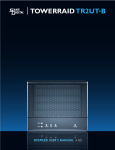
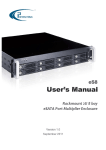
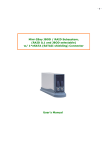
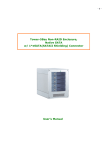
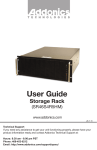
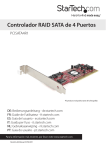
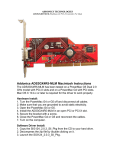
T E C H N O L O G I E S
R
Cipher
eSATA
HDD
CipherChain
PWR
User Guide
Cipher RAID Tower
(CRT535PES)
www.addonics.com
v5.1.11
Technical Support
If you need any assistance to get your unit functioning properly, please have your
product information ready and contact Addonics Technical Support at:
Hours: 8:30 am - 6:00 pm PST
Phone: 408-453-6212
Email: http://www.addonics.com/support/query/
IMPORTANT
There is no back door for the Cipher tower encrypted
hard drives if the Cipher keys are lost or stolen.
Cipher key
Check to make sure you have the correct version of the
Cipher key. A sample key is shown
Black label AES-256 stands for Cipher 256-bit key.
To ensure there is a spare key, your Cipher tower comes with a pair of Cipher keys.
These cipher keys have all identical encryption code unless you requested then to
be coded differently. One of these keys should be kept in a safe and secure location
and can be sent back to Addonics for duplicating additional keys. If you are down to
the last key, be sure to make a back up of all the data stored inside your Cipher tower
prior to sending the last key to Addonics. Addonics is not responsible for key lost in
the mail or retrieval of the data inside the encrypted hard drive.
Keeping track of the hard drive
If you are using the Cipher tower to encrypt multiple hard drives, it is important to
label your hard drive if you are taking the drive out of the Cipher tower. The hard
drive from the Cipher tower that is encrypted will look like a brand new drive when
attach directly to the SATA controller of a computer. There will be no partition or any
hint to indicate that the drive contains encrypted data. When the drive is partitioned,
all the encrypted data will be lost.
The same holds true if a hard drive already has data on it is installed into the Cipher
tower. The computer detects the hard drive as a brand new drive or a drive that is
unallocated. Once you proceed to partition the drive, the data that was on the hard
drive will be erased and cannot be recovered.
I.
Installing drive into the Cipher tower
Step 1
Use a Philips screwdriver to secure the 3.5” SATA hard
drive to the drive tray.
Step 2
Slide the tray into the Disk Array drive bay.
Note: It is recommended to fill up the Cipher Tower with
SATA drives from right to left. This is to help in identifying which
drives connect to which ports for easier troubleshooting.
www.addonics.com
Technical Support (M-F 8:30am - 6:00pm PST)
Phone: 408-453-6212
Email: www.addonics.com/support/query/
HD LED
Auxillary Power Switch
HD LED
R
Cipher
eSATA
HD Power Switch
HDD
CipherChain
PWR
eSATA Port
Power & HDD LED
Cipher Keyhole
II.
Connecting the power cable and Cipher Tower
to the computer
a.
b.
c.
d.
Connect the power cord provided from the wall outlet to the
back of the Cipher Tower.
A main power switch is located at the back of the tower. Turn
the switch on. Another auxiliary switch is located on the front of
the tower.
Make sure the power is off on the auxiliary switch (power LED
light should be off)
Connect the provided eSATA cable from the back of the Cipher
Tower to the eSATA controller card on the computer.
Note: Check with your system supplier to confirm the PM
support on your existing eSATA port
www.addonics.com
Technical Support (M-F 8:30am - 6:00pm PST)
Phone: 408-453-6212
Email: www.addonics.com/support/query/
III.
Initial setup of the Cipher tower:
a.
Insert the AES 256-bit cipher key into the cipher keyhole located at
the front of the Cipher tower.
b.
Power on the Cipher tower. Observed that the green Cipher power
LED at the front of the Cipher tower is on. If not, reinsert the cipher
key and re-power the Cipher tower.
c.
Option of individual drive or raid volume configuration:
1.
Individual drive configuration:
When the Cipher tower is connected to a eSATA Host
controller with SiI3124 or SiI3132 chip (port multiplier
compatible), the 5 SATA drives will be detected by the
system otherwise only one drive is detected.
2.
RAID volume configuration
When the Cipher tower is connected to a eSATA Host
controller with SiI3124 or SiI3132 chip (port multiplier
compatible), the 5 SATA drives will be detected by the
system otherwise only one drive is detected.
Once the system detect all 5 drives, use the SATARAID5
array manager or Windows RAID software utility to
configure the RAID volume.
d.
IV.
Go to the operating system’s management utility to partition, format
and mount the encrypted drives.
How to operate the Cipher tower after initial setup
1.
Insert the AES 256-bit cipher key into the cipher keyhole located at
the front of the Cipher tower.
2.
Power on the Cipher tower. Observed that the green Cipher power
LED at the front of the Cipher tower is on. If not, reinsert the cipher
key and re-power the Cipher tower.
3.
Use the system’s File Explorer to access the files on the encrypted
drive.
4.
For security purposes, remove the cipher keys from the Cipher
tower after the drives are detected by the system. All the files being
transferred into the drives are still encrypted even if the cipher key is
removed.
5.
When the Cipher tower is restarted, the cipher key must be inserted
again in order to gain access to the drives.
www.addonics.com
Technical Support (M-F 8:30am - 6:00pm PST)
Phone: 408-453-6212
Email: www.addonics.com/support/query/