1
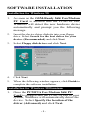
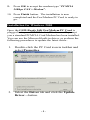
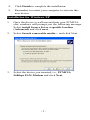
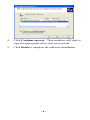
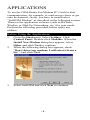
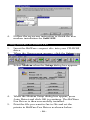
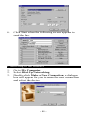
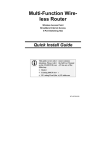
GSM Ready
56K FAX/MODEM
PC Card
Quick Installation
Guide
M73-APO02-110
INTRODUCTIONS
The GSM-Ready 56K Fax/Modem PC Card provides
you both fax and data connection via GSM cellular
networks. With this combo communication PC Card, you
can always keep in touch with via fax or Email and gain
access to the Internet over GSM.
GSM Kit Contents
♦
♦
♦
One GSM driver disk
One GSM cable for Ericsson or Nokia handies
This GSM Installation Guide
System Requirements
♦
♦
♦
♦
A laptop with 486 CPU or above.
At least 8MB RAM installed.
At least 3MB of free hard disk space
Windows 95/98/ME/ NT 4.x /2000/XP
For Windows NT, Administrator Access is required for
installing the GSM software.
GSM Cellular Phone Requirements
♦
Corresponding services (data, fax and SMS)
included
-1-
PC CARD INSTALLATION
Connecting the GSM hand-phone to your laptop
1. Locate the PCMCIA slot of your laptop. Align the
GSM-ready 56K Fax/Modem PC Card toward the
PCMCIA slot.
2. Load “56K Fax/Modem PC Card” driver into your
free drive. Follow the on-screen instruction to finish
the installation. Or refer to the user manual for
details.
Notebook computer
GSM-ready
56K Fax/Modem
PC Card
GSM Cable
3. Connect the provided GSM cable to the GSM-Ready
56K Fax/Modem PC Card.
4. Plug in the GSM cable to your GSM hand-phone.
-2-
SOFTWARE INSTALLATION
Installation for Windows 98
1.
As soon as the GSM-Ready 56K Fax/Modem
PC Card is inserted into the PCMCIA slot,
Windows will detect the new hardware device
automatically and prompt you the following
message.
2.
Insert the device driver diskette into your floppy
drive. Select Search for the best driver for your
device. (Recommended) and click Next.
3.
Select Floppy disk drives and click Next.
4.
Click Next.
5.
When the following window appears, click Finish to
complete the software installation.
Installation for Windows Millennium
1. Once the PCMCIA Fax Modem 56K PC
Card is plugged into the PCMCIA slot of your
system, Windows will automatically detect the
device. Select Specify the location of the
driver (Advanced) and click Next.
-3-
2.
Select Search for the best driver for your device.
(Recommended) and click Next.
3.
Click Next.
4.
Click Finish to complete the software installation.
Installation for Windows NT
1.
Plug the Fax/Modem PC Card into the PCMCIA
slot.
2.
Run Windows NT 4.0.
3.
Double click the Modem Icon in Control Panel.
4.
In the Install New Modem window, press the Next
button to detect the modem automatically.
5.
Press the Change button to change the modem type.
6.
Press the Have Disk... button.
7.
Insert the INF file disk bundled with the fax/modem
PC Card to the floppy drive.
8.
Enter the path A:\ and press OK button.
-4-
9.
Press OK to accept the modem type “PCMCIA
56Kbps FAX + Modem”.
10. Press Finish button. The installation is now
completed and the Fax/Modem PC Card is ready to
go.
Installation for Windows 2000
Once the GSM-Ready 56K Fax/Modem PC Card is
plugged into your PCMCIA slot, Windows will prompt
you a standard PCMCIA Card Modem has been installed.
You can use the Microsoft built-in driver, or perform the
following procedures to update the latest driver.
1.
Double-click the PC Card icon in taskbar and
select Properties.
2.
Select the Driver tab and click the Update
Driver…button.
-5-
3.
Click Next to continue.
4.
Select Search for a suitable driver for my
device (Recommended) as illustrated below.
And click Next.
5.
Load the device driver diskette into your floppy
drive. Select Floppy disk drives and click Next.
6.
Click Next.
7.
When Windows prompt you to continue the
installation. Select Yes.
-6-
8.
Click Finish to complete the installation.
9.
Remember to restart your computer to activate this
new device.
Installation for Windows XP
1.
Once the device is well inserted into your PCMCIA
slot, windows will prompt you the following message.
Select install form a list or a specific location
(Advanced) and click next.
2.
Select Search removable media… and click Next.
3.
Select the device you inserted, i.e., PCMCIA
56Kbps FAX+Modem and click Next.
-7-
4.
Click Continue anyway. Then windows will start to
copy the appropriate driver into your system.
5.
Click finish to complete the software installation.
-8-
APPLICATIONS
To use the GSM-Ready Fax/Modem PC Card for data
communication, for example, to send/receive faxes or get
onto the Internet, firstly, you have to install/select
“SoftGSM Modem” as described in the following section.
Then use the application software (such as BitWare,
WinFax, or Dial-Up Networking, etc.) for your needs.
Perform the following procedure before apply any
utilities.
Before Using the Applications
1.
2.
3.
Go to the Start menu. Select Settings. Click
Control Panel. Double-click Modems. When the
Install New Modem dialog box appears, select
Other and click Next to continue.
When the following dialog box appears, check
“Don’t detect my modem; I will select it from a
list.” And click Next.
Select SoftGSM and click Next to continue.
-9-
4.
Follow the on-screen instruction to finish the new
modem installation for SoftGSM.
Using BitWare to Send a Fax
1.
2.
Insert the BitWare compact disc into your CD-ROM
drive.
When the Open screen appears, click the Setup icon.
3.
Select Modem when the Setup dialog box appears.
4.
When the Modem Setup dialog box appear, press
Auto Detect and click OK to continue. The BitWare
Fax Driver is then successfully installed.
Print the file you want to fax to file and set the
printer to BitWare Fax Driver as shown below.
5.
- 10 -
6.
Click Start when the following screen appears to
send the fax.
Connecting to the Internet
1.
2.
3.
Go to My Computer.
Select Dial-Up Networking.
Double-click Make a New Connection, a dialogue
box will appear for you to name the new connection
and select the device.
- 11 -
4.
5.
6.
7.
Name the new connection appropriately. Select
SoftGSM Modem and click Next.
Enter the area code and phone number of your
Internet Service Provider (ISP). Follow the onscreen instruction to proceed.
When finished, from the Dial-Up Networking
window right-click your newly created connection.
Select Properties. On the Server Types tab, enter
the proper selections as illustrated below and click
OK to complete the settings.
.
You are now ready to connect to the Internet.
- 12 -
SMS & PHONEBOOK
1.
2.
3.
Click SMS & Phonebook in the “SoftGSM”
program folder.
Short Message Service (SMS). Before sending
SMS messages, the phone number of your local
Short Message Service (SMS) Center should be
available for configuring the application. If not,
check with your network operator.
Phonebook. The Phonebook Manager helps you
organize phone numbers and names in your personal
and cellular phone databases with ease and
convenience. You can add, change, or move phone
numbers and names much easier than by the phone.
- 13 -