1
ATP-CNX-040-01
Document Revision 01.07
Aastra CNX
Conference Network Switch
Release 1.3
June 2006
Aastra CNX
Conference Network Switch
System Administrator Guide
*Aastra, Aastra Telecom, and the Aastra Telecom corporate logo are registered trademarks of Aastra Technologies,
Limited. Microsoft, Microsoft Windows, and Internet Explorer are trademarks of Microsoft Corporation. NFS, Sun, SunOS,
Java, JavaHelp, Solaris, and Sun Microsystems are trademarks of Sun Microsystems, Inc. Ethernet is a registered
trademark of Xerox Corporation, Inc. UNIX is a registered trademark in the United States and other countries, licensed
exclusively through The Open Group. All other third-party trademarks (and registered trademarks) are the property of their
respective owners.
© 2005 Aastra Technologies, Limited. All rights reserved. Information in this document is subject to change without notice.
Aastra Technologies, Limited assumes no responsibility for any errors that may appear in this document.
Published in the USA
Warranty, regulatory, safety, and copyright / licensing notices
Warranty - Aastra Telecom, Inc......................................................................................... ix
Warranty Limitation .................................................................................................... ix
Regulatory information ....................................................................................................... x
U.S.A. requirements .................................................................................................... x
Canadian requirements .............................................................................................. xi
European requirements .............................................................................................xiii
Safety warnings ................................................................................................................xiv
General warnings ......................................................................................................xiv
Lithium battery caution ..............................................................................................xiv
Compliances .............................................................................................................xiv
Software licensing and copyright...................................................................................... xv
Introduction
Congratulations!! .............................................................................................................xvii
What is in the Aastra CNX shipping package? ........................................................xvii
Chapter 1
Aastra CNX Installation and Setup Procedures
Introduction .....................................................................................................................1-1
Prepare for hardware installation ....................................................................................1-2
.
What you need for a single installation ....................................................................1-2
.
Check the shipping contents ....................................................................................1-3
.
Determine location of Aastra CNX (desktop or rackmount) .....................................1-3
.
Install the Aastra CNX in a rack ......................................................................................1-4
.
Procedure .................................................................................................................1-4
.
Illustration .................................................................................................................1-4
ATP-CNX-040-01 Rel. 1.3, Doc. Rev. 01.07
.
iii
Contents
Contents
Connect to the console ...................................................................................................1-5
Contents
.
Console port parameters ..........................................................................................1-5
.
Local connection ......................................................................................................1-5
.
Remote connection ..................................................................................................1-6
.
Illustration .................................................................................................................1-6
.
Connect the network cables ...........................................................................................1-7
.
Procedure .................................................................................................................1-7
.
Illustration .................................................................................................................1-7
.
Connect the power cable ................................................................................................1-8
.
Ground the chassis ..................................................................................................1-8
.
Illustration .................................................................................................................1-8
.
Startup and check the Aastra CNX .................................................................................1-9
.
Apply power to the Aastra CNX ...............................................................................1-9
.
Check the LEDs .......................................................................................................1-9
.
Illustration ...............................................................................................................1-10
.
Alarm Indicators .....................................................................................................1-10
.
Configure the network settings .....................................................................................1-11
.
Requirements .........................................................................................................1-11
.
Procedure ...............................................................................................................1-11
.
Using the Aastra CNX GUI via the Web .......................................................................1-19
.
Requirement ...........................................................................................................1-19
.
Procedure ...............................................................................................................1-19
.
Configuration details (System Administrators only) ...............................................1-20
.
Troubleshooting information ...................................................................................1-20
.
Chapter 2
About the Aastra CNX
Overview .........................................................................................................................2-1
Features and benefits ..............................................................................................2-2
.
.
Languages ...............................................................................................................2-3
.
Aastra CNX hardware .....................................................................................................2-4
.
Description ...............................................................................................................2-4
.
Chassis ....................................................................................................................2-4
.
Front panel ...............................................................................................................2-5
.
Rear panel ................................................................................................................2-7
.
iv
ATP-CNX-040-01 Rel. 1.3, Doc. Rev. 01.07
Aastra CNX software ......................................................................................................2-8
.
Contents
Description ...............................................................................................................2-8
.
Protocols and RFCs .................................................................................................2-8
.
Conference capabilities ..........................................................................................2-10
.
Users and user privileges .......................................................................................2-11
.
Reporting capabilities .............................................................................................2-14
.
Aastra CNX upgrades ............................................................................................2-15
.
Software requirements ...........................................................................................2-16
.
Chapter 3
Configuring the Aastra CNX
Overview .........................................................................................................................3-1
.
Description ...............................................................................................................3-1
.
Initial configuration ...................................................................................................3-1
.
Modifying the initial configuration .............................................................................3-2
.
Logging in to the Aastra CNX .......................................................................................3-10
.
Description .............................................................................................................3-10
.
Requirements .........................................................................................................3-10
.
Procedure ...............................................................................................................3-11
.
Configuring the Aastra CNX .........................................................................................3-14
.
Description .............................................................................................................3-14
.
Procedures ...................................................................................................................3-16
General configuration .............................................................................................3-16
.
.
Conference configuration .......................................................................................3-29
.
Voice over IP configuration ....................................................................................3-32
.
Chapter 4
Managing the Aastra CNX
Managing users on the Aastra CNX ...............................................................................4-1
.
Description ...............................................................................................................4-1
.
Procedures ...............................................................................................................4-2
.
Managing conferences on the Aastra CNX ....................................................................4-7
.
Description ...............................................................................................................4-7
.
Permanent Conference List .....................................................................................4-8
.
Scheduled Conference List ....................................................................................4-16
.
ATP-CNX-040-01 Rel. 1.3, Doc. Rev. 01.07
v
Contents
Chapter 5
Maintaining the Aastra CNX
Overview .........................................................................................................................5-1
.
Description ...............................................................................................................5-1
.
Update CNX software .....................................................................................................5-4
.
Description ...............................................................................................................5-4
.
Procedure .................................................................................................................5-4
.
Announcement options ...................................................................................................5-9
.
Description ...............................................................................................................5-9
.
Loading/removing language packs ..........................................................................5-9
.
Loading/removing customized greetings ................................................................5-16
.
Operational status ........................................................................................................5-22
.
Description .............................................................................................................5-22
.
Displaying operational status .................................................................................5-23
.
Entering/editing License Key ........................................................................................5-25
.
Description .............................................................................................................5-25
.
Procedure ...............................................................................................................5-26
.
Rebooting the Aastra CNX ...........................................................................................5-28
.
Description .............................................................................................................5-28
.
Procedure ...............................................................................................................5-28
.
Saving/Restoring Configuration ....................................................................................5-30
.
Description .............................................................................................................5-30
.
Procedure ...............................................................................................................5-31
.
Setting date and time ....................................................................................................5-37
.
Description .............................................................................................................5-37
.
Procedure ...............................................................................................................5-37
.
Downloading logs .........................................................................................................5-40
.
Description .............................................................................................................5-40
.
What are CDR logs? ..............................................................................................5-41
.
Downloading/deleting CDR logs ............................................................................5-43
.
Procedures .............................................................................................................5-43
.
Cleaning up the Aastra CNX ........................................................................................5-49
.
Description .............................................................................................................5-49
.
Procedure ...............................................................................................................5-50
.
vi
ATP-CNX-040-01 Rel. 1.3, Doc. Rev. 01.07
Contents
Appendix A
Conference key options
Participant and Moderator key options .......................................................................... A-1
.
Description .............................................................................................................. A-1
.
Appendix B
Additional information about CDR logs
Description .............................................................................................................. B-1
.
What do the CDR logs contain? .............................................................................. B-1
.
Where are the CDR logs stored? ............................................................................ B-9
.
Reference ................................................................................................................ B-9
.
Index
ATP-CNX-040-01 Rel. 1.3, Doc. Rev. 01.07
vii
Warranty, regulatory, safety, and
copyright / licensing notices
Warranty - Aastra Telecom, Inc.
Aastra Telecom Inc. ("Aastra") warrants ("Warranty") to its customer that: (i) Aastra has good and marketable title to
the Product at the time of delivery to its customer, free and clear of any and all security interests, liens, claims, charges
or encumbrances; and (ii) the Product shall be free from defects in design, material and workmanship and shall
perform in accordance with the Aastra specifications in all material respects when used for the intended purpose for a
period of twelve (12) months from the date of purchase of the Product by such customer from Aastra ("Warranty
Period"). This Warranty specifically excludes any representation, warranty, condition or other term relating to any
software contained in the Product. At its sole option, Aastra shall either repair or replace defective Product returned
during the Warranty Period. Any repaired or replacement Product shall subsequently be covered for the balance of the
original Warranty Period or ninety (90) days, whichever is longer. Upon customer's specific request, Product that fails
after the Warranty Period expires may be returned for repair at the then current rates, with the cost of such repairs and
shipping to be borne by customer.
Customer shall obtain a "returned material authorization" ("RMA") number from Aastra and comply with shipping
instructions for all defective Products being returned to Aastra. Defective Products shall be returned to Aastra at the
customer's sole expense. Aastra shall repair or replace defective Products returned under Warranty at no charge to
customer, and Aastra shall bear the expense of the return shipment of the repaired or replacement Product to customer.
Aastra does not warrant the Product to be compatible with the equipment of any particular telephone company, or their
network. This Warranty does not extend to Products damaged by improper installation or operation, alteration,
accident, neglect abuse, misuse, fire or natural causes such as storms or floods. Aastra reserves the right to use
refurbished parts in the repair or replacement of defective Products. Unauthorized modification or repair will void the
Warranty.
To exercise the Aastra CNX Warranty,:
1. First contact your reseller for instructions.
2. Alternatively, you can contact Aastra Telecom at 1-866-599-7399.
Warranty Limitation
THE FOREGOING PRODUCT WARRANTIES ARE IN LIEU OF ALL OTHER WARRANTIES AS TO THE
CONDITION, OPERATION AND PERFORMANCE OF THE PRODUCT, EXPRESSED OR IMPLIED,
INCLUDING, WITHOUT LIMITATION, ANY WARRANTIES AND/OR CONDITIONS OF
MERCHANTABILITY OR FITNESS FOR A PARTICULAR PURPOSE. AASTRA'S SOLE AND EXCLUSIVE
LIABILITY, AND CUSTOMER'S SOLE AND EXCLUSIVE REMEDY, FOR ANY AASTRA BREACH OF
WARANTIES HEREUNDER SHALL BE AASTRA'S OBLIGATION TO REPAIR OR REPLACE THE PRODUCT,
AS SET FORTH IN THIS SECTION, AND AASTRA SHALL NOT BE LIABLE FOR ANY DAMAGES
WHATSOVER, INCLUDING BUT NOT LIMITED TO DIRECT, INDIRECT, INCIDENTIAL OR
CONSEQUENTIAL DAMAGES OF ANY KIND OR NATURE, OR OTHER LOSS, DAMAGE OR EXPENSE
DIRECTLY OR INDIRECTLY ARISING FROM CUSTOMER'S USE OF OR INABILITY TO USE PRODUCT,
EITHER SEPARATELY OR IN COMBINATION WITH OTHER EQUIPMENT.
ATP-CNX-040-01 Rel. 1.3, Doc. Rev. 01.07
ix
CNX System Administrator Guide
Regulatory information
U.S.A. requirements
The AASTRA CNX has been tested and found to comply with the limits for a Class A digital device, pursuant to Part
15 of the Federal Communications Commission (FCC) rules. These limits are designed to provide reasonable
protection against harmful interference when the equipment is operated in a commercial environment. This equipment
generates, uses, and can radiate radio frequency energy. If it is not installed and used in accordance with the
instruction manual, it may cause harmful interference to radio communications. Operation of this equipment in a
residential area is likely to cause harmful interference, in which case users will be required to take whatever measures
may be necessary to correct the interference at their own expense.
Do not attempt to repair or modify this equipment. All repairs must be performed by Aastra Telecom, or an authorized
Aastra Telecom representative.
FCC Part 68 general information
The AASTRA CNX complies with Part 68 of the FCC rules and the requirements adopted by the ACTA. On the
bottom of this equipment is a label that contains, among other information, a product identifier in the format
US:2L4DDNANAASTRA01. If requested, this number must be provided to the telephone company.
This Aastra CNX uses the following USOC RJ-48 jacks:
Interface
Service Code
Facility Code
1.544 Mb/s superframe format (SF) without line power
6.0Y
04DU9-BN
1.544 Mb/s superframe format (SF) and B8ZS without line power
6.0Y
04DU9-DN
1.544 Mb/s ANSI extended superframe format (ESF) without line
power
6.0Y
04DU9-1KN
1.544 Mb/s ANSI extended superframe format (ESF) and B8ZS
without line power
6.0Y
04DU9-1SN
A plug and jack used to connect this equipment to the premises wiring and telephone network must comply with the
applicable FCC Part 68 rules and requirements adopted by the ACTA. A compliant telephone modular plug is
provided with this product. It is designed to be connected to a compatible modular jack that is also compliant. See
installation instructions for details.
If the AASTRA CNX causes harm to the telephone network, the telephone company will notify you in advance that
temporary discontinuance of service may be required. But if advance notice isn’t practical, the telephone company
will notify the customer as soon as possible. Also, you will be advised of your right to file a complaint with the FCC if
you believe it is necessary.
The telephone company may make changes in its facility, equipment, operations or procedures that could affect the
operation of the AASTRA CNX. If this happens the telephone company will provide advance notice in order for you
to make necessary modifications to maintain uninterrupted service.
If you experience trouble with this equipment, please contact Aastra Telecom for repair and warranty information. If
there is a problem with the network, the telephone company may request that you remove the equipment from the
network until the problem is resolved.
x
ATP-CNX-040-01 Rel. 1.3, Doc. Rev. 01.07
Aastra Telecom recommends that you install an AC surge protector in the AC outlet to which the equipment is
connected. This helps to prevent damage to the equipment caused by local lightning strikes or other electrical surges.
THE AASTRA CNX HAS NO USER SERVICEBLE PARTS.
FCC and telephone company procedures and requirements
In order to connect this equipment to the network, you must provide the local telephone company with the registration
number of this equipment, and you must order the proper connections.
To order the proper service, provide the telephone company with the following information:
•
•
•
Number of required jacks and their USOC numbers
Sequence in which the trunks are to be connected
Facility interface codes, by position
CSA certification - U.S. and Canada
This equipment has been certified by CSA for use in the U.S. and Canada to the requirements of UL 1950. Third
Edition - Safety of Information Technology Equipment. Including Electrical Business equipment and Canadian
Standards Association CAN/CSA C22.2 No. 950-95 Third Edition.
Canadian requirements
Canadian Department of Communications Radio Interference Regulations
This digital apparatus (Aastra CNX) does not exceed the Class A limits for radio-noise emissions from digital
apparatus, as documented in the Radio Interference Regulations of the Canadian Department of Communications.
Règlement sur le brouillage radioélectrique du ministère des Communications
Cet appareil numérique (Aastra CNX) respecte les limites de bruits radioélectriques visant les appareils numériques
de classe A prescrites dans le Règlement sur le brouillage radioélectrique du ministère des Communications du
Canada.
Canada CS-03 rules and regulations
NOTICE: This equipment meets the applicable Industry Canada Terminal Equipment
Technical Specifications. This is confirmed by the registration number. The abbreviation, IC,
before the registration number signifies that registration was performed based on a
Declaration of Conformity indicating that Industry Canada technical specifications were met.
It does not imply that Industry Canada approved the equipment.”
NOTE: The Canadian Department of Communications label identifies certified equipment. The certification means
that the equipment meets certain telecommunications network protective, operational, and safety requirements. The
Department does not guarantee the equipment will operate to the user’s satisfaction.
Before installing this equipment, ensure that it is permissible to connect to the facilities of the local
telecommunications company. You must install this equipment using an acceptable connection method.
Repairs to certified equipment should be made by a supplier-designated representative. If you make repairs or
alterations to this equipment, or if the equipment malfunctions, the telecommunications company may request that
you disconnect the equipment.
You should ensure, for your own protection, that the electrical ground connections for the power utility, telephone
lines, and internal water-pipe system, if present, are connected. This precaution may be particularly important in rural
areas.
ATP-CNX-040-01 Rel. 1.3, Doc. Rev. 01.07
xi
CNX System Administrator Guide
CAUTION: You should not attempt to make such connections. You should contact the appropriate inspection
authority or electrician.
Canada CS-03 Règles et règlements
« AVIS : Le présent matériel est conforme aux spécifications techniques d’Industrie Canada
applicables au matériel terminal. Cette conformité est confirmée par le numéro
d'enregistrement. Le sigle IC, placé devant le numéro d'enregistrement, signifie que
l’enregistrement s’est effectué conformément à une déclaration de conformité et indique que
les spécifications techniques d'Industrie Canada ont été respectées. Il n’implique pas
qu’Industrie Canada a approuvé le matériel. »
NOTE: L’étiquette du ministère des Communications du Canada indique que l’appareillage est certifié, c’est-à-dire
qu’il respecte certaines exigences de sécurité et de fonctionnement visant les réseaux de télécommunications. Le
ministère ne garantit pas que l’appareillage fonctionnera à la satisfaction de l’utilisateur.
Avant d’installer l’appareillage, s’assurer qu’il peut être branché aux installations du service de télécommunications
local. L’appareillage doit aussi être raccordé selon des méthodes acceptées.
Les réparations de l’appareillage certifié devraient être confiées à un service désigné par le fournisseur. En cas de
réparation ou de modification effectuées par l’utilisateur ou de mauvais fonctionnement de l’appareillage, le service
de télécommunications peut demander le débranchement de l’appareillage.
Pour leur propre sécurité, les utilisateurs devraient s’assurer que les mises à la terre des lignes de distribution
d’électricité, des lignes téléphoniques et de la tuyauterie métallique interne sont raccordées ensemble. Cette mesure de
sécurité est particulièrement importante en milieu rural.
ATTENTION: Les utilisateurs ne doivent pas procéder à ces raccordements, mais doivent plutôt faire appel aux
pouvoirs de réglementation en cause ou à un électricien, selon le cas.
xii
ATP-CNX-040-01 Rel. 1.3, Doc. Rev. 01.07
European requirements
EMI/EN 55 022 statement
This certifies that the Aastra CNX Asterisk Network Switch is shielded against the generation of radio interference in
accordance with the application of Council Directive 89/336/EEC. Conformity is declared by the application of EN 55
022:1998 and EN 55 024:1998.
WARNING: This is a Class A product. In a residential area, this product may cause radio interference, in which case
the user may be required to take the appropriate measures.
EC declaration of conformity
This product conforms to the provisions of Council Directive’s EMC Directive (89/336/EEC), Low Voltage Directive
(73/23/EEC), and R+TTE Directive (1999/5/EC).
ATP-CNX-040-01 Rel. 1.3, Doc. Rev. 01.07
xiii
CNX System Administrator Guide
Safety warnings
General warnings
The following safety warnings apply:
•
•
•
•
•
•
Mechanical hazards and electrical shock hazards are possible if you remove one or more of the modules. There
are no operator-serviceable modules. Only qualified personnel should service this equipment.
This equipment must be connected to a protective ground according to the instructions in this manual. Improper
grounding may result in electrical shock.
This equipment does not provide safety isolation between any port that is connected to a digital network
termination point or any port to which terminal equipment is connected.
The wall circuit breaker provides the main protection for this equipment.
Ensure that rack installation does not result in airflow blockage to power supply vents or chassis vents.
Before installing the Aastra CNX rackmount version, ensure that the rack is sturdy and well-secured.
Lithium battery caution
CAUTION: Danger of explosion if battery is incorrectly replaced. Replace only with the same or equivalent type
recommended by the manufacturer. Discard used batteries according to the manufacturer’s instructions.
ATTENTION: Il y a danger d’explosion s’il y a remplacement incorrect de la batterie. Remplacer uniquement avec
une batterie du même type ou d’un type recommandé par le constructeur. Mettre au rebut les batteries usagées
conformément aux instructions du fabricant.
Compliances
The Aastra CNX is in compliance with regulations as follows:
•
•
32-104° F (0-40° C)
•
Humidity 10-85% non-condensing
•
400 BTUs/hour
•
•
•
•
•
•
•
xiv
Environmental
28 dBA maximum acoustic noise
Safety Certifications
cUL 950, NTRL/UL 1950, TUV EN 60 950
Telecom Approvals
FCC Part 68, Industry Canada, CTR4
EMI/RF
FCC Part 15 Class A, EN55022 Class A (CISPR), EN55024
ATP-CNX-040-01 Rel. 1.3, Doc. Rev. 01.07
Software licensing and copyright
The Aastra CNX product consists of an Aastra designed hardware platform
distributed with embedded Linux operating system and application software. This
embedded software consists of multiple Aastra and third party programs; each
individual program may be subject to one or more Copyrights or Software
Licenses; the overall aggregation and distribution of these separate programs is
protected as a collective work, Copyright © Aastra Telecom Inc. 2005.
Use and distribution of the CNX product are deemed to be acceptance of the
Software Licensing terms contained within the Aastra CNX Service Level
Agreement. Associated third party license agreements and applicable Open
Source software licenses are incorporated by reference; the full text of all licenses
can be found on the Aastra CNX documentation CDROM.
The following is a list of Aastra CNX software licenses. See the Aastra CNX
documentation CD for more information about these licenses.
•
Aastra SLA 1.5
•
PWLIB
•
Copying GPLv2
•
PCMCIA CS
•
Netfilter-licensing
•
BSD
•
Asterisk credits
•
Syslogd Klogd
•
LINUX note
•
Copying.LIB LGPL 2v1
•
Apachev11
•
GLIBC
•
APLv11
•
Sendmail
•
OpenORB
•
WU-ftpd
•
EXOLAB
•
Xinetd
•
MPLv1
•
Ntpd
•
MPLv11
•
OpenSSL
•
OpenH323
•
BerkleyDB
•
LFS bootscripts
ATP-CNX-040-01 Rel. 1.3, Doc. Rev. 01.07
xv
Introduction
Congratulations!!
You have purchased a highly functional, cost-effective, easy-to-use Aastra CNX
Conference Network Switch for use in your network.
The Aastra CNX is easy to install and operate, and provides a comprehensive set
of security features you would expect from a state-of-the-art call conferencing
product.
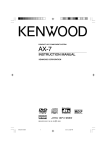
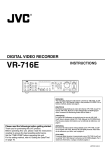
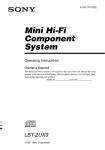
What is in the Aastra CNX shipping package?
The Aastra CNX is carefully and securely packaged within the shipping container.
Upon opening the shipping package, inventory the contents to be sure there are no
missing or damaged parts. The following parts are included:
•
•
•
•
•
•
•
One Aastra CNX unit
One Power cable (for connection to AC power source)
One DB-9 to DB-9 console cable
One CompactFlash memory card that contains the software required to
operate the unit (for use in CompactFlash memory slot 1)
One set of rack mounting brackets with six Phillips head screws
One Aastra CNX Technical Documentation CD ROM
One CD ROM envelope with License Key label
ATP-CNX-040-01 Rel. 1.3, Doc. Rev. 01.07
xvii
CNX System Administrator Guide
For a list of additional parts that you need to install the Aastra CNX (which are not
included in the shipping package), see Chapter 1, “Aastra CNX Installation and
Setup Procedures.”.
1 2 3 4
POWER
1 2
ACTIVE
STATUS
ALARM
10/100 ENET
T1 / E1
1
COMPACTFLASH
2
CNX
Aastra CNX unit
Console cable
Power cable
CompactFlash card
License Key: 996-555-1e9-f6
License Key: 996-555-1e9-f6
License Key: 996-555-1e9-f65-421-e85
License Key
Rack mounting brackets with
Phillips head screws
xviii
Technical documentation CD ROM
CD ROM envelope with
license key label
ATP-CNX-040-01 Rel. 1.3, Doc. Rev. 01.07
Chapter 1
Aastra CNX Installation
and Setup Procedures
Introduction
This section provides quick installation and setup procedures for installing and
starting up the Aastra CNX Conference Network Switch. This section also
provides a list of additional parts that you need to install the Aastra CNX.
References
For more information about the Aastra CNX, see Chapter 2, “About the Aastra
CNX.”
For information about configuring and using the Aastra CNX, see the following
chapters in this guide:
Chapter 3, “Configuring the Aastra CNX”
Chapter 4, “Managing the Aastra CNX”
Chapter 5, “Maintaining the Aastra CNX”
ATP-CNX-040-01 Rel. 1.3, Doc. Rev. 01.07
1-1
CNX System Administrator Guide
Prepare for hardware installation
1
Prepare for hardware installation
What you need for a single installation
•
One Aastra CNX unit
•
One AC power cable
•
One CompactFlash memory card
•
One set of rack mounting brackets with six (6) Phillips head screws
•
Truss head screws (not provided)
•
One to four RJ-48C T1/E1 cable(s) (not provided)
Note: T1/E1 Ports 1, 2, 3, and 4 are available for the 30, 60, and 120 port
units.
•
One 9-pin male DB-9 to female DB-9, RS-232 serial cable
•
One or two RJ-45 10/100BaseT Ethernet cable(s) (not provided)
•
(Optional) One 9-pin male DB-9 to female DB-25, RS-232 serial cable for
modem connections (not provided)
Tools required for rackmount installations
In addition to the parts listed above, the following tools are also required when
installing an Aastra CNX rackmount unit:
1-2
•
#2 Phillips screwdriver
•
Torque wrench
•
Nutdriver set
ATP-CNX-040-01 Rel. 1.3, Doc. Rev. 01.07
Aastra CNX Installation and Setup Procedures
Prepare for hardware installation
Check the shipping contents
Upon opening the shipping package, inventory the contents to be sure there are no
missing or damaged parts, as described in the Introduction section of this guide.
Determine location of Aastra CNX (desktop or rackmount)
Procedure
To determine the location of your Aastra CNX:
Step
Action
a
If you are installing the Aastra CNX as a desktop unit, place it on a flat surface in
close proximity to your PC, skip Step 2, and perform Steps 3 through 8.
b
If you are installing the Aastra CNX as a rackmount unit, proceed to Step 2.
ATP-CNX-040-01 Rel. 1.3, Doc. Rev. 01.07
1-3
CNX System Administrator Guide
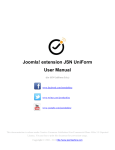
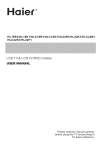
Install the Aastra CNX in a rack
2
Install the Aastra CNX in a rack
Warning: Before you install the Aastra CNX unit in a rack, ensure that
the rack is sturdy and well secured.
Caution: The operating environment must provide unobstructed
front-to-back airflow to the chassis that is mounted in a rack.
Procedure
To install the Aastra CNX in a rack:
Step
Action
a
Mount the rackmount brackets to the Aastra CNX unit in a flush-mount position
using the 6 Phillips head screws.
b
Align the bracket holes to the rack and insert truss-head screws (not provided).
c
Tighten the screws to 15 in-lb (.69 Nm).
Illustration
1 2 3 4
POWER
1 2
ACTIVE
STATUS
ALARM
10/100 ENET
1-4
T1 / E1
1
COMPACTFLASH
2
CNX
ATP-CNX-040-01 Rel. 1.3, Doc. Rev. 01.07
Aastra CNX Installation and Setup Procedures
Connect to the console
3
Connect to the console
Console port parameters
You can access the Aastra CNX console locally or remotely. Ensure that you
configure your terminal or PC (terminal emulator) console port parameters as
provided in the following table.
Parameter
Value
Baud rate
9600
Flow control
None
Data bits
8
Stop bit
1
Parity
None
For the procedures in this section, refer to the illustration on page 1-6.
Local connection
Procedure
To connect a local PC or terminal:
Step
Action
a
Attach the 9-pin male DB-9 connector on the serial cable to the female console
port on the rear panel of the Aastra CNX.
b
Attach the 9-pin female connector on the serial cable to the male console port on
the back of your PC or terminal.
ATP-CNX-040-01 Rel. 1.3, Doc. Rev. 01.07
1-5
CNX System Administrator Guide
Connect to the console
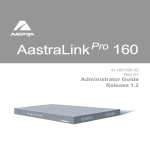
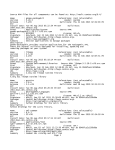
Remote connection
Procedures
To connect a remote PC and an Aastra CNX to an Ethernet LAN:
Step
Action
a
Attach one end of an Ethernet cable to the Ethernet port on the PC, and the other
end to a LAN port.
b
Attach one end of an Ethernet cable to an Ethernet port on the back panel of the
Aastra CNX, and the other end to a LAN port.
To connect a modem:
Step
Action
a
Attach the 9-pin male connector on the serial cable to the female console port on
the rear panel of the Aastra CNX.
b
Attach a 25-pin male connector on the modem cable to the modem's DB-25
RS-232 port.
Illustration
DB-9 port on PC
PC or terminal
Aastra CNX
10/100 ENET
T1 / E1
1
2
3
4
CONSOLE
RESET
1
2
100-240VAC
1.0A 47-63HZ
Ethernet LAN
Console port
DB-9 to DB-9 console cable
Modem (AT or Hayes compatible)
DB-25 RS-232 port
To console port
on Aastra CNX
1-6
NMS
DB-9 to DB-25 modem cable
PHONE
(LEASE
3810
DIAL
(LEASED)
3810
DTE
DWR
ATP-CNX-040-01 Rel. 1.3, Doc. Rev. 01.07
Aastra CNX Installation and Setup Procedures
Connect the network cables
4
Connect the network cables
Procedure
Note: Make sure you have the appropriate network cables that you need
for your facility. Connect them to the applicable interfaces on the rear of
the Aastra CNX as described in the following procedure.
To connect the network cables:
Step
Action
a
Connect RJ-48C T1/E1 cable(s) to the RJ-48C T1/E1 port(s) on the rear panel of
the Aastra CNX as shown in the illustration below.
b
Connect the RJ-45 Ethernet UTP cable(s) to the RJ-45 10/100 ENET port(s) on
the rear panel of the Aastra CNX as shown in the illustration below.
Illustration
10/100 ENET
T1 / E1
1
2
3
4
CONSOLE
RESET
1
2
100-240VAC
1.0A 47-63HZ
T1/E1 RJ-48C
connectors
ATP-CNX-040-01 Rel. 1.3, Doc. Rev. 01.07
Ethernet RJ-45
connectors
1-7
CNX System Administrator Guide
Connect the power cable
5
Connect the power cable
Ground the chassis
To ground the chassis:
Step
Action
a
Locate the 3-hole, female, power receptacle on the rear of the chassis.
b
Plug the male, 3-prong connector on the power cable into the power receptacle as
shown in the illustration below.
c
Insert the plug at the other end of the power cable into a grounded power source
(100 to 240 VAC).
Note: North America: 120 V at 15 A
Europe: 240 V at 10 A
Illustration
10/100 ENET
T1 / E1
1
2
3
4
CONSOLE
RESET
1
2
100-240VAC
1.0A 47-63HZ
AC power cord
Connect to a grounded 15 A
power source (100 to 240 VAC).
(North America: 120 V at 15 A)
(Europe: 240 V at 10 A)
1-8
ATP-CNX-040-01 Rel. 1.3, Doc. Rev. 01.07
Aastra CNX Installation and Setup Procedures
Startup and check the Aastra CNX
6
Startup and check the Aastra CNX
Apply power to the Aastra CNX
To start up the Aastra CNX, insert the CompactFlash card into slot 1 of the unit
and apply power from the power source.
Powering up a new Aastra CNX:
•
•
•
•
Starts diagnostic test routines on the Aastra CNX.
Checks for a flash memory card in CompactFlash slot 1 of the Aastra CNX
chassis.
Initializes the Aastra CNX and, if successful, resets all LEDs to their normal
state.
Starts a one-time software script that allows you to setup your network
settings (See Step 7, “Configure the network settings.”)
Check the LEDs
To check the Aastra CNX LEDs:
Step
Action
a
Check the common LEDs on the front panel. The Power and Status LEDs should
be ON (green) indicating the Aastra CNX is ready to take calls.
b
Check the ENET LEDs on the front panel. If your Aastra CNX has a physical
Ethernet link to your network from the 10/100 ENET ports 1 or 2 on the back
panel, and no alarms are present, the ENET LEDs 1 and/or 2 should be ON
(green).
Note: The ENET LEDs FLASH (green) when there is Rx/Tx activity.
c
The T1/E1 ports are disabled by default in the Aastra CNX software configuration.
The top row of T1/E1 LEDs should be OFF. To enable these ports and check the
LEDs, the System Administrator must enable the T1/E1 ports using the Aastra
CNX GUI.
ATP-CNX-040-01 Rel. 1.3, Doc. Rev. 01.07
1-9
CNX System Administrator Guide
Startup and check the Aastra CNX
Illustration
POWER
STATUS
1 2
1 2 3 4
ACTIVE
ALARM
10/100 ENET T1 / E1
Alarm Indicators
To check alarm indicators on the Aastra CNX:
1-10
Step
Action
a
Check that the Status LED is not ON Red. If the Status LED is ON Red, an alarm
condition exists in the unit. Contact your System Administrator.
Note: During bootup of the Aastra CNX, the Status LED is ON Red for 1 second.
This is a normal condition at bootup.
b
When the T1/E1 port(s) are enabled, check that the T1/E1 LEDs on the bottom
row are OFF. If the T1/E1 LED(s) on the bottom row are ON Amber, a yellow
alarm is present on the T1/E1 link. If the T1/E1 LEDs are ON Red, a Red alarm is
present on the T1/E1 link. Contact your System Administrator.
ATP-CNX-040-01 Rel. 1.3, Doc. Rev. 01.07
Aastra CNX Installation and Setup Procedures
Configure the network settings
7
Configure the network settings
Requirements
The following is required before you configure the Aastra CNX for the first time:
•
The Aastra CNX must physically be connected to your console using an
RS-232/DB-9 cable.
•
The Aastra CNX must physically be connected to your network interface via
the Ethernet port(s).
•
The Aastra CNX must be turned on.
•
You must be running a terminal emulator on your PC. Terminal emulator must
be set as follows:
— Baud Rate
9600
— Data
8 bit
— Parity
None
— Stop
1 bit
— Flow Control
None
After powering up the Aastra CNX, a network script runs in a terminal emulator
window allowing you to initially configure the unit for your network.
Procedure
The following procedure describes how to configure the network settings.
Note: If at any time during the initial configuration process, you want to
backout of the configuration, press <ESC> to cancel.
ATP-CNX-040-01 Rel. 1.3, Doc. Rev. 01.07
1-11
CNX System Administrator Guide
Configure the network settings
Run network and time configuration
Use the following procedure to initially configure the network settings on the
Aastra CNX hardware.
Step
Action
1
After first-time power up of the CNX, the following displays in a terminal window:
Welcome to the
Aastra CNX - Conference Bridge
Configuration Utility
- please press <enter> to continue -
2
Press <Enter>.
The following displays:
Hostname:
3
Enter the hostname for the Aastra CNX and press <Enter>. For example:
Hostname: cnx1 ↵
The following displays:
Configuring ENET #1...
IP Address:
4
Enter the IP address for the Ethernet port for which you want to use as a management interface, and
press <Enter>. For example:
IP Address: 192.168.2.6 ↵
The following displays:
Netmask:
5
Enter the Netmask for the Ethernet port for which you want to use as a management interface, and
press <Enter>. For example:
Netmask: 255.255.255.0 ↵
The following displays:
Default Gateway:
(continued)
1-12
ATP-CNX-040-01 Rel. 1.3, Doc. Rev. 01.07
Aastra CNX Installation and Setup Procedures
Configure the network settings
Step
Action
6
Enter “y” if the network information is correct, and press <Enter>.
Enter “n” if the network information is incorrect, and press <Enter>.
Note: If you entered “n” at the verification prompt, repeat steps 3 through 7 to correct the network
information, and then enter “y” at step 8.
The following message and prompt display (after entering “y” at the verification prompt):
Configuring Domain Name Service (DNS)...
Domain Name:
7
Enter the Default Gateway for the Ethernet port for which you want to use as a management
interface, and press <Enter>. For example:
Default Gateway: 192.168.2.1 ↵
The following displays:
Before the following information is configured, please verify the
information below is correct before proceeding.
Hostname:
IP Address:
Broadcast Address:
Netmask:
cnx1
192.168.2.6
192.168.2.255
255.255.255.0
Default Gateway:
192.168.2.1
Is this correct (y/n):
8
Enter “y” if the network information is correct, and press <Enter>.
Enter “n” if the network information is incorrect, and press <Enter>.
Note: If you entered “n” at the verification prompt, repeat steps 3 through 7 to correct the network
information, and then enter “y” at step 8.
The following message and prompt display (after entering “y” at the verification prompt):
Configuring Domain Name Service (DNS)...
Domain Name:
(continued)
ATP-CNX-040-01 Rel. 1.3, Doc. Rev. 01.07
1-13
CNX System Administrator Guide
Configure the network settings
Step
Action
9
Enter the domain name for the Aastra CNX and press <Enter>. For example:
Domain Name: aastra.com ↵
The following prompts display:
Nameserver #1:
Nameserver #2:
10
Enter the IP address of the DNS servers for the Aastra CNX and press <Enter>. For example:
Nameserver #1: 192.167.2.11 ↵
Nameserver #2: 192.168.2.12 ↵
The following message and prompts display:
Before the following information is configured, please verify the
information below is correct before proceeding.
Domain Name:
aastra.com
Nameserver #1:
Nameserver #2:
192.167.2.11
192.168.2.12
Is this correct (y/n):
(continued)
1-14
ATP-CNX-040-01 Rel. 1.3, Doc. Rev. 01.07
Aastra CNX Installation and Setup Procedures
Configure the network settings
Step
Action
11
Enter “y” if the DNS information is correct, and press <Enter>.
Enter “n” if the DNS information is incorrect, and press <Enter>.
Note: If you entered “n” at the verification prompt, repeat steps 9 and 10 to correct the DNS
information, and then enter “y” at step 11.
The following message and prompts display (after entering “y” at the verification prompt):
Unpacking timezones, please wait one moment...
Timezone Configuration
Africa
Chile
America
Cuba
Antarctica EET
Arctic
EST
Asia
EST5EDT
Atlantic
Egypt
Australia
Eire
Brazil
Etc
CET
Europe
CST6CDT
GB
Canada
GB-Eire
GMT
GMT+0
GMT-0
GMT0
Greenwich
HST
Hongkong
Iceland
Indian
Iran
Israel
Jamaica
Japan
Kwajalein
Libya
MET
MST
MST7MDT
Mexico
Mideast
NZ
NZ-CHAT
Navajo
US
PRC
UTC
PST8PDT
Universal
Pacific
W-SU
Poland
WET
Portugal
Zulu
ROC
ROK
Singapore
Turkey
UCT
Enter a choice, "back" to go up one level, or "cancel" to cancel:
12
Enter your local timezone and press <Enter>. For example:
Enter a choice, "back" to go up one level, or "cancel" to cancel: EST ↵
Note: Some of the options in the Timezone Configuration list display an additional list of options. For
example, if you select “America” from the Timezone Configuration list, another list of options displays
for timezones in America.
The following message and prompt displays:
Timezone: EST
Are you sure? (y/n)
(continued)
ATP-CNX-040-01 Rel. 1.3, Doc. Rev. 01.07
1-15
CNX System Administrator Guide
Configure the network settings
Step
Action
13
Enter “y” if the timezone is correct, and press <Enter>.
Enter “n” if the timezone is incorrect, and press <Enter>.
Note: If you entered “n” at the verification prompt, repeat step 12 to correct the timezone, and then
enter “y” at step 13.
The following message and prompts display (after entering “y” at the verification prompt):
Please enter the date and time:
Four-digit year [2005]:
Month [03]:
Day [09]:
Hour [19]:
Minutes [40]:
14
The defaults for the date and time are the current date and time on your PC.
If these defaults are correct, press <Enter> at each prompt without making an entry.
If a default is incorrect, enter the correct value and press <Enter> to continue. In the following
example, 14 is entered for the hour since the default of 19 is incorrect.
Four-digit year [2005]:
Month [03]:
Day [09]:
Hour [19]: 14
Minutes [40]:
The following displays:
Before the following information is configured, please verify the
information below is correct before proceeding.
Date: 2005-03-09 14:40:00
Is this the correct time (y/n) [n]:
(continued)
1-16
ATP-CNX-040-01 Rel. 1.3, Doc. Rev. 01.07
Aastra CNX Installation and Setup Procedures
Configure the network settings
Step
Action
15
Enter “y” if the date and time are correct, and press <Enter>.
Enter “n” if the date and time are incorrect, and press <Enter>.
Note: If you entered “n” at the verification prompt, repeat step 14 to correct the date and time, and
then enter “y” at step 15.
The following message displays (after entering “y” at the verification prompt):
Configuring Network Time Protocol (NTP)...
You can configure up to 4 NTP servers. To remove an existing
server, set it's address to 0.0.0.0. If no valid servers are
given then ntp will be disabled.
Do you want to continue (y/n) [n]:
16
Enter “y” to continue, and press <Enter>.
The following prompts display:
NTP
NTP
NTP
NTP
Server
Server
Server
Server
#1:
#2:
#3:
#4:
[pool.ntp.org]:
[pool.ntp.org]:
[pool.ntp.org]:
[pool.ntp.org]:
(continued)
ATP-CNX-040-01 Rel. 1.3, Doc. Rev. 01.07
1-17
CNX System Administrator Guide
Configure the network settings
Step
Action
17
Enter up to four NTP servers in your network, and press <Enter>. For example:
NTP
NTP
NTP
NTP
Server
Server
Server
Server
#1:
#2:
#3:
#4:
[pool.ntp.org]:
[pool.ntp.org]:
[pool.ntp.org]:
[pool.ntp.org]:
192.167.2.11 ↵
192.167.2.12 ↵
0.0.0.0 ↵
0.0.0.0 ↵
Notes:
1. You can enter up to four NTP servers. If you have fewer than four NTP servers, enter the
IP address(es) for the NTP servers that you have, and then enter 0.0.0.0 for the remaining
NTP entries.
2. If you do not have your own NTP server, and the Aastra CNX has Internet connectivity,
you may use the default server entry of pool.ntp.org.
3. Aastra Telecom strongly recommends the use of NTP servers, either your own or the
default servers. NTP servers avoid clock slippage and inconsistent conference
start times on the Aastra CNX. However, you may completely disable the NTP
server feature by setting the IP address of all four servers to 0.0.0.0.
The following displays:
Before the following information is configured, please verify
the information below is correct before proceeding.
NTP Server #1 : 192.167.2.11
NTP Server #2 : 192.167.2.12
Is this information correct (y/n)[n]:
18
Enter “y” if the NTP information is correct, and press <Enter>.
Enter “n” if the NTP information is incorrect, and press <Enter>.
Note: If you entered “n” at the verification prompt, repeat step 17 to correct the NTP information, and
then enter “y” at step 18.
The following message displays (after entering “y” at the verification prompt):
The conference bridge has now been configured, the system will now reboot
to reflect the changes.
19
You have successfully initialized the Aastra CNX.
When you have completed initializing and configuring the Aastra CNX, go to Step 8, “Using the
Aastra CNX GUI via the Web” on page 1-19. For more information about logging in, see Chapter 3,
“Configuring the Aastra CNX.”
1-18
ATP-CNX-040-01 Rel. 1.3, Doc. Rev. 01.07
Aastra CNX Installation and Setup Procedures
Using the Aastra CNX GUI via the Web
8
Using the Aastra CNX GUI via the Web
Requirement
Important: The JRE allows you to use the Aastra CNX graphical user interface
(GUI) to configure, manage, and maintain the Aastra CNX. You must have JRE
installed in order to use the Aastra CNX GUI. If your PC (running Windows) is
connected to the Internet, the JRE automatically installs (if not already installed)
when accessing the Aastra CNX GUI. If you do not have access to an Internet
connection OR if you are using the Aastra CNX in a Linux environment, you must
acquire the applicable JRE and install it manually before using the Aastra CNX
GUI.
Procedure
To begin using the Aastra CNX via the Web interface:
Step
Action
a
Open your web browser and enter the URL or IP address of the Aastra CNX. For
example:
http://cnx1.aastra.com
or
http://192.168.112.15
b
Enter the username and password provided by the System Admininstrator.
Note: Default username and password for System Administrators is "cnxadmin".
c
Enter the Aastra CNX License Key and click APPLY.
The License Key can be found on the label located on the back of the
Documentation CDROM envelope.
Result: The Aastra CNX reboots.
d
When the reboot is complete, log into the Aastra CNX by repeating steps a. and b.
ATP-CNX-040-01 Rel. 1.3, Doc. Rev. 01.07
1-19
CNX System Administrator Guide
Using the Aastra CNX GUI via the Web
Step
Action
e
For security purposes, it is advisable to change the default password by clicking
the "Change Password" button.
f
Configure the Aastra CNX and/or schedule conferences as required.
Note: Available tasks are dependent on whether you are a System Administrator
or Registered User.
Notes:
1. After port upgrades and major software releases on the Aastra CNX,
a System Administrator must enter a new license key to activate the
software. For more information about license key activation, see
Chapter 5, “Maintaining the Aastra CNX.”
2. The Aastra CNX performs an automatic reboot as part of the upgrade
process.
Configuration details (System Administrators only)
For configuration information on the Aastra CNX, see Chapter 3, “Configuring
the Aastra CNX.”
The CDROM included in the Aastra CNX package provides the Aastra CNX
technical documentation in PDF format for your reference as required.
Troubleshooting information
If you are having problems using your Aastra CNX, contact your reseller or
Aastra Telecom Technical Support.
1-20
ATP-CNX-040-01 Rel. 1.3, Doc. Rev. 01.07
About the Aastra CNX
Overview
Chapter 2
About the Aastra CNX
Overview
The Aastra Conference Network Switch (CNX) is a high-quality, state-of-the-art,
voice-conferencing switch for small and medium enterprise conferencing. It
mixes traditional circuit-switched telephone calls (TDM) and packet
Voice-over-IP (VoIP) calls within the same conference, initiated from either a
channel within Integrated Services Digital Network (ISDN) Primary Rate
Interface (PRI) lines, or from its VoIP ports using Session Initiation Protocol (SIP)
and/or H.323 signaling.
The Aastra CNX has four T1/E1 ports that allow up to 30 participants and 15
active conferences (30-port unit), and are upgradable to either 60 participants and
30 active conferences (60-port unit), or 120 participants and 60 active
conferences. It supports permanent and scheduled (temporary) conferencing, with
or without a moderator. Conference booking and invitations are made via the web
interface.
ATP-CNX-040-01 Rel. 1.3, Doc. Rev. 01.07
2-1
CNX System Administrator Guide
Overview
The Aastra CNX is easy to install and configure for the network administrator.
Managing and maintaining the Aastra CNX can be accomplished using a web
browser. Diagnostic features include reporting facilities, such as booking records
and activity records, to aid in assisting the administrator in determining the
amount of port usage, to aid in resource planning, and to track potential security
breaches by unauthorized persons. The Aastra CNX software allows you to export
the data to a spreadsheet or database for subsequent analysis.
Features and benefits
Specific features of the Aastra CNX include:
•
High quality voice conferences for up to 30 participants in up to 15 active
conferences, upgradable to 60 participants and 30 active conferences, or 120
participants and 60 active conferences.
•
Allows for permanent and scheduled conferences
•
Allows for email notification of new or modified conferences
•
Comprehensive conference controls for host and participants using a simple
touch-tone telephony interface
•
Allows you to brand the Aastra CNX with customized greetings
•
Simple to install, configure, manage, and maintain through an intuitive web
interface
•
Maintenance features in the web interface include setting date and time,
saving and restoring configurations, downloading logs and core files,
debugging, and cleaning up unnecessary files from the CompactFlash card.
•
Integrates with existing office systems: connects to Private branch exchange
(PBX) using ISDN PRI and IP PBXs using SIP or H.323
•
Comprehensive security features
— Web access to Aastra CNX administrative and conference booking portal
via Hypertext Transfer Protocol (HTTP)
— Authentication of users and administrators from an internal database,
Microsoft Windows server or Unix/Linux server
— Auto-generation of separate moderator and participant passcodes
— Optional restriction of administrative access to an internal IP interface
— All pertinent booking and usage data, including caller ID, are collected
and available for subsequent audit
2-2
ATP-CNX-040-01 Rel. 1.3, Doc. Rev. 01.07
About the Aastra CNX
Overview
•
Cost-effective conferencing for small to medium-size enterprises
— Time and travel cost savings
— Faster product development
— Availability of decision makers
— Global presence with low cost
— Critical information exchange
Voice processing features
The Aastra CNX offers the following technical features:
•
Dedicated digital signal processor (DSP)-based speech processing for up to
64 VoIP channels using the G.729a codec, and 120 channels using G.711
codec, with G.168 echo cancellation, voice activity detection, silence
suppression, and comfort noise generation
•
Hardware-based audio mixer with automatic gain control, acoustic and
electrical echo cancellation, adaptive noise suppression, and dominant
speaker selection.
•
Touchtone (dual-tone multifrequency (DTMF)) detection, suppression, and
generation
Languages
The following anguage packs are available for the Aastra CNX. Lanaguage packs
include announcements and GUI prompts in a specific language.
•
English (default)
•
British English (available for announcements only)
•
French-Canadian
•
Spanish
Reference
For a procedure on loading language packs, see Chapter 5, “Maintaining the
Aastra CNX.”
ATP-CNX-040-01 Rel. 1.3, Doc. Rev. 01.07
2-3
CNX System Administrator Guide
Aastra CNX hardware
Aastra CNX hardware
Description
This section provides information about the Aastra CNX chassis, the components
shipped with the product, and descriptions of the front and rear panels on the unit.
Chassis
The Aastra CNX chassis has a width of 12 in. (30.5 cm), a depth of
9 in. (22.9 cm), and weighs approximately 6 lbs. (2.73 kg).
It has an internal fan module for cooling the unit with fresh air circulation vents on
the front panel and exhaust vents on the rear panel.
You can install the Aastra CNX chassis on a flat surface (desktop), or you can
install it in a Telco or standard EIA 19-inch computer rack.
Reference
For information about installing the desktop and rackmount versions, and starting
up the Aastra CNX for the first time, see the Aastra CNX Conference Network
Switch Installation and Setup Guide.
2-4
ATP-CNX-040-01 Rel. 1.3, Doc. Rev. 01.07
About the Aastra CNX
Aastra CNX hardware
Front panel
The Aastra CNX front panel consists of the following:
•
•
•
•
Status/Power LEDs
Two (2) Ethernet LEDs
Four (4) pairs T1/E1 LEDs
Two (2) CompactFlash memory card slots (slot 1 and slot 2)
Note: One (1) CompactFlash memory card is included with the Aastra
CNX unit and is shipped installed in slot 1. Aastra CNX supports
True IDE mode, and Type I and Type II cards.
The following illustration shows the Aastra CNX front panel.
Aastra CNX Front Panel
Fresh air circulation vents
POWER
STATUS
1 2
1 2 3 4
ACTIVE
ALARM
10/100 ENET T1 / E1
1
COMPACTFLASH
Slots 1 and 2
Ethernet LEDs
Power/Status LEDs
CNX
2
T1/E1 LEDs
CompactFlash memory card
ATP-CNX-040-01 Rel. 1.3, Doc. Rev. 01.07
2-5
CNX System Administrator Guide
Aastra CNX hardware
The following table describes each of the components on the Aastra CNX front
panel.
Front Panel
Component
State
Meaning
Power LED
OFF
ON (green)
Power off
Power on
Status LED
OFF
ON (green)
ON (red)
ON (red) for 1 second
Power off
Ready to take calls
Alarm condition
Normal condition at bootup
ENET LEDs
(1, 2)
OFF
ON (green)
No link present
Link present and online: normal operating
condition
Rx/Tx activity
FLASH (green)
T1/E1 LEDs
Top LED
(Pairs 1, 2, 3, 4)
OFF
ON (green)
No link provisioned or link in alarm status
Link present and online with no errors or
alarms detected
Bottom LED
OFF
ON (amber)
ON (red)
Slot 1/Slot2
No link provisioned or no alarm
Physical link is in yellow alarm state.
Physical link is in red alarm state.
Slots to accept a CompactFlash memory card.
Note: One (1) CompactFlash memory card is included with the Aastra
CNX unit and is shipped installed in slot 1. Aastra CNX supports
True IDE mode, and Type I and Type II cards.
2-6
ATP-CNX-040-01 Rel. 1.3, Doc. Rev. 01.07
About the Aastra CNX
Aastra CNX hardware
Rear panel
The Aastra CNX rear panel consists of the following:
•
AC power cord receptacle
•
Four RJ-48C T1/E1 ports
•
One 9-pin female DB-9 serial console port (for RS-232 cable)
•
Two RJ-45, 10/100BaseT Ethernet ports
The following illustration shows the Aastra CNX rear panel.
Aastra CNX Rear Panel
10/100 ENET
T1 / E1
1
2
3
4
CONSOLE
RESET
1
2
100-240VAC
1.0A 47-63HZ
AC power cord receptacle
Fan exhaust vent
RJ-48C T1/E1 ports
RJ-45 Ethernet ports
Console port
ATP-CNX-040-01 Rel. 1.3, Doc. Rev. 01.07
2-7
CNX System Administrator Guide
Aastra CNX software
Aastra CNX software
Description
This section provides the following software features for the Aastra CNX:
•
Protocols and RFCs
•
Conference capabilities
•
Users and user privileges
•
Reporting capabilities
•
Aastra CNX upgrades
•
Protocols and RFCs
Protocols and RFCs
You can connect the Aastra CNX directly to the Public Switched Telephone
Network (PSTN), or to a Private Branch Exchange (PBX). It supports both user
and network-side PRI.
The Aastra CNX supports the following protocols:
•
ISDN PRI for PBX and PSTN interconnection:
— American National Standards Institute (ANSI) National ISDN-2 (NI2)
— European Telecommunications Standards Institute (ETSI) NET5
— Nortel DMS-100 Custom
— Lucent 5ESS Custom
2-8
•
Session Initiation Protocol (SIP) call control
•
H.323 call control
•
Real-Time Transport Protocol (RTP) for VoIP media streams, with RFC 2833
DTMF detection
•
Winbind for integration with Microsoft Windows servers
ATP-CNX-040-01 Rel. 1.3, Doc. Rev. 01.07
About the Aastra CNX
Aastra CNX software
•
Network Information Service (NIS) for integration with Unix and Linux
servers
•
Simple Mail Transfer Protocol (SMTP) for integration with email systems
When using H.323, the Aastra CNX functions as a terminal appearing as a peer to
H.323-based IP phones. You can configure the Aastra CNX to work with one or
more H.323 gatekeepers.
When using SIP, the Aastra CNX functions as a SIP user-agent. You can configure
the Aastra CNX to work with one or more SIP proxies which may be acting as an
IP PBX. The Aastra CNX conforms to the following RFCs:
•
RFC 3261, Session Initiation Protocol
•
RFC 3262, Reliability of Provisional Responses in the Session Initiation
Protocol
•
RFC 2327, Session Description Protocol
•
RFC 2806, URLs for Telephone Calls
The Aastra CNX receives audio streams for VoIP connections over RTP on top of
User Datagram Protocol (UDP), with RTCP providing periodic reports on the
reception of the audio stream. The Aastra CNX conforms to the following RTP
RFCs:
•
RFC 3550, RTP: A Transport Protocol for Real-Time Applications
•
RFC 2833, RTP Payload for DTMF Digits, Telephony Tones and Telephony
Signals
ATP-CNX-040-01 Rel. 1.3, Doc. Rev. 01.07
2-9
CNX System Administrator Guide
Aastra CNX software
Conference capabilities
Each Aastra CNX supports 30 conference participants with up to 15 active
conferences (60-port unit supports 60 participants with up to 30 active
conferences; 120-port unit supports 120 participants with up to 60 active
conferences). Participants can connect by TDM, VoIP, or both.
The following table describes the type of Aastra CNX conferences and the
features associated with these conference types.
Conference
types
Permanent
Description
This type of conference is always available. It
uses ports from a pool dedicated for permanent
conferences.
You can use a permanent moderated bridge as
a personal bridge. Participants are put on hold
until the moderator joins and are disconnected
when the moderator leaves. The first person to
join activates the conference in this type of
bridge.
Note: Permanent conferences must be setup
by a system administrator.
Scheduled
Conference type features
Moderated and Unmoderated - A user(s)
is designated as a moderator(s). The
moderator uses a PIN that provides full
control over the conference. You can also
enable or disable a moderator as the
dominant speaker of the conference.
Note: The moderator PIN is different from
This type of conference exists for a specific
the conference participant’s PIN.
duration and uses a reserved number of ports
for the conference. Scheduled conferences can
handle early arrivals and over-runs and do not
require moderators.
Scheduled conferences can also have multiple
recurrences of a conference.
2-10
ATP-CNX-040-01 Rel. 1.3, Doc. Rev. 01.07
About the Aastra CNX
Aastra CNX software
Port resource management
You can configure Aastra CNX switches with a number of ports to be held in
reserve for specific conferences. If all non-reserved ports on the Aastra CNX are
in use, any attempt to join a conference on that Aastra CNX results in a busy
signal. When scheduling conferences, the Aastra CNX does not permit allocation
of reserved ports if it prevents existing reservations to be met.
Users and user privileges
The Aastra CNX supports three types of users with various user privileges:
•
System Administrators
•
Registered Users
•
Conference Participants
The following paragraphs describe the privileges for each type of user.
System Administrator
System administrators have access privileges to all Aastra CNX management
features and functions. The following table provides a list of available Aastra
CNX functions that a system administrator can perform.
Function
Description
Configure
•
•
•
•
•
•
•
•
•
•
•
•
Perform initial configuration using setup script
Determine language to be used on Aastra CNX
Set number of ports for conference
Set external servers (DNS and NTP)
Set management interface
Configure ISDN PRI attributes
Set Windows and/or Network Information System
authentication
Determine conference passcode length, leeway, and
warning time
Configure conference VoIP attributes
Configure SIP, H.323, and/or RTP
Change password after logging in
Return Aastra CNX to factory defaults
(continued)
ATP-CNX-040-01 Rel. 1.3, Doc. Rev. 01.07
2-11
CNX System Administrator Guide
Aastra CNX software
Function
Description
Manage
•
•
•
•
•
•
•
•
Maintain/Troubleshoot
•
•
•
•
•
•
•
•
•
•
Add and delete users and system administrators
Modify passwords
Create, modify, and delete permanent conferences
with or without moderators
Create, modify and delete scheduled conferences
with or without moderators
Set tones and lanaguage announcements
Set time zones for conferences
Set duration of conferences
Set recurrence of conferences
Perform software updates
Load/remove lanaguage packs
Load/remove customized greetings
Display Aastra CNX operational status and monitor
real-time conference activity
Load new software License Keys
Reboot CNX
Save/restore Aastra CNX configuration
Set Aastra CNX date/time
Download call data and conference data logs for use
with report generation applications such as Microsoft
Excel or Microsoft Access
Delete unwanted files from CompactFlash
Registered User
The following table provides a list of available Aastra CNX functions that a
registered user can perform.
2-12
Function
Description
Manage own conferences
•
Create, modify, and delete conferences with or
without moderators
ATP-CNX-040-01 Rel. 1.3, Doc. Rev. 01.07
About the Aastra CNX
Aastra CNX software
Conference participant
Conference participants have access to a conference via dual-tone multifrequency
(DTMF) using a passcode. One or more conference participants can be a
moderator which provides additional control over the conference. The following
table provides a list of available Aastra CNX functions that a conference
participant can perform.
Function
Description
Manage
•
•
Access live conferences when required using a
passcode (DTMF code)
For live conferences, a conference participant can:
–
–
•
Mute/unmute self
Initiate help sequence (unrecognized DTMF
key sequence automatically elicits help)
– Listen to roll call
– Extend a conference if required (unmoderated
conferences only)
Can act as a moderator for the conference which
provides additional control. A moderator can
additionally perform the following:
–
–
Lock/unlock the conference
Mute all other participants and unmute self
(lecture mode)
– Mute participant
– Eject participant
– Assign moderator privileges
– Request additional ports
– Extend a conference (unmoderated
conferences only)
– Terminate a conference
Note: A conference can have multiple moderators that
can pass tasks among themselves.
ATP-CNX-040-01 Rel. 1.3, Doc. Rev. 01.07
2-13
CNX System Administrator Guide
Aastra CNX software
Reporting capabilities
The reporting feature on the Aastra CNX provides the following:
•
Assists a system administrator in gauging port usage (and abuses), with a
view to resource planning.
•
Tracks potential security breaches by unauthorized users logging into
conferences
The Aastra CNX provides raw data called Call Detail Records (CDRs) that are
stored in logs on the CompactFlash. There are two types of CDR logs:
•
Call and conference activity CDR logs (cdrlog)
•
Conference scheduling CDR logs (confcdrlog)
The Aastra CNX automatically generates the CDR logs in comma-separated value
(CSV) format during call activity (ISDN, H.323, and SIP), and during conference
activity of an active 24 hour period and when the Aastra CNX starts up.
You can download these CDRs to your PC and use an external application (such
as, Microsoft Excel or Microsoft Access), to produce reports. You can use CDR
log files for billing purposes and for debugging and troubleshooting the Aastra
CNX as required.
Reference
For a procedure on downloading CDRs, see Chapter 5, “Maintaining the Aastra
CNX.”
For more information about the contents of the CDRs, see Appendix B,
“Additional information about CDR logs.”
2-14
ATP-CNX-040-01 Rel. 1.3, Doc. Rev. 01.07
About the Aastra CNX
Aastra CNX software
Aastra CNX upgrades
The Aastra CNX is field upgradable from a 30-port unit to a 60- or 120-port unit.
The following table shows the potential number of active participants and
conferences for each type of unit.
Aastra CNX
Number of active participants
Number of active conferences
30-port unit
30
15
60-port unit
60
30
120-port unit
120
60
ATP-CNX-040-01 Rel. 1.3, Doc. Rev. 01.07
2-15
Software requirements
The following table provides the minimum software you need to configure and
manage conferences on the Aastra CNX.
Software
Minimum requirements
Web browser
Any Web browser running Java 2 Platform V1.5.0
Standard Edition or later
Java Runtime Environment (JRE)
JRE 1.5.0 Standard Edition or later
Note: The JRE allows you to use the
Aastra CNX graphical user interface
(GUI) to configure, manage, and
maintain the Aastra CNX.
You must have JRE installed in order
to use the Aastra CNX GUI.
If your PC (running Windows) is
connected to the Internet, the JRE
automatically installs (if not already
installed) when accessing the Aastra
CNX GUI.
If you do not have access to an
Internet connection OR
if you are using the Aastra CNX in
a Linux environment, you must
acquire the applicable JRE and
install it manually before using the
Aastra CNX GUI.
Chapter 3
Configuring the Aastra CNX
Overview
Description
You perform an initial configuration of the Aastra CNX from the console port.
Initial configuration includes setting specific essential parameters, including the
unit’s network settings. Successful initial configuration allows you to complete
the unit’s software configuration using a web-based GUI.
Initial configuration
After installing the Aastra CNX, you must initially configure the unit to operate in
your network by specifying its hostname, Ethernet IP address, Netmask, default
gateway, NTP servers, and date and time. When you power up the Aastra CNX for
the first time, a setup script runs to allow you to initially configure the unit for
your network.
Reference
For more information about the Aastra CNX hardware installation and for a
procedure to perform the initial configuration, see the Aastra CNX Conference
Network Switch Installation and Setup Guide.
ATP-CNX-040-01 Rel. 1.3, Doc. Rev. 01.07
3-1
CNX System Administrator Guide
Overview
Modifying the initial configuration
After initially configuring the Aastra CNX using the setup script, you can modify
the settings using additional options that the script provides.
The following procedures provide additional options you can perform using the
setup script:
•
(1) Run network and time configuration
(See Aastra CNX Installation and Setup Guide for more information on option 1)
•
(2) Change Telnet access
•
(3) Set date and time
•
(4) Configure Network Time Protocol (NTP)
•
(5) Force reboot
(2) Change Telnet access
This option allows you to enable or disable Telnet on the Aastra CNX. Enabling
Telnet provides you the ability to Telnet into the Aastra CNX as required. Use the
following procedure to change Telnet access on the Aastra CNX.
Note: If at any time during the initial configuration process, you want to
backout of the configuration, press <ESC> to cancel.
3-2
ATP-CNX-040-01 Rel. 1.3, Doc. Rev. 01.07
Configuring the Aastra CNX
Overview
Step
Action
1
At the Aastra CNX Main Menu, select option 2, and press <Enter>.
Welcome to the
Aastra CNX Conference Network Switch
Main Menu
1.
2.
3.
4.
5.
Run network and time configuration
Change Telnet access
Set date and time
Configure Network Time Protocol (NTP)
Force reboot
Please select an option: 2↵
The following prompt displays:
1. Enable
2. Disable
[2]:
2
Enter “1” to enable Telnet, or enter “2” to disable Telnet on the Aastra CNX, and press <Enter>.
1 ↵
The setting is saved and displays the main menu.
3
You have successfully changed Telnet access on the Aastra CNX.
ATP-CNX-040-01 Rel. 1.3, Doc. Rev. 01.07
3-3
CNX System Administrator Guide
Overview
(3) Set date and time
This option allows you to modify the date and time that you set during the “Run
network and time configuration” procedure. Use the following procedure to
modify the date and time on the Aastra CNX.
Note: If at any time during the initial configuration process, you want to
backout of the configuration, press <ESC> to cancel.
Step
Action
1
At the Aastra CNX Main Menu, select option 3, and press <Enter>.
Welcome to the
Aastra CNX - Conference Bridge
Configuration Utility
1.
2.
3.
4.
5.
Run network and time configuration
Change Telnet access
Set date and time
Configure Network Time Protocol (NTP)
Force reboot
Please select an option: 3 ↵
The following message and prompts display:
Unpacking timezones, please wait one moment...
Timezone Configuration
Africa
Chile
America
Cuba
Antarctica EET
Arctic
EST
Asia
EST5EDT
Atlantic
Egypt
Australia
Eire
Brazil
Etc
CET
Europe
CST6CDT
GB
Canada
GB-Eire
GMT
GMT+0
GMT-0
GMT0
Greenwich
HST
Hongkong
Iceland
Indian
Iran
Israel
Jamaica
Japan
Kwajalein
Libya
MET
MST
MST7MDT
Mexico
Mideast
NZ
NZ-CHAT
Navajo
US
PRC
UTC
PST8PDT
Universal
Pacific
W-SU
Poland
WET
Portugal
Zulu
ROC
ROK
Singapore
Turkey
UCT
Enter a choice, "back" to go up one level, or "cancel" to cancel:
(continued)
3-4
ATP-CNX-040-01 Rel. 1.3, Doc. Rev. 01.07
Configuring the Aastra CNX
Overview
Step
Action
2
Enter your local timezone and press <Enter>. For example:
Enter a choice, "back" to go up one level, or "cancel" to cancel: EST ↵
The following message and prompt displays:
Timezone: EST
Are you sure? (y/n)
3
Enter “y” if the timezone is correct, and press <Enter>.
Enter “n” if the timezone is incorrect, and press <Enter>.
Note: If you entered “n” at the verification prompt, repeat step 2 to correct the timezone, and then
enter “y” at step 3.
The following message and prompts display (after entering “y” at the verification prompt):
Please enter the date and time:
Four-digit year [2005]:
Month [03]:
Day [09]:
Hour [19]:
Minutes [40]:
4
The defaults for the date and time are the current date and time on your PC.
If these defaults are correct, press <Enter> at each prompt without making an entry.
If a default is incorrect, enter the correct value and press <Enter> to continue. In the following
example, 14 is entered for the hour since the default of 19 is incorrect.
Four-digit year [2005]:
Month [03]:
Day [09]:
Hour [19]: 14
Minutes [40]:
The following displays:
Before the following information is configured, please verify the
information below is correct before proceeding.
Date: 2005-03-09 14:40:00
Is this the correct time (y/n) [n]:
ATP-CNX-040-01 Rel. 1.3, Doc. Rev. 01.07
3-5
CNX System Administrator Guide
Overview
Step
Action
5
Enter “y” if the date and time are correct, and press <Enter>.
Enter “n” if the date and time are incorrect, and press <Enter>.
Note: If you entered “n” at the verification prompt, repeat step 4 to correct the date and time, and
then enter “y” at step 5.
The setting is saved and displays the main menu.
6
3-6
You have successfully modified the date and time on the Aastra CNX.
ATP-CNX-040-01 Rel. 1.3, Doc. Rev. 01.07
Configuring the Aastra CNX
Overview
(4) Configure Network Time Protocol (NTP)
This option allows you to modify the Network Time Protocol (NTP) that you set
during the “Run network and time configuration” procedure. Use the following
procedure to modify the NTP on the Aastra CNX.
Note: If at any time during the initial configuration process, you want to
backout of the configuration, press <ESC> to cancel.
Step
Action
1
At the Aastra CNX Main Menu, select option 4, and press <Enter>.
Welcome to the
Aastra CNX - Conference Bridge
Configuration Utility
1.
2.
3.
4.
5.
Run network and time configuration
Change Telnet access
Set date and time
Configure Network Time Protocol (NTP)
Force reboot
Please select an option: 4 ↵
The following message and prompts display:
Configuring Network Time Protocol (NTP)...
You can configure up to 4 NTP servers. To remove an existing
server, set it's address to 0.0.0.0. If no valid servers are
given then ntp will be disabled.
Do you want to continue (y/n) [n]:
2
Enter “y” to continue, and press <Enter>.
The following prompts display:
NTP
NTP
NTP
NTP
Server
Server
Server
Server
#1:
#2:
#3:
#4:
[pool.ntp.org]:
[pool.ntp.org]:
[pool.ntp.org]:
[pool.ntp.org]:
(continued)
ATP-CNX-040-01 Rel. 1.3, Doc. Rev. 01.07
3-7
CNX System Administrator Guide
Overview
Step
Action
3
Enter up to four NTP servers in your network, and press <Enter>. For example:
NTP
NTP
NTP
NTP
Server
Server
Server
Server
#1:
#2:
#3:
#4:
[pool.ntp.org]:
[pool.ntp.org]:
[pool.ntp.org]:
[pool.ntp.org]:
192.167.2.11 ↵
192.167.2.12 ↵
0.0.0.0 ↵
0.0.0.0 ↵
Notes:
1.You can enter up to four NTP servers. If you have less than four NTP servers, enter the
IP address(es) for the NTP servers that you have, and then enter 0.0.0.0 for the remaining
NTP entries.
2. If you do not have your own NTP server, and the Aastra CNX has Internet connectivity,
you may use the default server entry of pool.ntp.org.
3. Aastra Telecom strongly recommends the use of NTP servers, either your own or the
default servers. NTP servers avoid clock slippage and inconsistent conference
start times on the Aastra CNX. However, you may completely disable the NTP
server feature by setting the IP address of all four servers to 0.0.0.0.
The following displays:
Before the following information is configured, please verify
the information below is correct before proceeding.
NTP Server #1 : 192.167.2.11
NTP Server #2 : 192.167.2.12
Is this information correct (y/n)[n]:
4
Enter “y” if the NTP information is correct, and press <Enter>.
Enter “n” if the NTP information is incorrect, and press <Enter>.
Note: If you entered “n” at the verification prompt, repeat step 3 to correct the NTP information, and
then enter “y” at step 4.
5
3-8
You have successfully modified NTP on the Aastra CNX.
ATP-CNX-040-01 Rel. 1.3, Doc. Rev. 01.07
Configuring the Aastra CNX
Overview
(5) Force reboot
This option allows you to manually force a reboot of the Aastra CNX.
Warning: Use caution when using the reboot option. If the Aastra CNX
is in use and you perform a reboot, all active conferences are aborted.
Note: If at any time during the initial configuration process, you want to
backout of the configuration, press <ESC> to cancel.
Step
Action
1
At the Aastra CNX Main Menu, select option 4, and press <Enter>.
Welcome to the
Aastra CNX - Conference Bridge
Configuration Utility
1.
2.
3.
4.
5.
Run network and time configuration
Change Telnet access
Set date and time
Configure Network Time Protocol (NTP)
Force reboot
Please select an option: 4↵
The following prompt displays:
Are you sure you want to reboot the Aastra CNX (y/n)?
Caution: Rebooting the Aastra CNX causes interruption in the services that the unit is providing.
Aastra Telecom recommends that only System Administrators reboot the Aastra CNX when required.
2
Enter “y” if you still want to reboot the Aastra CNX.
Enter “n” if you do not want to reboot the Aastra CNX.
After entering “y” at the prompt, the following displays:
The Aastra CNX is rebooting.....
Wait for the Aastra CNX to reboot before using the Aastra CNX Configuration Utility or the Aastra
CNX GUI.
3
You have successfully rebooted the Aastra CNX.
ATP-CNX-040-01 Rel. 1.3, Doc. Rev. 01.07
3-9
CNX System Administrator Guide
Logging in to the Aastra CNX
Logging in to the Aastra CNX
Description
After initial setup of the Aastra CNX network information via the console port,
the Aastra CNX becomes active and ready for you to continue configuration of the
software to manage users, conferences, and the unit using the GUI.
Requirements
•
You must have performed the initial network configuration using the
procedures in the Aastra CNX Installation and Setup Guide, Step 7,
“Configure the network settings.”
•
At first-time login for system administrators, the default user ID is cnxadmin
(all lowercase) and the default password is cnxadmin. For security purposes,
you should change your password
Notes:
1. To change the password after logging in, click on the
“Change Password” button in the Aastra CNX window.
2. To change the default user ID after logging in, see
Chapter 4, “Managing the Aastra CNX.”
3-10
ATP-CNX-040-01 Rel. 1.3, Doc. Rev. 01.07
Configuring the Aastra CNX
Logging in to the Aastra CNX
Procedure
Use the following procedure to log into the Aastra CNX.
Step
Action
1
Open your Web browser.
Enter the URL or IP address of the Aastra CNX and press <Return>. For example:
http://CNX.aastra.com
or
http://192.168.2.6
Result: A digital certificate displays. This certificate warrants to the user that the downloaded
applet is indeed provided by Aastra Telecom, and is safe to run on their computer.
ATP-CNX-040-01 Rel. 1.3, Doc. Rev. 01.07
3-11
CNX System Administrator Guide
Logging in to the Aastra CNX
Step
Action
2
Click
to accept the certificate.
Note: Clicking YES accepts the certificate for the current session only. If you log out and log
back into the Aastra CNX GUI, this certificate displays again.
or
Click
to always accept the certificate from the current PC.
Note: Clicking ALWAYS prevents the certificate from displaying during future login sessions on
the current PC.
Result: If you clicked YES or ALWAYS, the Aastra CNX proceeds to install the latest version of
the Java Plug-in to your PC.
3
3-12
When the Java console window is up and running, the Aastra CNX GUI initializes and the
Username/Password screen displays.
.
ATP-CNX-040-01 Rel. 1.3, Doc. Rev. 01.07
Configuring the Aastra CNX
Logging in to the Aastra CNX
Step
Action
4
Enter your Aastra CNX user name and password, and then click
.
For a procedure to change your password, see “Configuring the Aastra CNX” on page 3-14. To
change your user ID, see Chapter 4, “Managing the Aastra CNX.”
Result: The Aastra CNX Administrative Web Portal main window displays.
WARNING: You are allowed three attempts to input the correct username and password. If all
three attempts fail, close your browser and reopen a new browser window and try logging in
again.
The Aastra CNX main window for a system administrator allows you to perform the following:
• Change passwords
• Configure users and system administrators
• Manage users and system administrators
• Manage permanent and scheduled conferences
• Maintain the system
5
Click Logout to logout of the Aastra CNX GUI.
ATP-CNX-040-01 Rel. 1.3, Doc. Rev. 01.07
3-13
CNX System Administrator Guide
Configuring the Aastra CNX
Configuring the Aastra CNX
Description
You configure the Aastra CNX using the GUI provided by the downloaded applet
running in a Web browser.
At the Aastra CNX main window, the Configure CNX tab displays the
configurable objects. Clicking on a configurable object displays a group of
attributes and their values that you can configure.
The following figure shows the Aastra CNX configuration tree structure.
3-14
ATP-CNX-040-01 Rel. 1.3, Doc. Rev. 01.07
Configuring the Aastra CNX
Configuring the Aastra CNX
The following parameters may be configured:
Parameter
What you configure
Global
•
•
•
•
Languages for voice prompts
Secondary Language for voice prompts
Conference phone number
Number of ports to reserve for permanent
(reservationless) conferences
Network
•
•
•
•
•
•
•
•
•
•
IP addresses
Netmasks
Default gateway address
Host name
Domain name
Domain Name Servers (DNSs)
Server information
Management Interface
File Transfer Protocol (FTP) (enable or disable)
Network Time Protocol (NTP) Servers
T1/E1
•
•
•
•
•
•
•
•
•
•
•
•
Framing Types
Clocking
Switch Types
Direction
Line Coding
Line Framing
Loopback
Line Buildout
CRC (E1 only)
Overlap (E1 only)
Number of Digits (E1 only)
Ports 1 through 4 (enable or disable)
User Authentication
•
•
Windows Authentication
Network Information Service (NIS) Authentication
Conference
•
•
•
•
Conference passcode lengths
Period of time when callers can access a conference
before it starts.
Warning time period of impending conference ending
Voice quality parameters
•
•
•
Session Initiation Protocol (SIP) service parameters
H.323 service parameters
Real-Time Transport Protocol (RTP) parameters
Voice over IP
ATP-CNX-040-01 Rel. 1.3, Doc. Rev. 01.07
3-15
CNX System Administrator Guide
Procedures
Procedures
General configuration
Use the following procedure to configure the Aastra CNX to communicate in your
network.
Step
Action
1
Open your Web browser and enter the URL for your Aastra CNX.
Log in with a valid user ID and password.
2
Click the Configure CNX tab in the Aastra CNX main window.
3-16
ATP-CNX-040-01 Rel. 1.3, Doc. Rev. 01.07
Configuring the Aastra CNX
Procedures
Step
Action
Global Configuration
3
Under the CNX Configuration object, click “Global”.
Result: The Aastra CNX global attribute fields display.
4
Configure the attributes as required.
Attribute
Default
Valid Values/Description
Primary Language
English
English
British English
French-Canadian
Spanish
Description: Primary language that plays for the
conference greeting on the Aastra CNX. For a procedure
on loading language packs see Chapter 5, “Maintaining
the Aastra CNX.”.
Secondary Language
None
None
English
British English
French-Canadian
Spanish
Description: Secondary language that plays for the
conference greeting on the Aastra CNX. For a procedure
on loading language packs see Chapter 5, “Maintaining
the Aastra CNX.”
Note: If you select a secondary language, the Aastra CNX
conference greeting plays in this language after the
primary language conference greeting.
Conference Phone
Number
000-0000 Description: Phone number to dial for reaching the
conference. This number is sent out in emails to
moderators when conferences are booked.
ATP-CNX-040-01 Rel. 1.3, Doc. Rev. 01.07
3-17
CNX System Administrator Guide
Procedures
Step
Action
4
Global configuration attributes continued
(cont’d)
Attribute
Default
Valid Values/Description
Permanent Ports
0
0 to 120
Note: This attribute must
be set to an appropriate
number of ports before
using Permanent
conferences.
Note: Values are: 0 to 30 for 30-port unit
0 to 60 for 60-port unit
0 to 120 for 120-port unit
Description: Number of ports reserved for permanent
conferences. This value is subject to ports being physically
configured on the Aastra CNX, either T1/E1 ports and/or
VoIP ports. It is also subject to the licensed number of
ports.
Note: Permanent ports are not available for scheduled
conferences.
You must provision the T1/E1 ports, SIP service, or H.323
service on the Aastra CNX before setting the Permanent
Port value. See the following table for applicable settings.
Physical Ports Enabled Maximum Permanent Port Value
5
3-18
Click
1 T1
2 T1s
4 T1s
23
46
92
1 E1
2 E1s
4 E1s
30
60
120
SIP or H.323 service enabled
30
60
120
to save the configuration to the Aastra CNX and to the CompactFlash card.
ATP-CNX-040-01 Rel. 1.3, Doc. Rev. 01.07
Configuring the Aastra CNX
Procedures
Step
Action
Network Configuration
6
Under the CNX Configuration object, click “Network”.
Result: The Aastra CNX network attribute fields display.
ATP-CNX-040-01 Rel. 1.3, Doc. Rev. 01.07
3-19
CNX System Administrator Guide
Procedures
Step
Action
7
Configure the attributes as required.
Attribute
Default
Valid Values/Description
IP Address 1
<Current IP
address of the
Aastra CNX>
Description: IP address for Ethernet 1, as initially
configured from the console.
Netmask 1
<Current
Description: Netmask address for Ethernet 1.
netmask address
of the Aastra
CNX>
IP Address 2
0.0.0.0
Description: IP address of a second Ethernet port.
Netmask 2
0.0.0.0
Description: Netmask address of a second Ethernet
port.
Default Gateway
<Current default
gateway of the
Aastra CNX>
Description: Default gateway IP address.
Hostname
<Current
hostname of the
Aastra CNX>
Description: Hostname of the Aastra CNX.
Domain
<Current domain
name of the
Aastra CNX>
Description: Domain name of the Aastra CNX.
DNS Server 1
<Current DNS
Description: IP address of DNS server 1.
Server 1 address
of Aastra CNX>
DNS Server 2
<Current DNS
Description: IP address of DNS server 2.
Server 2 address
of Aastra CNX>
Management
Interface
ETHERNET
INTERFACE 1
ETHERNET INTERFACE 1
ETHERNET INTERFACE 2
BOTH
Description: Determines which IP network can
access the Aastra CNX for managed functions.
FTP
ENABLE
ENABLE
DISABLE
Description:. Specifies whether or not File Transfer
Protocol (FTP) is enabled or disabled on the Aastra
CNX.
3-20
ATP-CNX-040-01 Rel. 1.3, Doc. Rev. 01.07
Configuring the Aastra CNX
Procedures
Step
Action
7
Network configuration attributes continued
(cont’d)
Attribute
Default
Valid Values/Description
NTP Server 1
Description: IP address of NTP server 1.
<Current NTP
Server 1 address
of Aastra CNX>
NTP Server 2
Description: IP address of NTP server 2.
<Current NTP
Server 2 address
of Aastra CNX>
NTP Server 3
Description: IP address of NTP server 3.
<Current NTP
Server 3 address
of Aastra CNX>
NTP Server 4
Description: IP address of NTP server 4.
<Current NTP
Server 4 address
of Aastra CNX>
Note: You can enter up to four NTP servers in your network, and press <Enter>. For example:
NTP
NTP
NTP
NTP
Server
Server
Server
Server
#1:
#2:
#3:
#4:
[pool.ntp.org]:
[pool.ntp.org]:
[pool.ntp.org]:
[pool.ntp.org]:
192.167.2.11 ↵
192.167.2.12 ↵
0.0.0.0 ↵
0.0.0.0 ↵
You can enter up to four NTP servers. If you have less than four NTP servers, enter the IP
address(es) for the NTP servers that you have, and then enter 0.0.0.0 for the remaining NTP
entries.
If you do not have your own NTP server, and the Aastra CNX has Internet connectivity, you may use
the default server entry of pool.ntp.org.
Aastra Telecom strongly recommends the use of NTP servers, either your own or the default
servers. NTP servers avoid clock slippage and inconsistent conference start times on the Aastra
CNX. However, you may completely disable the NTP server feature by setting the IP address of all
four servers to 0.0.0.0.
8
Click
to save the configuration to the Aastra CNX and to the CompactFlash card.
ATP-CNX-040-01 Rel. 1.3, Doc. Rev. 01.07
3-21
CNX System Administrator Guide
Procedures
Step
Action
T1/E1 Configuration
9
Under the CNX Configuration object, click “T1/E1”.
Result: The Aastra CNX T1/E1 attribute fields display.
3-22
ATP-CNX-040-01 Rel. 1.3, Doc. Rev. 01.07
Configuring the Aastra CNX
Procedures
Step
Action
10
Configure the attributes as required.
Attribute
Default
Valid Values/Description
Framing Type
T1 FRAMING
T1 FRAMING
E1 FRAMING
Clocking
PORT 1 CLOCK
INTERNAL CLOCK
PORT 1 CLOCK
PORT 2 CLOCK
PORT 3CLOCK
PORT 4CLOCK
INTERNAL CLOCK - Uses the internal Aastra CNX
clock for synchronization on TDM links.
PORT 1 thru PORT 4 CLOCK - Uses the external
clocking on port 1 thru port 4, respectively, for
synchronization on TDM links.
Switch Type
For T1 Framing: For T1 Framing:
DMS 100
DMS 100
5ESS
For E1 Framing: NI2
FXO Loop Start
ETSI
FXO Ground Start
FXS Loop Start
FXS Ground Start
E&M
For E1 Framing:
ETSI
Description: Specifies the switch type for the ISDN
PRI connection.
Descriptions of T1 Switch Types:
DMS 100 - Northern Telecom Inc. DMS-100
5ESS - Lucent 5ESS
NI2 - North American National ISDN 2 (NI2)-compliant
switch
ATP-CNX-040-01 Rel. 1.3, Doc. Rev. 01.07
3-23
CNX System Administrator Guide
Procedures
Step
Action
10
T1/E1 attributes continued.
(cont’d)
Attribute
Default
Valid Values/Description
Switch Type
(continued)
For T1 Framing:
DMS 100
Descriptions of T1 Switch Types (continued):
The following options are methods that enable
Robbed Bit Signaling (RBS) on the CNX:
For E1 Framing:
ETSI
FXO Loop Start - Foreign exchange office loop start
signaling.
FXO Ground Start - Foreign exchange office ground
start signaling.
FXS Loop Start - Foreign exchange subscriber loop
start signaling.
FXS Ground Start - Foreign exchange subscriber
ground start signaling.
E & M - Ear & mouth signaling
Descriptions of E1 Switch Types:
ETSI - Specifies the European Telecommunications
Standards Institute (ETSI)
switch; reflects the latest revision (TBR4).
Direction
USER SIDE
USER SIDE
NETWORK SIDE
Description: Specifies the location of the T1 ISDN
PRI connection.
Line Coding
Line Framing
Loopback
3-24
For T1 Framing:
AMI
For T1 Framing:
AMI
B8ZS
For E1 Framing:
HDB3
For E1 Framing:
HDB3
For T1 Framing:
ESF
For T1 Framing:
ESF
SF
For E1 Framing:
CCS
For E1 Framing:
CCS
DISABLE
DISABLE
LOCAL
REMOTE
ATP-CNX-040-01 Rel. 1.3, Doc. Rev. 01.07
Configuring the Aastra CNX
Procedures
Step
Action
10
T1/E1 attributes continued.
(cont’d)
Attribute
Default
Valid Values/Description
Line Buildout
For T1 Framing: For T1 Framing:
0 to 110
Short-haul values:
ft.(DSX-1)
0 to 110 ft.(DSX-1)
110 to 220 ft. (DSX-1)
For E1 Framing: 220 to 330 ft. (DSX-1)
120 Ohms
330 to 440 ft. (DSX-1)
440 to 550 ft. (DSX-1)
550 to 660 ft. (DSX-1)
Long-haul values:
0 dB (long haul)
-7.5 dB (long haul)
-15 dB (long haul)
-22.5 dB (long haul)
CRC
ENABLE
Note: Applies to E1
Framing only.
Overlap
DISABLE
Note: Applies to E1
Framing only.
Number of digits
ENABLE
DISABLE
0
0 to 10
Note: Applies to T1
RBS or E1 PRI only.
11
For E1 Framing:
120 Ohms
ENABLE
DISABLE
Port 1
ENABLE
Port 2
DISABLE
Port 3
DISABLE
Port 4
DISABLE
Click
Description: Sets the number of digits to wait before
starting the PIN collection announcement. This field is
enabled only if the Switch Type is set to an RBS value
for T1 or PRI ETSI for E1.
ENABLE
DISABLE
ENABLE
DISABLE
ENABLE
DISABLE
ENABLE
DISABLE
to save the configuration to the Aastra CNX and to the CompactFlash card.
ATP-CNX-040-01 Rel. 1.3, Doc. Rev. 01.07
3-25
CNX System Administrator Guide
Procedures
Step
Action
User Authentication Configuration
12
Under the CNX Configuration object, click “User Authentication”.
Result: The Aastra CNX User Authentication attribute fields display.
Note: Users may be authenticated against a secure local database stored on the Aastra CNX, or
against an external server. The Aastra CNX first tries the local database, then the Network
Information Service (NIS), then Windows. System administrators must be authenticated locally on
the Aastra CNX.
3-26
ATP-CNX-040-01 Rel. 1.3, Doc. Rev. 01.07
Configuring the Aastra CNX
Procedures
Step
Action
13
Configure the attributes as required.
Attribute
Default
Valid Values/Description
Windows
Authentication
DISABLE
ENABLE
DISABLE
Domain Username
Domain Password
None
None
Domain
None
Primary Domain
Controller
0.0.0.0
Password Server
Wins Server
0.0.0.0
0.0.0.0
Description: Specifies whether or not to authenticate
a user against a Windows server.
Description: Specifies the username of a Windows
domain administrator.
Note: This is used once to register the Aastra CNX
with the Windows domain.
Description: Specifies the password of a Windows
domain administrator.
Note: This is used once to register the Aastra CNX
with the Windows domain.
Description: Specifies the Windows domain that the
Aastra CNX uses. This is the default domain for users
who do not specify a domain and for users who do not
have accounts on the Aastra CNX.
Description: Specifies the hostname or IP address of
the server that the Aastra CNX uses to join the
domain.
Note: The Primary Domain Controller (PDC) is
considered the “master” DC on the network for a
particular workgroup/domain.
Description: Specifies the hostname or IP address of
the server that the Aastra CNX uses to authenticate
users.
Note: In most cases, this is also the PDC or a Backup
Domain Controller (BDC).
Description: Specifies the hostname or IP address of
the server that the Aastra CNX uses to resolve
Windows names.
Note: WINS is a Microsoft Windows NT or Windows
2000 service that dynamically registers names of
computers on the network. In most cases, the WINS
server is the PDC or BDC.
ATP-CNX-040-01 Rel. 1.3, Doc. Rev. 01.07
3-27
CNX System Administrator Guide
Procedures
Step
Action
13
User Authentication attributes continued.
(cont’d)
Attribute
Default
Valid Values/Description
NIS Authentication
DISABLE
DISABLE
SERVER
BROADCAST
Description: Specifies the method for which the
Aastra CNX enables or disables Network Information
System (NIS).
DISABLE - Disables NIS
SERVER - Uses a specific server for authentication
with an optional NIS domain.
BROADCAST - Broadcast on the network for the
specified NIS domain.
14
3-28
NIS Server
0.0.0.0
Description: Specifies the hostname or IP address
that the Aastra CNX uses for NIS authentication.
NIS Domain
0.0.0.0
Description: Specifies the NIS domain that the
Aastra CNX uses.
Click
to save the configuration to the Aastra CNX and to the CompactFlash card.
ATP-CNX-040-01 Rel. 1.3, Doc. Rev. 01.07
Configuring the Aastra CNX
Procedures
Conference configuration
Use the following procedure to configure the conference specifications for your
Aastra CNX.
Step
Action
1
While logged into the Aastra CNX, click the Configure CNX tab.
2
Double-click the Conference object to expand the conference folder.
Conference/General
3
Under the Conference object, click “General”.
Result: The general conference attributes display.
4
Configure the attributes as required.
Attribute
Default
Valid Values/Description
Pin Length
5
Range: 3 to 8
Description: Number of digits in the passcode used for the
conference.
Leeway
5
Range: 5 to 10
Description: Period of time, in minutes, when callers can
access a conference before it starts.
Warning Time
5 MINUTES
Range:5 MINUTES
OFF
Description: Determines whether or not a warning
message is played five minutes before the conference
ends.
ATP-CNX-040-01 Rel. 1.3, Doc. Rev. 01.07
3-29
CNX System Administrator Guide
Procedures
Step
Action
5
Click
to save the configuration to the Aastra CNX and to the CompactFlash card.
Conference/Voice
6
Under the Conference object, click “Voice”.
Result: The voice conference attributes display.
Note: The conference voice settings are for advanced users only. You must be familiar with these
voice concepts to change the settings. If you are not familiar with the voice attributes, DO NOT
change the default settings.
3-30
ATP-CNX-040-01 Rel. 1.3, Doc. Rev. 01.07
Configuring the Aastra CNX
Procedures
Step
Action
7
Configure the attributes as required.
Attribute
Default
Valid Values/Description
Electrical Echo
Cancellation
32
Range: 0 (disabled), 32 to 128 in increments of 4 ms
Acoustic Echo
Cancellation
128
Range: 0 (disabled), 128, 256, 512, or 1024 ms
DC Offset Removal
ENABLE
ENABLE
DISABLE
Noise Reduction
BOTH
BOTH
NONE
ADAPTIVE
CONFERENCE
Level Control
AUTOMATIC
AUTOMATIC
MANUAL
Note: The Aastra CNX echo canceller is G.168 (2002)
compliant.
Level Control Gain Db -19
Automatic Level Control:
-40 to 0
Manual Level Control:
-24 to 24
8
Click
to save the configuration to the Aastra CNX and to the CompactFlash card.
ATP-CNX-040-01 Rel. 1.3, Doc. Rev. 01.07
3-31
CNX System Administrator Guide
Procedures
Voice over IP configuration
Use the following procedure to configure the voice over IP specifications for your
Aastra CNX.
Step
Action
1
While logged into the Aastra CNX, click the Configure CNX tab.
Voice over IP/SIP
2
Under the Voice over IP object, click “SIP”.
Result: The SIP attributes display.
Note: SIP service and Registration is disabled by default. To enable Registration, you must enable
SIP service first.
3-32
ATP-CNX-040-01 Rel. 1.3, Doc. Rev. 01.07
Configuring the Aastra CNX
Procedures
Step
Action
3
Configure the attributes as required.
4
Attribute
Default
Valid Values/Description
SIP service
ENABLE
ENABLE
DISABLE
Registration
DISABLE
ENABLE
DISABLE
Register
Note: Enabled
only if
Registration is
set to ENABLE.
username:password
@mysipproxy.com
Up to 80 integers or characters in the form
[email protected] where name is the authentication
name of the Aastra CNX and the domain is the domain
name (or IP address) of the SIP registration server.
Port
5060
Click
Note: The “:password” in the default value is optional.
It is required only if the authenticate field is set to true.
1,024 to 64,000
to save the configuration to the Aastra CNX and to the CompactFlash card.
ATP-CNX-040-01 Rel. 1.3, Doc. Rev. 01.07
3-33
CNX System Administrator Guide
Procedures
Step
Action
Voice over IP/H.323
5
Under the Voice over IP object, click “H.323”.
Result: The H.323 attributes display.
3-34
ATP-CNX-040-01 Rel. 1.3, Doc. Rev. 01.07
Configuring the Aastra CNX
Procedures
Step
Action
6
Configure the attributes as required.
Attribute
Default
Valid Values/Description
H.323 service
DISABLE
ENABLE
DISABLE
Description: Enables or disables the H.323 protocol
on the Aastra CNX. H.323 is an international standard
protocol for multimedia communication over
packet-switched networks, including LANs, WANs,
and the Internet.
H.323 Identification
CNX
Description: The equipment that has H.323 enabled
in the network.
ETHERNET
INTERFACE 1
ETHERNET INTERFACE 1
ETHERNET INTERFACE 2
Note: Enabled only if
H.323 service is set to
ENABLE.
Bind Address
Note: Enabled only if
H.323 service is set to
ENABLE.
Gatekeeper
Registration
Description: Specifies the interface on the Aastra
CNX that is being used to gain access to the H.323
gatekeeper.
DISABLE
Note: Enabled only if
H.323 service is set to
ENABLE.
ENABLE
DISABLE
DISCOVER
Description: Enables or disables the Aastra CNX to
locate the H.323 Gatekeeper. If set to DISCOVER,
the Aastra CNX searches until it discovers the
Gatekeeper when specifying by IP address or
hostname.
Note: When using H.323, the Aastra CNX functions
as a terminal appearing as a peer to H.323-based IP
phones. You can configure the Aastra CNX to work
with one or more H.323 gatekeepers.
ATP-CNX-040-01 Rel. 1.3, Doc. Rev. 01.07
3-35
CNX System Administrator Guide
Procedures
Step
Action
6
H.323 attributes continued.
(cont’d)
Attribute
Default
Valid Values/Description
Gatekeeper Address
0.0.0.0
Description: The IP address of the Gatekeeper in the
network.
DISABLE
ENABLE
DISABLE
Note: Enabled only if
Gatekeeper
Registration is set to
ENABLE.
User Authentication
Note: Enabled only if
Gatekeeper
Registration is set to
ENABLE.
Gatekeeper
Password
Description: Specifies whether or not authentication
is enabled or disabled on the Aastra CNX.
Authentication is the process of verifying whether a
user is allowed access to the Aastra CNX using the
H.323 protocol over a LAN, WAN, or over the Internet.
*****
Description: Specifies the password that the
Aastra CNX uses to gain access to the H.323
gatekeeper.
1720
1024 to 64000
Note: Enabled only if
User Authentication is
set to ENABLE.
Port
Note: Enabled only if
Gatekeeper
Registration is set to
ENABLE.
7
3-36
Click
Description: Specifies the User Datagram Protocol
(UDP) port on the Aastra CNX that listens for and
receives/processes H.323 messages.
to save the configuration to the Aastra CNX and to the CompactFlash card.
ATP-CNX-040-01 Rel. 1.3, Doc. Rev. 01.07
Configuring the Aastra CNX
Procedures
Step
Action
Voice over IP/RTP
8
Under the Voice over IP object, click “RTP”.
Result: The RTP attributes display.
9
Configure the attributes as required.
Attribute
Default
Valid Values/Description
No Voice Path
Teardown
DISABLE
ENABLE
DISABLE
Description: Specifies whether or not the CNX uses
no voice path teardown for Voice over IP.
Path Teardown Timer
15
Note: Enabled only if
“No Voice Path
Teardown” is set to
ENABLE.
10
Click
10 to 100
Description: Specifies the period of time, in seconds,
that the Aastra CNX waits before automatically
clearing a call if it receives no voice Real-Time
Transport Control Protocol (RTCP) packets.
to save the configuration to the Aastra CNX and to the CompactFlash card.
ATP-CNX-040-01 Rel. 1.3, Doc. Rev. 01.07
3-37
Chapter 4
Managing the Aastra CNX
Managing users on the Aastra CNX
Description
A system administrator manages registered users and other system administrators
on the Aastra CNX by accessing the Manage Users tab on the GUI main page.
The following illustration shows the Aastra CNX Manage Users tab in the
Aastra CNX GUI with an existing user of “cnxadmin”.
Aastra CNX Manage Users tab
Left column
displays
existing users
ATP-CNX-040-01 Rel. 1.3, Doc. Rev. 01.07
4-1
CNX System Administrator Guide
Managing users on the Aastra CNX
Procedures
This section provides procedures for creating, modifying, and deleting Aastra
CNX registered users and system administrators.
Note: You cannot modify or delete the “cnxadmin” System
Administrator. If you logged in as “cnxadmin”, you can change your
password using the
button.
Creating a registered user/system administrator
Use the following procedure to create a registered user and/or system
administrator on the Aastra CNX.
Step
Action
1
Open your Web browser and enter the URL for your Aastra CNX.
Log in with a valid user ID and password.
2
Click the Manage Users tab in the Aastra CNX main window.
4-2
ATP-CNX-040-01 Rel. 1.3, Doc. Rev. 01.07
Managing the Aastra CNX
Managing users on the Aastra CNX
Step
Action
3
Click
.
Result: The user settings window displays.
4
Set the attributes as required.
Attribute
Default
Valid Values/Description
User Type
Regular
Regular
System Administrator
Description: Specifies the type of user that has access to
the Aastra CNX Web user interface.
Regular - A Regular user has access to the Aastra CNX
for managing scheduled conferences only. A Regular user
can schedule, modify, and delete scheduled conferences.
Regular users can only see and modify their own
conferences.
User Name
Password
Confirm Password
5
Click
None
System Administrator - A System Administrator has full
access to the Aastra CNX for configuring and managing
the Aastra CNX hardware and software. A System
Administrator can also create, modify, and delete regular
user and system administrator profiles, and schedule,
modify and delete conferences (permanent and
scheduled).
3 to 20 lowercase alphanumeric characters
5 to 20 alphanumeric characters
5 to 20 alphanumeric characters
to save the settings to the Aastra CNX secure database.
ATP-CNX-040-01 Rel. 1.3, Doc. Rev. 01.07
4-3
CNX System Administrator Guide
Managing users on the Aastra CNX
Modifying a registered user/system administrator
Use the following procedure to modify an existing registered user and/or system
administrator on the Aastra CNX.
Step
Action
1
While logged into the Aastra CNX, click the Manage Users tab.
Result: The following window displays. Existing users display in the left column.
Left column
displays any
existing users
2
Click on a user you want to modify in the “Existing Users” column.
3
Select an existing user that you want to modify and click
.
Result: A window displays with the current user settings for the user you selected. The following
example shows the user settings for “user”.
4-4
ATP-CNX-040-01 Rel. 1.3, Doc. Rev. 01.07
Managing the Aastra CNX
Managing users on the Aastra CNX
Step
Action
4
Modify the attributes as required.
Note: You can modify the password and confirm password fields only. Usernames cannot be
modified.
5
Click
to save the settings to the Aastra CNX secure database.
ATP-CNX-040-01 Rel. 1.3, Doc. Rev. 01.07
4-5
CNX System Administrator Guide
Managing users on the Aastra CNX
Deleting a user/system administrator
Use the following procedure to delete an existing user and/or system administrator
on the Aastra CNX.
Step
Action
1
While logged into the Aastra CNX, click the Manage Users tab.
Result: The following window displays. Existing users display in the left column.
Left column
displays any
existing users
2
Click on a user you want to delete in the “Existing Users” box.
3
Click
.
Result: A prompt displays asking you to verify if you want to delete the selected user.
4
Click YES to delete the user you selected.
or
Click NO to cancel the delete action.
5
Click
4-6
to save the settings to the Aastra CNX secure database.
ATP-CNX-040-01 Rel. 1.3, Doc. Rev. 01.07
Managing the Aastra CNX
Managing conferences on the Aastra CNX
Managing conferences on the Aastra CNX
Description
A system administrator manages conferences on the Aastra CNX by accessing the
Permanent Conferences tab and/or the Scheduled Conferences tab on the GUI
main page.
The following illustration shows the Aastra CNX Permanent Conferences and
Scheduled Conferences tab in the Aastra CNX GUI with example conferences
scheduled.
Permanent Conference List
Scheduled Conference List
Note: You can click on the column headings in the Permanent and
Scheduled conference windows to sort the columns in ascending or
descending order.
ATP-CNX-040-01 Rel. 1.3, Doc. Rev. 01.07
4-7
CNX System Administrator Guide
Managing conferences on the Aastra CNX
Permanent Conference List
A Permanent Conference List displays for system administrator use only. These
conferences are permanently available, and are also known as “reservationless” or
“ad-hoc” conferences. You create permanent conferences with a guaranteed
number of ports that are reserved for that particular conference. Additional
participants may join the conference subject to availability of ports in the pool of
ports reserved for permanent conferences.
Note: Moderated permanent conferences end when a moderator leaves
the conference, and all participants are disconnected.
A system administrator can schedule new, modify, or delete permanent
conferences from the list as required.
4-8
ATP-CNX-040-01 Rel. 1.3, Doc. Rev. 01.07
Managing the Aastra CNX
Managing conferences on the Aastra CNX
Booking a new permanent conference
Use the following procedure to schedule a new permanent conference on the
Aastra CNX.
Note: Dial-in services must be configured and enabled to create
permanent conferences. Before creating a conference, you must configure
ISDN PRI or Voice over IP. For configuring dial-in services, see
Chapter 3, “Configuring the Aastra CNX.”
Step
Action
1
Open your Web browser and enter the URL for your Aastra CNX.
Log in with a valid user ID and password.
2
Click the Permanent Conferences tab in the Aastra CNX main window.
3
In the Permanent Conference List, click
.
Result: The Create New Permanent Conference window displays.
ATP-CNX-040-01 Rel. 1.3, Doc. Rev. 01.07
4-9
CNX System Administrator Guide
Managing conferences on the Aastra CNX
Step
Action
4
Enter the information as required.
Attribute
Default
Valid Values/Description
Conference Name
None
Up to 256 alphanumeric characters
Guaranteed Number of
Ports
0
For 30-port Aastra CNX:
2 to 30
For 60-port Aastra CNX:
2 to 60
For 120-port Aastra CNX:
2 to 120
Language
Announcement
English
English
British-English
French-Canadian
Spanish
Description: Specifies the language to be used for
conference announcements.
Entry Notification
Tone
Tone
Name
None
Description: Specifies whether the Aastra CNX uses
tones, names, or nothing when a conference participant
enters and exits from a conference.
Notes:
1. If you select Names for conference entry
notification, the exit notification will be Tone.
2. When booking a conference with more than 10
participants, it is recommended that Entry Notification
be set to Tone or None. Using Name notification with
larger conferences may lead to delays in joining the
conference and excessive interruptions when multiple
participants join the conference.
4-10
ATP-CNX-040-01 Rel. 1.3, Doc. Rev. 01.07
Managing the Aastra CNX
Managing conferences on the Aastra CNX
Step
Action
4
Schedule new permanent conference window continued
(cont’d)
Attribute
Default
Valid Values/Description
Moderated
Not checked
(disabled)
Not checked (disabled)
Checked (enabled)
Description: Specifies whether or not the conference
has been assigned a moderator. A moderator is one
who acts as a chairperson and has the authority to
control the conference. If you enable this field, you may
enter a moderator email address in the “Moderator
Email” field.
Dominant Speaker
(Applicable only if
Moderated field is
enabled.)
Not checked
(disabled)
Not checked (disabled)
Checked (enabled)
Description: Allows a moderator to be the dominant
speaker in a conference. If enabled, all other
participants of the conference are attenuated by 15dB
so that the moderator is the dominant voice. This
feature is recommended for large conferences where
the moderator acts as a chair-person.
Note: You must have the Noise Reduction field enabled
at Configure CNX/Conference/Voice if enabling
Dominant Speaker.
Moderator E-Mails
None
Alphanumeric characters in the form
[email protected] where name is the email name of
the moderator and the domain is the domain name of
the email server. Multiple email addresses must be
separated by a comma, space, or semicolon.
User E-Mails
None
Alphanumeric characters characters in the form
[email protected] where name is the email name of
the user and the domain is the domain name of the
email server. Multiple email addresses must be
separated by a comma, space, or semicolon.
Note: User emails do not include the moderator PIN for
a conference if it is moderated.
ATP-CNX-040-01 Rel. 1.3, Doc. Rev. 01.07
4-11
CNX System Administrator Guide
Managing conferences on the Aastra CNX
Step
Action
4
Schedule new permanent conference window continued
(cont’d)
Attribute
Default
Valid Values/Description
PIN Participant
<participant
passcode>
Description: Specifies the current participant passcode
for the conference.
(Up to 8 numeric characters)
(Applicable only when
modifying an existing
permanent conference.)
Moderator
(Applicable only when
modifying an existing
permanent conference
that has a moderator
assigned.)
Owner
(Applicable only when
modifying an existing
permanent conference.)
4-12
Note: If you modify this passcode, you must notify the
participants of the change in order for them to access
the conference. This field is for system administrator
use only. User’s must contact the system administrator
to request a passcode change.
<moderator
passcode>
Description: Specifies the current moderator passcode
for the conference.
(Up to 8 numeric characters)
Note: If you modify this passcode, you must notify the
moderators of the change in order for them to access
the conference. This field is for system administrator
use only. User’s must contact the system administrator
to request a passcode change.
cnxadmin
cnxadmin
Also lists all the users configured on the Aastra CNX.
Description: This field allows you to change the
ownership of the permanent conference if required.
ATP-CNX-040-01 Rel. 1.3, Doc. Rev. 01.07
Managing the Aastra CNX
Managing conferences on the Aastra CNX
Step
Action
5
Click
.
Result: If a Moderator was not selected for the conference, a message similar to the following
displays:
If a moderator was selected (enabled), a message similar to the following displays:
6
Click OK to save the conference to the Aastra CNX.
ATP-CNX-040-01 Rel. 1.3, Doc. Rev. 01.07
4-13
CNX System Administrator Guide
Managing conferences on the Aastra CNX
Modifying a permanent conference
Use the following procedure to modify an existing permanent conference on the
Aastra CNX.
Step
Action
1
While logged into the Aastra CNX, click the Permanent Conferences tab.
Result: The following window displays. Existing conferences display in the Permanent
Conference List.
2
Click on a permanent conference in the Permanent Conference List.
3
Click
.
Result: The Modify Conference window displays.
Note: The Modify Conference window also allows you to change the Participant PIN, Moderator
PIN, and/or Owner of the conference if required. See the table on page 4-10 for a description of
each field in the Modify Permanent Conference window.
4-14
ATP-CNX-040-01 Rel. 1.3, Doc. Rev. 01.07
Managing the Aastra CNX
Managing conferences on the Aastra CNX
Step
Action
4
Modify the conference as required and click
.
Result: The Modify Complete window displays.
Click OK.
The conference displays in the Permanent Conference List with the new changes.
Deleting a permanent conference
Use the following procedure to delete an existing permanent conference on the
Aastra CNX.
Step
Action
1
While logged into the Aastra CNX, click the Permanent Conferences tab.
2
Click on a permanent conference in the Permanent Conference List.
3
Click
.
Result: A prompt similar to the following displays for you to verify the delete action.
4
Click YES to delete the permanent conference.
or
Click NO to cancel the delete action.
ATP-CNX-040-01 Rel. 1.3, Doc. Rev. 01.07
4-15
CNX System Administrator Guide
Managing conferences on the Aastra CNX
Scheduled Conference List
A Scheduled Conference List consists of temporary conferences that occur for a
scheduled period with a start time and end time. Once the conference is complete,
the scheduled conference no longer displays in the Scheduled Conference List and
the port(s) that the conference was using are made available.
Note: Moderated scheduled conferences do not end when a moderator
leaves the conference. Participants of a moderated scheduled conference
can continue the conference without the moderator present.
Booking a new scheduled conference
Use the following procedure to book a new scheduled conference on the Aastra
CNX.
Note: Dial-in services must be configured and enabled to create
scheduled conferences. Before creating a conference, you must configure
ISDN PRI or Voice over IP. For configuring dial-in services, see
Chapter 3, “Configuring the Aastra CNX.”
Step
Action
1
Open your Web browser and enter the URL for your Aastra CNX.
Log in with a valid user ID and password.
2
Click the Scheduled Conferences tab in the Aastra CNX main window.
4-16
ATP-CNX-040-01 Rel. 1.3, Doc. Rev. 01.07
Managing the Aastra CNX
Managing conferences on the Aastra CNX
Step
Action
3
In the Scheduled Conference List, click
.
Result: The Create New Scheduled Conference window displays.
ATP-CNX-040-01 Rel. 1.3, Doc. Rev. 01.07
4-17
CNX System Administrator Guide
Managing conferences on the Aastra CNX
Step
Action
Conference tab
4
Click on the Conference tab and enter the information as required; then click on the Recurrence
tab to set the recurrence pattern.
Attribute
Default
Valid Values/Description
Conference Name
None
Up to 256 alphanumeric characters
Number of Ports
2
For 30-port Aastra CNX:
2 to 30
For 60-port Aastra CNX:
2 to 60
For 120-port Aastra CNX:
2 to 120
Language
Announcement
English
English
British-English
French-Canadian
Spanish
Description: Specifies the language to be used for
conference announcements.
Entry Notification
Tone
Tone
Name
None
Description: Specifies whether the Aastra CNX
uses tones, names, or nothing when a conference
participant enters and exits from a conference.
Notes:
1. If you select Names for conference entry
notification, the exit notification will be Tone.
2.When booking a conference with more than 10
participants, it is recommended that Entry
Notification be set to Tone or None. Using Name
notification with larger conferences may lead to
delays in joining the conference and excessive
interruptions when multiple participants join the
conference.
4-18
ATP-CNX-040-01 Rel. 1.3, Doc. Rev. 01.07
Managing the Aastra CNX
Managing conferences on the Aastra CNX
Step
Action
4 (cont’d)
Schedule New Conference window continued.
Attribute
Default
Valid Values/Description
Moderated
Not checked
(disabled)
Not checked (disabled)
Checked (enabled)
Description: Specifies whether or not the
conference has been assigned a moderator. A
moderator is one who acts as a chairperson and
has the authority to control the conference. If you
enable this field, you may enter a moderator email
address in the “Moderator Email” field.
Dominant Speaker
(Applicable only if
Moderated field is
enabled.)
Not checked
(disabled)
Not checked (disabled)
Checked (enabled)
Description: Allows a moderator to be the
dominant speaker in a conference. If enabled, all
other participants of the conference are attenuated
by 15dB so that the moderator is the dominant
voice. This feature is recommended for large
conferences where the moderator acts as a
chair-person.
Note: You must have the Noise Reduction field
enabled at Configure CNX/Conference/Voice if
enabling Dominant Speaker.
Moderator E-Mails
None
Alphanumeric characters in the form
[email protected] where name is the email name
of the moderator and the domain is the domain
name of the email server. Multiple email addresses
must be separated by a comma, space, or
semicolon.
User E-Mails
None
Alphanumeric characters in the form
[email protected] where name is the email name
of the user and the domain is the domain name of
the email server. Multiple email addresses must be
separated by a comma, space, or semicolon.
Note: User emails do not include the moderator
PIN for a conference if it is moderated.
ATP-CNX-040-01 Rel. 1.3, Doc. Rev. 01.07
4-19
CNX System Administrator Guide
Managing conferences on the Aastra CNX
Step
Action
4 (cont’d)
Schedule New Conference window continued.
Attribute
Default
Valid Values/Description
Start
<Current PC
Date and
Time>
Date: Specifies the month, day, and year that the
scheduled conference is to begin.
Time: Specifies the time of day that the scheduled
conference is to begin. (Values are 12:00 A.M.
through 11:30 P.M.)
Timezone
GMT-05:00
Description: Specifies the timezone to use when
Eastern Time scheduling a conference.
(USA and
Canada)
Duration
00:30 hrs
Description: Duration of the conference. Valid
values are in 30 minute increments from 00:30 hrs.
to 23:30 hrs.
PIN Participant
<participant
passcode>
Description: Specifies the current participant
passcode for the conference.
(Up to 8 numeric characters)
(Applicable only when
modifying an existing
scheduled conference.)
4-20
Note: If you modify this passcode, you must notify
the participants of the change in order for them to
access the conference. This field is for system
administrator use only. User’s must contact the
system administrator to request a passcode
change.
ATP-CNX-040-01 Rel. 1.3, Doc. Rev. 01.07
Managing the Aastra CNX
Managing conferences on the Aastra CNX
Step
Action
4 (cont’d)
Schedule New Conference window continued.
Attribute
Default
Valid Values/Description
Moderator
<moderator
passcode>
Description: Specifies the current moderator
passcode for the conference.
(Up to 8 numeric characters)
(Applicable only when
modifying an existing
scheduled conference
that has a moderator
assigned.)
Owner
cnxadmin
(Applicable only when
modifying an existing
scheduled conference.)
Note: If you modify this passcode, you must notify
the moderators of the change in order for them to
access the conference. This field is for system
administrator use only. User’s must contact the
system administrator to request a passcode
change.
cnxadmin
Also lists all the users configured on the Aastra
CNX.
Description: This field allows you to change the
ownership of the scheduled conference if required.
Recurrence tab
5
Schedule New Conference window continued.
Attribute
Default
Valid Values/Description
Conference recurs
Not checked
(disabled)
Not checked (disabled)
Pattern
Daily
(Pattern attributes are
enabled only if
“Conference recurs” is
checked)
Checked (enabled)
Description: Specifies whether or not the
scheduled conference is to recur.
Description: Specifies the recurrence pattern for
the conference.
Daily:
Recurs every day
Weekly: Sunday to Saturday.
Monthly: Recurrence period (first, second,
third, fourth, or last) and the day of
recurrence from Sunday to Saturday.
ATP-CNX-040-01 Rel. 1.3, Doc. Rev. 01.07
4-21
CNX System Administrator Guide
Managing conferences on the Aastra CNX
Step
Action
5 (cont’d)
Schedule New Conference window continued.
Attribute
Default
Valid Values/Description
Duration
End by
<current
date>
Description: Specifies the month, day, and year
that the scheduled conference is to end and the
number of recurrences of the conference.
(Duration attributes are
enabled only if
“Conference recurs” is
checked.
End by: <month><day><year>
Number of recurrences: 1 to 500
Note: Conferences cannot be scheduled more than
2 years in advance.
6
Click
.
Result: A verification window displays asking you to confirm that the information you entered for
the scheduled conference is correct. The following is an example of the window that displays.
4-22
ATP-CNX-040-01 Rel. 1.3, Doc. Rev. 01.07
Managing the Aastra CNX
Managing conferences on the Aastra CNX
Step
Action
7
Click YES if the information you entered is correct.
or
Click NO to close the verification window and reenter correct information in the “Schedule New
Conference” window.
Result: If you click YES, a confirmation window displays with the applicable passcode(s) used
for the conference. If a Moderator was not selected for the conference, a Participant passcode
displays in the confirmation window.
If a moderator was selected (enabled), the confirmation window displays the Participant PIN and
the Moderator PIN.
8
Click OK to save the conference to the Aastra CNX.
Result: The conference and all of its attributes display in the Scheduled Conference List.
ATP-CNX-040-01 Rel. 1.3, Doc. Rev. 01.07
4-23
Modifying a scheduled conference
Use the following procedure to modify an existing scheduled conference on the
Aastra CNX.
Step
Action
1
While logged into the Aastra CNX, click the Scheduled Conferences tab.
The following window displays. Existing conferences display in the Scheduled Conference List.
2
Click on a scheduled conference in the Scheduled Conference List.
Managing the Aastra CNX
Managing conferences on the Aastra CNX
Step
Action
3
Click
.
Result: The Modify Conference window displays with the information about the conference you
selected.
ATP-CNX-040-01 Rel. 1.3, Doc. Rev. 01.07
4-25
Step
Action
4
Modify the conference and recurrence as required and click
.
Note: The Modify Conference window also allows you to change the Participant PIN, Moderator
PIN and/or Owner of the conference if required. See the table on page 4-18 for a description of
each field in the Modify Conference window.
Result: A verification window displays asking you to confirm that the information you entered for
the scheduled conference is correct. The following is an example of the window that displays.
5
Click YES if the information you entered is correct.
or
Click NO to close the verification window and reenter correct information in the “Schedule New
Conference” window.
6
Click OK to save the conference to the Aastra CNX.
Result: The conference displays with the changes in the Scheduled Conference List.
Managing the Aastra CNX
Managing conferences on the Aastra CNX
Deleting a scheduled conference
Use the following procedure to delete an existing scheduled conference on the
Aastra CNX.
Step
Action
1
While logged into the Aastra CNX, click the Scheduled Conferences tab.
Result: The following window displays. Existing conferences display in the Scheduled
Conference List.
2
Click on a scheduled conference in the Scheduled Conference List.
3
Click
.
Result: A prompt displays for you to verify the delete action.
4
Click YES to delete the scheduled conference from the Aastra CNX and from the CompactFlash
card.
or
Click NO to cancel the delete action.
ATP-CNX-040-01 Rel. 1.3, Doc. Rev. 01.07
4-27
Chapter 5
Maintaining the Aastra CNX
Overview
Description
You can maintain the Aastra CNX by accessing the Maintain CNX tab in the
Graphical User Interface (GUI).The following illustration shows the
Maintain CNX tab in the Aastra CNX GUI.
Aastra CNX status
License Key Info
System/Log File Tools
ATP-CNX-040-01 Rel. 1.3, Doc. Rev. 01.07
5-1
CNX System Administrator Guide
Overview
The following information can be found on the Maintain CNX tab:
Maintain CNX tab
Allows you to:
Status
Display current software version, language
pack, number of active calls, number of active
conferences, number of scheduled
conferences
s
- Update Aastra CNX software
- Load or remove language packs and
customized conference greetings
Note: The CNX Operational Status button is
for Technical Support use only and is not
described in this guide.
License Key Info
Display key number, serial number, version,
number of ports
- Enter a new license key for updated
software
Manage System
Maintain system functionality
- Reboot the Aastra CNX when required
- Save an Aastra CNX configuration file to
your PC
- Restore a configuration file from your PC to
the Aastra CNX
- Set a date, clock time, and time zone on the
Aastra CNX
5-2
ATP-CNX-040-01 Rel. 1.3, Doc. Rev. 01.07
Maintaining the Aastra CNX
Overview
Maintain CNX tab
Allows you to:
Log Files
Maintain log files, core files, and
CompactFlash disk space, and perform
troubleshooting functions
- Download Call Detail Records (CDRs)
- Cleanup unwanted files on the
CompactFlash to maximize disk space
capacity
Note: The Download Core Files and Debug
CNX buttons are for Technical Support use
only and are not described in this guide. Also,
the “Support Logs” tab in the Download
Logs screen is for Technical Support use only.
ATP-CNX-040-01 Rel. 1.3, Doc. Rev. 01.07
5-3
CNX System Administrator Guide
Update CNX software
Update CNX software
Description
The Update CNX Software tool in the Maintain CNX window allows you to
install software updates to the Aastra CNX.
The Aastra CNX software is packaged in a single file called “cnx.dra”.You can
place the cnx.dra file on your PC and use the Update CNX Software button to
install the update.
The cnx.dra file automatically updates the onboard CNX flash and the
CompactFlash card.
Procedure
Use the following procedure to update your Aastra CNX software.
Notes:
1. After capacity upgrades and major software releases on the
Aastra CNX, you must enter a new license key to activate the software.
2. The CNX performs an automatic reboot as part of the upgrade process.
5-4
ATP-CNX-040-01 Rel. 1.3, Doc. Rev. 01.07
Maintaining the Aastra CNX
Update CNX software
Step
Action
1
Open your Web browser and enter the URL for your Aastra CNX.
Log in with a valid user ID and password.
2
Click the Maintain CNX tab in the Aastra CNX main window.
Result: The Maintain Aastra CNX window displays.
Update CNX
Software
Save Configuration
CNX Operational
Status
3
In the “Manage System” section, click
configuration on the Aastra CNX.
4
In the “Status” section, click
to save the current
and verify that there is sufficient
disk space to upgrade the Aastra CNX.
Note: The Aastra CNX requires approximately 35 MB or more of free disk space for an upgrade.
If there is insufficient disk space, click “CLEANUP CNX” to delete unwanted files on the
CompactFlash.
ATP-CNX-040-01 Rel. 1.3, Doc. Rev. 01.07
5-5
CNX System Administrator Guide
Update CNX software
Step
Action
5
Click
.
Result: The following prompt displays.
6
Enter the location of the cnx.dra file in the text box.
or
Click
.
The Select File window displays.
Navigate to the location of the cnx.dra file and click OPEN to automatically place it in the text box
of the Browse window.
5-6
ATP-CNX-040-01 Rel. 1.3, Doc. Rev. 01.07
Maintaining the Aastra CNX
Update CNX software
Step
Action
7
Click
.
Result: The cnx.dra file proceeds to download to your Aastra CNX onboard flash and the CNX
CompactFlash card).
When the upgrade is complete, the Aastra CNX reboots, the unit is upgraded, and is ready for
use.
When the upgrade is complete, the following message displays:
“Upgrade of the Aastra CNX is complete”.
8
Close and then open your Web browser and enter the URL for your Aastra CNX.
Log in with a valid user ID and password.
9
Click on the Maintain CNX tab.
Result: The Maintain Aastra CNX window displays.
ATP-CNX-040-01 Rel. 1.3, Doc. Rev. 01.07
5-7
CNX System Administrator Guide
Update CNX software
Step
Action
10
Click
11
•
There is sufficient disk space for the operation of the Aastra CNX.
Note: The Aastra CNX requires approximately 35 MB or more of free disk space to operate
properly.
•
There are no PRI alarms.
•
The Aastra CNX is accepting the following types of calls:
—
PRI calls (including alarms on active PRI lines)
—
SIP calls
—
H.323 calls
Click the Permanent Conferences or Scheduled Conferences tab to perform the following:
•
•
12
and verify the following:
Verify that previous permanent and scheduled conferences are still present after the
upgrade.
Schedule new conferences with AND without a moderator to verify:
- that conferences can be created successfully.
- that moderators and users can join the conferences.
After port upgrades and major software releases, enter a new license key using the procedure in
the Aastra CNX Conference Network Switch System Administrator Guide, Chapter 5, the
section, “Entering/Editing License Key.”
Note: If any of the steps in the previous Update Procedure results in an
error, contact your reseller for help first. Alternatively, you can contact
Aastra Telecom Technical Support.
5-8
ATP-CNX-040-01 Rel. 1.3, Doc. Rev. 01.07
Maintaining the Aastra CNX
Announcement options
Announcement options
Description
The Announcement Options tool in the Maintain CNX window allows you to
load or remove language packs and customized conference greetings to/from the
Aastra CNX.
Language pack files are identified as “<language>.tar.gz”. Customized greeting
files are identified as “<filename>.pcm”. Using the Announcement Options
button, you can remove these files from your Aastra CNX, or you can load new
files to the Aastra CNX from your PC.
This section describes the following announcement options:
•
Loading/Removing language packs
•
Loading/Removing customized greetings
Loading/removing language packs
You can load or remove language packs to/from the Aastra CNX to provide
various language options to users as required. A language pack includes
announcements and GUI prompts in a specific language. The Aastra CNX has the
following language packs available:
•
English (default language)
•
British-English (available for announcements only)
•
French-Canadian
•
Spanish
ATP-CNX-040-01 Rel. 1.3, Doc. Rev. 01.07
5-9
CNX System Administrator Guide
Announcement options
Procedure for loading language packs
Use the following procedure to load language packs to the Aastra CNX.
Step
Action
1
Open your Web browser and enter the URL for your Aastra CNX.
Log in with a valid user ID and password.
2
Click the Maintain CNX tab in the Aastra CNX main window.
Result: The Maintain Aastra CNX window displays.
Announcement
Options
5-10
ATP-CNX-040-01 Rel. 1.3, Doc. Rev. 01.07
Maintaining the Aastra CNX
Announcement options
Step
Action
3
Click
.
Result: The following window displays.
4
Select the “Load Language Pack” option and click OK.
Result: The following prompt displays.
ATP-CNX-040-01 Rel. 1.3, Doc. Rev. 01.07
5-11
CNX System Administrator Guide
Announcement options
Step
Action
5
Enter the location of the <language>.tar.gz file in the text box.
or
Click
.
The Select File window displays.
Navigate to the location of the <language>.tar.gz file and click OPEN to automatically place it in
the text box of the Browse window.
6
Click
.
Result: The <language>.tar.gz file proceeds to download to your Aastra CNX CompactFlash
card.
When the download is complete, close the A reboot is also required prior to loading another
language pack.
7
5-12
When the download is complete, the Aastra CNX GUI session closes.
Log back into the Aastra CNX GUI and verify that the language pack has been applied by
selecting the language pack from Configure CNX/CNX Configuration/Global/Primary Lanaguge.
ATP-CNX-040-01 Rel. 1.3, Doc. Rev. 01.07
Maintaining the Aastra CNX
Announcement options
Procedure for removing language packs
Use the following procedure to remove language packs from the Aastra CNX.
Step
Action
1
Open your Web browser and enter the URL for your Aastra CNX.
Log in with a valid user ID and password.
2
Click the Maintain CNX tab in the Aastra CNX main window.
Result: The Maintain Aastra CNX window displays.
Announcement
Options
ATP-CNX-040-01 Rel. 1.3, Doc. Rev. 01.07
5-13
CNX System Administrator Guide
Announcement options
Step
Action
3
Click
.
Result: The following window displays.
4
Select the “Remove Language Pack” option and click OK.
Result: The following prompt displays.
5-14
ATP-CNX-040-01 Rel. 1.3, Doc. Rev. 01.07
Maintaining the Aastra CNX
Announcement options
Step
Action
5
Enter the location of the <language>.tar.gz file in the text box.
or
Click
.
The Select File window displays.
Navigate to the location of the <language>.tar.gz file and click OPEN to automatically place it in
the text box of the Browse window.
6
Click
.
Result: The <language>.tar.gz file proceeds to delete from your Aastra CNX CompactFlash
card.
When removal is complete, you need to reboot the Aastra CNX for the change to take affect.
Note: You can remove other language packs if required before rebooting the Aastra CNX.
7
When the removal is complete, the Aastra CNX GUI session closes.
Log back into the Aastra CNX GUI and verify that the language pack has been removed by
checking the configuration at Configure CNX/CNX Configuration/Global/Primary Lanaguge.
ATP-CNX-040-01 Rel. 1.3, Doc. Rev. 01.07
5-15
CNX System Administrator Guide
Announcement options
Loading/removing customized greetings
You can load or remove customized greeting files to/from the Aastra CNX to
provide customized telephony access when joining conferences.
Notes: Create a customized greeting using an applicable recording
application. Save the recording to a file on the PC.
Procedure for loading customized greetings
Use the following procedure to load a customized greeting to the Aastra CNX.
Step
Action
1
Open your Web browser and enter the URL for your Aastra CNX.
Log in with a valid user ID and password.
2
Click the Maintain CNX tab in the Aastra CNX main window.
Result: The Maintain Aastra CNX window displays.
Announcement
Options
5-16
ATP-CNX-040-01 Rel. 1.3, Doc. Rev. 01.07
Maintaining the Aastra CNX
Announcement options
Step
Action
3
Click
.
Result: The following window displays.
4
Select the “Load Customized Greeting” option and click OK.
Result: The following window displays.
5
Select the language of the customized greeting you want to load.
ATP-CNX-040-01 Rel. 1.3, Doc. Rev. 01.07
5-17
CNX System Administrator Guide
Announcement options
Step
Action
6
Enter the location of the <filename>.pcm file in the text box.
or
Click
.
The Select File window displays.
Navigate to the location of the <filename>.pcm file and click OPEN to automatically place it in
the text box of the Browse window.
7
Click
.
Result: The <filename>.pcm file proceeds to download to your Aastra CNX CompactFlash card.
When the download is complete, the Aastra CNX GUI session closes.
5-18
ATP-CNX-040-01 Rel. 1.3, Doc. Rev. 01.07
Maintaining the Aastra CNX
Announcement options
Procedure for removing customized greetings
Use the following procedure to remove a customized greeting from the Aastra
CNX..
Step
Action
1
Open your Web browser and enter the URL for your Aastra CNX.
Log in with a valid user ID and password.
2
Click the Maintain CNX tab in the Aastra CNX main window.
Result: The Maintain Aastra CNX window displays.
Announcement
Options
ATP-CNX-040-01 Rel. 1.3, Doc. Rev. 01.07
5-19
CNX System Administrator Guide
Announcement options
Step
Action
3
Click
.
Result: The following window displays.
4
Select the “Remove Customized Greeting” option and click OK.
Result: The following window displays.
5-20
ATP-CNX-040-01 Rel. 1.3, Doc. Rev. 01.07
Maintaining the Aastra CNX
Announcement options
Step
Action
5
Select the language of the customized greeting you want to remove and click
.
Result: The following prompt displays:
6
Click YES to remove the customized greeting.
Result: The <filename>.pcm file proceeds to delete from your Aastra CNX CompactFlash card.
When the download is complete, the Aastra CNX GUI session closes.
ATP-CNX-040-01 Rel. 1.3, Doc. Rev. 01.07
5-21
CNX System Administrator Guide
Operational status
Operational status
Description
The Operational Status tool in the Maintain CNX window allows you to display
operational information about the Aastra CNX, such as, the length of time the
Aastra CNX has been up and running. This information can be useful when
memory and on-board flash (OBF) version needs to be verified, and when T1/E1
alarms occur on the Aastra CNX.
5-22
ATP-CNX-040-01 Rel. 1.3, Doc. Rev. 01.07
Maintaining the Aastra CNX
Operational status
Displaying operational status
Use the following procedure to display the current operational status of the Aastra
CNX.
Step
Action
1
Open your Web browser and enter the URL for your Aastra CNX.
Log in with a valid user ID and password.
2
Click the Maintain CNX tab in the Aastra CNX main window.
Result: The Maintain Aastra CNX window displays.
CNX Operational
Status
ATP-CNX-040-01 Rel. 1.3, Doc. Rev. 01.07
5-23
CNX System Administrator Guide
Operational status
Step
Action
3
Click
.
Result: The CNX Operational Status window displays.
4
5-24
Click
to close the CNX Operational Status window.
ATP-CNX-040-01 Rel. 1.3, Doc. Rev. 01.07
Maintaining the Aastra CNX
Entering/editing License Key
Entering/editing License Key
Description
The Aastra CNX has a license key assigned that specifically identifies the unit.
When a you perform an update or upgrade to the Aastra CNX, the upgrade script
requires that you input this license key for validation purposes.
The Maintain CNX tab displays the following license key information about the
Aastra CNX:
•
License key number
•
Serial number
•
License key version
•
Total ports
The Maintain CNX tab also provides a License Key tool for editing the license
key when required.
You must enter a new license key for:
•
Port upgrades (upgrading 30-port unit to 60-port unit or a 120-port unit)
•
Major software releases (You must enter a license key to activate the software
after the update is complete.)
ATP-CNX-040-01 Rel. 1.3, Doc. Rev. 01.07
5-25
CNX System Administrator Guide
Entering/editing License Key
Procedure
Use the following procedure to edit license key information on the Aastra CNX.
Step
Action
1
Open your Web browser and enter the URL for your Aastra CNX.
Log in with a valid user ID and password.
2
Click the Maintain CNX tab in the Aastra CNX main window.
Result: The Maintain Aastra CNX window displays.
License Key
5-26
ATP-CNX-040-01 Rel. 1.3, Doc. Rev. 01.07
Maintaining the Aastra CNX
Entering/editing License Key
Step
Action
3
Click
.
Result: The License Key window displays.
Note: For port upgrades and major software releases, you must enter a new license key to
activate the Aastra CNX software.
4
Enter the new license key you received with the port upgrade or major software release
and click
.
Result: The Aastra CNX software activates and is ready for use.
ATP-CNX-040-01 Rel. 1.3, Doc. Rev. 01.07
5-27
CNX System Administrator Guide
Rebooting the Aastra CNX
Rebooting the Aastra CNX
Description
This section describes how you can reboot the Aastra CNX unit for maintenance
purposes if required.
Caution: Rebooting the Aastra CNX causes interruption in the service
that the unit is providing. Aastra Telecom recommends that you only
reboot the Aastra CNX when required.
Procedure
Use the following procedure to reboot your Aastra CNX unit.
Step
Action
1
Open your Web browser and enter the URL for your Aastra CNX.
Log in with a valid user ID and password.
2
Click the Maintain CNX tab in the Aastra CNX main window.
Result: The Maintain Aastra CNX window displays.
Reboot CNX
5-28
ATP-CNX-040-01 Rel. 1.3, Doc. Rev. 01.07
Maintaining the Aastra CNX
Rebooting the Aastra CNX
Step
Action
3
Click
.
Result: The following prompt displays.
4
Click YES to reboot the Aastra CNX.
OR
Click NO to cancel the reboot operation.
5
Close your browser and wait a few minutes before restarting your browser to access the Aastra
CNX GUI.
ATP-CNX-040-01 Rel. 1.3, Doc. Rev. 01.07
5-29
CNX System Administrator Guide
Saving/Restoring Configuration
Saving/Restoring Configuration
Description
The Aastra CNX GUI provides both a Save Configuration and Restore
Configuration tool. These tools save and/or restore:
•
Software configuration
•
User information
•
Permanent and scheduled conferences
When using the Save Configuration tool, the Aastra CNX creates a compressed
file that contains all of the Aastra CNX configuration, user, and conference
information, and stores that file to the directory path you specify. You can use the
Restore Configuration tool to unpack this compressed file back to your Aastra
CNX when required.
Warning: Restoring a previous Aastra CNX configuration file overwrites
your current configuration, user, and conference information.
5-30
ATP-CNX-040-01 Rel. 1.3, Doc. Rev. 01.07
Maintaining the Aastra CNX
Saving/Restoring Configuration
Procedure
Saving a configuration
Use the following procedure to save the Aastra CNX configuration, user, and
conference information to a compressed file.
Step
Action
1
Open your Web browser and enter the URL for your Aastra CNX.
Log in with a valid user ID and password.
2
Click the Maintain CNX tab in the Aastra CNX main window.
Result: The Maintain Aastra CNX window displays
Save Configuration
ATP-CNX-040-01 Rel. 1.3, Doc. Rev. 01.07
5-31
CNX System Administrator Guide
Saving/Restoring Configuration
Step
Action
3
Click
.
Result: The Save CNX Configuration window displays.
Note: The default file name is cnx.conf. You can rename this file if required.
5-32
ATP-CNX-040-01 Rel. 1.3, Doc. Rev. 01.07
Maintaining the Aastra CNX
Saving/Restoring Configuration
Step
Action
4
Navigate to the location on your local PC where you want to save the CNX configuration and
click SAVE.
Result: The following information window displays.
When the download is complete, the following prompt displays.
5
Click
.
ATP-CNX-040-01 Rel. 1.3, Doc. Rev. 01.07
5-33
CNX System Administrator Guide
Saving/Restoring Configuration
Restoring a configuration
Use the following procedure to restore the Aastra CNX configuration, user, and
conference information.
Warning: Restoring a previous Aastra CNX configuration file will
overwrite your current configuration, user, and conference information.
Step
Action
1
Open your Web browser and enter the URL for your Aastra CNX.
Log in with a valid user ID and password.
2
Click the Maintain CNX tab in the Aastra CNX main window.
Result: The Maintain Aastra CNX window displays.
Restore
Configuration
5-34
ATP-CNX-040-01 Rel. 1.3, Doc. Rev. 01.07
Maintaining the Aastra CNX
Saving/Restoring Configuration
Step
Action
3
Click
.
Result: The Restore CNX Configuration Data window displays.
ATP-CNX-040-01 Rel. 1.3, Doc. Rev. 01.07
5-35
CNX System Administrator Guide
Saving/Restoring Configuration
Step
Action
4
Navigate to the location on your local PC where a previous version of the Aastra CNX
configuration file is stored and click OPEN.
Result: The following information window displays.
When the download is complete, the following prompt displays.
5
Click YES to reboot your Aastra CNX and restore the configuration;
OR
Click NO to cancel the restore operation.
5-36
ATP-CNX-040-01 Rel. 1.3, Doc. Rev. 01.07
Maintaining the Aastra CNX
Setting date and time
Setting date and time
Description
During initial configuration of the Aastra CNX (see Chapter 3, “Configuring the
Aastra CNX”) the date and time is set in the setup script. Using the
Set CNX Date and Time tool, this date and time configuration displays as the
default in the Aastra CNX GUI. You can change the date and time as required by
clicking the Set CNX Date and Time button.
Procedure
Setting the date and time
Use the following procedure to set the date and time on the Aastra CNX.
Step
Action
1
Open your Web browser and enter the URL for your Aastra CNX.
Log in with a valid user ID and password.
2
Click the Maintain CNX tab in the Aastra CNX main window.
Result: The Maintain Aastra CNX window displays
Set CNX Date
and Time
ATP-CNX-040-01 Rel. 1.3, Doc. Rev. 01.07
5-37
CNX System Administrator Guide
Setting date and time
Step
Action
3
Click
.
Result: The following window displays.
4
Set the date by selecting the appropriate month, day, and year from the lists in this window.
5
Set the time by selecting the appropriate timezone and clock time from the lists in this window.
6
Click
.
Result: The following is an example of the prompt that displays:
5-38
ATP-CNX-040-01 Rel. 1.3, Doc. Rev. 01.07
Maintaining the Aastra CNX
Setting date and time
Step
Action
7
Click OK to accept the date and time changes.
Result: The following message displays:
8
Click OK to return to the Maintain CNX window.
ATP-CNX-040-01 Rel. 1.3, Doc. Rev. 01.07
5-39
CNX System Administrator Guide
Downloading logs
Downloading logs
Description
This section describes the call detail record (CDR) logs generated by the Aastra
CNX. It also provides a procedure for downloading CDR logs to your local PC.
Note: The Download Logs window displays a “Support Logs” tab and a
“CDR Logs” tab. The Support Logs maintenance is for Technical
Support use only. Therefore, this section of the guide describes CDR logs,
and provides a procedure for maintaining CDR logs only.
5-40
ATP-CNX-040-01 Rel. 1.3, Doc. Rev. 01.07
Maintaining the Aastra CNX
Downloading logs
What are CDR logs?
Call detail record (CDR) logs are files that the Aastra CNX automatically
generates during call activity (ISDN, H.323, and SIP), and during conference
activity of an active 24 hour period and when the Aastra CNX starts up.
The Aastra CNX maintains an open record until the call or conference activity is
over. When the call or conference activity has ended, the Aastra CNX appends a
footer to the bottom of the file, closes the file, and opens a new file.
You can use CDR log files for billing purposes and for debugging and
troubleshooting the Aastra CNX as required.
There are two types of CDR logs:
•
Call and conference activity CDR logs (cdrlog)
•
Conference scheduling CDR logs (confcdrlog)
The CDR file names are in the following formats:
•
cdrlog.<year>-<month>-<day>.<hour>.<minute>.<second>.csv
•
confcdrlog.<year>-<month>-<day>.<hour>.<minute>.<second>.csv
The file names indicate the specific date/time period when the Aastra CNX
generates the file. The time reference reflects the local time of the Aastra CNX
using the 24-hour clock. The following are examples of CDR log names.
Note: For a detailed description about the contents of the CDR logs, see
Appendix B, “Additional information about CDR logs.”
Example 1
The following example indicates an active call and conference activity, CDR log.
The log was generated by the Aastra CNX on March 1, 2004 at 2:25 P.M. and 52
seconds.
cdrlog.2004-03-01.14.25.52.csv
ATP-CNX-040-01 Rel. 1.3, Doc. Rev. 01.07
5-41
CNX System Administrator Guide
Downloading logs
Example 2
The following example indicates an active conference scheduling CDR log. The
log was generated by the Aastra CNX on March 20, 2004 at 1:20 P.M. and 34
seconds.
confcdrlog.2004-03-20.13.20.34.csv.gz
Note: The “csv” appendix indicates a comma separated value file. If the
CDR log file name has a “.gz” indication, the log file is considered to be a
compressed file.
5-42
ATP-CNX-040-01 Rel. 1.3, Doc. Rev. 01.07
Maintaining the Aastra CNX
Downloading logs
Downloading/deleting CDR logs
You can download cdrlog and/or confcdrlog file(s) to your local PC for viewing
using the Download CDR Logs tool on the Maintain CNX tab in the Aastra
CNX GUI. You can also delete the log files as required.
The following procedure provides information about how to download or delete
CDR logs from the Aastra CNX.
Procedures
Download CDR logs
Use the following procedure to download CDR log files to your local PC.
Step
Action
1
Open your Web browser and enter the URL for your Aastra CNX.
Log in with a valid user ID and password.
2
Click the Maintain CNX tab in the Aastra CNX main window.
Result: The Maintain Aastra CNX window displays.
Download Logs
ATP-CNX-040-01 Rel. 1.3, Doc. Rev. 01.07
5-43
CNX System Administrator Guide
Downloading logs
Step
Action
3
Click
.
Result: The Download Logs window displays.
4
Click the “CDR Logs” tab.
5
Select the “from” and “to” dates of the log(s) you want to download.
6
Select the log type you want to download and then click FILTER.
.
Note: Valid log types are cdrlog, confcdrlog, or cdrlog/confcdrlog (both).
7
Select a file(s) from the log list that you want to download to your local PC.
Note: To select multiple files, hold down the Ctrl key and then click on all the files you want to
download.
5-44
ATP-CNX-040-01 Rel. 1.3, Doc. Rev. 01.07
Maintaining the Aastra CNX
Downloading logs
Step
Action
8
Click
.
Result: The Save As window displays.
9
Navigate to the location on your local PC where you want to save the CDR log file(s) and click
SAVE.
Result: The CDR log file(s) save to your local PC in the specified location. When the download
is complete, the following message displays:
ATP-CNX-040-01 Rel. 1.3, Doc. Rev. 01.07
5-45
CNX System Administrator Guide
Downloading logs
Delete CDR logs
Use the following procedure to delete a CDR log file(s) from the Aastra CNX
CompactFlash card.
Step
Action
1
Open your Web browser and enter the URL for your Aastra CNX.
Log in with a valid user ID and password.
2
Click the Maintain CNX tab in the Aastra CNX main window.
Result: The Maintain Aastra CNX window displays.
Download Logs
5-46
ATP-CNX-040-01 Rel. 1.3, Doc. Rev. 01.07
Maintaining the Aastra CNX
Downloading logs
Step
Action
3
Click
.
Result: The Download Logs window displays.
4
Click the “CDR Logs” tab.
5
Select the “from” and “to” dates of the log(s) you want to delete.
6
Select the log type you want to delete and then click FILTER.
.
Note: Valid log types are cdrlog, confcdrlog, or cdrlog/confcdrlog (both).
Default is cdrlog/confcdrlog (both).
7
Select a file(s) from the log list that you want to delete from the Aastra CNX CompactFlash card.
Notes:
To select a specific file(s) to delete:
- Hold down the <Ctrl> key and then click on each file you want to delete.
To select a range of files to delete:
- Click on the first file, hold down the <Shift> key, then click on the last file. All the files between
and including the first file and the last file are selected for deletion.
ATP-CNX-040-01 Rel. 1.3, Doc. Rev. 01.07
5-47
CNX System Administrator Guide
Downloading logs
Step
Action
8
Click
.
Result: The following is an example of the message that displays.
Note: If any of the logs you are trying to delete are in use by the Aastra CNX, the following
message displays: “Files are currently in use and will not be deleted”.
9
Click YES to delete the selected CDR log(s).
or
Click NO to cancel the delete action.
Note: The Download Core Files and Debug CNX buttons are not
described in this guide. They are forTechnical Support’s troubleshooting
purposes only.
5-48
ATP-CNX-040-01 Rel. 1.3, Doc. Rev. 01.07
Maintaining the Aastra CNX
Cleaning up the Aastra CNX
Cleaning up the Aastra CNX
Description
The Aastra CNX generates logs and events that are stored on the Compactflash.
Significant amounts of extraneous files can fill up required space preventing any
more files from being stored. A full Compactflash can also prevent you from
upgrading the Aastra CNX.
You can safely delete unwanted files using the Cleanup CNX tool in the
Maintain CNX window. Some of the files you can delete include:
•
/tmp/*
•
/var/log/*.gz
•
/var/log/asterisk/debug
•
/usr/local/cnx/core/*
•
/usr/local/apache2/logs/*.gz,
•
/usr/local/cnx/cdrlogs/*.gz
•
/var/omninames/*.bak, /var/spool/mqueue/*
•
/var/spool/clientmqueue/*
ATP-CNX-040-01 Rel. 1.3, Doc. Rev. 01.07
5-49
CNX System Administrator Guide
Cleaning up the Aastra CNX
Procedure
Use the following procedure to clean up the files on the Aastra CNX.
Step
Action
1
Open your Web browser and enter the URL for your Aastra CNX.
Log in with a valid user ID and password.
2
Click the Maintain CNX tab in the Aastra CNX main window.
Result: The Maintain Aastra CNX window displays
Cleanup CNX
5-50
ATP-CNX-040-01 Rel. 1.3, Doc. Rev. 01.07
Maintaining the Aastra CNX
Cleaning up the Aastra CNX
Step
Action
3
Click
.
Result: The following window displays.
Note: The files in this window are automatically selected and can be safely removed without
affecting the operational integrity of the Aastra CNX. If there are no unnecessary files to delete, a
message displays to indicate this.
4
Click YES to safely remove the unwanted files from the Compactflash.
5
Click OK to return to the Maintain CNX window.
ATP-CNX-040-01 Rel. 1.3, Doc. Rev. 01.07
5-51
Appendix A
Conference key options
Participant and Moderator key options
Description
This section provides a quick reference list of the participant and moderator key
options you can use after successfully joining a conference on the Aastra CNX.
Participant key options
The following table lists the participant key options.
Function
Press key
Mute/Unmute
*1
Roll Call List*
*2
Go to first page in list
1
Go to previous page in list
2
Repeat current page in list
3
Go to next page in list
4
Exit list
#
Help (repeats Roll Call options)
*
(continued)
ATP-CNX-040-01 Rel. 1.3, Doc. Rev. 01.07
A-1
CNX System Administrator Guide
Participant and Moderator key options
Function
Press key
Conference Extension Request
*3
(Participant is allowed this option only in
unmoderated conferences)
Extend conference by 30-min
1
Cancel current request for 30-min
extension
3
Cancel current request for 30-min
extension
#
Help (repeats Conference Extension options)
*
Help (repeats Aastra CNX menu options)
**
*Roll Call List holds up to 10 names on each page with each name assigned an ID number.
Moderator key options
The following table lists the moderator key options.
Function
Press key
Mute/Unmute
*1
Roll Call List*
*2
Go to first page in list
1
Go to previous page in list
2
Repeat current page in list
3
Go to next page in list
4
Mute participant from conference
5, <ID Number>
Cancel
#
Help
*
Eject participant from conference
6,<ID Number>
Cancel
#
Help
*
Assign moderator privileges
7,<ID Number>
Cancel
#
Help
*
(continued)
A-2
ATP-CNX-040-01 Rel. 1.3, Doc. Rev. 01.07
Conference key options
Participant and Moderator key options
Function
Press key
Exit list
#
Help (Repeats Roll Call options.)
*
Conference Extension Request
*3
(Participant is allowed this option only in
unmoderated conferences.)
Extend conference by 30-min
1
Cancel current request for 30-min
extension
3
Cancel current request for 30-min
extension
#
Help (Repeats Conference Extension options.)
*
Lecture Mode
*4
(Allows only moderators to speak.)
Add Port(s) Request
*5,<Number of ports#>
Cancel add port(s) request
#
Conference Status
*6
Lock/Unlock Conference
*7
End Conference
*8
End the existing conference
1
Cancel request to end the conference
3 or #
Help (Repeats End Conference options.)
*
Help (Repeats Aastra CNX menu options.)
**
*Roll Call List holds up to 10 names on each page with each name assigned an ID number.
ATP-CNX-040-01 Rel. 1.3, Doc. Rev. 01.07
A-3
Appendix B
Additional information
about CDR logs
Description
This appendix describes the call detail record (CDR) logs generated by the Aastra
CNX. For a procedure on downloading CDR logs to your local PC, see Chapter 5,
“Maintaining the Aastra CNX.”
What do the CDR logs contain?
The cdrlog files contain specific information about call activity and conference
activity that occur on the Aastra CNX in a 24 hour period or when the Aastra
CNX starts up. The confcdrlog file contains specific information about the
conference scheduling activity that occurs when a user adds, modifies, or deletes
conferences in the Aastra CNX GUI.
Every CDR log contains a Header Record. The Header Record is the first record
in the CDR log file. When a CDR log is no longer active, the Aastra CNX
generates a Footer Record in the log. The Footer Record is the last record in the
CDR log file.
Each line in the CDR log represents a single record. A comma separates each
parameter in the record. The second record in the CDR log is always the time the
record was generated and the reason the record was generated. For a sample CDR
log, see the following example.
ATP-CNX-040-01 Rel. 1.3, Doc. Rev. 01.07
B-1
CNX System Administrator Guide
Example
The following example illustrates the contents of log file
cdrlog.2000-04-03.00.39.35.csv. This cdrlog file has ended activity since it
contains a footer.
954722375,HEADER,1,RESTART
954722375,SYS_RESTART
954722385,CONF_ACT,256
954726246,CONF_INACT,257,15912104
954727484,CONF_INACT,256,84
954803032,CONF_INACT,258,15913383
954806687,CONF_INACT,256,15913444
954808775,FOOTER
CDR logs can contain various types of records. The following table identifies the
type of records that get stored in cdrlog and confcdrlog files.
Record type
HEADER
Found in
Found in
cdrlog files confcdrlog files
Aastra CNX generates the record in a log....
D
D
for each new CDR log file.
D
D
each time a restart occurs. A completed record may
contain any number of restart records.
D
D
each time a shutdown occurs.
D
D
when it closes a CDR log file.
(Header Record)
SYS_RESTART
(Restart Record)
SYS_SHUTDOWN
(Shutdown Record)
FOOTER
(Footer Record)
B-2
ATP-CNX-040-01 Rel. 1.3, Doc. Rev. 01.07
Additional information about CDR logs
Record type
CONF_ACT
Found in
Found in
cdrlog files confcdrlog files
D
-
(Conference Active
Record)
Aastra CNX generates the record in a log....
when a conference instance is scheduled. A
CONF_ACT record includes:
•
Conference ID (integer)
For permanent conferences, this record is
generated when the conference is booked, since it
becomes active immediately.
For scheduled conferences, this record is
generated each time the conference is about to
begin.
CONF_INACT
D
-
(Conference Inactive
Record)
CALL_START
when a conference instance is no longer scheduled.
A CONF_INACT record includes:
•
•
D
(Call Start Record)
-
when a user calls into the the Aastra CNX using call
types of TDM, SIP, or H.323. A CALL_START
record includes:
•
•
•
•
ATP-CNX-040-01 Rel. 1.3, Doc. Rev. 01.07
Conference ID (integer)
Duration of conference in minutes
Caller ID
Conference ID
Call type
Caller
(integer)
(interger)
(TDM/SIP/H323)
(SIP/H323 address of the
caller or the caller’s phone
number)
B-3
CNX System Administrator Guide
Record type
CALL_END
(Call End Record)
Found in
Found in
cdrlog files confcdrlog files
D
-
Aastra CNX generates the record in a log....
when a user disconnects a call or is disconnected
from the Aastra CNX using call types of TDM, SIP,
or H.323. A CALL_END record includes:
•
•
•
•
•
•
Caller ID
Conference ID
Call type
Caller
(integer)
(interger)
(TDM/SIP/H323)
(SIP/H323 address of the
caller or the caller’s phone
number)
Reason
(Disconnect cause)*
Duration in minutes
*Disconnect causes could be any of the following:
Disconnect
cause
Description
NORMAL
Normal call clearing (for
example, a hang-up during a
conference).
SHUTDOWN
System was shutting down.
NO_RESOURCES
All 30/60 ports in use.
LOGIN_FAILED
Incorrect pin entered. This
cause may log even if a user
enters the wrong pin once, and
then hangs up.
NOT_STARTED
Attempted to log into a
conference that has not yet
started.
NO_PORTS
All the reserved ports for the
conference are in use.
EJECTED
The moderator ejected the user
off of the bridge.
CONF_OVER
User is ejected from the
conference because the
conference time was up.
INTERNAL_ERROR An error condition on the CNX
occurred; check the logs for
error messages.
UNKNOWN
B-4
Unknown error
ATP-CNX-040-01 Rel. 1.3, Doc. Rev. 01.07
Additional information about CDR logs
Record type
CONF_ADD
Found in
Found in
cdrlog files confcdrlog files
-
(Conference Added
Record)
D
Aastra CNX generates the record in a log....
when the user has added a conference to the
Aastra CNX via the graphical user interface (GUI).
A CONF_ADD record includes:
•
Exit status*
•
Conference detail
(OK, DATA_INVALID,
NOT_ENOUGH_PORTS,
PORTS_IN_USE)
See list below.**
Note: *An exit status of OK means the conference
was added successfully. All other values for exit
status indicates an error occurred.
ATP-CNX-040-01 Rel. 1.3, Doc. Rev. 01.07
Conference
Detail
Description
Name
Name of the conference
ID
ID of the conference
Type
PERM (permanent)
SCHED (scheduled)
Moderated
MODERATED
NOTMODERATED
PIN
PIN for non-moderators of conference
Moderator PIN
Moderator’s PIN (only if moderator
exists for conference)
Ports
Number of ports allocated for the
conference
Owner
User who created the conference
Start date
Start date/time of conference in format
YYYY-MM-DD-HH-mm
End date
End date/time of conference in format
YYYY-MM-DD-HH-mm
Duration
Length of time (duration) of the
conference
Recurrence
NO_RECURR (no recurrence)
DAILY
WEEKLY
MONTH_DAY
MONTH_DOW (month and day of
week)
YEAR_DAY
YEAR_DOWOM (year and day of
week, week of month)
B-5
CNX System Administrator Guide
Record type
CONF_MOD
Found in
Found in
cdrlog files confcdrlog files
-
D
(Conference
Modified Record)
Aastra CNX generates the record in a log....
when the user has modified an existing conference
on the Aastra CNX via the graphical user interface
(GUI). A CONF_MOD record includes:
•
Exit status*
•
Old conference
detail.
New conference
detail.
•
(OK, DATA_INVALID,
NOT_ENOUGH_PORTS,
PORTS_IN_USE)
See conference detail
list on page B-5.
See conference detail
list on page B-5.
Note: *An exit status of OK means the conference
was modified successfully. All other values for exit
status indicates an error occurred.
CONF_DEL
(Conference Deleted
Record)
-
D
when the user has deleted an existing conference
on the Aastra CNX via the graphical user interface
(GUI). A CONF_DEL record includes:
•
Exit status*
•
Conference detail
(OK, DATA_INVALID,
NOT_ENOUGH_PORTS,
PORTS_IN_USE)
See conference detail
list on page B-5.
Note: *An exit status of OK means the conference
was deleted successfully. All other values for exit
status indicates an error occurred.
B-6
ATP-CNX-040-01 Rel. 1.3, Doc. Rev. 01.07
Additional information about CDR logs
The following are examples of the cdrlog and the confcdrlog files.
Example 1
The following example illustrates the contents of log file
confcdrlog.2000-04-03.00.39.35.csv. This log file has ended activity indicated by
the FOOTER entry at the end of the file.
954722375,HEADER,1,RESTART
954722375,SYS_RESTART
954722385,CONF_ADD,OK,test,256,cnxadmin,PERM,NOTMODERATED,60467,2,0-0-0-0-0,0-0-0-0-0,0,NO_RE
CURR,
954725463,CONF_ADD,OK,HR
Meeting,257,admin,SCHED,NOTMODERATED,23048,5,2004-10-5-13-30,2004-10-5-15-30,4,NO_RECURR,
954726246,CONF_MOD,NOT_ENOUGH_PORTS,HR
Meeting,257,admin,SCHED,NOTMODERATED,23048,5,2004-10-5-13-30,2004-10-5-15-30,4,NO_RECURR,,HR
Meeting,257,admin,SCHED,NOTMODERATED,44444,5,2004-10-5-13-30,2004-10-5-15-30,4,YEAR_DOWOM,
954726375,CONF_ADD,DATA_INVALID,HR
Meeting,256,admin,SCHED,NOTMODERATED,828528456,5,2004-10-5-13-30,2004-10-27-15-30,4,DAILY,
954726496,CONF_MOD,DATA_INVALID,,262151132,,SCHED,MODERATED,262151132,873267152,0,4000-612163999-7132-13325,61376-3986-0-9216-17442,4128,,,262151132,,SCHED,MODERATED,262151132,873267152
,0,4000-61216-3999-7132-13325,61376-3986-0-9216-17442,4128,
954726706,CONF_ADD,DATA_INVALID,HR
Meeting,256,admin,SCHED,NOTMODERATED,828528456,5,2004-10-5-13-30,2004-10-5-15-30,4,NO_RECURR,
954727484,CONF_DEL,OK,test,256,cnxadmin,PERM,NOTMODERATED,60467,2,0-0-0-0-0,0-0-0-0-0,0,NO_RE
CURR,
954741756,CONF_ADD,DATA_INVALID,test,257,admin,SCHED,NOTMODERATED,828528456,2,2005-10-1-17-0,
2014-10-1-17-30,1,DAILY,
954802093,CONF_ADD,OK,HR
Meeting,258,admin,SCHED,NOTMODERATED,828528456,5,2004-10-6-10-0,2004-10-6-12-0,4,NO_RECURR,
954803032,CONF_DEL,OK,HR
Meeting,258,admin,SCHED,NOTMODERATED,828528456,5,2004-10-6-10-0,2004-10-6-12-0,4,NO_RECURR,
954803554,CONF_ADD,OK,HR
Meeting,259,admin,SCHED,MODERATED,828528456,828528456,5,2004-10-6-10-0,2004-10-6-12-0,4,NO_RE
CURR,
954806027,CONF_ADD,OK,HR
Meeting,256,admin,SCHED,MODERATED,828528456,828528456,5,2004-10-6-11-0,2004-10-6-13-0,4,NO_RE
CURR,
954806687,CONF_DEL,OK,HR
Meeting,256,admin,SCHED,MODERATED,828528456,828528456,5,2004-10-6-11-0,2004-10-6-13-0,4,NO_RE
CURR,
954806740,CONF_ADD,DATA_INVALID,General
Meeting,257,admin,SCHED,MODERATED,830625608,830625608,5,2004-10-6-11-0,2004-10-6-13-0,4,NO_RE
CURR,
954807002,CONF_ADD,OK,General
Meeting,256,admin,SCHED,MODERATED,828528456,828528456,5,2004-10-6-11-0,2004-10-6-13-0,4,NO_RE
CURR,
954808775,FOOTER
ATP-CNX-040-01 Rel. 1.3, Doc. Rev. 01.07
B-7
CNX System Administrator Guide
Example 2
The following example illustrates the contents of log file
cdrlog.2004-09-03.13.16.57.csv. This log file is still active.
1094217417,HEADER,1,RESTART
1094217417,SYS_RESTART
1094217494,CONF_ACT,256
1094217508,CALL_START,1,256,SIP,SIP/10.50.20.56-1015c980
1094217593,CALL_START,2,0,SIP,SIP/10.50.10.51-10182e58
1094217593,CALL_END,2,0,SIP,SIP/10.50.10.51-10182e58,LOGIN_FAILED,0
1094217713,CALL_START,3,256,SIP,SIP/10.50.10.51-10182e58
1094217727,CALL_END,1,256,SIP,SIP/10.50.20.56-1015c980,NORMAL,3
1094217738,CONF_ACT,257
1094217829,CALL_START,4,0,SIP,SIP/10.50.10.51-10177590
1094217829,CALL_END,4,0,SIP,SIP/10.50.10.51-10177590,NORMAL,0
1094217866,CALL_START,6,257,SIP,SIP/10.50.20.56-1017d0b0
1094217986,CALL_START,5,257,SIP,SIP/10.50.10.51-10184220
1094217986,CALL_END,5,257,SIP,SIP/10.50.10.51-10184220,NORMAL,0
1094218019,CALL_START,7,0,SIP,SIP/10.50.10.51-101801c8
1094218019,CALL_END,7,0,SIP,SIP/10.50.10.51-101801c8,CONF_LOCKED,0
1094218093,CALL_START,8,0,SIP,SIP/10.50.10.51-101801c8
1094218093,CALL_END,8,0,SIP,SIP/10.50.10.51-101801c8,NORMAL,0
1094218105,CALL_START,9,257,SIP,SIP/10.50.10.51-101801c8
1094218116,CALL_END,9,257,SIP,SIP/10.50.10.51-101801c8,NORMAL,0
1094218132,CONF_INACT,257,6
B-8
ATP-CNX-040-01 Rel. 1.3, Doc. Rev. 01.07
Additional information about CDR logs
Where are the CDR logs stored?
When CDR logs are generated, the Aastra CNX automatically stores the logs to
the CompactFlash card for easy access and download when required. You can
download these logs to your local PC using the log file tools on the Maintain
CNX tab in the Aastra CNX GUI.
You can download a single CDR or multiple CDRs from the Aastra CNX
CompactFlash card to your local PC. You can also delete single or multiple CDR
logs as required.
The following illustration shows an example of CDR logs stored on the Aastra
CNX.
Reference
For a procedure on downloading CDR logs and core files, see Chapter 5,
“Maintaining the Aastra CNX.”
ATP-CNX-040-01 Rel. 1.3, Doc. Rev. 01.07
B-9
Index
Index
A
software updates and upgrades for 2-15
system administrator privileges 2-11
ad-hoc conference 4-8
announcement options 5-9
B
baud rate
2-10
conference participant
2-13
conferences
permanent 2-10, 4-8
port resource management of 2-11
scheduled 2-10
1-11
C
CDR logs
deleting 5-46
description 5-41
downloading 5-40, 5-43
chassis description
conference capabilities
2-4
cleanup of CNX 5-50
file types 5-49
CNX
benefits of 2-2
cleaning up 5-49
cnx.cfg file 3-1
conference participant in 2-13
configuring using Web UI 3-14
features of 2-2
installing 2-2
languages supported 2-3
logging in 3-10
overview 2-1
protocols supported 2-8
registered user for 2-12
regulatory and compliance information 3-x
reporting capabilities 2-14
RFCs supported 2-8
saving and restoring a configuration 5-30
setting date and time 5-37
software features for 2-8
ATP-CNX-040-01 Rel. 1.3, Doc. Rev. 01.07
conferences, managing
4-7
conferences, scheduled
4-16
configuring
conference general attributes 3-29
conference voice attributes 3-30
global attributes 3-17
initial network information 3-1
ISDN PRI attributes 3-22
network attributes 3-19
user authentication attributes 3-26
VoIP RTP attributes 3-37
VoIP SIP attributes 3-32
configuring the CNX
3-14
configuring, initial setup
force reboot 3-9
network and time 1-12
NTPs 3-7
Telnet access 3-2
customized greetings
loading 5-16
removing 5-19
D
date and time, setting 5-37
Index-1
G
Index
generating reports
R
2-14
reboot
rebooting from GUI 5-28
H
hardware, Aastra CNX
front panel 2-5
rear panel 2-7
rebooting in initial setup 3-9
2-4
rebooting, procedure for 5-28
reporting capabilities 2-14
requirements
login 3-10
software 2-16
L
reservationless conference
language packs
loading 5-10
removing 5-13
LED descriptions 2-5, 2-6
5-26
M
maintaining
loading/removing customized greetings 5-16
loading/removing language packs 5-9
updating software 5-4
maintaining, overview 5-1
O
operational status 5-22
operational status, displaying 5-23
4-8
5-30, 5-34
restoring a configuration
languages supported in CNX 2-3
license key 5-25
procedures for editing
5-28
S
saving a configuration
5-30, 5-31
scheduled conference
booking new 4-16
deleting 4-27
modifying 4-24
scheduled conferences
4-16
system administrator 2-11
U
upgrading, procedure for
5-4
users
creating 4-2
deleting 4-6
modifying 4-4
users, managing 4-1
P
permanent conferences 4-8
booking new 4-9
deleting 4-15
modifying 4-14
privileges
conference participant 2-13
system administrator 2-11
Index-2
ATP-CNX-040-01 Rel. 1.3, Doc. Rev. 01.07
Aastra CNX Conference Network Switch
System Administrator Guide
Published in the USA
ATP-CNX-040-01
Aastra CNX Release 1.3, Document Revision 01.07
June 2006