1
Release Notes for 3Com® Asterisk Appliance
Release 1.4.0.14.3
February 29, 2008
Important Information ............................................................................................................................. 2
Updating the 3Com Asterisk Appliance to Release 1.4.0.14.3........................................................... 2
Supported Browsers ........................................................................................................................... 3
Fax Support......................................................................................................................................... 3
Saving Configuration Changes ........................................................................................................... 3
Calling Queues.................................................................................................................................... 4
Modifying Configuration Files.............................................................................................................. 5
Updating Your 3Com Asterisk Appliance Configuration ..................................................................... 5
Updating the Bootloader Image ...................................................................................................... 5
Updating the 3Com Asterisk Appliance Firmware Image ............................................................... 6
Updating the Telephone Image Files .............................................................................................. 8
Configuring Polycom Telephones ....................................................................................................... 9
Backing up and Restoring the 3Com Asterisk Appliance ................................................................. 10
Guidelines for Using the Bandwidth.com Service Provider .............................................................. 10
Problems Corrected in R1.4.0.14.3 ...................................................................................................... 14
Problems Corrected in R1.4.0.14.2 ...................................................................................................... 14
Known Anomalies for the 3Com Asterisk Appliance ............................................................................ 14
Documentation Comments ................................................................................................................... 16
Copyright © 2007-2008, 3Com Corporation. All Rights Reserved.
Unless otherwise indicated, 3Com registered trademarks are registered in the United States and may
be registered in other countries.
3Com and the 3Com logo are registered trademarks of 3Com Corporation.
Asterisk and Digium are registered trademarks and Asterisk Business Edition, AsteriskNOW,
AsteriskGUI, and Asterisk Appliance are trademarks of Digium, Inc.
Other brand and product names may be registered trademarks or trademarks of their respective
holders.
Release Notes for 3Com Asterisk Appliance Release 1.4.0.14.3
Page 2
The 3Com Asterisk Appliance is a stand-alone PBX, which runs a specially enhanced version of
the Asterisk software. It is suitable for the desktop or mounting in a typical network closet or
restricted access location. The 3Com Asterisk Appliance is ideal for small office environments.
The 3Com Asterisk Appliance can function not only as a PBX, but also as a voice mail server,
IVR server, conferencing server, VoIP ATA, or VoIP gateway. It has four FXO ports and four
FXS analog ports. Additionally, the built-in four port LAN switch and WAN port allow it to serve
as a basic router.
See the 3Com Partner Access web site or the 3Com ftp site for additional information and
resources for the 3Com Asterisk Appliance, such as:
A README file that augments the information in this document.
The firmware, bootloader, and 3Com telephone images.
The CompactFlash Image and its corresponding README file.
Time zone files, which you down load using the Networking page in the 3Com AsteriskGUI.
Follow the instructions in the 3Com Asterisk Appliance Administrator’s Guide to set the time
zone for your appliance.
The 3Com Asterisk Appliance Administrator’s Guide.
The 3Com Service FAQs (frequently asked questions) site provides additional information about
3Com Asterisk. Point your browser to http://servicefaq.3com.com and select Asterisk from the
drop-down menu. Check this site frequently for new FAQs.
For information about using 3Com Asterisk with 3Com telephones, point your browser to
http://www.3com.com/downloads. Enter the product number, 3CR10551A, and then click the
Search button.
As always, address all questions about the 3Com Asterisk Appliance and related hardware and
software to your authorized 3Com reseller.
Important Information
Updating the 3Com Asterisk Appliance to Release 1.4.0.14.3
Release 1.4.0.14.3 includes new 3Com Asterisk Appliance firmware and telephone images. To
update the 3Com Asterisk Appliance to Release 1.4.0.14.3, see Updating Your 3Com Asterisk
Appliance Configuration and do the following:
Skip the section that describes how to update the bootloader image. Because Release
1.4.0.14.3 does not include a new bootloader image, there is no need to update the image.
Update the 3Com Asterisk Appliance firmware to Release 1.4.0.14.3. Follow the steps in the
Updating the 3Com Asterisk Appliance Firmware Image section. The firmware image file is
uImage-dgm-1.0.3.2-3com-r1.4.0.14.3
Update the telephone image to Release R_7_1_47_3. Follow the steps in the Updating the
Telephone Image Files section. The telephone image file is
phone_image_R_7_1_47_3.tar.gz.
Release Notes for 3Com Asterisk Appliance Release 1.4.0.14.3
Page 3
Supported Browsers
To access the 3Com AsteriskGUI, use the Firefox browser, Release 1.5 or a later release.
Note: If you exit the browser, a new browser session might not require a user to provide login
information and allows full access to the 3Com AsteriskGUI. To ensure that users are required to
provide a username and password each time a new browser window opens:
1
From the Firefox toolbar, click Tools > Options.
2
Click the Privacy icon.
3
In the Private Data dialog box, enable Always clear my private data when I close Firefox.
4
Click OK.
Fax Support
The 3Com Asterisk Appliance supports analog-to-analog fax transmission. Fax detection and
routing are supported using analog FXS connections. Note that IP-to-analog fax transmission is
not supported.
Saving Configuration Changes
The 3Com AsteriskGUI includes these controls:
Save – changes are made in memory, however, they are not active or permanent
Activate Changes (in the upper right of the page) – makes any changes active, however,
the changes are not permanent
Save Configuration (on the Home page) – changes are permanently retained after you
reboot or power cycle the appliance
To ensure that you save any configuration changes permanently:
1
Click Save in the 3Com AsteriskGUI page in which you have made changes.
2
Click Home on the left navigation tab.
3
Click Save Configuration on the Home page.
4
Click Activate Changes in the upper right of the page.
Note: If you click Network > LAN, modify LAN settings, and then click Save, the changes
become effective immediately. Make sure that you enter the correct IP address so that you do
not lose access to the 3Com AsteriskGUI immediately after clicking the Save button.
Note: Before you remove the power cord from the 3Com Asterisk Appliance, make sure that you
complete and then save your configuration changes.
Release Notes for 3Com Asterisk Appliance Release 1.4.0.14.3
Page 4
Calling Queues
From the Call Queues tab in the 3ComAsteriskGUI, you can create multiple calling queues and
also assign multiple agents as members of those calling queues.
Before you can assign an agent to a calling queue, you must enable the Is Agent field that
corresponds to the agent’s user extension on the Users page.
For agents to receive calls as members of a calling queue, they must first log in to the calling
queue. The Options tab in the 3Com AsteriskGUI lets you choose two methods for agents to log
in to a calling queue. Under the Agent Login Settings section, select one of the following:
Agent Login Extension – When an agent dials this number, the agent is immediately
logged in to all the calling queues of which the agent is a member. The agent will hear hold
music until a telephone call comes in. If the agent hangs up the telephone, the agent is
automatically logged out of all the calling queues.
Agent Callback Login Extension – When an agent dials this number, the agent is logged in
to all the calling queues of which the agent is a member. The agent can leave the telephone
on hook. The telephone will ring when the agent receives a call through any of the calling
queues. Unlike the Agent Login Extension option, the agent remains logged in to the calling
queue until the agent explicitly logs out of the calling queue.
If your agent login setting is Agent Login Extension, to log in to any calling queues from your
telephone:
1
Dial the Agent Login Extension.
2
At the prompt, enter your extension.
3
At the prompt, enter your password.
4
Wait for the system to indicate you are logged in as an agent.
The system plays hold music until you receive a call.
To log out of the calling queues, hang up the telephone.
If your agent login setting is Agent Callback Login Extension, to log in to any calling queues from
your telephone:
1
Dial the Agent Callback Login Extension.
2
At the prompt, enter your extension.
3
At the prompt, enter your password.
4
At the prompt, enter a new extension. This is the extension of the telephone that you are
currently using, which can be the same as the extension in Step 2 or another extension if you
are at another telephone.
5
Wait for the system to indicate you are logged in as an agent.
6
Hang up the telephone.
Release Notes for 3Com Asterisk Appliance Release 1.4.0.14.3
Page 5
You can now receive calls made to the calling queues.
To log out of the calling queues:
1
Dial the Agent Callback Login Extension.
2
At the prompt, enter your extension.
3
At the prompt, enter your password.
4
At the prompt for a new extension, press #.
5
Wait for the system to indicate you are logged out as an agent.
Modifying Configuration Files
If you have opened a configuration (.cfg) file from the Linux shell, make sure that you close the
file before you use the 3Com AsteriskGUI to make changes associated with that configuration
file. If you keep the file open, 3Com Asterisk might not function as expected.
Updating Your 3Com Asterisk Appliance Configuration
Note: Before you update your 3Com Asterisk Appliance, see Important Information to determine
if you need to follow some or all the steps in this section. If you only need to update the firmware
image on the 3Com Asterisk Appliance to a newer version, skip the next section and follow the
steps in Updating the 3Com Asterisk Appliance Firmware Image. Update the bootloader and
telephone images only if you have been instructed to do so in the current version of the release
notes or by 3Com technical support personnel.
Updating the Bootloader Image
If you have been instructed to update the bootloader image, follow these steps:
1
Use an adapter to connect the serial port on the 3Com Asterisk Appliance to the serial port
on your PC.
2
Establish a connection from your PC to the appliance using one of the following:
Terminal emulation software (such as HyperTerminal)
The terminal settings are:
Baud Rate – 57600
Data bits – 8
Parity – None
Stop bits – 1
Flow Control – None
SSH
The default root password for SSH is digium.
Release Notes for 3Com Asterisk Appliance Release 1.4.0.14.3
Page 6
3
Copy the bootloader image to an FTP server if you do not have access to the image from a
public FTP server.
4
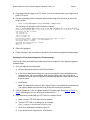
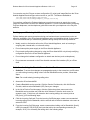
Use the bootloaderupdate command to download the image from the server on which the
image resides:
root:~> bootloaderupdate tftp <hostname> <image file>
The following is an example of the bootloader command:
root:~> bootloaderupdate tftp 123.45.12.34 app.ldr-dgm-1.0.3.2-3com-r1.4.0.11.3
Downloading app.ldr-dgm-1.0.3.2-3com-r1.4.0.11.3 from host 123.45.12.34 via TFTP
Verifying the MD5 checksum...
1+0 records in
1+0 records out
3503+0 records in
3503+0 records out
Downloaded firmware /tmp/image-4244.bin program size is 112096
Writing firmware to FLASH -- DO NOT REBOOT!!!!...
Verifying FLASH...PASSED
Finished writing firmware to FLASH...
Updating environment...
root:~>
5
Reboot the appliance.
6
Follow the steps in the next section to update the 3Com Asterisk Appliance firmware image.
Updating the 3Com Asterisk Appliance Firmware Image
Log in to the 3Com AsteriskGUI and follow these steps to update the 3Com Asterisk Appliance
firmware image:
1
Save your appliance’s configuration:
a) Click the Backup tab, and then click Take a Backup.
b) In the Create New Backup dialog box, type a meaningful file name using alphanumeric
characters only. Do not use dashes, dots, hyphens, and the like. Do not include an
extension for the file name; the appliance automatically appends a date and time stamp
to the file name.
c) Click Backup.
Note: The backup file is saved on the Compact Flash in /var/lib/asterisk/sounds/backup/.
You might be asked to provide this file by 3Com technical support personnel.
2
Click the Update tab. From the Update Appliance Firmware page, follow Step 3, Step 4 or
Step 5 depending on how you will access the firmware file.
3
If you have been provided with an HTTP URL for a software server:
a) Make sure the HTTP URL radio button is enabled.
b) Type the HTTP URL in the dialog box, for example:
http://company.com/downloads/software.img
c) Click Go to download the software to your PC.
d) In the Upload a new image section, click Browse.
Release Notes for 3Com Asterisk Appliance Release 1.4.0.14.3
Page 7
e) Select the image file that is on your PC and then click Upload Image.
f)
4
Reboot the appliance.
If you have been provided with a software file name and a TFTP server address:
a) Click the TFTP Server radio button.
b) Type the software file name and TFTP server address in the dialog boxes.
c) Click Go.
5
If you downloaded the image to your PC:
a) In the Upload a new image section, click Browse.
b) Select the local image file on your PC and then click Upload Image.
c) Reboot the appliance.
6
If necessary, customize the default configuration to modify 911 connectivity, service
providers, user names, calling rules, passwords, NTP server, SSH access, GUI access using
the WAN, and the like. See the 3Com Asterisk Appliance Administrator’s Guide for the
default configuration settings. Make sure that you save all changes. See Saving
Configuration Changes for information about how to save changes in the 3Com AsteriskGUI.
Note: See the NTP: Network Time Protocol Some web site (www.ntp.org) for a list of NTP
servers. Some commonly used NTP servers include:
7
tick.ucla.edu / tock.ucla.edu (Los Angeles, California)
time.nist.gov (Boulder, Colorado)
tick.mit.edu (Boston, Massachusetts)
Upload the appropriate timezone files from the 3Com Partner Access Web site. If your
configuration includes analog lines, calibrate the analog service provider:
a) Click the Service Providers tab.
b) Click the Options drop-down list for the analog service provider.
c) Click Calibrate.
d) Save your changes. See Saving Configuration Changes for information about how to
save changes in the 3Com AsteriskGUI.
9
If you changed the dial plan calling rules for outgoing calls, you might want to create a
telephone provisioning custom configuration file (custom.cfg), or update an existing
configuration file if it exists, so that you do not have to press the # key after you dial.
a) Establish a connection from your PC to the appliance using one of the following:
Terminal emulation software (such as HyperTerminal), using an adapter to connect the
serial port on the 3Com Asterisk Appliance to the serial port on your PC.
The terminal settings are:
Baud Rate – 57600
Release Notes for 3Com Asterisk Appliance Release 1.4.0.14.3
Data bits – 8
Parity – None
Stop bits – 1
Flow Control – None
Page 8
SSH
The default root password for SSH is digium.
b) Create or edit the custom.cfg file, which resides in the
var/lib/asterisk/sounds/phoneprov_configs/ folder on the CompactFlash card.
The custom.cfg file is in xml format and specifies the user-defined settings that will be provided
to all phones that use the appliance.
The following shows the contents of the polycom.xml file, which you can use as a template:
<?xml version="1.0" encoding="UTF-8" standalone="yes"?>
<config>
<digitmap
dialplan.1.digitmap="1xxx|5xxx|6xxx|7xxx|9xxxxxxxT|91xxxxxxxxxx|9[29]xxxxxxxxx|911|[89]911|[89]1800xxxxxxx|[89]1855xxxxxxx|[89]1866xxxxxxx|[89]1877
xxxxxxx|[89]1888xxxxxxx" dialplan.1.digitmap.timeOut="3"
dialplan.2.digitmap="1xxx|5xxx|6xxx|7xxx|9xxxxxxxT|91xxxxxxxxxx|9[29]xxxxxxxxx|911|[89]911|[89]1800xxxxxxx|[89]1855xxxxxxx|[89]1866xxxxxxx|[89]1877
xxxxxxx|[89]1888xxxxxxx" dialplan.2.digitmap.timeOut="3"
/>
</config>
The pattern explanations include:
1xxx
5xxx
6xxx
7xxx
9xxxxxxxT
91xxxxxxxxxx
9[2-9]xxxxxxxxx
911
[89]911
[89]1800xxxxxxx
[89]1855xxxxxxx
[89]1866xxxxxxx
[89]1877xxxxxxx
[89]1888xxxxxxx
Internal ext
Internal ext
Internal ext
Internal ext
Local 7 digit
Long distance
Local 10 digit
Emergency 911
Emergency 911 or 811
Toll free
Toll free
Toll free
Toll free
Toll free
Updating the Telephone Image Files
If you have been instructed to update the 3Com telephone image files, follow these steps.
1
Make sure that you have updated the bootloader image (see Updating the Bootloader
Image) and the 3Com Asterisk Appliance firmware image (see Updating the 3Com Asterisk
Appliance Firmware Image).
2
Establish a connection from your PC to the appliance using one of the following:
Terminal emulation software (such as HyperTerminal), using an adapter to connect the
serial port on the 3Com Asterisk Appliance to the serial port on your PC.
The terminal settings are:
Release Notes for 3Com Asterisk Appliance Release 1.4.0.14.3
Baud Rate – 57600
Data bits – 8
Parity – None
Stop bits – 1
Flow Control – None
Page 9
SSH
The default root password for SSH is digium.
3
Copy the telephone image file to an FTP server if you do not have access to the image file
from a public FTP server.
4
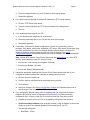
Use the 3com-get-phoneimage command to download the image from the server on which
the image resides:
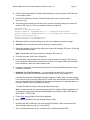
root:~> 3com-get-phoneimage <hostname> <image file>
The following is an example of the 3com-get-phoneimage command:
root:~> 3com-get-phoneimage 123.45.12.34 phone_image_R_7.1.47-0.tar.gz
Downloading phone_image_R_7_1_47_0.tar.gz from host 123.45.12.34
Installing Image [ OK ]
Starting 3com Downloader
root:~>
5
Reboot the appliance.
Configuring Polycom Telephones
The 3Com Asterisk Appliance supports Polycom telephones as well as 3Com telephones. If you
plan to use a Polycom telephone over a wide-area network (WAN), follow these steps to
configure the telephone:
1
Connect the Polycom telephone to one of the LAN ports on the 3Com Asterisk Appliance.
2
Use the 3Com AsteriskGUI to configure the Polycom telephone for your environment. Make
sure you enter the telephone’s MAC address in the Phone Serial field of the Users page.
See the 3Com Asterisk Appliance Administrator’s Guide for information about how to
configure the telephone.
3
Reboot the Polycom telephone and verify that it is operational.
4
Connect the Polycom telephone to the WAN.
5
Assign an IP address to the Polycom telephone. You can assign a static IP address or use
DHCP to provide the IP address.
6
Use the telephone’s LCD-based user interface to assign the WAN IP address of the 3Com
Asterisk Appliance.
7
For more information about configuring Polycom telephones, see the Polycom telephone
guide for your telephone or the Polycom web site.
Release Notes for 3Com Asterisk Appliance Release 1.4.0.14.3
Page 10
You can also copy the Polycom custom configuration (if it exists) and image files from the 3Com
Asterisk Appliance and configure a boot server on your PC. The files are available at:
/var/lib/asterisk/phoneprov/polycom.xml
/var/lib/asterisk/sounds/phoneprov_configs/custom.cfg
You can then configure the Polycom telephone to use the boot server to acquire the correct
image files rather than use the 3Com Asterisk Appliance. For more information about configuring
Polycom telephones, see the telephone guide that comes with your telephone or the Polycom
web site.
Backing up and Restoring the 3Com Asterisk Appliance
Perform backup and restore procedures during non-business hours to ensure that you do not
affect the availability of the 3Com Asterisk Appliance and to avoid additional load on the system.
3Com recommends that you follow these guidelines during backup and restore procedures:
Ideally, restrict or limit active calls on the 3Com Asterisk Appliance, such as incoming or
outgoing calls, internal calls, or voice mail activity.
Do not interrupt the power supply to the 3Com Asterisk Appliance.
Do not make configuration changes by using the 3Com AsteriskGUI or by directly modifying
configuration files on the 3Com Asterisk Appliance.
Do not change the hardware configuration or attach new devices (such as telephones).
Do not execute commands on the 3Com Asterisk command line interface (CLI) or uClinux
shell.
Guidelines for Using the Bandwidth.com Service Provider
Guideline: To ensure that changes are propagated properly to the extensions.conf file when
you edit existing incoming calling rules to use the Bandwidth service provider, follow these
steps.
Note: Do not edit existing incoming calling rules.
1
Access the 3Com AsteriskGUI.
2
Create a Bandwidth service provider. Click the Service Providers tab, click Add Service
Provider, and then select Bandwidth (SIP). Save your changes.
3
In the List of Service Providers page, click the Options drop-down menu next to the
Bandwidth service provider entry and then click Advanced. Note the trunk name, for
example, trunk_3, which lets you determine the incoming calling rule context (such as
DID_trunk_3) for the following steps.
4
Click the Incoming Calls tab. From the Incoming Call Rules page, create a new unmatched
incoming calling rule for Bandwidth, which routes all calls to the auto attendant voice menu at
extension 5500.
5
From the Incoming Call Rule page, create a new matched calling rule for Bandwidth. Specify
a DID (for example, 5551231010) and route that call to the corresponding extension (for
example, 1010). You will modify the calling rule in the following steps.
Release Notes for 3Com Asterisk Appliance Release 1.4.0.14.3
Page 11
6
Click the Options tab and then click the Advanced button, which reveals the File Editor tab
on the toolbar column.
7
Click the File Editor tab, click the Config Files drop-down menu, and then select
extensions.conf.
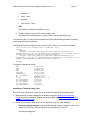
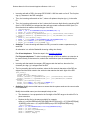
8
Scroll through the extensions.conf file until you reach the incoming calling rule context (for
example, DID_trunk_3). This is an example of what you might see:
include=default
exten=_+X.,1,Goto(default|5500|1)
exten=s,1,ExecIf($[ "${CALLERID(num)}"="" ],SetCallerPres,unavailable)
exten=s,2,ExecIf($[ "${CALLERID(num)}"="" ],Set,CALLERID(all)=unknown <0000000>)
exten=s,3,Goto(default|5500|1)
exten=15551231010,1,Goto(default|1010|1)
exten=+15551231010,1,Goto(${EXTEN:1}|1)
9
Manually modify the incoming calling rules, which you created in the previous steps.
Guideline: In the event that you need to delete an incoming call rule:
1
Delete the contents of the incoming calling rules context (for example, DID_trunk_3) from the
3Com AsteriskGUI file editor.
Note: Do not delete the context header (for example, DID_trunk_X).
2
From the Home tab, click Save Configuration.
3
In the file editor, verify that the lines under the context header (for example, DID_trunk_X)
have indeed been deleted from the extensions.conf file. If necessary, delete any remaining
lines; remember to leave the context header intact.
4
If required, create new incoming calling rules from the 3Com AsteriskGUI and then use the
file editor to edit them.
Guideline: For 3Com Telephones -- You must modify the caller ID for an incoming
Bandwidth call to perform a successful attended transfer from a 3Com telephone.
If an external caller dials a Bandwidth-assigned telephone number, which you have mapped
to an extension using incoming calling rules or routed to the auto attendant voice menu 5500
using an unmatched incoming calling rule, the system provides an error message when you
press the Transfer button to complete the transfer.
To modify the caller ID for the incoming call, follow these steps.
Note: It is assumed that your environment uses the 3Com Asterisk default configuration. As
an example for these steps, assume that Bandwidth has provided you with a DID range of
5551231000 – 5551231199.
1
Follow Step 1 through Step 8 from the first guideline.
2
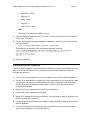
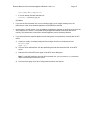
Make these modifications (see the example below) so that:
Incoming calls with a DID that is not in the range 5551231000 -1199 first match on line 2,
where 9 replaces the plus sign (+) in the caller ID.
Then, incoming calls match on line 3 and the call is routed to extension 5500.
Release Notes for 3Com Asterisk Appliance Release 1.4.0.14.3
Page 12
Incoming calls with a DID in the range 5551231000 -1199 first match on line 9. The first plus
sign (+) character in the DID is stripped.
Then, the incoming calls match on line 7, where a 9 replaces the plus sign (+) in the caller
ID.
Then, the incoming calls match on line 8, where the first seven digits from the remaining DID
(that is, 1555123XXXX) are stripped and the calls are routed to extension XXXX (that is, to
the extension that matches the last 4 digits of the DID).
1 include=default
2 exten = _+X.,1,Set(CALLERID(num)=9${CALLERID(num):1})
3 exten=_+X.,2,Goto(default|5500|1)
4 exten=s,1,ExecIf($[ "${CALLERID(num)}"="" ],SetCallerPres,unavailable)
5 exten=s,2,ExecIf($[ "${CALLERID(num)}"="" ],Set,CALLERID(all)=unknown
<0000000>)
6 exten=s,3,Goto(default|5500|1)
7 exten = _1555123XXXX,1,Set(CALLERID(num)=9${CALLERID(num):1})
8 exten=_1555123XXXX,2,Goto(default|${EXTEN:7}|1)
9 exten=_+1555123XXXX,1,Goto(${EXTEN:1}|1)
Guideline: To route incoming calls based on DID, you need to create a separate entry for
each DID.
An alternative is to edit the Bandwidth incoming calling rule directly.
For 3Com telephones: Follow the steps in the preceding guideline.
For Polycom telephones: To allow incoming calls with a DID that matches an extension to
be routed directly to that extension, make these modifications (see the example below) so
that:
Incoming calls that match the company DID range match the last line, where the first
character plus sign (+) is stripped from the DID.
The line preceding the last line matches, where the first several characters of the DID are
stripped and the call is routed to the extension that matches the last 4 digits of the DID.
[DID_trunk_3]
include=default
exten=_+X.,1,Goto(default|5500|1)
exten=s,1,ExecIf($[ "${CALLERID(num)}"="" ],SetCallerPres,unavailable)
exten=s,2,ExecIf($[ "${CALLERID(num)}"="" ],Set,CALLERID(all)=unknown
<0000000>)
exten=s,3,Goto(default|5500|1)
exten=_1555123XXXX,1,Goto(default|${EXTEN:7}|1)
exten=_+1555123XXXX,1,Goto(${EXTEN:1}|1)
Guideline: Modify the trunk dial macro to ensure that the system sends out the correct caller
ID to Bandwidth.
Modify the trunkdial macro (see the example below) so that:
The characters +1 are prepended to the first digits of the DID range to the caller ID of a
phone extension.
Replace the first line in the macro-trunkdial, for example,
exten=s,1,set(CALLERID(all)=${IF(${LEN(${CALLER ID(num)})} > 6 ? ${CALLERID(all)}
: ${ARG2})}) with exten = s,1,set(CALLERID(num)=+555123${CALLERID(num)})
[macro-trunkdial]
exten = s,1,set(CALLERID(num)=+1555123${CALLERID(num)})
exten = s,n,Dial(${ARG1})
exten = s,n,Goto(s-${DIALSTATUS},1)
exten = s-NOANSWER,1,Hangup
exten = s-BUSY,1,Hangup
Release Notes for 3Com Asterisk Appliance Release 1.4.0.14.3
Page 13
exten = _s-.,1,NoOp
root:~>
If Bandwidth assigns a DID range of 5551231000 -1199, the caller ID for all outgoing calls
typically is a number from the above range with the characters +1 prepended. For example,
if a user at extension 1010 dials out, the caller ID would be +15551231010. Note that this
meets Bandwidth's requirements.
Release Notes for 3Com Asterisk Appliance Release 1.4.0.14.3
Page 14
Problems Corrected in R1.4.0.14.3
•
3Com telephones display time in 12-hour UTC format. The time that a 3Com telephone displays on
its LCD is based on the default time zone setting on the 3Com Asterisk Appliance (click Networking
on the left navigation tab and then click the TimeZone button). If you change time zone information,
you must reboot the 3Com Asterisk Appliance and the 3Com telephone. (ID 49063)
Problems Corrected in R1.4.0.14.2
•
You do not need to press the pound key (#) after you enter an extension to make a call from a
3Com telephone. (ID 48857)
Known Anomalies for the 3Com Asterisk Appliance
•
You can upload multiple timezone files to the 3Com Asterisk Appliance. When you delete timezone
files, you can delete all but one file. Therefore, one timezone file will remain on the 3Com Asterisk
Appliance.
•
When you establish a conference bridge, unfavorable audio might occur when a second caller or
subsequent callers join the conference. (ID 48285)
•
By default, the 3Com Asterisk Appliance does not support Caller ID blocking and Feature Code
890, and Caller ID Next blocking and Feature Code 889. (ID 48239, ID 48248)
•
The Hands Free feature is active for calls from outside your local processor, that is, external calls.
(ID 48315)
•
If you use the ftp command from the Linux shell, the 3Com Appliance will not function. Instead, use
the ftpput and ftpget commands. (ID 48798)
•
If you enter invalid server information in the Update tab of the 3Com AsteriskGUI, the Upgrading
Firmware pop-up message box displays indefinitely. To clear the pop-up message box, click
another tab and then click the Update tab again. (ID 48790)
•
A 3Com telephone cannot park a call from a telephone with Caller ID that is not the same as the
extension number. (ID 48844)
•
You might need to reboot the 3Com Asterisk Appliance if WAN IP settings do not restore properly
after you restore a configuration backup file. (ID 48908)
•
If you reset to the factory default settings and the 3Com Asterisk Appliance does not operate as
expected, reset the factory default settings again and reboot. (ID 48923)
•
When you create a Service Provider entry or update an existing entry for a 3Com V7111 Gateway,
in the Advanced Settings dialog box, set the insecure field to port,invite. (ID 48929)
•
If you use the 3Com AsteriskGUI to add the VoicePulse service provider, edit the VoicePulse
[trunk_x] context in the users.conf configuration file:
Change the line that references a VoicePulse gateway from :
host=connect10.voicepulse.com
to:
Release Notes for 3Com Asterisk Appliance Release 1.4.0.14.3
Page 15
host=connect01.voicepulse.com
If it is not already included, add this line:
fromuser= <VoicePulse_login_ID>
(ID 48964)
•
If you use the 3Com Asterisk CLI to turn on debug logging or set a high verbosity level, the
performance of the 3Com Asterisk Appliance can be adversely affected.
•
Unless there is a valid reason, such as validating configuration changes or call flows, do not use the
3Com Asterisk CLI asterisk –r command during a HyperTerminal/ssh connection and leave it
running. The performance of the 3Com Asterisk Appliance can be adversely affected
•
If you observe that the Asterisk Appliance time setting does not synchronize correctly with an NTP
server:
a) Create (or modify, if it already exists) the /etc/config/rc.local file to include these lines:
killall ntpd
ntpd -g &
b) From the 3Com AsteriskGUI, click the Networking tab and then delete the URL of the NTP
server.
c) Enter the URL of the NTP server again in the NTP server dialog box.
Note: To test DNS resolution, from the 3Com Asterisk CLI, you can use the ping command
with the domain name of the NTP server.
d) From the Home page, click Save Configuration and then click Reboot.
Release Notes for 3Com Asterisk Appliance Release 1.4.0.14.3
Page 16
Documentation Comments
As we work to make the documentation easier for you to use, we invite you to send us your
feedback on errors that you find in the books and Help systems, and also on areas that you
would like to see explained more fully.
Please send your documentation comments to us at the following address:
[email protected]
IMPORTANT: As always, please address all questions about the 3Com Asterisk Appliance and
related hardware and software to your authorized 3Com reseller.
Thank you.