1
Quick Start Guide
Wireless
Building-to-Building
Bridge
3CRWE90096A
Wireless Network Solution
http://www.3com.com/
http://www.3com.com/productreg
09-2099-000
Published June 2001
3Com Corporation ■ 5400 Bayfront Plaza ■ Santa Clara, California ■ 95052-8145 ■ U.S.A
Copyright © 2001 3Com Corporation. All rights reserved. 3Com is a registered trademark and the 3Com logo is a
trademark of 3Com Corporation. Assembled in the USA.
No part of this documentation may be reproduced in any form or by any means or used to make any derivative
work (such as translation, transformation, or adaptation) without written permission from 3Com Corporation.
3Com Corporation reserves the right to revise this documentation and to make changes in content from time to
time without obligation on the part of 3Com Corporation to provide notification of such revision or change.
3Com Corporation provides this documentation without warranty, term, or condition of any kind, either implied or
expressed, including, but not limited to, the implied warranties, terms or conditions of merchantability, satisfactory
quality, and fitness for a particular purpose. 3Com may make improvements or changes in the product(s) and/or
the program(s) described in this documentation at any time.
If there is any software on removable media described in this documentation, it is furnished under a license
agreement included with the product as a separate document, in the hard copy documentation, or on the
removable media in a directory file named LICENSE.TXT or !LICENSE.TXT. If you are unable to locate a copy, please
contact 3Com and a copy will be provided to you.
UNITED STATES GOVERNMENT LEGEND
If you are a United States government agency, then this documentation and the software described herein are
provided to you subject to the following:
All technical data and computer software are commercial in nature and developed solely at private expense.
Software is delivered as “Commercial Computer Software” as defined in DFARS 252.227-7014 (June 1995) or as a
“commercial item” as defined in FAR 2.101(a) and as such is provided with only such rights as are provided in
3Com’s standard commercial license for the Software. Technical data is provided with limited rights only as
provided in DFAR 252.227-7015 (Nov 1995) or FAR 52.227-14 (June 1987), whichever is applicable. You agree not
to remove or deface any portion of any legend provided on any licensed program or documentation contained in,
or delivered to you in conjunction with, this User Guide.
Unless otherwise indicated, 3Com registered trademarks are registered in the United States and may or may not be
registered in other countries.
3Com is a registered trademark and the 3Com logo is a trademark of 3Com Corporation.
Microsoft, Windows, and Windows NT are registered trademarks of Microsoft Corporation.
All other company and product names may be trademarks of the respective companies with which they
are associated.
Contents
Product Registration and Support 1
System Requirements 1
Installation Overview 2
Unpacking the Wireless Bridge Kit Contents 2
Installing the Wireless Bridge Manager Software
Configuring the Wireless Bridge Units 4
Starting the Bridge Manager 5
Scanning for Bridge Groups 5
Selecting a Bridge to Configure 5
Setting Network and Security Values 6
Network Values
Security Settings
6
8
Setting Network Transmission Options 10
Mounting the Wireless Bridge 11
Mounting the Antenna 11
3Com Corporation Limited Warranty 13
Regulatory Compliance Information 15
3
Quick Start Guide
This quick start guide describes basic installation and configuration of the
3Com Wireless Building-to-Building Bridge. For more detailed information,
refer to the online user guide, available in Portable Document Format (PDF) on
the Installation CD. The PDF format lets you view the user guide online or print
a hardcopy.
NOTE: You must have Adobe Acrobat Reader installed on your system
to read the 3Com Wireless Building-to-Building Bridge User Guide PDF
file. You can download the latest Adobe Acrobat Reader from the
Installation CD or from http://www.adobe.com.
The user guide is installed on your hard drive when you install the 3Com
Wireless Bridge Manager software from the Installation CD. You can access
the user guide by using the Windows Start menu to locate the Bridge
Manager program group.
Product Registration and Support
To register this product with 3Com, go to the following Web site:
http://www.3com.com/productreg/
To find support information, firmware updates, and links to the latest available
drivers and utilities, go to the following Web site:
http://support.3com.com/
System Requirements
■
■
■
■
Physically isolated Ethernet LANs
Two or more 3Com Wireless Building-to-Building Bridge units
One antenna with cable for each wireless bridge unit (can be purchased
separately from 3Com as an accessory)
Computer with Windows 95, 98, Me, Windows 2000, or Windows NT
installed
1
Quick Start Guide
Installation Overview
Installing a set of 3Com Wireless Building-to-Building Bridges involves the
following tasks:
■ Unpacking the wireless bridge hardware and software
■ Installing the wireless bridge configuration software
■ Configuring all available wireless bridge units
■ Mounting the wireless bridge units (if necessary)
■ Mounting and configuring one antenna for each wireless bridge unit
NOTE: Installing the 3Com Wireless Building-to-Building Bridge, cables,
and antennas should be done only by professional network personnel.
The following sections outline the installation process for you, task by task. For
detailed installation and configuration information, refer to the 3Com Wireless
Building-to-Building Bridge User Guide on the Installation CD.
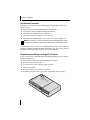
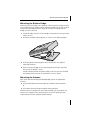
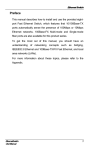
Unpacking the Wireless Bridge Kit Contents
In your 3Com Wireless Building-to-Building Bridge package, you will find the
following components:
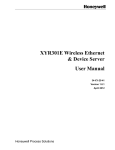
■ 3Com Wireless Building-to-Building Bridge (assembled)
■ RJ-45 Ethernet crossover cable
■ 5.2V Universal AC-to-DC power supply and cord
■ Mounting hardware
■ This printed quick start guide with warranty
■ Installation CD containing a user guide and configuration software
Po
we
r
g
in
ild
Bu
ss ole -t
ire ing
W ild e
Bu ridg
B
Ale
rt
Wir
ele
Eth
ss
ern
Se
et
rial
2
Installing the Wireless Bridge Manager Software
If any of these items is missing or damaged, please contact the place of
purchase or 3Com Customer Support (http://support.3com.com).
Installing the Wireless Bridge Manager Software
You can install the 3Com Wireless Building-to-Building Bridge Manager
on a PC or workstation running Windows 95, 98, Me, Windows 2000, or
Windows NT. The Bridge Manager is a software configuration utility that
allows you to perform all bridge configuration and management functions.
You typically install the Bridge Manager on:
■ One desktop computer, through which you can globally configure and
administer all of the wireless bridge units.
■ One laptop computer, through which you can adjust antenna polarization
during installation by using the RSSI monitor at the antenna site.
1 Insert the Installation CD into your computer’s CD-ROM drive.
If the installation program does not begin automatically:
a Click My Computer.
b Click the icon for the drive in which the Installation CD is located.
c Double-click setup.exe.
The Welcome screen appears.
2 Click Next to continue the installation.
The Software License screen appears.
3 Click Yes to indicate that you agree with the displayed terms.
The Choose Destination Location screen appears. This screen displays the
default path and location for the Bridge Manager files and documents:
c:\program files\3com\3com wireless bridge manager
You can leave the directory set at the default path, or you can change the
directory to suit your requirements.
4 Enter the directory in which the Bridge Manager program will be installed.
When you have finished, click Next to continue.
The Bridge Manager files and documents are installed in the directory you
specified. It is possible that the installer will require that you restart your
computer to complete the installation. When the installation is complete,
a message is displayed that confirms a successful installation.
5 Click Finish to exit the installation.
The Bridge Manager is now installed and you are ready to use it to
configure your wireless bridge units.
3
Quick Start Guide
Configuring the Wireless Bridge Units
The 3Com Wireless Building-to-Building Bridge Manager software communicates
with each wireless bridge using a non-routable protocol. Therefore, your wireless
bridge units must be accessible on the local subnet to communicate with the
Bridge Manager.
CAUTION: Do not try to batch-configure a set of wireless bridge units
by powering up all of your units and connecting them to the same
subnet at the same time. Connecting a set of bridge units to the same
subnet while configuring them can produce a network loop. Avoid
this situation by serially powering up, connecting, configuring,
powering down, and detaching each bridge from the subnet unit one
at a time.
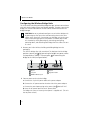
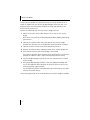
1 Remove your 3Com Wireless Building-to-Building Bridge from the
packaging.
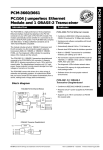
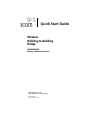
The wireless bridge ships fully assembled. The back panel of the bridge
provides a power jack 2 for connecting the bridge to a power source.
It also provides a 10BASE-T Ethernet port 3 for connecting the
bridge to the LAN (see figure below).
2
3
5 VDC
RJ-45
10
Serial
Config.
SMA port
Serial port
2Power jack
Configuration button
310BASE-T Ethernet port
2 Connect power to the wireless bridge:
a Connect the six-pin DC power cable to the power adapter.
b Connect the AC power cord to the other side of the power adapter.
c Connect the round power plug to the power jack
2
labeled 5 VDC.
d Insert the AC power cord into an AC power outlet.
The bridge unit turns on instantly when power is supplied to it. (The unit
has no power switch.)
4
Configuring the Wireless Bridge Units
3 Insert one end of the RJ-45 crossover cable into the bridge 10BASE-T
Ethernet port 3 . Insert the other end of the cable into the appropriate
port on your Ethernet LAN device (a hub, for example).
Starting the Bridge Manager
To run the Wireless Bridge Manager, follow these steps:
1 On the Windows taskbar, click Start.
2 Select Programs and then select the Program Group you created when you
installed the Wireless Bridge Manager.
3 Select the 3Com Wireless Bridge Manager entry.
The 3Com Wireless Building-to-Building Bridge Manager screen appears
and the Bridge Manager automatically scans the network for new devices.
Scanning for Bridge Groups
Whenever it is started, the Bridge Manager automatically scans the local
network to detect currently accessible bridge groups. In this case, a bridge
group is defined as all wireless bridge units having the same wireless local area
network (WLAN) service area (also known as Extended Service Set Identification
(ESSID)). The detected bridge groups are displayed on the 3Com Wireless
Building-to-Building Bridge Manager screen.
Selecting a Bridge to Configure
With the 3Com Wireless Building-to-Building Bridge Manager screen displayed,
follow these steps:
1 Right-click a displayed wireless bridge unit name to show the configuration
options available for it.
2 Select Configure.
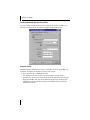
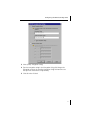
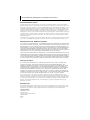
The Wireless Bridge Configuration screen appears (see the next figure),
displaying tabs for Network / Security, Options, Tools, and Info. The
functions of these tabs are described in detail in the user guide.
5
Quick Start Guide
Setting Network and Security Values
You can change network and security settings for the wireless bridge in the
Network / Security tab of the Wireless Bridge Configuration screen.
Network Values
Network settings determine the wireless network with which the bridge can
associate. To change the Network / Security tab settings:
1 Enter the name of a WLAN Service Area.
The WLAN service area (ESSID) is used to specify a unique wireless
network. The service area name can be up to 32 alphanumeric characters
long. Only bridges with the same WLAN service area can associate with
each other; they cannot communicate with bridges that have different
WLAN service areas.
6
Configuring the Wireless Bridge Units
2 Use the Security Setting pull-down menu to select one of the following
security settings:
■ No Security (Open System)
■ 40-bit Shared Key for basic encryption
■ 128-bit Shared Key for strong encryption
Using either a 40-bit or 120-bit shared key setting, all wireless bridge units
in a single wireless LAN service area must share the same security key.
The security settings for any associating bridge pair must match exactly.
For more information about the security settings, see “Security Settings”
on page 8.
3 Enter the Station Name.
The station name is an arbitrary identifier for each wireless bridge. This
value lets you conveniently identify the bridge units with the Wireless
Bridge Manager. Assigning a meaningful station name to each wireless
bridge is recommended. Like the WLAN Service Area Name, this field uses
any alphanumeric combination.
4 Enter the IP Address you want to assign to the wireless bridge.
The IP address is the network address that will be used by other computers
to communicate with the wireless bridge. Assigning an IP address to the
bridge is required only if you plan to use Telnet for remote configuration.
(Refer to Appendix B in the user guide for more information about
using Telnet.)
5 Enter the Subnet Mask value.
This value defines the range of IP addresses available within your local
network. Assigning a subnet mask address to the bridge is required only
if you plan to use the Telnet feature for remote configuration.
6 If your network uses a gateway (router or firewall), enter the Gateway IP
address.
You must enter the IP address of your gateway if you plan to use Telnet to
administer the wireless bridge from computers on a different subnet.
7 Click Apply.
When the wireless bridge has joined your wireless network by associating
with another wireless bridge, the radio association LED will light green.
7
Quick Start Guide
Security Settings
3Com recommends using the strongest encryption setting supported by your
wireless bridge. The Bridge Manager offers 128-bit (strong) or 40-bit (basic)
shared-key encryption; however, 128-bit encryption may not be available to
you, depending on U.S. export restrictions to your country.
Both strong and basic encryption make use of Wired Equivalent Protection
(WEP) keys, which are expressed in hexadecimal notation. The WEP keys must
be set identically for every wireless bridge you configure for your network. You
can set the WEP keys in one of two ways. You can:
■
■
Have the keys automatically generated — Allows you to easily
enter any string of characters (as you would enter a password) that will
automatically generate the WEP keys the same way for every wireless
bridge you are configuring.
Enter the keys manually — Allows you to use an existing set of
encryption keys, but forces you to manually enter four long series of
hexadecimal numbers in exactly the same way for every wireless bridge
you are configuring.
Entering an Encryption String To enter an encryption string that will
automatically generate the WEP keys, follow these steps:
1 In the Network / Security tab of the Wireless Bridge Configuration screen,
select either 128-bit Shared Key or 40-bit Shared Key from the Security
setting list.
2 Click Encryption Key Settings.
The appropriate Encryption Key Settings screen appears.
8
Configuring the Wireless Bridge Units
3 Select Specify Encryption String.
4 Type the encryption string in the Encryption String field. Retype the
encryption string in the Confirm Encryption String field to make sure
that you have entered the string correctly.
5 Click OK when finished.
9
Quick Start Guide
Entering the Encryption Keys You can decline to enter an encryption
string and instead manually enter the WEP keys. To manually enter the WEP
keys in hexadecimal notation, follow these steps:
1 In the Network / Security tab of the Wireless Bridge Configuration screen,
select either 128-bit Shared Key or 40-bit Shared Key from the Security
setting list.
2 Click Encryption Key Settings.
The appropriate Encryption Key Settings screen appears.
3 Select Specify Encryption Keys.
4 Enter the key settings.
You must enter settings for all four keys. All four keys must be entered in
precisely the same hexadecimal notation for all the wireless bridges you
are configuring for your network.
5 Click one of the radio buttons to select the transmit key to use.
6 Click OK when finished.
Setting Network Transmission Options
The Options tab of the Wireless Bridge Configuration screen lets you set values
for the following options:
■ Transmit rate settings — Control the rates at which the wireless bridge
makes physical layer transmissions.
■ Medium reservation — Controls the 802.11 Request to Send/Clear to
Send (RTS/CTS) mechanism
■ Channel — Controls the radio frequency
Refer to the user guide for descriptions of the network transmission options.
10
Mounting the Wireless Bridge
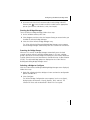
Mounting the Wireless Bridge
Mounting a wireless bridge unit is optional. If desired, you can simply leave the
unit standing freely on a table surface. Whether to mount the unit on a wall or
ceiling will usually depend on the length of the cable extending from the
bridge unit to the antenna.
1 Detach all cables from the wireless bridge so that you can safely and easily
mount the unit.
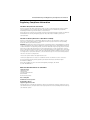
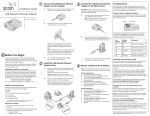
2 Remove the bottom mounting plate, as shown in the following figure.
3 Install the bottom mounting plate where desired with the supplied
mounting hardware.
4 Place the wireless bridge on the mounting plate and snap it into place.
Ensure that the bridge is secure.
Do not reattach network and power cables until after you have installed
and connected the antenna, as described in the next section.
Mounting the Antenna
Each 3Com Wireless Building-to-Building Bridge requires an appropriate
antenna:
■ An omnidirectional antenna for point-to-multipoint communications
or
■ A flat-panel antenna for point-to-point communications
Neither antenna is supplied with your wireless bridge: you must obtain the
antenna as a separate 3Com accessory. Refer to the user guide for more
information on antenna selection and positioning.
11
Quick Start Guide
To fine-tune the position of a particular antenna, it can be helpful to use a
mobile PC loaded with the Wireless Bridge Manager so that you can use a
diagnostic tool, the RSSI monitor, to adjust the angle and direction of the
antenna at the antenna site.
Perform the following steps for each wireless bridge antenna:
1 Mount the antenna within cable distance (50 ft. max.) of the wireless
bridge.
Refer to the user guide for detailed information about properly positioning
your antenna.
2 Connect the antenna cable to the SMA port on the wireless bridge.
To locate the SMA port, see the bridge back panel illustration on page 4.
3 Connect the other end of the antenna cable to the antenna.
4 Reattach all Ethernet cables and power cords to the wireless bridge unit.
5 Verify that the Ethernet LED on the bridge is illuminated.
The Ethernet LED lights green to show that a valid Ethernet link is present
through the 10BASE-T port. It lights amber during Ethernet activity.
6 Start the Bridge Manager software to scan the network for the installed
wireless bridge.
7 Using the Bridge Manager software, select the appropriate bridge and
use the RSSI Monitor tool to position the antenna so that it receives the
maximum possible signal strength.
The RSSI Monitor statistics will update only when traffic crosses the radio
link due to network activity.
Successfully positioning the antenna completes the wireless bridge installation.
12
Limited Warranty and
Regulatory Compliance Information
3Com Corporation Limited Warranty
This warranty applies to customers located in the United States, Australia, Canada (except Quebec), Ireland,
New Zealand, U.K., and other English language countries, and countries for which a translation into the local
language is not provided
3Com Wireless Building-to-Building Bridge
HARDWARE
3Com warrants to the end user ("Customer") that this hardware product will be substantially free from material
defects in workmanship and materials, under normal use and service, for the following length of time from the
date of purchase from 3Com or its authorized reseller:
Warranty duration.
One (1) year.
3Com’s sole obligation under this express warranty shall be, at 3Com’s option and expense, to repair the
defective product or part, deliver to Customer an equivalent product or part to replace the defective item, or if
neither of the two foregoing options is reasonably available, refund to Customer the purchase price paid for the
defective product. All products that are replaced will become the property of 3Com. Replacement products or
parts may be new or reconditioned. 3Com warrants any replaced or repaired product or part for ninety (90)
days from shipment, or the remainder of the initial warranty period, whichever is longer.
SOFTWARE
3Com warrants to Customer that each software program licensed from it, except as noted below, will perform
in substantial conformance to its published program specifications, for a period of ninety (90) days from the date
of purchase from 3Com or its authorized reseller. 3Com warrants the media containing software against failure
during the warranty period. No updates are provided under this warranty. 3Com's sole obligation under this
express warranty shall be, at 3Com's option and expense, to refund the purchase price paid by Customer for any
defective software product, or to replace any defective media with software which substantially conforms to
applicable 3Com published program specifications. Customer assumes responsibility for the selection of the
appropriate applications program and associated reference materials.
3Com makes no warranty or representation that its software products will meet Customer’s requirements or
work in combination with any hardware or applications software products provided by third parties, that the
operation of the software products will be uninterrupted or error free, or that all defects in the software
products will be corrected. For any third party products listed in the 3Com software product documentation or
specifications as being compatible, 3Com will make reasonable efforts to provide compatibility, except where
the non-compatibility is caused by a "bug" or defect in the third party's product or from use of the software
product not in accordance with 3Com’s published specifications or user manual.
THIS 3COM PRODUCT MAY INCLUDE OR BE BUNDLED WITH THIRD PARTY SOFTWARE. THE WARRANTY
PROVISIONS OF THIS DOCUMENT DO NOT APPLY TO SUCH THIRD PARTY SOFTWARE. IF A SEPARATE END
USER LICENSE AGREEMENT HAS BEEN PROVIDED FOR SUCH THIRD PARTY SOFTWARE, USE OF THAT
SOFTWARE WILL BE GOVERNED BY THAT AGREEMENT. FOR ANY APPLICABLE WARRANTY, PLEASE REFER
TO THE END USER LICENSE AGREEMENT GOVERNING THE USE OF THAT SOFTWARE.
Limited Warranty and Regulatory Compliance Information
OBTAINING WARRANTY SERVICE
Customer must contact a 3Com Corporate Service Center or an Authorized 3Com Service Center within the
applicable warranty period to obtain warranty service authorization. Dated proof of purchase from 3Com or its
authorized reseller may be required. A User Service Order (USO), Return Material Authorization (RMA) or Service
Repair Order (SRO) number will be issued. This number must be marked on the outside of the package. The
product must be packaged appropriately for safe shipment and sent prepaid. It is recommended that returned
products be insured or sent by a method that provides for tracking of the package. Responsibility for loss or
damage does not transfer to 3Com until the returned item is received by 3Com. 3Com will make commercially
reasonable efforts to ship the repaired or replaced item to Customer, at 3Com's expense, not later than thirty
(30) days after 3Com receives the defective product. 3Com will retain risk of loss or damage until the item is
delivered to Customer.
3Com shall not be responsible for any software, firmware, information, or memory data of Customer contained
in, stored on, or integrated with any products returned to 3Com for repair, whether under warranty or not.
WARRANTIES EXCLUSIVE, WARRANTY DISCLAIMER
TO THE FULL EXTENT ALLOWED BY LAW, THE FOREGOING WARRANTIES AND REMEDIES ARE EXCLUSIVE AND
ARE IN LIEU OF ALL OTHER WARRANTIES, TERMS, OR CONDITIONS, EXPRESS OR IMPLIED, EITHER IN FACT OR
BY OPERATION OF LAW, STATUTORY OR OTHERWISE, INCLUDING, WITHOUT LIMITATION, WARRANTIES OF
MERCHANTABILITY, FITNESS FOR A PARTICULAR PURPOSE, SATISFACTORY QUALITY, CORRESPONDENCE WITH
DESCRIPTION, NON-INFRINGEMENT AND QUIET ENJOYMENT, ALL OF WHICH ARE EXPRESSLY DISCLAIMED.
3COM NEITHER ASSUMES NOR AUTHORIZES ANY OTHER PERSON TO ASSUME FOR IT ANY OTHER LIABILITY IN
CONNECTION WITH THE SALE, INSTALLATION, MAINTENANCE OR USE OF THIS PRODUCT.
3COM SHALL NOT BE LIABLE UNDER THIS WARRANTY IF ITS TESTING AND EXAMINATION DISCLOSE THAT THE
ALLEGED DEFECT OR MALFUNCTION IN THE PRODUCT DOES NOT EXIST OR WAS CAUSED BY CUSTOMER'S OR
ANY THIRD PERSON'S MISUSE, NEGLECT, IMPROPER INSTALLATION OR TESTING, UNAUTHORIZED ATTEMPTS
TO OPEN, REPAIR OR MODIFY THE PRODUCT, OR ANY OTHER CAUSE BEYOND THE RANGE OF THE INTENDED
USE, OR BY ACCIDENT, FIRE, LIGHTNING, POWER CUTS OR OUTAGES, OTHER HAZARDS, OR ACTS OF GOD.
LIMITATION OF LIABILITY
TO THE FULL EXTENT ALLOWED BY LAW, 3COM ALSO EXCLUDES FOR ITSELF AND ITS LICENSORS AND
SUPPLIERS ANY LIABILITY, WHETHER BASED IN CONTRACT OR TORT (INCLUDING NEGLIGENCE), FOR
INCIDENTAL, CONSEQUENTIAL, INDIRECT, SPECIAL, OR PUNITIVE DAMAGES OF ANY KIND, OR FOR LOSS OF
REVENUE OR PROFITS, LOSS OF BUSINESS, LOSS OF INFORMATION OR DATA, OR OTHER FINANCIAL LOSS
ARISING OUT OF OR IN CONNECTION WITH THE SALE, INSTALLATION, MAINTENANCE, USE, PERFORMANCE,
FAILURE, OR INTERRUPTION OF ITS PRODUCTS, EVEN IF 3COM OR ITS AUTHORIZED RESELLER HAS BEEN
ADVISED OF THE POSSIBILITY OF SUCH DAMAGES, AND LIMITS ITS LIABILITY TO REPAIR, REPLACEMENT, OR
REFUND OF THE PURCHASE PRICE PAID, AT 3COM'S OPTION. THIS DISCLAIMER OF LIABILITY FOR DAMAGES
WILL NOT BE AFFECTED IF ANY REMEDY PROVIDED HEREIN SHALL FAIL OF ITS ESSENTIAL PURPOSE.
Some countries, states, or provinces do not allow the exclusion or limitation of implied warranties or the
limitation of incidental or consequential damages for certain products supplied to consumers, or the limitation of
liability for death or personal injury, so the above limitations and exclusions may be limited in their application to
you. When the implied warranties are not allowed to be excluded in their entirety, they will be limited to the
duration of the applicable written warranty. This warranty gives you specific legal rights which may vary
depending on local law.
GOVERNING LAW
This Limited Warranty shall be governed by the laws of the State of California, U.S.A., and by the laws of the
United States, excluding their conflicts of laws principles. The United Nations Convention on Contracts for the
International Sale of Goods is hereby excluded in its entirety from application to this Limited Warranty.
3Com Corporation
5400 Bayfront Plaza
P.O. Box 58145
Santa Clara, CA 95052-8145 USA
(408) 326-5000
4/12/01
v8.2
Limited Warranty and Regulatory Compliance Information
Regulatory Compliance Information
FCC RADIO-FREQUENCY EXPOSURE NOTICE
This device generates and radiates radio-frequency energy. In order to comply with FCC radio-frequency radiation
exposure guidelines for an uncontrolled environment, this equipment has to be installed and operated while
maintaining a minimum body to antenna distance of at least 2 meters.
This product does not contain any user serviceable components. Any unauthorized product changes or modifications
will invalidate 3Com’s warranty and regulatory approvals. This product must be installed by a professional
technician/installer.
FCC PART 15 NOTICE (APPLICABLE TO USE WITHIN THE USA)
This device complies with part 15 of the FCC Rules. Operation is subject to the following two conditions: (1) This
device may not cause harmful interference, and (2) this device must accept any interference received, including
interference that may cause undesired operation.
WARNING: This equipment has been tested and found to comply with the limits for a Class B digital device, pursuant
to Part 15 of the FCC Rules. These limits are designed to provide reasonable protection against harmful interference in
a residential installation. This equipment generates, uses and can radiate radio frequency energy and, if not installed
and used in accordance with the instructions, may cause harmful interference to radio communications. However,
there is no guarantee that interference will not occur in a particular installation. If this equipment does cause harmful
interference to radio or television reception, which can be determined by turning the equipment off and on, the user
is encouraged to use a professional technician to correct the interference by one or more of the following measures:
• Reorient or relocate the receiving antenna.
• Increase the separation between the equipment and receiver.
• Connect the equipment into an outlet on a circuit different from the one which the receiver is connected to.
The user may find the following booklet prepared by the Federal Communications Commission helpful:
The Interference Handbook
This booklet is available from the U.S. Government Printing Office, Washington, D.C. 20402.
Stock No. 004-000-00345-4.
MANUFACTURER’S DECLARATION OF CONFORMITY
3Com Corporation
5400 Bayfront Plaza
P.O. Box 58145
Santa Clara, CA 95054-8145
(408) 326-5000
Declares that the product:
Date: 31 May 2001
Brand Name: 3Com Corporation
Model Number: WL-311
Equipment Type: Wireless LAN
Complies with Part 15 of the FCC rules. Operation is subject to the following two conditions: (1) this device may not
cause harmful interference, and (2) this device must accept any interference received, including interference that may
cause undesired operation.
Limited Warranty and Regulatory Compliance Information
3Com Corporation
Tested to Comply
With FCC Standards
FOR HOME OR OFFICE USE
INDUSTRY CANADA NOTICE (APPLICABLE TO USE WITHIN CANADA)
This Class B digital apparatus complies with Canadian ICES-003.
To prevent radio interference to the licensed service, this device is intended to be operated indoors and away from
windows to provide maximum shielding. Equipment (or its transmit antenna) that is installed outdoors is subject to
licensing.
AVIS DE CONFORMITÉ À LA RÉGLEMENTATION D’INDUSTRIE CANADA
Cet appareil numérique de la classe B est conform à la norme NMB-003 du Canada.
Pour empêcher que cet appareil cause du brouillage au service faisant l'objet d'une licence, cet appareil doit être utilisé
à l'intérieur seulement et devrait être placé loin des fenêtres afin de fournir un écran de blindage maximal.
EUROPEAN COMMUNITY - CE NOTICE
Marking by the symbol:
indicates compliance of this equipment to the R&TTE Directive 1999/5/EC.
Such marking is indicative that this equipment meets or exceeds the following technical standards:
■
ETS 300 328 - Electromagnetic compatibility and Radio spectrum Matters (ERM); Wideband
Transmission systems; data transmission equipment operating in the 2,4 GHz ISM band and using
spread spectrum modulation techniques
■
ETS 300 826 - Electromagnetic compatibility and Radio spectrum Matters (ERM); ElectroMagnetic
Compatibility (EMC) standard for 2,4 GHz wideband transmission systems and HIgh PErformance Radio
Local Area Network (HIPERLAN) equipment
■
ES 59005 - Considerations for the evaluation of human exposure to electromagnetic fields (EMF's) from
mobile telecommunication equipment (MTE) in the frequency range 30 MHz - 6 GHz
■
EN 55022 - Limits and Methods of Measurement of Radio Interference Characteristics of Information
Technology Equipment. (CISPR 22 Class B).
■
EN 60950 - Safety of information technology equipment, including electrical business equipment.
SAFETY COMPLIANCE NOTICE
This device has been tested and certified according to the following safety standards and is intended for use only in
Information Technology Equipment which has been tested and certified to these or other equivalent standards:
■
UL Standard 1950 / CSA C22.2 No. 950
■
IEC 60950
■
EN 60950
Published June, 2001