1
RPAA1, B1, C1
Installation Instructions
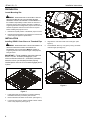
Attaching Projector to Security Mount Drawer
Aligning Projector
1.
Align projector and security mount drawer so that the
projector is oriented correctly.
The RPAX1 can be adjusted for vertical elevation (pitch),
horizontal tilt (roll), and rotation (yaw).
2.
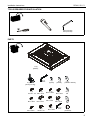
Remove the paper backing from the adhesive washers (V)
and attach projector to drawer using adhesive washers (V)
and thumbnuts (P) over the security legs (R). (See Figure 8)
Pitch
(P) x 4
2
(V) x 4
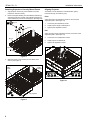
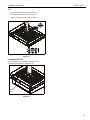
Adjust pitch using the adjustment screws on the end of the
adjustment plate. (See Figure 10)
1.
Loosen the pitch adjustment screws.
2.
Adjust projector angle to desired pitch.
3.
Tighten pitch adjustment screws.
Roll
Adjust roll using the two adjustment screws on the back of the
adjustment plate. (See Figure 10)
(R) x 4
4.
Loosen the two roll adjustment screws.
5.
Adjust projector to desired roll.
6.
Tighten roll adjustment screws.
Projector
2
Figure 8
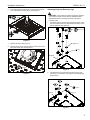
3.
Slide the security mount drawer into the RPAX1 outer
sleeve. (See Figure 9)
Security
Mount
Drawer
5
RPAX1
Outer
Sleeve
4
5
1
6
Figure 10
Projector
3
Figure 9
8
2
3
pitch adjustment screws
roll adjustment screws