1
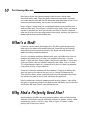
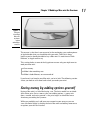
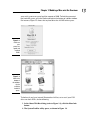
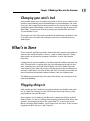
Chapter 1 RI AL Modding a Mac mini: An Overview TE In This Chapter 䊳 Knowing when to mod your Mac 䊳 Finding out what you can do to your Mac 䊳 Making a plan for your mod TE D 䊳 Thinking about software MA 䊳 Discovering hacks and mods T CO PY RI GH he multipurpose mini is the most modifiable Mac on the market. If you don’t yet have a mini, you will realize this as soon as you pull it out of its Styrofoam cocoon. Sure, there’s the big expensive Power Mac with its expansion slots and room for more hard drives than any sane person needs, but its sheer bulk makes it destined to be tied to a desk or working as a network server in a closet somewhere. The Mac mini, on the other hand, is the size of a few CD jewel cases, as big as one of the Power Mac’s hard drives, fitting inside the pocket of your cargo pants. Not only can you install things inside the Mac mini, but you can also install the mini itself inside of other places. This book shows you how to modify (alter the hardware) and hack (change the look or function of software) a Mac mini to be more productive, to have fun, or to go where no Mac has gone before, at least in your experience as a Mac user. Or maybe you’re a veteran Windows user switching to your first Mac and want to know what you can do with it inside and out. Perhaps you don’t have a mini yet, but you think the minis are cool and you’re looking for a reason to justify augmenting the Mac you already have. 10 Part I: Owning a Mac mini Don’t worry if you aren’t daring enough to do the most radical mods described in this book. There are plenty of down-to-earth mods that won’t cost more than the mini did. But the maxed-out mods described in Part VI are interesting and entertaining, even if you just read about them. In this chapter, I cover what you should know before you do anything rash with your Mac mini. This chapter is all about scope, and it shows you how to find out if your mini has what you need for your mod. It also lets you know what you’re in for, what you might need to investigate, and why you’d want to modify and hack your beautiful Mac mini. What’s a Mod? If you ever saw the movie Quadrophenia by The Who, you’d recognize the term mod as the name of the trendily dressed, Vespa-driving, occasionally rioting British youth faction of the early ’60s. Hyper and with attitude, the mods were doing something different. A mod is also doing something different with your stylish Mac mini. Not just changing the look or feel, but using it for something that you — or even Apple — might not have thought about. And because your Mac is a tiny mini, it can go in places that you wouldn’t ordinarily take a Mac, such as in your TV’s entertainment center, in a cupboard, or in your car. I don’t recommend using a Mac mini on a Vespa, however. A mod isn’t limited to working with the hardware. Changing or adding software can open up the mini to new uses just as changes to hardware can. Then there are hacks, which usually describe unusual techniques for changing software for good or for ill. I only talk about the good here. Like the authorities facing an armada of mod-carrying scooters, some of the designers at Apple may cringe at the kind of mods and hacks you can do with and to your Mac mini. There’s your attitude for you. Why Mod a Perfectly Good Mac? Apple loaded up the Mac mini with plenty of goodies, both in hardware and software. It already lets you do cool things with music, photos, movies, video conferencing, e-mail — the list is long. And, as Figure 1-1 shows, it looks pretty cool. So why mess with it? Chapter 1: Modding a Mac mini: An Overview Figure 1-1: Take your 2-inch high Mac mini to places where other Macs won’t fit. The answer is that there’s no reason to let the marketing gurus and engineers at Apple decide what you should do with your mini. Their job is done, because you’ve already decided to buy a Mac mini. It’s now time to Think Different, as Apple used to say. This section looks at some of the big-picture reasons why you might want to mod your Mac mini: ⻬ Save money ⻬ Make it do something new ⻬ Make it look different, on-screen and off If you haven’t yet bought your Mac mini, you’re in luck. The following section shows you how to save some bucks when you order your mini. Saving money by adding options yourself Buying a Mac mini is a little like buying a car. The basic model has an affordable sticker price. But as soon as you start adding options — power windows, sunroof, and cruise control — the price begins to climb like Lance Armstrong ascending the Pyrenees. While you probably can’t add your own sunroof to your new car, you can save substantial bucks by buying the basic Mac mini and adding some extras or options yourself. For instance: 11 12 Part I: Owning a Mac mini ⻬ RAM: Depending on when you bought your Mac mini, you either have 256MB, 512MB, or 1GB. When you order a Mac mini, Apple offers to up your RAM memory from the basic configuration for a fee. It may seem tempting until you find out that you can find an upgrade RAM module for at least $15 cheaper than what Apple charges at purchase time. If you hunt around, you can find a 1GB RAM model for the mini for about $85. Chapter 7 shows you how to install RAM yourself. For the best prices for RAM memory, check out www.ramseeker.com. This site isn’t a seller of RAM. Instead, it finds the cheapest prices at the moment from different sellers and displays links to those sellers’ Web sites. You don’t need to know the tech specs of the type of RAM that fits in the mini. Just choose Mac mini from the menu on the RamSeeker home page, and you get a list of Mac mini RAM prices from several different RAM sellers. The price of RAM can change daily, so make sure you check back before you place your order. ⻬ Keyboard and mouse: If you have a box of keyboards and mice in your garage from all of the Macs and PCs you’ve owned, there’s no need to buy another set. If you do need a keyboard or mouse, you can find them for less than what Apple charges. Chapter 2 describes what to look for in a keyboard and mouse for your mini. ⻬ Wireless goodies: If you’re going to be adding wireless peripherals to the mini, you’ll need Bluetooth. An external Bluetooth adapter generally costs less than Apple’s internal Bluetooth upgrade. On the other hand, Apple’s price for AirPort wireless networking is on par with other vendors, and its bundle of both AirPort and Bluetooth upgrades is actually a good deal. If you already bought your Mac mini without wireless, read Chapter 6 to install it yourself. ⻬ Hard drive: Apple can increase the basic 40GB hard drive to 80GB for $50, or to 100GB for $150, which isn’t bad. The problem is that 80GB or even 100GB isn’t a whole lot of storage if you plan on filling up a 60GB iPod or want to do a bit of video editing with iMovie. Over time, Apple increases the size of the biggest hard drive option, but it is never as big as what’s available. If you think you’ll need to go beyond 100GB of storage, order your mini with the basic 40GB and put your money toward a big hard drive. Chapter 7 describes replacing the internal drive. ⻬ DVD burners: One upgrade from Apple that you just can’t beat is the SuperDrive DVD burner. You won’t be able to come near Apple’s price of $100 for the slot-loaded DVD-RW drive, so if you want to put your movies on disc or need over 4GB of storage per disc, the Apple upgrade is the way to go. If you missed out when you bought your mini, check out Chapter 8 to do your own upgrade. Even if you already own a Mac mini, you may still need to add some of these hardware options. But you may not know what hardware is already inside the mini. Fortunately, all you have to do is ask Mac OS X. Go to the menu and choose About This Mac. A window appears, as shown in Figure 1-2, showing Chapter 1: Modding a Mac mini: An Overview your mini’s processor speed and the amount of RAM. To find the amount of free hard disk space, go to the Finder and look at the bottom of a folder window. For instance, Figure 1-3 shows that my hard drive has 24.12GB of free space. Figure 1-2: Check out your processor speed and installed RAM. Figure 1-3: Look at the bottom of the window for the available hard disk space. To find out if you have internal Bluetooth or AirPort, or to see if your DVD drive can burn DVDs, do the following: 1. In the About This Mac dialog (refer to Figure 1-2), click the More Info button. 2. The System Profiler utility opens, as shown in Figure 1-4. 13 14 Part I: Owning a Mac mini Figure 1-4: Open System Profiler to check the hardware options installed inside the mini. 3. Click Disc Burning to find out if your optical drive can burn DVDs. Figure 1-4 shows that this Mac mini can. 4. Click Bluetooth or AirPort Card to see if your mini has these wireless options installed. New tricks for a not-so-old mini Saving money is all well and good, but a more fun reason to mod your mini is to make it do something different. If you like to use iTunes to listen to music and watch movies, try a few modifications to have the mini control the entertainment center in your living room, as described in Chapter 9. Or have it control music and video in your car (check out Part V). Try doing these things with an iMac. And do you really want to spend $1500 to dedicate a PowerBook to your car? Speaking of going mobile, you can also use the mini in different places. If you don’t have a notebook computer to carry to different locations, the Mac mini can be the next best thing. Chapter 3 shows you how to take the mini on the road. Chapter 1: Modding a Mac mini: An Overview Changing your mini’s look Some modifications have no productivity value at all but are very high on the coolness meter. Making your mini look different is pure indulgence. Do something easy, like turning the mini into one half of a pair of fuzzy dice. Or attempt something harder, like building a clear plastic case reminiscent of some of the older iMacs. Or amaze your friends by putting your modern Mac mini into a 15-year-old Mac Classic. The chapters in Part VI describe these kinds of modifications and hacks. Part VI also describes the tools and techniques you can use to build your own mod designs. What’s in Store There are mods and there are mods. Some mods don’t require much effort or time to make, while with others, there is “some assembly required.” Finally, other mods can fall into the categories of hobbies, or with some people, obsession. A good place to start out modding is to add peripheral hardware and new software. The next level is cracking open the case and exposing the guts of your mini, something that you’ll find yourself doing a lot in this book. When you start replacing parts yourself, you may venture into the realm of voiding your warranty if your mini is less than 90 days old. Part VI includes instructions on how to break out the ultimate hardware hacker’s tool: the soldering iron. The following subsections describe some of the things you can expect to do when mini modding. Plugging things in Okay, maybe you don’t think that plugging hardware into the Mac mini qualifies as a mod. Fair enough, but you can do some interesting things by plugging hardware into your Mac mini. Some chapters in this book use the Mac mini’s connection abilities to do all kinds of things. I’m not just talking about plugging in external hard drives and scanners, but plugging in things like stereos and TVs. If you’re new to the Mac or switching from Windows, read Chapter 2 for the basics. If you’ve been plugging into Macs for years, skip Chapter 2. 15 16 Part I: Owning a Mac mini Adding software Not all modifications are made completely with hardware. Some modifications require you to install new software on the Mac mini. For instance, the description in Chapter 10 of controlling home appliances uses software that you may not have heard of before. It’s not difficult to install software, but it’s not something you should do blindly, either. The next step up from that is hacking the operating system, described in Chapter 18. Check out the section, “Software Considerations,” later in this chapter. Adding software includes upgrading Mac OS X. Although Apple wants you to upgrade to the latest and greatest, the latest may not actually be the best for your purposes. Always be careful before changing a perfectly good OS installation. For the details, check out the section, “When to upgrade Mac OS X,” later in this chapter. Breaking open the box Many of the mods and hacks require that you crack open the Mac mini to get to the guts. It’s not obvious how to open it, or that it can be opened at all. There are no screws, no visible tabs, and no holes in which to stick implements. The Mac mini looks like it appeared fully formed, just like Athena popping out of the head of Zeus (although without quite the same mythic proportions). I will be honest with you: The first time you open the mini will be nerve– wracking. Don’t worry, though. It’s actually not that difficult — as long as you know what you’re doing. Chapter 4 describes how to open the Mac mini. Replacing parts Some mods involve taking original parts out of the mini and replacing them with something else, either because you just want something better, or you want to make repairs yourself. Apple sanctions the replacement of a few parts, such as RAM. For other parts, such as the hard drive and the optical driver, you’re on your own. It’s not a good idea to remove these parts before the 90-day warranty expires, though. The main thing to remember about replacing internal parts is to make sure you’re not carrying a static electricity charge that can damage the Mac’s circuitry. Some parts will come with a wrist strap that you attach to a metal appliance, which has the effect of electrically grounding you. If you don’t Chapter 1: Modding a Mac mini: An Overview have a wrist strap, just be sure that before you touch any of the Mac mini’s internal parts, you touch a metal lamp or other metal object to discharge static electricity you may be holding. Planning Your Mod The most basic goal of any project is to finish it. Doing some planning before you start can prevent you from running out of money, time, parts, technical skill, or enthusiasm in the middle of a project. Planning is knowing what you’re getting into and how to get out of it. The more complex a project is, the more planning will be helpful. Some mods, such as installing more RAM, require a minimum of planning. For others, such as installing a Mac mini in your car, you want to spend the time to do thorough planning before you touch or buy anything. Here are the basic steps to take to plan for a complex modding project: 1. Estimate the scope of the project. 2. Estimate the time it will take. 3. Estimate the cost. 4. Locate potential suppliers of parts and tools. 5. Set realistic expectations. Sizing up the job The first step in planning a project is to estimate how big a job it will be and how much work you’ll need to put into it. List all major steps involved in the project. Check to see if you’re missing anything. It’s easy to overlook something when you’re reading about it. I find that the act of writing things down gives me a better understanding of what’s involved. This makes it less likely that I’ll skip a step or hit a brick wall in the middle. After you make your list, review each of the steps. Identify any steps that might stick out as particularly labor-intensive or that might require additional research or understanding. You need to know what you’re doing at each step of the way. 17 18 Part I: Owning a Mac mini Estimating time Estimating how long it will take to complete a project is one of the more difficult aspects of planning, but it is important to know if you want to finish the project. You can think of time estimation as the second, more detailed part of the estimating process you started in the preceding section. Here’s a trick. Before you start your time estimation, decide how much time you want to spend on the project. You’ll find this handy to compare it to the estimate you come up with. Look at the list of steps you created in the preceding section and assign a time estimate to each step. If the project requires a technique that you’ve never used before, try out some sample tasks to see how long it will take. Now add up the time estimates for each step. Then increase the sum by 25 percent. Like a lot of home improvement projects, a complex modification will almost always take longer than you initially thought it would. Finally, compare this final number to the amount of time you were willing to spend on the project. I’m guessing that it will be larger. You’ll now need to reevaluate how much time you are willing to put into the project. Estimating costs Cost estimation is one of the easier planning tasks. That’s because it’s objective: You find numbers and add them up. This doesn’t mean you can’t underestimate costs, so it pays to be methodical. ⻬ Create a parts list. Go through your list of steps again and list the parts that you’ll need. Don’t forget the smaller items. The cost of items such as cables can quickly add up when you aren’t looking. ⻬ Create a tools list. First, list the tools that the project will require. Then inventory your own tools and note which tools you’ll need to buy. ⻬ Use the Internet to estimate cost. Whether it’s cables, drives, or tools, you can use Google to search for what you need and come up with pricing information. If these are big-ticket items, include estimates for shipping and sales tax. It’s annoying as all heck when Google returns 600,000 items that are mostly relevant to Windows PCs. To restrict Google to Mac items, try searching www.google.com/mac. This will separate the Macs from the chaff. Chapter 1: Modding a Mac mini: An Overview Now add up the costs. If the total exceeds the amount you wanted to spend for the project, you may want to rethink your plan. But it’s better finding this out now than after you started to invest. Locating suppliers For some particularly adventurous modifications, be sure you can actually get the parts or tools you need before you start your modifications. You don’t want to get halfway through a project only to be stopped because you can’t find a particular and necessary item. If you have to rethink your plan, it’s best to do it before you start so you don’t waste your efforts. Throughout this book, I give you suggestions as to where you will find parts. These are only jumping-off places, as are some of the mods described in this book. When you branch off on your own mods, you may need to find your own vendors. Of course, the Internet, and Google in particular, is a great way to find suppliers, no matter where they are located. Setting realistic expectations The final bit of planning is to estimate your own abilities and endurance. Before you start a modding project, make sure that you have a realistic idea of what you can accomplish. Part of this is knowing what kind of commitment you’re willing to give to the project. Ask yourself some questions and see if you can give yourself some honest answers: What do I really want out of this project? Do I have the time and energy to devote to my goal? If I don’t reach my goal, what would I be willing to settle for? What you don’t want is to get stuck halfway through a project, with a partially assembled Mac mini gathering dust. Software Considerations Some Mac mini mods call for adding software or upgrading Mac OS X. Installing software may seem like an easy aspect of modding, but before you 19 20 Part I: Owning a Mac mini buy the new software, you first need to find out if your Mac mini is up to snuff. When to upgrade Mac OS X Don’t be a Mac OS X pioneer when it comes to upgrading to major new “cat” versions of Mac OS X (Jaguar, Panther, Tiger, Leopard, and so on). A Mac OS X pioneer is someone who races out to buy the newest version of Mac OS X while the shrink-wrap on the box is still warm. Bad idea. The first “.0” releases of Jaguar, Panther, and Tiger contained bugs and incompatibilities with existing software and even with some hardware. It takes a little while for manufacturers to catch up to Mac OS X, and it takes Apple some time to create backwards compatibility with some software. The best practice is to hold off changing cats until Apple issues one or two “.1” upgrades. That’s a version such as 10.4.1 or 10.4.2 (or 10.5.1 or 10.5.2) that you can install using the Software Update utility in System Preferences. Let other people find the problems with brand new versions of Mac OS X for you. Read the problem reports at Web sites such as macintouch.com and macfixit.com. Researching your software’s needs Before putting out any money for software, do a little research. If you don’t plan, your brand new software may run slowly, or it may not run at all. Read the requirements Before you install software, and even some hardware, read the requirements that the manufacturer recommends for a minimum Mac system. This will be the amount of RAM memory, the amount of free hard disk space, and the type of processor the software needs to run. If you’re buying software in a retail store, the requirements section is listed on the box in ultra-small type. The manufacturer’s Web site should also list the software’s requirements. Chapter 1: Modding a Mac mini: An Overview Check for Intel processors Starting in 2006, Apple will begin shipping certain Mac models with Intel Pentium processors (the same processors that Windows PCs use). Eventually, Apple will retire the PowerPC, and all Macs will run Intel processors. (Perhaps Apple will change the name from Macintosh to Macintel, but I wouldn’t bet on it.) We don’t know when the Mac mini, or any other Mac model, will make the switch. As far as requirements go, a lot of software will run on both Intel and PowerPC processors. Most of the software you already have (which is written for PowerPC software) will also run on Intel-based Macs. So if the processor requirement says “1 GHz G4,” it will likely run on an Intel Mac of some gigahertz rating. Newer software may only run on Intel Macs, so you will need to check your software carefully before purchasing. The switch to Intel processors could also affect hardware. Most peripherals use driver software, sometimes built into Mac OS X, and sometimes provided by the manufacturer. Chances are good that some hardware just won’t work on the newer Macintel boxes, at least for a while. At this point, it’s difficult to say whether PowerPC or Intel processors are faster. When comparing different processors, the gigahertz ratings of each don’t reflect the same performance measures. The main reason Apple is switching to Intel is that IBM is not moving fast enough in producing new versions of PowerPC processors. At some point, the fastest Intel processors will be faster than IBM processors, not because of gigahertz ratings, but because Intel is advancing faster than IBM. This will translate into faster Macs. Don’t squeak by Software manufacturers always list the bare minimum hardware required to run their software. This is kind of like watching a big blockbuster movie on a tiny black and white TV with a 1-inch speaker. Yes, you can do it, but you’d be happier with beefier hardware. So if the manufacturer says its software requires 256MB of RAM memory and you have 256MB, go out and buy some more RAM. Otherwise, you’re likely to get slower performance than you’d like. If the requirement for free hard disk space is 3GB and you have 3.1GB, the software will install, but you aren’t going to have much space to do much else. If the required processor is a 1.2 GHz PowerPC and your Mac mini has a 1.2 GHz PowerPC processor, you’re squeaking by. (Chapter 19 describes how to use a soldering iron to push that 1.2 GHz to 1.4 GHz.) 21 22 Part I: Owning a Mac mini