1
PART I
TE
RI
AL
DEPLOYMENT AND
ADMINISTRATION SECRETS
Windows Server 2008 R2 Deployment Secrets
Chapter 2
The Windows Server 2008 R2 Administrator’s Toolkit
Chapter 3
Server Core Secrets
Chapter 4
Active Directory Domains and Forests
Chapter 5
Effectively Managing Group Policy
Chapter 6
Managing Users and Computers
Chapter 7
Managing Active Directory Certificate Services
CO
PY
RI
GH
TE
D
MA
Chapter 1
C h apt e r 1
1
Windows Server 2008 R2
Deployment Secrets
I n T h i s C h apt e r
33
Understanding the differences between Windows Server 2008 R2 editions
33
Creating a deployment image
33
Choosing virtual or physical deployment
33
Minimizing deployment time
33
Going further with System Center
As an experienced administrator, you’ve installed Windows
Server operating systems more times than you can count. You didn’t pick up this book
of secrets to read a walkthrough telling you how to insert a DVD into an optical drive
and then proceed with a screen-by-screen description of how to perform the install. At
this stage of your career, you are likely to perform a traditional optical media OS installation only if you haven’t had time to set up Windows Deployment Services or configure
a custom image on a USB flash drive.
In this chapter, you learn the differences between the various editions of Windows
Server 2008 R2, including the answer to the question, “What is the real difference
between the Enterprise and Datacenter Editions, beyond the licensing cost?” And,
you find out what the Foundation Edition is and the types of situations where it makes
sense to deploy Windows Web Server 2008 R2.
4
C h apt e r 1 Windows Server 2008 R2 Deployment Secrets
Read this chapter and you will also learn how to set up a USB flash drive to deploy
Windows Server 2008 R2 to individual servers far more quickly than using a DVD. You
learn how to modify the install image to include drivers and updates, so you don’t
have to install them as part of post-installation configuration, and you find out how
to switch on certain features, so you don’t have to do it manually after the deployment is complete.
This chapter contains information you can use to get Windows Deployment Services not only broadcasting images in WIM format, but also how to add VHD images to
the deployment server. You also learn about the types of situations where you’ll save
your organization time and money by using answer files and products like System
Center Configuration Manager.
Choosing an Edition of Windows Server 2008 R2
You probably know that Windows Server 2008 R2 comes in a variety of flavors, but
do you know the real differences between each edition? Though most systems administrators deal with only one or two editions of Windows Server 2008 R2 on a regular
basis, there are a total of seven editions available. Of course the more editions there
are, the greater the complexity in choosing the right one for a specific set of needs.
When most administrators see the number of editions that are available, they throw
up their hands and choose the Enterprise Edition. In general, choosing the Enterprise Edition of any Microsoft product is a reasonable strategy, because with it, you
have access to all the available features and won’t be caught unable to install some
unusual role like Federation Services. The downside of this strategy is that occasionally you’ll spend more on a server operating system license than might actually be
necessary. In reality, understanding the differences between the editions comes
down to the following factors:
33 How many virtual licenses you want included with your OS so you can run
separate instances on the same machine.
33 Whether you need a specific feature or role, such as wanting to set up an
enterprise root certificate authority.
33 Whether you have a specific amount of RAM or number of processors that you
want to be able to support.
5
Choosing an Edition of Windows Server 2008 R2
NO TE All
versions of Windows Server 2008 R2 run on only 64-bit platforms. If
you’ve got a server that has a 32-bit processor, you won’t be able to run Windows
Server 2008 R2, though you will still be able to run Windows Server 2008.
There are seven editions of Windows Server 2008 R2. The differences between
them are as follows:
33 The Standard Edition comes with only one virtual license, does not support
Active Directory Federation Services, and has caveats when it comes to hosting the Certificate Services role. There are connection limits on Network Policy and Access Services and Remote Desktop Services roles, and DFS is limited
to one stand-alone DFS root. The Standard Edition supports up to four processor
sockets and up to 32 GB of RAM.
33 Enterprise comes with four virtual licenses, supports all server roles and features, and supports up to eight sockets and 2 TB of RAM. This version of Windows Server 2008 R2 is most commonly deployed in medium- to large-sized
organizations.
33 The Datacenter Edition differs from the Enterprise Edition only in that you
get an unlimited number of virtual instances and can use up to 64 processor
sockets. The Datacenter Edition is most often deployed in virtualization
scenarios, as it allows you to run as many virtual machines as you want on the
one bit of hardware.
33 The Foundation Edition is available only from OEMs on single-socket servers and is limited to 8 GB of RAM. The key to understanding the Foundation
Edition is that it is limited to 15 user accounts. You can have it as a Domain
Controller (DC) or as a member server, but if there are more than 15 accounts
in the domain or on the stand-alone system, the Foundation Edition will
automatically shut down after a ten-day grace period. With that 15-account
limitation and a few minor exceptions, the Foundation Edition supports the
same features as the Standard Edition of Windows Server 2008 R2. You cannot
install the Foundation Edition in the Server Core configuration.
33 The Web Server Edition supports only the Web server and DNS server roles. It is
cheaper to license than other editions, and you should deploy it if you need a
server running IIS but nothing else. It supports up to 32 GB of RAM and four
processor sockets.
are
Sockets om
3f3
erent fr
dif
if you
cores, soollection
have a ccore
of quad-ors that
process he same,
are all t install four
you can quadof thesecessors
core prover that
on a sere Standard
runs th of Windows
Edition 2008 R2.
Server
6
C h apt e r 1 Windows Server 2008 R2 Deployment Secrets
33 The HPC Server Edition is used in high-performance computing applications
where it is necessary to run complex jobs against thousands of processing
cores. The HPC Server version of Windows Server 2008 is often used with special applications for financial analysis. It supports up to 128 GB of RAM and
four processor sockets.
33 Windows Server 2008 R2 for Itanium Edition runs on the Itanium platform and
supports only Itanium-specific server applications, like SQL Server 2008 R2.
NO TE 2 008
R2 will be Microsoft’s last server release for the Itanium platform.
In general, it costs less to deploy a server running the Enterprise Edition than it
does to deploy five servers running the Standard Edition. Therefore, it makes sense
to choose the Enterprise Edition with its four virtual licenses rather than purchasing
five servers running the Standard Edition. A lot of organizations don’t actually need
all the roles present in the Enterprise Edition of Server 2008 R2 and would be fine
using the Standard Edition. A need for domain-based DFS is a common reason organizations choose to deploy the Enterprise Edition of Windows Server 2008 R2 over the
the Standard Edition.
C r os s Ref You
learn more about DFS in Chapter 10, “Secrets Behind Shared
Folders.”
Deciding Between Types of Installation
After you’ve worked out which edition of Windows Server 2008 R2 you want to deploy,
you need to decide what type of installation you are going to perform. This involves
figuring out:
33 Do you want to perform a physical deployment or a virtual deployment?
33 Do you want to install the full version or Server Core?
33 Do you want to install to volume or VHD?
One of the big cost-cutting strategies organizations are pursuing today is server
consolidation. That is, rather than deploying a collection of servers physically, the
collection is deployed virtually. The virtual licensing options available in the Enterprise and Datacenter Editions of Windows Server 2008 R2 are an attempt to address
7
Deciding Between Types of Installation
this strategy. Rather than deploying an extra physical server, you might choose to
deploy a hosted virtual server instead. It makes sense to take this approach, because,
depending on which edition of Windows Server 2008 R2 you have chosen, you’ve
already got virtual licenses available.
For example, you might have a branch office site where there is currently a file
server, a domain controller, a Web server and a mail server. All hosts are running
Windows Server 2003, and each of these servers are running on hardware that is
approaching its end of life. As you know, “end of life” hardware is generally underpowered by present-day standards. If this underpowered hardware is adequate
enough to service the requirements of the roles at the branch office site, it is likely
that servicing those requirements will consume only a portion of the resources provided by modern hardware.
ot
n
You are by
3ly3
g
in
sav
on
g to buy
not havinardware,
server h’re saving
but you you don’t
because buy extra
have to censes.
server li
Rather than replace each server with one running Windows Server 2008 R2 on
current hardware, it might make sense to consolidate all of these servers so that
they run as virtual machines on one physical computer running the Enterprise Edition of Windows Server 2008 R2. Because you are using Windows Server 2008 R2,
which includes four virtual licenses, you are already covered for the licenses of each
of these virtual machines.
The main factor that determines whether a host can be deployed virtually is
input/output requirements. In most branch office scenarios, computers hosting traditional roles, such as file server, domain controller, and DNS server, are rarely placed
under sustained load. This makes them perfect candidates for virtualization.
Of course you can consolidate all these roles onto a single server without virtualizing each machine. For example, you might configure one server to function as a
DC, Remote Desktop server, Web server, and file server rather than configuring four
separate virtual machines on the same virtual host. Whether you consolidate the
roles onto one computer or split them up into virtual machines depends on several
administrative considerations, including:
33 Placing each server role inside its own virtual machine simplifies the process
of delegating administrative rights. For example, you might want to allow
Kasia to manage all the permissions on file shares on a file server and adjust
quotas but not give her any rights in Active Directory. While it is possible to
do this when you have the file server and Active Directory roles installed on
the same computer, the process is simpler when these roles are installed on
separate computers. If you’ve already got the virtual licenses, why not run
dedicated virtual machines, so that you lessen the chance that Kasia ends up
with permissions that she shouldn’t have.
he
simpler ts
e
h
T
33 the les
process,ere is to be
likely ths.
mistake
8
C h apt e r 1 Windows Server 2008 R2 Deployment Secrets
33 Placing each server role inside its own virtual machine makes the process of
migrating roles away from the host server easier. For instance, traffic may
increase substantially to your virtualized file server. It takes substantially
less effort to migrate file shares, quotas and permissions to a new host, if all
you have to do is transfer a virtual machine, than it does if the file server role
is co-located with the domain controller. You also have the possibility of performing a virtual to physical migration should the input/output requirements
of the file server make virtually hosting the role impractical.
If you are in the process of upgrading to Windows Server 2008 R2 from Windows
Server 2003, it is likely that you are going from hardware that is at least a couple
of years old to hardware that is probably new. New hardware can usually deal with
resource pressure that would cause bottlenecks on older hardware.
Deploying Server Core
you are
n
e
h
W
e
3n3
ing wher
co sidery a server
to deploWindows
running 2008 R2,
Server e to think
take timhether it
about we better
might bvirtually or
hosted r it needs
whethe physical
to be a ent.
deploym
If you are like most administrators, you’ve heard about Server Core versions of
Windows Server 2008 R2, but you probably haven’t worked with them. If you haven’t
heard of Server Core, it is perhaps best described as Windows Server 2008 R2 commandline edition. You perform all the primary setup activities from the command line.
After you’ve got the server set up, you can connect remotely using management consoles that are part of the Remote Server Administration Tools (RSAT).
C r os s Ref You
learn more about Remote Server Administration Tools in
Chapter 2, “The Windows Server 2008 R2 Administrator’s Toolkit.”
The advantage of a Server Core deployment is that computers running Server Core
don’t have all the extra components that a full version of Windows Server 2008 R2
has, and thus there are fewer components susceptible to vulnerabilities that require
patching. For example, although you need to apply whatever updates are released for
Internet Explorer to computers that run the full versions of Windows Server 2008 R2,
you don’t need to apply these updates to computers that run Server Core.
NO TE T he
advantage of a Server Core deployment is that you spend a lot less
time fussing with patches and worrying about downtime caused by reboots.
9
Deciding Between Types of Installation
The disadvantage is that from the outset, you will have to spend more time mucking about in the command line configuring Server Core so that you can use the RSAT
tools to manage the installation.
Another advantage of the version of Server Core that comes with Windows Server
2008 R2 is that it fully supports PowerShell. PowerShell wasn’t fully supported in
the Server Core version of Windows Server 2008 RTM, which meant that you had an
operating system managed from the command line without having access to the most
powerful command-line tool on the platform.
The main drawback of Server Core installations is that they don’t support all the
roles available on the full versions. Another drawback is that Server Core installations do not support server applications such as Exchange or SQL Server. The Enterprise Edition of Server Core supports the following roles:
33 Active Directory Certificate Services
33 Active Directory Domain Services
33 Active Directory Lightweight Directory Services
33 BranchCache Hosted Cache
33 DHCP Server
33 DNS Server
33 File Services
33 Hyper-V
33 Media Services
33 Print Services
33 Web Services (IIS)
A Server Core installation running the Standard Edition of Windows Server 2008 R2
supports all these roles except BranchCache Hosted Cache. As with the full install, a
Server Core installation of Windows Server 2008 R2 Standard Edition is also limited
to one stand-alone DFS root. Server Core installations are not supported on Itanium
or Foundation Editions of Windows Server 2008 R2.
C r os s Ref You learn more about how to configure systems running Server
Core in Chapter 3, “Server Core Secrets.”
10
C h apt e r 1 Windows Server 2008 R2 Deployment Secrets
Installing to VHD
Usually, when you install an operating system, the installation routine writes a
collection of files and folders across volumes on the hard-disk drive. If you booted
the server up with Windows Preinstallation Environment (PE) and looked at the
hard-disk drive, you’d see a collection of files and folders. Unlike previous versions
of Windows Server, Windows Server 2008 R2 gives you the option of performing an
installation to VHD file. The VHD file is a container that appears to the computer as a
separate volume. When you have configured it correctly, you can format the VHD file,
write files to it, and treat it exactly as any other volume on the hard disk. Because
you can store multiple VHD files on a disk, you can configure Windows Server 2008
R2 to boot into different versions without having to repartition an existing harddisk drive. If you install to VHD, boot up from Windows PE, and look at the hard disk,
you’ll see the VHD file and pretty much nothing else.
Installing to VHD makes your deployment of Windows Server 2008 R2 more portable. You are able to move the VHD file to another computer or even configure the
VHD file as a differential disk, so that you can roll back any changes that occur if they
cause a problem.
C r os s Ref You
learn more about differential disks in Chapter 14, “Configuring
Hyper-V Virtual Machines.”
To prepare Windows Server 2008 R2 for an installation to VHD on a computer with
an unformatted disk, perform the following steps:
1. Start the Windows Server 2008 R2 installation routine either by booting from
DVD, USB, or PXE.
2. Select your language and click Next. Instead of selecting Install Now, click
Repair Your Computer.
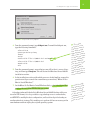
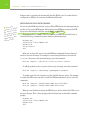
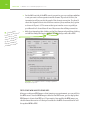
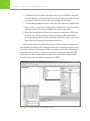
3. On the System Recovery Options dialog, click Next (you won’t have any system to recover). When Windows fails to find a system to recover, click Cancel.
Click Cancel again until you can see the System Recovery Options dialog,
shown in Figure 1-1. Then click Command Prompt.
11
Deciding Between Types of Installation
Figure 1-1: System Recovery Options
4. From the command prompt, type diskpart.exe. From within diskpart.exe,
type the following commands:
select
create
format
assign
create
select
attach
exit
disk 0
partition primary
vdisk file=”c:\2008r2.vhd” maximum=X
vdisk file=”c:\2008r2.vhd”
vdisk
5. From the command prompt, ensure that you are still in the X:\sources directory, and then type Setup.exe. This will restart the Windows Server 2008 R2
installation routine.
6. In the installation routine, with which you are no doubt familiar, answer the
questions until you come to the screen where you are asked, “Where Do You
Want to Install Windows?”
7. On the Where Do You Want to Install Windows dialog, select the volume that
matches the size of the VHD file that you created.
As backups taken with the built-in Windows Server 2008 R2 backup utility are
stored in VHD format, it is also possible to copy a backup across to a new volume,
use BCDEDIT to modify the boot configuration, and boot directly to the backup as
an alternative boot strategy. This enables you to perform full server recovery on the
same hardware without wiping the original operating system.
e
The valur the
3u3
put fo
yo
size of
maximumshould
the VHD ate the
approximhe volume
size of th you want
on whicll Windows
to insta2008 R2.
Server this figure
You set bytes.
in mega2008 R2
Server bout 15-20
needs apace for a
GB of sinstallation.
normal
ough
Click thrg that
33
e warnin
th
you are
indicateso install
unable t rive. The
to this dion will
installat from this
continue normal.
point as
12
C h apt e r 1 Windows Server 2008 R2 Deployment Secrets
C r os s Ref You will learn how to configure Windows Server 2008 R2 to boot
from a VHD file generated from a backup in Chapter 12, “Backup and Recovery.”
Optimizing Your Deployment Image
When you deploy Windows Server 2008 R2 for the first time, you will notice that it
comes with no roles or features installed. There is a solid reason for this. When you
start with no roles or features installed, it means that the only roles and features
that will be installed in the future are the ones that you put there yourself. This
all has to do with security. In the past several years, Internet worms propagated
because a lot of administrators installed their Internet-facing servers in a default
configuration. That default configuration came with a Web server and other roles and
features installed and active—something that a lot of administrators didn’t realize.
The reason that many of these systems admins didn’t patch their servers was that
they simply didn’t know that they were vulnerable. With Windows Server 2008 R2,
an administrator has to actually install a feature like Internet Information Services
explicitly. In theory, this means that administrators should be aware that any vulnerabilities that impact that feature need to be dealt with as soon as possible.
a
Creatingt image
3p3
loymen
ry
a
de
ll necess
where aisite roles
prerequ ures are
and featigured
preconf ically can
automat a lot of
save youcause you
time be ve to add
don’t ha les and
those ro after the
featuresirst boots.
server f
As good as it is from a security perspective that Windows Server 2008 R2 installs
with no features or roles present, this creates a small challenge for administrators
who need to regularly and rapidly deploy the operating system. For example, if you
wanted to deploy all the pre-requisite software for a Windows Server 2008 R2 system
that will function as a mailbox and client access server, you need to install a significant number of roles and features as well as configure several services. As you are
aware, manually adding roles and features can take some time. You have to add the
roles and then often reboot and log in again before the role is completely installed.
Managing Windows Server 2008 Images
In previous versions of Windows Server, such as Windows Server 2003, installation
occurred through the extraction of relevant files from compressed archives (called
CAB files). Rather than using compressed archives, Windows Server 2008 and Windows
Server 2008 R2 use image files that are applied directly to the installation destination.
The Windows Server 2008 R2 image is located in the sources directory of the Windows Server 2008 R2 installation media. The image is stored in WIM format, and the
13
Optimizing Your Deployment Image
operating system ships with tools that allow you to mount and edit images directly.
Of course, before you are able to modify the image, you need to copy the image to a
volume that has a read/write file system. You can’t write changes back to the original
DVD media, but you can write a revised image to a new DVD. The sources directory
contains two image files that are of interest to administrators. These are as follows:
33 Install.wim: This file contains the Windows Server 2008 R2 image. You
modify a copy of this file when creating a custom image. You install this file
on a Windows Deployment Services (WDS) server when you want to perform a
network deployment of Windows Server 2008 R2.
33 Boot.wim: This file contains information necessary to boot Windows Server
2008 R2. You install this file on a WDS server as a boot image, allowing the
network installation process to prepare a computer for the deployment of
Windows Server 2008 R2.
Using DISM to Manage Images
DISM.exe is a command-line tool included with Windows Server 2008 R2. DISM.exe
allows you to modify a Windows Server 2008 R2 image whether that image is stored
in WIM format or VHD format. You can use DISM.exe to turn on features, add drivers,
and add software updates to the image. This process is sometimes referred to as an
offline update to the image. Online updates to an image traditionally involve deploying the image, performing the updates on an active system, and then recapturing the
updated system to a new image. An advantage of the WIM and VHD image formats is
that they allow you to modify an image that you have created without having to go
through the rigmarole of performing that modification on a live system.
If you obtain the installation media from Microsoft, TechNet, or MSDN, the
install.wim image will allow the following installations:
33 Windows Server 2008 R2 Standard
33 Windows Server 2008 R2 Standard (Server Core)
33 Windows Server 2008 R2 Enterprise
33 Windows Server 2008 R2 Enterprise (Server Core)
33 Windows Server 2008 R2 Datacenter
33 Windows Server 2008 R2 Datacenter (Server Core)
33 Windows Server 2008 R2 Web
33 Windows Server 2008 R2 Web (Server Core)
to
You needoot.wim
3v3
e the b
e
h
ha
lled on t
file instarver even
WDS se e deploying
if you arages rather
VHD im IM images.
than W enables
This file puter to
the comover the
boot up , just as
network if the file
it wouldred locally.
was sto
14
C h apt e r 1 Windows Server 2008 R2 Deployment Secrets
As you’ll already know, when you deploy Windows Server 2008 R2, you choose one
of these options, and that’s the version of the operating system that installs. When
you decide to modify the image, you need to select which of these installations you
are going to modify, even though they are all stored in the same image file.
To modify an image, you need to specify which installation you want to mount
and then mount it in a temporary directory. Each installation image has a corresponding index number that you will need to reference when making modifications.
With DISM, you make modifications to one installation at a time. For example, if you
add a driver to the Enterprise Edition installation, it does not automatically add the
driver to the Standard and Datacenter Editions installation. You can determine the
image index number that corresponds to a particular installation by running the
command:
dism.exe /get-wiminfo /wimfile:c:\images\install.wim
For example, on the normal Windows Server 2008 R2 installation media, the
index number of the standard version of Enterprise Edition is 3. To mount the Enterprise Edition image so that you can make modifications in a directory called c:\
mount, issue the command:
dism.exe /mount-wim /wilmfile:c:\images\install.wim index:3
/mountdir:c:\mount
n’t
o
If you dmmit
33
nt to co
wa
nges you
the cha the
made toubstitute
image, smmit
the /co or /discard.
switch f
u’ve
After yo an
3m3
ed
co mittou’ll need
y
,
image unt it
to remoant to
if you w y further
make an as
changested images
commit only.
are read
When you finish modifying the image, you will need to commit the image.
Committing the image writes all the changes back to the install.wim file, which you
can then add to your USB flash device, burn to a DVD or add to a WDS server so that
you can deploy that image. To commit an image using DISM, issue the command:
dism.exe /unmount-wim /mountdir:c:\mount /commit
Adding Drivers to Images
Once the image is mounted, you can use the DISM to add drivers to the image. For
example, you could create a directory named c:\drivers and copy all of the driver
files into that directory, placing each driver’s files in its own separate folder. Once
you’ve placed all the drivers into the directory, you can use DISM to recursively add
all of these drivers to the image. To do this, issue the command:
Dism.exe /image:c:\mount /Add-Driver /driver:c:\drivers\ /Recurse
15
Optimizing Your Deployment Image
You may be aware that Windows 7 has better driver detection routines than
Windows Server 2008 R2. Rather than attempting to locate each separate driver for
a model of computer that you intend to have running Windows Server 2008 R2 and
then adding them to the install image for a specific hardware configuration, you can
do the following:
1. Install a 64-bit version of Windows 7 on the hardware that you will use to host
Windows Server 2008 R2.
2. Allow Windows 7 to connect to the Internet so it can detect and install all the
drivers necessary for this hardware configuration.
3. Once all drivers have been installed, copy the contents of the c:\windows\
system32\driverstore directory to a USB flash drive.
4. Use DISM.exe with the /add-driver and /recurse options to inject all these
drivers into the mounted Windows Server 2008 R2 image.
When you use this modified image to install Windows Server 2008 R2, all necessary drivers for this hardware configuration will be present, and you won’t have to
spend time trying to figure out which unknown hardware device is missing its driver.
Enabling Features
You can use DISM.exe to enable features such as the DHCP server so you do not have
to manually install the role or feature after installation completes. You can see a list
of features that you can enable by using the command:
dism.exe /image:c:\mount /get-features /format:list
To enable a specific feature, use the /Enable-Feature option. For example, to
ensure that the DNS server role and management tools are installed on a server during installation, rather than as a post-installation configuration step, issue the
commands:
Dism.exe /image:c:\mount /Enable-Feature:DNS-Server-Full-Role
Dism.exe /image:c:\mount /Enable-Feature:DNS-Server-Tools
Each feature must be enabled separately. This means that if you want to enable
the Web server role on a server during installation rather than doing it as a part of the
post-installation configuration routine, you need to enable each specific Web server
feature.
Windows8 R2
3e3
rver 200
e
S
the sam
can useas the
drivers ditions of
64-bit es 7.
Window
16
C h apt e r 1 Windows Server 2008 R2 Deployment Secrets
NO TE A ll
feature names are case sensitive.
Adding Updates to Images
if
In fact, ome
3u3
c
yo don’ta way
h
it
up w porate
to incor into your
updates ou’ll
image, ylly find that
eventua longer
it takes rm the
to perfotallation
post-insprocess
update takes to
than it install the
actually g system in
operatint place!
the firs
Every month Microsoft publishes new updates, some of which need to be deployed
to computers running Windows Server 2008 R2. Something that you have to take
into account when you are thinking about deployment is whether or not you want to
include all the currently released updates in the deployment image or whether you
want to have the server retrieve all necessary updates after the installation process
has completed. Having the server retrieve all those updates and install them can substantially add to your deployment time.
You can use DISM.exe to add updates to a mounted image. To do this, copy all the
updates that have the .MSU extension into the same folder. After all the updates are
in the same folder, use DISM.exe with the /Add-Package switch. For example, to add
all the updates in the c:\updates directory to the Windows Server 2008 R2 Enterprise
Edition image mounted in the directory earlier, issue the command:
Dism.exe /image:c:\mount /add-package /packagepath:c:\updates\
All of the updates that are added to the image are applied automatically at the end
of the installation routine. This is likely to add to the amount of time it takes for the
installation routine to complete but uses less time than having each server download
the updates from your WSUS server or Microsoft Update server and then install them.
As updates are released each month, you can use this simple procedure to perform an
offline update of your deployment image.
Unfortunately, you don’t apply service packs to images in the same way that you
apply updates. Because Windows Server 2008 and 2008 R2 use a different type of
image than previous versions of Windows, you can no longer “slipstream” service
packs. When the Windows Server 2008 R2 service pack becomes available, you should
obtain an updated operating system image from Microsoft that includes the new service pack.
It is, of course, possible to build an updated image and then capture it using a
utility such as ImageX.exe, but whether this is worth the effort when the updated
image will be available for download is a decision that only you can make.
17
Optimizing Your Deployment Image
C r os s Ref You learn more about managing updates in Chapter 15, “Patch
Management with WSUS.”
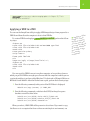
Applying a WIM to a VHD
You can use the ImageX.exe utility to apply a WIM image that you have prepared to a
VHD file and then allow the computer to boot to that VHD file.
To create a VHD file and apply a prepared WIM file to the VHD, perform the following steps:
diskpart.exe
create vdisk file=c:\win2k8r2.vhd maximum=30000 type=fixed
select vdisk file=c:\win2k8r2.vhd
attach vdisk
create partition primary
assign letter=v
format quick label=vhd
exit
imagex.exe /apply c:\images\install.wim 3 v:\
diskpart.exe
select vdisk file=c:\win2k8r2.vhd
detach vdisk
exit
You can copy this VHD file across to another computer, as long as the volume on
which you put the VHD has enough space. Ensure that the computer to which you are
copying already boots and runs either Windows 7 Professional or Ultimate Editions or
Windows Server 2008 R2. After the file has been copied, perform the following steps:
1. Run the following command, taking note of the CSLID that is displayed:
Bcdedit.exe /copy {current} /d “2K8R2_VHD”
2. Run the following commands, substitute the CSLID, but keep the square
brackets around the drive letter:
bcdedit.exe /set {CSLID} device vhd=[c:]\2k8r2.vhd
bcdedit.exe /set {CSLID} osdevice vhd=[c:]\2k8r2.vhd
bcdedit.exe /set {CSLID} detecthal on
When you reboot, 2K8R2.VHD will be present as a boot item. If you want to copy
the file across to a computer that does not have an existing boot environment, use
a WIM
Applying VHD
33
age to a
im
booting
and thenVHD gives
off the ick method
you a qu g whether
of testinIM image
your W ctly
is corre ed.
configur
18
C h apt e r 1 Windows Server 2008 R2 Deployment Secrets
diskpart.exe to configure the volume and then the BCDboot tool to create the boot
configuration. BCDboot is located on the Windows PE media.
Servicing VHD Files with DISM.exe
You can’toffline
3r3
form an
pe
n a VHD
service on you are
file wheinto the
booted g system
operatinhosts.
that it
You can use the DISM.exe utility to service offline VHD files in the same way that you
use the tool to service WIM images. Rather than using DISM.exe to mount the VHD
file, you use the Diskpart utility to attach the file as a volume.
To mount the file c:\2008R2.vhd as a volume associated with the drive letter v,
issue the following commands from an elevated command prompt:
Diskpart.exe
Select vdisk file=c:\2008r2.vhd
Attach vdisk
Assign letter=v
exit
After you’ve done this, you can use the DISM.exe commands that you learned
earlier to service the image. For example, to recursively add drivers stored in the
c:\drivers directory to the mounted image, issue the command:
Dism.exe /image:v:\ /add-driver /driver:c:\drivers /recurse
To add all updates in the c:\updates directory to an image, issue the command:
Dism.exe /image:v:\ /add-package /packagepath:c:\updates\
To enable a specific role or feature, use the /Enable-Feature option. For example,
to enable the DNS server role and to install the DNS management console, issue the
commands:
Dism.exe /image:V:\ /Enable-Feature:DNS-Server-Full-Role
Dism.exe /image:V:\ /Enable-Feature:DNS-Server-Tools
When you are finished servicing the VHD file, you need to detach the VHD to commit your changes. This is done by typing the following from an elevated command
prompt:
Diskpart.exe
Select vdisk file=c:\2008r2.vhd
Detach vdisk
exit
19
Minimizing Deployment Time
Minimizing Deployment Time
Systems administrators are busy people. Although sitting in front of a computer
watching a little grey bar go across a screen during the installation process might
seem fun the first few times, there are probably better things that you can be doing.
In this section, you learn about methods through which you can speed up deployment of Windows Server 2008 R2. These include:
33 Creating a USB device to deploy Windows Server 2008 R2 directly
33 Configuring Windows Deployment Services to deploy Windows Server 2008 R2
to more than one computer at a time
Deploying from a USB Flash Drive
USB flash devices generally have quicker read performance than optical media. This
means that performing a direct deployment from a USB flash drive is the quickest
method of getting Windows Server 2008 R2 onto a server. With USB 3.0 becoming
more prevalent, the speed benefit of deploying operating systems using this method
will only increase. As USB flash drives are writable media, you can make modifications to the install.wim image, such as injecting drivers or updates, without having
to burn a new installation DVD.
The drawback to using USB flash drives as deployment devices is that you need
to muck around with BIOS settings on each server to ensure that it will boot from the
USB flash drive. Also, you need to go through the steps of preparing each USB flash
drive and ensuring that the answer files and WIM images are kept up-to-date, if you
are using more than one. If you are regularly performing bulk deployments of server
operating systems, you may prefer to go with Windows Deployment Services (WDS).
To prepare a USB flash drive so that you can use it to deploy Windows Server 2008 R2,
perform the following general steps:
1. Open an elevated command prompt on a computer running Windows 7 or
Windows Server 2008 R2.
2. Enter the command Diskpart and then list disk. Determine which of the connected disks represents the USB flash drive.
3. From the Diskpart prompt, issue the command select disk X, where X is the
number associated with the USB flash drive.
You canan
33
o place
als
ded
unattenion file on
t
installa tick and
a USB sthat as
update ry, allowing
necessa tallation
rapid insr without
to occu essity of
the necthrough
walking allation
the inst
wizard.
20
C h apt e r 1 Windows Server 2008 R2 Deployment Secrets
4. Issue the following commands:
clean
create partition primary
select partition 1
active
format fs=fat32
assign
exit
5. After the USB flash drive is prepared, copy the entire contents of the Windows
Server 2008 R2 installation DVD across to the device. If you have created a
custom WIM image, replace the custom install.wim file with the one in the
sources directory on the USB flash drive. If you have an answer file, place it in
the root directory of the volume on the USB flash drive.
Configuring Windows Deployment Services
Windows Deployment Services (WDS) is a service included in Windows Server 2008
and 2008 R2 that enables you to perform multicast deployments of operating system
images. WDS in 2008 R2 can be configured to not only deploy images in the standard
WIM format but also to deploy operating system images in VHD format. You can add
only VHD images to WDS using the command-line tools, and you must configure a
special unattended installation file for this type of deployment to work.
Preparing the WDS Server
There are several things that you need to do when preparing a server that is running
WDS. These include the following:
33 WDS requires that Active Directory, DNS, and DHCP be configured and working
on your network. These roles don’t have to be on the server hosting WDS, but
the server hosting WDS should be on a member server in a domain where these
role services work.
33 You shouldn’t use the system volume to host your WDS images. As you know,
bad things happen when your system volume fills up.
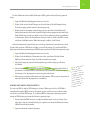
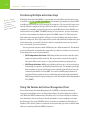
33 If you’ve co-located the WDS role and the DHCP role on the same server, ensure
that you’ve configured WDS to listen on another port. You can do this on the
DHCP tab of the WDS server’s properties as shown in Figure 1-2.
21
Minimizing Deployment Time
Figure 1-2: Configure the DHCP tab if DHCP and WDS
are on the same server.
33 In the PXE Response tab of the WDS server’s properties, configure an appropriate response policy. You can configure WDS to respond to any computers that
PXE boot, to known computers only, or to both known and unknown computers, but manual administrator approval is required for unknown computers.
WDS knows a computer if you have pre-staged an account for that computer in
Active Directory and associated that pre-staged account with the GUID of the
network adapter. You can pre-stage an account using the WDSUTIL.exe utility
from the command prompt. For example, to pre-stage a computer account named
SERVER42 with the network card GUID AABBCCDDEE112233445566778899AABB,
issue the following command from an elevated command prompt:
WDSUTIL.exe /Add-Device /Device:SERVER42 /ID:
AABBCCDDEE112233445566778899AABB
33 On the Boot tab of the WDS server’s properties, configure the level of interaction you require from the client. You can choose between having to press the
F12 key to continue the PXE boot, always perform the PXE boot, or continue
the PXE boot unless interrupted by the ESC key. You can specify the default
boot images for each architecture. You can select only from boot images that
you’ve already added to WDS.
ase of
In the c 8 R2,
3e3
g
rver 200
in
S
u are us
unless yois almost
IA64, it oing to
always g
be x64.
22
C h apt e r 1 Windows Server 2008 R2 Deployment Secrets
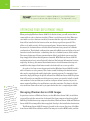
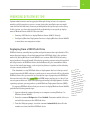
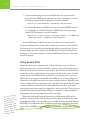
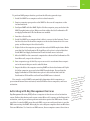
33 On the Multicast tab of the WDS server’s properties, you can configure whether
or not you want to allow separate transfer streams. If you don’t do this, the
transmission will proceed at the speed of the slowest connection. You should
select the Separate clients into the three sessions (slow, medium, fast) option
as shown in Figure 1-3. This ensures that your transfer occurs as quickly as
possible and isn’t slowed down if one of the servers has a flakey connection.
ult
a
The def the boot
3c3
f
ation o
lo
is in the
.wim file directory
sources indows
on the W
008 R2
Server 2ion media.
installat
33 Add a boot image by right-clicking on the Boot Images node and then clicking
on Add Boot Image. Browse to the boot.wim file that you will add to WDS.
Figure 1-3: Configure transfer settings to optimize
deployment speed.
Deploying WIM Images Using WDS
After you configure a WIM image so that it meets your requirements, you can add it to
the WDS server. Once the WIM image is added to the WDS server, you can deploy that
WIM image to clients that PXE boot. If you want to later modify the WIM image, you
should remove the version of it that you’ve added to the WDS server and then re-add
the updated WIM to WDS.
23
Minimizing Deployment Time
To add a Windows Server 2008 R2 image to WDS, perform the following general
steps:
1. Open the Windows Deployment Services console.
2. Right-click on the Install Images node, and then click Add Image Group.
Provide an appropriate name for the image group.
3. Right-click on the newly created image group, and then click Add Install
Image. Navigate to the install.wim file that you have prepared and then click
Next. Windows provides you with a list of the installations that are available
in the image. Select the installations that you want to add to the WDS server,
and then click Next twice. When the image is added, click Finish.
After the image has been added, you can set up a multicast transmission so that
clients that perform a PXE boot are able to install the image. To configure WDS to
deploy an operating system image in WIM format, perform the following general steps:
1. Open the Windows Deployment Services console.
2. Right-click the Multicast Transmission node, and then click the Create
Multicast Transmission item. Provide a transmission name.
3. Select the image group and the image that you wish to deploy, and then
click Next.
4. Choose between Auto-Cast and Scheduled-Cast. Choose a Scheduled-Cast if
you want to configure WDS to wait for a certain number of clients to request
the image or for deployment to start at a particular time.
5. After you’ve configured the multicast deployment, PXE boot your server hardware and allow the deployment to commence.
Adding VHD Images Using WDSUTIL
You can use WDS to deploy VHD images to clients. When you do this, a VHD file is
transferred from the WDS server to the target server, and the server is then configured to boot off that VHD image. To configure WDS to deploy an operating system
image in VHD format, perform the following general steps:
1. Ensure that the WDS server is configured with at least one boot image. Usually, this is the boot.wim file that you copied across from the Windows Server
2008 R2 installation media.
2. Open an elevated command prompt.
Cast
An AutoS
3o3
D
ws W
all
mit an
to transs soon as
image a requests
a client other
it. If anants the
client w age, it
same im to the
is joined sion.
transmis
24
C h apt e r 1 Windows Server 2008 R2 Deployment Secrets
3. Create a separate image group for the WDS images. You can perform this
action from the WDSUTIL.exe command-line utility. For example, to create
an image group named VHD_Deployment, issue the command:
WDSUTIL.exe /Add-ImageGroup /ImageGroup:”VHD_Deployment”
4. To add the VHD image to the WDS server, you also use the WDSUTIL.exe utility. For example, to add the VHD image c:\2008R2.vhd to the image group
named VHD_Deployment, issue the command:
WDSUTIL.exe /verbose /progress /Add-Image /ImageFile:”C:\2008R2.vhd”
/ImageType:Install /ImageGroup:”VHD_Deployment”
Once the VHD image is added to the server, you will need to create a special
unattend.xml file that will configure the installation procedure to use the VHD file.
You then need to associate this unattend.xml file with a pre-staged client. You can
find an example unattend.xml file in the TechNet Article “Deploying Virtual Hard
Disk Images,” the address of which is listed in the Additional Sources section at the
end of this chapter.
Using Answer Files
hings
t
Just so ou
3e3
y
,
r
a
cle
ar
DT 2010
M
in
a
t
b
o
AIK,
to get Wllows you
which a Windows
to build2008 R2
Server files using
answer s SIM.
Window
Answer files allow you to automate parts of the installation process, such as performing a domain join, selecting installation features, and partitioning the server.
When the installation routine starts, it performs a quick check to locate whether an
answer file is present. Although you can put the answer file on the volume on which
you are going to install Windows Server 2008 R2, it is generally easier to put it on a
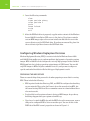
USB stick. You can also place answer files on the WDS server, as shown in Figure 1-4.
Answer files on the WDS server are done on a per-architecture basis. With WDS, there
is also one answer file per architecture (× 86, × 64, IA64). This means that if you want
to deploy different server builds that require different answer files, you’ll need to
come up with some way to swap those answer files on the server level. If you are using
System Center Configuration Manager (SCCM), you are able to configure individual
deployments and associate them with specific answer files.
Windows Server 2008 R2 answer files are stored in XML format. Although it is
possible to create these files in Notepad, you should really use the Windows System
Image Manager (SIM), a tool included as part of the Windows Automated Installation
Kit (WAIK), to generate these files. To make this even more complicated, the easiest
way to obtain the WAIK is to download Microsoft Deployment Toolkit (MDT) 2010 or
later.
25
Minimizing Deployment Time
Figure 1-4: Configure unattended installation files in WDS.
There are several reasons why you should use Windows SIM rather than Notepad
to create your Windows Server 2008 R2 answer files. These include:
33 The answer file XML syntax is complicated, and you are likely to mess something up if you do it manually. There are better uses of your time than trying
to figure out where you made a syntax error in an XML file.
33 Windows SIM is designed to create these files, and you’ll probably find out
about automatic configuration options that you weren’t aware of when you
use the tool.
33 Windows SIM generates a catalog file based on the image that you are importing. This means that you will only be able to configure settings that are relevant to the image for which you are creating the answer file.
33 Windows SIM allows you to validate your answer file, which will go some way
toward ensuring that the installation file you’ve created will work.
To create an answer file, perform the following general steps:
1. Open Windows System Image Manager.
26
C h apt e r 1 Windows Server 2008 R2 Deployment Secrets
2. Click New Answer File. When asked if you want to open a Windows image file,
click Yes. Navigate to the install.wim file. Select the image for which you want
to create an answer file. Most of the time this will be install.wim.
3. Click Yes when prompted to create a catalog file. This step takes several minutes.
4. Right-click on a component and then click on Add Setting to Pass. Press F1 to
learn more about the settings available for a specific component.
5. When you have finished configuring all necessary components, click on the
Validate Answer File to perform a check and then save the answer file as
autounattend.xml. This is the file name that the Windows setup routine automatically looks for when you perform an installation.
One could write a whole book detailing all the possible settings to configure for
an unattended installation file. Finding all the settings is primarily a matter of navigating through each of the items in the Windows Image section and configuring an
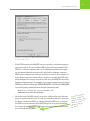
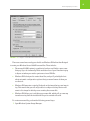
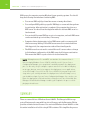
appropriate setting. Figure 1-5 shows an answer file configuration where the DHCP
server and tools will automatically be installed. This unattended installation file
must be located under the folder you configured for WDS.
Figure 1-5: Configure answer file with Windows SIM.
27
Activating Windows
Activating Windows
Part of getting deployment right is ensuring that the Windows Product Activation
process occurs smoothly. Product activation is a process by which a Windows Product
Key and a hardware identification are registered with Microsoft. Product activation
generally occurs over the Internet, but it is also possible to perform product activation over the phone. The drawback to performing product activation over the phone
is that it can take a long time, and, if you make an error, you need to start over again.
Systems administrators only perform product activation over the phone if their computers don’t directly connect to the Internet. If you have more than one server that
isn’t connected to the Internet, you should investigate performing activation using
the Volume Activation Management Tool, which you will learn about later in this
chapter.
Windows product activation must usually occur within 30 days of completing the
installation of Windows Server 2008 R2. If activation has not occurred within this
30-day period, Windows Server 2008 R2 enters reduced functionality mode. During reduced functionality mode, the operating system continually prompts you to
perform activation. The functionality of services, applications, and remote administration are not impacted in reduced functionality mode. You can manually rearm
a computer’s activation clock three times to stave off reduced functionality mode.
Each reset gives you an additional 30 days of use before you must perform activation.
To rearm a computer’s activation clock, issue the command:
slmgr.vbs -rearm
Even after you’ve activated a computer, there are certain circumstances where
activation must be performed again. Reactivation is usually triggered if you change
a substantial number of hardware components on the server, such as changing the
server’s motherboard and the amount of RAM it supports. When reactivation is triggered in this manner, you have three days for reactivation to complete successfully
before the server enters reduced functionality mode.
NO TE You
can’t rearm a computer after it has been activated.
28
C h apt e r 1 Windows Server 2008 R2 Deployment Secrets
Purchasing Multiple Activation Keys
ot
n
You canM
3c3
AK
a
over
re
t
once than has
activationsumed.
been co
A Multiple Activation Key (MAK) is a special key issued by Microsoft that allows you
to perform a specific number of activations. For example, you might purchase a MAK
from Microsoft that allows you to perform 50 activations. You can use this key to activate 50 different computers, but you will not be able to use this key to activate a 51st
computer. For example, you build a new server, install Windows Server 2008 R2 on it,
and activate it using a MAK. The MAK allows you 25 activations, and you’ve already
used 24, so the number of activations against the MAK comes to 25. Two days later,
that same server mysteriously falls off the roof of your building and lands six floors
below in a dumpster. Even if you replaced the server with identical hardware and gave
it the same name, you would still need to obtain a new key, because once an activation is consumed, you can’t reclaim it.
You can perform activation with a MAK using two different methods. The method
you choose depends on whether the servers that you want to activate are connected
to the Internet or on an isolated network.
33 MAK Independent Activation: MAK independent activation works the same
way as activating with a retail key. The server either connects through the
Internet to Microsoft’s servers, or you perform activation over the phone.
33 MAK Proxy Activation: MAK proxy activation allows you to collect activations
from multiple computers, performing them all at once. For example, you might
have a number of servers and clients on an isolated network but not enough
to meet the threshold for using KMS. You could use MAK proxy activation to
activate all these computers at once rather than activating them individually.
MAK proxy activation requires that you use the Volume Activation Management
Tool (VAMT).
Using the Volume Activation Management Tool
You use the Volume Activation Management Tool (VAMT) to centralize activation
requests from multiple servers and then allow them to be collectively sent to Microsoft. When the VAMT communicates with Microsoft, it collects activation confirmation identifiers, which can then be distributed back to servers seeking to activate.
An advantage of using the VAMT is that it stores these confirmation identifiers in a
database. This allows clients to reactivate in the event that you need to rebuild them
without consuming additional MAK activations.
29
Activating Windows
To perform MAK proxy activation, perform the following general steps:
1. Install the VAMT on a computer on the isolated network.
2. Create a computer group and use the VAMT to discover all computers on the
isolated network.
3. Configure VAMT with the MAK. Right-click the computer group and select the
MAK Proxy Activate option. Make sure that neither the Get Confirmation ID
nor Apply Confirmation ID checkboxes are enabled.
4. Save the collection file.
5. Install the VAMT on a computer that is able to connect to the Internet. Transfer the collection file from the computer on the isolated network to this computer, and then import the collection file.
6. Right-click on the computer group and then select MAK Proxy Activate. Make
sure that the Get Confirmation ID from Microsoft option is selected but that
Install MAK and Apply Confirmation ID and Activate are not selected.
7. After the VAMT on the connected computer has obtained the Confirmation IDs
from Microsoft, export the collection.
8. Save a separate copy of this file, as you can use it to reactivate these computers in the event that you need to rebuild them.
9. Import the file to the computer running VAMT on the isolated network. Rightclick the computer group and select MAK Proxy Activate. Ensure that the
Apply Confirmation ID and Activate option is selected but that both Get
Confirmation ID from Microsoft and Install MAK are not selected.
T
the VAMm
g
in
s
U
You can also use the VAMT to automatically determine which computers on
fro
3n3
save youpe the
a
c
y
your network haven’t been activated, install a MAK on those computers, and force
ot
having tAK into
activation.
M
same mputer
each coely,
separat you to
Activating with Key Management Services
enabling the task
performlating
Key Management Services (KMS) allows a computer to function as a local activation
of popuers with
server. Rather than having each server contact Microsoft’s servers on the Internet for
comput trally.
activation, each of your servers performs activation against the KMS server. Clients
keys cen
are able to locate the KMS server through DNS, or you can configure clients to use the
KMS server using the VAMT. Although you can configure computers that run Windows
Vista and Windows 7 to function as KMS servers, these computers cannot function as
30
C h apt e r 1 Windows Server 2008 R2 Deployment Secrets
KMS servers for computers running Windows Server operating systems. You should
keep the following in mind when considering KMS:
33 You can use KMS only if you have five servers or twenty-five clients.
33 You configure KMS by adding a specific KMS key to a server and then performing activation. After activation is completed, the computer functions as a
KMS server. You should use the telephone method to activate KMS on an isolated network.
33 You can install the same KMS key on up to six computers, and each KMS server
can be reactivated up to nine times, if necessary.
33 Computers that activate against a local KMS server need to reconnect with
that server every 180 days. If the KMS server cannot be contacted within a
180-day period, the computer enters reduced functionality mode.
33 The KMS server does not need to contact Microsoft’s servers unless a change
in the hardware configuration of the KMS server itself triggers reactivation.
This means that KMS is a good solution for isolated networks.
NO TE A lthough
answer files and WDS can minimize the amount of time it
takes to deploy Windows Server 2008 R2, with Microsoft’s System Center
Configuration Manager, you can go further and fully automate the deployment
process. Not only can you configure separate answer files for different deployment types, but you can also incorporate the deployment server applications,
such as Exchange Server 2010 or SQL Server 2008 R2. If you want to get to the
stage where you can fully automate the deployment of a new Exchange server,
you should investigate System Center Configuration Manager. You can also configure the deployment of virtual machines using System Center Virtual Machine
Manager. Virtual Machine Manager enables you to optimize the process of deploying to virtual hosts.
Summary
There are seven editions of Windows Server 2008 R2. The Enterprise Edition supports all features and comes with four virtual licenses, and the Datacenter Edition
provides unlimited virtual licenses. You can install Windows Server 2008 R2 so that
the entire installation is held in a single VHD container. This simplifies the process
31
Summary
of multiple boots and also simplifies physical to virtual migrations. Using DISM.exe,
you can configure a Windows Server 2008 R2 installation image with extra drivers.
You can also use DISM.exe to automatically install Windows Server 2008 R2 roles and
features and install software updates during the installation process. You can configure a USB flash drive with the installation files so that you can perform a quicker
deployment of a custom image than you could if you were using a DVD or WDS. WDS
allows you to deploy Windows Server 2008 R2 to multiple computers at the same time,
either by deploying WIM images or by deploying images in VHD format. Unattended
installation files are generated by Windows SIM and allow portions of the installation
process to be automated. You can use KMS to provide an activation server on your
local network rather than having computers activate against Microsoft’s servers on
the Internet.
Additional Sources
If you are interested in finding out more about the topics covered in this chapter,
consult the following online resources:
Windows Server 2008 R2 Editions
http://www.microsoft.com/windowsserver2008/en/us/editions.aspx
Creating Virtual Machines from a Template
http://technet.microsoft.com/en-us/library/cc764306.aspx
Deploying Virtual Hard Disk Images
http://technet.microsoft.com/en-us/library/dd363560(WS.10).aspx
Planning Volume Activation
http://technet.microsoft.com/en-us/library/dd996589.aspx
Zero Touch, High-Volume Deployment
http://technet.microsoft.com/en-us/library/dd919178(WS.10).aspx