1
➟
AL
Chapter
1
Get ready to . . .
RI
Getting
Comfortable with
the Windows 7
Desktop
TE
➟ Get a New Computer with
M
GH
TE
D
MA
icrosoft Windows 7 is a special type of
program or software — tools for getting
things done with a computer — called an
operating system, which is the master control of
a computer. Windows 7 gives a computer
essential functions that enable you to run other
programs and work with documents, photos,
and music.
CO
PY
RI
Whether you already have a computer or you
intend to buy a new computer with Windows 7
installed, this chapter takes you into Windows 7
for the first time, from turning the computer
on, looking around, to turning it off again.
Get familiar with common terms and concepts,
such as the desktop, which you see soon after
you start. Use the Start menu to start programs.
Take advantage of the taskbar to see what’s
going on. You work with these parts of
Windows 7 every time you use your computer.
Windows 7 ........................ 10
➟ Turn On Your Computer ...... 12
➟ Check Out the Windows 7
Desktop ............................. 15
➟ Try Out the Mouse .............. 17
➟ Go with the Start Button ....... 20
➟ Get Familiar with the
Taskbar ............................. 22
➟ Get Help When You
Need It .............................. 24
➟ Close Windows 7 ............... 26
Part I: Getting to Know Windows 7
In the process of exploring the major features of Windows 7 for the first
time, come to grips with the mouse, your pet for prodding Windows 7
into action. The mouse and its buttons enable you to point and click
your way to happiness. From time to time, I emphasize when the keyboard provides a good alternative to the using the mouse.
Get a New Computer with Windows 7
Although this is not the book to tell you everything there is to know
about buying a new computer, I do have a few suggestions for you as
you shop. The first consideration is what style or size of computer do
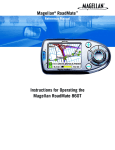
you want? Choose from these types of computers (see Figure 1-1):
~
!
`
@
1
#
2
$
3
W
A
Q
Tab
Caps
Lock
%
4
Desktop
Figure 1-1
➟
10
^
5
E
S
Z
Shift
Ctrl
PgUp
Insert Home
PgDn
Pause
Break
ScrLk
Delete End
NumLk
PrtScr
e
F12
SysRq
Backspac
F11
+
F10
_
F9
|
=
)
}
F8
F7
F6
F5
F4
F3
F2
F1
Esc
*
&
7
6
R
D
X
T
F
C
7
(
8
Y
G
V
8
9
U 4
H
B
0
9
I
J
5
1
N
/
-
O 6
K 2
M
{
P
L
<
0
3
]
[
*
,
:
“
;
>
,
‘
?
-
.
.
\
Enter
Shift
/ +
Ctrl
Alt
Alt
Fn
Laptop
Netbook
➟
A desktop computer is usually shoebox sized or
larger. Often, a desktop computer is a vertical tower
that sits under a desk or table. This desktop box
usually accepts numerous hardware upgrades
internally, but not everyone wants to open the box
and insert new hardware. A desktop has a separate
screen (also called a display or monitor) that displays
what the computer is doing, a keyboard for typing,
plus a mouse for doing things onscreen. (More on
these components shortly.)
➟
A laptop computer is not only smaller than most
desktop computers, it is portable. Even if you never
intend to leave the house with your computer, you
may enjoy taking the computer from one room to
another. A desktop computer requires you to connect
Chapter 1: Getting Comfortable with the Windows 7 Desktop
a few different parts during setup. A laptop computer
is ready to go when you get it.
➟
A netbook is a small laptop computer that may
be less powerful than a more expensive laptop. A
netbook is a great beginner’s computer because
netbooks are much cheaper than other machines
($250 to $400). The small size of a netbook may
suit you perfectly, but look closely at the size of any
laptop or netbook. Is the computer too big to carry
comfortably? Will your hands fit the keyboard?
In the rest of the book, when I use the words computer or machine, I
mean any style of computer. I use the words desktop or laptop
(including netbook) to emphasize differences between those
machines, as needed.
For more information on buying a computer, see
Computer For Seniors For Dummies, by Nancy C. Muir.
When you buy a new computer, check the ad or the box or talk with a
salesperson to find out whether that computer comes with Microsoft
Windows 7 installed. Ask which edition you’re buying. The various
editions of Windows 7 have different features and capabilities. You
are most likely to see one of these editions:
➟
Starter Edition: Many of the Windows 7 visual
effects are missing from the Starter Edition, and so
are some of the useful accessories discussed in
Chapter 5. This edition may be too stripped down to
give you the real benefits of using Windows 7.
➟
Home Premium Edition: This is a good choice for
most computer users and is likely to be the version
already installed if you are buying a new PC. It has
media options, such as music and video. Home
Premium supports all the slick visual effects of
Windows 7. Some people dismiss these visual effects
as eye-candy, but these effects, such as semi-transparent
➟
11
Part I: Getting to Know Windows 7
objects onscreen and rich colors, are part of the fun
of using Windows 7.
➟
Ultimate Edition: This version has everything
Windows 7 can provide. (The name says as much.)
Ultimate may include some advanced features —
including options for backing up your files — that
you won’t immediately need. This is the Edition that
may impress your teen-aged kids or grandkids, if
anything does.
Through a program called Windows Anytime
Upgrade, you can upgrade from Starter to Home
Premium or Ultimate. See Chapter 17 for more
information.
You can buy a DVD with Windows 7 and use that to
install Windows 7 on an older computer that currently
uses Windows XP or Vista. Sometimes, upgrades
work flawlessly; but the older the computer, the
greater the odds that some hardware or software
won’t work with the brand new Windows 7. It is
often more reliable to get a new version of Windows
on a new computer. (At least, that’s what the marketing department says.)
Turn On Your Computer
1. If your computer is a laptop, find the latch on the front
edge of the computer that releases the screen from the
keyboard. You may need to push the latch in or slide it
to the right to open the laptop. Raise the lid so you can
see the screen and the keyboard.
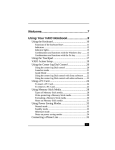
2. Locate the power switch. On most laptops, the switch is
➟
12
located near one of the hinges of the lid. On a desktop
computer, the power switch is usually on the front of the
computer box or tower (see Figure 1-2). Push in or slide
Chapter 1: Getting Comfortable with the Windows 7 Desktop
the power switch from left to right; then release the
switch to turn on the computer. You should hear some
noise from the fan or see lights on the keyboard or screen
soon after you turn it on.
Power button
Laptop/netbook
Desktop
Figure 1-2
3. The very first time you turn on a computer running
Windows 7, you may have to create a user account with
the following information:
• User name and computer name: Your user name
appears throughout the system, from the log-in
screen to the Start menu to the folder containing
all your documents. Use a simple, clear name.
Your first name is just fine. Your computer needs a
name, as well. Windows 7 suggests your user name
plus -PC, but you can change that, if you wish.
(See Figure 1-3.) Click Next.
➟
13
Part I: Getting to Know Windows 7
Enter a user name and computer name...
...And then click Next.
Figure 1-3
• Password: A password is an optional security
measure. If you enter a password when you create
your user account, that password is required each
time you start the computer. If someone other
than you tries to start your computer, he or she
will have to know (or guess) the password to get
into your files. (Don’t put your password on a
note stuck to the computer or nearby.) Click Next.
➟
14
For home computers, passwords may be unnecessary
unless you need to keep someone else in the
house out of your business. Laptop users should
always create a password, however, because it is
easy to lose a laptop. Don’t make it easy for a
thief to use your computer.
Chapter 1: Getting Comfortable with the Windows 7 Desktop
• Use Recommended Settings: After the password
screen, you select settings for updating and securing
Windows 7. Click Use Recommended Settings.
• Date and Time Settings: Select your time zone.
Check or uncheck Automatically Adjust for
Daylight Saving Time, as appropriate. Confirm the
current time. Click Next.
• Select Your Computer’s Current Location: Your
computer may detect an Internet connection
automatically. If you are at home, click Home
Network. Otherwise, click Public Network. See
Chapter 8 for more information about network
connections.
After the initial setup, every time you turn on the
computer, you may be asked to log in under the user
account you created in Step 3, including a password
if you created one. If you are the only user of the
computer and did not create a password, Windows 7
logs you in automatically.
Check Out the Windows 7 Desktop
1. After you turn on the computer and log in with your user
name and (if necessary) password, you see a screen
indicating that Windows is starting. Then you see the
Windows desktop. Figure 1-4 shows a common desktop
setup, although yours may be different.
Often, an interesting picture or photo is displayed on
the desktop. You see how to change this picture in
Chapter 14.
➟
15
Part I: Getting to Know Windows 7
Icon
Icons
Figure 1-4
2. Examine your desktop for icons — small pictures that
represent programs, which perform functions, or
documents such as letters and photos. Icons provide
a way to run a program or open a document. The
Windows 7 desktop displays an icon for the Recycle
Bin, where deleted documents go. The Recycle Bin may
be the only icon on your desktop, or you may see others.
3. Finally, the desktop displays gadgets, which are usually
➟
16
larger than icons. Gadgets display information, such as
the time (in a clock) or the current weather report. See
Chapter 5 for more about using gadgets.
Desktop
Chapter 1: Getting Comfortable with the Windows 7 Desktop
Try Out the Mouse
1. If your computer came with a mouse pad, which is a
thin, flexible rectangle with a very smooth surface, place
the mouse pad under the mouse.
2. Move the mouse, which is typically about the size of a
bar of soap and has two buttons at one end. Your mouse
may have a wheel between the buttons. Use the wheel in
long documents or on Web pages (see Chapter 9) to
scroll to areas below or above the area displayed on your
screen.
Hold the mouse gently so that you can click either
button easily without having to reposition your
hand.
Instead of a mouse, a laptop usually has a touchpad — a
small rectangle below the keys on the keyboard with
buttons below it that do the same things as the mouse
buttons. Drag your index finger over the touchpad to
move the mouse pointer (see Step 3) over the screen.
You can use more than one mouse or other pointing
device with any computer. If your current mouse is
too small or big or hard to use, buy a wireless mouse.
In addition to mice, other pointing devices include
trackballs, which you roll to move the mouse
pointer, and pens that you use on a separate tablet or
directly on the screen.
3. As you move the mouse, an arrow called the mouse
pointer moves on your computer screen (see Figure 1-5).
Try moving that pointer over the screen. With experience,
you’ll become very comfortable using the mouse. For
practice, pat your head while rubbing your stomach.
➟
17
Part I: Getting to Know Windows 7
Icon
Mouse pointer
Figure 1-5
4. Try out the mouse or touchpad buttons in the following
ways:
• Move the mouse pointer on top of an icon or gadget
on the desktop, such as the Recycle Bin. Let the
mouse pointer sit there for a moment — this is
hovering — you may see a pop-up message (called
a tooltip) with information about the icon you
hover over. Press and release (click) the left mouse
button. This action highlights, or selects, that icon
or gadget. As you work with menus, which are lists
of items (see Chapter 3), you put the mouse
pointer on the menu item you intend to use and
then click the left mouse button to select the item.
In this book, when you see the words point or
hover, they mean move the mouse pointer to the
specified location but don’t click. The word click
means a single, quick press and release of the left
mouse button. A double-click is two rapid clicks of
the left mouse button. A right-click is a single
press and release of the right mouse button.
➟
18
• Place the mouse pointer on an icon and then
double-click the left mouse button to open the
object associated with that icon, such as an e-mail
program or a document that you want to read,
edit, or print.
Chapter 1: Getting Comfortable with the Windows 7 Desktop
Sometimes you don’t know for sure whether you
need to click or double-click. One way to tell is to
hover over the icon you want to use. Often, a little bit of help info pops up, telling you what the
icon is for (see “Get Help When You Need It,”
later in this chapter). Then click the left mouse
button to see whether anything happens. If nothing does, double-click the icon. In other words,
you may not always have to double-click to open
a document or run a program, so don’t assume
that you have to until you get more familiar with
when one click is sufficient.
• Place your mouse pointer over any object on the
screen and right-click (click the right mouse button
one time). You see a menu of options, related to
the item your mouse pointer is over. This menu is
called a context menu because it changes with the
context or the position of the mouse pointer and
is different for different items. Right-clicking a
photograph’s icon, for example, displays a menu
of options for viewing that photo, and right-clicking
a music file’s icon displays a menu of options for
playing the music. A few options, such as Open
and Properties, appear in most context menus, but
others change depending on the context (what the
mouse pointer is pointing at).
The right mouse button is the key to the kingdom
because of context menus. Try right-clicking various
areas of the screen. You almost never double-click the
right mouse button, though.
5. With the mouse pointer over an icon, such as the Recycle
Bin, click and hold down the left mouse button; then
move the mouse to the right or down the screen. As you
move the mouse, the icon moves in the same direction
on the screen. This process is called click and drag. When
you release the left mouse button, the icon stays where
➟
19
Part I: Getting to Know Windows 7
you moved it. Click and drag the Recycle Bin or any
other icons you see on the desktop to some other places
on the desktop. Fun, huh?
6. You can also click and drag with the right mouse button.
Hover the mouse pointer over an icon, such as the
Recycle Bin or any other icon or gadget on the desktop;
click and hold down the right mouse button; and move
the mouse. When you release the right mouse button, a
small context menu pops up. You use this menu to copy
or move documents in Chapter 4.
If you have a laptop, you can click, double-click, and
click and drag by using your finger on a touchpad
and the buttons near it. Keep in mind, too, that you
can use a mouse with a laptop (though it’s not easy if
you have the laptop on your lap!).
Go with the Start Button
1. The Start button, located in the bottom-left corner of the
screen, provides easy access to all the programs you use.
This circular button displays the Windows logo — a
four-colored flag. Click the Start button to display the
Start menu, which is a list of options (see Figure 1-6).
2. Move your mouse pointer slowly over each item on the
left side of the menu. As you hover, some menu items
display a tooltip. A menu item with a triangle to the right
displays a pop-out list called a jump list. See Chapter 15
for more information about using jump lists.
3. Click the All Programs item to display a menu of all the
available programs on your computer.
4. On the All Programs menu, find a yellow icon for
➟
20
Games or Accessories, and click that icon to display more
programs. (Later, to play a game or open an accessory,
you click its name.)
Chapter 1: Getting Comfortable with the Windows 7 Desktop
Click an item to start that program.
Start typing to find the program you want.
Start button
Figure 1-6
5. Click Back near the bottom of the All Programs menu to
return to the first Start menu. You can also press the Esc
(Escape) key to back up through the menus.
6. You don’t have to dig through menus by clicking as you
did in the preceding steps. Instead, you can type part of
the name of the program you want to run. When the
Start menu opens, the cursor, which is a vertical or
horizontal line indicating where words you type will
appear, is automatically in the box labeled Search
Programs and Files. Start typing solitaire, and you see
several programs listed, including the game Solitaire.
Note that the game appears in the list as soon as you
➟
21
Part I: Getting to Know Windows 7
type the letter s. By the time you type sol, Solitaire is at
the top of the list. Click the Solitaire item to start the
game. See Chapter 11 for information about Solitaire and
other games.
You can perform most actions with the mouse, the
keyboard, or a combination of the two. Another way
to display the Start menu, for example, is to press the
Windows logo key, which is located between the keys
labeled Ctrl (Control) and Alt (Alternate) near the
spacebar — the largest key on the keyboard. The
Windows logo key has the same four-part flag icon as
the Start menu (although not in color). From here
on, I’ll refer to this key as the Win key.
7. Tap and release the Win key to display the Start menu;
tap the Win key a second time to remove the Start menu
from the screen. If you want to run something else, you
can type the name of the program you want and press
Enter or click the program name. This is the easiest way
to start any program you know the name of. You may
need to type only a few letters to run a program.
See Chapter 15 for information on customizing the
items that appear on the Start menu.
Learning keystroke shortcuts is especially valuable if
you don’t like using the mouse or other pointing
device, which is a common complaint laptop users
have about the touchpad.
Get Familiar with the Taskbar
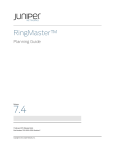
1. The area at the bottom of the screen and to the right of
➟
22
the Start button is the taskbar, where you see icons for
some programs. Figure 1-7 shows four icons in the
taskbar. The first three icons are for programs that aren’t
running (Microsoft Internet Explorer, Windows Explorer,
Chapter 1: Getting Comfortable with the Windows 7 Desktop
Media Player); the fourth icon is for Solitaire, which you
started in the preceding task. The mouse hovers over
Solitaire to display the thumbnail or the program name.
Taskbar
Thumbnail
Notification area
Figure 1-7
Use the taskbar as another way to run programs, in
addition to the Start menu. You can use the taskbar to
switch between programs by clicking the icon for the
program you want to use.
2. Hover the mouse pointer over icons in the taskbar. For
programs that are running, you may see a preview or
thumbnail (small picture) of that program (refer to
Figure 1-7).
Whether your computer has this capability depends,
in part, on your edition of Windows 7. The Starter
edition, for example, does not show thumbnails in
the taskbar. This function also depends on your
computer’s graphics hardware, so you may not see
taskbar thumbnails if you don’t have the necessary
hardware.
3. The right end of the taskbar is an area called the
Notification area or icon tray (refer to Figure 1-7), which
displays the current date and time, as well as icons for
➟
23
Part I: Getting to Know Windows 7
other programs that run automatically when your
computer starts. Messages called notifications pop up here
from time to time. Get information about these icons by
hovering the mouse pointer over them. Click any icon in
the icon tray to open the associated program, and rightclick an icon to see a menu of available options, such as
those to change settings or exit the program.
Before too long, you see a pop-up notification in the
icon tray to Activate Windows Now. Windows 7
needs to phone home to Microsoft to check in —
that’s activation. Ignore this message until you have
an Internet connection. See Chapter 8 for information on connecting to the Internet and Chapter 17
for steps to activation.
To recap: Start a program by using the Start menu,
icons on the desktop, or icons in the taskbar. Switch
between programs you have started by clicking their
icons in the taskbar.
Get Help When You Need It
1. Hover the mouse pointer over anything on the screen to
see a pop-up box, or tooltip, with a brief explanation of
the item.
2. Look for information on the screen. A How to Play box
appears briefly when you start Solitaire, for example. The
bottom edge of the screen, called the status bar, may display help text that changes as you highlight different
items on the screen. Some screens display blue links you
can click for more information.
3. Many programs, including the one shown in Figure 1-8,
➟
24
have a Help menu. Click the Help menu to see a list of
help options. You can also press the F1 key near the top
of your keyboard to see help information.
Chapter 1: Getting Comfortable with the Windows 7 Desktop
Click Help.
Figure 1-8
In most programs, choose Help➪About (this
program) to find out the name and version number
of the program. You may need the version number as
you seek help elsewhere.
4. Choose Start➪Help and Support to start the Windows 7
Help program. Click blue links to see more information.
Type a term you want help with in the Search Help box
at the top of the Help window, and press the Enter key
to search for that term. Try this by typing taskbar or
start menu, for example. Search the Help and Support
program for what’s new if you have used Windows Vista
or Windows XP (see Figure 1-9).
➟
25
Part I: Getting to Know Windows 7
Type a term you want to find more about and press Enter.
Figure 1-9
Close Windows 7
1. Although you can let Windows 7 run indefinitely, you
probably want to turn your computer off if you aren’t
going to use it for a few hours. To see your options for
turning the computer off, click the Start button to open
the Start menu (refer to “Go with the Start Button,”
earlier in this chapter).
2. At the bottom of the Start menu, to the right of the box
➟
26
labeled Search Programs and Files, you see a button with
Chapter 1: Getting Comfortable with the Windows 7 Desktop
a triangle at its right end. This button usually displays
Shut Down, although the button may be programmed to
display another option.
3. The Shut Down button has other options, as shown in
Figure 1-10. Click the triangle to the right of the button
for these options. For now, these three options matter
most (you may not have all of these):
• Shut Down: This option exits Windows 7 and saves
power by turning the computer off. In exiting
Windows 7, Shut Down closes any programs that are
currently running.
Click the triangle for more options.
Figure 1-10
➟
27
Part I: Getting to Know Windows 7
• Sleep: This option reduces the computer’s power
consumption without exiting Windows 7 or closing
programs. As a result, when you wake the computer
by moving the mouse or touching the keyboard,
everything is exactly as you left it: programs and
documents are open, if they were before Sleep.
• Hibernate: This option combines Sleep and Shut
Down. Hibernate records which programs are
running but completely shuts down the computer.
When you start the computer, Windows 7 opens
all programs you were using, just like Sleep.
Hibernate or Shut Down are equally green options —
they save the same amount of power. Sleep is a little
less green, but saves time in returning to a task you’re
in the middle of.
4. Choose Shutdown to turn off the computer.
On most computers, pressing the power switch also
shuts down the computer. On a laptop, closing the
lid may shut down the laptop or put it into Sleep or
Hibernation mode.
For a desktop computer, consider using a power strip
to plug in the computer, the monitor, and the printer.
After you shut down or hibernate the computer, turn
the power strip off. This saves the most power.
➟
28