1
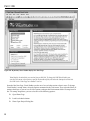
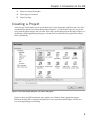
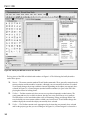
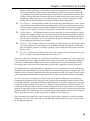
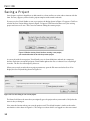
AL
Part I
MA
TE
RI
IDE
Chapter 1: Introduction to the IDE
TE
D
Chapter 2: Menus, Toolbars, and Windows
GH
Chapter 3: Customization
Chapter 4: Windows Form Designer
RI
Chapter 5: WPF Designer
PY
Chapter 6: Visual Basic Code Editor
CO
Chapter 7: Debugging
Introduction to the IDE
The chapters in the first part of this book describe the Visual Studio integrated development
environment (IDE). They explain the most important windows, menus, and toolbars that make up
the environment, and show how to customize them to suit your needs. They explain some of the
tools that provide help while you are writing Visual Basic applications and how to use the IDE to
debug programs.
Even if you are an experienced Visual Basic programmer, you should at least skim this material.
The IDE is extremely complex and provides hundreds (if not thousands) of commands, menus,
toolbars, windows, context menus, and other tools for editing, running, and debugging Visual
Basic projects. Even if you have used the IDE for a long time, there are sure to be some features
that you have overlooked.
When I teach Visual Basic, for example, I cover the IDE’s keyboard shortcuts (such as Alt+Space
to open IntelliSense, and Ctrl+C, Ctrl+X, and Ctrl+V to copy, cut, and paste) early in the class.
The students don’t really write enough code to take full advantage of these tools for several weeks,
however, so we revisit the topic later.
These chapters describe some of the most important of those features, and you may discover
something useful that you’ve never noticed before.
Even after you’ve read these chapters, you should periodically spend some time wandering
through the IDE to see what you’ve missed. Every month or so, spend a few minutes exploring
little-used menus and right-clicking things to see what their context menus contain. As you
become a more proficient Visual Basic programmer, you will find uses for tools that you may have
previously dismissed or not understood before.
It’s also useful to save links to tips you discover online. You can make a Visual Basic Tips folder
in your browser’s favorites list to make finding tips easier.
This chapter explains how to get started using the IDE. It tells how to configure the IDE for
different kinds of development. It explains Visual Basic projects and solutions, and shows how
to create, run, and save new projects. This chapter is mostly an introduction to the chapters that
Part I: IDE
follow. The other chapters in this part of the book provide much more detail about particular tasks such
as using the IDE’s menus, customizing menus and toolbars, and using the Windows Form Designer to
build forms.
Different IDE Appearance
Before you start reading about the IDE and viewing screen shots, it’s important to understand that the
Visual Studio IDE is extremely customizable. You can move, hide, or modify the menus, toolbars, and
windows; create your own toolbars; dock, undock, or rearrange the toolbars and windows; and change
the behavior of the built-in text editors (change their indentation, colors for different kinds of text, and
so forth). These chapters describe the basic Visual Studio development environment as it is initially
installed. After you’ve moved things around to suit your needs, your IDE may look nothing like the
pictures in this book.
To avoid confusion, you should probably not customize the IDE’s basic menus and toolbars too much.
Removing the help commands from the Help menu and adding them to the Edit menu will only cause
confusion later. Moving or removing commands will also make it more difficult to follow the examples
in this and other books, and will make it more difficult to follow instructions given by others who might
be able to help you when you have problems.
Instead of making drastic changes to the default menus and toolbars, hide the menus and toolbars that
you don’t want and create new customized toolbars to suit your needs. Then you can find the original
standard toolbars if you decide you need them later. Chapter 3, “Customization,” has more to say about
rearranging the IDE’s components.
There are several other reasons why Visual Studio on your system may not look exactly like the screens
shown in this book. Visual Studio looks different on different operating systems. The figures in this book
were taken on a computer running Windows Vista so they display the distinctive Vista look and feel.
This computer was using the Aero Glass style, so the forms use large, translucent borders and other Aero
decorations. You may see a different appearance, even if you are using Vista and you have selected
another style, or if Vista thinks your hardware won’t support Aero nicely. Additionally, some commands
may not behave exactly the same way on different operating systems.
In addition to its new Aero appearance, new features in Vista also include a new User Account Control
(UAC) security model. When you first log on, all accounts get a normal level of user privileges. Later,
when you try to run certain applications that require increased permissions, a UAC privilege elevation
dialog box appears where you can enter an administrator password. The examples in this book were tested
using a normal user account, so you should not see that dialog while running them, but you may see it if
you use other development tools. Chapter 24, “UAC Security,” provides more details about UAC.
4
Chapter 1: Introduction to the IDE
Visual Studio will also look different depending on which version you have installed. The free Visual
Basic 2008 Express Edition product has fewer tools than other editions such as the high-end Visual Studio 2008 Team Suite. The figures in this book were captured while using Visual Studio 2008 Team Suite,
so, if you have another version, you may not see all of the tools shown here.
You can learn about Visual Studio’s free Express editions at msdn2.microsoft.com/en-us/
express/default.aspx. Learn about Visual Basic in general at the Visual Basic home page
msdn2.microsoft.com/en-us/vbasic/default.aspx.
Finally, you may be using different configuration settings from the ones used while writing this book.
You can configure Visual Studio to use settings customized for developing projects using Visual Basic,
C#, Web tools, and other technologies. This book assumes your installation is configured for Visual Basic
development and the screen shots may look different if you have selected a different configuration. The
following section says more about different IDE configurations and tells how you can select a particular
configuration.
IDE Configurations
When you install it, Visual Studio asks you what kind of development settings you want to use. The
most obvious choice for a Visual Basic developer is Visual Basic Development Settings. This choice customizes Visual Studio to work more easily with Visual Basic, and is a good choice if you will focus on
Visual Basic development.
Another reasonable choice is General Development Settings. This option makes Visual Studio behave
more like Visual Studio 2003. It’s a good choice if you are used to Visual Studio 2003, or if you expect to
use other Visual Studio languages, such as C#, fairly regularly because these settings are fairly effective
for C# development as well as Visual Basic development.
This book assumes that you have configured Visual Studio for Visual Basic development. If you have
chosen a different configuration, some of the figures in this book may look different from what you see
on your screen. Some of the menu items available may be slightly different, or may appear in a different
order. Usually, the items are available somewhere, but you may have to search a bit to find them.
If you later decide that you want to switch configurations, open the Tools menu and select Import and
Export Settings to display the Import and Export Settings Wizard. Select the Reset all settings option button and click Next. In the second page, tell the wizard whether to save your current settings and click
Next. On the wizard’s final page (shown in Figure 1-1), select the type of configuration you want and
click Finish. When the wizard is done saving the new settings, click Close.
5
Part I: IDE
Figure 1-1: Use the Tools menu’s Import and Export Settings command to change the Visual Studio
configuration.
Projects and Solutions
Before you can understand how to use the IDE effectively to manage Visual Basic projects and solutions,
you should know what projects and solutions are.
A project is a group of files that produces some specific output. This output may be a compiled executable program, a dynamic-link library (DLL) of classes for use by other projects, or a control library for
use on other Windows forms.
6
Chapter 1: Introduction to the IDE
A solution is a group of one or more projects that should be managed together. For example, suppose that
you are building a server application that provides access to your order database. You are also building a
client program that each of your sales representatives will use to query the server application. Because
these two projects are closely related, it might make sense to manage them in a single solution. When
you open the solution, you get instant access to all the files in both projects.
Both projects and solutions can include associated files that are useful for building the application
but that do not become part of a final compiled product. For example, a project might include the
application’s proposal and architecture documents. These are not included in the compiled code, but
it is useful to associate them with the project so that they are easy to find, open, and edit while working
on the project.
When you open the project, Visual Studio lists those documents along with the program files. If you
double-click one of these documents, Visual Studio opens the file using an appropriate application. For
example, if you double-click a file with a .doc extension, Visual Studio normally opens it with Microsoft
Word.
To associate one of these files with a project or solution, right-click the project in the Solution Explorer
(more on the Solution Explorer shortly). Select the Add command’s Add New Item entry, and use the
resulting dialog box to select the file you want to add.
Often a Visual Basic solution contains a single project. If you just want to build a small executable
program, you probably don’t need to include other programming projects in the solution.
Another common scenario is to place Visual Basic code in one project and to place documentation (such
as project specifications and progress reports) in another project within the same solution. This keeps the
documentation handy whenever you are working on the application but keeps it separate enough that it
doesn’t clutter the Visual Studio windows when you want to work with the code.
Although you can add any file to a project or solution, it’s not a good idea to load dozens of unrelated
files. Although you may sometimes want to refer to an unrelated file while working on a project, the
extra clutter brings additional chances for confusion. It will be less confusing to shrink the Visual Basic
IDE to an icon and open the file using an external editor such as Word or WordPad. If you won’t use a
file very often with the project, don’t add it to the project.
Star ting the IDE
When you launch Visual Studio, it initially displays the Start Page shown in Figure 1-2 by default. The
Start Page’s Recent Projects section lists projects that you have worked on recently and provides links
that let you open an existing project or Web site, or create a new project or web site. The Getting Started
section contains links to help topics that may be useful to beginners.
Depending on your network connection, the Visual Studio Headlines and Visual Studio Developer News
sections display developer-related news. In Figure 1-2 the computer wasn’t connected to the Internet so
the Start Page doesn’t show developer news.
7
Part I: IDE
Figure 1-2: By default, Visual Studio displays the Start Page.
Visual Studio downloads the news section from an RSS feed. To change the URL Visual Studio uses,
open the Tools menu, select Options, open the Environment folder, and select the Startup item. Enter the
new URL in the “Start Page news channel” text box.
Instead of the Start Page, Visual Studio can take one of several other actions when it starts. To change
Visual Studio’s startup action, select the Options command in the Tools menu. Then select the Show all
settings check box so you can see all of the options and open the Environment folder’s Startup item. In
the “At startup” dropdown, you can select one of the following options:
8
❑
Open Home Page
❑
Load last loaded solution
❑
Show Open Project Dialog Box
Chapter 1: Introduction to the IDE
❑
Show New Project Dialog Box
❑
Show empty environment
❑
Show Start Page
Creating a Project
After you open Visual Studio, you can use the Start Page’s Create Project link or the File menu’s New Project command to open the New Project dialog shown in Figure 1-3. Use the Project Types tree view on the
left to select the project category that you want. Then select a specific project type on the right. In Figure 1-3,
the Windows Forms Application project type is selected. Enter a name for the new project in the text box
below, and click OK.
Figure 1-3: The New Project dialog lets you start a new project.
Figure 1-4 shows the IDE immediately after starting a new Windows Forms Application project.
Remember that the IDE is extremely configurable, so it may not look much like Figure 1-4 after you
have rearranged things to your liking.
9
Part I: IDE
Figure 1-4: Initially the IDE looks more or less like this.
The key pieces of the IDE are labeled with numbers in Figure 1-4. The following list briefly describes
each of these pieces:
10
1.
Menus — The menus contain standard Visual Studio commands. These generally manipulate the
current solution and the modules it contains, although you can customize the menus as needed.
Visual Studio changes the menus and their contents depending on the object you currently have
selected. In Figure 1-4, a Form Designer (marked with the number 4) is open so the IDE is displaying the menus for editing forms.
2.
Toolbars — Toolbars contain tools that you can use to perform frequently needed actions. The
same commands may be available in menus, but they are easier and faster to use in toolbars.
The IDE defines several standard toolbars such as Formatting, Debug, and Image Editor. You
can also build your own custom toolbars to hold your favorite tools. Visual Studio changes the
toolbars displayed to match the object you currently have selected.
3.
Toolbox — The Toolbox contains tools appropriate for the item that you currently have selected
and for the project type that you are working on. In Figure 1-4, a Form Designer is selected in a
Chapter 1: Introduction to the IDE
Windows Forms application so the Toolbox contains tools appropriate for a Form Designer.
These include Windows Forms controls and components, plus tools in the other Toolbox tabs:
Crystal Reports, Data, and Components (plus the General tab is scrolled off the bottom of the
Toolbox). You can add other customized tabs to the Toolbox to hold your favorite controls and
components. Other project types may display other tools. For example, a Web project would
display web controls and components instead of Windows Forms components.
4.
Form Designer — A Form Designer enables you to modify the graphical design of a form. Select a
control tool from the Toolbox, and click and drag to place an instance of the control on the form.
Use the Properties window (marked with the number 6) to change the new control’s properties.
In Figure 1-4, no control is selected, so the Properties window shows the form’s properties.
5.
Solution Explorer — The Solution Explorer lets you manage the files associated with the current
solution. For example, in Figure 1-4, you could select Form1.vb in the Project Explorer and then
click the View Code button (the third icon from the right at the top of the Solution Explorer) to
open the form’s code editor. You can also right-click an object in the Solution Explorer to get a
list of appropriate commands for that object.
6.
Properties — The Properties window lets you change an object’s properties at design time. When
you select an object in a Form Designer or in the Solution Explorer, the Properties window displays that object’s properties. To change a property’s value, simply click the property and enter
the new value.
7.
Error List — The Error List window shows errors and warnings in the current project. For example, if a variable is used and not declared, this list will say so.
If you look at the bottom of Figure 1-4, you’ll notice that the Error List window has a series of tabs. The
Task List tab displays items flagged for further action such as To Do items. The Command window lets
you execute Visual Studio commands such as those invoked by menu items. The Immediate window
lets you type and execute Visual Basic commands, possibly while a program is running, but paused.
The Output tab shows output printed by the application. Usually an application interacts with the user
through its forms and dialog boxes, but it can display information here to help you debug the code. The
Output window also shows informational messages generated by the IDE. For example, when you compile an application, the IDE sends messages here to tell you what it is doing and whether it succeeded.
As soon as you create a new project, it is ready to run. If you open the Debug menu and select Start
Debugging, the program will run. It displays only an empty form containing no controls, but the form
automatically handles a multitude of mundane windowing tasks for you. For example, before you write
a single line of code, the form lets the user resize, minimize, restore, maximize, and close the form. The
form draws its title bar, borders, and system menu, and repaints itself as needed when it is covered and
restored. The operating system also automatically handles many tasks such as displaying the form in the
Windows taskbar and Task Manager. Vista automatically generates thumbnail previews for its Flip and
Flip 3D tools that you display by pressing Alt+Tab or Windows+Tab, respectively.
The form contains no controls, can’t open files, doesn’t process data, in fact doesn’t really do anything
unique but a lot of the setup is done for you. It handles the windowing chores for you so you can focus
on the application domain.
11
Part I: IDE
Saving a Project
Later chapters explain in depth how to add controls to a form and how to write code to interact with the
form. For now, suppose you have built a project complete with controls and code.
If you try to close Visual Studio or start a new project, the dialog shown in Figure 1-5 appears. Click Save
to make the Save Project dialog shown in Figure 1-6 appear. Click Discard to throw away the existing
project and start a new one. Click Cancel to continue editing the current project.
Figure 1-5: Before closing Visual Studio or starting a new project,
you must decide what to do with the previous project.
As you work with the new project, Visual Studio saves its form definitions and code in a temporary
location. Each time you run the program, Visual Studio updates the files so it doesn’t lose everything if
it crashes. The files are still temporary, however.
When you are ready to make the new project permanent, open the File menu and select Save All to
display the Save Project dialog shown in Figure 1-6.
Figure 1-6: Use this dialog to save a new project.
The Name field shows the name that you originally gave the project when you created it. Verify that the
name is okay or change it.
Next, enter the location where you want the project saved. The default location is similar to the rather
non-intuitive value shown in Figure 1-6. This image was taken while I was logged in as the user named
12
Chapter 1: Introduction to the IDE
Developer. When you save a project, the “Developer” part of the location would be replaced with your
user name.
Be sure to pick a good location before you click Save. The next time you build a project, the default will
be the location you specify now so you won’t need to be quite as careful in the future, assuming you
want to build a lot of projects inside the same directory.
If you check the “Create directory for solution” box, Visual Studio enables the Solution Name text box
and adds an extra directory above the project directory to hold the solution. This is most useful when
you want to include more than one project in a single solution.
For example, suppose you are building a graphical office furniture layout tool — a CAD system for
arranging desks and chairs. You want the solution to include an executable main project and a drawing
tool DLL project. In that case, you could name the solution OfficeArranger and call the executable project
OfficeArrangerMain. Visual Studio would make a directory named OfficeArranger and place the executable project inside a subdirectory named OfficeArrangerMain. Later you could add a DLL project called
OfficeArrangerTools to the solution and place it also inside the OfficeArranger solution directory.
After you have entered the project name and location, and optionally specified a separate solution
directory, click Save.
The File menu’s Save As commands let you save particular pieces of the solution in new files. For example, if you have a project named OfficeArrangerMain selected in Project Explorer, then the File menu
contains a command named “Save OfficeArrangerMain As.” This command lets you save the project
file with a new name. Unfortunately it doesn’t make a new copy of the whole project; it just makes a
copy of the project file. That file contains information about the project on a high level such as references
used by the project, files imported by the project, and the names of the forms included in the project. It
does not contain the forms themselves.
Many beginners try to use the File menu’s Save As commands to make copies of a project or a solution
but it doesn’t work. Instead, use Windows Explorer to find the directory containing the whole project or
solution and make a copy of the entire directory.
Summar y
This chapter explained how to get started using the Visual Studio integrated development environment.
It tells how to configure the IDE for different kinds of development and explains that different configurations might make your version of Visual Studio look different from the screen shots shown in this book.
It explains what Visual Basic projects and solutions are, and shows how to create, run, and save a new
project.
The next few chapters describe parts of the IDE in greater detail. Chapter 2, “Menus, Toolbars, and
Windows,” describes the commands available in the IDE and the menus, toolbars, and secondary windows
that hold them.
13