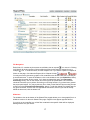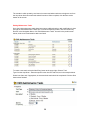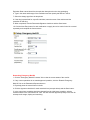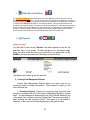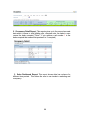
1
User Manual 1 Table of Contents Icons ................................................................................................................................................ 5 Departmental Responsibilities ......................................................................................................... 7 1. OFFICE ...................................................................................................................................... 12 A. Scheduling Calendar ....................................................................................... 12 B. Shared Files C. Enter Timecard D. My Shifts ......................................................................................................... 21 E. Time Off .......................................................................................................... 21 F. Request Maintenance .................................................................................................... 15 .............................................................................................. 19 ...................................................................................... 22 2. STAFF ....................................................................................................................................... 23 A. Add New Staff B. Select Staff .............................................................................. 24 C. Staff Reports ............................................................................. 27 D. All Former Staff ............................................................................ 27 E. Staff Scheduling ....................................................................................... 23 .......................................................................... 28 3. RESIDENT................................................................................................................................. 32 A. Select/View Residents B. Change Resident Status C. Discharged Residents D. Resident Reports ....................................... 32 ...................................................... 41 ................................................................... 41 ............................................................................ 42 2 E. Input Activity .................................................................................. 42 4. MEDICATION ............................................................................................................................ 45 A. MARs (Custom) B. Scheduled MARs C. Administer OTC PRN D. Administer Prescribed PRN E. ..................................................................................... 45 Medication Reports .................................................................................. 46 ............................................................................. 47 .................................................................... 49 .............................................................................. 50 5. COMMUNITY............................................................................................................................. 52 A. Clinical Monitor B. Community Census Monitor ...................................................... 53 C. Community Records Monitor ....................................................... 54 D. Communities Maintenance Monitor E. Pharmacist Report F. Enter Occupancy Budget G. Community Record ........................................................................... 52 ..................................................... 56 ............................................................................... 60 ............................................................. 67 ....................................................................... 68 6. ACTIVITIES/FAMILY CONNECT .............................................................................................. 69 A. Activities Calendar B. Family Connect Access ................................................................................ 69 ......................................................................... 70 7. MARKETING/LEADS ................................................................................................................ 72 A. Lead Search ......................................................................... 72 3 B. My Open Leads C. Task Manager D. My Tasks E. Lead Sources F. Moving a Lead to Resident .................................................................... 81 ....................................................................... 81 ............................................................................. 82 ....................................................................... 82 ............................................. 83 G. Creating Mailing Lists and Using Mailing Group Entries H. Maintaining a Current Occupancy I. Daily Reconciliations J. Reports ..... 86 .......................................................... 94 ............................................................................... 97 ................................................................................. 97 4 Icons Icons are used throughout the User Guide to illustrate three points; 1. Whether the item is a function or report, 2. Whether the item is mandatory, not used at this time, or optional/as needed, and 3. Who is required or may use the function. See descriptions below: 1. Function or Report: = Function = Report 2. Usage: = Mandatory = Not used at this time = Optional/as needed 3. User/Responsible Party: =General Manager = Business Office Manager =Resident Care Director/Care Staff 5 = Sales = Plant Operations Manager = Transportation Director = Recreational Services 6 Departmental Responsibilities 1. General Manager A. Monitor sales activity. Blue Step offers a quick and thorough means of monitoring the activity of the Sales Department. GM‟s should review the at least once a week. Completed Task Summary report (Section 7 F) B. Ensure resident records are complete. All resident records should include, at a minimum: DOB, Date Admitted, Admit Agree, and Pre-Admit. To select which record items appear on the Resident Monitor report, see section 5 C in this document. The General Manager should review the Resident Record Monitor at least once a month and follow up with the BOM on any open items. C. Ensure staff records are complete. All staff records should include, at a minimum, DOB, Date Hired, and Certs Done. To select which record items appear on the Staff Monitor Report, see section 5 C in this document. The General Manager should review the Staff Record Monitor at least once a month and follow up with the BOM on any open items. D. Ensure that alerts are properly set up. At a minimum, the following alerts should be set up in the system: 7 License certifications: self (30 days prior via email & alert), RCD (If nursing related, 30 days prior via email & alert), BOM (once expired via email and alert) GM: (once expired via email and alert, 30 days if no RCD if nursing related). AL Inquiry/Leads that move from “Inquiry/Lead” to “Pending”: RCD (or GM if no RCD) (email and alert immediately), BOM (email and alert immediately). IL Inquiry/Leads that move from “Inquiry/Lead” to “Pending”: BOM (email and alert immediately). 30 minutes after med prescribed time if not delivered any nursing related, anyone with Resident Basic Medical permission/security group but excludes anyone with Resident Edit Medical permission/security group (alert). 40 minutes after med prescribed time if not delivered: RCD and GM (or anyone with Resident Edit Medical permission/security group) (alert and, if possible, text). E. Ensure that the census is correct. Follow up periodically to make sure that the BOM is reconciling the manual census with Blue Step. F. Ensure that assessments are being performed for each resident at least once a quarter. The setup for this appears in XXXX. G. Ensure that activities and transportation are being posted for Family Connect. 2. The procedures for this appear in the Input Activities section on pp. 34-35. Business Office Manager Enters all staff information: Enter all information that is relevant, but must: (1) fill in all nursing and other required certifications and license information, especially expiration dates, 8 (2) fill in Med Pass Set Up only if restricting view of meds to certain hours, (3) fill in Medication Delegation (a record of who a nurse delegate med pass authority to) if required by state, and must (4) use Discharge Staff function when terminating staff member. The following staff sections are not yet required to (and should not) be used: Performance/Goal Review, Schedule Preference, Scheduled Shifts, Time Off Request and Time Card. Enter all relevant resident info and must update all “Pending” residents to “Active Resident” status by no later than the move in date. Enter all information deemed necessary, but the following are required fields: (1) Name (2) Phone numbers (3) Move In Date (4) Apartment number (5) Insurance information (for AL resident) (6) Medication and medical information (for AL resident, as required by state) (7) Emergency contacts (at least two) While the following information is not required, it is highly recommended in the event of an emergency: (1) Birth date (2) SS # (3) Insurance information (IL resident) (4) Medication and medical information (for IL resident) (5) Physician contact information (6) Medical screening information (7) Preferences Ensure census is correct. Reconcile with manual census daily and Great Plains monthly. 3. Resident Care Director 9 Responsible for all medical information on resident file. Update AL resident (and IL under med care by facility) med and care plan info that are in “Pending” status. Ensure meds are delivered on time. Records are thorough and accurate. Timely assessments that correlate with revenue. Review the Master Nursing Report (under the Community Clinical Monitor path) daily. Record all incidents on Incident/Behavior report. Review system to see if Blue Step forms can replace state forms and notify RDO of missing forms. Continue using current manual forms unless specifically notified otherwise. 4. Recreational Services Director Keep activities calendar updated. Enter resident Leisure Recreation Preferences. Post activities to all residents‟ files for update on Family Connect. [Access this through the path Residents Input Activities.] 5. Plant Manager Process all work orders though Community Community Maintenance Monitor. 6. Sales Director Staff must record all activity, for both leads and lead sources. Use system (and not manual card system) to plan activities. Record receipt of all deposits. Enter all leads and lead sources (professional and non-professional) in system. Director to monitor activity. 10 Run mailing lists and emails from Blue Step. Moves leads from “Lead” to “Pending” within 24 hours of receipt of deposit and confirmation of move in date. Ensure that all leads and lead sources have no past due tasks and all have future tasks. 7. Transportation Director Transportation employee should post all transportation information so that it appears in Family Connect. [Access this through the path Residents Input Activities.] All Staff Enter maintenance requests through Office Request Maintenance. 11 Modules 1. OFFICE Office Scheduling Calendar A. | Shared Files | Enter Timecard | My Shifts | Time Off | Request Maintenance Scheduling Calendar The My Office Scheduling Calendar is a convenient place for each user to store appointment, event and meeting information. Events added to the HQ calendar will also be displayed on this view, if the specific user has been added to the event as an attendee. 12 Viewing/Editing an Event 1. To see information on a selected event, click the underlined name of the event. A pop-up will appear. When viewing is complete, click the „Close‟ button on the pop-up. 2. The user who originally created the event entry may also see and/or edit the event by clicking on the edit icon . 3. The user who originally created the event entry may also delete the event by clicking the delete icon . Adding a New Event 1. Click the „New Event‟ button at the upper right. 2. On the New Event Screen (example shown below) type a title for the event in the Title field. Enter a location and select an event type, if desired. 3. Enter any information about the meeting in the Event Details editor box. 13 4. Use the current date, type in a date or use the calendar icon Enter a time of day. to select a date for the event. 5. Verify that the Time Zone is set to the correct zone. 6. If the event is „all day‟ or repeats on a set schedule, make the appropriate choices. 7. When all fields are set as desired, click the „Save‟ button. Changing Views 1. The calendar defaults to the current day. To navigate to past or future days, click the arrows on either side of the header date, as in this example. 14 To move ahead or back by months, click one of the links or month calendars at the bottom of the current view. Alternately, enter a specific date in the search field and click the „Go‟ button. 2. The calendar also defaults to the Day View. To see a full week, click the week icon upper right. To see the full month, click on the month icon at the . Setting Calendar Preferences 1. At the bottom of the screen, click the „Calendar Preferences‟ button. 2. On the resulting page, click the Time Zone drop-down and select the applicable zone for your facility. 3. Click the drop-down and select the desired starting view of the calendar, Day, Week or Month. 4. Select starting hour and ending hour for the calendar display. If events are scheduled outside these default hours, the view will expand to include them. 5. The Day View of the calendar may be set to increments of 10, 15, 20, 30 minutes or 1 hour. Click the drop-down and select the appropriate interval. 6. When completed, click the „Save‟ button at the bottom of the screen. B. Shared Files Shared Files The Shared Files pagelet displays the five (5) most recently posted documents by title and document name. To directly access the document, click on the underlined title/name. To view the 15 complete list of files, click on the Shared Files section title or the numbers to the right of it. To view any jpeg images or gif graphics contained in Shared Files in a slide show format, click on the slideshow icon at the bottom of the list (also see Slideshow, below). Working with Shared Files On the main Shared Files page, you will find a list and description of every file that has been uploaded through HQ™ for your organization, which also includes the size of the file, the name of the person who posted it and the date it was uploaded. These files can be accessed, edited, deleted, locked or unlocked, organized into folders and rearranged to meet your organization‟s information needs. The image below is from the standard Shared Files (List) format. If your Administrator has changed the format from List to Icon, the page will appear with each folder or file represented by an icon and the associated function icons displayed below it. See Edit Page – Shared Files in Administrative Options, below, for details and illustrations. Please note that all of the following functions are applicable, the page is simply displayed in a different layout. Any of these columns may be visible or hidden, depending upon the permissions level you have been granted. For instance, if you have Reader permissions, the Delete column will not appear, since deleting requires Editor permissions. Additionally, a column, such as Description, may be hidden if no file descriptions have been entered for any file. Also, any file or folder may be visible or hidden to you, depending upon the security assigned to that specific file or folder. 16 File Navigation Each folder, if it contains any documents or subfolders, has an expand icon next to it. Clicking it will display all the documents or folders within that folder and change the expand icon to a collapse icon. To close the folder, click the collapse icon. If you wish to expand or collapse all folders on the page, click either the Expand All or Collapse All tabs. You may access any document, graphic or file contained on the Shared Files tree, by clicking on its underlined name. To open the slideshow, click on the slideshow icon (see Slideshow, below). To work with document version control, if you have purchased this option (see Document Versioning, below), click on the version icon to the right of the posted date. The locked and unlocked icons allow you to perform file locking or unlocking functions, if you have been granted the proper permissions. You may reorder any file or folder on the Shared Files tree using the two reorder icons (see File and Folder Reordering, below). To edit the original File Upload page for any given document, click the edit icon opposite the document‟s name. If you wish to entirely delete the document, click the delete icon. Slideshow The slideshow icon at the bottom of the Shared Files pagelet allows you to view graphic files in a slideshow version. On the main Shared Files page, magnifier icons appear opposite all files. If you click on any magnifier icon, all the files contained in that specific folder will be displayed, starting with the one you clicked. 17 If you would like to see every file in every folder, click the icon across from the root folder, then click the box at the bottom of the slideshow screen, see below. The images will each appear, one after another, centered on the slideshow screen, formatted according to your choices in speed and size. Any files that are not graphical format or are unsupported by the browser (Internet Explorer™, etc.), will appear as only as an icon representing Word, Excel or other program, not as images of the document. The slideshow was designed to produce images from graphical files only. The slideshow options for image display speed are accessed from the Speed drop-down and include: Paused, Slowest, Slow, Medium, Fast and Fastest. The options for image display size are accessed from the Size drop-down and include: Small, Medium and Large. The Previous/Next button moves your view forward or backward by one image. 18 C. Enter Timecard Clocking In on the Timecard 1. From the Office Module or the My Profile link, select the „Timecard‟ link and click the „New Entry‟ button. 2. On the Timecard page, as seen here, click the „Clock In‟ signature checkbox. 3. If needed, enter any comments or notes, then click the „Save‟ button at the bottom. Entering Breaks on the Timecard 1. To clock out for a break, click the edit icon for the current day‟s entry. Do not click the „New Entry‟ button again. 2. Click the „Start Break‟ signature checkbox, as seen below, and the „Save‟ button. 3. The „Override‟ fields are for the use of Organization Administrators and are auto-filled by the system. Do not change the data displayed. 19 4. To clock in after a break, click the edit icon for the current day‟s entry. Do not click the „New Entry‟ button when clocking back in. 5. Click the „End Break‟ signature checkbox, displayed below. 6. If needed, type in any notes or enter any mileage, then click the „Save‟ button. Clocking Out on the Timecard 1. To clock out for the day, click the edit icon for the current day‟s entry. Do not click „New Entry‟ when clocking out. 2. Click the „Clock Out‟ signature checkbox, seen below, and the „Save‟ button. 3. During any edit, notes or mileage may be added to the appropriate fields. 20 D. My Shifts Allows staff to log-in and see the shifts that they work. The staff scheduling has to be implemented first before shifts for individual staff will show up. E. Time Off For that gives staff availability to enter a time off request and to monitor that request up to approval or denial. To see the history of your requests simply click on Time Off Request under the Office module and you will see the following screen. To fill out a new form to request time off click on the Request Time Off icon. Once you click on the icon the following form will appear for you to complete and hit save. 21 F. Request Maintenance Form to be filled out when a resident or staff member fills has a maintenance request. Maintenance Request is found under the Office module. Simply fill out the form and hit save at the end. 22 2. STAFF Staff Add New Staff A. | Select Staff | Staff Reports | All Former Staff | Staff Scheduling Add New Staff Adding New Staff 1. Click the Add New Staff link for access to a series of four (4) screens in which information is entered, saved and stored in the staff member‟s record. 2. Enter as much data as is known, then click the Next button at the bottom of the screen. 3. On the fourth screen, click the Save button. The system will take you to the Record Summary, titled with the employee‟s name, which you may access other forms to add any additional information or to edit existing information. 4. 23 B. Select Staff Viewing and Selecting Staff The Select Staff link under the HR/Staff module gives you access to the All Staff screen, which lists every member of your organization who has been designated “Staff” (a member of the Staff record category). The page gives you a snapshot of the records of each individual, with a Select link to open each record summary. The All Staff screen is set to alphabetize by last name as a default. You may click on any underlined column titles to reorder the records by Date Hired, Social Security Number or E-mail Address. * The display columns seen on this page were selected at the time HQ™ was configured for your organization. They may be changed by someone in your organization with a Relate™ license or by BlueStep™, upon request. Using a Search If you have a long list of staff members, the Search function will be a useful timesaver in locating the record needed. 1. The Search By field contains a drop-down list of the fields on which you may conduct the search. In the example above, click on the down arrow, then on First Name, Last Name or Social Security number. 2. The next field (Starts With is the first selection) contains a much longer list of possible search operators. Select one of these options, then proceed to the Search For field. 3. Type an identifier (the name, partial name or number, in this case) for which you are searching and click the Search button. 24 4. The page will repaint with the records that most closely match your search criteria. Click the Select link and proceed to work with the record. Inside the Staff Record Once a staff record has been created you can navigate back to it to change information as needed. Below you will find further explanation of each form: Name and Email-Click on this form if you want to update a resident‟s name and email. Online Profile-This form is where the Staff‟s Username and Password is kept. Those with access to staff files can go here to reset an employee‟s password. Contact Information-Can record home and work information such as home and work address. Med Pass Setup-See medication section. Time Card and Time Card Records-Houses all timecard information for that employee. Personal Info-Form where information can be entered such as SS number, Birth Date, and Educational data. Medication Delegation-Form where nurse can record that she gave her consent for another employee to pass medications under her direction. Also includes a document link to allow scanning of completed medication training documents. Certifications/Inservice-Form where in-services and certifications can be documented. Also includes document link to upload scanned certification cards. Health History-Form to record health history of employee. Performance/Goal Review-Form to record expectations and goals set forth for employee. Staff Employment Checklist-Checklist to show information that has been completed for a staff member and that information that still needs to be completed. Scheduled Shifts-Scheduled shifts for an employee. Time Off Request-Shows all Time Off requested submitted by employee. Employment Info-(Important)-This form is where a staff member's HQ Security Groups and other important information is determined. See below for highlights of this section: a. Position Title List - The CER workflow alerts are affected by this field. If you are a staff member that who is involved in the CER workflow process you will not get alerts if you don‟t have a title selected. b. Hire Date - Date of hired employee. Both this field and the position/title list fields are required and you will not be able to save data entered until these two fields are completed. c. HQ Security Group - This section determines what access a staff member has in BlueStep. Explanations of each security group are listed so that you can make the correct decision on access for each staff member. Once you have determined the level of access a staff member has, check the corresponding check boxes as seen below: 25 d. Alerts-There are three types of alerts: Email Notifications, Alert Notifications, and Text Notifications. Email notifications allow BlueStep to send you an email for a chosen alert to the email address of your choice. BlueStep looks at the email address in the Name and Email from to determine where that alert should be sent. 26 Alert Notifications give you an on screen alert when you log into BlueStep as seen below: To find why you are getting the alert above simply click on the gray bar and you will see a message with a link. Click on the signature button to the right of the message and then click on the link provided, in this example “Doe, James has been added as a new inquiry by Shannon Mecham”. Once you do this you have acknowledged that you have received the alert. Text Notifications-Messages will be sent to the mobile phone of your choosing. You simply need to put your cell phone carrier and accompanying cell number in the Contact Information form. C. Staff Reports Staff Reports Note that the illustration below contains the most common reports requested by Organization Administrators. Your organization may have a greater or fewer number of reports available, as per your management instructions. 1. Click Staff reports under the HR/Staff Module. 2. Click on the desired report you wish to view. D. All Former Staff 27 Former Staff All former staff records are kept here. To view former staff, click the “Former Staff” tab. To view a record, click “Select” next to the former staff members name. E. Staff Scheduling Setup: Staff Scheduling Activate the scheduling functions by selecting a community. In the Navigation Menu, select „Setup: Staff Scheduling‟ and click the Enable checkbox. „Last Schedule Generation‟ may be blank or contain the date your system was implemented. Staff Module Screens Click the Staff Scheduling sub-menu in the HR/Staff module. Select „Staff Schedule Setup‟. The resulting screen, example below. If you are viewing in the „By Shift‟ mode (as above), only the „By Staff‟ link at the top of the grid will be active. Note that the left column lists all shifts that have been created in alphabetical order. 28 Clicking the „By Staff‟ link presents the staff view, seen below. Note that the left column contains all staff members who have been added to any shift. The „By Staff‟ link is inactive, while the „By Shift‟ link has returned to active. Setting up Shifts Plan out a shift naming pattern that you will use for all shifts (see suggested names in the grids above) and a consistent abbreviation pattern of no more than three (3) characters per shift. In designing the naming pattern, consider if nurses, CNAs, office staff, administration, etc. work the same hours or different hours. All shifts will be listed in alphabetical order, so if a particular shift order is required, name them appropriately or begin the shift names with A., B., etc. or 1., 2., etc. Create a separate shift entry for each group that works hours different from any other group. In the example above, CNAs work a different hourly schedule from nurses even though the shifts are named similarly. From the „By Shift‟ view, click the Add Shift button at the top right of the screen. On the resulting screen example right, all fields are required. Enter the selected shift name and abbreviation, plus the start and end times. Consider if your staff members work weeks/weekends, 4 days & 3 days, or any other combination and assign the appropriate days for this shift. The „Hours‟ field will calculate automatically after the shift has been saved. Some shifts will have a pay differential other than the default 1.0. If this shift pays time-and-a-half, for instance, enter 1.5 into the „Differential‟ field. Make the appropriate entry for this shift, then check the completed form. Once the form is saved, it is locked to prevent editing the shift and you will not be able to revise the name, abbreviation, times, days or differential. Locking is critical to preserving the integrity of your records, as editing after a shift has been worked would destroy the accuracy of the staff‟s work history and compromise the veracity of staff payroll records. For the same reasons, shifts cannot be deleted, only discontinued. Discontinuing a Shift If a shift should be changed, such as when new hours are adopted, names changed, etc., discontinue it. Start by creating a new shift, as described above, reviewing and saving it. Remove 29 the unneeded shift by clicking the underlined name from the Staff Schedule Setup screen and entering a DC date: the date on which this shift will no longer appear on the work schedule. Likewise, any unused or inappropriate default shifts that appear on your shift schedule should be discontinued in the same manner. Configuring Staff Shifts Once the shifts are entered and correctly reflect the hours worked at your facility, populate them with staff members. This may be done two ways: by assigning the shift on the Staff Schedule Setup or by setting routine schedules for individual staff members. Setting up Staff per Shift It is easiest to populate the shifts from the Staff Schedule Setup screen. Click one of the tan boxes in the appropriate shift. The resulting page, example at right, displays the name and times of the shift. Choose a staff member from the drop-down field, Staff to Fill Shift, by activating the field down arrow. If staff member does not appear in the dropdown, you must go to the staff member‟s record, employment info, and then check the box Add to Staffing Schedule Choose all days of the shift that the selected individual will work by clicking the appropriate checkboxes. Days that do not apply to the shift are grayed out (uncheckable). Review the screen for accuracy, and then save. Once at least one staff member has been added to a day, that grid box is no longer blue, but light blue and the Add Staff icon Add Staff appears below the staff member‟s name. Clicking this icon also leads to the above Shift Information screen. Setting up Routine Staff Schedules* The second method begins by selecting a staff member from the „Select Staff‟ query in the HR/Staff module. * If you are performing this operation from the top or management level of your organization, be sure to select a staff member whose record is in the unit where you are attempting to create the schedule. If you are unsure where a specific individual works, you may check the „Change Unit‟ link on the Navigation Menu in his/her record. Click the „Routine Schedule‟ link in the Navigation Menu, then the New Entry button. Select the appropriate shift from the drop-down and check the days represented by this shift. For instance, in the above example, the Weekend Swing shift for nurses occurs on Sunday and Saturday. Set Effective Start and End dates and click the Save button at the bottom of the screen. If the staff member works additional shifts, select the New Entry button again and setup the next shift. To change a schedule, click the Edit icon and make the appropriate changes in the days worked, the start date or end date. If the Day(s) field is changed, be sure to enter the current date as the Effective Start Date. To change the shift worked, delete the existing routine schedule, using the delete icon associated with it. Create a new entry for the staff member for the new shift to be worked. If you return to the Staff Schedule Setup screen, the display shows the selected staff member added to the chosen 30 shifts and days. As future schedules are generated, this automatic assignment to the shifts and days will continue until the effective end date is reached. Viewing Scheduled Shifts When the setup is complete and for any week thereafter, the past week, current week and following week‟s schedule can be viewed and printed from the Scheduled Shifts screen, example below. This example is a „By Staff‟ view; a „By Shift‟ view is also available. 31 3. RESIDENT Resident Select/View Resident | Change Resident Status |Discharged Resident A. | Resident Reports |Input Activity Select/View Residents The Select/View Resident link under the Resident module provides access to the All Residents query screen, which lists every individual within your organization who has been designated a “Resident” (a member of the Resident record category). The page gives you a snapshot of the records of each individual, with a Select link to open each record summary. 32 Inside the Resident File This look into the resident file deals with those issues that are applicable to the moment. As you continue to learn BlueStep and become more involved in the healthcare applications we will update this section accordingly. 1. Record Summary - When a resident file is opened up, this is the default page you will see. It is a summary of important information that is meant to be printed off in cases of emergency. 2. Name and Email - Use this form to change the name of a resident or add an email. 3. Contact Information - Home contact and Work Contact (if applicable) information. General Resident Tab 4. Resident Info - Form that includes Resident Birthdate, Religious Preferences, and Hospital/Healthcare preferences. 5. Individual Worksheet - Form occupancy changes are made as the apartment the resident will occupy as well as the number of beds that resident will occupy in that room. This form is also used to upload a resident photo, change location of resident, and upload advance directives. 33 6. Agreement Summary - Form used to acknowledge that certain agreements have been signed and also allows the ability to upload these contracts as signatures are obtained. 7. Next of Kin - Form used to record primary contacts for the resident. 8. Insurance - Form where insurance data can be entered and copies of cards can be uploaded and stored. 9. Personal Belongings - Form where a resident can report belongings they brought with them to the community. 10. Prior Res/Services - Form to record data of previous residence and prior services received. 11. Leisure/Rec Pref - Form for gathering data concerning resident activity interests. Resident Wizards Tab 12. Move-Out/Transfer (**Note** This form is to be used for final discharge of a resident or transfer of a resident.) Click on this form. Next, click on the New Entry on the upper right hand corner. Once you have completed that step the below form will appear. The discharge date is the last date that the resident is financially responsible. When you select “Move Out a hidden field will appear to ask you the “Reason for Move-Out”. Next, if you want to medications discontinued, select “Yes” (You will always select yes for a final discharge”.) **IMPORTANT**-You should mark “Yes HOLD This Apartment” if the Discharge date is in the future. You should mark “No, Do NOT hold this Apartment” if the discharge date is the same as the current date or before. Failing to follow these instructions could affect the accuracy of your current occupancy. 13. Transfer of a Resident- When transferring a resident make sure you use the MoveOut/Transfer form (same form as shown above). You don't need to use this form when 34 moving a resident to a different room in the same Apartment Type. Meaning if you have someone moving from IL to IL or AL to AL, but they are just changing rooms, simply go into their individual worksheet and change the apartment number. When transferring a resident from a IL to AL you will use the Move-Out/Transfer form, even if in BlueStep they are all in the same HQ. This allows you to re-admit with a date that shows their move from IL to AL, which the state will require in most cases. Within the Move-Out/Transfer form you will be asked if this is an Internal Transfer with the Same Community. If it is a transfer within the same HQ you will select "Yes". If it is an internal transfer, but you are moving the resident from IL to AL or vice versa in and you have a separate HQ for your IL residents and separate one for you AL residents you will select "No". In both cases, once you have saved the Transfer. **Note** If this is a medical transfer and the resident is still paying for the room, make sure you put “Hold This Apartment” then re-admit the resident when they come back to the community. 14. Admission/Re-Admission - Anytime the Transfer This Resident has been used, the resident must be re-admitted into BlueStep using this form. 15. Transportation - Keeps history of transportation activity with the ability to add new activity. (See Input Activity for ability to use add transportation to multiple residents on the same screen) 16. Activities/Exercise - Keeps history of all activities/exercise activity with the ability to add a new activity as needed. (See Input Activity for ability to add activities/exercise to multiple residents at once) Medication Tab 18. Medication Prescribed-Form where all medications are entered. Entering a New Medication* 1. On the navigation menu of a resident record, open the Medications folder. 2. Click the „Medication-Prescribed‟ form link. 3. Click the „New Entry‟ button. See example of „Medication-Prescribed‟ form below. 35 4. Fill in all the fields marked with an asterisk. 5. Additionally, enter choices for the following fields: a. Medication Classification, if known b. Diagnosis c. Refills Allowed d. Pharmacy Dispensing e. Administration End Date - only if a limited script, such as a 10-day antibiotic, etc. 36 f. Scheduled Admin Time – do not select time if medication is a PRN (given as needed) g. Periodic Administration – only if not administered each day h. DEA Number i. Order fill/refill j. Any additional fields for which you desire to enter information 6. Verify correctness and completion of information 7. Scroll to the bottom of the screen and click the „Save‟ button * Medications entered into the „Medication-Prescribed‟ form should be one of the following: 1. A prescription medication 2. An OTC medication that has been prescribed 3. A regularly scheduled medication, whether prescription or OTC 4. A medication for which the need should be assessed before administration or on a regular basis * For a description of how to fill in each field on the „Medication-Prescribed‟ form, see the Medication – Form Details section. Discontinuing a Medication* * Important to note: Do not delete any medications! This will delete the resident‟s entire administration history of the drug. Use the discontinue (DC) process instead. 1. On the navigation menu of the resident record, open the Medications folder. 2. Click the „Medication-Prescribed‟ form link. 3. Click the edit icon associated with the name of the medication to be discontinued. 4. Scroll to the Authorizations section and click the „DC this medication‟ checkbox. 5. You may also edit the following fields, if desired: a. Assistance Needed b. Administration End Date c. Scheduled Administration Time d. Memo to Pharmacy 6. Scroll to the bottom of the screen and click the „Save‟ button. 19. Medication (Mar)-Record of activity of distribution of medications over a two week time period. 20. Historical MAR Data-Shows all activity of distribution of medications as long as the resident is active. 21. 31 Day MAR-Printable MAR for staff to hand chart on. 37 22. 1 Month MAR Summary-Looks similar to 31 day MAR, however, as staff chart medications this form is fills out the boxes with the staff member‟s first and last initials, similar to if they were charting using a pen with a paper MAR. 23. Printable MARs-Printable version of the historical MAR. 24. Current Prescribed Medications-Printable version of resident‟s current prescribed medications. 25. Discontinued Medications-History of all Discontinued Medications. 26. Medication History-Form that allows the user to document when I medication was started, ended, and response to the medication. 27. Physician Refill Authorization-Form to be sent to Physician to seek refill authorization for medications. 28. Physicians Quarterly Med Review-Form to be sent to Physician quarterly for approval of continued distribution of medications. 38 29. Future MARs-Shows 2 weeks into the future how medications will show up on the Schedule MARs. 30. Medication Side Affects-Form where side affects to medications can be documented. 31. Medication Error Form-Form where a medication that was given in error can be charted. Daily Nursing Forms. 32. Shift Change Notes-Form for staff to relay information to staff that is coming on for the next shift. 33. All Individual Notes Report-Printable Historical Shift Changes Notes. 34. Incident/Behavior Report-Form used for incidents that occur in the community to document type of incident and steps that were taken after the incident. 39 35. Vital Signs-Form to chart vital signs as needed. 36. Vital Sign Print Report-Report where the historical vital signs can be printed off. Medical Tab 37. Doctors‟ Orders-Form to record doctor orders. Also a document link is available to upload resident prescriptions. 38. Medical History-Form used to record medical history of resident. 39. Physician Roster-Form used to record Physician(s) contact information for the resident. 40. Dietary Preferences-Form used to record residents dietary preferences. Also food allergies and diet type can also be recorded. 41. Dietary Consultation-Form that is used by dietician to monitor residents and make recommendations. 42. Task/Notes-If a resident was converted from a lead the task/notes history will still be available as they become residents. Also, Marketing staff can continue to chart as they make the leads make the transition of being residents. 43. Account/Inquiry Information-Historical information that continues to be on the record even as a resident. 40 B. Change Resident Status -This sub menu is located under the Resident Module. Within this sub-menu you will find the link where all the pending residents are housed. By clicking on the link called “View/Select Pending Resident” you will see all residents that have been moved to a pending status. C. Discharged Residents -Query where all discharged resident files are kept. 41 D. Resident Reports Using Resident Reports* * Note that the illustration below contains the most common reports requested by Organization Administrators. Your organization may have a greater or fewer number of reports available, as per your management instructions. 1. Click the „Resident Reports‟ link in the Resident Database or from the Resident dropdown on the navigation bar. 2. The submenu page, example below, will appear. It contains the names of all reports to which you have at least „Reader‟ permissions. 3. View the desired report by clicking on the report name. E. Input Activity The Input Activity sub menu is found under the Resident Module. Upon clicking on this link you will find the following group entry options: Add Transportation 42 -Add transportation allows a staff member to entry all the transportation needs in one place for a variety of residents. Upon clicking on the Add Transportation link you will this screen: Select the residents you need to add transportation data for by placing a check in the box next to their name. Then hit next button at the bottom. Next, you would complete the fields for each resident that is listed. Once it is completed, the staff member would hit save. The data would post that transportation information to the individual residents file and to family connect. Add Activities/Exercise This group entry allows your staff to record activity/exercise that has occurred within the community at one location. To record information, simply click input activity under the Resident Module. Next click on Add Activities/Exercise and it will take you to a page where you can select multiple residents that attended the same activity (see Add Transportation section for example). Put a check mark next to the residents you want to 43 record activity on and then hit next at the bottom. A page will appear where you can record the activity that was completed and then put a comment next to each resident that participated. See below: When documentation has been completed hit save at the bottom. Once you have clicked the save button the information will be recorded in the individual resident‟s file and on family connect. 44 4. MEDICATION Medication MARs (Custom) | Scheduled MARs | Administer OTC PRN | Administer Prescribed PRN A. | Medication Reports MARs (Custom) Using Custom MARs* * Users may choose to use either Custom or Scheduled MARs or a combination of both. 1. To access the Custom MARs for today, click the „MARs (Custom)‟ link in the Medication Module. 2. The Med Pass Setup screen will appear, as shown below. 45 3. Select as many medication administration times as you would like to have displayed on the administration screen. 4. The system will remember these choices each time you return to Custom MARs until you manually change selections on the setup screen. This is especially time-saving if your shift routinely covers specific med pass times. 5. Click Save at the bottom of the screen. 6. On the Daily Meds Report (Custom) screen, seen below, displays the administration times selected on the setup screen, if there are any medications to be administered at those times. Each individual requiring medication is listed separately and each medication is grouped under the name, with amount and administration instructions displayed. B. Scheduled MARs Using Scheduled MARs* * Scheduled MARs is provided for an alternate method of listing and accessing medications to be administered. As opposed to the Custom MAR, Scheduled MARs displays all scheduled medication administration times for the current day, excluding those that have already been administered. 46 Using the Custom MAR to administer medications is recommended, but users or administrators may choose to use the Scheduled MARs periodically throughout the day or at the end of a shift to be sure no medications have been missed. 13. To access the scheduled MARs for today, click the „Scheduled MARs‟ link in the Medication Module. 14. All residents needing medications at any time during the day will be displayed on the list, example below, grouped by the time the medications are to be administered. C. Administer OTC PRN Administering an OTC PRN 1. Click the „Administer OTC PRN‟ link in the Medication Module 2. Access the appropriate resident by clicking the Select next to his/her name. 3. Click the „New Entry‟ button. 4. On the resulting screen, example below, carefully read the „Contraindicated by Physician‟ field. Any medications listed in this field MUST NOT BE GIVEN TO THE RESIDENT, so contact the supervisor. 47 5. Read the „Medication Instructions‟ for the drug needed by the resident. 6. Following these instructions, administer the medication. 7. Click the radio button next to the name of the medication administered . 8. Click the „Save‟ button. OTC PRN Follow Up 1. When 30 minutes have elapsed, contact the resident. 48 2. Evaluate the effectiveness of the medication and enter the results in the „Effectiveness‟ field. 3. Click the „Follow Up Signature‟ checkbox. 4. Click the „Save‟ button. D. Administer Prescribed PRN Administering a Prescribed PRN* 11. Click the „Administer Prescribed PRN‟ link in the Medication Module. 12. All residents with prescribed PRNs will be displayed. Access the appropriate resident by clicking the Select next to his/her name. 13. Click the „New Entry‟ button. 14. On the resulting screen, example below, find the current day (Creation Date) and click the edit icon of the PRN medication. 15. When the screen repaints, be sure that the „View Layout‟ field (upper right) reads „Enhanced MAR Edit‟ and displays similarly to the example below. 49 16. Check the „PRNs Previously Administered Today‟ section to be sure that the medication has not already been taken or that it is not being given too soon after the last administration. 17. Read the „Medication Prompts‟ box (in blue) to be sure the desired PRN has not been restricted. 18. The desired PRN should be displayed in the „Medication‟ field. If it is not, click the dropdown arrow and select from the list. If the medication is not on the list, it has not been entered into the system as a prescribed medication, so contact the supervisor. 19. If it is appropriate to give the drug, proceed as with any other medication administration: a. Administer the medication. b. Click the „Staff signature‟ checkbox. c. Click the „Save‟ button. * As with other administration records, dosages may be changed, notes may be added or the date/time field may be edited prior to saving the record. E. Medication Reports Using Medication Reports* * Note that the illustration below contains the most common reports requested by Organization Administrators. Your organization may have a greater or fewer number of reports available, as per your management instructions. 50 1. Click the „Medication link under the Medication Module. 2. The submenu page, example below, will appear. It contains the names of all reports to which you have at least „Reader‟ permissions, mean you can view it, but cannot change the data on the report. 3. View the desired report by clicking on the report name. Controls & Contingency Plan Control: Given the critical nature of administering medication, it is imperative that for each input of new or modified medication plans that someone other than the person inputting the changes/new information double check the accuracy of the input. Contingency Plan: In the event of an interruption in internet service, please contact Blue Step Client Care at (801) 336-3043 and have then fax manual copies of the MARS to use until internet service is restored. 51 5. COMMUNITY Community Module Clinical Monitor | Community Census Monitor |Community Records Monitor | Community Maintenance Monitor |Providers | Pharmacist Reports | Enter Occupancy Budget |Community Record A. Clinical Monitor This section allows the nurse view multiple reports to help monitor residents and staff to keep in compliance with state regulations. 52 For example, the Master Nursing Report gives a snapshot of the community to show such things as New Residents in the community, Missed Labs, MRSA Reported and so forth. B. Community Census Monitor Under the Community module you will find the Community Census Monitor. You will find several reports that allow you to look at all aspects of your Community Census. **Note**-The Room Census Report does not take into account those rooms that are .5 occupied. 53 C. Community Records Monitor Before viewing the reports on under this tab you first must do a Setup:Records Review. Following is information on how to accomplish this along with explanations about the staff and resident record reviews. Setup: Records Reviews BlueStep offers a record review function that allows management a concise summary of the status of selected critical data for all residents and all staff. To initialize this function, select the community record and click „Setup: Records Reviews‟ on the Navigation Menu. On the resulting page seen below, several options are available for the types of records administrators might want to see on the record review. Click the checkbox associated with desired data for both residents and staff. Click the Save button at the bottom of the screen. Staff Record Review Fields: DOB: Date Birth for employee. Date Hired: Hire date employee. Health Exam: Date on Health History form has been completed. TB: TB Documentation has been scanned and uploaded to BlueStep.(Will show a green circle when it has been). TB Test: Date of last TB test. Immunization: Date of last Immunization field has been filled out. Job Description: Job Description has been scanned and uploaded to BlueStep. Certs Done: All certs needed for job specifications have been recorded in BlueStep. Certs Still Needed: Certs still needed to be recorded in BlueStep. Medical Licensure: Certification has been recorded in BlueStep for any Medical Licensure(if applicable to employees position). CPR: Certification has been recorded in BlueStep for CPR(if applicable to employees position). First Aide: Certification has been recorded in BlueStep for First Aide(if applicable to employees position). Food Handlers: Certification has been recorded in BlueStep for food handlers(if applicable to employees position). Medication Delegation: Nurses have documented medication delegation in BlueStep(if applicable to employees position). Resident Records Review: DOB: Date of Birth of the resident Date Admitted: Date of Admission of resident. Admit Agree: Admission Agreement has been signed. Pre-Admit: Pre-Admission assessment completed. 6 month: 6 month assessment completed. Sign Chng: Significant change assessment completed. 54 Serv Plan: Service Plan completed. Meds Entered: Link provided to see what meds, if any, have been entered in for resident. Diet Consult: Dietary Consultation has been completed. Advance Directive: Advanced Directive has been scanned and attached to the resident file. Viewing or Printing the Resident Record Review A summary of resident records may be checked at any time to ensure completion of critical forms and data. To reach the summary, click the Community Records Monitor link in the Community module. Select „Resident Records Review‟ from the sub-menu. The screen displays the selections that were chosen on the Setup screen. The example below shows all available selections for the three displayed individuals. A print link is available at the upper right. The icons indicate various stages of completion for each of the displayed items: Complete (form is signed) Unfinished (some information has been entered; form is unsigned) No data (form contains no information) 55 For details concerning any resident listed, click the underlined resident name. The screen will repaint with the resident‟s summary screen, from which you can navigate view data. Viewing or Printing the Staff Record Review Staff records may be checked for accuracy and completeness at any time. To reach the summary, click the Community Records Monitor link in the Community module. Select „Staff Records Review‟ from the sub-menu. The screen displays the selections that were chosen on the Setup screen. The example below shows all available selections for the five individuals listed. A print link is available at the upper right. The icons indicate various stages of completion for each of the displayed items: Complete (field in filled in or all required certifications have been obtained) Unfinished (some information entered or some certifications obtained) No data (in the specified field or no certifications obtained) For details concerning any staff member listed, click the underlined name. The screen will repaint with the staff member‟s summary screen, from which you can navigate to view data. D. Communities Maintenance Monitor Before viewing the Maintenance Checklist and Preventive Maintenance Review data, you need to see up the Preventive Maintenance in the Community Record. 56 Setup: Maintenance The Preventive Maintenance system in BlueStep allows administrators to select those maintenance issues that must be addressed on a recurring basis and also provides an interface for maintenance staff to record completion of such tasks. A summary screen is available for reviewing the current status of preventive maintenance projects. Before configuring the maintenance tasks, there are five (5) Option Lists that should be modified to meet the specific needs of your facility. They are for Annual-Summer, Annual-Winter, Monthly, Quarterly and Semi-Annual tasks. Maintenance Selection Click the Select Community link in the Community module. Select the appropriate community and click „Setup: Maintenance‟ on the Navigation Menu. The maintenance items entered on the Option Lists will be displayed. Make appropriate selections, as seen in the example below. 57 The months in which quarterly, semi-annual, summer and winter tasks are to begin are set from the drop-down lists below each task-selection section. When complete, click the Save at the bottom of the screen. Editing Maintenance Tasks Once the initial maintenance tasks have been setup, additional tasks or task modification is done through the „Edit Maintenance Tasks‟ link. From the Community module, click the Community Record. In the Navigation Menu, click „Edit Maintenance Tasks‟. As seen in the partial screen below, all the current maintenance tasks are listed. To create a new task, select the New Entry button at the upper right. Select a Task Type from the drop-down.* Enter the specific action into the Task field, as in the example below. Select how often and, if appropriate, in what month the task should be completed. Click the Save button when finished. 58 To change how often or in what month a task should be done, select the Edit icon. The Edit Task screen will appear, as above, on which you can make the desired changes. It is advisable to delete tasks for which the Task Type and Task fields must be changed or those default tasks that have no application at your facility. To delete such a task from the schedule, click the Delete icon associated with that item. * In the rare instance that a new Task Type is required, add the type to the Preventive Maintenance Types option list. Tracking Maintenance Tasks To report the completion of any scheduled task, select the Community Maintenance Monitor in the Community module and the Maintenance Checklist on the subsequent page. Any maintenance personnel or others with recurring tasks (consulting pharmacist, head nurse, kitchen staff, dietitian, etc.) should have access to this checklist. The checklist, as seen above, will list all tasks by type and display the due date. Any tasks that were previously completed will show the name of the individual, date and time the data was entered. To mark a task as completed, check the associated checkbox and enter any appropriate notes. Click the Save button when done. Once the end of the current month has passed, these maintenance tasks will no longer appear on the list and it will not be possible to check them as completed. 59 The bottom section of the checklist is a report of any maintenance items that remained uncompleted after the due date. Ideally, this list should remain empty, as this would indicate that all tasks were completed on time. Preventive Maintenance Review The maintenance status can be reviewed at any time by selecting the Community Maintenance Monitor in the Community module, then the Preventive Maintenance Review. This report shows all maintenance items for the past six months and for one month into the future, a portion of which can be seen in the example on the next page. Note that the date/time of completion is listed, along with the name of the person who checked-off the task. E. Pharmacist Report When clicking on the Pharmacist Reports under the Community Module you will be given the following options: 60 Pharmacists and Consulting Pharmacists will find specialized links and reports in the „Pharmacist Reports‟ section of the Community module. These are designed to help pharmacists conduct medication reviews and other functions quickly and thoroughly with a minimum of navigation through the system and to provide all pertinent information in a meaningful format. Emergency Med Kit Each community will need to have a „setup‟ performed for the emergency med kit when the BlueStep program is being initialized. Once the setup is complete and signed by a pharmacist, it will never need to be repeated. Contents of the kit fall into three (3) categories: 1) prescription drugs to meet the emergency needs of specific individuals (such as, EpiPens, digitalis tablets, etc.), 2) non-prescription drugs (both taken internally and applied externally), and 3) non-drug supplies (such as, dressings, stethoscopes, scissors, latex gloves, hot/cold packs, etc.). If the facility stores resident‟s medications in a med cart or an area with fast and easy access, the facility may choose to store the emergency prescription drugs with the resident‟s other medications in an emergency drug section. In that case, the emergency kit would contain only non-prescription drugs and supplies, and the emergency prescription drugs would need to be checked separately. Setup: Emergency Med Kit * * If the setup has already been created by an administrator or nurse, a licensed pharmacist will need to sign each entry. If that is the case, access each entry by using the Edit Pencil icon and click the „(Re) Stocked by‟ signature checkbox. No further setup action is required. 1. Select the appropriate community from the „Select/View Communities‟ query in the Community monitor. 2. Click the „Setup: Emergency Med Kit‟ link in the left-side Navigation Menu. 3. If any default medications appear on the list, use the Delete icon to remove them. 4. Click the New Entry button at the upper right of the screen. 5. On the resulting setup screen, example seen below, the date will prefill with the current date and the expiration will prefill with one year from the current date. Edit either of these, if needed, by using the mini-calendar icon or by typing in the appropriate date. The 61 Expiration Date entered should be the expiration date printed on the drug packaging. 6. Type in the name and dosage of the medication and the quantity that will be in the kit. 7. Select the dosage type from the drop-down. 8. If the drug is prescribed for a specific individual, enter the name of the resident and the prescriber of that drug. 9. When completed, click the Pharmacist Signature checkbox and the Save button. 10. Click the New Entry button for each medication or supply item to be carried in the kit or stored separately and complete the form as above. Restocking Emergency Med Kit 1. Click the „Emergency Med Kit Contents‟ link to view the current status of the med kit. 2. If any current quantities do not match approved quantities, click the „Restock Emergency Med Kit‟ link on the Pharmacist Reports submenu. 3. Physically place the restock items in the kit. 4. Click the signature checkbox for each restocked item (example below) and the Save button. 5. In the case where quantities should be changed from the initial setup quantities, edit the amounts shown in the „Amt Stocked to:‟ field. This will reset the approved quantity of the item for subsequent kit usage, display and restocking. 62 Emergency Med Kit History A listing of the entire history of the Med Kit can be viewed or printed using the „Emergency Med Kit History‟ link on the Pharmacist Reports submenu. Each Med Kit transaction is displayed, giving date, item, quantity, action (administration or restocking) and „nature of emergency‟ details. Individual Medication Review 1. Click the „Select Resident for Individual Medication Review‟ link on the Pharmacist Reports submenu. 2. On the resulting page, all current residents in the facility will be displayed. 3. Click the Select next to a resident‟s name to access his/her record. 4. Click the „Pharmacists Qtrly Med Review‟ link on the Navigation Menu. 5. All previous reviews will display one per line. For details, you may click the Edit icon. 6. Click the New Entry button at the top right. 7. In the View Layout field (top right) change the selection to read [Generic], if it is not already set. 8. All medications currently prescribed for the individual are displayed on the page, see example below. 63 9. Click the radio buttons to select if all medications or only some will be reviewed. 10. Activate the Medication drop-down by clicking the down arrow and select a medication from the list. 11. Enter any comments, advice or warnings in the Comments box and proceed to the next section until all medications or the medications you have selected are reviewed. 12. If more than six drugs are reviewed, enter additional information into the „Additional Medication Comments‟ field. 13. Assign either „Acceptable‟ or „Questionable‟ usage to the medication regimen. 14. Click the „Signed by RPh‟ checkbox and enter pharmacist‟s license number. 15. Click the Save button at the bottom of the screen. 16. Repeat the review process as needed for additional residents. * If additional information about a medication is needed, click the Go button next to the medication drop-down that displays the appropriate drug. Additional information about the resident and his/her condition is recorded in several forms in the resident‟s Navigation Menu. See “Navigating a Record” for additional information. * Some communities are turning to paperless data storage; however, if a signed paper copy of this review is needed, a formatted report is available. If a signed paper copy of all medication reviews is needed, a separate report in the Community module is available. Printing a Single Medication Review 64 1. Reopen the review by clicking on the Edit icon. 2. Change the View Layout (upper right) to read „Pharmacists Printable Review‟. 3. When the screen repaints, it will contain all of the data entered on the previous screen. 4. Click the Print icon at the upper right. 5. A pop-up will allow you to select a printer associated with the computer in use. 6. When done, close the print pop-up and hand-sign the printed document. Printing All Medication Reviews 1. To print all reviews for the Community in which you are working, click Pharmacist Reports in the Community module. 2. Click „Pharmacists Medication Review‟ on the submenu. 3. It may take a moment for all the records in the facility to formulate the report. See example of resident Medication Review below. 4. When the screen repaints, click the Print icon in the upper right. 5. A pop-up will allow you to select a printer associated with the computer in use. Each resident‟s review will print on a separate page. 6. When done, close the print pop-up and hand-sign the printed documents. 65 Consulting Pharmacist Facility Report * 1. Most states have a requirement for quarterly, on-site pharmacist evaluations of general medication management by the facility. 2. In the Community module, click the Pharmacist Reports link. 3. Select „Consulting Pharmacist Report‟. 4. All past reports will be listed and can be viewed by clicking the Edit icon. 5. To do a new evaluation, click the New Entry button at the top right. 6. A list of „Yes/No‟ questions and spaces for notes are displayed. 7. Answer each question and enter any comments, instructions or evaluation notes that are necessary. 8. Enter the next review date and click the „Pharmacist Signature‟ checkbox. 9. Click Save at the bottom of the screen. * The default questions on the Facility Report cover the standard issues requested by most states. If additional information is required by the state in which the facility is located, please have the facility‟s administrator contact BlueStep and we will be happy to add the needed items. See “List of Facility Questions” below. Printing a Facility Report 1. Reopen the report by clicking on the Edit icon. 3. Change the View Layout (upper right) to read „Printable Facility Report‟. 4. When the screen repaints, it will contain all of the data entered on the previous screen. See partial-screen example below. 5. Click the Print icon at the upper right. 6. A pop-up will allow you to select a printer associated with the computer in use. 7. When done, close the print pop-up and hand-sign the printed document. 66 F. Enter Occupancy Budget Enter Occupancy Budget is the location where the user would enter the budgeted occupancy for the community. This may change several times during the budget year. Each time the budget occupancy changes the user would need to enter the Allowed Monthly Occupancy for that month and hit save. All occupancy numbers will be entered at the Corporate level. 67 G. Community Record The Community Record takes you to the community record summary where all set up for the community takes place. This is an alternative way to navigate to various reports which include the Occupancy Report, Sales Task Summary, and the Sales Dashboard Report. 68 6. ACTIVITIES/FAMILY CONNECT Family Connect Activity/Even Calendar A. Activities Calendar There is an activity calendar link within BlueStep that enables the user to upload their calendar that they have created. Once the upload is complete family members that are using family connect can view that calendar. To upload this calendar, click on Community Record under the Community module. Next, click on Monthly Events on the left hand navigation. When this form comes up, click on the New Entry button on the right hand side of the page. 69 Once you click the New Entry button you will see the following page: Put in the Month of the calendar, the year, and click the edit pencil to upload the calendar to BlueStep. B. Family Connect Access Setting up Family Connect Preferences: 1. In the Community Record, select “Family Connect Preferences”. Choose a template color (Brown, Green, or Plum). In the “Header” field you also have the ability to upload a new logo. (Current logo‟s are already uploaded) 2. In the Community Record, select “Monthly Events” then click the “New Entry” button. This is where you will upload your monthly activity/event calendar. This calendar needs to be saved previously as a PDF document. Setting up a user account: 1. In HQ select a resident and click on the “Create Family Access Account” link in the lefthand navigation section under “Family Connect” folder. 2. On the next page you are prompted to create an online profile for the responsible party named on the previous page. Enter a username, password and the “In case you forget…” information for this individual. When you have completed this information click on the “Next” button at the bottom of the page. 3. Give the responsible party the username and password information created in step 2 and have them follow the instructions below (How to view the Family Access Page). 4. You are prompted to fill out the “Next of Kin” information if it hasn‟t already been completed. Use the name of the main contact for the resident who will view the Family Access Page. When you have completed this information click on the “Save” button at the bottom of the page. 70 How to view the Family Access Page: 1. Access the following Website: http://centuryparkfamily.bluestep.net and enter your username and password when prompted. 2. The first time you log in, click on the “My Account” link at the top-right of the page and then click on the “Online Profile” link. Change the password to your own personal password. When you are done click on the “Save” button at the bottom of the page. 3. Click on the “Sites” box at the top-right of the page. Then select “Family Connect” This will take you back to the home page and display the information for your family member. 71 7. MARKETING/LEADS Marketing/Leads Lead Search | My Open Leads | Task Manager | My Tasks | Lead Sources | Reports It is important to distinguish Leads from Lead Sources in the Marketing/Lead Module. That is, Leads are contact records of potential residents that include information as to the status of the lead. Lead Sources are contact records and other data of people or advertising that may refer customers/residents to us. In Blue Step, Lead Sources are further broken down into Professional Sources and Non Professional Sources. Professional Sources are further broken down into categories such as Doctors, Attorneys, Nursing Centers, etc. Non Professional Sources are broken down into categories such as TV, Newspaper, Direct Mail, etc. Lastly, each of these categories can be distinguished by a specifically named event that includes a date range, cost, and description. For example, in the Newspaper category, you could have a sub-source called “NY Times October Ad” that lists the run date, whether it is “active” or “inactive”, and cost of the ad. A. Lead Search Under the Marketing/Lead module you will see the tab Lead Search. By clicking this link it will take you to all your Open Leads. Note that you can sort the leads on this page by clicking on the bold column header. For example, if you click on the header “Lead Status”, it will sort the leads by A, B, and C. To select a current lead click Select next to the name of the lead whose information you want to view. Adding a New Lead On the Lead Search screen you will be able to enter a new lead. On the top right of the screen will be a button that says “Add Lead”. You will need to click this button so the page will load for you to enter the new inquiry. 72 STEP 1 The Add New Lead form allows for the user to record data on the prospective resident. 1. “ Resident Contact” section is for the actual potential resident‟s contact information. “ 2. Primary Contact” section is for the person who is inquiring for the resident or the person who wishes to be contacted about the potential resident. You will need to enter as much info as you know into the fields allotted. At the minimum you will be required to enter the Primary Contact Name, Inquiry Method, Lead Status, Lead Source, Lead Source Percentage, Assigned To, and Sales Phase. These fields will be marked with an *. Note that checking the Allow Contact box simply provides you with a reminder as to the client’s contact preference and does not affect any of the system functions. If you check the Inquirer box, this means that the 73 potential resident is the one that inquired. Also, by checking the Mailing List box, the person will be added to the system mailing list. Unsubscribe for mass mailings checkbox will shows if a lead as opted out of a system email list. “Inquiry Information” section will need to be filled out before you can save and move on. You will note the * on those fields that are mandatory. Inquiry Method simply describes the method in which the prospect contacted you. The choices are: Email Fax Mail In Corp Phone In Phone In Walk In Web Cold Calls Lead Status indicates how “hot” or “cold” a lead is, with A being the hottest and C being the coldest. See “How to Change the Lead Status of a Lead” further down in this document. Lead Source will give you a choice of several options, as noted in the flowchart earlier in this document. Note that you can have up to three lead sources per lead, and you can assign a weight to them as long as they add up to 100%. The higher the weight, the more influential the source. During one of your initial contacts with a lead, please make sure you ask them about how they heard of your facility. Since this can often come from many sources (e.g., “a doctor referred me but I also saw your ad on TV”), please use at least one but up to three of the fields to record those sources. As noted, if some of the sources were more influential than others, you can assign that source a higher percentage. Decision Status indicates where the lead is in the sales decision making process. Assigned To is the person taking control of this lead. Sales Phase indicates where the lead is in the sales process, from an early stage such as No Contact Made to later stages such as Tour, Deposit, etc. See “How To Change the Sales Phase of a Lead” further down in this document. 74 “Resident Profile” section will allow you to enter any additional information you have on the potential resident. Such as: Date of Birth Services Desired Amenities Desired Floor preference Time frame for move in Needs they have expressed **NOTE**- In order for potential residents to show up on any waitlist report provided in BlueStep the Waitlist box needs to be selected and an amount greater than $0.00 needs to be entered into the deposit amount. “Financial Information” section allows you to enter the residents funding type, home owner vs. renter, and budget constraints expressed. At this point if you have filled in the * info that is required and mandatory to move on then you are ready to click the “next” button at the bottom of this page. Step 2 The page will load with the title “Task/Notes”. In the page you will finish entering a new lead. 75 You will select a task from the menu for follow up. When entering an initial lead, select one of the first six options (Note Only, Call, Email, Fax, or Mail) to describe the initial encounter. There is an area to input your notes and details form the conversation to help complete your next task. Once you have entered all the info from this first contact, you should select the current date, and check the Completed box to note that the initial inquiry is complete. At this point you will need to make sure you have entered all data into the fields that have an * next to them because it is required info. Now you are ready to click “Save” on the bottom of the page. You will see your “Account/Inquiry Information” appear in one long page with your newly added task on the bottom of the page. …now you have successfully entered a new Lead! …Don‟t forget to schedule a follow up task! 76 How to Create Notes or Update a Task for a Lead Note: All activity with a lead MUST BE ENTERED INTO BLUE STEP!! You will need to click on the “Lead Search” link which appears on the left, top and right side of your screen. All links will take you to the search page. Once you have searched for your lead and found it you will need to click on “Select.” This will open the lead. Once the lead is open you will need to scroll to the bottom of the page where your tasks are listed for that lead. On the bottom right there will be a link that says “Add Task/Note” which when clicked will take you the Task page for you to enter notes on a conversation you had with a lead, schedule a task for a future date, or mark a task as completed. The information to be entered is as follows: “Select Task” will allow you to choose from the following options: Note Only (this is not a mailing- just a note made) Incoming Call Left Message Fax Email Mail Tour Home visit Prof. Referral Visit Deposit Assessment Close-lost lead Re-opened lead Re-tour Outgoing Call Other “Notes” allows you enter specific information you have uncovered in your probing with the new inquiry. “Due Date” is when you want schedule this next task, or you can type in the current date if it is a task you just completed. 77 To mark a task as being completed, you will need to enter the updated notes and check the completed box before saving the task. How to Change the Lead Status of a Lead Note: It is important for sales team members to keep the status of their leads updated on a timely basis. You will need to click on one of the “Lead Search” links which appear on screen, as noted earlier. All links will take you to the search page. Once you have searched for your lead and found it you will need to click on “Select.” This will open the lead. Once the lead is open you will need to scroll down to the “Inquiry Information” section so that you can find the “Lead Status” drop down box on the upper right side. You will be able to label the lead as one of the following: A Lead B Lead C Lead As you may suspect, an “A” lead is a very strong, hot lead while a “C” lead is weak/cold. You will need to click “Save” at the bottom for your changes to be complete and save to the lead record. How to Change the Sales Phase of a Lead It is important for Sales Team Members to consistently update the phase of a lead on a timely basis. You will need to click on one of the “Lead Search” links which appear on screen, as noted earlier. All links will take you to the search page. Once you have searched for your lead and found it you will need to click on “Select.” This will open the lead. Once the lead is open you will need to scroll down to the “Inquiry Information” section so that you can find the “Sales Phase” drop down 78 box on the lower right side. You will be able to label the lead sales phase as one of the following: No Contact Made Pre Tour (this is automatically created by the related task) Post Tour (this is automatically created by the related task) Deposit Made (this is automatically created by the related task) Closed – Lost Lead Reopened Lead You will need to click “Save” at the bottom for your changes to be complete and save to the lead record. Record a Deposit To record a deposit, select “Add Task/Note” on the bottom right hand side of the “Account/Inquiry Information” screen. From there, select “Deposit” from the drop down box. Additional boxes will appear for the deposit amount and deposit date. Enter all necessary information, enter the Due Date (date of deposit), and click the signature box if the deposit has been received. Once completed, this will automatically change the sales phase to “Deposit Made”. How to Change the Decision Status of a Lead Similar to the Lead Status and Sales Phase, it is important for sales team members to regularly update the Decision Status of a Lead. You will need to click on one of the “Lead Search” links which appear on screen, as noted earlier. All links will take you to the search page. Once you have searched for your lead and found it you will need to click on “Select.” This will open the lead. Once the lead is open you will need to scroll down to the “Inquiry Information” section so that you can find the “Decision Status” drop down box on the lower left side. You will be able to label the lead sales phase as one of the following: Comfortable in Current Location Concerned About Price Considering Other Care Options Consulting With Family Convincing the Resident Decision Made (Move In or Closed) Decision on Hold 79 Early Stage Research Family Not Responding Making a Decision Soon Not Ready to Tour Yet Resident in Hospital Touring Competition Waiting to Sell House Medicaid Recipient You will need to click “Save” at the bottom for your changes to be complete and save to the lead record. How to View Task History on Pending Residents and Residents 1. Directions on updating or viewing tasks for pending residents: Under the Resident Module, click on "Change Resident Status". Next, click on "Select View/Pending Resident". Then, click "Select" next to the name you need to update. Then update the tasks. 2. Directions for updating or viewing previous information for residents: Click "Select" next to the resident that you need to view tasks for. Next, on the left hand side navigation, select "Account/Inquiry Information". 80 B. My Open Leads My Open Leads- Is found under the Marketing/Lead Module. It shows only the leads of the person that is logged in. C. Task Manager Task Manager: Is located under the Marketing/Lead Module. Defaults to a “Week at a Glance” view of all tasks a community has for the week. Also includes three links for This Month‟s Tasks, Next Month‟s Tasks, and All Tasks. 81 D. My Tasks My Tasks: Is found under the Marketing/Lead module. It shows only the tasks for current date and the following six days for the person who is logging in. E. Lead Sources How to Add a Lead Source To add a Lead Source, click on the “Lead Source” link which appears on the left, top and right side of your screen. All links will take you to the search page. Once this page loads you will have the option to “Add Professional Source” which will appear above the Search line. By clicking on this link you will be taken to a walk thru of the required info needed to add a complete Referral Source. Similarly, if you want to add a Non-Professional Source, first click on “Non-Professional Source” and then click “Add a Non-Professional Source”, and follow the screen logic. Continue to enter required info and click “Save” as it will prompt you for the information necessary. 82 Lead Source Management You will need to click on the “Lead Sources” link which appears on the left, top and right side of your screen. All links will take you to the search page. Once you have searched for your lead source and found it you will need to click on “Select.” This will open the source detail. Once the “Lead Source” is open you will be able to update any contact info needed, but more importantly you can Add Tasks to this Professional Referral Source. On the bottom right there will be a link that says “Add Task/Note” which when clicked will take you the Task page for you to enter notes on a conversation you had with a lead source, schedule a task for a future date, or mark a task as completed. You will need to enter the updated notes and check the completed box before saving the task if the task is completed you the user. F. Moving a Lead to Resident Moving a Lead to a Pending Resident 1. Click on the Lead Search under the Marketing/Lead Module and select the lead you want to move from the Lead list and click "Select". 2. Next, on the left hand side select the tab "Move Inq to Pending ( **Hint**-If you don't see this tab, go to the top of the left hand side and click the "red" arrow pointed down. This will expand and unhide anything that may be hidden on the left hand side). 83 3. Select from Admission Type whether this will be an admission or you are moving this lead to a pending resident. Put in expected Admission date and click on next. If the you choose the pending resident the below next step appears. Complete the sections (remember that any field with a * is required) and hit save. 4. Once you hit save it will bring the Account/Lead Information section again. 84 (**Note** The point of moving a resident to a pending resident is that it now gives the RCD an opportunity to go in and enter medications, Assessment, and a Care Plan in preparation of the resident coming in.) Moving a Pending Resident to an Active Resident 1. Under the Resident Module click on the tab "Change Resident Status". 2. Next, click on "Select/View Pending Resident". 3. On the left hand side click the tab "Move Resident to Pending. 4. This will take you to the admission form. At the top of the form click “Admission” in the Admission Type field. Then re-confirm the admission date by entering it in and choose the apartment they will be occupying. Make sure to hit save at the end. 85 The Lead is now an active Resident!!! Moving a Lead to Resident (Moving to Pending Resident would not be applicable) 1. Lead to Resident: A. B. C. D. D. Select Lead you want to move to a pending resident. Next select “Move Inquiry to Pending. This will take you directly to the admission form. Select “Admission” from the Admission Type field. Fill out the rest of the admission form and hit save. G. Creating Mailing Lists and Using Mailing Group Entries How to create mailing lists from data in BlueStep: Mailing Labels To export data out of BlueStep and do a mail merge into Word where mailing labels can be produced. 86 1. Under Marketing Reports, you will find two reports. One is labeled Mailing List (Resident Contacts) and other is labeled Mailing List (Primary Contacts). (**Note** If a lead or primary contact does not show up on the mailing list it will because the “Mail List” box was not checked within the file of the Lead.) Once you open one of these reports up you will notice an export button at the upper right hand corner. Clicking this will export the data out of BlueStep and into an excel spreadsheet. Save this excel spreadsheet as a CSV file. 2. Instructions for a mail merge in BlueStep: Please keep in mind that these instructions may vary depending on the version of Microsoft Office you are using. Login to your site Under the „Marketing/Leads‟ module, click on the „Reports‟ link A menu will pull up that contains mailing lists Click on the mailing list you will be using for the labels When that opens, you have the option to export the list (located in the top right) **You may have to enable pop-ups or allow the download on this step*** The list will export into an Excel spreadsheet At this point you can clean up the list (delete names that do not have an address, etc.) Save the spreadsheet to a place you will remember. It will automatically default to a .csv extension, which is what you want. ***You will get a message pop up, click on „Yes‟*** Close the spreadsheet and open MS Word 87 Depending on the version of Word you are using, you will do one of the two options o Click on the „Tools‟ menu, go to „Letters and Mailings‟ then click on „Mail Merge Wizard‟ o In word 2007 you will click on „Mailings‟, „Start Mail Merge, then „Step by Step Mail Merge Wizard‟ ***The steps remaining are very similar throughout the different versions of Microsoft. However, some of the words or phrases may be slightly different*** On the left of the Word document a wizard will appear. Select „Labels‟ and click on next. Make sure the „Change document layout‟ option is selected. Click on „Label options‟ and select the label you will be using. Click on next. The next step is where you will select the spreadsheet you saved earlier. Click on the „browse‟ option and select the spreadsheet you saved. 88 The lead names will show up, if you did not remove the names from the spreadsheet that did not have an address, you can do that now by clicking on the check box. This will deselect that lead and will not include it on the labels. When you have finished, click on „ok‟. Click on Next. The next step will enter the fields where they need to be on the mailing list. Click on „More items‟. A list will appear that has the field id‟s (The first line on the spreadsheet). Click on each of those fields and click on „Insert‟. These will now become the data markers and will populate with the leads names 89 When you have inserted all the data markers, click on ok. The word document will look something like this. What about Lead Status? Delete? You will now need move the data markers so they are arranged like a real address block. Put your curser after «Primary_Contact», then hit the enter key. Do the same after «Resp_Address». After «Resp_City» type comma, then space. After «Resp_State» put a space. The result will look like this. 90 On the wizard click on the option that says „Update all labels‟. Selecting this option will update the data markers on each label. The end result will look like this. Click on next 91 Here you can preview all your labels, it will only show the first page, but you can view any additional pages by clicking on the arrows at the top of the wizard. If it does not look the way you want it to you can click on the previous step and adjust where the data markers are or add spaces where necessary. If everything looks correct, click on next to complete the merge Step 6 your merge has been completed, you can either print your labels now by clicking on „Print‟, or you can save these labels for future use by clicking on „Edit individual labels‟, click on „Merge all‟. It will open a separate window which you can then save 3. You will need to select the exported CSV file during the second step "Connect to the data file" by selecting "Use an existing list". Marketing Group Entries: Mailing group entries allow the user to create and complete a task for multiple leads or primary contacts for who a mailing was just created for. They are divided into two sections, Group entries for Resident Contacts and Group entries for Primary Contacts. There is also an additional group entry called Group Tasks/Notes. 92 A. Group Entries for Resident Contacts 1. Add Task to Resident Contacts-This group entry is to be used when the un-filtered mailing list for Resident Contacts is used. 2. Add Task (A Leads)-To be used when the Resident Contact mailing list is filtered for A Leads. 3. Add Task (B Leads)-To be used when the Resident Contact mailing list is filtered for B Leads. 4. Add Task (C Leads)-To be used when the Resident Contact mailing list is filtered for C Leads. 5. Add Task (Waitlist)-To be used when the Resident Contact mailing list is filtered for Waitlist. B. Group Entries for Primary Contacts 1. Add Task to Primary Contacts-This group entry is to be used when the un-filtered mailing list for Primary Contacts is used. 2. Add Task (A Leads)-To be used when the Primary Contacts mailing list is filtered for A Leads. 3. Add Task (B Leads)-To be used when the Primary Contacts mailing list is filtered for B Leads. 4. Add Task (C Leads)-To be used when the Primary Contacts mailing list is filtered for C Leads. 5. Add Task (Waitlist)-To be used when the Primary Contacts mailing list is filtered for Waitlist. C. Group Entry Task/Notes 93 This group entry allows for the creating and completing of a task to multiple leads. H. Maintaining a Current Occupancy Maintaining a current occupancy is critically important component in BlueStep. The following are helpful hints and things that you need to be aware of as you continue to use BlueStep for occupancy tracking. Occupancy is the number of occupied units. Therefore, until a resident‟s file has an apartment attached to it, it will not count towards occupancy on Occupancy Report or Occupancy Detail Report in BlueStep. To help with the understanding of occupancy four scenarios have been created. Before moving someone into the community it would be beneficial to check the apartment in the rooms/bed form (resides in the community record) and know how man beds are available in that room. In Scenario # 1 has 2 beds or spaces that can be occupied in room 206. Scenario # 1 (One Resident in One Apartment) John Doe has moved into room 206, in the first instance room 206 has 2 beds (spaces) available to be occupied. In John Doe‟s individual worksheet you would then need to put that John is occupying both of those spaces by putting a 2 in the # of beds in the individual worksheet. If the # of beds (spaces) that can be occupied in apartment 206 is 1 then in the # of beds in the individual worksheet you would put a 1. In essence you need to have the number of beds available in apartment and the number of beds the resident is occupying match up. 94 **Note**-Please see above the how you could get a .5 occupied apartment if you don‟t follow the steps above. Scenario # 2: (Two Residents in one room and two residents in one room with one of those residents moving out.) In order to get John and Jane Doe into the same apartment, the number of # of beds for 206 would have to be 2. Then in John and Jane‟s individual worksheet you would put a 1 for the # of beds, meaning John is occupying on the spaces in the room and Jane is occupying the other space. If John is discharged and only Jane is occupying the room then you have two choices of what needs to be done. One, once John is discharged you can then go into Jane‟s room and change # of beds from 1 to 2, because she is now occupying both beds(spaces) in that room. Two, you could go into edit the # of beds in room 206 and change that number from 2 to 1. Scenario # 3: (Attaching two rooms to one resident) 95 For John to occupy two rooms the user would first need to go into the individual worksheet of st John. Next, in the Apt/Unit # (1 room) put the first room that he is occupying and then put in the nd number of beds in that room that John is occupying. Next, in the Apt/Unit #(2 room) put in the second room that he is occupying and then the # of beds he is occupying in that room. Scenario # 4 (Shared Rooms) All shared rooms should have a 2 for the # of beds that can be occupied. Then, as see above when one person leaves, no changes would need to be made to the person remaining, unless they chose to rent the whole room. 96 I. Daily Reconciliations It is extremely important that the BOM reconcile their Blue Step census with their manual (Excel) census on a daily basis. This is the only way to ensure that the records are accurate. If needed, a detail report of the Occupancy census count is available under Marketing Reports Century Park Management Reports Occupancy Detail. This report should be used to compare to the manual detail to reconcile and correct any differences. Note that the Occupancy Report contains data as of midnight from the night before, and the Occupancy Detail Report is real time. Therefore, BOM‟s should compare the Occupancy Detail Report to their manual census at the end of each day to ensure that the figures will tie as of that date. J. Reports Reports on Leads You will need to click on the “Reports” link which appears on the left, top and right side of your screen. All links will take you to the reports page. Once you have found the report you would like to run simply click on the NAME of the report you want and it will take you to that screen. The Reports are broken up into two sections: A. Century Park Management Report Century Park Management Reports allow you to get a view of you community during a chosen time period. Those reports in which you will work with most are: 1. Occupancy Report: Report at a community level shows the total number of occupied units and Total Activity of Marketing Results for a given week. The data displayed is determined by the “End of Week Selection” day of the week that is selected and the “Report Date” The report goes back 7 days including the date selected.(**Note** This report is a day behind in reporting, so the most current data displayed is for the previous day) 97 2. Occupancy Detail Report: This reports gives up to the second accurate data when it comes to total billable units, occupied units, the beds in room versus the beds occupied.(**Note** If you receive a red number 1 in the beds occupied that means that apartment is .5 occupied) 3. Sales Dashboard Report: This report shows data has columns for different time periods. This allows the user to see trends in marketing and occupancy. 98 3. Source Report: Searchable by date range, plus Inquiry, Deposit, and Move-In. Allows the community to affectively target certain areas of their marketing by knowing how leads are being referred to their community. 5. Sales Task Summary Report (There is also a link for this under Marketing Queries): Report shows activity by salesperson and can be searched within a desired date range. 99 B. Marketer‟s Queries: Below is a list of other marketing reports available. These reports are not meant to be a complete and total list. More reports will follow. You can print most reports by Exporting or Printing from the same window. The options appear on the top right side of the frame for you to click on. 100