1
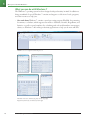
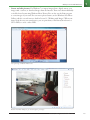
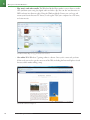
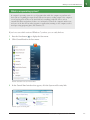
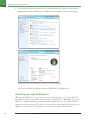
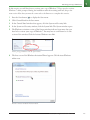
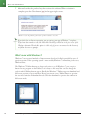
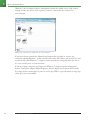
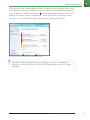
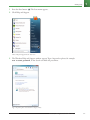
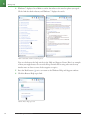
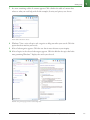
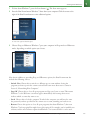
Lesson 1
What you’ll learn
in this lesson:
• What you can do with
Windows 7
• Activating your copy of
Windows 7
TE
RI
AL
• Starting Windows 7
• The Windows 7 desktop
• Getting help
TE
D
MA
Getting Started with
Windows 7
Starting up
PY
RI
GH
The public spoke, and Microsoft listened.Windows 7 boasts
hundreds of improvements based on feedback from users of previous
versions of the Windows operating system.The result: a faster, more
intuitive, more reliable, and more streamlined operating system.
1
CO
Before you start, be sure you have Windows 7 installed on your computer. If you haven’t
installed Windows 7 yet, refer to the section “Installing Windows 7” on page 3 of this book.
See Lesson 1 in action!
Use the accompanying video to gain a better understanding of how to use some of the features
shown in this lesson.The video tutorial for this lesson can be found on the included DVD.
Lesson 1, Getting Started with Windows 7
17
1
What you can do with Windows 7
What you can do with Windows 7
The Windows 7 operating system has been designed with productivity in mind. In addition to
being streamlined for speed, Windows 7 contains and supports a collection of tools, programs,
and other resources to help you:
• Get work done. Windows 7 contains a word-processing program, WordPad, for generating
documents; a calculator, which supports four modes—Standard, Scientific, Programmer, and
Statistics—as well as several templates for calculating such real-world numbers as mortgages,
salaries, etc. Windows 7 offer many productivity applications to help you be more efficient.
WordPad serves as a simple but useful word processor.
Calculator’s four modes: Standard (top left), Scientific (top right),
Programmer (bottom left), and Statistics (bottom right.
18
Windows 7 Digital Classroom
What you can do with Windows 7
1
• Create and edit pictures. Use Windows 7 to import images from a digital camera, scan
images with a scanner, or download images from the Internet. Then view them individually
or in slide show format using Windows Photo Viewer.You can also use the Paint program
to create images of your own. For even more photo features, use the Windows Live Photo
Gallery, which is covered in more detail in Lesson 13, “Working with Images.” When your
images look the way you want them to, you can print them, e-mail them, burn them to a
CD or DVD, or create a video DVD.
View your images in Windows Photo Viewer.
Windows Live Photo Gallery lets you edit and organize your images.
Lesson 1, Getting Started with Windows 7
19
1
What you can do with Windows 7
• Play music and other media. The Windows Media Player makes it easy to listen to audio
CDs (and burn your own), play digital audio and video clips.You can also watch movies on
DVD and tune into Internet radio. Using the Windows Media Center, you can locate and
stream your favorite Internet TV shows, record regular TV, if your computer has a TV tuner,
and view movies.
Use Windows Media Player to enjoy your favorite music and videos.
• Get online. With Windows 7, getting online is a breeze. Once you’re connected, you have
all the tools you need to get the most out of the Web, including the Internet Explorer 8 web
browser, which makes surfing a snap.
Surf the Web with Internet Explorer 8.
20
Windows 7 Digital Classroom
What you can do with Windows 7
1
What is an operating system?
A computer’s operating system is a set of programs that enable the computer to perform such
basic tasks as recognizing user input from a keyboard or mouse, sending output to the computer
screen, keeping track of files on the hard disk, and controlling peripheral devices, such as
external hard drives and printers. It also acts as an interface between the computer and the user,
and serves as the host for any other programs, or applications, running on the computer, such as
word-processing programs, games, web browsers, etc.
If you’re not sure which version of Windows 7 you have, you can easily find out.
1
Press the Start button ( ) to display the Start menu.
2
Click Control Panel in the Start menu.
Click the Start button and choose Control Panel.
3
In the Control Panel window that appears, click the System and Security link.
Click the System and Security link.
Lesson 1, Getting Started with Windows 7
21
1
Activating your copy of Windows 7
4
In the System and Security window, click the System link. The System window opens,
displaying the version of Windows 7 installed on your computer, among other things.
Click the System link to find out which edition of Windows 7 is running on your computer.
You can learn about the different versions of Windows 7 in Appendix A.
Activating your copy of Windows 7
When you install Windows 7, you have the option of activating your copy of the software. If
you prefer to wait, you can activate it later—you have 30 days to do so. Activating your copy of
Windows 7, which is mandatory, enables Microsoft to verify that your copy of the software is
authentic, and ensures that you’ll be able to use every feature of the software. It also makes you
eligible to receive updates to the software as well as product support from Microsoft.
22
Windows 7 Digital Classroom
Activating your copy of Windows 7
1
In this exercise, you will learn how to activate your copy of Windows 7. If you opted to activate
Windows 7 when prompted during the installation rather than waiting until later, skip to the
next section. Note that you must be connected to the Internet to complete this exercise.
1
Press the Start button ( ) to display the Start menu.
2
Click Control Panel in the Start menu.
3
In the Control Panel window that appears, click the System and Security link.
4
In the System and Security window, click the System link. The System window opens.
5
The Windows activation section of the System window indicates how many days you
have left to activate your copy of Windows 7.You may have to scroll down to see this
section of the window. Click the Activate Windows now link.
Activate your copy of Windows 7 from the System window.
6
The first screen of the Windows Activation Wizard appears. Click Activate Windows
online now.
Windows 7 launches the Windows Activation Wizard.
Lesson 1, Getting Started with Windows 7
23
1
What’s new with Windows 7
7
Microsoft verifies the product key, then activates the software. When activation is
complete, press the Close button ( ) in the upper right corner.
Windows 7 verifies the product key, then notifies you when activation is successful.
If you don’t have an Internet connection, you can activate your copy of Windows 7 via phone.
To find out what number to call, click Show Me Other Ways to Activate in the first screen of the
Windows Activation Wizard (this option is visible only if you are not connected to the Internet)
and follow the onscreen prompts.
What’s new with Windows 7
Windows 7 incorporates hundreds of improvements based on feedback provided by users of
previous versions of the operating system—most notably Windows 7’s immediate predecessor,
Windows Vista.
The Windows 7 Taskbar buttons are larger and easier to see. In Windows 7, you can pin a
button for any program on the Taskbar, so it’s always a click away.You can also change the
order in which Taskbar buttons appear. Finally, the Windows 7 Taskbar supports thumbnail and
full-screen previews of open windows. Hover your mouse over a Taskbar button to preview
the associated window in thumbnail mode. Click the thumbnail to preview the window in
full-screen mode.
Preview the associated window in thumbnail mode.
24
Windows 7 Digital Classroom
What’s new with Windows 7
1
Jump lists offer a handy way to quickly access your most recent files—right from the Taskbar. If
you frequently access a particular file, you can pin it to the Taskbar. Right-click a Taskbar button
to view a jump list of recent documents.
To view a jump list of recent documents
right-click a Taskbar button.
Windows 7 makes window management a snap—literally. For example, in previous operating
systems, to compare the contents of two open windows, you were required to manually resize
and position each one. In contrast, with Windows 7’s new Snaps feature, you can drag one
window to the right edge of the screen and the other to the left; Snaps automatically resizes
them as needed and snaps them into place.
Revealing your desktop when windows are open is also simple: Just hover your mouse over the
Show Desktop button on the right-most edge of the Taskbar, and the open windows hide from
view. To hide all open windows but one, click and shake the title bar of the window you want to
remain; all other open windows are minimized. Shake the open window again; the minimized
windows reappear.
Windows 7 adds a new feature called libraries. A library displays all content of a particular type,
for example, image files, in one easy-to-find location, no matter where on your computer those
files are located.
Lesson 1, Getting Started with Windows 7
25
1
What’s new with Windows 7
Windows 7 also has improved device-management features that enable you to easily connect,
manage, and use any devices, such as printers, scanners, cameras, that are connected to
your computer.
Manage devices connected to your computer from one convenient location.
If you have a home network, the HomeGroup feature makes it painless to connect any
computers running Windows 7 to that network, and to share files, folders, and even devices such
as printers with other Windows 7 computers on the network. Accessing these files and devices
is as easy as if they were on your hard drive.
If you use a laptop computer, you’ll appreciate Windows 7’s improved power-management
features. One feature, adaptive display brightness, dims the display if your system has been idle
for a time; another ensures that less power is used to play DVDs—especially handy on long trips
where AC power is unavailable.
26
Windows 7 Digital Classroom
What’s new with Windows 7
1
If you were one of the countless Windows Vista users frustrated by the seemingly endless stream
of pop-up alerts, you’ll appreciate Windows 7’s new notification system. Rather than launching
a pop-up, Windows 7 displays a special icon ( ) in the Taskbar’s Notification area. Click the icon
whenever you want to open the new Windows 7 Action Center. This special window offers
one-stop access to alerts and tasks related to keeping your computer in good form.
Review messages and resolve problems from the Action Center window.
If you have a touch-screen monitor, you can use your fingers to scroll, resize windows, play
media, pan, and zoom.The Start menu,Taskbar, and Windows Explorer window also support
touch input.
Lesson 1, Getting Started with Windows 7
27
1
What’s new with Windows 7
Live from Redmond
In the interest of streamlining, Microsoft also omitted some features from Windows 7 that
existed in earlier versions of Windows. These include the following:
•
•
•
•
•
The sidebar
Windows Calendar
Windows Mail
Windows Photo Gallery
Windows Movie Maker
Some of these features, such as Windows Mail, Windows Photo Gallery, and Windows Movie
Maker, are now available free from Windows Live, a collection of web services and downloadable
applications from Microsoft.You’ll explore the programs that are available on Windows Live later
in this book in Lesson 13, “Working with Images.”.
Starting Windows 7
The first time you start Windows 7, you may be prompted to complete a series of configuration
steps. Simply follow the onscreen prompts. After completion, whenever you turn on your
computer, Windows 7 starts automatically, displaying the Welcome screen. From there, you must
specify which account you want to use by clicking it. If you’ve set a password for the selected
account, enter it when prompted. Note that the characters you type appear as dots to prevent
others from seeing your password as you type, and the Windows 7 desktop appears.
Be sure to remember your password, or write it down and store it somewhere safe. If you forget
your password, press the Go button to the right of the password field;Windows 7 displays the
password hint you set when you created your password. For more about creating passwords and
other user account details, see Lesson 8, “Setting Up User Accounts.”
28
Windows 7 Digital Classroom
What’s new with Windows 7
1
The Windows 7 desktop
The Windows 7 desktop serves as the jumping-off point for any task you want to perform
using your computer. Take a moment to familiarize yourself with the various components of
the desktop.
A
C
B
D
E
F
G
H
I
A. Shortcut Icon. B. Work area. C. Start Button. D. Quick Launch Program Icons. E. Programs that are currently running.
F. Taskbar. G. Notification area. H. Time & Date. I. Show Desktop Button.
• The Start button. Clicking this button reveals the Start menu, from which you can launch
any Windows 7 application.
• The Windows Taskbar. Buttons representing any programs you have open appear on the
Taskbar. Also, by default, the Taskbar features icons for launching Internet Explorer 8,Windows
Explorer, and Windows Media Player.You can pin additional program icons—or even icons for
frequently accessed documents or folders—to the Taskbar if you like.You’ll learn more about
customizing the Taskbar in Lesson 4, “Customizing Windows 7.” Note that open programs appear
highlighted; buttons for launching programs do not.
Lesson 1, Getting Started with Windows 7
29
1
Getting help
• The Notification area. This area displays important information about your computer,
such as whether you are connected to a wireless network, whether your laptop is plugged
in, and the system volume level. It also displays special alert icons if your system is in need of
attention.You can click the icons displayed in this area to view additional information or to
make necessary adjustments.
• Time and date.Your computer displays the time and date to the right of the Notification
area. For more a more detailed calendar and clock, you can click the Time and Date. From
there you can click the Change date and time settings link to make any changes to the
Time, Date, and Time zone.
• Show Desktop button. If you need to access the desktop, but have several programs
running at once, press the Show Desktop button to minimize all open windows and reveal
the desktop. If you just need to glance at the desktop, but don’t want to minimize the open
program windows, hover your mouse over the Show Desktop button to take a quick peek at
the desktop underneath.
• Work area. Any programs, folders, and files that you open display in the work area.
• Shortcut icon. You double-click icons on the Windows 7 desktop to launch a program or
Windows 7 feature. Often, when you install new programs, these shortcut icons are added by
default; if not, you can create them yourself.You’ll learn how to create or pin shortcut icons
in Lesson 4, “Customizing Windows 7.”
Getting help
If you run into a problem with Windows 7, or you aren’t sure how to accomplish a task, for
example, you may want to find out how to set a password for your user account, the Windows
Help and Support Center is your first stop for expert assistance. Here, you can search for help
by typing a keyword or phrase, such as password or user account password, to view a list of
links to related help articles. Another approach is to browse help articles.
If your computer is connected to the Internet, help includes online resources.
30
Windows 7 Digital Classroom
Getting help
1
Press the Start button ( ). The Start menu appears.
2
Click Help and Support.
1
Choose Help and Support from the Start menu.
3
The Windows Help and Support window appears. Type a keyword or phrase, for example
user account password, in the Search text field and press Enter.
Type a keyword or phrase in the Search box and press Enter.
Lesson 1, Getting Started with Windows 7
31
1
Getting help
4
Windows 7 displays a list of links to articles that relate to the word or phrase you typed.
Click a link that looks relevant, and Windows 7 displays the article.
Click a relevant link, and then read the help article.
You can also browse the help articles in the Help and Support Center. Here’s an example
of how you might browse for an article. Keep in mind that locating other articles may
involve more or fewer screens of subcategories or topics.
5
Press the Back button ( ) twice to return to the Windows Help and Support window.
6
Click the Browse Help topics link.
Click the Browse Help topics link.
32
Windows 7 Digital Classroom
Getting help
7
1
A screen containing a table of contents appears. Click a link in the table of contents that
relates to what you need help with. In this example, Security and privacy was chosen.
Click a link in the table of contents.
8
Windows 7 lists a series of topics and categories to help you refine your search. Click the
option that best matches your needs.
9
A list of subcategories appears. Click the one that is most relevant to your inquiry.
10 A list of topics in the selected subcategory appears. Click the link for the topic that looks
most promising. Windows 7 displays the article you selected.
Click the most promising topic, and then read the help article.
Lesson 1, Getting Started with Windows 7
33
1
Shutting down Windows 7
Finding program-specific help
Although the Help and Support Center is a great way to get help with Windows 7, it can’t help
you with a program that’s not included with the Windows 7 operating system, such as Microsoft
Excel or Adobe Photoshop. To access the Help function in these programs, click the Help menu
in the specific program window and choose View Help, Help Topics, or something similar (the
precise terminology varies). Alternatively, press the F1 key on your keyboard.You can also access
program-specific Help information from within certain dialog boxes and screens, indicated by a
question mark icon or a text link.
Shutting down Windows 7
When you are not using your computer, you should power it down to conserve energy. While
your instinct may be to press the machine’s power button, you should not do so, as unsaved
changes in open documents could be lost. In addition, Windows system files could be damaged,
which could make your system less stable. Instead, you should power down Windows 7. When
you do, you have three options:
• Sleep. Sleep is essentially a stand-by mode. Power is withheld from non-essential
components and operations in order to conserve energy. When a sleeping system is awakened,
it resumes operation quickly.
• Hibernate. When in Hibernate mode, your Windows 7 system saves your data to your
hard disk, then completely powers down your computer. When you are ready to use the
computer again, press the machine’s power button; the system restarts, reverting to the state
it was in before it entered hibernation with all the same programs, folders, and files displayed
on the desktop. The advantage of using Hibernate mode over Sleep mode is that no power
is consumed. Although it does take the system a bit longer to resume operation after
hibernating. When the system restarts, it remembers any open programs or documents on
which you were working.
If your Hibernate option is missing, you might have Hybrid sleep turned off.The Hybrid sleep
option can be found by opening the Control panel and clicking the Hardware and Sound link.
Click the Power Options link and click the Change plan settings link of your current power plan.
In the Edit Plan Settings window, click the change advanced power settings link. In the Power
Options Advanced settings dialog box that appears, look for the Allow hybrid sleep option under
the Sleep category. If the setting is On, then the Hibernate option is missing due to a setting in
your computer’s BIOS, which are changed outside of Windows 7,
• Shut Down. Like Hibernate, Shut Down completely powers down your computer. The
difference is that the next time you start it back up, you begin with a fresh desktop.
34
Windows 7 Digital Classroom
Shutting down Windows 7
1
To shut down Windows 7, press the Start button ( ). The Start menu appears.
2
Press the Shut Down button.Windows 7 shuts down your computer. Click the arrow to the
right of the Shut Down button to view additional options.
1
Choose Shut Down from the Start menu or click
the arrow to the right for additional options.
3
Choose Sleep or Hibernate. Windows 7 puts your computer in Sleep mode or Hibernate
mode, depending on which option you choose.
Choose Sleep or Hibernate.
Note that in addition to providing Sleep and Hibernate options, the Shut Down menu also
includes the following choices:
• Switch User. Choose this to switch to a different user account without closing the
programs you have open in the current session.You’ll learn more about user accounts in
Lesson 9, “Networking Your Computer.”
• Log Off. Choose this to close all open programs and log out of your account. This returns
Windows 7 to the Welcome screen that appears immediately after startup, where users
indicate which account they want to use.
• Lock. Choose this to lock the computer. To unlock the computer, you will need to enter
the password you have specified for the current user account, assuming one has been set.
• Restart. Choose this option to close all open programs, shut down Windows 7, then start
Windows 7 back up again.You might choose this option if, for example, you’ve installed new
software, and the new software requires that Windows 7 be restarted before it can be used.
Lesson 1, Getting Started with Windows 7
35
1
Self study
Self study
1
Click and right-click the various icons currently on display in the Notification area on
the right side of the Taskbar, and explore the options and windows that appear.
2
Press the Ask button in the Windows Help and Support window to learn about
additional ways to obtain help and support.
Review
Questions
1 What is an operating system?
2
How many versions of the Windows 7 operating system are there?
3
How do you obtain Windows Mail, Windows Photo Gallery, and Windows
Movie Maker?
4
On what part of the Windows 7 desktop do you find important information about your
computer, such as whether you are connected to a wireless network, or whether your
system is in need of attention?
5
What are the two main ways to find help using the Windows Help and Support Center?
Answers
1 An operating system is a set of programs that enable the computer to perform basic
tasks, such as recognizing user input from a keyboard or mouse, sending output to the
computer screen, keeping track of files on the hard disk, and controlling peripheral
devices such as external hard drives and printers. It also acts as an interface between the
computer and the user, and serves as the host for any other programs, or applications,
running on the computer, such as word-processing programs, games, web browsers, etc.
2
In all, there are three versions of the Windows 7 operating system:
• Windows 7 Home
• Windows 7 Professional
• Windows 7 Ultimate
36
3
Windows Mail, Windows Photo Gallery, and Windows Movie Maker—as well as other
free software for Windows 7 users—are available from Windows Live, a Microsoft-run
Web site offering various web services and downloadable applications.
4
You find this information in the Taskbar’s Notification area.You can click the icon’s
display in this area to view additional information or to make necessary adjustments.
5
You can obtain help from the Windows Help and Support Center by searching using a
keyword or phrase, or by browsing Help topics.
Windows 7 Digital Classroom