1
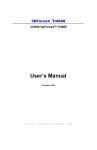
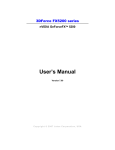
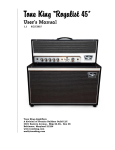
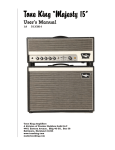
Part 1
AL
The Windows 7
User Experience
CO
PY
RI
GH
TE
D
MA
TE
RI
When fully utilized, the Windows 7 desktop, as shown in the following figure,
offers an extremely rich, visual user experience. However, as you find out in this
part, the Windows 7 desktop is much more than just a pretty face. Indeed,
Windows 7 is also Microsoft’s most powerful and usable personal computer
interface to date (and this statement is coming from someone who really liked
Windows XP — and Vista not so much).
In this part . . .
✓
✓
✓
✓
✓
Getting Acquainted with the Windows 7 Desktop
Adding Gadgets to Your Desktop
Using the Getting Started Option and Windows Help and Support
Personalizing the Windows 7 Desktop
Using the Windows 7 Taskbar
2
Part 1: The Windows 7 User Experience
Desktop
The Windows 7 desktop (see Figure 1-1) consists of the taskbar (see “Taskbar”
later in this part) that normally appears along the bottom of the screen, a background image (or color) that fills the rest of the screen (see “Personalize” later
in this part), any gadgets you display on the screen (see “Gadgets” later in this
part), and whatever desktop icons and desktop shortcuts you then choose to
place on this background.
Recycle Bin desktop icon
Desktop background image
Gadgets
Figure 1-1
Taskbar
Displaying additional desktop icons
The Windows 7 desktop starts with just a single Recycle Bin desktop icon
(where you drop any files, folders, and desktop shortcuts you want deleted from
the system). In addition to the Recycle Bin icon, you can add the following icons
to your Windows 7 desktop:
✓ Computer: To open your Computer window (same as choosing Start➪
Computer from the taskbar), which shows all the drives and components connected to your computer (including drives that you’ve mapped
onto a drive letter).
Desktop
3
✓ User’s Files: To open your Documents window (same as choosing
Start➪Documents from the taskbar), which shows all the document files
on your computer. (See “Windows Explorer” in Part 2.)
✓ Network: To open the Network window (same as choosing Start➪Network),
which shows all the computers on your local area network. (See Part 3.)
✓ Control Panel: To open the Control Panel (same as Start➪Control Panel),
which enables you to customize all sorts of computer settings. (See
“Control Panel” in Part 5.)
To add any or all of these desktop icons, follow these steps:
1. Right-click somewhere on the desktop background (not on any icon) and
then choose Personalize from the shortcut menu that appears.
2. In the Personalization window that appears, click the Change Desktop
Icons link in the Navigation pane to open the Desktop Icon Settings
dialog box.
3. Click the check boxes for all the desktop icons (Computer through
Control Panel) you want to appear on the Windows 7 desktop.
4. Click OK to close the Desktop Icons Settings dialog box and then click the
Close button in the upper-right corner of the Personalization window.
After adding a desktop icon to the desktop, you can open its window by doubleclicking the icon or right-clicking it and then choosing Open from its shortcut
menu.
Creating desktop shortcuts
You can create desktop shortcuts to launch applications you’ve installed as well
as to open drives, folders, documents on your computer system, and Web pages
on the Internet.
To create a desktop shortcut, you need to do just two things:
1. Locate the icon for the program, drive, folder, or document for which you
want to create the shortcut on the Start menu or in the Computer,
Network, or Documents window. (To create a shortcut to a Web page,
right-click the page in the Internet Explorer, click the Create Shortcut
option on its shortcut menu, and click OK in the alert dialog box that asks
whether you want the shortcut on your desktop.)
2. Right-click the program, folder, or document icon and then choose
Send To➪Desktop (Create Shortcut) on the icon’s shortcut menu.
4
Part 1: The Windows 7 User Experience
In the case of a Web page, choose File➪Send➪Shortcut to Desktop in Internet
Explorer when the Classic pull-down menus are displayed.
Note that to create a desktop shortcut to a drive on your computer system, you
must right-click the drive and choose the Create Shortcut item from its shortcut
menu (there is no Send To item). Windows 7 then displays an alert dialog box
indicating that it can’t create a shortcut in the same window and asking whether
you want the shortcut placed on the desktop instead. Click the Yes button.
You can also use a wizard to create a desktop shortcut by following these few
steps:
1. Right-click anywhere on the desktop (but not on an existing desktop item)
and then choose New➪Shortcut from the shortcut menu that appears.
2. Enter the location of the item to which you want to create the shortcut
either by entering its path and filename or URL (Web) address or by clicking the Browse button and locating the item in the Browse for Files or
Folders dialog box before you click OK.
3. Click the Next button and then, if you want, edit the name for the shortcut
in the Type a Name for This Shortcut text box. Wrap up by clicking Finish.
After you create a desktop shortcut, you can open the program, drive, folder,
document, or Web page associated with it by double-clicking the shortcut icon
or by right-clicking it and then choosing Open from its shortcut menu.
To change the size of all desktop icons, to disable the automatic arrangement of
the icons and alignment to an invisible grid, or even to temporarily remove the
display of all icons, right-click any open space on the desktop, choose View from
the shortcut menu that appears, and then choose the appropriate option. To
change the order in which your desktop shortcuts appear in columns across the
desktop, use the options (Name, Size, Item Type, and Date Modified) on the Sort
By shortcut menu, which you can access by right-clicking any open space on the
desktop.
Flip and Flip 3-D
When you have many windows open in Windows 7, the Flip and Flip 3-D (also
known as the Window Switcher) features provide you with two quick methods
for activating the window you want to work by displaying it on the top of the
others.
To use the Flip feature (see Figure 1-2), hold down Alt+Tab. Windows 7 displays
a panel in the middle of the desktop showing thumbnails of each open window
in the order in which they were opened with the name of the window that’s currently selected. To activate a new window in the panel, press Tab as you hold
Flip and Flip 3-D
5
down the Alt key until the thumbnail of that window is highlighted and its name
appears. Then release the Alt key along with Tab to hide the panel display.
Figure 1-2
If you hold the Ctrl key down while you press the Alt and Tab key, Windows 7
opens a panel with thumbnails of all open windows, and this panel remains displayed even after you release these three keys. You can then flip through the
panel by pressing the → or ← (to move forward or backward). When the thumbnail of the window you want to access is highlighted in the panel, press Enter to
close the panel and display the selected window on the desktop.
To use the Flip 3D feature, hold down the Windows logo key (the key with picture of a waving flag divided into four parts, Q) and then press the Tab key.
Windows 7 then displays all open windows in 3-D cascading arrangement (see
Figure 1-3). You can then flip through the cascading thumbnails by continuing to
the press the Tab key until the thumbnail of the window you want displayed is
at the front of the stack. If your mouse has a center wheel, you can then flip
through the 3-D stack by turning the wheel. (Turn the wheel forward to flip backward through the stack and backward to flip forward.)
As soon as you’ve brought the thumbnail of the window you want displayed on
the desktop to the front of the 3-D stack, release the Windows logo key.
Windows 7 then closes the cascading 3-D stack while at the same time displaying the selected window on the desktop.
If you hold the Ctrl key down while you press the Windows logo key and the Tab
key, Windows 7 opens a 3-D stack of all open windows that remains displayed on
your desktop even after you release these three keys. You can then flip through
the 3-D stack by pressing the → or ← (to move forward and backward). When
the thumbnail of the window you want to access is at the front of the stack, you
can press Enter to close the stack and display its window on top of the desktop.
When all the open windows in Windows 7 are minimized as Quick Launch buttons (see “Taskbar” later in this part) on the taskbar — which happens after you
click the Show the Desktop icon on the taskbar’s shortcut menu or you press
Q+D — remember that you can position the mouse pointer over each minimized
button to display a thumbnail of its window. Then, when you see the image of
the window you want to activate, you can position the mouse pointer on the
thumbnail to temporarily display its window on the Windows 7 desktop either
full screen or in its previous position and size. You can then click its Quick
Launch button on the taskbar or displayed thumbnail to keep the window open
on the desktop.
6
Part 1: The Windows 7 User Experience
Figure 1-3
Gadgets
Gadgets are mini-applications (applets) for the Windows 7 desktop that give you
access to frequently changing information, such as the current time, weather,
stock quotes, news feeds, computer usage, and the like. Figure 1-4 shows you my
desktop with the Gadgets Gallery window displayed. (See “Adding new gadgets
to your desktop” later in this part.)
My desktop currently holds the following items:
✓ Clock, which shows an analog clock with the current time for any time
zone you select.
✓ Slide Show, which displays a continuous slide show of the images that are
stored in your Pictures library.
✓ Calendar, which shows the current day and date.
✓ Weather, which shows the current temperature (and when enlarged,
weather conditions) for a selected town or city.
✓ Feed Headlines, which shows you news headlines for the RSS feed you
select. (See “Internet Explorer 8” in Part 4 for details on RSS feeds and how
to subscribe to them.)
Gadgets
7
Larger size
Close
Close
Figure 1-4
Drag Gadget
Options
Adding new gadgets to your desktop
You can easily add gadgets to your Windows desktop. Not only can you select
new gadgets from among those that are automatically shipped with the Windows 7
operating system, but you can always download gadgets from an ever-expanding
online library. When you add new gadgets, Windows automatically displays them
sequentially down a single column on the far right of your desktop (although,
you can then move them anywhere you want on the desktop — see “Resizing
gadgets and repositioning them on the desktop” later in this part).
To add gadgets to the desktop from among those that are included with
Windows 7, follow these few steps:
1. Right-click the desktop and then choose Gadgets from the shortcut menu.
Windows 7 opens the Gadget Gallery window that displays all the gadgets
on your computer, similar to the one shown in Figure 1-4.
8
Part 1: The Windows 7 User Experience
2. Double-click the icon of the gadget you want to add to the desktop or
right-click it and then click the Add option on the shortcut menu.
Windows adds the gadget to the right side of the Windows desktop.
3. When you finish adding gadgets, click the Close button in the Gadget
Gallery window.
To download more gadgets from the Internet, open the Gadgets Gallery window as
described in Step 1 and then click the Get More Gadgets Online link. Windows 7
then opens the Personalize Your PC Web page in the Internet Explorer. This page
offers not only gadget news and instructions on how to download new gadgets,
but also information on how to build your own gadgets, if you’re so inclined.
To remove a gadget from the desktop, position the mouse pointer in the upperright corner of the gadget you want to remove and then click the X that appears.
Note that removing a gadget from the desktop doesn’t delete it from your
computer — to do that, you need to open the Gadgets Gallery window, rightclick the gadget’s thumbnail, and then choose Uninstall from its shortcut menu.
To restore a gadget that you’ve removed from the desktop, just repeat the preceding steps for adding a new gadget.
Customizing the contents of a gadget
Many of the gadgets you add to the desktop are generic and need to be customized. For example, you can customize the Clock gadget by selecting a new clock
face, giving it a name, and selecting a time zone other than your own. (By
default, this analog clock automatically displays the same time as the digital
time display in the notification area of the Windows 7 taskbar.) You also need to
customize the Feed Headlines gadget so that it displays news headlines for a
particular RSS feed to which you’ve subscribed. (See “Internet Explorer 8” in
Part 4 for details on how to subscribe to an RSS feed.)
To customize the contents of a gadget, position the mouse pointer in the upperright corner of the gadget and then click the wrench icon that appears immediately beneath the X. Alternatively, you can also right-click its icon and then
choose Options from the shortcut menu. Windows 7 then opens a dialog box
specific to the gadget that enables you to customize its display.
For example, if you open the settings dialog box for the Clock gadget (see Figure
1-5), you can then select a new clock face by clicking either the Next or Previous
button (the ones with the triangles pointing right and left, respectively), and
entering a clock name (such as London or Beijing) in the Clock Name text box.
Next, select the appropriate time zone for the clock from the Time Zone dropdown list. In addition, this dialog box contains a Show the Second Hand check
box that you can select if you want the Clock gadget to display a moving red
second hand.
Gadgets
9
Figure 1-5
Changing the opacity of a gadget
In addition to customizing what information appears in a gadget (as in the RSS
feed headlines shown in the Feed Headlines gadget), you can also customize the
overall opacity of a gadget. Any gadget you add to the Windows 7 desktop is
automatically displayed at 100-percent opacity (making it as opaque and nonsee-through as possible). You can, however, lighten up any of your gadgets —
making them more see-through — by changing the gadget’s opacity.
To modify the opacity of a gadget, right-click the gadget and then highlight the
Opacity item on its shortcut menu. Windows then displays a submenu where
you can click the new opacity percentage item you want to use (20%, 40%, 60%,
or 80%). The lower the percentage, the more transparent the gadget is.
Resizing gadgets and repositioning them on the desktop
Some gadgets have a Larger Size option that you can use to increase its display
size on the desktop. To use this option, position the mouse pointer somewhere
on the gadget and then click the Larger Size button (with an arrow pointing diagonally up to the right) that appears between the Close and Options buttons on
the right size of the gadget (when the gadget offers this resizing option).
Immediately after you increase the display size of a gadget, the Larger Size
button changes into a Smaller Size button that you can click whenever you want
to return the gadget to its original display size on the desktop.
Windows 7 also enables you to reposition any gadget on the desktop by moving
it out of its original position on the far right of the desktop. To relocate a gadget,
position the mouse pointer on its Drag Gadget button (the one whose icon
sports a grid of dots) that appears immediately beneath the Options button (the
one with the wrench icon) on the right side of the gadget. Then, drag and drop
the gadget in its new position on the Windows desktop just as you would any
other desktop icon or the title bar of any open window.
10
Part 1: The Windows 7 User Experience
Getting Started
The Windows 7 comes with a Getting Started window (shown in Figure 1-6), that
you can open by clicking the Start button followed by the Getting Started option.
The Getting Started window has links to an overview of the new Windows 7
operating system as well as help in dealing with common tasks associated with
setting up your Windows 7 PC:
✓ Discover Windows 7: Opens the Windows 7 Home page on the Microsoft
Web site in the Internet Explorer, where you can get the latest information
about this latest and greatest version of the PC’s favorite operating system.
✓ Personalize Windows: Enables you to select a new desktop background
image, window colors, sounds, and screen saver as part of your personal
Windows 7 settings. (See “Personalize” later in this part for details.)
✓ Transfer Your Files: Enables you to transfer your files, folders, e-mail, and
other personal settings from another older computer running an earlier
version of Windows to the current computer running Windows 7.
✓ Share with a Homegroup: Enables you to set up a new homegroup or join
your computer to an existing one so that you can easily share files and
resources such as printers and scanners. (See “Connect to a Network” in
Part 3 for more on homegroups.)
✓ Change UAC Settings: Enables you to change the User Account Control
settings that determine when you’re notified about changes that programs
are about to make to your computer. (See “Modifying User Account settings” in Part 5 for more.)
✓ Get Windows Live Essentials: Opens the Windows Live Essentials page in
the Internet Explorer. On this page, you can get more information about
the various Windows Live application programs, including Messenger,
Mail, Writer, and Photo Gallery. The page also provides a convenient link
for downloading the entire Live Essentials package.
✓ Back Up Your Files: Enables you to back up the files on your PC as well as
restore files saved in a previous backup. (See “Backup and Restore” in Part
5 for details.)
✓ Add New Users: Enables you to make changes to your own user account
as well as add new users to your computer. (See “Modifying User Account
settings” in Part 5 for details.)
✓ Change Text Size: Enables you to increase the size of the text and icons
displayed on the Windows 7 desktop.
To display information about the function of a particular option in the top section of the Getting Started window, click its icon and text description. To open
Help and Support
11
the dialog box or window associated with a particular option, double-click its
icon in the Getting Started window.
You can also access any of the options displayed in the Getting Started window
directly from the Windows Start menu. Simply click Start and then position the
mouse pointer on the Getting Started option (rather than clicking it) at the top
of the Start menu. Windows then displays a submenu with each of the nine getting started options on it.
Figure 1-6
Help and Support
Windows 7 has an extensive help system that you can use not only to get general and detailed information on how to use Windows, but also to get answers
from Microsoft on specific problems that you’re experiencing. To open the
Windows Help and Support window (see Figure 1-7), choose Start➪Help and
Support.
The Windows Help and Support window contains three main links in the Not
Sure Where to Start section:
✓ How to Get Started with Your Computer displays a list of links to topics
ranging from Protecting Your Computer to Installing Programs.
✓ Learn About Windows Basics displays a list of links to basic topics
divided into the following six main categories: Learn about Your Computer;
12
Part 1: The Windows 7 User Experience
Desktop Fundamentals; Programs, Files, and Folders; Internet, E-Mail, and
Networking; Pictures and Games; and Help and Support.
✓ Browse Help Topics displays a Contents page with links to topics ranging
from Getting Started to Hardware, Devices, and Drivers.
Figure 1-7
In addition to these links, the Windows Help and Support window contains a
Search Help text box that you can use to search for particular topics. This text
box works just like any other Search text box in Windows 7: Simply type the
name of the feature you need help on (such as printing or searching files) and
then click the Search Help button (the one with the magnifying glass icon)
to display links to all related topics in the Windows Help and Support
windoPersonalize
Windows 7 makes it easy for you to personalize your computer by selecting a
new desktop background image, a color scheme for the various Windows
Help and Support
13
elements, a screen saver to use when the computer has been idle for a certain
period, as well as the sound effects to play when different events take place.
The easiest way to open the Personalization window (see Figure 1-8) for changing these settings is by right-clicking anywhere on the desktop background and
then choosing Personalize at the bottom of the shortcut menu that appears.
Figure 1-8
Note that you can also open this dialog box through the Control Panel
(Start➪Control Panel) by first clicking the Appearance and Personalization link
followed by the Personalization link, but this method requires a whole lot more
steps to do the same thing.
The options for customizing Windows 7 in the Personalization window include:
✓ Change Desktop Icons: Choosing this option opens the Desktop Icon
Settings dialog box where you can specify which desktop icons to display
on your desktop.
✓ Change Mouse Pointers: Clicking here opens the Mouse Properties dialog
box with the Pointers tab selected, where you can select a new mouse
pointer scheme — very helpful if you suffer a vision impairment that
makes it difficult to track the normal mouse pointer — as well as customize what icons are used in various pointing situations.
✓ Change Your Account Picture: Using this option opens the Change Your
Picture window, where you can select a new photo to represent you on the
Windows 7 Start menu.
14
Part 1: The Windows 7 User Experience
✓ Display: Click here to open the Display window, where you can adjust all
sorts of display settings for the monitor or monitors connected to your
computer, including the screen’s brightness, text and icon size, screen resolution, and color depth. Note that the range of the resolution and color
settings you have to choose from depends on the capabilities of your monitor or monitors.
✓ Taskbar and Start Menu: Click here to open the Taskbar and Start Menu
Properties dialog box, where you can make changes to the appearance of
the Windows taskbar, Start menu, and toolbars that appear on the taskbar.
(See “Customizing the taskbar,” “Customizing the Start menu,” and “Adding
other toolbars to the taskbar” later in this part for details.)
✓ Ease of Access Center: Use this option to open the Ease of Access Center
window, where you can turn on and adjust a wide range of accessibility
settings designed to make the personal computer easier to use for those
with different visual and auditory physical impairments.
✓ Change the Visuals and Sounds on Your Computer: Use this pane of the
Personalization window to select a new predefined theme for your
Windows 7 desktop or to save the changes you’ve made to the desktop
background, color scheme, sound effects, and screen saver (as described
in the following bullets) as a new theme to reuse. To select a Windows XP
color scheme, click Windows Classic or one of the high-contrast themes in
the Basic and High Contrast area of the theme list box.
✓ Desktop Background: Click here to open the Desktop Background window
(see Figure 1-9), where you can select new, ready-made wallpaper images,
select your own photo images as the wallpaper (with the Browse button),
change how the wallpaper image is displayed on the desktop (Fill, Fit,
Stretch, Tile, or Center), or select a new solid color for the background by
selecting Solid Colors from the Picture Location drop-down list.
✓ Window Color: Using this option opens the Window Color and
Appearance window (see Figure 1-10), where you can select a new color
and the amount of reflectiveness (called glassiness by Microsoft) for the
title bars of windows, the Start menu, and taskbar.
✓ Sounds: Click here to open the Sounds tab in the Sound dialog box, where
you can assign new sounds to different program events and save your new
choices as a custom sound scheme to reuse.
✓ Screen Saver: Use this option to open the Screen Saver Settings dialog
box, where you can select a new screen saver to use, customize the
amount of idle time before the screen saver kicks in, and adjust your
monitor and hard drive power settings (by clicking the Change Power
Settings link).
Taskbar
15
Figure 1-9
Figure
1-10
Taskbar
The taskbar is your almost constant companion in Windows 7. No matter where
you go or what you do, the taskbar and the buttons of the various toolbars
16
Part 1: The Windows 7 User Experience
continue to be displayed along the bottom of the screen (unless you’re using
your computer to play a full-screen video or game). That way, you have access
to all the neat features contained therein no matter whether you’re writing a
letter in your favorite word processor, surfing the Web with Internet Explorer 8,
or perusing your favorite graphic images in the Windows Photo Viewer or Media
Center.
The taskbar forms the base of the Windows desktop. Running along the bottom
of the complete width of the screen, the Windows 7 taskbar, as shown in
Figure 1-11, is divided into four sections:
✓ The Start button, with the accompanying Start menu at the far left.
✓ Quick Launch buttons for the Internet Explorer, Windows Explorer, and
Media Player to the immediate right of the Start button. Click the Internet
Explorer button to launch the Internet Explorer and display your Home
page, click the Window Explorer button to open an Explorer window showing the Documents, Music, Picture, and Video libraries on your computer,
and click the Media Player button to launch the Windows Media Player.
(See “Windows Media Player” in Part 6.)
✓ Buttons for open toolbars and minimized application windows in the
center area to the right of the Quick Launch buttons.
✓ The notification area (at the far right; sometimes called the system tray),
with current time and icons showing the current status of computer components and programs as well as processes that are running in the
background.
Whenever you minimize an open window by clicking its Minimize button in
the upper-right corner, Windows 7 reduces the window to the appropriate
Quick Launch or application button on the taskbar. Then, when you position
the mouse pointer over a particular Quick Launch button, Windows displays
thumbnail images of each of its open files above the button: Individual Web
pages on different Web tabs are displayed above the Internet Explorer Quick
Launch button, specific Windows 7 folders above the Windows Explorer button,
the Media Player with playback controls above the Media Player button, and
document files created with the particular program above the application
buttons.
To display the document represented in a thumbnail, position the mouse
pointer somewhere on the thumbnail image. To then reopen the document on
the Windows desktop, simply click the thumbnail image.
Taskbar
17
Figure
1-11
Start
button
Application
buttons
Internet Media
Explorer Player
button button
Notification
area
Show Desktop button
Windows
Explorer
button
To minimize all open windows and clear the desktop, click the Show Desktop
button (the rectangle at the very end of the taskbar, to the immediate right of
the notification area), press Q+D or right-click the taskbar and then choose
Show the Desktop from the shortcut menu that appears. To once redisplay all
the open windows on the desktop in their original order, click the Show Desktop
button or press Q+D again or right-click the taskbar and this time, click Show
Open Windows on its shortcut menu. To temporarily hide the contents of all
open windows displaying only their outlines on the desktop with the new Aero
Peek feature, simply position the mouse pointer on the Show Desktop button
instead of clicking it.
18
Part 1: The Windows 7 User Experience
Remember that when you have multiple windows open at the same time on the
desktop, you can use the Flip or Flip 3-D feature to bring a particular window to
the top of the stack. (See “Flip and Flip 3-D” earlier in this part.)
The Start menu
The Start button that opens the Start menu (see Figure 1-12) always appears as
the first button on the taskbar. The Start menu is the most basic menu in
Windows, giving you access to all the stuff on your computer.
To open the Start menu, simply click the Start button icon in the lower-left
corner of the taskbar, press the Q button, or press Ctrl+Esc on your keyboard.
The Start menu is divided into two columns. The options in the right column of
the Start menu are fixed and never change. (Note that your user picture and
name are included as part of these fixed items, appearing at the top of the right
column.) As for the left column, only the All Programs button, the Search
Programs and Files text button (at the bottom), and the Internet Explorer
options (at the top) are fixed. The other icons that appear in this column change
over time to represent the applications that you launch most frequently.
To ensure that a particular item remains on the Start menu, open the menu,
right-click the item you want added, and then choose Pin to Start Menu from its
shortcut menu.
Figure
1-12
Taskbar
19
To run one of the recently used programs, simply click that icon in the left
column of the Start menu. To open a Windows Explorer window for a particular
Windows component — Documents, for example, or Computer, or Network,
or Control Panel — click the component’s button in the right column of the
Start menu.
To launch an application program or open a Windows Explorer window or the
Control Panel that does not appear on the Start menu, type the first few characters of its name in the Search Programs and Files text box and then click the link
for the sought-for program that appears in the Search Results on the Start menu
to launch or open it.
To display a list of all the application programs installed on your computer,
click the All Programs option on the Start menu. You can then launch the application by clicking its folder (if the program uses one) and then clicking its program icon and name on the Start menu.
To shut down your computer at the end of the workday, press your computer’s
Power button or click the Shut Down button that appears to the immediate right
of the Search Programs and Files button. Windows then prompts you to save
any unsaved changes before closing down open application programs, logging
you off, and powering down your system. (See “Restart, Sleep/Hibernate, Lock,
Log Off, and Shut Down” in Part 2 for details about the other Power button
options.)
See “Customizing the Start menu” later in this part for details on how you can
change the look and contents of the Start menu.
Customizing the taskbar
The Taskbar and Start Menu Properties dialog box enables you to customize the
settings for the taskbar and the Start menu. To open this dialog box, right-click
the Start button or any open area (with no buttons) on the taskbar and then
choose Properties from the shortcut menu that appears. After the dialog box
makes its appearance, click the Taskbar tab. (See Figure 1-13.)
The options in the Taskbar Appearance section at the top of the Taskbar tab do
the following:
✓ Lock the Taskbar: Locks all the bars so that you can’t adjust the size of the
different toolbar areas of the taskbar.
✓ Auto-Hide the Taskbar: Hides the taskbar until you roll the mouse pointer
somewhere over that position. This way, the taskbar appears only when
you need it.
✓ Use Small Icons: Reduces the height of the taskbar and accordingly the
size of all the buttons and toolbars displayed on it.
20
Part 1: The Windows 7 User Experience
✓ Taskbar Location on Screen: Enables you to select the position of the
taskbar — Bottom (the default), Left, Right, or Top.
✓ Taskbar Buttons: Enables you to determine how the buttons for minimized
documents open in the various Windows components and applications are
displayed and whether or not they’re combined so that one type of Quick
Launch button appears (with individual thumbnails above) or each
appears in individual buttons on the taskbar. Your options here are Always
Combine, Hide Labels (the default), Combine When Taskbar Is Full, or
Never Combine.
Figure
1-13
Near the bottom of the Taskbar tab, you can find the Use Aero Peek to Preview
the Desktop check box. When this check box is selected (as it is by default),
keep in mind that you can temporarily hide all but the outlines of the windows
that are currently open on the Windows desktop simply by positioning the
mouse pointer over the Show Desktop button located at the far-right end of the
taskbar. The contents of the open windows are then instantly redisplayed on the
desktop the moment you move the mouse pointer off of the Show Desktop
button.
See “Customizing the Notification area,” later in this part, for information about
using the Customize button under Notification Area on the Taskbar tab of the
Taskbar and Start Menu Properties dialog box to modify the appearance of this
part of the Windows taskbar.
Taskbar
21
Customizing the Start menu
To customize the appearance of the Start menu, you need to click the Start
Menu tab in the Taskbar and Start Menu Properties dialog box. To modify what
items automatically appear on the Start menu and how they’re displayed, you
then click the Customize button to open the Customize Start Menu dialog box.
(See Figure 1-14.)
Use the check boxes in the list box of the Customize Start Menu dialog box to
control which items appear on the Start menu. For example, to add a Network
item that opens the Network window (where you can see all the devices connected on your network), select the Network check box. Likewise, to remove the
Default Programs item that opens the Default Programs dialog box (where you
can configure what default programs to use for tasks such as Web browsing and
reading e-mail), deselect the Default Programs check box.
To change the way fixed icons, such as Computer, Control Panel, Documents,
and the like, are displayed in the right-hand column of the Start menu, click one
of the following option buttons under Computer at the top of the Customize
Start Menu dialog box:
✓ Display As a Link: This option is the default setting for all fixed items. It
causes Windows to open a separate folder window showing the item folders and files.
Figure
1-14
22
Part 1: The Windows 7 User Experience
✓ Display As a Menu: Select this option when you want Windows 7 to dis-
play the item folders and files as menu items on a continuation menu that
you can select and open from the Start menu.
✓ Don’t Display This Item: Select this option to remove the display of the
fixed item, such as Network Places.
After changing items in the Customize Start Menu dialog box, click its OK button
and then click the Apply button on the Start Menu tab in the Taskbar and Start
Menu Properties dialog box. This enables you to open the Start menu to check
that the modifications you want on the Start menu have been put into place
before you click OK in the Taskbar and Start Menu Properties dialog box to
close it.
Beneath the Customize button on the Start Menu tab of the Taskbar and Start
Menu Properties dialog box, you find a Power Button Action drop-down list. You
can use this drop-down list to change the function of the button that appears to
the immediate right of the Search Programs and Files button at the bottom of
the Start menu from Shut Down to any of the other options found on the associated pop-up menu (Switch User, Log Off, Lock, Restart, Sleep, or Hibernate).
After you select a new function for the Power Button, the name of its option
appears on the button, and the previously defined function then appears on the
associated pop-up menu.
If you don’t want Windows 7 to add the names of the programs you recently
worked in or the names of files you recently opened to the Start menu, you can
prevent this addition. Simply deselect the Store and Display Recently Opened
Programs in the Start Menu check box and the Store and Display Recently
Opened Items in the Start Menu and the Taskbar check box, which appear at
the bottom of the Start Menu tab in the Taskbar and Start Menu Properties
dialog box.
The Windows 7 Start menu adds jump lists to the application icons (such as
Microsoft Office Word or Excel) that appear on it. Jump lists show the documents you recently opened with the particular program, and you can use their
items to quickly launch the application while at the same time reopening the
document for more editing. If you have a document that you regularly edit, you
can even pin it to the program’s jump list by clicking the Pin to This List button
that appears when you position the mouse pointer over the document’s filename. That way, the document doesn’t disappear from the program’s jump list
as you continue editing other files with the program.
Pinning icons to the taskbar
The Windows 7 taskbar contains three standard Quick Launch buttons that you
can use to start commonly used programs:
✓ Internet Explorer: Opens Internet Explorer 8 for browsing Web pages. (See
“Internet Explorer 8” in Part 4.)
Taskbar
23
✓ Windows Explorer: Opens the Libraries window in the Windows Explorer
so that you can access documents stored on your computer. (See “File,
Folder, and Library Management” in Part 2.)
✓ Windows Media Player: Opens Windows Media Player so that you can
view photos or play music or video stored on your computer. (See
“Windows Media Player” in Part 6.)
In addition to these three standard Quick Launch buttons, you can add your own
custom buttons by dragging a desktop shortcut to the desired position on the
taskbar and then releasing the mouse button when the Pin to Taskbar ScreenTip
appears above the shortcut icon. The mouse pointer indicates where the new
button will be inserted with a dark I-beam cursor at the tip of the pointer. A
button for the shortcut then appears at the position of the I-beam on the taskbar.
You can delete any of these custom Quick Launch buttons from the taskbar by
right-clicking the button and then choosing Unpin from Taskbar from the shortcut menu that appears.
As you continue to add new Quick Launch buttons to the taskbar, some of the
existing buttons at the end of the bar become hidden from view when the Lock
the Taskbar option is selected (as it is by default). Windows 7 then adds a continuation button with triangles pointing up and down to the taskbar. Click the
triangle pointing downward on this continuation button to display hidden buttons at the end of the taskbar, and click the triangle pointing upward to redisplay the buttons at the beginning of the taskbar.
Adding other toolbars to the taskbar
When you first start using Windows 7, none of its built-in toolbars are added to
the taskbar. You can, however, add any of the following toolbars:
✓ Address toolbar: Here you can directly enter pathnames for folders and
files you want to open or URL addresses for Web pages you want to visit.
✓ Links toolbar: Enables you to add links to Web pages you visit regularly by
dragging the Web page icon — located to the immediate left of the page’s
URL address — to a place on the toolbar.
✓ Tablet PC Input Panel toolbar: This toolbar (a button, actually) opens the
Input Panel on the Windows 7 desktop where you can write rather than
type your entries (assuming that you’re running Windows 7 on a Tablet PC
laptop computer).
✓ Desktop toolbar: Gives you access to all the desktop items on your
computer.
To add any (or all) of these toolbars to your taskbar, right-click the bar at a
place where there isn’t already a toolbar and then choose Toolbars from the
pop-up menu that appears, followed by the name of the toolbar to add.
24
Part 1: The Windows 7 User Experience
Creating new toolbars
You can add your own custom toolbars to the Windows 7 taskbar from the folders that you keep on your computer. When you create a custom toolbar from an
existing folder, Windows creates buttons for each of the subfolders that the
folder may contain.
To create a custom toolbar from a folder, follow these steps:
1. Right-click the taskbar (without clicking any of the buttons or icons it con-
tains) and then choose Toolbars➪New Toolbar from the shortcut menu
that appears.
Windows opens the New Toolbar – Choose a Folder dialog box, where you
select the folder to be used in creating the new toolbar.
2. Use the Navigation pane in the Choose a Folder dialog box to select the
folder whose contents are to be used in creating the new toolbar by clicking the folder icon in the navigation list box.
3. Click the OK button to close the New Toolbar dialog box.
As soon as you close the New Toolbar dialog box, Windows adds the new
toolbar, indicated by the folder’s name followed by a continuation button
(>>). When you click this continuation button, Windows 7 displays a pop-up
menu showing all the subfolders and documents contained in that folder.
All custom toolbars that you create are automatically deleted the moment you
remove their display from the Windows 7 taskbar (by right-clicking the taskbar
and then choosing Toolbars followed by the name of the custom toolbar).
The notification area
The notification area displays the current time as well as icons that indicate the
active status of various components — the status of your network connection,
Active Sync connection to your hand-held device, hot-pluggable cards such as
PC cards or ExpressCards inserted into a laptop computer, or the printer queue,
to name a few examples. In addition, the notification area displays icons representing various programs or processes that run in the background, such as the
Windows Sidebar (for hiding and redisplaying the Sidebar), the Language Bar
(for using Voice Recognition and Handwriting Recognition in Microsoft Office
programs), the Windows Clipboard when it contains multiple items, and
Windows Messenger.
This is also the place from which the Windows Update feature displays its
Update Reminder message telling you that new updates for the system are available. (See “Windows Update” in Part 5.)
To identify an icon that appears in the status area, position the mouse pointer
over it until the ScreenTip appears. To change the status of an icon, right-click it
Taskbar
25
to display the pop-up menu and then click the appropriate menu option. For
example, to open the Volume Control dialog box to adjust the volume of your
speakers, right-click the speaker icon in the notification area and then choose
Open Volume Mixer from the pop-up menu that appears.
To temporarily expand the notification area so that all of its icons are displayed,
click the Show Hidden Icons button (the one to the left of the first displayed
icon in this area, sporting a triangle pointing upward). Note that you can also
customize the notification area as part of customizing the taskbar and Start
menu properties. (See the next section, “Customizing the notification area,” for
more information.)
Customizing the notification area
You can also customize the settings for the notification area of the taskbar by
altering the settings in the Notification Area Icons window opened by clicking
the Customize button in the Notification Area of the Taskbar tab in the Taskbar
and Start Menu Properties dialog box, which in turn is opened by right-clicking
the taskbar and then choosing Properties from the shortcut menu that appears.
In the Notification Area Icons window, you can change the circumstances under
which particular notification icons are displayed in the notification area and
also turn the display of system icons on and off.
The list box in this window is divided into two columns: Icons and Behaviors.
You can then change the way a particular icon is displayed in the notification
area by selecting any of the following behaviors on its Behaviors drop-down
button:
✓ Show Icon and Notification: Displays the particular process’s icon in your
notification area as well as any notifications above the icon.
✓ Hide Icon and Notification: Displays neither the process’s icon nor notifi-
cation in your notification area.
✓ Only Show Notifications: Displays a process’s notification above the notifi-
cation area without also displaying its icon.
If you want all icons on your notification area displayed along with their notifications, you can turn on the Show Icon and Notification setting for all the icons in
one step: Simply click the Always Show All Icons and Notifications on the
Taskbar check box at the bottom of the Notification Area Icons window and then
click OK.
Arranging windows on the desktop
Normally when you open multiple windows on the desktop, they overlap one
another, with only the most recently opened window fully displayed on top. As
you open more windows, it becomes increasingly difficult to arrange them so
26
Part 1: The Windows 7 User Experience
that the information you need is displayed onscreen. (The arrangement is especially difficult to manage when copying or moving files and folders between
open windows.)
To help you organize the windows you have open, Windows 7 offers several
arrangement options. To rearrange the open windows with one of these options,
right-click the taskbar at a place that isn’t occupied by a window button and
then choose one of the following options from the shortcut menu that appears:
✓ Cascade Windows to overlap the open windows so that the title bars are
all displayed one above the other in a cascade
✓ Show Windows Stacked to place the windows vertically one on top of
the other
✓ Show Windows Side by Side to place the windows horizontally side
by side
✓ Show the Desktop to reduce all the windows open on the desktop to mini-
mized buttons on the taskbar
In Windows 7, you can now resize windows open on the desktop simply by dragging them to particular positions on the screen. To maximize a window on the
desktop, drag it to the very top of the screen. To get a particular window ready
to be displayed side by side, drag it to the left or right edge of the screen until
its window is resized to fit half the screen. Then, repeat this resizing process
with the second window using the opposite side of the screen.
Using the Task Manager
Windows Task Manager keeps tabs on your system and how it’s running. You
can use Task Manager to get an overview of what programs and processes are
running on your computer. You can also use it to switch to programs and to end
programs that have stopped responding (in other words, programs that have
frozen up on you).
To open Windows Task Manager, right-click the taskbar at a place where there
are no buttons and then choose Start Task Manager from the shortcut menu
that appears. Figure 1-15 shows you Windows Task Manager when running three
different applications.
To switch to another program or window from Windows Task Manager, click it
in the list box on the Applications tab and then click the Switch To button.
Windows then minimizes Task Manager and displays the selected window on
the desktop.
Taskbar
27
Figure
1-15
To end a process or program that has frozen up on you, click it in the list box on
the Applications tab and then click the End Task command button. Note that
you’ll probably get an alert dialog box indicating that the program has stopped
responding. Click the End command button in this dialog box (as many times as
you have to) to get Windows 7 to kill the process.
The status bar of Windows Task Manager shows you statistics on the number of
processes running under the program, the percentage of the CPU (Central
Processing Unit, the big chip at the heart of the computer), and the memory
usage of the program. If you like to look at schematics, click the Performance
tab in this window to see a dynamic charting of the total CPU and memory usage
on your computer (and to find really useful stuff like the number of handles,
threads, and processes that are being run).
28
Part 1: The Windows 7 User Experience