1
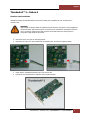
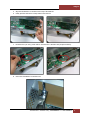
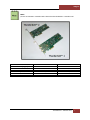
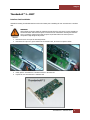
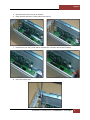
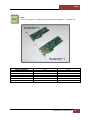
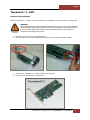
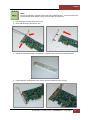
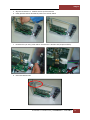
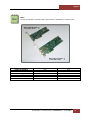
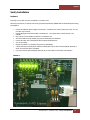
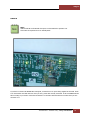
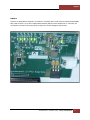
Thunderbolt™ 2
Installation Guide
Thunderbolt™ 2 Interface Card
Magma
Contents
Safety Instructions .................................................................................................. 3
Thunderbolt™ 2 for Roben-3 ........................................................................................ 5
Interface Card Installation ........................................................................................ 5
Thunderbolt™ 2 for EB3T ............................................................................................ 8
Interface Card Installation ........................................................................................ 8
Thunderbolt™ 2 for EB1T .......................................................................................... 11
Interface Card Installation ...................................................................................... 11
Verify Installation ..................................................................................................... 15
Hardware ............................................................................................................. 15
How to Get More Help ............................................................................................... 18
Contacting Technical Support ................................................................................. 18
Returning Merchandise to MAGMA ........................................................................... 18
Thunderbolt™ 2 Interface Card
| 2
Magma
Safety Instructions
Always use caution when servicing any electrical component. Before handling the Magma Expansion chassis, read the
following instructions and safety guidelines to prevent damage to the product and to ensure your own personal
safety. Refer to the “Advisories” section for advisory conventions used in this manual, including the distinction
between Danger, Warning, Caution, Important, and Note.
1.
Always use caution when handling/operating the computer. Only qualified, experienced, authorized electronics
personnel should access the interior of the computer and expansion chassis.
WARNING
Never modify or remove the radio frequency interference shielding from your workstation or
expansion unit. To do so may cause your installation to produce emissions that could interfere with
other electronic equipment in the area of your system.
When Working Inside a Computer
1.
2.
3.
Before taking covers off a computer, perform the following steps:
Turn off the computer and any peripheral devices.
Disconnect the computer and peripheral power cords from their AC outlets or inlets in order to prevent
electric shock or system board damage.
In addition, take note of these safety guidelines when appropriate:
§
§
To help avoid possible damage to systems boards, wait five seconds after turning off the computer before
removing a component, removing a system board, or disconnecting a peripheral device from the computer.
When you disconnect a cable, pull on its connector or on its strain-relief loop, not on the cable itself. Some
cables have a connector with locking tabs. If you are disconnecting this type of cable, press in on the
locking tabs before disconnecting the cable. As you pull connectors apart, keep them evenly aligned to avoid
bending any connector pins. Also, before connecting a cable, make sure both connectors are correctly
oriented and aligned.
CAUTION
Do not attempt to service the system yourself except as explained in this manual. Follow installation
instructions closely.
Thunderbolt™ 2 Interface Card
| 3
Magma
Protecting Against Electrostatic Discharge
Electrostatic Discharge (ESD) Warning
Electrostatic Discharge (ESD) is the enemy of semiconductor devices. You should always take
precautions to eliminate any electrostatic charge from your body and clothing before touching any
semiconductor device or card by using an electrostatic wrist strap and/or rubber mat.
Static electricity can harm system boards. Perform service at an ESD workstation and follow proper ESD procedures
to reduce the risk of damage to components. Magma strongly encourages you to follow proper ESD procedures,
which can include wrist straps and smocks, when servicing equipment.
You can also take the following steps to prevent damage from electrostatic discharge (ESD):
•
When unpacking a static-sensitive component from its shipping carton, do not remove the component’s antistatic packaging material until you are ready to install the component in a computer. Just before
unwrapping the anti-static packaging, be sure you are at an ESD workstation or are grounded.
•
When transporting a sensitive component, first place it in an anti-static container or packaging.
•
Handle all sensitive components at an ESD workstation. If possible, use anti-static floor pads and workbench
pads.
•
Handle components and boards with care. Don’t touch the components or contacts on a board. Hold a
board by its edges or by its metal mounting bracket.
Thunderbolt™ 2 Interface Card
| 4
Magma
Thunderbolt™ 2 for Roben-3
Interface Card Installation
Uninstall the existing Thunderbolt Interface card in the chassis prior to installing the new Thunderbolt™ 2
Interface card.
WARNING
High voltages are present inside the expansion chassis when the unit’s power cord is plugged into
an electrical outlet. Disconnect the power cord from the AC outlet before removing the enclosure
cover. Turning the system power off at the power on/off switch does not remove power to
components. High voltage is still present.
1.
2.
Remove the screw on top of the mounting bracket.
Disconnect the 3-pin wire / power cable from the Interface card, as shown from pictures below.
3.
4.
Gently pull the Thunderbolt Interface card out in the PCIe slot.
Prepare the new Thunderbolt™ 2 Interface card (see picture below).
Thunderbolt™ 2 Interface Card
| Thunderbolt™ 2 for Roben-3 5
Magma
5.
6.
Align the Thunderbolt™ 2 Interface card on top of the PCIE slot.
Gently push the card until it is firmly seated in the PCIe slot.
7.
Reconnect the 3-pin wire / power cable to Thunderbolt™ 2 Interface card (see pictures below).
8.
Secure the Thunderbolt™ 2 Interface card.
Thunderbolt™ 2 Interface Card
| Thunderbolt™ 2 for Roben-3 6
Magma
NOTE
The new Thunderbolt™ 2 Interface card is shorter that the Thunderbolt™ 1 Interface card.
.
Vendor ID (Magma)
UID
Mac OS Supported
Speed
Lane width
# of LEDs
Thunderbolt™ 1
0X19
0X00190003
10.8 below
10Gb/s
X4
5
Thunderbolt™ 2
0X19
0X00190008
10.9 and above
20Gb/s
X4
10
Thunderbolt™ 2 Interface Card
| 7
Magma
Thunderbolt™ 2 for EB3T
Interface Card Installation
Uninstall the existing Thunderbolt Interface card in the chassis prior to installing the new Thunderbolt™ 2 Interface
card.
WARNING
High voltages are present inside the expansion chassis when the unit’s power cord is plugged into
an electrical outlet. Disconnect the power cord from the AC outlet before removing the enclosure
cover. Turning the system power off at the power on/off switch does not remove power to
components. High voltage is still present.
1.
2.
Remove the screw on top of the mounting bracket.
Disconnect the 3-pin wire / power cable from the Interface card, as shown from pictures below.
3.
4.
Gently pull the Thunderbolt™ 1 Interface card out in the PCIe slot.
Prepare the new Thunderbolt™ 2 Interface card.
Thunderbolt™ 2 Interface Card
| 8
Magma
5.
6.
Align the Interface card on top of the PCIE slot.
Gently push the card until it is firmly seated in the PCIe slot
7.
Reconnect the 3-pin wire / power cable to Thunderbolt™ 2 Interface card (see pictures below).
8.
Secure the interface card.
Thunderbolt™ 2 Interface Card
| Thunderbolt™ 2 for EB3T 9
Magma
NOTE
The new Thunderbolt™ 2 Interface card is shorter that the Thunderbolt™ 1 Interface card.
.
Vendor ID (Magma)
UID
Mac OS Supported
Speed
Lane width
# of LEDs
Thunderbolt™ 1
0X19
0X00190003
10.8 below
10Gb/s
X4
5
Thunderbolt™ 2
0X19
0X00190008
10.9 and above
20Gb/s
X4
10
Thunderbolt™ 2 Interface Card
| 10
Magma
Thunderbolt™ 2 for EB1T
Interface Card Installation
Remove Thunderbolt™ 1 Interface card in the chassis prior to installing the new Thunderbolt™ 2 Interface card.
WARNING
High voltages are present inside the expansion chassis when the unit’s power cord is plugged into
an electrical outlet. Disconnect the power cord from the AC outlet before removing the enclosure
cover. Turning the system power off at the power on/off switch does not remove power to
components. High voltage is still present.
1.
2.
Remove the screw on top of the mounting bracket.
Disconnect the 3-pin wire / power cable from the Interface card, as shown from pictures below.
1.
2.
Gently pull the Thunderbolt™ 1 Interface card out in the PCIe slot.
Prepare the new Thunderbolt™ 2 Interface card.
Thunderbolt™ 2 Interface Card
| Thunderbolt™ 2 for EB1T 11
Magma
NOTE
The new Thunderbolt™ 2 Interface card comes with a standard bracket. You need to replace this
bracket with the shorter bracket in order to fit in the EB1T card guide slot.
1.
2.
Remove the two mounting screws on the card.
Slowly slide the bracket out from the card.
3.
Prepare the new bracket for EB1T Thunderbolt™ 2 Interface card as shown from the picture below.
4.
Properly align the mounting holes of the card on top of the bracket and secure it firmly.
Thunderbolt™ 2 Interface Card
| Thunderbolt™ 2 for EB1T 12
Magma
5.
6.
Align the Thunderbolt™ 2 Interface card on top of the PCIE slot.
Gently push the card into the PCIE slot, make sure it is firmly seated.
7.
Reconnect the 3-pin wire / power cable to Thunderbolt™ 2 Interface card (see pictures below).
8.
Secure the Interface card.
Thunderbolt™ 2 Interface Card
| Thunderbolt™ 2 for EB1T 13
Magma
NOTE
The new Thunderbolt™ 2 Interface card is shorter than the Thunderbolt™ 1 Interface card.
.
Vendor ID (Magma)
UID
Mac OS Supported
Speed
Lane width
# of LEDs
Thunderbolt™ 1
0X19
0X00190003
10.8 below
10Gb/s
X4
5
Thunderbolt™ 2 Interface Card
Thunderbolt™ 2
0X19
0X00190008
10.9 and above
20Gb/s
X4
10
| Thunderbolt™ 2 for EB1T 14
Magma
Verify Installation
Hardware
Final step is to test and verify the Thunderbolt™ 2 Interface card.
When the Thunderbolt™ 2 Interface card is fully operational the following GREEN LEDs are illuminated (Solid Green),
see FIGURE A.
•
•
•
•
•
•
•
•
•
Connect Thunderbolt cable to Magma Thunderbolt™ 2 Interface card, use the bottom port. Note: You can
use either top or bottom.
Connect Displayport thunderbolt cable to available port. You can skip this if external monitor is not
available.
Plug in power cord to Magma Thunderbolt™ 2 expansion unit.
Two Green LEDs D6 (3V3) and D8 (3V3_STB) are illuminated, see FIGURE B.
Connect the other end of Thunderbolt cable to laptop Thunderbolt port.
Turn on the Laptop.
Magma Thunderbolt™ 2 expansion unit powers up immediately.
7 Green LEDs (D1,D3,D4,D5,D6,D7 and D9) are illuminated. This is with an external display attached, as
shown from the photo below, FIGURE A.
If you don’t have an External display attached, only 5 Green LEDs are illuminated, see FIGURE C.
FIGURE A
Thunderbolt™ 2 Interface Card
| Verify Installation 15
Magma
FIGURE B
NOTE
LEDs D6 and D8 are illuminated when power cord is attached to expansion unit.
This means the expansion unit is on standby-mode.
If you don’t see these TWO GREEN LEDs coming ON, it means there is no power being supplied to the board. Check
J7 on the Interface card and make sure the 3-pin wire / power cable is firmly connected. If the two GEREN LEDs are
still not coming on you need to reseat the Thunderbolt™ 2 Interface card and remove & reconnect the 3-pin wire
connector to J7.
Thunderbolt™ 2 Interface Card
| Verify Installation 16
Magma
FIGURE C
If there is no Display Monitor attached to Thunderbolt™ 2 Interface card it would only show FIVE illuminated GREEN
LEDs, which is normal. If you have a Display Monitor attached, LEDs D1 and D5 should come on. Otherwise, the
Thunderbolt™ 2 Interface card is not properly working or the monitor Displayport cable is faulty.
Thunderbolt™ 2 Interface Card
| Verify Installation 17
Magma
How to Get More Help
You can visit the Magma Technical Support FAQ pages on the Internet at: www.magma.com/support/
Contacting Technical Support
Our support department can be reached by fax at (858) 530-2733 or by phone at (858) 530-2511. Support is
available Monday through Friday, 8:00 AM to 5:00 PM PT. When contacting MAGMA Technical Support make sure to
include the following information:
1.
2.
3.
4.
5.
Exact and correct Magma Serial #
Service Ticket or Case # (if you already submitted an online request)
Computer Type & Model: Operating System
Make & Model of PCI/PCIe cards: Application
Problem description
When submitting an online technical support request always provide a valid working e-mail address, phone number,
shipping address and proper contact name. Check your e-mail for an automated response containing the case # and
updates. You can also visit our web site at: www.magma.com/support. For a quick response, use the Technical
Support and RMA Request Form available in the Support Section of the website. Simply complete the form with all
required information. Please make sure that your problem description is sufficiently detailed to help us understand
your problem.
Shipping or Transporting of Expansion Unit with PCI / PCIe cards
Any PCIe cards in should be removed (or not to be installed) prior to shipment to avoid or prevent possible
damage. Note: Expansion board and PCIe / PCI cards that arrive damaged in shipment will not be covered under
warranty.
Returning Merchandise to MAGMA
If factory service is required, a Service Representative will give you a Return Merchandise Authorization (RMA)
number. Put this number and your return address on the shipping label when you return the item(s) for service.
Magma will return any product that is not accompanied by an RMA number. Please note that Magma WILL
NOT accept COD packages, so be sure to return the product freight and duties-paid.
Ship the well-packaged product to the address below:
MAGMA RETURNS DEPT.
RMA # ________
9918 Via Pasar
San Diego, CA 92126
USA
It is not required, though highly recommended, that you keep the packaging from the original shipment of your
Magma product. However, if you return a product to Magma for warranty repair/ replacement or take advantage of
the 30-day money back guarantee, you will need to package the product in a manner similar to the manner in which
it was received from our plant. Magma cannot be responsible for any physical damage to the product or component
pieces of the product (such as the host or expansion interfaces for the expansion chassis) that are damaged due to
inadequate packing. Physical damage sustained in such a situation will be repaired at the owner’s expense in
accordance with Out of Warranty Procedures. Please, protect your investment, a bit more padding in a good box will
go a long way to insuring the device is returned to use in the same condition you shipped it in. Please call for an RMA
number first.
Thunderbolt™ 2 Interface Card
| How to Get More Help 18
QSG P/N 09-09996-00