1
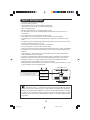
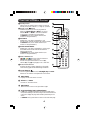
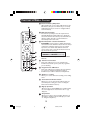
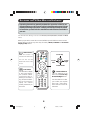
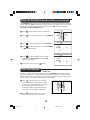
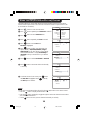
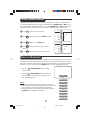
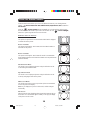
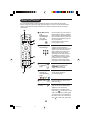
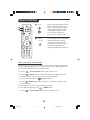
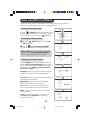
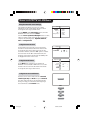
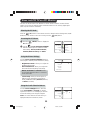
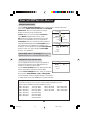
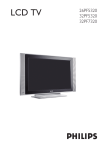
Operating Instructions
17PF9946
23PF9946
26PF9946
LCO4 AP p1-5
LCD TV
23PF9956
26PF9956
1
4/16/04, 11:12 AM
TABLE OF CONTENTS
SAFETY INFORMATION ...................................................................................................................... 3
FUNCTIONS OF REMOTE CONTROL ................................................................................................. 4 – 5
ACCESSING THE TV MAIN MENU AND SUB-MENUS........................................................................ 6
SELECTING THE MENU LANGUAGE AND AUTOMATIC INSTALLATION OF TV CHANNELS ................ 7
MANUAL TUNING OF LCD TV CHANNELS .................................................................................. 8
SORTING OF LCD TV CHANNELS ................................................................................................. 9
NAMING OF LCD TV CHANNELS ................................................................................................. 9
EDITING OF LCD TV CHANNELS .................................................................................................. 10
USING THE LCD TV PICTURE/SOUND SETTINGS ........................................................................... 11
USING THE TIMER.............................................................................................................................. 12
USING THE CHILD LOCK................................................................................................................... 13 – 14
USING THE CONTRAST+ FEATURE.................................................................................................... 15
USING THE NR (NOISE REDUCTION) FEATURE .............................................................................. 15
PIXEL PLUS FEATURE.......................................................................................................................... 15
USING THE PC PICTURE-IN-PICTURE FEATURE..................................................................................16
USING THE MODE SELECT FEATURE ..................................................................................................17
USING THE SLEEPTIMER.......................................................................................................................17
USING THE SCREEN FORMATS ...........................................................................................................18
USING THE PROGRAM LIST FEATURE .................................................................................................19
USING THE ACTIVE CONTROL ..........................................................................................................19
USING THE TV SMART PICTURE AND SOUND FEATURE.................................................................... 20
USING THE TELETEXT........................................................................................................................ 21 – 22
USING THE LCD TV AS A FM RADIO
SELECTING THE FM RADIO MODE.................................................................................................... 23
ACCESSING THE FM RADIO MENUS.................................................................................................. 23
INSTALLING THE FM RADIO STATIONS............................................................................................. 23
USING THE FEATURES ITEMS............................................................................................................... 24
USING THE MODE FEATURE ..............................................................................................................24
USING THE SMART SOUND FEATURE................................................................................................. 24
USING THE LCD TV AS A PC MONITOR
SELECTING THE PC MODE................................................................................................................ 25
ACCESSING THE PC MODE .............................................................................................................. 25
USING THE PICTURE SETTINGS........................................................................................................... 25
USING THE AUDIO SELECTION FEATURE .......................................................................................... 25
USING THE PIP IN THE FEATURE MENU............................................................................................ 26
USING THE RESET TO FACTORY FEATURE ........................................................................................ 27
USING THE MODE FEATURE ..............................................................................................................27
USING THE HD (HIGH DEFINITION) MODE .....................................................................................27
USING THE HD LOCK CHANNEL .....................................................................................................27
BEFORE CALLING SERVICE ................................................................................................................28
SPECIFICATIONS.................................................................................................................................. 29
2
LC04 pg 02
2
6/10/04, 4:59 PM
SAFETY INFORMATION
•
–
–
–
–
•
•
•
•
•
•
•
•
•
•
•
•
Disconnect mains plug when :
the red light below the TV screen is flashing continuously.
cleaning the TV screen. Never use abrasive cleaning agents.
there is a lightning storm.
the set is left unattended for a prolonged period of time.
No naked flame sources, such as lighted candles, should be placed on top of the TV or
in the vicinity.
Do not place your TV set under direct sunlight or heat.
Leave at least 5 cm around each side of TV set to allow for proper ventilation.
Avoid placing your set (e.g. near the window) where it is likely to be exposed to rain or
water.
No objects (such as vases) filled with liquids should be placed on top the TV so as to avoid
dripping or splashing of liquids on the set.
Do not shift or move the set around when it is switched on.
Do not touch, push or rub the surface with hard object.
When the surface becomes dusty, wipe gently with absorbent cotton or other soft materials
like chamois. Do not use acetone, toluene and acohol as it causes chemical damage to the
polarizer.
Wipe off saliva or water droplets as soon as possible. Long time contact with polarizar
causes deformations and colour fading.
Be careful of condensation at sudden temperature change. Condensation does damage to
polarizar or electrical contact parts. After condensation fades, smear or spot will occur.
Installation of the LCD TV on the wall should be carried out by qualified servicemen.
Improper and incorrect installation may render the set unsafe,
Safety information is located on the rear of the set. To read the safety information, you need
to open the VESA cover (see diagram below).
Open VESA cover
.
CAUTION
ATENCION
VERIFIQUE QUE EL VOLTAJE DE ALIMENTACION SEA EL
REQUIERIDO PARA SU APARATO
PARA EVITAR EL RIESGO DE CHOQUE ELECTRICO NO QUITE
LA TAPA. EN CASO DE REQUIERIR SERVICO, DIRIJASE AL
PERSONAL AUTORIZ ADO POR LA COMPANIA
RISK OF ELECTRIC SHOCK
DO NOT OPEN
ATTENTION
É
RISQUE DE CHOC ELECTRIQUE
NE PAS OUVRIR
PRECAUCION ADVERTENCIA
NO ABRIR
RIESGO DE CHOQUE ELECTRICO
Recycling Directive – To minimise harm to the environment, the batteries supplied
with the TV set do not contain mercury or nickel cadmium. If possible, when disposing of
batteries, use recycling means available to you.Your TV set uses materials which are reusable
or which can be recycled. To minimise the amount of waste in the environment, specialist
companies recover used sets for dismantling and collection of reusable materials (contact
your dealer).
3
LC04 pg 03
3
6/9/04, 7:14 PM
FUNCTIONS OF REMOTE CONTROL
& Standby button
Switch set off to standby mode. To switch on set from
standby mode, press Channel +/– or Digit (0 -9) button.
é Sound mode / 4 button
– In TV mode, it allows you to force programme in
Stereo and Nicam Stereo to Mono or to choose
between Dual5or Dual6. (The Mono indication
on the screen is red when in forced position).
– In Teletext mode, use for teletext functions (see
section on “Using the Teletext”).
“ AV button
– In TV mode, press button repeatedly to cycle
through the AV channels and select the required channel.
– In Teletext mode, use for teletext functions. (see
section on “Using the Teletext”).
‘ Screen Format button
– In TV mode, press button repeatedly to cycle through
the available screen formats channels and select the
desired screen format.
– In Teletext mode, use for teletext functions. (see
section on “Using the Teletext”).
( Mode / DVD buttons
–
Press one of the four buttons to
select TV PC, FM Radio or HD mode.
– In DVD mode, press these buttons to record (v),
rewind (s), stop (u) and play (q) a CD or DVD disc.
§ Active Control button
Optimises the picture quality depending on the quality
of the incoming signal and the ambient light conditions.
&
é
“
‘
(
§
è
!
ç
0
1
è Cursor buttons
The four segments function as the Left, Right, Up and Down
buttons for the selection and adjustment of menu items.
! Menu button
Displays and also exits menu on screen.
ç Volume + / – button
Increases or decreases volume.
0 Mute button
Mutes sound. To restore sound, press button again.
1 On-Screen Display (OSD) / Teletext button
– In TV mode, it displays information (programme number, sound
mode, time remaining on the timer, if any). Press and hold button for
5 seconds to display the programme number permanently on the
screen.
– In Teletext mode, press button to return to the main Index page.
4
FUNCTIONS OF REMOTE CONTROL
2 Picture-in-Picture (PIP)button
When in PC mode, you can call up a PIP window for the
PC. Likewise, when you are in PC mode, you can call up
a PIP window for TV (See section on “Using the PIP for
more information).
2
3
4
5
3 Mode Selector button
Press button repeatedly to select the required mode
(TV, DVD, AUX).The indicator lights up to display the
selected mode when the button is pressed.The indicator
switches off after about 20 seconds if left idle and
automatically return to TV mode.
4 Pixel Plus button / Fast Forward button
– In TV mode, press the button to display the Pixel Plus
demonstration mode. Pixel Plus feature offers the unique
combination of ultimate sharpness, increased depth
impression, true natural detail, brillioant and vivid
colours. It also offers a smooth and natural motion at
any time and from any source.
6
7
8
9
20
NOTE : Pixel Plus is applicable to
23PF9956 and 26PF9956 models only.
–
In DVD mode, it allows you to fast forward a VCD/
DVD disc.
5 Teletext / Pause button
– In TV mode, it allows you to access teletext mode.
– In DVD mode, it allows you nto pause the programme
you are watching.
6 Programme list / OK button
– In TV mode, it allows you to display a list of programmes
(see section on “Using the Programme Feature”).
– In DVD mode, it confirms selections and adjustments.
7 Channel + / – button
Allows you to select channels in ascending or descending
order.
8 Smart Sound and Picture button
Allows you to access and select the different types of s
sound and picture setting (see section on :Using the
Smart Sound and Picture feature”).
9 Digit (0 -9) buttons
Allows you select a channel. Note : For a 2-digit number,
the second digit must be entered before the “–” sign
disappears.
20
Sleep buttons
Allows you to select a time period after which the set
will switch to standby mode automatically. (see section
on “Using the Sleeptimer”).
5
LC04 pg 05
5
8/10/04, 3:57 PM
USING THE TV INSTALL MENU
ACCESSING THE TV MAIN MENU AND SUB-MENUS
Operating instructions generally explains the operation of the TV set
using the buttons on the remote control unless otherwise stated. Please
read the following instructions carefully and follow the steps as shown
to familiarise yourself with the installations and all features available in
your set.
The TV main menu allows you access to the Picture, Sound, Features, Install and Mode
menus.
Before you proceed to access the TV menus, familiarise yourself with these remote control
buttons which you will use very often. They are namely : MENU, CURSOR and On-Screen
Display (OSD) buttons.
MENU button
Cursor Up
Press this button to
enter the TV main menu.
You can also use this
button exit menu on the
screen.
Cursor
Right
Cursor
Left
Cursor Down
OSD button
Use this button to display
or exit screen information (channel number,
sound mode, time remaining on the timer, if
any). Press and hold button for five seconds to
display the channel
number permanently on
the screen.
CURSOR buttons
The four segments on the
button are the Cursor Up/
Down/Left/Right buttons.
Use these buttons to allow
you to select your required
menu item, make adjustments and also access the
sub-menus.
6
LC04 AP p06-10
6
4/16/04, 11:16 AM
SELECTING THE MENU LANGUAGE AND
AUTOMATIC INSTALLATION OF TV CHANNELS
The TV Install menu allows you access to the Language, Auto Store, Manual Store, Sort,
Name and Channel Edit functions.
Before you access the TV Install menu, ensure the set is in TV mode. If not, press the
button on the remote control to enter into TV mode.
(TV)
Step Press button
TV Menu
&
é
Enter the main menu.
Select Install.
Picture
• Brightness
Sound
• Colour
Features
Note : The shaded part of the Cursor
button indicates the area where you
should press.
“
Enter Install menu.
‘
Select your preferred language
(The menu language will now be in the
language you have selected).
• Contrast
Install
• Sharpness
Mode
• Hue
Install
Language
Auto Store É
Manual Store É
Sort É
Name É
Channel Edit É
Ñ
English
É
NOTE : IF you have selected the wrong language for one reason or another and do not
understand the language to operate the set, do the following to bring you back to your
preferred language :
– press the OSD button to quit the menu.
– press the MENU button to enter the main menu.
– press the CURSOR DOWN button repeatedly to highlight the fourth item on the menu
and press CURSOR RIGHT button to go into the Language menu.
– select your preferred language with the CURSOR LEFT or RIGHT buttons (the menu
will now appear in the chosen language). You can now proceed to install the TV channels
automatically.
Install
(
Select Auto Store.
Language
Auto Store É
Manual Store É
Sort É
Name É
Channel Edit É
§
Start automatic tuning of channels.
è
Exit menu from screen once the
automatic installation is completed,
7
Start
É
Auto Store
Channel É
TV É
Ñ
7
LC04 AP p06-10
Ñ
4/16/04, 11:17 AM
2
196.MHz
É
MANUAL TUNING OF TV CHANNELS
You can also choose to tune your TV channels. Manual tuning allows you to store each
programme manually.
Step Press button
Manual Store
Repeat Steps 1 to 3 as in “Automatic Installation
of TV Channels”
‘
(
§
è
Select Manual Store and enter
Manual Store menu.
Colour System is highlighted.
Select the appropriate colour system.
Select Sound System.
Select the appropriate sound system.
Note : If Auto is selected, the respective
colour and sound system will be
automatically selected according to the
transmission system.
!
Select Search to start manual tuning
of channels.Searching stops once a
transmitting channel is found.
ç
If the channel reception is not
satisfactory, select Fine Tune.
0
Adjust accordingly with the Cursor
Left or Right buttons. If reception is
good, proceed to select channel.
1
Select Channel.
2
Key in your desired channel number.
3
Auto
Ñ
É
É
É
É
Manual Store
Colour System É
Sound System
Auto Search É
Channel É
Fine Tune É
Store É
Auto
Ñ
Select Store.
Manual Store
Colour System É
Sound System É
Search
Channel É
Fine Tune É
Store É
Ñ
196.25MHz
É
Manual Store
Colour System É
Sound System É
Search É
Channel É
Fine Tune
Store É
2
Ñ
Colour System É
Sound System É
Search É
Channel
Fine Tune É
Store É
Ñ
8
É
Manual Store
Exit menu from screen.
8
É
7
Colour System É
Sound System É
Search É
Channel É
Fine Tune É
Store
Ñ
8
LC04 AP p06-10
É
É
Manual Store
Store channel. Note : If you want to
continue searching for another
transmitting channel, repeat steps 8 to 12.
4
Colour System
Sound System
Search
Channel
Fine Tune
Store
4/16/04, 11:17 AM
Store?
É
É
SORTING OF TV CHANNELS
This Sort function allows you to change channel number of your choice for a particular TV
station.
Step
Press button
Repeat Steps 1 to 3 as in “Automatic Installation of TV Channels”.
‘
(
Select Sort and enter sort mode
by the Cursor Right button.
Select the programme you want
to change channel number.
§
Enter sorting mode (The arrow
cursor now points to the left).
è
Select the new channel you want to
be exchanged.
!
ç
Activate sorting mode (The arrow
cursor points to the right and the
sorting is completed).
Exit menu from screen.
Install
Language É
Auto Store É
Manual Store É
Sort É
Name É
Channel Edit É
•
•
•
•
•
•
0
1
2
3
4
5
•
•
•
•
•
•
0
1
2
3
4
5
Ñ
Install
Language É
Auto Store É
Manual Store É
Sort É
Name É
Channel Edit É
É
NAMING OF TV CHANNELS
Naming function allows you to enter a name for any channel you select.
Step
Press button
Repeat Steps 1 to 3 as in “Automatic Installation of TV Channels”.
‘
Select Name and enter name mode
by the Cursor Right button.
(
Select the programme you want to
name.
§
è
!
ç
Enter naming mode.
Key in first character. To key in the
next character, press the
(Cursor right) button to move to
the next slot. (You can key up to a
maximum of 5 characters).
Store name. The name is now
indicated on the top left corner.
Install
Language
Auto Store
Manual Store
Sort
Name
Channel Edit
É
É
É
É
É
Language
Auto Store
Manual Store
Sort
Name
Channel Edit
É
É
É
É
É
É
É
Exit menu from screen.
9
2
Install
9
LC04 pg 09-10
Ñ
É
8/10/04, 4:01 PM
2
Ñ
Z
É
EDITING OF TV CHANNELS
This feature allows you to edit or skip channels have bad or weak TV signal or channels
that you do not watch often.
Note : Once a channel is skipped, you cannot have access to it by the CHANNEL + or –
button. You can only access the channel by the DIGIT (0 - 9) button.
Step
Press button
Repeat Steps 1 to 3 as in “Automatic Installation of TV Channels”.
‘
Install
Select Channel Edit.
Language
Auto Store
Manual Store
Sort
Name
Channel Edit
(
• Channel
• Skipped
É
É
É
É
É
É
Channel Edit
Enter Channel Edit menu.
§
Select the channel you want to skip.
è
Select Skipped.
!
Select On option to activate skipping
of channel. A “✗ “ sign will appear at
the top left hand corner indicating
channel is skipped.
ç
Exit menu from screen.
Channel
Skipped
Ñ
3
É
É
Channel Edit
Channel
Skipped
É
Ñ
On
É
How to restore skipped channels
• Repeat steps 1 to 6 as in “Editing of TV Channels”.
• Select the channel you want to unskip by the
button.
• Press the
(Cursor Up) or
(Cursor Down)
(Cursor Right) button to activate unskipping of channel.
• Exit menu from screen by the
(OSD) button.
10
LC04 pg 09-10
10
8/10/04, 4:01 PM
USING THE PICTURE AND SOUND SETTINGS
The Picture and Sound menus allow you to choose or make adjustments to the pictutre
and sound settings.
Step
Press button
Picture
&
Enter the main menu.
é
Select Picture or Sound.
“
Enter Picture or Sound menu.
‘
Select Picture or Sound item you
want to adjust.
(
Adjust Picture or Sound menu item.
Brightness
Colour
Contrast
Sharpness
Colour Temp
Ñ
É
É
É
Sound
Equalizer
Balance
AVL
Dolby Virtual
ÉÑ
1É
É
É
Picture menu items
Activities
Brightness
Increase or decrease brightness level.
Colour
Increase or decrease color level.
Contrast
Increase or decrease contrast level until lightest parts of the
picture show good detail.
Sharpness
Increase or decrease sharpness level to improve detail in the
picture.
* Hue
Increase or decrease colour intensity * Note : Hue is only
applicable to NTSC programmes. The Hue item will not appear
on the menu if programme is in PAL mode.
Colour Temperatue
Allows you a choice of 3 picture settings : Normal (balanced),
Warm (redder) and COOL (bluer).
Sound menu items
Activities
Equalizer
Allows you to select a sound tone from 120 Hz (Bass) to 10KHz
(Treble).
Balance
Increase or decrease to adjust balance level on the left and right
speakers.
AVL (Auto Volume
Leveller)
Selecting the “On” option will limit increase in volume especially
during programme change or commercial breaks.
Dolby Virtual
Allows you to select between Stereo and Dolby Virtual when
transmission is in stereo and Spatial and Mono sound when
transmission is in mono.
11
LC04 pg 11
38É
É
11
8/10/04, 4:02 PM
USING
THE
TIMER
The Timer feature allows you to set the timer to switch to another channel at a specified
time while you are watching another channel. For the timer to function, the set must not be
switched off. Once the set is switched off, the timer is disabled.
& Press
(Menu) button to enter the main menu.
é Press
(Cursor Down) button to select Features.
“ Press
(Cursor Right) button to enter Features
menu.
‘ Press
Features
• Time
• Start Time
• Stop Time
• Channel
• Activate
Timer
Child Lock
Contrast+
NR
PIP
É
É
É
É
(Cursor Right) button to enter Timer menu.
Use the Menu and Cursor Up, Down, Right and Left buttons to access the Timer menu items.
make the following adjustments or activate the timer.
Time
Start Time
Stop Time
: Key in the current time to enable
functioning of the timer feature.
: Key in the time you want the channel
to be switched on.
: Key in the time you want the program
to be switched off.
Timer
Time
Start Time
Stop Time
Channel
Activate
Display
Ñ
––:––
É
É
É
É
É
É
Timer
Channel
: Key in the channel number you want
to switch to.
Time
Start Time
Stop Time
Channel
Activate
Display
É
É
É
É
Ñ
2
É
É
É
Timer
Activate
Display
: Select between the Once and Daily
mode to activate the timer.
: Select the On option to display
current time on screen.
Time
Start Time
Stop Time
Channel
Activate
Display
É
É
É
É
É
12
Once
É
Timer
Time
Start Time
Stop Time
Channel
Activate
Display
É
É
É
É
É
É
12
LC04 AP p11-16
Ñ
É
4/15/04, 3:05 PM
Ñ
On
É
USING THE CHILD LOCK
The Child Lock feature allow you to lock channels to prevent your children from watching
programmes you deem undesirable.
How to Access the Child Lock menu
Step
Press button
&
Enter the main menu.
é
Select Features..
“
Enter Features menu..
‘
Select Child Lock.
(
§
TV Menu
Picture
Sound
Features
Install
Mode
•
•
•
•
•
Timer
Child Lock
Contrast+
NR
PIP
TV Menu
Timer
Child Lock
Contrast+
Install
Mode
Enter Child Lock mode.
Key in access code 0711.A message
Incorrect will appear. Key in access
code 0711 a second time. It will then
prompt you to change code.
É
Access Code
É
É
Ñ
––––
É
É
É
TV Menu
Timer
Child Lock
Contrast+
Install
Mode
É
Access Code
É
É
Ñ
****
É
É
É
TV Menu
è
!
Key in access code of your choice.
Confirm new access code.
Once the new code is confirmed, the
Child Lock menu will appear. If you
want to activate locking of channels,
you can proceed to the next page
for information on how to use the
various locking options. If not, press
button to exit menu from screen.
Timer
Child Lock
Contrast+
Install
Mode
É
Change Code
É
É
Ñ
****
É
É
É
TV Menu
Timer
Child Lock
Contrast+
Install
Mode
É
Confirm Code
É
É
É
Ñ
****
Confirmed
É
É
Note : If you exit menu from screen and enter child lock menu again, you need to key the new
access code only once. If you have forgotten the new access code, repeat steps 4 to 8.
13
LC04 pg 13
13
8/10/04, 4:04 PM
USING THE CHILD LOCK
The Child Lock menu allows you to : lock Individual or All TV channels, lock HD (High
Definition) channel, change Access Code and clear Individual or All TV channels.
Repeat Steps 1 to 5 as in “Using the Timer” and key in access code by the
(Digit 0 - 9) buttons.
In the Child Lock menu, use the Menu and Cursor Up / Down / Right and Left buttons
to access and activate the Child Lock functions.
Lock Channel : Press
button to enter channel lock
mode. Use
buttons to select channel
to lock or unlock channel and
buttons
to lock or unlock selected channel. Once
a channel is locked, a keylock symbol (F)
will appear beside the channel number.
Press the
button to exit from
Lock Channel mode and return to
Child Lock menu.
Child Lock
Lock Channel
Lock HD
Change Code
Clear All
Lock All
8
Ñ
É
F
É
É
É
É
Child Lock
Lock HD
: Use the
button to select On or Off
option to lock or unlock HD channel.
Change Code : Press
button to enter change code
mode. Key in the access code of your
choice by the Digit 0 - 9 buttons. Key
new access code a second time to
confirm.
Lock Channel
É
Lock HD
Change Code É
Clear All É
Lock All É
Ñ
On
É
Child Lock
Lock Channel
Lock HD
Change Code
Clear All
Lock All
New Code
É
É
Ñ
––––
É
É
É
Child Lock
Clear All
Lock All
: Press the
button to clear all channels.
: Use the
button to lock all channels.
Lock Channel
Lock HD
Change Code
Clear All
Lock All
É
É
É
Ñ
É
É
É
É
Ñ
14
14
É
Child Lock
Lock Channel
Lock HD
Change Code
Clear All
Lock All
LC04 AP p11-16
Clear?
É
4/15/04, 3:05 PM
On
É
USING THE CONTRAST+ AND NOISE REDUCTION FEATURE
The Contrast+ feature allows you to optimise the total contrast of the picture for improved
picture visibility. The NR (Noise Reduction) feature allows you to improve “noisy” picture (little
dots on picture) due to weak signal transmission. Select the “On” option to activate this
Contrast+ or Noise Reduction feature.
& Press
(Menu) button to enter the main menu.
é Press
(Cursor Down)) button to select Features.
“ Press
(Cursor Right) button to enter Features.
‘ Press
(Cursor Right) button to select Contrast+
or NR (Noise Reduction).
( Press
TV Menu
Picture
Sound
Features
Install
Mode
•
•
•
•
•
Timer
Child Lock
Contrast+
NR
PIP
Features
Timer
Child Lock
Contrast+
NR
PIP
Ñ
On
É
Ñ
On
É
Features
(Cursor Left/Right) button to toggle
toggle between On and Off options. Select On
option to activate feature.
§ Exit menu from screen by the
PIXEL PLUS FEATURE
button.
Timer
Child Lock
Contrast+
NR
PIP
Applicable to 23PF9956 and 26PF9956
models only.
This LCD TV comes with a unique feature known as the Pixel Plus. Pixel Plus feature offers
the unique combination of ultimate sharpness, increased depth impression, true natural detail,
brilliant and vivid colours. It also offers a smooth and natural motion at any time and from any
source. To allow you to see this unique feature, do the following :
(Pixel Plus) button on the remote
& Press
control. A Pixel Plus demonstration will appear
on the screen. The left hand side of the screen
shows the picture without the Pixel Plus
enhancement while the right hand side shows
the picture with the Pixel Plus enhancement.
Pexel Plus Demo
Pixel Plus Demo
Off
é Press
(Pixel Plus) button to exit the
Pixel Plus demonstration from the screen.
15
LC04 pg 15
15
6/10/04, 1:41 PM
On
USING THE PIP (PICTURE-IN-PICTURE) FEATURE
The feature allows you call up a PIP (Picture-in-Picture) window of the PC. For the PIP to
function, the DVI input of the LCD TV must be connected to the DVI output of the PC (see
Quick Guide for connection).
Features
& Press
button to enter the main menu.
é Press
button repeatedly until Features is selected.
“ Press
button to enter Features menu.
‘ Press
button repeatedly until PIP is selected.
PIP Size
Horizontal
Vertical
button to select your desired PIP size
§ Press
options, namely : Off, Small, Medium, Large or
Side-by-Side.You can also choose to move the PIP
window (Small, Medium or Large) horizontally or
vertically from top to the bottom to your desired
position.
Time
Start Time
Stop Time
Channel
Activate
Ñ
Off
É
É
PIP Size É
Horizontal Ñ
Vertical É
1É
PIP
PIP Size É
Horizontal É
Vertical Ñ
button
ç To exit PIP window from screen, press
repeatedly
until PIP Size is highlighted. Press
until Off option is selected.
NOTE
You can also access the PIP window directly via the
• Press the
button to display the PIP window.
É
PIP
button to select Horizontal or Vertical.
! Press
button to move PIP window horizontally
or vertically.
•
•
•
•
•
PIP
button to enter PIP menu.
( Press
PIP Size is highlighted.
è Press
Timer
Child Lock É
Contrast+ É
NR É
PIP É
1É
PIP
PIP Size
Horizontal
Vertical
Ñ
Off
É
É
É
(PIP) button on the remote control.
• Press the
button repeatedly to toggle through the various PIP window sizes and select
your desired PIP wndow size.
buttons to move your PIP window horizontally or vertically.
• Use the
16
LC04 pg 16
16
7/5/04, 3:02 PM
USING THE MODE FEATURE
This LCD TV also offers the use of your TV as a FM Radio, PC monitor and a High Definition
TV. The Mode feature allows you to switch from TV mode to FM Radio, PC or HD mode to
access the benefits in the chosen mode. Note : For the FM Radio, PC or HD to function, the
appropiate and right connections must be made (refer to Quick Guide on connections).
& Press
TV Menu
button to enter main menu.
• TV
• FM Radio
• PC
• HD
Picture
Sound
é Press
Features
button repeatedly until Mode is selected.
Install
É
É
É
Mode
“ Press
button to enter Mode menu.
‘ Press
button select the mode you want to
TV Menu
• TV
• FM Radio
• PC
• HD
Picture
Sound
switch to.
Features
Install
( Press
É
É
É
Mode
button to activate the change of mode.
USING THE SLEEPTIMER
Sleeptimer function allows you to select a time period (15 minutes increment up to 60 minutes,
followed by 30 minutes increment up to 90 minutes and then 60 minutes increment up to 240
minutes) in which the set will switch to standby mode automatically upon reaching the selected
time period. You can also choose the Sleep Off option to switch off Sleeptimer function.
1. Press the
(SLEEPTIMER) button to display
the time period.
2. Press the
(SLEEPTIMER) button repeatedly to
cycle through the various time periods and select the
your desired time period.
Sleep Off
➠
Sleep 15
OR
Note
• During the last minute of a Sleep time setting, an on-screen
countdown will be displayed. Pressing any button on the remote
control during the countdown will cancel the Sleep-timer.
• During the last 10 seconds of a Sleep timer setting, the word
“Goodbye” will be displayed on the screen.
Sleep 30
OR
Sleep 45
OR
Sleep 60
OR
Sleep 90
OR
Sleep 120
OR
Sleep 180
OR
Sleep 240
17
LC04 AP p17-22
17
4/16/04, 10:52 AM
USING THE SCREEN FORMATS
Screen Format function allows you a choice of different formats for your viewing pleasure,
namely : - 4:3, Zoom 14:9, Zoom 16:9, Subtitle Zoom, Super Zoom, Widescreen and
Full Screen.
Press the
(Screen Format) button repeatedly to cycle through the various screen
formats and select the format of your choice.You can also use the
(Cursor Left/Rght)
buttons to cycle through the various screen formats.
Definition of Screen Formats
4:3 Mode
This picture is reproduced in 4:3 format and a black band is displayed
on either side of the picture.
Zoom 14:9 Mode
This picture is enlarged to 14:9 format, a thin black band remains on
both sides of the picture.
Zoom 16:9 Mode
This picture is enlarged to 16:9 format. This mode is recommended
when displaying pictures which have black bands at the top and bottom
(letterbox format).
Subtitle Zoom Mode
This mode is use to display 4:3 pictures using the full surface of the
screen leaving the subtitles visible.
Super Zoom Mode
This mode is use to display 4:3 pictures using the full surface of the
screen by enlarging the sides of the picture.
Widescreen Mode
This mode restores the correct proportions of pictures transmitted
in 16:9 using full screen display.
Note : If you display a 4:3 picture in this mode, it will be enlarged
horizontally.
Full Screen
Select this mode when displaying pictures have black bands at the top
and bottom or at the left and right to enable you to enjoy full display
of the picture on the screen.
18
LC04 AP p17-22
18
4/16/04, 10:52 AM
USING THE PROGRAM LIST FEATURE
Program List feature allows you to an overview of the listing of all the installed TV channels
and at the same time to let you select the channel you want to watch.
& Press
(Program List) button to display the list
of the installed TV channels
Program List
Ñ
é Press
button to scroll through the list of channels
and select the channel you want to watch.
“ Press
2
3
4
5
5
Program List
button to switch to your selected channel.
‘ Press
É
button to exit menu from screen.
Ñ
2
3
4
5
5
É
USING THE ACTIVE CONTROL FEATURE
This feature automatically adjust the picture setting for optimal picture quality continuously
under any signal conditions. You can select the Active Control On mode or the Active
Control On With Sensor mode.
If Active Control On With Sensor mode is selected, the sensor will sense and adjust picture
setting according to the lighting conditions of the room.
You can also select to Active Control Off mode to switch off Active control function.
& Press the
ACTIVE
CONTROL
(ACTIVE CONTROL)
button repeatedly to cycle through the various
Active Control modes and select your desired
mode.
Active Control
Off
OR
é Press
button to exit menu from screen.
Active Control
On
OR
Active Control
19
LC04 AP p17-22
19
4/16/04, 10:52 AM
On With Sensor
USING THE TV SMART PICTURE AND SOUND FEATURE
Smart Picture feature offers you a choice of 5 picture settings, namely, Rich, Natural, Soft,
DVD/VCD and Personal.
Smart Sound feature offers you a choice of 4 sound settings, namely, Theatre, Music,Voice
and Personal.
Press
(Smart Picture) or
(Smart Sound) button repeatedly to cycle
through the settings to select your desired mode.
Definition of Picture Settings
Personal
: Picture settings are set to your
preference.
Rich
: Emphasize very vibrant colours.
(Suitable for AV mode in
brightly-lit room)
: Emphasize original colours.
Natural
Soft
DVD/VCD:
: Emphasize “warm” colours.
(Suitable for dimly-lit room
condition and gives cinema-like
effect when light is switched off).
Emphasize “soft” colours. (Suitable
for playing computer games,
surfing, etc.)
Personal
OR
Rich
OR
Natural
OR
Soft
OR
DVD/VCD
Note : The Personal setting is the setting that you set up using the Picture menu in the main
menu. This is the only setting in the Smart Picture settings that can be changed. All the other
settings are pre-set at the factory.
Definition of Sound Settings
Personal
Theatre
: Sound settings are set to your
preference.
: Emphasize sensation to action.
(Bass and Treble boosted)
Personal
OR
Theatre
Music
: Emphasize low tone. (Bass boosted)
Voice
: Emphasize high tone. (Treble boosted)
OR
Music
OR
Voice
20
LC04 AP p17-22
20
4/16/04, 10:52 AM
USING THE TELETEXT
If a TV channel broadcast contains teletext information, each channel that broadcasts
teletext transmits a page (index page) with information on how to use the teletext system,
usually on page 100. The system transmitted is indicated in the option line at the bottom
of the screen.
§
‘
& On/Off teletext
and
Superimpose
teletext page
over TV
programme
Press the button once to switch on
teletext display. (Select a channel in
which teletext is being transmitted).
Press the button the second time to
superimpose the teletext page over
the TV programme.
Press the button the third time
to exit teletext mode.
é Selecting a
teletext page
Key in the required teletext page
(3 digits). The page number is
displayed at the top left hand corner
of the screen. When the teletext
page is located, the counter stops
searching. If the counter keeps
searching, it means that the page is
not available for selection. If you
make a mistake in keying the page
number, you have to complete
keying the 3-digit number before
re-keying the correct page number.
“ Accessing
a teletext
page
Press the CHANNEL + button to
display the next page and the
CHANNEL – button to
display the previous page.
‘ Direct Access to
an item or
corresponding
pages
The 4-colour buttons allow you to
access directly an item or
corresponding pages.
( Main Index
Press the button to return to the
main index page.
§ Dual Page
Text
Press button to display or exit dual
page text mode. The active page is
displayed on the left and the
following page is displayed on the
right. Press
( Hold) button if you
want to hold a page (contents page).
The active page is now displayed on
the right. To return to normal mode,
press
( Dual page / 4) button.
&
“
é
(
21
LC04 pg 21
21
USING THE TELETEXT
è
Hold
When a dual page is displayed, use this
button to toggle between the dual
page. Once an active page is selected,
the other page will be on hold mode.
If the page has sub-pages, use the
Cursor Right or Left button to
access the next or previous page
!
Reveal/
Conceal
Press the button once to reveal hidden
information (solutions to puzzles,
riddles, etc). Press the button the
second time to conceal information.
This button is applicable only to
teletext page with puzzles, riddles, etc.)
!
è
How to select your favourite page
This feature allows you select 4 of your favourite or most commonly viewed page and stored
them in the favourite page selection. You can then access directly your favourite page by the
colour buttons without having to key in the page number.
1. Press the
(Teletext On/Off) button to enter teletext mode.
2. Press the
(MENU) button to enter favourite page selection. Note : The colour
alphabets at the bottom of the screen is now changed to page numbers.
3. Key in your favourite page by the
1
2
4
5
6
8
9
7
0
3
(Digit 0 -9) buttons.
4. Press the
(OSD/Index) button followed by your desired colour button to store
your favourite page.
5. Repeat step 3 to 4 to select and store other favourite pages.
6. To exit Favourite page mode, press
7. Press the
(MENU) button.
(Teletext On/Off) button twice to exit teletext mode.
22
LC04 pg 22
22
6/10/04, 5:47 PM
USING THE LCD TV AS A FM RADIO
This LCD TV also provides you an FM Radio for your listening pleasure. Connect the radio
aerial lead to the FM Antenna socket located at the bottom of the TV.
Selecting the FM Radio Mode
Radio Menu
Press the
(FM Radio) button on the remote control
to change from the existing mode (TV/PC/HD) to FM Radio
mode. To return to TV mode, press the
(TV) button.
Picture
Sound
Features
Install
Mode
Accessing the FM Radio Menus
& Press the
(MENU) button to enter the FM
Radio main menu.
é Use the
(Cursor Up/Down/Left/Right)
buttons to select, adjust or activate menu items.
NOTE : Picture menu is not applicable for FM Radio.
The other menus (Sound/Features/Install/Mode)
work in exactly the same way as the TV menus.
Installing the FM Radio Stations
Using the MENU button, enter the FM Radio main menu.
Use the Cursor Up/Down/Left/Right buttons to select,
adjust or activate menu items. The Install menu comprises
the following items, : Language, Auto Store, Manual
Store, Sort and Name.
Language : Allows you to select your preferred language
to view the on-screen menu in the selected language.
Auto Store : Allows you to install the FM Radio stations
automatically (complete search).
Manual Store : Allows you to install the FM Radio
stations manually (station for station search).
Sort : Allows you to change the channel number to
another channel number for a particular radio station.
Name : Allows you to enter a name for any FM Radio
channel you select.
Note : Once the FM Radio stations are installed, use
the Digit (0 - 9) or CHANNEL + / – buttons to
access the radio stations.
Install
Language
Auto Store É
Manual Store É
Sort É
Name É
Channel Edit
23
English
Ñ
É
Install
Language
Auto Store É
Manual Store É
Sort É
Name É
Channel Edit
Start
Ñ
É
Manual Store
Colour System
Sound System
Search
Channel É
Fine Tune
Store É
Ñ
196.25MHz
É
Manual Store
Language É
Auto Store É
Manual Store É
Sort É
Name É
Channel Edit
•
•
•
•
•
•
0
1
2
3
4
5
Ñ
Manual Store
Language É
Auto Store É
Manual Store É
Sort É
Name É
Channel Edit
23
LC04 AP p23-30
• Equaliser
• Balance
• AVL
• Dolby Virtual
4/16/04, 10:56 AM
Ñ
2
É
USING THE LCD TV AS A FM RADIO
Using the FM Radio Sound Settings
The Sound menu allows you to choose or make
adjustments to the sound settings. The menus work
in exactly the same way as the TV menus.
Use the MENU and Cursor Down buttons, enter the
FM Radio main menu and select Sound.
Use the Cursor Up/Down/Left/Right buttons to select,
adjust or activate sound menu items. The Sound menu
comprises the following items : Equalizer, Balance,
AVL and Dolby Virtual.
Sound
Equalizer
Balance
AVL
Dolby Virtual
•
•
•
•
•
É
É
É
120 Hz
500 Hz
1500 Hz
5 KHz
10 KHz
Using the Features Items
In the Features menu, you have access to the Timer
and the Screensaver function. The Timer menu works
in exactly the same way as the TV menu. As for the
Screensaver function, select the “On” option to activate
the Screensaver mode. Once activated, the time, the
frequency of the station and the name (if available) will
be displayed in motion on the screen.
Features
Timer É
Screensaver
On
Ñ
Radio Menu
Using the Mode feature
In the Mode menu, it allows you to switch from
FM Radio mode to TV, PC or HD mode to access the
benefits in the chosen mode. The Mode menu works
in exactly the same way as the TV menu.
Picture
Sound
Features
Install
Mode
•
•
•
•
Using the Smart Sound feature
You have a choice of five musical modes : Personal,
Classical, Jazz, Pop and Rock. Except for Personal,
the other musical modes are pre-determined in the
factory. The way you select the desired frequency is
the Sound menu is the Personal mode.
Personal
OR
Classical
OR
Jazz
OR
Pop
OR
Rock
24
LC04 pg 24
É
24
8/10/04, 4:05 PM
TV
FM Radio
PC
HD
É
É
É
USING THE LCD TV AS A PC MONITOR
This LCD TV also be used as a PC Monitor. For the PC mode to function, connect the VGA
cable if your PC has only analogue option and the DVI cable if our PC has only digital option
(refer to Quick Guide for connection).
Selecting the PC Mode
Press the
(PC) button on the remote control to change from the existing mode (TV/FM
Radio/HD) to PC mode. To return to TV mode, press the
(TV) button.
Accessing the PC Menus
& Press the
(MENU) button to display the
PC Mode
(Cursor Up/Down/Left/Right)
buttons to select, adjust or activate PC menu
items, namely : Picture, Audio Selection,
Features, Reset to Factory and Mode.
Audio Selection
PC main menu.
• Brightness
• Contrast
• Horizontal
• Vertical
• Colour Temp.
Picture
é Use the
Features
Reset to Factory
Mode
Using the Picture Settings
Use the Cursor Up/Down/Left/Right buttons to
select, adjust or activate picture menu items., namely :
– Brightness/Contrast : allows you to adjust the
brightness and contrast.
– Horizontal/Vertical : allows you to adjust the
horizontal and vertical placing of the image.
Picture
Brightness
38
Ñ
Contrast É
Horizontal É
Vertical É
Colour Temp. É
NOTE : Horizontal and Vertical features
are only applicable when the PC is connected
via the VGA cable.
– Colour Temp. : allows you three options of
different colour temperature of the picture,
namely : Cool (blue white), Normal (balanced)
or Warm (red white).
Using the Audio Selection feature
Use the Cursor Left/Right buttons, select the
sound (TV,FM Radio or PC/ HD) you want to
reproduce on the TV . For example, you can listen
to the radio while you are using the computer.
Note : You cannot listen to the radio when you
display the PIP (Picture-in-Picture) screen.
PC Mode
Picture
Audio Selection
Features
Reset to Factory
Mode
25
LC04 AP p23-30
25
4/16/04, 10:56 AM
Ñ
Radio
É
É
USING THE LCD TVAS A PC MONITOR
Using the Features Items
Use the Cursor Up/Down/Left/Right buttons to select, adjust or activate picture menu
items, namely : Phase, Clock, Format, PIP and Auto Adjust.
Phase/Clock : allows you to eliminate the horizontal
(Phase) and vertical (Clock) interfering lines.
Format : allows you to choose between Full Screen
or the Native (original) format of the PC screen.
PIP : allows you to display a PIP window for the TV, See
below for more information on the use of this feature.
PC Mode
Picture
Audio Selection
Features
Reset to factory
Mode
Auto Adjust : allows you to adjust and set the position of
the image automatically. Press the Cursor Right button to
start adjustment. Once adjustment is completed, it will
prompt you to store adjustment. Use the Cursor Up/Down
buttons to select “Yes” option and press Cursor Right
button to store adjustment.
•
•
•
•
•
Phase
Clock
Format
PIP
Auto Adjust
Features
Phase
Clock
Format
PIP
Auto Adjust
3É
Ñ
NOTE : Phase, Clock and Auto Adjust features are only
applicable when the PC is connected via the VGA cable.
Using the PIP in the Features menu
You can display a PIP window to watch TV programme at
the same time. This feature is only applicable when the
computer is connected to the DVI input.
Use the Cursor Up/Down buttons to select the items (PIP
Size, Horizontal Size, or Vertical) you want to adjust.
PIP
PIP Size
Horizontal
Vertical
Ñ
Off
É
É
É
Use the Cursor Left/Right buttons to select your preferred
PIP screen size (Small, Medium, Large or Side-by-Side)
or to move the PIP screen horizontally, vertically or side-by-side).
To switch off PIP screen, select “Off” option in the PIP Size menu.
Configure the computer on 1024 x 768, 60 Hz for optimum resolution. If you use another resolution,
the PIP function may not work. In this case, a warning message is displayed on the screen.
Here is the list of different resolutions available on your TV.
640 X 350, 70HZ
640 X 350, 85HZ
640 X 480, 60HZ
640 X 480, 67HZ
640 X 480, 72HZ
640 X 480, 75HZ
640 X 480, 85HZ
720 X 400, 70HZ
720 X 400, 85HZ
800 X 600, 56HZ
800 X 600, 60HZ
800 X 600, 72HZ
800 X 600, 75HZ
800 X 600, 85HZ
800 X 624, 75HZ
1024 X 768, 60HZ
1024 X 768, 70HZ
1024 X 768, 75HZ
1024 X 768, 85HZ
1152 X 864, 75HZ
1280 X 960, 60HZ
1280 X 1024, 60HZ
1280 X 1024, 75HZ
26
LC04 pg 26
26
7/3/04, 5:17 PM
USING THE LCD TV AS A PC MONITOR
Using the Reset to Factory Feature
This feature allows you to reset the TV settings to the factory settings.
Use the Cursor Up/Down buttons to select
Reset to Factory.
PC Mode
Picture
Use the Cursor Right button to enter Reset to Factory
mode and press the Cursor Up/Down button to select
Yes or No option. If Yes option is selected, press the
Cursor Right to activate reset mode.
Audio Selection
Features
Reset to Factory
Reset
Ñ
Mode
Yes
É
No
Using the Mode Feature
This feature allows you to switch from PC mode to TV, FM Radio or HD mode.
Use the Cursor Up/Down buttons to select Mode.
Use the Cursor Right button to enter Mode menu and
press the Cursor Up/Down button to the mode you want
to switch to. Press Cursor Right button to activate the
change of mode.
PC Mode
Picture
Audio Selection
Features
Reset to Factory
• TV
• FM Radio
• PC
• HD
É
É
É
Mode
USING THE HD (HIGH DEFINITION) MODE
This LCD TV also provides you HD facility to enjoy clearer and sharper pictures through the
VGA inputs if you ar using a High Definition receiver/equipment that can transmit high definition
programming.
Press the
(HD) button on the remote control to
change from the existing mode (TV/PC/HD) to HD mode.
Except for the absence of the Install function, all menu
items in the HD main menu, namely : Picture, Sound,
Features and Mode are the same as TV menu items
and work in exactly the same way as the TV main menu.
HDMenu
Picture
• Brightness
Sound
• Colour
Features
• Sharpness
Mode
• Hue
Using the MENU button, enter the HD main menu.
Use the Cursor Up/Down/Left/Right buttons to
select, adjust or activate menu items.
27
LC04 AP p23-30
27
• Contrast
Install
4/16/04, 10:57 AM
BEFORE CALLING SERVICE
Below is a list of frequently occurred symptoms. Before you call for service, make these simple
checks. Some of these symptoms can easily be rectified if you know what to do.
Symptom
What you should do
No power
• Check the TV’s AC power cord is plugged into the mains
socket. If there is still no power, disconnect plug. Wait for
60 seconds and re-insert plug. Switch on the TV again.
No picture
• Check the antenna connection at the rear of the TV.
• Try another channel to confirm whether it is a particular
TV station problem or otherwise.
Good picture
but no sound
• Try increasing the volume.
• Check that the sound is not muted. If it is muted, press the
Mute button on the remote control to restore sound.
Good sound but poor
colour or no picture
• Try increasing the contrast and brightness setting.
Snowish picture and noise
• Check antenna connection at the rear of the TV.
Horizontal dotted lines
• Possible electrical interference e.g. hairdryer, vacuum cleaner,
etc. Switch off appliances.
Double images or
“Ghost” images
• Possible poor positioning of antenna. Using a highly directional
antenna may improve reception.
TV not responding to
remote control handset
• Aim remote control handset directly at remote control sensor
lens on the TV.
• If still not responding, check whether plastic insulation sheet
is removed and the battery is not placed correctly (words on
battery facing you).
• Try changing the battery.
Incorrect Display position
(PC mode)
• Adjust the image position using the Horizontal Position and/or
Vertical Position in the PC Mains Controls menu.
No Video Input
(PC Mode)
• Make sure the monitor cable is properly connected to the PC
input (VGA/DVI) at the bottom of the TV.
• Check whether the monitor cable has bent pins.
Vertical flicker appears
(PC Mode)
• Try eliminating the vertical bars by using the Clock Adjustment
Adjustment of Video Noise in the Main PC Menu.
Horizontal flicker appears
(PC Mode)
• Try eliminating the horizontal bars by using the Phase.
Adjustment of Video Noise in the Main PC Menu.
Screen too bright or dark
(PC Mode)
• Try adjusting the contrast and brightness in the Main Menu.
Cannot access FM radio
(FM Radio Mode)
• Check whether the connection from FM Antenna socket to
the FM Radio mains is done correctly.
28
LC04 AP p23-30
28
4/16/04, 10:57 AM
SPECIFICATIONS
17PF9946
23PT9946 / 23PT9956
Picture tube screen size
450 mm
590 mm
660 mm
Audio Output :
2 x 3W
2 x 5W
2 x 5W
TV System
26PF9946 / 26PF9946
NTSC M (3.58 – 4.5)
NTSC (4.43 – 5.5)
PAL B/G
PAL D/K
PAL I
SECAM B/G
SECAM D/K
SECAM K1
Playback System
NTSC 3.58, NTSC 4.43, PAL 60
Set Dimensions :
Width
Depth
Height
Net Weight of set with
stand (approximate )
528 mm
375 mm
240 mm
690 mm
433 mm
240 mm
788 mm
504 mm
270 mm
6 kg
11.2 kg
15 kg
Note
Open the Connector Cover at the rear of the set for
information on the Operating Voltage, Frequency, Power
Consumption and Version Number.
Ñ
29
AP p29
29
6/10/04, 7:06 PM
3139 125 32702