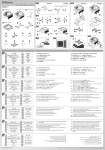
1
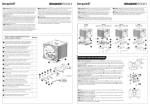
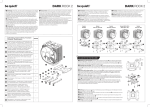
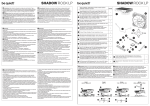
Introduction: Many thanks for choosing to purchase a be quiet! product. These instructions will assist you in the installation process. Should you encounter any difficulties during the installation, please contact our customer services by mailing [email protected]. Please note that be quiet! can accept no liability for damage arising from compatibility problems. Einleitung: Vielen Dank, dass Sie sich für ein be quiet! Produkt entschieden haben. Diese Anleitung wird Ihnen beim Installationsprozess behilflich sein. Sollten bei der Installation Schwierigkeiten auftreten, kontaktieren Sie bitte unseren Kundenservice unter [email protected]. be quiet! kann keinerlei Haftung für durch Kompatibilitätsprobleme bedingte Schäden übernehmen. Introduction : Merci d'avoir choisi un produit be quiet!. Pour effectuer le montage de votre ventirad dans les meilleures conditions, nous vous invitons à suivre les instructions ci-dessous. Si toutefois vous rencontriez des difficultés, vous pouvez contacter notre service après-vente à l'adresse suivante : [email protected]. Nous vous rappelons que la responsabilité de be quiet! ne peut être engagée dans le cadre de dommages résultant de problèmes de compatibilité. Warranty: • 3-years manufacturer guarantee for consumers (original purchase from authorised be quiet! dealers only). • Guarantee work can only be processed with an included copy of the purchase receipt from an authorised be quiet! dealer. • Manipulation of any kind, structural changes of any kind as well as damages through external mechanical forces lead to a complete voiding of the guarantee. • Our General Warranty Conditions apply, which can be viewed on the Internet on www.bequiet.com. Listan GmbH & Co.KG . Biedenkamp 3a . 21509 Glinde . Germany For further information, you can contact us via e-mail: [email protected] Garantie: • 3 Jahre Herstellergarantie für Endkonsumenten (nur Ersterwerb vom autorisierten be quiet! Händler), ab Datum des Kaufbelegs. • Eine Garantieabwicklung ist nur in Verbindung mit einer beigefügten Kopie des Kaufbeleges eines autorisierten be quiet! Händlers möglich. • Manipulationen jeglicher Art, bauliche Veränderungen jeglicher Art, sowie Beschädigungen durch äußere mechanische Einwirkungen führen zum totalen Garantieverlust. • Es gelten unsere Allgemeinen Garantiebestimmungen, die Sie unter www.bequiet.com im Internet abrufen können. Listan GmbH & Co. KG . Biedenkamp 3a . 21509 Glinde . Deutschland Für weitere Unterstützung erreichen Sie uns via E-Mail: [email protected]. Garantie : • 3 ans de garantie constructeur pour le client final (uniquement pour un premier achat auprès d’un distributeur be quiet! agréé). • La prise en charge de la garantie est assujettie à la fourniture d'une copie de la preuve d’achat auprès d’un distributeur be quiet! agréé. • Les manipulations, les modifications de construction de tout type ainsi que les dommages causés par des actions mécaniques extérieures entraînent la perte totale de la garantie. • Les conditions détaillées de garantie peuvent être consultées sur le site web www. bequiet.com dans la rubrique Service/Conditions de garantie. Listan GmbH & Co.KG . Biedenkamp 3a . 21509 Glinde . Allemagne Si vous avez des questions sur nos produits, veuillez nous contacter par mail à l'adresse suivante : [email protected] Wprowadzenie: Dziękujemy, że zdecydowali się Państwo na zakup produktu marki be quiet!. Niniejsza instrukcja pomoże Państwu w procesie instalacji. W razie trudności podczas instalacji można się z nami skontaktować mailowo pod adresem [email protected]. W przypadku pytań nasz dział obsługi klienta jest do Państwa dyspozycji. Firma be quiet! nie ponosi odpowiedzialności za uszkodzenia spowodowane problemami z kompatybilnością. Introducción: Muchas gracias por haber elegido un producto de calidad de be quiet! Estas instrucciones le ayudarán en el proceso de instalación. Si se topase con dificultades durante la instalación, contacte con nuestro servicio de atención al cliente a través de [email protected]. Recuerde que be quiet! no asume ninguna responsabilidad por los daños debidos a problemas de compatibilidad. Введение: Спасибо за выбор в пользу be quiet!. Инструкция поможет вам в процессе установки. Если возникнут трудности при установке, пожалуйста свяжитесь с нашей службой поддержки с помощью электронной почты ([email protected]). Обратите внимание, что be quiet! не несет oтветственности за повреждения, возникшие из-за проблем совместимости. Gwarancja: • Trzy lata gwarancji producenta dla klienta końcowego (tylko pierwszy zakup u autoryzowanego dystrybutora be quiet!). • Rozpatrzenie gwarancji jest możliwe jedynie na podstawie dołączonej kopii dowodu zakupu u autoryzowanego dystrybutora be quiet!. • Jakiekolwiek manipulacje i zmiany w budowie, jak również uszkodzenia powstałe w wyniku mechanicznych działań zewnętrznych prowadzą do całkowitej utraty gwarancji. • Obowiązujące Ogólne warunki gwarancji na nasze produkty można znaleźć w Internecie pod adresem www.bequiet.com. Listan Poland Sp. z o.o. ul. Drzeworytników 66, 01-385 Warszawa Szersze wsparcie na terenie Polski mogą uzyskać Państwo pod adresem e-mail: [email protected] Garantía: • 3 años de garantía del fabricante para el consumidor final a partir de la fecha de compra (sólo para compra original de distribuidores autorizados de be quiet!). • Sólo se podrán ejercer los derechos de la garantía presentando una copia del comprobante de compra expedido por un distribuidor autorizado de be quiet! • La manipulación de cualquier tipo, las modificaciones estructurales de cualquier tipo y los daños por influencias mecánicas externas provocarán la pérdida total de la garantía. • Los términos y condiciones íntegros de la garantía se pueden consultar en la página web www.bequiet.com dentro de la sección de servicio técnico / condiciones de la garantía. Listan GmbH & Co. KG . Biedenkamp 3a . 21509 Glinde . Alemania Si tiene más preguntas acerca de nuestros productos, póngase en contacto con nuestra línea gratuita de atención al cliente en el número: Correo electrónico del servicio de atención: [email protected] Гарантия: • 3 года гарантии от производителя для конечного покупателя (от первоначальной покупки у официального дилера be quiet!). • Гарантийный ремонт может быть выполнен только при наличии копии документа о покупке устройства у официального дилера be quiet!. • Манипуляции и структурные изменения любого рода, а также наличие внешних механических повреждений автоматически приводит к лишению гарантии. • На продукт распространяются наши стандартные условия гарантии, которые можно посмотреть в интернете на сайте www.bequiet.com. Listan GmbH & Co.KG. Biedenkamp 3А. 21509 Glinde. Germany. Для получения дополнительной информации Вы можете связаться с нами по электронной почте: [email protected] 4. Cartons, cases, batteries, cabinets, tapes, accessories or other consumables used with this product. 5. be quiet!, Inc. does not warrant that this product will meet your requirements. It is your responsibility to determine the suitability of this product for your purpose. 6. Removal or installation charges. I. APPLICABILITY 7. Shipping charges. This non-transferable warranty is applicable to newly purchased, previously unopened 8. Any incidental charges. be quiet! products and is enforceable by only the original consumer purchaser. Proof of purchase is required for warranty service, so should be retained. be quiet! does not IV. EXCLUSION OF DAMAGES be quiet!‘s sole obligation and liability under this warranty is limited to the repair or provide warranty registration services. replacement of a defective product at its option. be quiet! shall not, in any event, II. WARRANTY PERIOD be liable for any special, incidental, indirect, or consequential damages whatsoever, For eligible products, parts and labor are warranted for the appli-cable warranty including but not limited to loss of profits, revenue, or data (whether direct or indirect), period from the date of purchase. The applicable warranty period varies by product damages resulting from interruption of service and loss of business, or for liability in model, and is identified in your user documentation, on the product package, or tort relating to this product or resulting from its use or possession, even if be quiet! as listed below. Should any of these warranty periods differ, the longest specified has been advised previously of the possibility of such damages. warranty period will apply. Replaced products will be warranted for the remainder of V. LIMITATIONS OF IMPLIED WARRANTIES the original warranty period or thirty days, whichever is longer. There are no other warranties, expressed or implied, including but not limited to III. EXCLUSIONS those of merchantability or fitness for a particular purpose. The duration of implied The following are not covered by the warranty: warranties is limited to the warranty length specified in Paragraph II. 1. Normal wear and tear. VI. LOCAL LAW AND YOUR WARRANTY 2. Any product which has been modified without permission from be quiet!, or on which the serial number or warranty sticker has been defaced, modified, or removed. This warranty gives you specific legal rights. You may also have other rights granted under local law. These rights may vary. 3. Damage, deterioration or malfunction resulting from: Accident, abuse, misuse or improper use, neglect, connection to an improper voltage VII. NO OTHER WARRANTY No be quiet! employee, dealer, or other agent is authorized to make any modification, source, unauthorized product modification, or failure to follow instructions included extension, or addition to this warranty. with the product. be quiet! Limited Warranty: Per the terms and conditions of this limited warranty as given below, be quiet! warrants its new products to be free of defects resulting from faulty materials and faulty manufacturing for the length of the warranty period. Fire, water, lightning, or other acts of nature. Repair or attempted repair by anyone not authorized by be quiet!. Shipping or transport damage (claims must be made with the carrier). Any other cause which does not relate to a defect in materi-als or manufacturing workmanship. VIII. TO OBTAIN TECHNICAL SUPPORT OR WARRANTY SERVICE Please see your product owner’s manual or visit the Online Support section at www. bequiet.com for details and contact information. You will need to provide proof of purchase for warranty service. 0 Scope of delivery / Lieferumfang / Contenu / Zestaw zawiera / Contenido / Комплект поставки Quantity Dark Rock TF CPU cooler / Dark Rock TF CPU-Kühler / Refroidisseur de processeur Dark Rock TF / Cooler CPU Dark Rock TF / Ventilador de CPU Dark Rock TF / Процессорный кулер Dark Rock TF 1 SilentWings® fan / SilentWings® Lüfter / Ventilateur SilentWings® / Wentylator SilentWings® / Ventilador SilentWings® / Вентилятор SilentWings® 2 Fan clips / Lüfterklammern / Clips de fixation pour ventilateur / Zapinki wentylatora / Clips del ventilador / Клипсы для вентилятора 4 Intel/AMD back plate / Intel/AMD Backplate / Plaque arrière Intel/ AMD / Backplate Intel/AMD / Placa de apoyo de Intel/AMD / Intel/ AMD задняя пластина 1 Intel mounting brackets / Intel Montagebrücken / Supports de montage Intel / Mostki montażowe Intel / Puentes de montaje de Intel / Intel кронштейны 2 Hexagonal nut with sleeve / Sechskantmutter mit Hülse / Ecrou hexagonal / Nakrętka sześciokątna z tuleją / Tuerca hexagonal con casquillo / Шестигранная гайка с втулкой 4 AMD mounting brackets / AMD Montagebrücken / Supports de montage AMD / Mostki montażowe AMD / Puentes de montaje de AMD / AMD кронштейны 2 M3x15 screws / M3x15 Schrauben / Vis M3x15 / Śruby M3x15 / Tornillos M3x15 / M3x15 винты 4 M3x3 screws / M3x3 Schrauben / Vis M3x3 / Śruby M3x3 / Tornillos M3x3 / M3x3 винты 4 C profile spacers / C-Profil Distanzhalter / Entretoises C / Uchwyty dystansowe o profilu C / Distanciador perfil C/ С-образные шайбы 4 LGA 2011(-3) Square ILM spacer nuts / LGA 2011(-3) Square ILM Distanzmuttern / Écrous-entretoises pour support LGA 2011(-3) Square ILM / Nakrętki dystansowe LGA 2011(-3) Square ILM / Tuercas distanciadoras LGA 2011(-3) Square ILM / Гайки для LGA 2011(-3) Square ILM 4 Intel hexagonal nut / Intel Sechskant-Muttern / Écrous hexagonaux pour support Intel / Nakrętki sześciokątne Intel / Tuercas hexagonales Intel / Intel шестигранная гайка 4 Thermal paste / Wärmeleitpaste / Pâte thermique / Pasta termoprzewodząca / Pasta conductora de calor / Термопаста 1 Hexagonal spanner / Sechskant-Maulschlüssel / Clef hexagonale / Klucz płaski sześciokątny / Llave de boca hexagonal / Шестигранный ключ 1 Y cable / Y-Kabel / Câble en Y / Kabla Y / Cable en Y / Y-кабель 1 Socket LGA 2011(-3) Square ILM Socket LGA 775, 115X, 1366 0 2 1 3 775 115X 1366, 2011(-3) Socket AM2(+), AM3(+), FM1, FM2(+) Socket 754, 939, 940 Intel & AMD Intel & AMD Mounting of fan/fans: Position the fans with the logo facing upwards centrally on the rubber inserts. For the upper fan insert the fan clips from above through the fan frame openings provided, for the middle fan please insert from below. Then draw the fan clips under the notches of the heat sink. Installation of the mounting brackets: Affix the two mounting brackets for Intel or AMD onto the bottom of the cooler. Use the short screws for this . For Intel, stick the hexagonal nut with sleeve through the Intel mounting brackets from below and fix with the hexagonal nut on top. Please note: Only when both fans are installed does the Dark Rock TF reach its peak performance of up to 220W TDP. The fans can operate separately or together using the Y cable . If the cooler is used with only one fan, it reliably cools the processor by removing heat of up to 150W TDP. Installation der Montagebrücken: Bringen Sie die zwei Montagebrücken für Intel oder AMD an der Unterseite des Kühlers an. Verwenden Sie hierzu die kurzen Schrauben . Für Intel die Sechskantmutter mit Hülse von unten durch die Intel Montagebrücke stecken und diese mit der Sechskantmutter von oben fixieren. mit dem Logo nach oben Montage und Anschluss des Lüfters/der Lüfter: Platzieren Sie die Lüfter zeigend mittig auf den Gummi-Elementen. Für den oberen Lüfter stecken Sie die Lüfterklammern von oben durch die vorgesehenen Lüfterrahmenöffnungen, für den mittleren bitte von unten. Ziehen Sie die Lüfterklammern anschließend unter die Einkerbungen des Kühlkörpers. Installation des supports de montage : Placez les deux barres pour Intel ou AMD sous le radiateur. À cet effet, utilisez les vis courtes . Pour Intel, tenez l'écrou hexagonal par le manchon , placez-le dessous, à travers les supports de montage Intel et fixez-le par dessus avec l'écrou hexagonal . Intel AMD 775 1366, 2011(-3) 115X Bitte beachten: Der Dark Rock TF erreicht nur bei Installation beider Lüfter seine Höchstleistung von bis zu 220W TDP. Die Lüfter können separat oder zusammen über das Y-Kabel agieren . Wird der Kühler nur mit einem Lüfter betrieben, kühlt er Prozessoren mit einer Abwärme von bis zu 150W TDP zuverlässig. Intel & AMD Montage des ventilateurs : Placez les ventilateurs sur les bandes anti vibration, en positionnant le logo audessus. Pour le ventilateur supérieur, placez les pattes de fixation par dessus. Pour le ventilateur inférieur, placez les pattes de fixation par dessous. Insérez les pattes de fixation dans les rainures prévues à cet effet. Application of the heat-conducting paste: Clean any sediment away from the CPU. Apply a small drop of the heat-conducting paste onto the surface of the CPU. Distribute that into a thin, uniform coat. NOTE: Too much heat-conducting paste impedes the transfer of heat and thus the cooling performance! The amount included with delivery is sufficient for 2-3 applications. Attention : le Dark Rock TF atteint son niveau de performance maximum de 220 W TDP uniquement lorsque les ou de manière deux ventilateurs sont montés. Les ventilateurs peuvent fonctionner en série avec le câble en Y indépendante. Utilisé avec un seul ventilateur, le ventirad refroidit jusqu’à 150 W TDP. Aufbringen der Wärmeleitpaste: Reinigen Sie die CPU von allen eventuell vorhandenen Rückständen. Pressen Sie einen kleinen Tropfen der Wärmeleitpaste auf die CPU-Oberfläche. Verteilen Sie eine dünne, gleichmäßige Schicht. ACHTUNG: Zu viel Wärmeleitpaste verschlechtert den Wärmetransfer und somit die Kühlleistung! Die mitgelieferte Menge ist für 2-3 Anwendungen ausreichend. Intel LGA 775 / 115X / 1366 & AMD 1366 115X 775 Installation: NOTE: If your mainboard already has a retention module for affixing the CPU cooler, then you must first remove it. Please check that all parts required for installation are on hand before attempting to install the cooler. AM2(+) AM3(+) FM1/ FM2(+) Installing the back plate: Move the long screws through the drill holes from the rear toward the front of the back plate . Please mind that the correct drill hole is used for the respective socket. Then use the C-profile spacers to fix the back plate to the mainboard. These are pressed onto the screw from the side until they click into place. Installation: ACHTUNG: Sollte Ihr Mainboard bereits über ein Retention-Modul zur Befestigung von CPUKühlern verfügen, so entfernen Sie dieses zunächst. Überprüfen Sie vor dem Einbau des Kühlers, ob sämtliche Teile zur Installation vorhanden sind. Befestigung der Backplate: Stecken Sie die längeren Schrauben durch die auf der Rückseite der Backplate befindlichen Bohrlöcher. Beachten Sie hierzu die Bohrlöcher für den jeweiligen Sockel (siehe Abbildung rechts). Zum fixieren der Backplate auf dem Mainboard verwenden Sie anschließend die C-Profil Distanzhalter . Diese werden seitlich an der Schraube angedrückt bis diese einrasten. Montage : ATTENTION : Si la carte mère est déjà équipée d’un système de rétention pour la fixation d’un ventirad, veuillez le retirer. Avant de monter le ventirad, veuillez vous assurer de la présence de l'ensemble des pièces nécessaires au montage. Fixation de la plaque arrière : Placez les vis longues à l'arrière de la plaque dans les perforations. Vérifiez que les vis correspondent aux trous de montage (voir figure à droite). Pour la fixation de la plaque arrière sur la carte mère, utilisez en dernier les entretoises C . Ces dernières sont appliquées contre les vis latéralement jusqu'à encliquetage. Note: For LGA 115X mainboards, mind that the cut-outs on the back plate fastening point of the Intel back plate. ( Bottom view ) 754 939 940 Application de pâte thermique : Nettoyez le processeur, pour enlever les éventuels résidus de pâte thermique. Déposez une petite goutte de pâte thermique sur la surface du processeur et veuillez l'étaler en une mince couche uniforme. ATTENTION : une quantité trop importante de pâte thermique réduit le transfert de chaleur et par conséquent diminue la qualité du refroidissement. La quantité de pâte livrée est suffisante pour deux à trois applications. Intel LGA 775/ 115X/ 1366 & AMD Installation of the CPU cooler: NOTE: Don't forget to first remove the protective wrap from the bottom of the cooler! Place the cooling element on the CPU. Tighten the screws on the back plate from below until the end of the threads. Check that all screws are tightened and correctly situated before turning on the computer. The cooler must be assembled with a firm fit to the mainboard! Montage des CPU-Kühlers: ACHTUNG: Entfernen Sie zunächst die Schutzfolie von der Unterseite des Kühlers! Platzieren Sie den Kühlkörper auf der CPU. Ziehen Sie die Schrauben der Backplate von unten bis zum Anschlag an. Überprüfen Sie vor der Inbetriebnahme des Rechners, ob alle Schrauben richtig und fest angezogen sind. Der Kühler muss mit dem Mainboard fest verbunden sein! Montage du ventirad : ATTENTION : retirez le film de protection qui recouvre le dessous du radiateur. Placez le radiateur sur le processeur. Serrez les vis de la plaque arrière par en dessous jusqu'à la butée. Avant de remettre l'ordinateur en service, contrôlez que toutes les vis sont en place et serrées correctement. Le radiateur doit être fermement fixé à la carte mère. Intel LGA 2011(-3) Square ILM Installation of the CPU cooler: NOTE: Do not forget to first remove the protective wrap and add some thermal paste to the base of the cooler! Place the cooling element on the CPU. Using the hexagonal spanner , tighten the hexagonal nut as tight as possible while still being careful. Check that all screws are tightened and correctly situated before turning on the computer. The cooler must be firmly installed to the mainboard! are positioned next to the Achtung: Beachten sie bei LGA 115X Mainboards, dass die Befestigung der Intel Backplate innerhalb der Aussparungen der Backplate liegen. Attention : Avec les plateformes LGA 115X, assurez-vous que la fixation de la plaque arrière Intel s'insère dans les découpes de celle-ci . Montage des CPU-Kühlers: ACHTUNG: Entfernen Sie zunächst die Schutzfolie von der Unterseite des Kühlers! Platzieren Sie den Kühlkörper auf der CPU. Ziehen Sie die Sechskant-Muttern mit Hilfe des SechkantMaulschlüssels vorsichtig bis zum Anschlag an. Überprüfen Sie vor der Inbetriebnahme des Rechners, ob alle Schrauben richtig und fest angezogen sind. Der Kühler muss mit dem Mainboard fest verbunden sein! Montage du ventirad : ATTENTION : retirez le film de protection qui recouvre le dessous du radiateur et appliquez de la pâte thermique sur la base du refroidisseur. Positionnez le corps du refroidisseur sur le processeur. Serrez avec précaution les écrous hexagonaux jusqu'à la butée à l'aide de la clé hexagonale prévue à cet effet . Avant de remettre l'ordinateur en service, vérifiez que toutes les vis sont en place et serrées correctement. Le radiateur doit être fermement fixé à la carte mère. Intel LGA 2011(-3) Square ILM Affixing of the 2011(-3) Square ILM clamping system: First screw the spacing nut is used for this. the 2011(-3) Square ILM socket frame. The hexagonal spanner into the threads of Intel & AMD Befestigung der 2011(-3) Square ILM Haltevorrichtung: Schrauben Sie zuerst die Distanzmuttern Gewinde des 2011(-3) Square ILM Sockelrahmens. Verwenden Sie hierzu den Sechskant-Maulschlüssel . Fixation du système de support 2011(-3) Square ILM : Commencez par visser les entretoises filetages du cadre du support 2011(-3) Square ILM. À cet effet, utilisez la clef hexagonale . in die dans les Connecting the fan: Connect the fan to the mainboard's PWM signal. Anschluss des Lüfters: Verbinden Sie den Lüfter mit dem PWM Signal des Mainboards. Raccordement du ventilateur : Raccordez le ventilateur au signal PWM de la carte mère. Fan Intel & AMD Intel & AMD Montaż wentylatora/wentylatorów: umieść wentylatory zwrócone logo do góry centralnie na gumowych ramach. W przypadku górnego wentylatora umieść klipsy montażowe od góry, przez otwory w ramie wentylatora, a w przypadku wentylatora dolnego, umieść je od dołu. Następnie naciągnij klipsy pod żebra radiatora. Instalacja mostków montażowych: Mostki montażowe do podstawki Intel lub AMD przymocować u spodu schładzacza. Użyć do tego krótkich śrub . Dla gniazda Intel użyć nakrętek sześciokątnych z tuleją od spodu mostka montażowego i dokręcić sześciokątną śrubą od góry. Zwróć uwagę: Dark Rock TF osiąga szczytową wydajność aż do 220W TDP tylko wtedy, gdy zamontowane są oba wentylatory. Mogą one pracować oddzielnie lub razem po zastosowaniu kabla Y . Jeśli używany jest tylko jeden wentylator, cooler efektywnie schładza procesor, odprowadzając ciepło aż do 150W TDP. Intel Instalación de los puentes de montaje: Coloque los dos puentes de montaje para Intel o AMD en la parte inferior del ventilador. Para ello emplee los tornillos cortos . Para Intel, pegue la tuerca hexagonal con manguito a través de los soportes de montaje de Intel desde abajo y fije con tuerca hexagonal en la parte superior. Montaje de los ventiladores: coloque los ventiladores con el logotipo hacia arriba y centrados sobre las piezas de goma de inserción. En el caso del ventilador superior, inserte los clips del ventilador desde arriba a través de las aberturas en la carcasa del ventilador y en el caso del ventilador central, insértelos desde abajo. A continuación, introduzca los clips de los ventiladores bajo las muescas del disipador térmico. Установка кронштейнов: Закрепите оба кронштейна Intel или AMD на нижней части кулера. Используйте короткие винты Для Intel: вставьте шестигранную гайку с втулкой снизу кронштейна Intel (4) и зафиксируйте ее шестигранной гайкой сверху. Tenga en cuenta lo siguiente: el Dark Rock TF solo alcanza su máximo rendimiento de hasta 220 W de TDP cuando los dos ventiladores están instalados. Los ventiladores pueden funcionar por separado o bien de forma conjunta mediante el cable en Y . Si el refrigerador se utiliza con un único ventilador, es capaz de refrigerar de forma segura el procesador absorbiendo calor hasta 150 W de TDP. . AMD 775 1366, 2011(-3) 115X Intel & AMD Монтаж вентилятора/вентиляторов: Расположите вентиляторы логотипом вверх по центру на резиновых вставках. Для верхнего вентилятора вставьте клипсы сверху в отверстия в рамке вентилятора, для нижнего вентилятора – снизу. Затем закрепите клипсы вентиляторов в прорезях радиатора. Nakładanie pasty termoprzewodzącej: Oczyścić jednostkę CPU z wszelkich pozostałości, o ile są obecne. Wycisnąć małą kroplę pasty termoprzewodzącej na powierzchnię jednostki CPU. Rozprowadzić cienką równomierną warstwę. UWAGA: Zbyt duża ilość pasty termoprzewodzącej pogarsza przewodzenie ciepła i tym samym moc chłodzenia! Dołączona ilość wystarczy na 2-3 użycia. Пожалуйста, обратите внимание: только установка двух вентиляторов позволяет Dark Rock TF достичь пиковой производительности до 220Вт TDP. Вентиляторы могут быть подключены по отдельности или вместе, используя Y-кабель . Использование кулера с одним вентилятором обеспечивает надежное охлаждение процессора, отводя тепло до 150 Вт TDP. Aplicación de la pasta conductora de calor: En caso necesario limpie los posibles restos que queden en la CPU. Aplique una gotita de pasta conductora de calor sobre la superficie de la CPU. Consiga una capa fina y homogénea. ATENCIÓN: si aplica demasiada pasta, se empeora la transmisión térmica y por tanto la refrigeración. La cantidad suministrada es suficiente para 2-3 aplicaciones. Нанесение теплопроводящей пасты: Очистите процессор от загрязнений. Нанесите небольшое количество термопроводящей пасты на поверхность процессора. Размажьте равномерно тонким слоем. Примечание: слишком большое количество теплоотводящей пасты препятствует передаче тепла и, следовательно, эффективному охлаждению! Количество пасты из комплекта поставки достаточно для 2-3 нанесений. Intel LGA 775 / 115X / 1366 & AMD 1366 115X 775 Montaż: UWAGA: Jeśli płyta główna posiada już moduł przytrzymujący do zamocowania schładzaczy CPU, należy go najpierw usunąć. Przed przystąpieniem do montażu coolera upewnij się, że masz pod ręką wszystkie elementy potrzebne do instalacji. AM2(+) AM3(+) FM1/ FM2(+) Mocowanie backplate: Umieścić dłuższe śruby w wywierconych otworach znajdujących się z tyłu backplate . Zwróć uwagę, że odpowiednia otwory przeznaczone są dla danego gniazda. Do zamocowania backplate na płycie głównej należy następnie użyć uchwytów dystansowych o profilu C . Są one przyciskane bokiem do śruby, aż zaskoczą. 754 939 940 Montaje: ATENCIÓN: Si la placa base ya dispone de un módulo de retención para la fijación de ventiladores de CPU, retírelo primero. Antes de montar el ventilador, compruebe que tiene todas las piezas para la instalación. Fijación de placa de apoyo: coloque los tornillos más largos en los orificios de perforación de la parte posterior de la placa de apoyo . Tenga en cuenta los orificios para cada zócalo (consulte la ilustración de la derecha). Para fijar la placa de apoyo en la placa base, utilice el distanciador de perfil C que se aprieta lateralmente en los tornillos hasta encajar. Установка: ПРИМЕЧАНИЕ: Если на Вашей материнской плате уже установлен модуль крепления для крепежа процессорного кулера, демонтируйте его. Перед установкой кулера, пожалуйста убедитесь в наличии всех необходимых для установки комплектующих. Установка задней пластины: Вставьте длинные болты в отверстия задней пластины снизу. Пожалуйста, обратите внимание, что используются отверстия, соответствующие типу сокета. Затем используйте С-образные шайбы , чтобы зафиксировать заднюю пластину на плате. Их нужно прижимать сбоку к винтам до их защелкивания в правильном положении. Uwaga: W przypadku płyt głównych LGA 115X zwrócić uwagę na to, żeby mocowania backplate intel leżały w wyżłobieniach backplate . Atención: Con las placas base LGA 115X, tenga en cuenta que la fijación de la placa de apoyo de intel esté dentro de las ranuras de la placa de apoyo . ( Bottom view ) Intel LGA 775/ 115X/ 1366 & AMD Montaż schładzacza CPU: UWAGA: Usunąć najpierw folię ochronną ze spodu schładzacza! Umieścić radiator na jednostce CPU. Dokręcić od dołu śruby backplate do oporu. Przed uruchomieniem komputera sprawdzić, czy wszystkie śruby są prawidłowo i mocno dokręcone. Zamontowany schładzacz musi być mocno złączony z płytą główną! Montaje del ventilador de la CPU: ATENCIÓN: primero retire el film protector de la parte inferior del ventilador. Coloque el disipador térmico sobre la CPU. Apriete los tornillos de la placa de apoyo desde abajo hasta el tope. Antes de poner en marcha el ordenador, compruebe que todos los tornillos estén bien apretados. El ventilador debe estar bien fijo a la placa base. Установка процессорного кулера: ПРИМЕЧАНИЕ: защитное покрытие на нижней части кулера должно быть удалено перед установкой! Установите кулер на процессор. Затяните болты на задней пластине до упора. Перед включением компьютера проверьте равномерность и надежность затяжки всех винтов. Важно, чтобы кулер был плотно прижат к материнской плате. Intel LGA 2011(-3) Square ILM Montaż schładzacza CPU: UWAGA: Usunąć najpierw folię ochronną ze spodu schładzacza! Umieścić radiator na jednostce CPU. Ostrożnie dokręcić do oporu nakrętki sześciokątne za pomocą klucza płaskiego sześciokątnego . Przed uruchomieniem komputera sprawdzić, czy wszystkie śruby są prawidłowo i mocno dokręcone. Schładzacz musi być mocno złączony z płytą główną! Montaje del ventilador de la CPU: ATENCIÓN: primero retire el film protector de la parte inferior del con la llave ventilador. Coloque el disipador térmico sobre la CPU. Apriete con cuidado las tuercas hexagonales de boca hexagonal hasta el tope. Antes de poner en marcha el ordenador, compruebe que todos los tornillos estén bien apretados. El ventilador debe estar bien fijo a la placa base. Установка процессорного кулера: ПРИМЕЧАНИЕ: защитное покрытие на нижней части кулера должно быть удалено перед установкой! Установите кулер на процессор. Используя шестигранный ключ , затяните шестигранную гайку плотно, но без чрезмерного усилия. Перед включением компьютера проверьте равномерность и надежность затяжки всех винтов. Важно, чтобы кулер был плотно прижат к материнской плате. Внимание: для материнских плат LGA 115x обратите внимание, что крепежные точки задней пластины Intel должны совпадать с вырезами на задней пластине . Intel LGA 2011(-3) Square ILM Mocowanie mechanizmu podtrzymującego 2011(-3) Square ILM: Wkręcić nakrętk dystansowe gwinty ramy gniazda 2011(-3) Square ILM. Użyć do tego klucza płaskiego sześciokątnego . na Fijación del dispositivo de fijación LGA 2011(-3) Square ILM: atornille primero las tuercas distanciadoras en la rosca de la estructura del zócalo LGA 2011(-3) Square ILM. Para ello, emplee la llave de boca hexagonal . Крепление на зажимную систему LGA 2011(-3) Square ILM: Сначала вкрутите в резьбовые отверстия рамки сокета LGA 2011(-3) Square ILM гайки . Для этого используйте шестигранный ключ . Intel & AMD Podłączenie wentylatorów: Podłączyć wentylatory do generatora sygnału PWM płyty głównej. Conexión de los ventiladores: Conecte los ventiladores a la señal PWM de la placa base. Подключение вентиляторов: подключите вентиляторы к PWM-разъемам на материнской плате. Fan