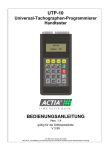
1
www.dtco.vdo.com
DTCO® fuelgate
Installation instructions
Delivery content, accessories and requirements
Delivery content
DTCO® fuelgate (DTCO CAN Gateway): article number
X10-140-400-020
Connecting cable (included)
Y-cable harness: article number A2C59515002
Booklet (7 languages): article number A2C59515005
Accessories
Commercial Mini USB cable
Configuration tool “DTCO® fuelgate“: download from
www.dtco.vdo.com
TIS-Web® evaluation tool: register at www.dtco.vdo.com
Requirements on vehicle side
Digital tachograph: DTCO® 1381 Rel. 1.2 or higher
Requirements on system side
Operating system (with current service pack): Microsoft® Windows®
Vista™, Windows® 7 (32- and 64-Bit) or Windows® 8 (32- and 64-Bit)
Interface: Free USB 2.0 port for connecting the DTCO® fuelgate
2
Table of Content
Delivery content, accessories and requirements
2
D
Deutsch
4-9
E
Español
10 - 15
F
Français
16 - 21
GB
English
22 - 27
I
Italiano
28 - 33
Nederlands
34 - 39
Русский
40 - 45
NL
RUS
Technical data and LED indicator
46
Disclaimer
47
3
DTCO® fuelgate – Arbeitsablauf
Service-Partner
1
Konto für Zugriff auf
TIS-Web® und den
Service TIS-Web® DMM
erstellen
E-Mail mit Zugangsdaten
zu TIS-Web® an Kunden
übermitteln
Tool DTCO® fuelgate
Werkstatt
(Konfiguration)
2
Werkstatt
TIS-Web® Admin
Konfigurationstool
DTCO® fuelgate herunterladen: www.dtco.vdo.com
3
Einbauort
bestimmen,
z. B. hinter
dem DTCO®
DTCO®
ausbauen
Kunde
- nur DTCO®
Kunde
- mit TIS-Web®
4b
4
®
Tool installieren
und starten
DTCO®
Werkstatt
(Montage)
Tool DTCO® fuelgate
Werkstattkarte
stecken;
Stecker A (weiß)
vom DTCO®
trennen
DTCO fuelgate (Gerät)
per Mini-USB-Kabel am
Computer anschließen
DTCO® fuelgate
(Gerät)
Kabel am
DTCO® fuelgate
anschließen
DTCO®
Erste Fahrt mit dem
montierten DTCO®
fuelgate unternehmen
Über die Menüfunktion
> Ausdruck auswählen
Download-Geräte für das
Herunterladen des
Datenblockes Status
konfigurieren
Massenspeicherdaten
herunterladen
DTCO® fuelgate (Gerät)
Anschlussleitungen in
AMP-Steckergehäuse
einsetzen und mit langem
Ende des Y-Kabels
verbinden
Kabel FUEL OUT (blau)
mit STATUS INPUT (D1)
von Stecker D (braun)
verbinden
DTCO®
TIS-Web®
Starten und
anmelden
DTCO® fuelgate (Gerät)
gemäß Fahrzeugklasse
konfigurieren
DTCO® fuelgate (Gerät)
Ausdruck
Über Ausdruck > Fahrzeug
> Status D1/D2 wählen
Werkstatt
(Montage)
Tool DTCO® fuelgate
Verbindung
zwischen DTCO®
fuelgate Tool
und Gerät
Markierungen zählen und
mit der vorgegebenen
Literleistung multiplizieren
Tool schließen und
DTCO® fuelgate
(Gerät) vom
Computer trennen
DTCO® fuelgate
(Gerät)
Kupplung des
Y-Kabels (kurz) und
Stecker A (weiß)
verbinden
DTCO® fuelgate
(Gerät) und
DTCO® montieren
Kunde
(nur DTCO®
und mit
TIS-Web® DMM)
Erste Prüfung
der Verbrauchsdaten
TIS-Web® DMM
TIS-Web® DMM starten und
Download-Einstellungen
(Datenblock Spezialdaten)
sowie Fahrzeugdetails
(Zusatzdaten) konfigurieren
DTCO® fuelgate
(Gerät) im Fahrzeug
montieren (stationär)
TIS-Web® DMM
Heruntergeladene
Daten nach
TIS-Web®
hochladen
Fahrzeugberichte erstellen,
z. B. Aktivitätsprotokoll
Fahrzeug
Weitere Prüfung
der Verbrauchsdaten
Hinweis: Prüfen Sie anhand der Übersicht auf Seite 2 den Inhalt
des Paketes zum DTCO® fuelgate auf Vollständigkeit.
Tipp: Diese Montageanleitung soll Ihnen den Weg zur Konfiguration und Montage eines DTCO® fuelgate ebnen.
Ergänzende Informationen finden Sie im Produkthandbuch zum
DTCO®, in den Anleitungen zu den Download Keys sowie in der
Online-Hilfe zu TIS-Web® DMM.
Voraussetzung: Laden Sie “DTCO FuelgateInstall.zip“ von
www.dtco.vdo.com herunter und installieren Sie die Konfigurationssoftware.
Hinweis: Informieren Sie sich vor Beginn der Konfiguration
anhand der Dokumentation zum Fahrzeug, welches CAN-Bus
Protokoll genutzt wird und wie viel Kraftstoff einem Impuls entspricht.
Geben Sie diesen Wert an den Kunden weiter, damit dieser in
TIS-Web® DMM hinterlegt werden kann; siehe Tipp Seite 8.
DTCO® fuelgate – Hardware konfigurieren
Das DTCO® fuelgate ist ein elektronisches Gerät zur Erfassung des
Kraftstoffverbrauchs. Die aufgezeichneten Daten helfen, durch
wirtschaftliche Fahrweise dem steigenden Kostendruck zu begegnen.
Dazu muss
• ein DTCO® 1381 ab Rel. 1.2
verbaut sein,
• das DTCO® fuelgate konfiguriert
werden,
• der Download den Datenblock
“Status“ enthalten und
• das Archivierungsprogramm den
Datenblock auswerten können.
Vorbereiten eines DTCO® fuelgate durch
die autorisierte Vertragswerkstatt:
Zum Konfigurieren muss
• die Konfigurationssoftware zum
DTCO® fuelgate installiert sein,
• der USB-Treiber installiert sein und
• das DTCO fuelgate (Box) über MiniUSB-Kabel am Computer angeschlossen werden.
®
Die LED “Power/ CAN“ leuchtet (grün);
siehe auch Seite 46.
• Wählen Sie anhand des Feldes CAN
Handler das entsprechende Protokoll
zum vorgesehenen Fahrzeug aus.
Die Angabe wird in das DTCO® fuelgate
übertragen.
• Bestimmen Sie über die Auswahlliste,
welcher Kraftstoffverbrauch in Litern
einem Impuls entsprechen soll.
Auch diese Angabe wird übertragen und
im DTCO® fuelgate gespeichert; eine
Bestätigung erfolgt nicht.
Ein DTCO® fuelgate fahrzeugspezifisch
konfigurieren:
Das DTCO® fuelgate ist konfiguriert; das
Mini-USB-Kabel kann abgezogen
werden.
• Starten Sie die Konfigurationssoftware
DTCO® fuelgate.
Sie können dieses DTCO® fuelgate montieren.
5
Voraussetzung: Das DTCO® fuelgate ist fahrzeugspezifisch
konfiguriert; siehe Seite 5.
Vorsicht: Arbeiten an einem Fahrzeug können gefährlich sein.
Führen Sie sämtliche Arbeiten unter Einhaltung der berufsgenossenschaftlichen Sicherheits- und Unfallverhütungsvorschriften aus.
Vorsicht: Vor Arbeiten am Bordnetz beachten Sie unbedingt die
diesbezüglichen Hinweise des Fahrzeugherstellers.
• Achten Sie vor dem Trennen der Anschlussklemmen von der
Batterie darauf, dass alle elektrischen Verbraucher ausgeschaltet sind und Sie die Minus- vor der Plus-Klemme entfernen.
• Das Abklemmen der Fahrzeugbatterie verhindert zwar Kurzschlüsse, jedoch können dadurch andere “Nebeneffekte“ auftreten, z. B. Löschen von Sicherheits-Codes und Daten.
DTCO® fuelgate – Hardware montieren
Die Montage des DTCO® fuelgate
erfordert weder Eingriffe in die
Sicherheitstechnologie noch in den
Kraftstoffkreislauf des Fahrzeugs.
Um auch keine anderen Leitungen
zu verletzen:
• Informieren Sie sich anhand der
Dokumentation zum Fahrzeug
über den Fahrzeugtyp und eventuelle Besonderheiten.
• Werfen Sie einen Blick in die
Bauschaltpläne, um die Lage
von Kraftstoff-, Hydraulik-,
Druckluft- und elektrischen
Leitungen zu überprüfen.
6
Vorbereiten der Montage eines
DTCO® fuelgate durch die autorisierte
Vertragswerkstatt:
• Einbauort bestimmen – vorzugsweise
hinter dem DTCO® 1381,
• Werkzeug vorbereiten, z. B. Entnahmehilfen für DTCO®, und
• Verbrauchsmaterialien bereit legen,
z. B. Kabelbinder.
DTCO® 1381 ausbauen:
• Werkstattkarte (Chip oben und Pfeil
vorn) in freien Kartenschacht stecken.
Kabel anschließen:
• Kabel am DTCO® fuelgate anschließen.
• Unbelegtes Kabel (blau) in Position 1
(oben links) des Steckers “D“ (braun)
einklinken und Stecker mit Buchse “D“
am DTCO® 1381 verbinden.
• Unbelegte Kabel (weiß, gelb, rot und
braun) an Kupplung anschlagen und mit
Stecker des Y-Kabels verbinden (lang).
• Kupplung des Y-Kabels (kurz) und
Stecker “A“ (weiß) verbinden. Die linke
LED (grün) blinkt; siehe Seite 46.
• DTCO® gemäß Herstellervorgaben ausbauen.
DTCO® fuelgate einbauen und befestigen, z. B. hinter dem DTCO®.
• Stecker A (weiß) und – soweit bereits
belegt – Stecker D (braun) ablösen.
DTCO® 1381 gemäß Herstellervorgaben
einbauen und Werkstattkarte entnehmen.
Voraussetzung: Das DTCO® fuelgate ist im Fahrzeug verbaut
(siehe Seite 6) und gemäß LED-Anzeige betriebsbereit (siehe
Seite 46).
Hinweis: Der CAN-Bus liefert – eine Verbindung zum Antriebsstrang vorausgesetzt – neben Daten zur Motordrehzahl und
Geschwindigkeit auch Daten zum Kraftstoffverbrauch.
Diese fahrzeugspezifischen Daten interpretiert das
DTCO® fuelgate gemäß Konfiguration (siehe Seite 5) in Informationen um, die im DTCO® 1381 gespeichert werden können.
Tipp: Mit einer Probefahrt und anschließender Auswertung des
Ausdrucks zum Status D1/D2 stellen Sie sicher, dass das
DTCO® fuelgate den Vorgaben gemäß eingebaut und konfiguriert ist.
Tipp: Weitere Informationen zum Ausdruck von Daten finden
Sie in der Bedienungsanleitung zum DTCO® 1381.
DTCO® fuelgate – Statusmeldung ausdrucken
Nach dem Einbau speichert der
DTCO® 1381 über den Statuseingang 1 die vom DTCO® fuelgate
ausgehenden Impulse pro vorgegebenem Verbrauch.
Diese Verbrauchsdaten können,
z. B. nach einer ersten kurzen Probefahrt,
• mittels Ausdruck direkt am
DTCO® 1381 eingesehen
werden oder
• mittels Download und entsprechender Software komfortabel
ausgewertet und archiviert
werden.
Durchführen einer ersten Fahrt nach dem
Einbau des DTCO® fuelgate:
Werten Sie die Angaben auf dem Ausdruck aus, indem Sie
• Funktionsweise des DTCO® 1381
prüfen,
• die Anzahl der Einträge pro Tag zählen
und
• Fahrerkarte oder Werkstattkarte
stecken und
• mit der hinterlegten Verbrauchsangabe
multiplizieren.
• (Probe-)Fahrt durchführen.
Ausgehend von der Standardanzeige
gehen Sie nach Beendigung der Fahrt
wie folgt vor:
• Menüfunktionen aufrufen.
• Ausdruck Fahrzeug auswählen.
• Fahrzeug Status D1/D2 auswählen.
• Ggf. Datum und UTC-Zeit bestimmen.
So ließe sich beispielsweise für diese
erste Fahrt bei 2 Einträgen und einer
hinterlegten Vorgabe von 10 Litern pro
Impuls (siehe Seite 5) ein Verbrauch
von 20 Litern errechnen.
Für eine komfortable Auswertung der
erfassten Verbrauchsdaten – insbesondere über einen längeren Zeitraum
und bei mehreren Fahrzeugen – siehe
Seite 8 und 9.
Der DTCO® 1381 startet den gewählten
Ausdruck.
7
Voraussetzung: Das DTCO® fuelgate ist im Fahrzeug verbaut
(siehe Seite 6) und gemäß LED-Anzeige betriebsbereit (siehe
Seite 46).
Hinweis: Für eine einwandfreie Übernahme und Auswertung
der Verbrauchsdaten ist zu beachten, dass
• die Konfiguration des DTCO® fuelgate mit Fahrzeugtyp und
dessen Verbrauch übereinstimmt,
• sowohl der Download Key als auch TIS-Web® DMM konfiguriert werden müssen und
• der DTCO® 1381 nur bis zu 1.000 Impulse speichern kann. Ist
die Höchstzahl erreicht, überschreibt jeder nachfolgende
Impuls die entsprechende Anzahl gespeicherter Impulse.
Tipp: Wählen Sie auch deshalb eine Anzahl Liter pro Impuls, die
dem Fahrzeugtyp und den Download-Zyklen entspricht, z. B.
Sattelzug 10 und Transporter 1 Liter.
DTCO® fuelgate – Download konfigurieren
Der Ausdruck zum Status D1/ D2
belegt, dass der DTCO® 1381 die
vom DTCO® fuelgate ausgehenden
Impulse über den Statuseingang 1
speichert.
Damit diese Informationen künftig
übertragen und komfortabel ausgewertet werden können, muss
• der Download Key wissen, dass
auch dieser Datenblock herunterzuladen ist, und
• das Archivierungsprogramm für
den Empfang und die Interpretation der Daten vorbereitet sein.
8
Konfigurieren Sie die von Ihnen eingesetzte Variante des Download Keys:
• Schließen Sie den Download Key am
Computer an, z. B. per USB-Kabel.
• Starten Sie, sofern nicht automatisch
erfolgt, die entsprechende PC-Applikation, z. B. “D:\start.exe“.
Konfigurieren Sie TIS-Web DMM für den
Download per DLD® Short Range oder
DLD® Wide Range:
• Starten Sie den bevorzugten Browser,
und melden Sie sich in TIS-Web an.
• Wählen Sie Einstellungen, und starten
Sie TIS-Web DMM.
• Wechseln Sie zum Modul Konfiguration > Register Download-Konfiguration.
• Klicken Sie auf Einstellungen >
System > Archiv, und markieren Sie
den Eintrag Datenblock Sonstige.
• Markieren Sie im Datenblock Spezialdaten den Eintrag Status.
• Klicken Sie auf [Übernehmen], und
bestätigen Sie den Hinweis auf Übernahme der Einstellungen mit [OK].
• Klicken Sie auf [Speichern], um die
Änderungen zu übernehmen.
Alle mit Häkchen markierten Daten
werden mit dem nächsten Download
heruntergeladen.
Die Vorgaben werden vom genutzten
Remote Manager importiert, so dass die
gewählten Datenblöcke künftig heruntergeladen werden können.
Voraussetzung: Die Geräte zum Download (DLK/ DLD) sind für
das Herunterladen der Verbrauchsdaten konfiguriert (siehe
Seite 8), es werden Fahrerkarten-, Massenspeicher- und SDaten heruntergeladen und – wie hier beschrieben – die Angaben zur Aufzeichnung der Zusatzdaten sind angepasst.
Hinweis: TIS-Web® DMM kann den Datenblock Status/ Sonstige nur richtig auswerten, nachdem die nachfolgend beschriebene Änderung im Ausklappmenü Aufzeichnung Zusatzdaten
erfolgt ist. Ohne Wahl der Option Kraftstoffverbrauch im Ausklappmenü Aufzeichnung Zusatzdaten werden die Daten des
DTCO® fuelgate falsch interpretiert.
Und damit die Auswertung des Kraftstoffverbrauchs zutreffende
Werte liefert, ist dieselbe Anzahl Liter anzugeben wie in der Konfiguration des DTCO® fuelgate, siehe Seite 5.
Tipp: Details zu den Einstellungen in TIS-Web® DMM und den
Berichten finden Sie in der Online-Hilfe zu TIS-Web®.
TIS-Web® DMM – Verbrauchsdaten auswerten
Mit den Berichten in TIS-Web®
DMM stehen Ihnen aussagekräftige Auswertungen zum Kraftstoffverbrauch Ihrer Fahrzeuge zur Verfügung.
So können Sie nach dem Übertragen der Download-Daten in
• der Aktivitätsübersicht prüfen,
wie viel Kraftstoff das Fahrzeug
auf 100 km durchschnittlich verbraucht, und in
• dem Statusprotokoll ablesen, wie
viel Kraftstoff das Fahrzeug pro
zurückgelegter Wegstrecke verbraucht hat.
Vorbereiten der Auswertung von Verbrauchsdaten durch TIS-Web® DMM:
• Starten Sie den bevorzugten Browser,
und melden Sie sich in TIS-Web® an.
• Wählen Sie Firmendaten Fahrzeuge,
und starten Sie TIS-Web DMM.
• Klicken Sie auf [Ändern], und wählen
Sie das Ausklappmenü Aufzeichnung
Zusatzdaten.
• Markieren Sie die Option Kraftstoffverbrauch, und wählen Sie die Anzahl Liter
pro Impuls (siehe Hinweis).
• Übernehmen Sie die Eingaben mit
[Speichern], und bestätigen Sie den
Hinweis mit [OK].
Die Auswertungen zum Kraftstoffverbrauch können vorgenommen werden.
Wenn Sie den durchschnittlichen Kraftstoffverbrauch ausgewählter Fahrzeuge
überprüfen möchten, erstellen Sie den
Fahrzeugbericht Aktivitätsübersicht
Fahrzeug.
Wenn Sie hingegen zu Vergleichszwecken eine auf die zurückgelegte
Wegstrecke bezogene Auswertung benötigen, dann wählen Sie den Fahrzeugbericht Statusprotokoll Fahrzeug.
Wie Sie die Berichte, Standorte, Fahrzeuge sowie Zeiträume auswählen und
die Zeilen und Spalten der Berichte interpretieren, ist in der Online-Hilfe von
TIS-Web® DMM beschrieben.
Ab jetzt jedenfalls erfolgt die Auswertung
mit detaillierten Verbrauchsangaben.
9
DTCO® fuelgate – Flujo de trabajo
Servicio de
asistencia técnica
1
Cuenta para acceder a
TIS-Web® y al servicio
TIS-Web® DMM
Enviar al cliente un
correo electrónico con
los datos de acceso
a TIS-Web®
Programa DTCO®
fuelgate
Centro de ensayo
(Configuración)
2
Centro de ensayo
TIS-Web® Admin
Descargar el programa
de configuración de
DTCO® fuelgate:
www.dtco.vdo.com
Instalar e iniciar el
programa
DTCO®
Centro de ensayo
(montaje)
3
Determinar
el lugar de
montaje, p. ej.,
detrás del
DTCO®
Desmontar
el DTCO®
Cliente
- sólo DTCO®
Cliente
- con TIS-Web®
4b
10
Insertar la tarjeta
de centro de
ensayo; desenchufar
el conector A
(blanco) del DTCO®
Programa DTCO®
fuelgate
Conectar el dispositivo
DTCO® fuelgate al
ordenador con el cable
mini USB.
DTCO®
DTCO®
Seleccionar la opción
printout del menú
Seleccionar printout
> vehicle > status D1/D2
Configurar dispositivos
para la descarga del
bloque de datos Status
Descargar los datos
de la memoria
TIS-Web®
Abrir e iniciar
sesión
Cerrar el programa
y desconectar el
dispositivo DTCO®
fuelgate del ordenador
DTCO® fuelgate
(dispositivo)
Colocar los cables de
conexión en la caja de
conectores AMP y conectarla
con el extremo largo del cable
en Y
Realizar el primer viaje
con el DTCO® fuelgate
montado
Centro de ensayo
(montaje)
Configurar el dispositivo
DTCO® fuelgate según la
clase de vehículo
DTCO® fuelgate
(dispositivo)
DTCO® fuelgate
(dispositivo)
Conectar el
cable al DTCO®
fuelgate
Programa DTCO®
fuelgate
Establecer la
conexión entre
el programa y
el dispositivo
DTCO® fuelgate
DTCO® fuelgate
(dispositivo)
Conectar el cable
FUEL OUT (azul) con
STATUS INPUT (D1) del
conector D (marrón)
Imprimir
Contar las marcas y
multiplicarlas por el consumo
en litros especificado
Conectar el
acoplamiento del cable
en Y (extremo corto) y
el conector A (blanco)
Montar el DTCO®
fuelgate
(dispositivo) y
el DTCO®
Cliente
(sólo DTCO®
y con
TIS-Web® DMM)
Comprobación
inicial de los
datos de
consumo
TIS-Web® DMM
Abrir TIS-Web® DMM y
configurar las opciones de
descarga (bloque de datos
Special Data) y los datos del
vehículo (datos adicionales)
Montar el
dispositivo DTCO®
fuelgate en el
vehículo (uso fijo)
TIS-Web® DMM
Cargar en
TIS-Web®
los datos
descargados
del tacógrafo
Crear informes del
vehículo, p. ej.,
Vehicle Activity Protocol
Comprobación
adicional de los
datos de
consumo
Nota: Utilice la lista de la página 2 para comprobar la integridad
del contenido del paquete del DTCO® fuelgate.
Sugerencia: Estas instrucciones de montaje deben facilitarle la
configuración y el montaje de un DTCO® fuelgate.
Encontrará información adicional en el manual del producto del
DTCO®, en las instrucciones del Download Key y en la Ayuda
en línea de TIS-Web® DMM.
Requisitos: Descargue el archivo «DTCO FuelgateInstall.zip»
desde www.dtco.vdo.com e instale el software de configuración.
Nota: Antes de la configuración, consulte en la documentación
del vehículo qué protocolo de bus CAN se utiliza y cuánto
combustible corresponde a un impulso.
Facilite dicho valor al cliente para que éste pueda introducirlo en
TIS-Web® DMM; véase la sugerencia en la página 14.
DTCO® fuelgate – Configurar el hardware
El DTCO® fuelgate es un
dispositivo electrónico para
registrar el consumo de
combustible. Los datos registrados
ayudan a reducir los crecientes
costes mediante una conducción
más económica.
Para ello, hay que
• disponer de un DTCO® 1381
versión 1.2 o superior,
• configurar el DTCO® fuelgate,
• incluir el bloque de datos
«Status» en la descarga y
• que el programa de archivo
pueda analizar el bloque de
datos.
Preparación de un DTCO® fuelgate por
parte del centro de ensayo autorizado:
Para la configuración, debe
• estar instalado el software de
configuración del DTCO® fuelgate,
• estar instalado el controlador USB y
• conectarse el DTCO® fuelgate
(dispositivo) al ordenador mediante un
cable mini USB.
El LED «Power/CAN» se ilumina
(verde); véase también la página 46.
Configurar un DTCO® fuelgate según el
vehículo:
• Inicie el software de configuración del
DTCO® fuelgate.
• Seleccione mediante el campo CAN
Handler el protocolo correspondiente al
vehículo previsto.
El dato se transmite al DTCO® fuelgate.
• Utilice la lista de selección para
determinar qué consumo de
combustible en litros corresponde a un
impulso.
Dicho dato también se transmite y se
guarda en el DTCO® fuelgate; no se
produce ninguna confirmación.
El DTCO® fuelgate ya está configurado;
se puede desconectar el cable mini USB.
Ya puede usted montar este dispositivo
DTCO® fuelgate.
11
Requisitos: El DTCO® fuelgate está ya configurado según el
vehículo; véase la página 11.
Precaución: Los trabajos en el vehículo pueden ser peligrosos.
Deben cumplirse siempre las normas generales de seguridad
laboral y prevención de accidentes.
Precaución: Antes de realizar trabajos en el sistema eléctrico
del vehículo, consulte las instrucciones correspondientes del
fabricante.
• Antes de desembornar la batería, asegúrese de que todos los
consumidores eléctricos estén desconectados y separe el
borne negativo del borne positivo.
• Al desembornar la batería del vehículo se evitan
cortocircuitos, pero esto puede causar otros «efectos
secundarios», p. ej., que se borren códigos de seguridad y la
pérdida de datos.
DTCO® fuelgate – Montar el hardware
El montaje del DTCO®fuelgate no
requiere intervenciones en la
tecnología de seguridad ni en el
circuito de combustible del
vehículo. Para evitar también
posibles daños en otras
conducciones:
• Infórmese sobre el tipo de
vehículo y sus particularidades
en la documentación del mismo.
• Eche un vistazo a los esquemas
de conexiones para comprobar
la posición de las conducciones
de combustible, hidráulicas,
neumáticas y eléctricas.
12
Montar el DTCO® 1381:
• Insertar la tarjeta de centro de ensayo
(chip hacia arriba y flecha hacia
delante) en la ranura de tarjeta libre.
• Desmontar el DTCO® según las
instrucciones del fabricante.
• Soltar el conector A (blanco) y, si
procede, el conector D (marrón).
Conectar los cables:
• Conectar los cables al DTCO® fuelgate.
• Insertar el cable suelto (azul) en la
posición 1 (arriba a la izquierda) del
conector «D» (marrón) y conectar el
conector al DTCO® 1381 (casquillo
«D»).
• Conectar los cables sueltos (blanco,
amarillo, rojo, marrón) al acoplamiento y
conectarlo con el conector del cable en
Y (extremo largo).
• Conectar el acoplamiento del cable en
Y (extremo corto) y el conector «A»
(blanco). El LED izquierdo (verde)
parpadea; véase la página 46.
Montar y fijar el DTCO® fuelgate, p. ej.,
detrás del DTCO®.
Montar el DTCO® 1381 según las
instrucciones del fabricante y extraer la
tarjeta de centro de ensayo.
Requisitos: El DTCO® fuelgate está ya montado en el vehículo
(véase la página 12) y está operativo según la indicación del
LED (véase la página 46).
Nota: Además de los datos de revoluciones del motor y
velocidad, el bus CAN proporciona también datos sobre el
consumo de combustible siempre que haya conexión con la
cadena cinemática.
De acuerdo con la configuración (véase la página 11), el
DTCO® fuelgate traduce estos datos específicos del vehículo en
información que puede registrarse en el DTCO® 1381.
Sugerencia: Con una prueba de conducción y el posterior
análisis de los datos impresos del Status D1/D2, se puede
comprobar si el DTCO® fuelgate está montado y configurado
según las especificaciones.
Sugerencia: Para más información sobre la impresión de datos,
consulte el manual de instrucciones del DTCO® 1381.
DTCO® fuelgate – Imprimir un mensaje de estado
Tras el montaje, el DTCO® 1381
registra –a través de la entrada de
estado 1– los impulsos enviados
por el DTCO® fuelgate según los
datos de consumo especificados.
Tras una primera prueba de
conducción, dichos datos de
consumo se pueden ver
• imprimiéndolos directamente en
el DTCO® 1381, o
• descargarlos para analizarlos y
archivarlos cómodamente con el
software correspondiente.
Para el primer viaje tras el montaje del
DTCO® fuelgate:
Para analizar los datos del impreso, haga
lo siguiente:
• Compruebe el funcionamiento del
DTCO® 1381,
• Cuente el número de entradas por día y
• inserte la tarjeta de conductor o tarjeta
de centro de ensayo y
• realice el viaje (de prueba).
Una vez finalizado el viaje y partiendo de
la indicación normal, haga lo siguiente:
• Acceda al menú principal.
• Seleccione printout vehicle.
• Seleccione status D1/D2.
• Si fuera necesario, especifique la fecha
y la hora UTC.
• multiplique dicha cifra con el valor de
consumo especificado.
Así, por ejemplo, para este primer viaje
tendríamos 2 entradas y un valor
especificado de 10 litros por impulso
(véase la página 11), lo que equivale a
un consumo de 20 litros.
Para un análisis más cómodo de los
datos de consumo registrados,
especialmente si se trata un período de
tiempo largo y de varios vehículos,
véanse las páginas 14 y 15.
El DTCO® 1381 inicia la impresión de
los datos.
13
Requisitos: El DTCO® fuelgate está ya montado en el vehículo
(pág. 12) y está operativo según la indicación del LED (pág. 46).
Nota: Para una recepción y análisis de los datos de consumo
debe tenerse en cuenta que
• coincida la configuración del DTCO® fuelgate con el tipo de
vehículo y su consumo,
• estén configurados tanto el Download Key como el programa
TIS-Web® DMM, y
• que el DTCO® 1381 sólo puede almacenar un máximo de
1.000 impulsos. Una vez alcanzado el número máximo, los
impulsos posteriores sobrescriben los impulsos
correspondientes registrados previamente.
Sugerencia: Por eso es conveniente elegir un número de litros
por impulso que se corresponda con el tipo de vehículo y los
ciclos de descarga, p. ej., tractora con remolque 10 litros y
furgoneta 1 litro.
DTCO® fuelgate – Configurar la descarga
La impresión del estado D1/D2
demuestra que el DTCO® 1381
registra los impulsos enviados por
el DTCO® fuelgate a través de la
entrada de estado 1.
Para poder transferir
posteriormente dichos datos y
analizarlos cómodamente,
• el Download Key debe saber que
también tiene que descargar
dicho bloque de datos y
• el programa de archivo debe
estar preparado para recibir e
interpretar los datos.
14
Configure la variante del Download Key
que usted utilice:
• Conecte el Download Key al ordenador,
p. ej., mediante un cable USB.
• Si no se abre automáticamente, inicie el
software correspondiente, p. ej.,
«D:\start.exe».
• Vaya al módulo Configuration >
pestaña Download configuration.
• En el bloque de datos Special data
active la casilla Status.
• Haga clic en [Save] para aplicar los
cambios.
Todos los datos marcados serán
descargados en la próxima descarga.
Configure TIS-Web DMM para la
descarga mediante el DLD® Short Range
o el DLD® Wide Range:
• Abra su navegador preferido e inicie
sesión en TIS-Web.
• Seleccione Settings e inicie TIS-Web
DMM.
• Haga clic en Settings > System >
Legal Archive y active la casilla Other
Data Block.
• Haga clic en [Apply] y confirme el
mensaje sobre la aplicación de los
ajustes con [OK].
La configuración será importada por el
programa Remote Manager que utilice y
así se podrán descargar los bloques de
datos seleccionados en el futuro.
Requisitos: Los dispositivos de descarga (DLK / DLD) están
configurados para descargar los datos de consumo (página 14),
se descargan los datos de las tarjetas de conductor, de la
memoria, los especiales y –como se describe aquí– se ha
adaptado la configuración para el registro de los datos
adicionales.
Nota: TIS-Web® DMM sólo podrá analizar correctamente el
bloque de datos Status/ Other Data, después de efectuarse el
cambio (descrito a continuación) en el menú desplegable
Additional Data Recording. Si no está seleccionada la opción
Fuel consumption en el menú desplegable, se interpretarán
incorrectamente los datos del DTCO® fuelgate.
Y, para que el análisis del consumo de combustible proporcione
valores correctos, se debe especificar el mismo número de litros
que en la configuración del DTCO® fuelgate, véase la página 11.
TIS-Web® DMM – Analizar los datos de consumo
Los informes de TIS-Web® DMM le
ofrecen análisis detallados sobre el
consumo de combustible de sus
vehículos.
Por ejemplo, una vez transferidos
los datos de la descarga,
• en el resumen de actividades
puede comprobar el consumo
medio de combustible del
vehículo en 100 km, y
• en el registro de estado puede
leer cuánto combustible ha
consumido el vehículo en el
trayecto recorrido.
Preparación del análisis de los datos de
consumo mediante TIS-Web® DMM:
• Abra su navegador preferido e inicie
sesión en TIS-Web®.
• Seleccione Company Data Vehicles e
inicie TIS-Web DMM.
• Haga clic en [Modify] y seleccione el
menú desplegable Additional Data
Recording
• Seleccione la opción Fuel
Consumption y el número de litros por
impulso (véase la «Nota»).
• Aplique los cambios con [Save] y
confirme el aviso con [OK].
Ahora ya se puede proceder al análisis
del consumo de combustible.
Si desea comprobar el consumo medio
de combustible de los vehículos
seleccionados, genere el informe Vehicle
Activity Summary.
O bien, si necesita el análisis para
comparar los datos de consumo en un
trayecto recorrido, seleccione el informe
Vehicle Status Protocol.
Para saber cómo seleccionar los
informes, emplazamientos, vehículos o
periodos de tiempo y cómo interpretar las
filas y las columnas de los informes,
consulte la Ayuda en línea de TIS-Web®
DMM.
A partir de este momento, ya puede
disponer de un análisis con datos
detallados del consumo.
15
DTCO® fuelgate – Procédure
Centre
partenaire agréé
1
Créer un compte pour
accéder à TIS-Web® et
au service TIS-Web® DMM
Envoyer au client par
mél ses identifiants
d’accès à TIS-Web®
Utilitaire DTCO®
fuelgate
Centre agréé
(configuration)
2
Centre agréé
TIS-Web® Admin
Télécharger l’utilitaire de
configuration DTCO®
fuelgate : www.dtco.vdo.com
Installer l’utilitaire
et le démarrer
DTCO®
Centre agréé
(Montage)
3
Client
- DTCO®
uniquement
Client
- avec TIS-Web®
4b
16
Définir l’
emplacement
pour l’installation,
par ex. derrière
le DTCO®
Démonter
le DTCO®
Insérer la carte
atelier ; débrancher
le connecteur A
(blanche) du
DTCO®
DTCO®
Effectuer un premier
trajet avec le DTCO®
fuelgate monté
Dans la commande
de menu, sélectionner
> printout
Configurer les outils de
téléchargement pour le
téléchargement du bloc
de données Status
Télécharger les
données de la
mémoire de masse
Utilitaire DTCO® fuelgate
®
Relier le DTCO fuelgate
(appareil) à un ordinateur
par câble mini USB
DTCO® fuelgate
(appareil)
Raccorder le
câble au DTCO®
fuelgate
Insérer les fils de connexion
dans le connecteur AMP et les
relier avec l’extrémité la plus
longue du câble en Y
DTCO®
TIS-Web®
Configurer le DTCO®
fuelgate (appareil) en
fonction de la catégorie
du véhicule
DTCO® fuelgate (appareil)
Sélectionner printout >
vehicle > status D1/D2
Démarrage et
ouverture de
session
Utilitaire DTCO®
fuelgate
Etablir une
connexion entre
l’utilitaire DTCO®
fuelgate et
l’appareil
Centre agréé
(Montage)
Refermer l’utilitaire et
débrancher le DTCO®
fuelgate (appareil) de
l’ordinateur
DTCO® fuelgate
(appareil)
DTCO® fuelgate
(appareil)
Relier le fil FUEL OUT
(bleu) avec STATUS INPUT
(D1) du connecteur D
(marron)
Tirage papier
Compter les marques et
multiplier par le nombre
de litres prescrit
Relier le coupleur
du câble en Y (court)
et le connecteur A
(blanche)
Installer le
DTCO® fuelgate
(appareil) et
le DTCO®
Client
(DTCO®
uniquement
et avec
TIS-Web® DMM)
Premier
contrôle des
données de
consommation
TIS-Web® DMM
Démarrer TIS-Web® DMM et
configurer le téléchargement
(bloc de données Special Data)
et les données du véhicule
(donnée complémentaires)
Installer le DTCO®
fuelgate (appareil)
dans le véhicule
(installation fixe)
TIS-Web® DMM
Transférer les
données
téléchargées
vers TIS-Web®
Générer les rapports
concernant le véhicule,
par ex. Vehicle Activity Protocol
Autre
contrôle des
données de
consommation
Remarque : A partir de la liste fournie en page 2, vérifiez le
contenu de votre carton DTCO® fuelgate.
Conseil : la présente notice de montage a été rédigée en vue de
vous faciliter la configuration et le montage d’un
DTCO® fuelgate.
Vous trouverez des informations complémentaires dans le
manuel du DTCO®, dans les notices des Download Keys ainsi
que dans l’aide en ligne de TIS-Web® DMM.
Condition requise : téléchargez le fichier « DTCO
FuelgateInstall.zip » depuis le site www.dtco.vdo.com, puis
installez le logiciel de configuration.
Remarque : avant de débuter la configuration, consultez la
documentation du véhicule pour connaître le protocole du bus
CAN et la quantité de carburant correspondant à chaque
impulsion. Indiquez cette valeur au client pour qu’il puisse la
paramétrer dans TIS-Web® DMM ; cf. conseil page 20.
DTCO® fuelgate – Configuration du matériel
Le DTCO® fuelgate est un appareil
électronique qui mesure la consommation de carburant. Les
données enregistrées permettent
de freiner la hausse constante des
coûts en favorisant une conduite
plus économique. Pour cela,
• un DTCO® 1381 rel. 1.2 (ou
sup.) doit être installé,
• il faut configurer le
DTCO® fuelgate,
• le téléchargement doit inclure le
bloc de données « Status », et
• le programme d’archivage doit
pouvoir analyser le bloc de
données.
Préparation d’un DTCO® fuelgate par le
centre agréé :
Pour la configuration, vous devez
• avoir installé le logiciel de configuration
du DTCO® fuelgate,
• avoir installé le pilote USB et
• raccorder le DTCO fuelgate (boîtier) à
un ordinateur à l’aide du cordon mini
USB.
®
La LED « Power/ CAN » est allumée
(verte) ; cf. aussi page 46.
• Dans le champ CAN Handler,
sélectionnez le protocole correspondant
au véhicule concerné.
Cette indication sera transférée dans le
DTCO® fuelgate.
• Dans le menu déroulant, sélectionnez la
quantité de carburant consommée à
chaque impulsion.
Cette valeur sera également transmise
et mémorisée dans le DTCO® fuelgate,
sans autre demande de confirmation.
Configuration d’un DTCO® fuelgate pour
un véhicule particulier :
Le DTCO® fuelgate est maintenant
configuré, vous pouvez débrancher le
cordon mini USB.
• Lancez le logiciel de configuration
DTCO® fuelgate.
Le DTCO® fuelgate peut maintenant être
installé.
17
Condition requise : le DTCO® fuelgate est configuré pour le
véhicule sur lequel il est monté ; cf. page 17.
Prudence : tous travaux sur un véhicule peuvent s’avérer
dangereux. Toutes les opérations devront impérativement être
exécutées dans le respect des consignes de sécurité et des
dispositions relatives à la prévention des accidents émanant des
caisses professionnelles d’assurance maladie.
Prudence : avant d’intervenir sur le réseau de bord, tenir
compte des consignes émanant du constructeur du véhicule à
ce sujet.
• Avant de débrancher la batterie, assurez-vous que tous les
consommateurs électriques sont éteints et veillez à
débrancher la borne moins avant la borne plus.
• Débrancher la batterie permet d’éviter les courts-circuits mais
peut provoquer d’autres « effets secondaires » tels que la
perte de données ou de codes de sécurité.
DTCO® fuelgate – Installation du matériel
Le montage du DTCO® fuelgate ne
requiert aucune intervention
affectant la sécurité ni le circuit
d’alimentation en carburant du
véhicule. Pour n’endommager
aucune conduite,
• renseignez-vous sur le modèle
du véhicule et ses éventuelles
particularités en consultant la
documentation de référence et
• consultez les plans de
construction afin de connaître
l’emplacement des réseaux de
carburant, hydraulique,
pneumatique et électrique.
18
Préparation du montage d’un
DTCO® fuelgate par un centre agréé :
Raccordement des câbles :
• Définir l’emplacement – de préférence
derrière le DTCO® 1381.
• Connecter le fil (bleu) à la borne 1 (en
haut à gauche) du connecteur « D »
(marron) puis le brancher au connecteur
femelle « D » sur le DTCO® 1381.
• Préparer les outils nécessaires, par ex.
les crochets d’extraction pour le DTCO®.
• Raccorder le câble au DTCO® fuelgate.
• Préparer les accessoires, tels que
serre-câbles.
• Sertir les fils (blanc, jaune, rouge et
marron) au coupleur et les raccorder au
connecteur du câble en Y (long).
Démontage du DTCO® 1381 :
• Relier le coupleur du câble en Y (court)
au connecteur « A » (blanche). La LED
gauche (verte) clignote ; cf. page 46.
• Insérer la carte atelier (puce vers le haut
et flèche vers l’avant) dans le lecteur
disponible.
• Démonter le DTCO® en suivant les
consignes du fabricant.
Encastrer puis fixer le DTCO® fuelgate,
par ex. derrière le DTCO®.
• Débrancher les connecteurs A
(blanche) et D (marron) – le cas
échéant.
Encastrer le DTCO® 1381 conformément
aux instructions de montage du fabricant
puis retirer la carte atelier.
Condition requise : le DTCO® fuelgate est installé dans le
véhicule (cf. page 18) et opérationnel (cf. page 46).
Remarque : outre les données de régime et de vitesse, le bus
CAN fournit également les données de consommation de
carburant - à condition toutefois que la transmission soit
connectée.
Le DTCO® fuelgate traduit ces données en informations conformément à sa configuration (cf. page 17) - qui pourront
être enregistrées dans le DTCO® 1381.
Conseil : réalisez un trajet d’essai et une analyse des données
Status D1/D2 après les avoir imprimées afin de vous assurer
que le DTCO® fuelgate est correctement installé et configuré.
Conseil : pour savoir comment imprimer les données, consultez
le mode d’emploi du DTCO® 1381.
DTCO® fuelgate – Impression du message d’état
Une fois installé, le DTCO® 1381
enregistre, via l’entrée de statut 1,
les impulsions données par le
DTCO® fuelgate en fonction de la
consommation spécifiée.
Après un premier trajet d’essai,
vous pouvez
• consulter ces données de
consommation en les imprimant
directement sur le DTCO® 1381,
ou
• les télécharger pour les analyser
et les archiver à l’aide d’un
logiciel adapté.
Effectuer un premier trajet après
l’installation du DTCO® fuelgate :
Analyser les informations fournies sur
l’imprimé :
• Vérifier le fonctionnement du
DTCO® 1381,
• Comptez le nombre d’entrées par jour et
• insérer la carte conducteur ou la carte
atelier et
• effectuer un trajet (d’essai).
Une fois le trajet terminé, à partir de
l’affichage par défaut, procédez comme
ceci :
• Appelez les fonctions de menu.
• Sélectionnez printout vehicle.
• Sélectionnez status D1/D2.
• multipliez-les par le coefficient de
consommation paramétré.
Avec 2 entrées et un coefficient de 10
litres par impulsion (cf. page 17), on
obtiendrait par exemple une
consommation de 20 litres pour ce
premier trajet.
Pour une analyse plus aisée de la
consommation – notamment sur de plus
longues périodes ou pour un plus grand
nombre de véhicules – voir pages 20
et 21.
• Au besoin, régler la date et l’heure UTC.
Le DTCO® 1381 lance l’impression
choisie.
19
Condition requise : le DTCO® fuelgate est installé dans le
véhicule (cf. page 18) et opérationnel (cf. page 46).
Remarque : pour que les données de consommation soient
correctement enregistrées et analysées, il faut veiller à ce que
• la configuration du DTCO® fuelgate corresponde au modèle
du véhicule et à sa consommation,
• la Download Key et TIS-Web® DMM soient configurés,
• le DTCO® 1381 ne peut enregistrer que 1 000 impulsions
max. Une fois ce nombre atteint, toute nouvelle impulsion
viendra écraser une impulsion déjà enregistrée.
Conseil : choisissez un nombre de litres par impulsion
correspondant au modèle du véhicule et aux cycles de
téléchargement, par ex. 10 litres pour un semi-remorque et
1 litre pour une fourgonnette.
DTCO® fuelgate – Configuration du téléchargement
L’imprimé Status D1/ D2 prouve
que le DTCO® 1381 enregistre les
impulsions du DTCO® fuelgate par
l’entrée de statut 1.
Pour pouvoir à l’avenir transférer et
analyser confortablement ces
données,
• la Download Key doit savoir que
ce bloc de données doit
également être téléchargé, et
• le programme d’archivage doit
être préparé pour la réception et
l’interprétation de ces données.
Configurer le modèle de Download Key :
• Branchez la Download Key sur
l’ordinateur, par ex. avec un cordon
USB.
• Si l’application ne démarre pas
automatiquement, lancez-la
manuellement, par ex. depuis
« D:\start.exe ».
• Démarrez votre navigateur habituel et
identifiez-vous dans TIS-Web.
• Choisissez Settings et démarrez TISWeb DMM.
• Ouvrez le module Configuration >
onglet Download configuration.
• Cliquez sur Settings > System > Legal
Archive, puis cochez la case Other
Data Block.
• Dans la zone Special data, cochez la
case Status.
• Cliquez sur [Apply] et validez la
demande de confirmation par [OK].
• Pour valider vos modifications, cliquez
sur [Save].
Toutes les données sélectionnées
seront téléchargées lors du prochain
téléchargement.
20
Configurer TIS-Web DMM pour le
téléchargement par DLD® Short Range
ou DLD® Wide Range :
Ces paramètres seront importés par
Remote Manager afin que - à l’avenir les blocs de données choisis puissent
être importés.
Condition requise : les outils de téléchargement (DLK/ DLD)
sont configurés pour télécharger les données de consommation
(cf. page 20), les cartes conducteur, la mémoire de masse et les
données S seront téléchargées et – comme décrit ici –
l’enregistrement des données supplémentaires a été adapté.
Remarque : pour que TIS-Web® DMM puisse analyser
correctement le bloc de données Status/ Other Data, vous
devez au préalable modifier les options du menu déroulant
Additional Data Recording. Si l’option Fuel consumption de
ce menu déroulant n’est pas sélectionnée, les données
provenant du DTCO® fuelgate ne pourront pas être
correctement interprétées.
Pour que l’analyse de la consommation livre des informations
cohérentes, vous devez paramétrer le même nombre de litres
que celui défini pour le DTCO® fuelgate, cf. page 17.
TIS-Web® DMM – Analyse de la consommation
Les rapports issus de TIS-Web®
DMM vous fournissent des
analyses pertinentes sur la
consommation de carburant de vos
véhicules.
Après transfert des données
téléchargées, vous pouvez ainsi
• à partir de la synthèse des
activités, connaître la
consommation du véhicule au
100 km, et
• à partir du rapport de statut,
savoir combien de litres de
carburant le véhicule a
consommé par trajet.
Préparer l’analyse des données de
consommation par TIS-Web® DMM :
• Démarrez votre navigateur habituel et
identifiez-vous dans TIS-Web®.
• Choisissez Company Data Vehicles et
démarrez TIS-Web DMM.
• Cliquez sur [Modify] et ouvrez le menu
déroulant Additional Data Recording.
• Sélectionnez l’option Fuel
Consumption et choisissez le nombre
de litres par impulsion (cf. remarque).
• Validez votre saisie avec [Save] et le
message de confirmation par [OK].
Les analyses de la consommation
peuvent maintenant être réalisées.
Si vous souhaitez vérifier la
consommation moyenne de certains
véhicules, générez le rapport Vehicle
Activity Summary.
Si, pour comparer, vous avez besoin
d’une analyse établie sur une distance
parcourue, choisissez le rapport Vehicle
Status Protocol.
Pour savoir comment sélectionner les
rapports, lieux, véhicules, et périodes et
comment interpréter les lignes et
colonnes des rapports, consultez l’aide
en ligne de TIS-Web® DMM.
A partir de maintenant, l’analyse
s’effectue avec des indications de
consommation détaillées.
21
DTCO® fuelgate – Workflow
Service Partner
1
Create account to access
TIS-Web® and the
TIS-Web® DMM service
Send e-mail with
TIS-Web® access
credentials to customer
DTCO® fuelgate tool
Workshop
(configuration)
®
2
Workshop
TIS-Web® Admin
Download DTCO
fuelgate configuration
tool (www.dtco.vdo.com)
3
Determine
installation
location, e. g.
behind
DTCO®
Remove
DTCO®
Customer
- DTCO® only
Customer
- with TIS-Web®
4b
22
Insert workshop
card; remove plug
connector A (white)
from DTCO®
Establish connection between
DTCO® fuelgate
tool & device
®
Install and start tool
DTCO®
Workshop
(installation)
DTCO® fuelgate tool
Connect DTCO fuelgate
(box) to computer via
mini USB cable
DTCO® fuelgate
(box)
Connect cable to
DTCO® fuelgate
DTCO®
Carry out first trip with
DTCO® fuelgate installed
Select menu function
> printout
Configure download
devices for Status data
block downloading
Download mass
memory data
DTCO® fuelgate (box)
DTCO®
TIS-Web®
Start and log on
Configure DTCO® fuelgate
(box) for vehicle category
Exit tool and
disconnect DTCO®
fuelgate (box) from
computer
Connect cable FUEL OUT
(blue) to STATUS INPUT
(D1) on plug connector
D (brown)
Printout
Install DTCO®
fuelgate (box) in
vehicle (stationary)
DTCO® fuelgate
(box)
DTCO® fuelgate (box)
Connect cables to AMP
connector housing and to Y
cable (long end)
Select printout > vehicle
> status D1/D2
Workshop
(installation)
DTCO® fuelgate tool
Connect Y-cable
coupling (short) and
plug connector A (white)
Install DTCO®
fuelgate (box) and
DTCO®
Customer
(DTCO® only,
TIS-Web® DMM)
First consumption
data check
Count ... and multiply by
specified litres
TIS-Web® DMM
Start TIS-Web® DMM and
configure download settings
(Special Data data block) and
vehicle (Additional Data)
TIS-Web® DMM
Upload
downloaded data
to TIS-Web®
Create vehicle reports, e. g.
Vehicle Activity Protocol
Further
consumption
data check
Important: Check that the DTCO® fuelgate package is
complete based on the summary on page2.
Tip: These Installation Instructions have been devised to
facilitate the configuration and installation of the
DTCO® fuelgate.
You'll find additional information in the DTCO® Product Manual,
Download Key Guides and in the TIS-Web® DMM Help.
Condition: Download the “DTCO FuelgateInstall.zip” from
www.dtco.vdo.com and install the configuration software.
Important: Before you start configuring the device, check the
vehicle documents to find out which CAN bus protocol is being
used and how many litres of fuel correspond to one pulse.
Inform your customer about this value so that it can be entered
in TIS-Web® DMM. See the Tip on page 26.
DTCO® fuelgate – Hardware configuration
The DTCO® fuelgate is an
electronic fuel consumption
recording device. The recorded
data helps you to ease the rising
costs pressure by adopting an
economic driving style.
Condition:
• A DTCO® 1381 Rel. 1.2 (or
higher) must be installed.
• The DTCO® fuelgate must be
configured.
• The download must include the
“Status” data block.
• The archiving program must be
able to analyse the data block.
DTCO® fuelgate preparation by the
authorised workshop:
Prior to configuring the device
• the DTCO® fuelgate configuration
software and the
• the USB driver must be installed;
• the DTCO® fuelgate (box) must be
connected to the computer via the mini
USB cable.
The “Power/ CAN” LED lights up
(green). See also page 46.
Vehicle-specific configuration of the
DTCO® fuelgate:
• Select the correct vehicle protocol from
the CAN Handler list.
The information will be copied to the
DTCO® fuelgate.
• Specify the amount of fuel (in litres)
which corresponds to one pulse by
selecting the relevant value in the list.
This value will also be copied and saved
in the DTCO® fuelgate (no confirmation
required)
The DTCO® fuelgate is now configured.
Remove the mini USB cable.
You can now install the DTCO® fuelgate.
• Start the DTCO® fuelgate configuration
software.
23
Condition: The DTCO® fuelgate has been configured for the
vehicle. See page 23.
Caution: Working on a motor vehicle can be dangerous.
Observe the Health and Safety regulations for safety and
accident prevention at work while carrying out any such work.
Caution: Before working on the vehicle's electrical system,
observe the vehicle manufacturer's instructions without fail.
• Before removing the connection terminals from the battery,
make sure that all electrical consumers are switched off and
that you disconnect the negative terminal before the
positive terminal.
• Disconnecting the vehicle battery naturally prevents short
circuits but this could cause other side effects such as
deleting security codes and data.
DTCO® fuelgate – Hardware installation
The installation of the
DTCO® fuelgate neither requires
access to the vehicle's safety
equipment nor its fuel system. To
avoid damaging any other lines:
• Refer to the vehicle
documentation to find out about
the vehicle model and any
particular features.
• Refer to the vehicle drawings to
identify the position of fuel,
hydraulic and compressed air
lines and electrical cables.
24
Removal of the DTCO® 1381:
• Insert the workshop card (chip facing
upwards and arrow pointing forwards)
into the empty card slot.
• Remove the DTCO® according to the
manufacturer's guidelines.
• Remove plug connector A (white) and if used - plug connector D (brown).
Cable connection:
• Connect the cable to the
DTCO® fuelgate.
• Insert the unused cable (blue) into
position 1 (top left) of plug connector “D”
(brown) and connect the plug to socket
“D” on the DTCO® 1381.
• Push the cables (white, yellow, red,
brown) into the coupling. Then connect
the coupling with the plug connector on
the (long) Y cable.
• Connect the coupling on the (short) Y
cable with the plug connector “A”
(white). The left LED (green) flashes.
See page 46.
Install and fix the DTCO® fuelgate, e.g.
behind the DTCO®.
Install the DTCO® 1381 according to the
manufacturer's guidelines and remove
the workshop card.
Condition: The DTCO® fuelgate is installed in the vehicle (see
page 24) and ready for operation (LED indicator, see page 46).
Important: If connected to the vehicle's driveline, the CAN bus
delivers fuel consumption details, in addition to engine
revolutions and speed.
Based on the configuration (see page 23), the DTCO® fuelgate
converts the vehicle-specific data into data that can be saved in
the DTCO® 1381.
Tip: Carry out a test drive and evaluate the Status D1/D2
printout to ensure that the DTCO® fuelgate is installed and
configured according to the requirements.
Tip: For more information on how to print out data, please refer
to the DTCO® 1381 operating instructions.
DTCO® fuelgate – Status message printout
The installed DTCO® 1381 saves
the pulses (per specified amount of
fuel) sent by the DTCO® fuelgate
via its status input 1.
If you carry out a short test drive, for
example, the consumption data can
be
• reviewed directly by creating a
DTCO® 1381 printout or
• downloaded for easy evaluation
and archiving using the relevant
software program.
First trip after the DTCO® fuelgate has
been installed:
Analyse the printout, i.e.
• Check the DTCO® 1381's functions,
• multiply by the saved consumption
value.
• insert a driver or workshop card and
• drive the vehicle (test drive).
Starting from the standard display (after
the trip), proceed as follows:
• Call up the main menu.
• Select “printout vehicle”.
• Select status D1/D2.
• Specify the date and UTC time (if
necessary).
• count the number of entries per day and
If 2 entries are available for the first
journey and a value of 10 litres per
pulse has been configured (see
page 23), the fuel consumption will be
20 litres.
For more information about how to
conveniently evaluate the recorded
consumption data – especially for a
longer period and for several vehicles,
see pages 26 and 27.
The DTCO® 1381 will create the
requested printout.
25
Condition: The DTCO® fuelgate is installed in the vehicle (see
page 24) and ready for operation (LED indicator, see page 46).
Important: Please note the following to ensure that
consumption data will be copied correctly for evaluation:
• The vehicle model and its consumption details must be
configured in the DTCO® fuelgate.
• The Download Key and TIS-Web® DMM must be configured
accordingly.
• The DTCO® 1381 can only save up to 1,000 pulses. If this
maximum limit is reached, new pulses will overwrite the
existing ones.
Tip: You should therefore specify a fuel amount per pulse that
matches the vehicle model and download intervals, e.g. 10 litres
for trailers and 1 litre for vans.
DTCO® fuelgate – Download configuration
The Status D1/ D2 printout
documents that the DTCO® 1381
saves the pulses sent by the
DTCO® fuelgate via its status
input 1.
To ensure that this information is
transferred and can be easily
evaluated in the future, the
• Download Key must be
configured to download this data
block and
• the archiving program must be
prepared to receive and interpret
the data.
26
Configure your Download Key version:
• Connect the Download Key to the
computer, e.g. via USB cable.
• Start the relevant PC application, e.g.
via “D:\start.exe”, if the program has not
been started automatically.
• Choose Configuration (module) >
Download configuration (tab).
• Under the Special data data block,
select the Status check box.
• Click on [Save] to save the changes.
All the selected data will be downloaded
during the next download procedure.
Configure TIS-Web DMM for DLD® Short
Range or DLD® Wide Range download:
• Start your preferred browser and log on
to TIS-Web.
• Select Settings. Then start TIS-Web
DMM.
• Click on Settings > System > Legal
Archive and select the Other Data
Block check box.
• Click on [Apply] and confirm the
message that the settings have been
applied with [OK].
The settings will be imported by the
relevant Remote Manager. Future
downloads will include the selected data
blocks.
Condition: The download devices (DLK/ DLD) have been
configured to download consumption data (see page 26). The
units will download driver card, mass memory and S data. The
settings for downloading additional data are correct (as
described below).
Important: TIS-Web® DMM can only evaluate the Status/ Other
Data data block correctly if the setting described below has been
modified beforehand in the Additional Data Recording dropdown-menu. If the Fuel consumption option is not selected in
the Additional Data Recording drop-down menu, DTCO®
fuelgate data will not be interpreted correctly.
The fuel consumption evaluation will only provide correct values
if the number of litres is the same as in the DTCO® fuelgate
configuration. See page 23.
Tip: You'll find detailed information about TIS-Web® DMM
settings and reports in the TIS-Web® Help.
TIS-Web® DMM – Consumption data evaluation
TIS-Web® DMM reports provide
you with informative evaluations of
your vehicles' fuel consumption.
When you have transferred the
downloaded data,
• you can use the Activity
Summary to check the vehicle's
average fuel consumption per
100 km
• and to find out about the amount
of fuel consumed by the vehicle
for the distance travelled.
Preparing fuel consumption evaluation in
TIS-Web® DMM:
• Start your preferred browser and log on
to TIS-Web®.
• Select Company Data Vehicles and
start TIS-Web DMM.
• Click on [Modify] and select the
Additional Data Recording drop-down
menu.
• Select Fuel Consumption and specify
the number of pulses per litre (see
Note).
• Click on [Save] to apply the settings and
confirm the message with [OK].
If you want to check the selected
vehicle's average fuel consumption,
create the Vehicle Activity Summary
vehicle report.
If you want to compare vehicles and you
need an evaluation based on distance
travelled, select the Vehicle Status
Protocol vehicle report.
For information on how to select reports,
sites, vehicles, report periods and
interpret report lines and columns, please
refer to the TIS-Web® DMM Help.
From now on you can analyse your
vehicles based on detailed consumption
data.
You can now evaluate fuel
consumption.
27
DTCO® fuelgate – Procedura di lavoro
Service Partner
1
Generare l'account per
accedere a TIS-Web® e al
servizio TIS-Web® DMM
Inviare al cliente un e-mail
con i dati per accedere
a TIS-Web®
Tool DTCO® fuelgate
Centro tecnico
(configurazione)
2
Centro tecnico
TIS-Web® Admin
Scaricare il tool di
configurazione DTCO®
fuelgate: www.dtco.vdo.com
Installare e avviare
il tool
DTCO®
Centro tecnico
(montaggio)
3
Decidere il
luogo di
montaggio,
ad es. dietro
il DTCO®
Smontare
il DTCO®
Cliente
- solo DTCO®
Cliente
- con TIS-Web®
4b
28
Inserire la carta dell'
officina; scollegare
il connettore A
(bianco) dal DTCO®
Tool DTCO® fuelgate
®
Collegare al PC il DTCO
fuelgate (dispositivo) tramite
cavo mini-USB
DTCO® fuelgate
(dispositivo)
Collegare il
cavo al DTCO®
Fissare i cavi nel morsetto
connettore AMP e collegarlo
al cavo a Y (estremità lunga)
Selezionare funzione
di menu > printout
Configurare i dispositivi
di download per il
download del blocco
dati (Status)
Scaricare i dati della
memoria di massa
DTCO®
TIS-Web®
Avviare e
accedere
Configurare il DTCO®
fuelgate (dispositivo) in
funzione alla categoria
di veicolo
Chiudere il tool e
scollegare il DTCO®
fuelgate (dispositivo)
dal PC
Montare (fisso) il
DTCO® fuelgate
(dispositivo) nel
veicolo
DTCO® fuelgate
(dispositivo)
Collegare il cavo FUEL
OUT (blu) allo STATUS
INPUT (D1) del connettore
D (marrone)
Stampato
Scegliere printout
> vehicle > status D1/D2
Centro tecnico
(montaggio)
Tool DTCO® fuelgate
DTCO® fuelgate
(dispositivo)
DTCO® fuelgate
(dispositivo)
DTCO®
Eseguire il primo giro di
prova con il DTCO®
fuelgate montato
Instaurare la
connessione tramite
il tool DTCO®
fuelgate e il
dispositivo
Collegare il morsetto
connettore del cavo a
Y (corto) e il connettore
A (bianco)
Montare il DTCO®
fuelgate (dispositivo)
e il DTCO®
Cliente
(solo DTCO®
e con
TIS-Web® DMM)
Primo esame
dei dati consumo
Contare gli input e
moltiplicare per la potenza
per litro prestabilita
TIS-Web® DMM
Avviare il TIS-Web® DMM e
configurare le impostazioni di
download (blocco dati Special
Data) e dettagli veicolo
(dati aggiuntivi)
TIS-Web® DMM
Caricare in
TIS-Web® i
dati scaricati
Generare i report, ad es.
Vehicle Activity Protocol
Ulteriore esame
dei dati consumo
Nota: a mezzo del sommario a pag. 2, verificare che confezione
DTCO® fuelgate contenga l'intera dotazione.
Suggerimento: le presenti istruzioni di montaggio facilitano la
configurazione e il montaggio di un DTCO® fuelgate.
Per informazioni complementari, consultare il manuale del
DTCO®, le istruzioni per l'uso del Download Key e la guida
online di TIS-Web® DMM.
Requisiti: scaricare «DTCO FuelgateInstall.zip» da
www.dtco.vdo.com ed installare il software di configurazione.
Nota: prima di configurare, leggere la documentazione del
veicolo per informarsi sul tipo di bus CAN utilizzato e sapere
quanto carburante corrisponde ad un impulso.
Fornire questi valori al cliente per affinché vengano memorizzati
nel TIS-Web® DMM; vedi suggerimento a pag. 32.
DTCO® fuelgate – Configurazione dell'hardware
DTCO® fuelgate è un dispositivo
elettronico che rileva il consumo di
carburante. I dati registrati
consentono di far fronte con una
guida economica alla pressione sui
costi in aumento.
Requisiti:
• è installato un DTCO® 1381
vers. 1.2 (o superiore);
• DTCO® fuelgate è stato
configurato;
• il download contiene il blocco
dati «Status»;
• il software di archiviazione può
valutare il blocco dati.
Preparazione di un DTCO® fuelgate a
cura di un centro tecnico autorizzato:
Prerequisiti per la configurazione
• Il software di configurazione
DTCO® fuelgate è installato;
• il driver USB è installato;
• il DTCO fuelgate (box) è collegato al
PC tramite cavo mini-USB.
®
Il LED «Power/ CAN» è accesso
(verde); vedi anche a pag. 46.
• Tramite il campo CAN Handler,
scegliere il protocollo per il veicolo
previsto.
Questa scelta viene trasferita e salvata
nel DTCO® fuelgate.
• Nell'elenco di selezione, impostare il
consumo di carburante (in litri) da
assegnare ad un impulso.
Questa scelta viene trasferita e salvata
nel DTCO® fuelgate; non è necessaria
alcuna conferma.
Configurare in modo specifico un
DTCO® fuelgate:
Il DTCO® fuelgate è così configurato;
rimuovere il cavo mini-USB.
• Avviare il software di configurazione
DTCO® fuelgate.
Installare il DTCO® fuelgate.
29
Requisiti: è stata eseguita la configurazione specifica del
DTCO® fuelgate; vedi a pag. 29.
Attenzione: eseguire lavori ad un veicolo può essere
pericoloso. Eseguire tutti i lavori secondo le norme
antinfortunistiche e di sicurezza dell'associazione professionale.
Attenzione: per i lavori alla rete di bordo, attenersi
assolutamente alle rispettive indicazione della casa
automobilistica.
• Prima di scollegare i morsetti dalla batteria, assicurarsi che
tutte le utenze elettriche siano spente e rimuovere prima il
morsetto negativo e poi quello positivo.
• Scollegando la batteria del veicolo si evitano cortocircuiti,
però si rischiano altre «conseguenze», come ad es.
cancellazione dei codici di sicurezza e di dati.
DTCO® fuelgate – Installazione dell'hardware
L'installazione del DTCO® fuelgate
non prevede alcun intervento nella
tecnologia di sicurezza e
nell'impianto del carburante del
veicolo. Per evitare di danneggiare
gli altri condotti:
• Leggere la documentazione del
veicolo per informarsi sul
modello di veicolo e le rispettive
specifiche.
• Esaminare gli schemi costruttivi
per verificare la posizione del
cablaggio, dei tubi idraulici,
pneumatici e del carburante.
30
Smontare il DTCO® 1381:
• Inserire la carta dell'officina (chip in alto/
freccia in avanti) in un vano disponibile.
• Smontare il DTCO® secondo le
istruzioni del produttore.
• Scollegare il connettore A (bianco) e –
se già occupato – il connettore D
(marrone).
Collegare il cavo:
• Collegare il cavo al DTCO® fuelgate.
• Fissare il cavo libero (blu) nella prima
posizione (in lato a sinistra) del
connettore «D» (marrone) e collegare
alla presa «D» (marrone) del
DTCO® 1381.
• Fissare i cavi liberi (bianco, giallo, rosso
e marrone) alla presa e collegarla al
connettore del cavo a Y (lungo).
• Collegare la presa del cavo a Y (corto) e
il connettore «A» (bianco). Il LED
sinistro (verde) lampeggia; vedi a
pag. 46.
Montare il DTCO® fuelgate e fissarlo, ad
es. dietro il DTCO®.
Montare il DTCO® 1381 secondo le
istruzioni del produttore e rimuovere la
carta dell'officina.
Requisiti: il DTCO® fuelgate è montato sul veicolo (vedi a
pag. 30) e pronto per l'uso stando al display a LED (vedi a pag.
46).
Nota: il bus CAN fornisce, se collegato agli organi di
trasmissione, i dati regime motore, velocità e consumo di
carburante.
In base alla configurazione (vedi a pag. 29), il DTCO® fuelgate
converte questi dati in informazioni che possono essere
memorizzate nel DTCO® 1381.
Suggerimento: eseguire un giro di prova ed esaminare il
stampato sullo Status D1/D2 per verificare che il
DTCO® fuelgate sia montato e configurato come da istruzioni.
Suggerimento: per ulteriori informazioni sul stampato dei dati,
consultare le istruzioni per l'uso del DTCO® 1381.
DTCO® fuelgate – Stampa del messaggio di stato
A montaggio avvenuto, il
DTCO® 1381 registra, tramite
l'ingresso di stato 1, gli impulsi in
uscita dal DTCO® fuelgate per ogni
consumo predefinito.
I dati consumo di carburante (ad es.
dopo un breve giro di prova)
possono essere
• esaminati tramite stampato del
DTCO® 1381 oppure
• scaricati e quindi valutati e
archiviati comodamente tramite
software.
Eseguire un primo giro di prova a
montaggio avvenuto del DTCO® fuelgate:
Esaminare i dati del stampato:
• Verificare il funzionamento del
DTCO® 1381.
• moltiplicare il risultato per il consumo
registrato.
• Inserire la carta conducente o quella
dell'officina.
• Eseguire il giro di prova.
Al termine del giro di prova, partendo
dalla schermata standard, procedere
come segue:
• Richiamare le funzioni di menu.
• Selezionare printout vehicle.
• Selezionare status D1/D2.
• Contare il numero di input al giorno e
Ad es., si supponga che, riguardo al
primo giro di prova, il numero di input
sia pari a 2 e il consumo registrato sia
pari a 10 litri per impulso (vedi a
pag. 29), il consumo calcolato sarà di 20
litri.
Per una valutazione comoda dei dati
consumo acquisiti, specialmente per un
lungo periodo di tempo e per più veicoli,
consultare a pagg. 32 e 33.
• specificare la data e l'ora UTC.
Il DTCO® 1381 avvia il stampato scelto.
31
Requisiti: il DTCO® fuelgate è montato sul veicolo (vedi a
pag. 30) e pronto per l'uso stando al display a LED (vedi a pag.
46).
Nota: per l'ottimo trasferimento e l'ottima valutazione dei dati
consumo, è necessario:
• che la configurazione del DTCO® fuelgate corrisponda al
modello di veicolo e al rispettivo consumo;
• configurare sia il Download Key che il TIS-Web® DMM;
• che il DTCO® 1381 possa registrare solo fino a 1.000 impulsi.
Raggiunto il valore massimo, ogni impulso successivo
sovrascrive il rispettivo numero di impulsi salvato.
Suggerimento: scegliere, quindi, anche un numero di litri per
impulso, che corrisponda al modello di veicolo e ai cicli di
download, ad es. autotreno 10 litri, furgone 1 litro.
DTCO® fuelgate – Configurazione di download
Il stampato sullo Status D1/ D2
dimostra che il DTCO® 1381
registra tramite l'input di stato 1 gli
impulsi provenienti dal
DTCO® fuelgate.
Affinché questi dati possano essere
in futuro trasferiti e letti
comodamente,
• il Download Key deve sapere
che anche questi dati vanno
scaricati;
• il software di archiviazione deve
essere configurato per ricevere
ed interpretare i dati.
32
Configurare le varianti utilizzate di
Download Key:
• Collegare al PC il Download Key, ad es.
tramite cavo USB.
• Se non si avvia automaticamente,
avviare la rispettiva applicazione per
PC, ad es. «D:\start.exe».
• Passare al modulo Configuration >
scheda Download configuration.
• Nel blocco dati Special data,
selezionare la casella Status.
• Fare clic su [Save] per applicare le
modifiche.
Tutti i dati selezionati verranno scaricati
con il prossimo download.
Configurare TIS-Web DMM per il
download con il DLD® Short Range o il
DLD® Wide Range:
• Avviare il browser preferito e accedere a
TIS-Web.
• Scegliere Settings e avviare TIS-Web
DMM.
• Fare clic su Settings > System > Legal
Archive e selezionare la casella Other
Data Block.
• Fare clic su [Apply] e confermare
l'applicazione delle impostazioni
premendo [OK].
I dati vengono importati dal Remote
Manager utilizzato, affinché i blocchi
dati selezionati possano essere
scaricati in futuro.
Requisiti: i dispositivi di download (DLK/ DLD) sono configurati
per scaricare i dati consumo (vedi a pag. 32); vengono scaricati
i dati delle carte dei conducenti, della memoria di massa e di
servizio e, come qui descritto, vengono aggiornate le
impostazioni per la registrazione di dati aggiuntivi.
Nota: TIS-Web® DMM può valutare correttamente il blocco dati
Status/ Other Data solo se si seleziona la voce consumo di
carburante nel menu a discesa Additional Data Recording. Se
non si seleziona Fuel consumption nel menu a discesa
Additional Data Recording, i dati del DTCO® fuelgate vengono
interpretati in modo errato.
Affinché la valutazione del consumo carburante fornisca valori
validi, indicare la stessa quantità di litri immessa nella
configurazione di DTCO® fuelgate; vedi a pag. 29.
Suggerimento: per i dettagli sulle impostazioni in TIS-Web®
DMM e i report, consultare la guida online di TIS-Web®.
TIS-Web® DMM – Valutazione dei dati consumo
Con i report in TIS-Web® DMM si
dispone di valutazioni conclusive
sul consumo di carburante dei
veicoli.
Dopo il trasferimento dei dati di
download, è possibile:
• verificare nel sommario delle
attività la media di carburante
consumato per 100 km;
• verificare nel protocollo di stato il
quantitativo di carburante che il
veicolo ha consumato per ogni
distanza percorsa.
Preparare la valutazione dei dati
consumo tramite TIS-Web® DMM:
• Avviare il browser preferito e accedere a
TIS-Web®.
• Scegliere Company Data Vehicles e
avviare TIS-Web DMM.
• Fare clic su [Modify] e scegliere il menu
a discesa Additional Data Recording.
• Selezionare Fuel Consumption e la
quantità di litri per impulso (vedi nota).
• Salvare le selezioni premendo [Save] e
confermare il salvataggio premendo
[OK].
Per verificare il consumo medio di
carburante di veicoli selezionati, generare
il report Vehicle Activity Summary.
Per una valutazione riferita alla distanza
percorsa a fini comparativi, scegliere il
report Vehicle Status Protocol.
Per sapere come selezionare report,
luoghi, veicoli e periodi ed interpretare le
righe e le colonne dei report, consultare
la guida online di TIS-Web® DMM.
D'ora in avanti la valutazione avverrà con
dati consumo dettagliati.
È possibile dunque eseguire le
valutazioni del consumo carburante.
33
DTCO® fuelgate – Werkproces
Service partner
1
Werkplaats
TIS-Web® Admin
Tool DTCO® fuelgate
Werkplaats
(configuratie)
®
2
E-mail met toegangsgegevens
voor TIS-Web® aan de klant sturen
Account voor toegang tot
TIS-Web® en de service
TIS-Web® DMM aanmaken
Configuratietool DTCO
fuelgate downloaden:
www.dtco.vdo.com
Tool installeren
en starten
Tool DTCO® fuelgate
DTCO fuelgate (apparaat)
per mini-USB-kabel aan de
computer aansluiten
DTCO®
Werkplaats
(Montage)
3
Inbouwlocatie
bepalen, bijv.
achter de
DTCO®
DTCO®
demonteren
Klant
- alleen DTCO®
Klant
- met TIS-Web®
4b
34
Werkplaatskaart
in apparaat stoppen;
stekker A (wit) uit
DTCO® trekken
DTCO®
Eerste rit met
gemonteerde
DTCO® fuelgate
Met de menu-optie
> printout selecteren
Download-apparaten
voor het downloaden van
het gegevensblok Status
configureren
Massageheugendata
downloaden
®
Kabel aan de
DTCO® fuelgate
aansluiten
Aansluitleidingen in de
AMP-stekkerbehuizing
stoppen en met het lange
einde van de Y-kabel
verbinden
DTCO®
TIS-Web®
Tool sluiten en DTCO®
fuelgate (apparaat) van
computer loskoppelen
DTCO® fuelgate
(apparaat)
DTCO® fuelgate
(apparaat)
Kabel FUEL OUT (blauw)
met STATUS INPUT (D1)
van stekker D (bruin)
verbinden
Koppeling van de
Y-kabel (kort) en stekker
A (wit) verbinden
Uitdraai
printout > vehicle >
status D1/D2 selecteren
Starten en
aanmelden
DTCO® fuelgate
(apparaat) aangepast aan
voertuigcategorie
configureren
DTCO® fuelgate
(apparaat)
DTCO® fuelgate
(apparaat)
Werkplaats
(Montage)
Tool DTCO® fuelgate
Verbinding maken
tussen DTCO®
fuelgate tool en
het apparaat
Markeringen tellen en met
de ingestelde verbruiksliters
vermenigvuldigen
DTCO® fuelgate
(apparaat) en
DTCO® monteren
Klant
(alleen DTCO®
en met
TIS-Web® DMM)
Eerste controle
van verbruiksgegevens
TIS-Web® DMM
TIS-Web® DMM starten en
download-instellingen
(gegevensblok Special Data)
evenals voertuigdetails
(extra gegevens) configureren
DTCO® fuelgate
(apparaat) in
voertuig monteren
(stationair)
TIS-Web® DMM
Gedownloade
gegevens
uploaden naar
TIS-Web®
Voertuigrapporten
aanmaken, bijv.
Vehicle Activity Protocol
Verdere controle
van verbruiksgegevens
Opmerking: controleer m.b.v. het overzicht op pagina 2 de
inhoud van het pakket van de DTCO® fuelgate op volledigheid.
Tip: deze montagehandleiding is bedoeld om u de weg te wijzen
bij het configureren en monteren van een DTCO® fuelgate.
Aanvullende informatie vindt u in het producthandboek van de
DTCO®, in de handleidingen van de Download Keys alsook de
online help van TIS-Web® DMM.
Vereiste: download “DTCO FuelgateInstall.zip” van
www.dtco.vdo.com en installeer de configuratiesoftware.
Opmerking: ga, voor u met de configuratie begint, met behulp
van de documentatie van het voertuig na, welk CAN-bus
protocol wordt toegepast en hoeveel brandstof overeenkomt
met één puls. Geef deze waarde door aan de klant, zodat deze
in TIS-Web® DMM kan worden opgeslagen; zie tip op
pagina 38.
DTCO® fuelgate – hardware configureren
De DTCO® fuelgate is een
elektronisch apparaat dat het
brandstofverbruik registreert.
Hiervoor moet
• er een DTCO® 1381 vanaf rel.
1.2 zijn ingebouwd,
• de DTCO® fuelgate worden
geconfigureerd,
• de download van het
gegevensblok “Status” zijn
geïntegreerd en
• het archiveringsprogramma het
gegevensblok kunnen
evalueren.
Voorbereiding van een DTCO® fuelgate
door een geautoriseerde werkplaats:
Om te kunnen configureren, moet
• de configuratiesoftware van
DTCO® fuelgate zijn geïnstalleerd,
• de USB-driver zijn geïnstalleerd en
• de DTCO fuelgate (Box) via een miniUSB-kabel aan de computer worden
aangesloten.
®
DE LED “Power/ CAN” gaat branden
(groen); zie ook pagina 46.
Een DTCO® fuelgate specifiek voor het
voertuig configureren:
• Start de configuratiesoftware
DTCO® fuelgate.
• Selecteer met behulp van het veld CAN
Handler het betreffende protocol voor
de beoogde voertuig.
De selectie wordt naar de
DTCO® fuelgate overgedragen.
• Bepaal met behulp van de keuzelijst,
welk brandstofverbruik in liters moet
overeenstemmen met één puls.
Deze selectie wordt eveneens
overgedragen en in de DTCO® fuelgate
opgeslagen; er volgt geen bevestiging.
De DTCO® fuelgate is geconfigureerd; de
mini-USB-kabel kan worden verwijderd.
U kunt deze DTCO® fuelgate monteren.
35
Vereiste: de DTCO® fuelgate is specifiek voor het voertuig
geconfigureerd; zie pagina 35.
Let op: werkzaamheden aan een voertuig kunnen gevaarlijk
zijn. Voer alle werkzaamheden uit in overeenstemming met de
veiligheids- en ongevallenpreventievoorschriften van het vak.
Let op: alvorens u met werkzaamheden aan de elektrische
installatie begint, dient u de betreffende instructies van de
fabrikant van het voertuig lezen.
• Controleer, alvorens u de accuklemmen van de accu
losmaakt, of alle elektrische verbruikers zijn uitgeschakeld;
verwijder eerst de min-pool, dan de plus-pool.
• Het losmaken van de accupolen kan weliswaar kortsluiting
voorkomen, maar heeft andere «bijwerkingen", zoals het
wissen van beveiligingscodes en gegevens.
DTCO® fuelgate – hardware monteren
De montage van de
DTCO® fuelgate vereist geen
ingrepen in de
veiligheidstechnologie of in het
brandstofsysteem van het voertuig.
Om ook geen andere leidingen te
beschadigen:
• studeer de bij het voertuig
horende documentatie m.b.t. het
type voertuig en eventuele
bijzondere kenmerken.
• Kijk ook naar de
leidingsschema's om de locatie
van brandstof-, hydraulische,
pneumatische en elektrische
leidingen vast te stellen.
36
DTCO® 1381 demonteren:
• Stop de werkplaatskaart (met chip naar
boven en pijl naar voren) in de vrije
kaartsleuf.
• DTCO® demonteren volgens
specificaties fabrikant.
• Stekker A (wit) en – indien al toegekend
– stekker D (bruin) losmaken.
Kabel aansluiten:
• Kabel aansluiten op de DTCO® fuelgate.
• Niet-toegekende kabel (blauw) in positie
1 (boven links) van stekker “D” (bruin)
steken en vervolgens de stekker met
aansluiting “D” van de DTCO® 1381
verbinden.
• De niet-toegekende kabels (wit, geel,
rood en bruin) in de koppeling steken en
met stekker van de Y-kabel verbinden
(lang).
• De koppeling van de Y-kabels (kort) en
stekker “A” (wit) verbinden. De linker
LED (groen) gaat knipperen; zie
pagina 46.
DTCO® fuelgate inbouwen en bevestigen,
bijv. achter de DTCO®.
DTCO® 1381 volgens specificaties van de
fabrikant inbouwen en werkplaatskaart
verwijderen.
Vereiste: de DTCO® fuelgate is al in het voertuig ingebouwd (zie
pagina 36) en de LED-indicatie meldt dat hij operationeel is (zie
pagina 46).
Opmerking: de CAN-bus levert – als er een verbinding met de
aandrijving bestaat – behalve gegevens over toerental en
snelheid, ook gegevens over brandstofverbruik.
Deze voertuig-specifieke gegevens converteert de
DTCO® fuelgate in overeenstemming met zijn configuratie (zie
pagina 35) in informatie die in de DTCO® 1381 kan worden
opgeslagen.
Tip: d.m.v. een proefrit en daarna een evaluatie van de uitdraai
van de Status D1/D2 kunt u zich ervan verzekeren dat de
DTCO® fuelgate volgens de specificaties is ingebouwd en
geconfigureerd.
Tip: meer informatie over het printen van gegevens vindt u in de
gebruiksaanwijzing van de DTCO® 1381.
DTCO® fuelgate – statusmelding printen
Na het inbouwen slaat de
DTCO® 1381 via de statusingang 1
de pulsen per vastgelegd verbruik
op die van de DTCO® fuelgate
komen.
Deze verbruiksgegevens kunt u,
bijv. na een korte proefrit,
• m.b.v. een uitdraai van de
DTCO® 1381 direct worden
bekeken of
• via de download en de
betreffende software comfortabel
worden geëvalueerd en
gearchiveerd.
Eerste proefrit na inbouw van de
DTCO® fuelgate:
Evalueer de gegevens van de uitdraai
door
• Functioneren van de DTCO® 1381
controleren,
• het aantal vermeldingen per dag op te
tellen en
• bestuurderskaart of werkplaatskaart in
het toestel steken en
• met de ingestelde verbruikswaarde te
vermenigvuldigen.
• (proef)rit uitvoeren.
Uitgaande van de standaardweergave,
gaat u na de proefrit als volgt te werk:
• Menu-opties oproepen.
• printout vehicle selecteren.
• status D1/D2 selecteren.
• Zo nodig datum en UTC-tijd instellen.
De DTCO® 1381 start de geselecteerde
uitdraai.
We kunnen bijvoorbeeld na deze eerste
rit op basis van de 2 vermeldingen en
de ingestelde waarde van 10 liter per
puls (zie pag. 35) een verbruik van 20
liter berekenen.
Voor uitleg over hoe u de geregistreerde
verbruiksgegevens comfortabel kunt
evalueren – vooral na een langere
tijdsperiode en van meerdere
voertuigen – zie pagina 38 en 39.
37
Vereiste: de DTCO® fuelgate is al in het voertuig ingebouwd (zie
pagina 36) en de LED-indicatie meldt dat hij operationeel is (zie
pagina 46).
Opmerking: om verbruiksgegevens zonder problemen te
kunnen overnemen en evalueren, dient u erop te letten dat
• de configuratie van de DTCO® fuelgate met het type voertuig
en het verbruik ervan overeenkomt.
• de Download Key evenals de TIS-Web® DMM moeten
worden geconfigureerd en
• de DTCO® 1381 slechts max. 1000 pulsen kan opslaan. Als
het maximum aantal is bereikt, zal elke volgende puls het
overeenkomstige aantal opgeslagen pulsen overschrijven.
Tip: kies daarom een aantal liters per puls dat overeenkomt met
het type voertuig en de downloadcycli, bijv. oplegger 10 liter en
bestelbus1 liter.
DTCO® fuelgate – download configureren
De uitdraai van Status D1/ D2 toont
aan dat de DTCO® 1381 de van de
DTCO® fuelgate komende pulsen
via statusingang 1 opslaat.
Om deze informatie in de toekomst
te kunnen overdragen en om ze
comfortabel te kunnen evalueren,
moet
• de Download Key weten dat dit
gegevensblok ook moet worden
gedownload, en
• het archiveringsprogramma voor
de ontvangst en interpretatie van
gegevens zijn voorbereid.
38
Configureer het door u gebruikte model
van de Download Key:
• Sluit de Download Key aan op uw
computer, bijv. via USB-kabel.
• Start, indien niet al automatisch gestart,
de betreffende pc-app, bijv.
“D:\start.exe”.
• Ga nu naar de module Configuration >
tabblad Download configuration.
• Selecteer in het gegevensblok Special
data het selectievakje Status.
• Klik op [Save] om de aanpassingen
over te nemen.
Alle gegevens die zijn geselecteerd,
zullen de volgende keer worden
gedownload.
Configureer TIS-Web DMM voor het
downloaden via DLD® Short Range of
DLD® Wide Range:
• Starten de gewenste browser en meldt
u zich aan bij TIS-Web.
• Kies Settings en start TIS-Web DMM.
• Klik op Settings > System > Legal
Archive en selecteer het selectievakje
Other Data Block.
• Klik op [Apply] en bevestig de melding
over het accepteren van de instellingen
met [OK].
De instellingen worden door de
gebruikte Remote Manager
geïmporteerd, zodat de gekozen
gegevensblokken in de toekomst
kunnen worden gedownload.
Vereiste: de apparaten voor de download (DLK/ DLD) zijn
geconfigureerd voor het downloaden van verbruiksgegevens
(zie pagina 38); er worden bestuurderskaarten-, massageheugen- en S-data gedownload en – zoals hier beschreven – de
gegevens voor het registreren van de bijkomende gegevens zijn
aangepast.
Opmerking: TIS-Web® DMM kan het gegevensblok Status/
Other Data pas correct evalueren nadat de hierna beschreven
wijziging in het vervolgmenu Additional Data Recording
is uitgevoerd. Als de optie Fuel consumption in het vervolgmenu niet is geselecteerd, zullen de gegevens van de DTCO®
fuelgate verkeerd worden geïnterpreteerd.
De evaluatie van het brandstofverbruik kan pas de juiste
waarden leveren als hetzelfde aantal liters wordt ingevoerd als
in de configuratie van de DTCO® fuelgate.
TIS-Web® DMM – verbruiksgegevens evalueren
De rapporten van TIS-Web® DMM
leveren zinvolle evaluaties over het
brandstofverbruik van uw
voertuigen.
U kunt bijvoorbeeld na het
overdragen van de downloadgegevens in
• het activiteitenoverzicht
controleren hoeveel brandstof
het voertuig per 100 km
gemiddeld heeft verbruikt en in
• het statusverslag lezen, hoeveel
brandstof het voertuig per
afgelegd traject heeft verbruikt.
Voorbereiding van de evaluatie van verbruiksgegevens met TIS-Web® DMM:
• Start de gewenste browser en meldt u
zich aan bij TIS-Web®.
• Kies Company Data Vehicles en start
TIS-Web DMM.
• Klik op [Modify] en selecteer het vervolgmenu Additional Data Recording
• Selecteer de optie Fuel Consumption
en kies het aantal liter per impuls (zie
opmerking).
• Neem de gegevens over met [Save] en
bevestig en de melding met [OK].
Evaluaties van het brandstofverbruik
kunnen nu worden uitgevoerd.
Als u het gemiddelde brandstofverbruik
van bepaalde voertuigen wilt controleren,
maak dan een voertuigrapport op Vehicle
Activity Summary.
Als u echter om te vergelijken een evaluatie nodig hebt die baseert op het afgelegde traject, selecteer dan het
voertuigrapport Vehicle Status Protocol.
Hoe u de rapporten, locaties, voertuigen
en tijdsperioden selecteert en de regels
en kolommen van de rapporten kunt
interpreteren, vindt u in de online help
van TIS-Web® DMM.
Vanaf nu krijgt u in elk geval evaluaties
met gedetailleerde verbruiksgegevens.
39
DTCO® fuelgate – Рабочий процесс
Сервис-партнер
1
Создать учетную запись
для получения доступа к
TIS-Web® и услуге
TIS-Web® DMM
Загрузить средство
конфигурации DTCO®
fuelgate на веб-странице:
www.dtco.vdo.com
3
Задать место
установки, например, с обратной стороны
DTCO®
DTCO®
Демонтаж
Клиент
- только DTCO®
Клиент
- с TIS-Web®
4b
Вставить карту
мастерской; штекер
A (белый)
отсоединить от
DTCO®
DTCO®
Выполнить первую
поездку с установленным
DTCO® fuelgate
40
Установить
приложение
и запустить
DTCO®
Мастерская
(Монтаж)
RUS
Отправить клиенту
электронное сообщение
с данными доступа к
TIS-Web®
Приложение DTCO®
fuelgate
Мастерская
(Конфигурация)
2
Мастерская
TIS-Web® Admin
Выбрать в функциях
Меню > Печать
Приложение DTCO®
fuelgate
Установить
соединение между
приложением
DTCO® и
устройством
Подключить устройство
DTCO® fuelgate к
компьютеру с помощью
USB-кабеля
Загрузить данные
устройства памяти
Закрыть приложение и
отсоединить устройство
DTCO® fuelgate от
компьютера
DTCO® fuelgate
(устройство)
DTCO® fuelgate
(устройство)
Подсоединить кабель
FUEL OUT (синего цвета)
в STATUS INPUT (D1)
штекера D (коричневого
цвета)
Соединить муфту
Y-образного кабеля
(короткий) и штекера
A (белого цвета)
Соединительные провода
вставить в корпус штекера и
соединить с длинным концом
Y-образного кабеля
Подключить
кабель к DTCO®
fuelgate
DTCO®
Выбрать printout >
vehicle > status D1/D2
Запустить и
зарегистрироваться
Мастерская
(Монтаж)
Выполнить конфигурацию
устройства DTCO® fuelgate
в соответствии с классом
транспортного средства
DTCO® fuelgate
(устройство)
DTCO® fuelgate
(устройство)
TIS-Web®
Конфигурировать Загрузку
устройство для загрузки
статуса блока данных
Приложение DTCO®
fuelgate
Печать
Установить устройство
DTCO® fuelgate в
транспортное средство
(стационарное)
Установить
устройство DTCO®
и DTCO®
Клиент
(только DTCO®
ис
TIS-Web® DMM)
Первая проверка
данных о расходе
Посчитать количество
маркировок и умножить их
на заданную мощность в литрах
TIS-Web® DMM
Запустить TIS-Web® DMM и выполнить
конфигурацию Настроек загрузки
(Специальных данных блока данных),
а также данных о транспортном
средстве (Дополнительные данные)
Выгрузить
загруженные
данные в
TIS-Web®
TIS-Web® DMM
Создать отчеты о
транспортном средстве,
например, Vehicle Activity
Protocol
Дальнейшая
проверка данных
о расходе
Указания: Согласно перечню следует проверить 2 полную
комплектацию DTCO® fuelgate.
Рекомендация: Данное Руководство по установке
предоставляет инструкции по конфигурации и установке
DTCO® fuelgate.
Дополнительные данные находится в Руководстве по
эксплуатации DTCO®, где изложены указания по загрузке
Download Key, и службы онлайн-поддержки TIS-Web® DMM.
Условия: Загрузите файл «DTCO FuelgateInstall.zip» на
www.dtco.vdo.com и установите программное
обеспечение для выполнения конфигурации.
Указания: Перед выполнением конфигурации необходимо
проверить в документах на транспортное средство,
какой протокол шины CAN используется, и какое
количество топлива соответствует одному импульсу.
Передайте это значение клиенту для сохранения в TISWeb® DMM; см. Рекомендации 44.
DTCO® fuelgate – устройства
DTCO® fuelgate - это электронное
устройство для учета расхода
топлива. Экономный режим
эксплуатации записи данных
помогает избежать высоких
расходов.
Необходима установка:
• DTCO® 1381 вер. 1.2.
• и настройка DTCO® fuelgate,
• чтобы иметь возможность
оценки загрузки блока данных
«Status» и
• программы-архиватора.
Подготовка DTCO® fuelgate с помощью
авторизованной мастерской:
Для конфигурации следует:
• установить ПО конфигурации
DTCO® fuelgate,
• установить драйвер для USB и
• подключить DTCO® fuelgate (коробку)
к компьютеру через мини-USBкабель.
Загорится индикатор «Power/ CAN»
(зеленый цвет); см. 46.
• На основании поля программыобработки CAN Handler
соответствующий протокол для
определенного транспортного
средства.
Данные будут переданы в
DTCO® fuelgate.
• В раскрывающемся меню выберите
значение потребления топлива в
литрах, которое соответствует
одному импульсу.
Указанное значение будет также
сохранено в DTCO® fuelgate.
Для конфигурации DTCO fuelgate в
зависимости от конкретного
транспортного средства:
DTCO® fuelgate таким образом
сконфигурирован.
• Выполните запуск программного
обеспечения DTCO® fuelgate.
Вы можете выполнить монтаж
DTCO® fuelgate.
®
41
Внимание: Выполнение работ на транспортном
средстве может быть опасным. Все работы необходимо
выполнять в строгом соответствии с инструкциями
Общества страхователей и Предупреждения
возникновения несчастных случаев.
Внимание: Перед выполнением работ на бортовой
электросети следуйте инструкциям производителя
транспортного средства.
• Перед отсоединением выводных зажимов от батареи
следите, чтобы все электрические детали были
отключены, и чтобы зажим с полюсом минус- был
отсоединен от зажима с полюсом плюс+ .
• Отсоединение выводных зажимов от батареи
транспортного средства хотя и предупреждает
короткое замыкание, но могут появится и другие
«побочные эффекты», например, удаление кода
безопасности и данных.
DTCO® fuelgate - монтаж устройства
RUS
Монтаж DTCO® fuelgate не
требует ни вмешательство в
технологии безопасности, ни в
циркуляцию топлива в
транспортном средстве. Чтобы
не повредить другие провода:
• Просмотрите схемы
коммутации, чтобы проверить
топливные, гидравлические, и
сжатого воздуха
трубопроводы.
Демонтаж DTCO® 1381:
• Вставьте карту мастерской (чип
должен находится сверху, а стрелка
спереди) в разъем для карты.
• Извлеките DTCO® в соответствии с
инструкциями поставщика.
• Освободите штекер A (белого цвета)
и – если был подключен – штекер D
(коричневого цвета).
Подключите кабель:
• Подключите кабель к DTCO® fuelgate.
• Свободный кабель (синего цвета)
зафиксируйте в положении 1 (сверху
слева) штекера «D» (коричневого
цвета), и подсоединить штекер с
гнездом «D» к DTCO® 1381.
42
• Свободный кабель (белого, желтого,
красного и коричневого цвета)
прикрепите к сцеплению и соединить
со штекером Y-образного кабеля.
• Соедините сцепление Y-образного
кабеля (короткий) и штекера A
(белого цвета). ЖК-индикатор с левой
стороны (зеленого цвета) загорится;
см. стр. 46.
Выполните монтаж DTCO® fuelgate и
зафиксировать, например, с обратной
стороны DTCO®.
Выполните монтаж DTCO® 1381 по
инструкциям производителя и
извлеките карту мастерской.
Условие: DTCO® fuelgate встраивается в транспортное
средство (см. 42) и по показателям ЖК-индикатора готов
к работе (см 46).
Указания: Шина CAN предоставляет данные, в
дополнение к данным об оборотах двигателя и скорости,
о потреблении топлива, при соединении к силовому
механизму.
Эти данные транспортного средства DTCO® fuelgate
интерпретирует согласно конфигурации (см. стр.41),
которая может быть сохранена в DTCO® 1381.
Рекомендация: С помощью тестовой поездки и оценки
распечатки о статусе D1/D2 можно удостовериться в
том, что DTCO® fuelgate встроен и сконфигурирован
согласно Инструкциям.
DTCO® fuelgate – распечатать сообщение о статусе
По окончанию монтажа,
DTCO® 1381 сохраняет во входе
статуса 1 DTCO® fuelgate
исходящие импульсы на
заданный расход.
После выполнение короткой
тестовой поездки эти данные о
расходе можно
• посмотреть с помощью
распечатки напрямую на
DTCO® 1381, или
• с помощью загрузки и
соответствующего ПО можно
их оценить и заархивировать.
Выполните первую поездку после
монтажа устройства DTCO® fuelgate:
• Поверьте работу DTCO® 1381,
• вставьте карту водителя и карту
мастерской и
• Задайте дату и время в формате
UTC.
DTCO® 1381 запустит печать в
соответствии с выбранными
параметрами.
• выполните тестовую поездку.
Выполните оценку распечатки,
В зависимости от показателей
индикатора после поездки выполните
такие действия:
• путем подсчета количества вводов за
день и
• Вызовите функции меню.
• Выберите printout vehicle.
• Выберите status D1/D2.
• умножьте полученное значение на
расход топлива.
Для более удобной оценки
обработанных данных о расходе
топлива - в частности, относительно
длительного периода и большого
количества транспортных средств см. стр. 44 и 45.
43
Условие: DTCO® fuelgate встраивается в транспортное
средство (см. стр. 42) и согласно показателям ЖКиндикатора готов к эксплуатации (см стр. 46).
Указания: Для безупречной передачи и оценки данных о
расходе необходимо учитывать
• согласование между конфигурацией DTCO® fuelgate с
типом транспортного средства и его расходом
топлива,
• а также необходимо конфигурировать Download Key и
TIS-Web® DMM,
• и DTCO® 1381 может сохранять только до 1000
импульсов. Если максимальное количество было
достигнуто, каждый последующий импульс
перезапишет соответствующее количество
сохраненных импульсов.
DTCO® fuelgate – конфигурация загрузки
RUS
44
Распечатка Status D1/D2 задана
таким образом, что DTCO® 1381
исходящие от DTCO® fuelgate
импульсы сохраняет во входе
статуса 1.
Чтобы в будущем можно было
передавать и оценить эти
данные, необходимо,
• чтобы Download Key знал, что
данный блок данных загружен
и
• чтобы программа архивации
была подготовлена для
получения и обработки
данных.
Сконфигурируйте выбранные Вами
варианты Download Key:
• Подсоедините Download Key к
компьютеру, например, с помощью
USB-кабеля.
• Запустите, если автоматически не
было выполнено, необходимое ПКприложение, например, „D:\start.exe“.
• Выберите Configuration модуля >
Зарегистрируйте Download
configuration.
• Маркируйте в блоке данных Special
data ввод Status.
• Нажмите правой кнопкой мышки на
[Save], чтобы принять изменения.
Все выделенные галочкой данные
будут загружены во время
следующей загрузки.
Сконфигурируйте TIS-Web DMM для
загрузки DLD® Short Range или DLD®
Wide Range:
• Откройте броузер и выполните вход в
TIS-Web.
• Выберите Settings, и запустите TISWeb DMM.
• Нажмите правой кнопкой мышки на
Settings > System > Legal Archive, и
выделите ввод Other Data Block.
• Нажмите правой кнопкой мышки на
[Apply], и подтвердите запрос на
принятие настроек, нажав на [OK].
Данные будут импортированы
используемым Дистанционным
менеджером таким образом, чтобы
выбранные блоки данных можно
было загрузить.
Условие: Устройства для выполнения загрузки (DLK/
DLD) сконфигурированы для загрузки данных о расходе
топлива (см. стр. 44), в процессе будет выполнена
загрузка карт водителя, устройств памяти и S-данные данные для записи дополнительной информации будут
приспособлены.
Указания: TIS-Web® DMM может выполнять правильную
оценку блока данных Status/ Other Data только тогда,
когда были выполнены выше описанные изменения в
раскрывающемся меню . Не выбрав список Fuel
Consumption в раскрывающемся меню данные DTCO®
fuelgate будут интерпретированы неправильно.
Так как оценка расхода топлива создает похожие
значения, необходимо указать такое же количество
литров, как было указано в конфигурации DTCO® fuelgate,
см. стр. 41.
TIS-Web® DMM – оценка данных о расходе
Отчеты в TIS-Web® DMM
помогают Вам выполнить оценку
расхода топлива Вашего
транспортного средства.
Таким образом, Вы можете после
передачи данных загрузки
проверить
• в отчете об активности,
сколько топлива расходует
транспортное средство на 100
км, а также
• прочесть в протоколе статуса,
сколько топлива расходует
транспортное средство на
заданный маршрут.
Подготовка оценки данных о расходе
через TIS-Web® DMM:
• Откройте броузер и выполните вход в
TIS-Web® .
• Выберите Company Data Vehicles, и
запустите TIS-Web DMM.
• Нажмите на [Modify], из
выпадающего меню выберите
Additional Data Recording
• Выделите список выбора Fuel
consumption, и выберите количество
литров на импульс (см. Инструкции).
• Выполните прием данных, нажав на
кнопку [Save], и подтвердите, нажав
на [OK].
Оценка расхода топлива может быть
выполнена.
Если Вы хотите проверить средний
расход топлива выбранных
транспортных средств, необходимо
создать отчет Vehicle Activity
Summary.
Если необходима оценка относительно
заданного маршрута, тогда выберите
отчет транспортного средства Vehicle
Status Protocol.
Как можно выбрать отчеты, места
расположения, транспортные
средства, а также периоды времени, и
каким образом необходимо
интерпретировать данные в колонках и
строках отчетов, представлено в
онлайн-справке TIS-Web® DMM.
Сейчас, по крайней мере, выполняется
оценка с помощью подробных данных
о расходе топлива.
45
Technical data and LED indicator
DTCO® fuelgate
Length, width, height
Rating
Temperature range
Protection class
Cable connection
LED indicators
Power/ CAN (green)
CAN active (orange)
46
100 x 46 x 20 (incl. port)
10 - 32 V
-40° – +50°
IP50
CAN low (white), CAN high (yellow), terminal 15
(ignition, red), terminal 31 (earth, brown),
consumption/status signal (blue)
LED flashes every 3 seconds = operating voltage
no CAN data – reasons: ignition off, no
connection/ wrong CAN bus protocol
LED lights up = CAN data without consumption
data – reason: ignition on, engine off
LED flashes (5 Hz) = CAN data, plus
consumption data – reason: engine on
CAN active mode LED = connection to special
module, correct baud rate
Disclaimer
Haftungsausschluss
Die Produzenten übernehmen keine Haftung für
Schäden, die durch eine bestimmungswidrige Verwendung entstehen, insbesondere nicht für Personen-, Sach- oder Vermögensschäden, die als
Folgeschäden unmittelbar im Zusammenhang mit
der bestimmungswidrigen Verwendung des
DTCO® fuelgate in Verbindung stehen.
Microsoft® und Windows® sind Marken der
Microsoft® Corporation.
DTCO® 1381, DTCO® fuelgate, TIS-Web® sind
Marken der Continental Corporation.
Exclusión de responsabilidad
Los fabricantes no se hacen responsables de los
daños derivados de un uso indebido del
dispositivo, especialmente los daños personales,
materiales o patrimoniales relacionados
directamente con el uso indebido del
DTCO® fuelgate.
Microsoft® y Windows® son marcas registradas de
Microsoft® Corporation.
DTCO® 1381, DTCO® fuelgate y TIS-Web® son
marcas registradas de Continental Corporation.
Clause d’exclusion de responsabilité
Les fabricants déclinent toute responsabilité quant
aux dommages liés à une utilisation non conforme,
notamment en cas de dommages corporels ou
matériels ou de préjudices financiers consécutifs
et en lien direct avec une utilisation abusive de la
DTCO® fuelgate.
Microsoft® et Windows® sont des marques
déposées de Microsoft® Corporation.
DTCO® 1381, DTCO® fuelgate et TIS-Web® sont
des marques déposées de Continental
Corporation.
Disclaimer
The producers shall not accept any liability for
damages resulting from any non-compliant use. In
particular, personal injuries, material damages or
financial loss in the form of consequential
damages arising directly from the non-compliant
use of the DTCO® fuelgate.
Microsoft® and Windows® are registered
trademarks of the Microsoft® Corporation.
DTCO® 1381, DTCO® fuelgate,and TIS-Web® are
registered trademarks of the Continental
Corporation.
Esclusione della responsabilità
Il produttore declina qualsiasi responsabilità per
danni dovuti all'uso non conforme alle disposizioni,
in particolare per le lesioni personali e i danni
materiali o patrimoniali direttamente o
indirettamente causati dall'uso non conforme alle
disposizioni del DTCO® fuelgate.
Microsoft® e Windows® sono marchi registrati di
Microsoft® Corporation.
DTCO® 1381, DTCO® fuelgate e TIS-Web® sono
marchi registrati di Continental Corporation.
Uitsluiting aansprakelijkheid
De producenten aanvaarden geen enkele
aansprakelijkheid voor schade veroorzaakt door
oneigenlijk gebruik, met name voor persoonlijk
letsel, materiële of financiële schade die het
gevolg zijn en rechtstreeks verband houden met
het oneigenlijk gebruik van DTCO® fuelgate.
Microsoft® en Windows® zijn geregistreerde
handelsmerken van de Microsoft® Corporation.
DTCO® 1381, DTCO® fuelgate en TIS-Web® zijn
geregistreerde handelsmerken van de Continental
Corporation.
Oграничение oтветственности
Изготовители не несут ответственности за
ущерб, причиненный вследствие
использованиея не по назначению, в частности,
за ущерб, причинённый людям, материальный
и имущественный ущерб, который причиняется
в качестве косвенного ущерба
непосредственно в связи с использованием
DTCO® fuelgate не по назначению.
Microsoft® и Windows® являются торговыми
марками корпорации Microsoft®.
DTCO® 3283, DTCO® fuelgate и TIS-Web®
является торговой маркой корпорации
Continental.
47
Continental Automotive GmbH
Heinrich-Hertz-Straße 45
78052 Villingen-Schwenningen
Germany
www.dtco.vdo.com
[email protected]
VDO – A trademark of the Continental Corporation
The information contained in this documentation is subject to change without prior notice. In doing so, Continental Automotive GmbH do not enter into any obligation.
The description is based on the information available at the time this documentation was printed. We reserve the right to change technical details in the description,
information and illustration in this manual. Continental Automotive GmbH shall accept no liability for program errors and for incorrect information in the documentation or
for any consequential damages arising from this.
© by Continental Automotive GmbH
All rights reserved.
A2C59515005 | Edition 06/2014