1
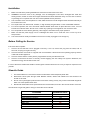
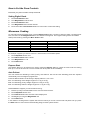
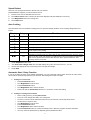
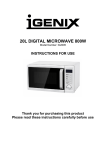
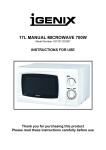
20L DIGITAL MICROWAVE 800W
Model Number: IG2940 / IG2950
INSTRUCTIONS FOR USE
Thank you for purchasing this product
Please read these instructions carefully before use
SAFETY INSTRUCTIONS
Important: This appliance is not intended for use by persons including children with reduced physical,
sensory or mental capabilities, or lack of experience and knowledge, unless they have been given
supervision or instruction concerning use of the appliances by a person responsible for their safety.
WARNING: To reduce the risk of burns, electric shock, fire, injury to persons or exposure to excessive
microwave energy:
1.
2.
3.
4.
5.
6.
7.
8.
9.
10.
11.
12.
13.
14.
15.
16.
17.
18.
19.
Read all instructions before using the appliance.
This appliance is for domestic use only. This appliance is for indoor use only. Do not use outdoors.
Make sure the voltage in your home corresponds to the one shown on the rating label of the appliance.
Use this appliance only for its intended use as described in this manual. Do not use corrosive chemicals
or vapors in this appliance. This type of oven is specifically designed to heat, cook or dry food. It is not
designed for industrial or laboratory use.
Do not operate the oven when empty.
Do not operate this appliance if it has a damaged cord or plug, if it is not working properly or if it has
been damaged or dropped. If the supply cord is damaged, it must be replaced by the manufacturer or its
service agent or a similarly qualified person in order to avoid a hazard.
Do not operate if the door or door seal is damaged
WARNING: Children should be supervised to ensure that they do not play with the appliance.
To reduce the risk of fire in the oven cavity:
When heating food in plastic or paper container, check the oven frequently.
Remove wire twist-ties from paper or plastic bags before placing bag in oven.
If smoke is observed, switch off or unplug the appliance and keep the door closed in order to stifle any
flames.
Do not use the cavity for storage purposes. Do not leave paper products, cooking utensils or food in the
cavity when not in use.
WARNING: Liquid or other food must not be heated in sealed containers since they are liable to
explode.
Microwave heating of beverages can result in delayed eruptive boiling, therefore care has to be taken
when handling the container.
Do not fry food in the oven. Hot oil can damage oven parts and utensils and even result in skin burns.
Eggs in their shell and whole hard-boiled eggs should not be heated in microwave ovens since they may
explode even after microwave heating has ended.
Pierce foods with heavy skins such as potatoes, whole squashes, apples and chestnuts before cooking.
The contents of feeding bottles and baby jars should be stirred or shaken and the temperature should
be checked before serving in order to avoid burns.
Cooking utensils may become hot because of heat transferred from the heated food. Potholders may be
needed to handle the utensil.
Utensils should be checked to ensure that they are suitable for use in microwave oven.
WARNING: It is hazardous for anyone other than a trained person to carry out any service or repair
operation which involves the removal of any cover which gives protection against exposure to
microwave energy.
This product is a Group 2 Class B ISM equipment. The definition of Group 2 which contains all ISM
(Industrial, Scientific and Medical) equipment in which radio-frequency energy is intentionally generated
and/or used in the form of electromagnetic radiation for the treatment of material, and spark erosion
equipment. For Class B equipment is equipment suitable for use in domestic establishments and in
establishments directly connected to a low voltage power supply network which supplies buildings used
for domestic purpose.
SPECIFICATIONS
Power Consumption:
Output:
Operation Frequency:
Oven Capacity:
Net Weight:
230-240V, 50Hz, 1280W(Microwave)
800W
2450MHz
20 Litres
Approx.12.8 kg
2
Installation
1.
2.
3.
4.
5.
6.
7.
8.
Make sure that all the packing materials are removed from the inside of the door.
WARNING: Check the oven for any damage, such as misaligned or bent door, damaged door seals and
sealing surface, broken or loose door hinges and latches and dents inside the cavity or on the door. If there is
any damage, do not operate the oven and contact qualified service personnel.
This microwave oven must be placed on a flat, stable surface to hold its weight and the heaviest food likely to
be cooked in the oven.
Do not place the oven where heat, moisture, or high humidity are generated, or near combustible materials.
For correct operation, the oven must have sufficient airflow. Allow 20cm of space above the oven, 10cm at
back and 5cm at both sides. Do not cover or block any openings on the appliance. Do not remove feet.
Do not operate the oven without glass tray, roller support, and shaft in their proper positions.
Make sure that the power supply cord is undamaged and does not run under the oven or over any hot or
sharp surface.
The socket must be readily accessible so that it can be easily unplugged in an emergency.
Before Calling for Service
If the oven fails to operate:
1. Check to ensure that the oven is plugged in securely. If it is not, remove the plug from the outlet, wait 10
seconds, and plug it in again securely.
2. Check for a blown circuit fuse or a tripped main circuit breaker. If these seem to be operating properly, test the
outlet with another appliance.
3. Check to ensure that the control panel is programmed correctly and the timer is set.
4. Check to ensure that the door is securely closed engaging the door safety lock system. Otherwise, the
microwave energy will not flow into the oven.
If none of the above rectifies the situation contact Igenix Customer Services. Do not try to adjust or repair the oven
yourself.
Utensils Guide
1.
2.
3.
4.
The ideal material for a microwave utensil is a Microwave safe transparent plastic dish.
Microwaves cannot pass through metal. Metallic utensils, dishes with metallic trim and aluminum foil
should not be used.
Do not use recycled paper products when microwave cooking as they may contain small metal fragments
which can cause sparks and/or fires.
Round/oval dishes rather than square dishes are recommended, as food in the corners tends to overcook.
The list below is a general guide to help you select the correct utensils.
COOKWARE
MICROWAVE SAFE?
Heat–Resistant Glass
Non Heat–Resistant Glass
Heat–Resistant Ceramics
Microwave–Safe Plastic Dish
Kitchen Paper
Metal Tray
Metal Rack
Aluminium Foil & Foil Containers
Yes
No
Yes
Yes
Yes
No
No
No
3
IG2940 – Digital Microwave at a Glance
Waveguide Cover
Housing
Oven Door
LED Display
Glass Turntable
Rotating Ring
Control Panel
Rotating Axis
Door Interlock
Control Panel at a Glance
Express
4
How to Set the Oven Controls
Each time you press a button a beep will sound.
Setting Digital Clock.
1.
2.
3.
4.
5.
Press Preset/Clock button.
Turn Weight/Time to set the hour.
Press Preset/Clock button.
Turn Weight/Time dial to set the minutes.
Press and hold the Preset/Clock button for 5 seconds to confirm the setting.
Microwave Cooking
To cook with microwave power alone, press the Micro Power button a number of times to select a cooking power
level, and then use the Weight/Time dial to set a desired cooking time. The longest cooking time is 60 minutes.
Select power level by pressing the Micro Power button:
PRESS POWER BUTTON
Once
Twice
3 times
4 times
5 times
LED DISPLAY
100P
80P
60P
40P
20P
COOKING POWER
100% - High Power
80% - Medium High Power
60% - Medium Power
40% - Medium Low Power - Defrost
20% - Low Power
For example, suppose you want to cook for 1 minute at 60% of microwave power.
1. Press Stop/Clear button once.
2. Press Micro Power button 3 times.
3. Turn Weight/Time to 1:00.
4. Press Start button.
Express Start
This feature allows you to start the oven quickly. Press the Express button a number of times to set the cooking
time up to 1 minute 30 seconds. The oven starts work at full power level immediately.
Auto Defrost
The oven allows the defrosting of meat, poultry, and seafood. The time and the defrosting power are adjusted
automatically once the weight is programmed.
Press the Defrost button consecutively to display either D.1, D.2 or D.3.
D.1 – For defrosting meat. Weight range from 0.1 kg to 2.0 kg.
D.2 – For defrosting poultry, Weight range from 0.2 kg to 3.0 kg.
D.3 – For defrosting seafood. Weight range from 0.1 kg to 0.9 kg
FOR EXAMPLE: Suppose you want to defrost 0.2 kg .
1. Place the poultry to be defrosted into the oven and close the door.
2. Press Stop/Clear button once.
3. Press Defrost button twice until the screen displays D.2
4. Set weight by turning the Weight/Time dial.
5. Press Start button.
In the middle of cooking time the system will sound to remind you to turn over the food and pause until you press
the Start button to enter into the next defrosting stage, and the system resume.
5
Speed Defrost
The oven can quickly defrost food to the set time you entered.
FOR EXAMPLE: Suppose you want to defrost mince.
1. Place the mince to be defrosted into the oven.
2. Press Micro Power button 4 times until the screen displays 40P (40% Medium Low Power).
3. Turn Weight/Time dial to set cooking time.
4. Press Start button.
Auto Cooking
This microwave oven has a default cooking menu for quick and simple operation. Auto Cooking categories are as
follows:
1.
2.
3.
4.
Display
Category
Direction
A.1
Popcorn
Suitable for popping a bag of corn, weighted 85g.
A.2
Popcorn
Same as A.1 except 100g.
A.3
Pizza
A.4
Beverage
Heating a cup of 250 ml liquid. Do not heat in a sealed container.
A.5
Beverage
Heating a cup of 500 ml liquid. Do not heat in a sealed container.
A.6
Potato
Total weight is about 0.45kg.
A.7
Potato
Same as A.6 except the total weight is 0.65Kg.
A.8
Fish
Warm a piece of chilled pizza of 0.15 kg.
Suitable for steaming a fish of 0.45Kg. After the fish washed and scales removed, make a
slits on the skin of fish .Put the fish on a shallow dish of 22-27cm diameter sprinkle lightly
with some ingredient and cover the dish with a thin film to prevent water loss. After
cooking, stand for 2 minutes.
Press Stop/Clear button once.
Turn Auto Cook / Weight Time dial. The LED display will cycle to show the menu A.1, A.2 etc.
Choose the appropriate menu according to the food type and weight.
Press Start.
Automatic Start / Delay Function
If you do not want the menu to be started immediately, you can preset the cooking menu and time and the preset
menus will be automatically started at your set time. The setting will consist of 2 steps:
1.
Setting the current clock
•
•
•
•
•
2.
Press Preset/Clock button.
Turn Weight/Time to set the hour.
Press Preset/Clock button.
Turn Weight/Time dial to set the minutes.
Press and hold the Preset/Clock button for 5 seconds to confirm the setting.
Setting the cooking menu and time.
•
•
•
•
•
•
•
•
•
Select cooking power by pressing Micro Power.
Turn Auto Cook / Weight Time dial to set cooking time.
To return to current, hold the Preset/Clock button for 3 seconds then a short beep will be heard.
Set the time you expect to start .
Turn Weight/Time to set the hour.
Press Preset/Clock button.
Turn Weight/Time dial to set the minutes.
Press Preset/Clock button to confirm the delayed menu. Now the program has been activated.
You may check the preset time by depressing the Preset/Clock button.
6
Multi-Sequence Cooking
To obtain the best cooking results, some recipes may call for different cooking levels and time. You may program your
menu to change as per the following example:
You want to cook at 100P (100% High Power) for 3 minutes and then 20P (20% Low Power) for 9 minutes.
1.
2.
100P for 3 minutes
•
Select 100P cooking power by pressing Micro Power.
•
Turn the Weight/Time dial to set the cooking time.
20P for 9 minutes
•
Select 20P cooking power by pressing Micro Power.
•
Turn the Weight/Time dial to set the cooking time.
Begin cooking by pressing Start button. When 100P microwave power cooking has finished the microwave will begin
cooking at 20P automatically. You can only set a maximum of 4 sequences per time by repeating steps 1 and 2.
Child Lock
Use to prevent unsupervised operation of the oven by children. The child lock indicator will show up on display
screen, and the oven can not be operated while the child lock is set.
To set the child lock Press and hold the Stop/Clear button for 3 seconds, a beep sounds and LOCK indicator will
display on the screen.
To cancel the child lock press and hold the Stop/Clear button for 3 seconds until lock indicator on display goes off.
Cleaning and Care
1. Turn off the oven and remove the power plug from the wall socket before cleaning.
2. Keep the inside of the oven clean. When food splatters or spilled liquids adhere to oven walls, wipe with a damp
cloth. Mild detergent may be used if oven gets very dirty. Avoid using spray and other harsh cleaners as they may
stain, streak or dull the door surface.
3. Do not allow the control panel to become wet. Clean with a soft, damp cloth. When cleaning the control panel,
leave oven door open to prevent oven from accidentally turning on.
4. If it becomes necessary to replace the oven light, please consult a dealer to have it replaced.
5. The oven should be cleaned regularly and any food deposits removed. Failure to maintain the oven in a clean
condition could lead to deterioration of the surface that could adversely affect the life of the appliance and possibly
result in a hazardous situation.
Disposal Information
Waste electrical products should not be disposed of with household waste. Please recycle where facilities exist. Check
with your local authority for recycling advice
This product carries a 2 year
guarantee. If you experience any
problems with your Igenix product
please call our Customer Services
Department on 01473 271 272.
7
Kettle Model Number IG7400. Toaster Model Number IG3400. Microwave Model Number IG2940
Complete your kitchen with the matching Kettle and Toaster.
Contact us to find your nearest stockist.
View the range online at www.igenix.co.uk
Distributed by Pik-a-Pak Home Electrical
38 Bluestem Road, Ransomes Europark, Ipswich. IP3 9RR Tel: 01473 271 272
8