1
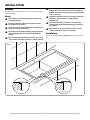
Sit-on Fit
Fig.6
1.
Place the sink upside down on the worktop. Position
the sink on the worktop as required. Make sure the
cabinet framework will clear all parts of the sink. Using a
soft, sharp pencil draw around the sink as accurately as
possible (Fig.6). Remove the sink.
Alternatively, you can use a sink template. For details go
to www.rangemaster.co.uk.
2.
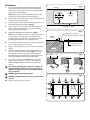
Fig.7
Worktop
3.
4.
Cutting line for
opening
6 mm
5.
6.
Sink outline
7.
Fig.8
Worktop
Sink
Draw another line 6 mm inside the sink top outline – this
is the cutting line for the opening (Fig.7).
Drill as large a hole as possible inside the cutting line.
Using a padsaw, jigsaw or similar, cut out the opening
up to the cutting line.
Fit the retaining clips onto the tags around the edge of
the sink. Open the hinge on each clip.
Apply silicon sealant around the underside of the sink
outer edge.
Turn the sink upside down and lay the worktop over
the sink. Swing each clip into place (Fig.8) – this is the
most effective method, although if the worktop has
been fitted to the cabinet the sink can be placed in the
opening and fixed in position from underneath.
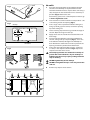
Centre the sink. Tighten the fixing screws, a few turns
at a time, in the sequence shown in Fig.9. Repeat the
sequence until the sink is secure.
The clamping brackets are suitable for worktops of
greater than 36 mm thickness. If your worktop is a
different size then it may require packing under the
clips or rebating.
nn
1
2
DO NOT tighten fully at first attempt.
nn
DO NOT overtighten the clips as this may distort the
nn
sink rim.
3
8.
Fig.9
9
5
1
3
7
16
15
12
11
14
13
10
6
2
4
8
Remove any surplus silicon sealant.