1
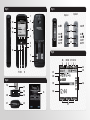
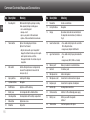
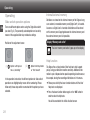
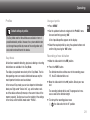
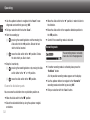
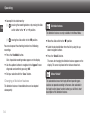
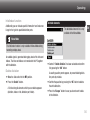
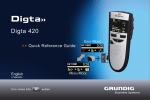
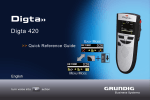
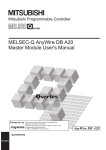
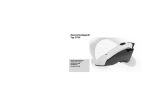
>> Quick Reference Guide DE EN FR NL ES HINWEISE Die ausführliche Anleitung zu Ihrem Digta 7 finden Sie auf der mitgelieferten DVD im Verzeichnis „Docu“. In der Hilfefunktion des Digta (untere seitliche Funktionstaste) finden Sie eine kurze Erklärung der zur Verfügung stehenden Funktionen. INFORMATION You will find the comprehensive manual for your Digta 7 in the “Docu” directory on the included DVD. In the help function (lower lateral function button) you will find a short description of the enabled functions. IT DA REMARQUE Vous trouverez la notice d‘utilisation détaillée de votre appareil Digta 7 dans le dossiers « Docu » du DVD fourni. Vous trouverez une brève explication concernant les fonctions disponibles dans la fonction d‘aide de l‘appareil Digta (touche fonctionnelle latérale inférieure). OPMERKING De handleiding voor uw Digta 7 vindt u op de meegeleverde DVD in de map „Docu“. Via de hulpfunctie van de Digta (onderste functietoets aan zijkant) krijgt u een korte beschrijving van de beschikbare functies. NOTA Las instrucciones del Digta 7 se hallan en el directorio „Docu“ del DVD que viene incluido. En la función de ayuda de Digta (tecla de función inferior lateral) encontrará un explicación breve de las funciones disponibles. NO SV INDICAZIONE Le Istruzioni relative al Digta 7 sono riportate nel DVD in dotazione, nella directory „Docu“. Nella funzione di aiuto del Digta (tasto funzione inferiore laterale) c‘è una breve spiegazione sulle funzioni disponibili. BEMÆRK Vejledningen til din Digta 7 findes på den medleverede dvd i biblioteket „Docu“. Under hjælpefunktionen på Digta (nederste funktionstast på siden) findes en kort forklaring med henblik på de funktioner, som står til rådighed. MERKNAD Veiledningen til din Digta 7 finnner du på medlevert DVD i mappen „Docu“. I hjelpefunksjonen til Digta (nedre funksjonstast på siden) finner du en kort erklæring av funksjonene som er tilgjengelige. ANVISNING Bruksanvisningen till Digta 7 finns i katalogen ”Docu” på medföljande DVD. För en kort förklaring av de tillgängliga funktionerna, använd Digtas hjälpfunktion (tryck på funktionsknappen längst ner på ena sidan). Fig. 1: Fig. 3: 15 2 14 13 3 28 8 9 21 22 REC g STOP e PLAY f REW i 29 30 31 32 33 34 35 36 39 17 18 19 27 41 40 Fig. 2: 20 26 FFWD h Fig 4: 7 16 25 FFWD h STOP e START f REW i 5 6 11 10 24 REC g 4 12 Option II Option I 1 23 38 37 Comment Controls/Keys and Connections No Description Meaning No Description Meaning 1 Recording LED Multicolored LED lights up during recording, blinks regularly during recording pause •red = overwrite/append •orange = insert •green = play-back in USB-audio mode •yellow = USB-connection/data transmission 11 New button Create a new dictation 12 Left-right-buttons Navigation 13 Display Operational status indicator and indicator of the adjustable menu functions (for details see Fig. 4) Option I: Recording/stop of dictation Option II: Fast forward •Only for devices with speech recognition*: Engage the button: Activates speech recognition for input of numbers and letters Disengage the button: Deselection of speech recognition 14 lower function button •Press button briefly: Help for the current On-/ Off-setting of functions •Long pressing: Keylock On/Off switch 15 upper function button •Press button briefly: Display illumination On-/ Off •Long pressing: EOL* (if EOL is activated) 16 Memory card* Memory medium for recorded dictations 17 Card slot For memory card 18 Microphone hole Internal microphone EN 2 3 Thumb button Slide switch Switch-setting functions are configurable by means of the adjustment screw and in the menu (see Fig. 3) 4 Display buttons Labeling in the display 19 Microphone socket Connection for external extra microphone 5 Up-Down-buttons Navigation 20 Earphone jack Connection for earphone or headphone 6 On/Off button Digta On- and Off switching 21 Contact strip Docking station connection 7 Battery case For rechargeable 962- or AAA-batteries 22 USB-connection Interface for PC and Grundig power supply 8 Unlocking button Unlocking button for the battery compartment 23 Battery case 9 Menu button Digta menu access Battery case with rechargeable batteries* 10 OK button Key button 24 Thumb button Function depends on the option 16 Comment Controls/Keys and Connections No Description Meaning No Description Meaning 25 Adjustment screw Option setting for slide switch and thumb grasp button 36 Slide switch functions 26 Slide switch Slide switch function depends on the option 27 Touch Pin Tangible slide switch setting 28 Clock Time in hours and minutes 29 Bluetooth* Bluetooth is active Switch-setting functions are configurable by means of the adjustment screw and in the menu g Recording ll Record pause i Rewind End rewinding h Fast forward End forwarding e Stop / f Play-back End of play-back 30 Voice Activation Speech activation On/Off 37 31 Remaining memory time Display of free memory space in minutes and seconds Display button labeling Function of display buttons in the current operational status mode 38 Dictation time 32 Card indicator Memory card is inserted in the device, the data is saved on the external memory card. •After dictation selection: length of dictation •During recording and play-back: dictation time at the current recording-/play-back position 33 Battery/rechargeable battery* Charge level of battery; blinks when the batteries are low 39 Progress bar Shows the current dictation position and marks 34 Status bar Device settings (see No 28-33) 35 Advanced status bar •Folder name •File format/recording quality of the next recording •Encryption •Charge level in % Insert Overwrite Info* Index EN 40 Dictation field Dictation data (dictation name, position number, dictation ID/bar code) 41 Dictation information Marks further information of each dictation: Deadline, priority, postponed, encryption, dictation lock * This product or function is not included in the delivery and available as an accessory. 17 Introduction EN Introduction • Use of non-approved spare parts This operating manual contains important instructions for safe and efficient handling of the Grundig Business Systems Digta 7 (hereinafter referred to as “device”). This operating manual is a part of the device and must be kept accessible in the immediate vicinity of the device for persons working on and with the device. Carefully read and make sure you understand this operating manual and all product safety labels prior to starting any work with the device. The basic prerequisite for safe work is compliance with all specified safety and handling instructions. In addition, all local accident prevention guidelines and general safety regulations effective at the implementation site of the device apply. Illustrations in this operating manual are provided for basic understanding and can vary from the actual model of the device. No claims can be derived from the illustrations in this operating manual. The originator is solely liable to the full extent for damages caused by such conduct. The agreed upon obligations in the delivery contract, the general terms and conditions, the manufacturer’s delivery conditions, and the statutory regulations valid at the time the contract was concluded, apply. Disclaimer All information and instructions in this operating manual have been provided under due consideration of applicable guidelines and regulations, the current and known state of the art, as well as our many years of inhouse experience. The manufacturer assumes no liability for damages due to: • Failure to comply with the instructions in this operating manual • Improper use / misuse • Willful operation by non-authorized persons • Unauthorized conversions or non-approved technical modifications 18 Copyright This operating manual is protected by copyright. No part of this operating manual may be reproduced in any form or incorporated into any information retrieval system without written permission Grundig Business Systems GmbH (“the manufacturer”). Delivery of the operating manual to third parties, duplication in any form – including excerpts – as well as exploitation and/or communication of the content, are not permitted without a written declaration of release from manufacturer. Actions to the contrary make damage compensations mandatory. We reserve the right to enforce additional claims. The manufacturer © Grundig Business Systems GmbH Weiherstraße 10 D – 95448 Bayreuth holds the copyright. Introduction Explanation of signalwords and symbols in this Operating Instruction Important notes for your safety are highlighted. Please pay particular attention to these notes in order to avoid accidences and damages to the device: Warnings Warnings are indicated by symbols. In addition they are introduced with signal words that express the scope of the hazard. • All instructions must strictly complied with! • When working always act cautiously to prevent accidents, personal injury, or property damage! Danger Indicates a hazardous situation which, if not avoided, will result in death or serious injury. Warning EN Indicates a hazardous situation which, if not avoided, could result in death or serious injury. Caution Used with the safety alert symbol indicates a hazardous situation which, if not avoided, could result in minor or moderate injury. Notice Used to address practices not related to personal injury. It indicates specific actions which prevent from damage to the device and from loss of dictations. Indicates useful tips and recommendations as well as information for efficient and trouble-free operation. 19 Introduction Please read the entire operating instruction before usage. Grundig Business Systems cannot accept any liability for damagEN es resulting from non-observance of the operating instruction. Please keep the user manual for future references. For safety reasons, follow all safety precautions to ensure a safe handling with the device! Make use of the customer center to administer your dictation technology and learn more about the benefits like warranty extension, firmware-updates etc.. Accessories Open the inner leaflet at the beginning of this operating manual to view the dictating machine and its control elements. Notice Scope of supply Damage to the device may occur due to unreleased accessories. •Dictation machine Digta 7 • USB-cable • Pouch Accessories and functions which are not available for all product or equipment lines are marked in this manual with a star “*”. Registration in customer center Please register your Digta 7 on http://www.grundig-gbs.com/en/customer-center . The browser AddIn of the customer center automatically identifies a connected Digta 7 and the serial number is read out. With a Digta 7 Premium and Digta 7 Premium BT machine you can activate MP3 recording format and speech recognition to enter numbers and characters. 20 Damages For the latest accessories like Digta Card, Digta Station 447, rechargeable battery pack 962, power supply, foot control, plugon microphone and earphone, please visit the Grundig Website on the internet at www.grundig-gbs.com. The performance characteristics described by Grundig Business Systems are only valid when using original accessories released by Grundig Business Systems. Grundig Business Systems cannot accept liability for lacks caused through the utilization of accessories which are not Grundig Business Systems genuine accessories. This also applies to accessories which are neither released nor recommended by Grundig Business Systems. Safety information Safety information Special hazards Purpose of use Electrical Voltage Please use your Digta only for such purposes as described in this Quick Reference Guide or in the comprehensive manual. You will find this manual in the “Docu” directory on the included DVD. The device may only be used for its intended purpose. Any other kind of utilization is forbidden. • Keep the dictation machine and the accessories out of the reach of children. • Protect the dictation machine from spray water or rain. • Do not place the dictation machine directly next to a heater or place it away from direct heat or bright sunlight. • Do not modify the device. EN Danger Danger of life due to electric shock! The power supply* operates with 230 V alternating current. Improper utilization may result in injury due to electric shock. Follow all safety precautions as follows to avoid accidences: • Never touch the connector plug of the power supply with wet hands. • Do not insert metal objects or like into the power supply. • Never open the power supply or modify the plug or cable. • Do not use the power supply if the housing or connection cable is damaged or the power supply does not function properly. • Always unplug the power cable from the wall jack by pulling the connector plug but never use the power cable for plugging off because the cable could tear apart. • Do not bend, clamp or drive over the power cable, and keep it away from heat. 21 Safety information EN • Data indicated on the tool identification plate must match the technical data of the mains supply otherwise this may destroy your device. • If the power supply is dropped, have it checked by an authorized dealer to ensure that it functions correctly and safely. Disregarding these precautions means risking a fatal electric shock. Warning Danger of fire, explosion and overheating! • Use the power supply only with the line voltage specified on the rating label. • Use the power supply only with its original connection cable or adapter (European, UK and USA version). Never use other connection cables or adapters with different plugs. • Do not place heavy objects on the power supply or connection cable, and do not cover the power supply. 22 • Use the power supply only in a dry indoor environment. Protect the power supply from moisture in the form of water and high humidity. • Do not bend the connection cable of the power supply. • Do not operate or store the power supply near heaters or direct sunlight. Ensure adequate ventilation. The permitted temperature range is: -4°F (-20°C) to 158°F (70°C) for storage 5°F (-15 °C) to 95°F (35°C) for operation • Grundig Business Systems power supplies are only to be used with Grundig Business Systems office equipment. • Pull the power supply out of the socket to separate the device from the power grid. • Unplug the power supply before cleaning it. Disregarding these precautions means risking fire, explosion or overheating. Safety information Rechargeable batteries Warning Danger of explosion and burns! The device operates with batteries and rechargeable batteries*. Follow all safety precautions as follows to avoid accidences: • Do not throw batteries or rechargeable batteries into fire. Do not try to short-circuit the electric contacts, this may lead to explosion. • Batteries or rechargeable batteries should not be kept unpacked in a bag and should not be opened or modified. Caution - there is the risk of burns through leakage. • Rechargeable batteries should only be charged in the dictation machine. The attempt to charge a rechargeable battery beyond its electrical capacity may lead to explosion. Disregarding these precautions means risking explosions and burns. Traffic EN Warning Danger of accidents! • Do not use the device while operating vehicles (such as cars, bicycles, motorcycles, ATVs, etc.). Disregarding these precautions can lead to traffic accidents. Particular groups of persons Caution Risk of injury! • Do not leave the device unattended and use it with extreme caution if children or persons who cannot assess the danger are nearby. • Keep the device away from persons (including children) who are unable to use it safely due to their physical, sensory or mental limitations, lack of experience or lack of knowledge. 23 Safety information Disregarding these precautions means risking injury. EN Obstacle Caution Stumbling hazard! • Ensure that the power supply is always in a safe position and that neither the power supply nor any cables connected to the device or to the docking station* constitute obstacles. Disregarding these precautions may lead to a stumbling hazard. Electronic components Notice Risk of damage and void warranty! • Protect the device from moisture (such as rain or water spray). • Do not place the device near a heater nor in direct sunlight. The permitted temperature range is: -4°F (-20°C) to 158°F (70°C) for storage 5°F (-15 °C) to 95°F (35°C) for operation • Do not open the device under any circumstances. • Do not modify the device. Disregarding these instructions can cause the device to be damaged and the warranty to become void. 24 Safety information Disposal Notice Signal interference! • Do not make recordings near mobile telephones. In case of interferences (such as hissing), increase the distance. Disregarding these instruction lead to disruption of the recording by interferences. Cleaning Notice Risk of damage! • Unplug the power supply before cleaning it. • Clean the device only on the outside with a dry, soft cloth. Do not use any chemical cleaning agents such as alcohol, thinner, gasoline or the like. Electronic waste is not allowed to be disposed of with the domestic waste. Electronic waste has to be returned to collecting points at public recycling authorities set up for this purpose. Consumers are obliged by law to return batteries or rechargeable batteries at the end of their service lives to the public collecting points at public waste disposal authorities or point of sale set up for this purpose. Defects Warning Risk of injury due to a defect device! Do not try to repair a defect device. The device may only be repaired by a specialised dealer. A list of the specialised dealers is available on our website: www.grundig-gbs.com Disregarding these instructions can cause the device to be damaged. 25 EN Initial setup Initial setup EN Charging of rechargeable batteries Warning Danger of explosion and burns! • Rechargeable batteries should only be charged in the dictation machine or Digta Station 447 Plus*. • Do not use damaged batteries. xx Disconnect the power supply* from the socket and the USB plug from the “USB-connection” of your device. Switching off/on Switching on xx Press the “MENU” button until the initial display view appears on the display. After a few seconds, the Digta changes to the main screen and is ready for operation. Switching off xx Switch your Digta off. xx Press the “MENU” button until the device switches off. xx Plug the power supply* plug to the wall outlet. Keylock xx Connect the other end of the mains supply cable - the USB plug - with the “USB-connection” of your dictation machine. The key lock helps to avoid that the active recording or playback process can be switched off by mistake. Shortly aftterwards, the animated load indicator » « appears on the display. The current loading level is shown in percentage. The rechargeable battery is fully charged after approx. 4 hours. » «. appears in the display. 26 xx Please press the lower function button until a locking symbol and “Device locked” are indicated on the display. Except when recording and playing back, you can switch off the device normally even when the buttons are locked. When your Digta is switched off, the button lock feature prevents the device from inadvertently being switched on, e.g. in your Initial setup briefcase. When the device is switched on, the message “Device locked” is displayed. You can remove this lock by pressing the lower function button until the main screen is fully visible. The buttons are now unlocked. If you do not deactivate this function, the device switches off automatically. EN 27 Operating EN Operating Internal/external memory Slide switch operation options Dictations are stored on the internal memory of the Digta as long as no external, removable memory card (Digta Card*) is inserted. As soon as a Digta Card is inserted, all dictations will be stored on this memory card. Copying between the internal memory and the external memory card is impossible. There are different options when using the Digta slide switch (see also Fig. 3). The personally selected option can be set by means of the supplied slider key and device settings. Display “Memory card active” Position of the adjustment screw The icon “memory card active” pops up on the display. Help function (I) Option I with top button as „Recording“ (II) Option II with top button as “Fast forward” In the operation instruction, the different options for slide switch operations are highlighted by means of the numbering. Please follow only those steps which are marked for the option you have selected. The Digta offers a help function. Brief help texts shall support you by using your dictation machine correctly. Additional information is put at disposal when special operating situations occur, for example, during the recording of dictations or in the menu. xx Please press briefly the lower function button until the brief help texts are displayed. xx Press the lower function button again or the “OK” button in order to close the help texts. You will be resetted to the initial situation/screen. 28 Operating Profiles Default settings of profiles The Easy Mode and the Menu Mode are available in form of predefined default profiles. However, the system administrator can change these profiles by means of the configuration software and transfered them to the device. Easy Mode All functions needed for dictating, play-back, deleting or inserting of dictations are available in the Easy Mode. The display is organized more clearly in the Easy Mode. The risk that operating errors are made is diminished because only the most important functions can be activated. In the menu of Easy mode, you can view important information about your Digta under “Device info”, e.g. serial number, version of the device software (firmware) or the current status of the memory capacity. To allow you to use the majority of the settings in the menu, switch to Menu mode under “Profiles”. Change of profile xx Press “MENU”. EN xx Use the up/down buttons to navigate to the “Profile” menu item and confirm by pressing “OK”. A list of possible profiles appears on the display. xx Select the required profile by using the up-down buttons and confirm it by pressing the “OK” button. Recording of new dictation xx Move the slide switch to the “e” position. xx Press the “NEW” button. The dictation machine switches over to the recording pause “ll”, the LED-indicator blinks red. xx Move the slide switch to the “g” position. Dictate your new text. The recording indicator blinks red. The progress bar increases as well as the dictation length. xx To interrupt the recording please move (I) the slide switch to the “ll” position. 29 Operating The dictation machine switches over to the recording pause “ll”, the LED-indicator blinks red. EN (II) move the slide switch to the “e” position. xx Continue with the recording, by moving the slide switch to the “g” position. Continue dictating your text. xx Stop the recording by (I) pressing the recording button or by moving the slide switch either to the “ ” or “i” position. (II) move the slide switch to the “e” position. The progress bar on the display increases. The minutes and seconds of the current dictation position shown on the display increase. xx Move the slide switch to the “e” position in order to interrupt the play-back process. Setting the volume xx Press the up-down buttons during play-back. The volume indicator appears on the display. The play-back volume can be turned up/down or soundless. Warning Select and listen to a dictation xx Move the slide switch to the “e” position. Danger of hearing impairment xx Press one of the up-down buttons. Do not hold the dictation machine near your ear during playback, particularly when the volume is turned up to a maximum in order to save you from hearing damages. xx Select the desired dictation by using the up-down navigation buttons. xx Move the slide switch to the “f” position, in order to listen to the dictation. 30 Fast forward and rewind xx Move the slide switch to (I) ”h” (fast forward) or ”i” (rewind). Operating (II) ”i” (rewind) or press the button “Fast Forward”. The progress bar increases or decreases and the dictation position changes. Fast play-back xx Move the slide switch to the “e” position. xx Move the slide switch to the “f” position, in order to listen to the dictation. The progress bar on the display increases. The minutes and seconds of the current dictation position shown on the display increase. xx Press the button “Speed”. xx Set the play-back speed as desired by means of the up-down buttons. xx Move the slide switch to the “e” position in order to interrupt the play-back process. xx Press the “OK” button, to turn back to the standard play-back speed. Insertion of a dictation part Additional dictation parts can be inserted at any position desired. xx Move the slide switch to the “e” position. xx Select the desired dictation by using the up-down navigation buttons. xx Move the slide switch to the “f” position, in order to listen to the dictation. xx Move the slide switch at the respective dictation position to the “e” position. xx Control if the insertion mode is activated. Insertion mode The insertion mode is marked through a triangle in the progress bar. xx If another recording mode is activated, please press the button “RecMode”. A list of possible recording modes appears on the display. 31 EN Operating EN xx Use the up/down buttons to navigate to the “Insert” recording mode and confirm by pressing “OK”. xx Move the slide switch to the “f” position, in order to listen to the dictation. xx End your selection with the button “Save”. xx Move the slide switch at the respective dictation position to the “e” position. xx Start the recording by (I) pressing the recording button and then moving the slide switch to the “g” position. Dictate the text which shall be inserted. (II) move the slide switch to the “g” position. Dictate the text which you like to insert. xx Stop the insertion by (I) pressing the recording button or by moving the slide switch either to the “h” or “i” position. (II) move the slide switch to the “e” position. xx Control if the overwriting mode is activated. Overwriting mode The overwriting mode is marked by means of a line in the progress bar. xx If another recording mode is activated, please press the “RecMode” button. A list of possible recording modes appears on the display. Overwrite dictation parts xx Use the up/down buttons to navigate to the “Overwrite” recording mode and confirm by pressing “OK”. You can overwrite a dictation from any dictation position on. xx End your selection with the “Save” button. xx Move the slide switch to the “e” position. xx Select the desired dictation by using the up-down navigation buttons. 32 Operating Overwriting of data The dictation will be overwritten from the selected dictation position on. xx Start the recording by (I) pressing the recording button and then moving the slide switch to the “g” position. dictate the modi fied text. (II) move the slide switch to the “g” position. Dictate the modified text. xx Stop the modification by (I) pressing the recording button or by moving the slide switch either to the “h” or “i” postion. (II) moving the slide switch to the “e” position. Appending of dictation parts An additionally recorded text can be added at the end of a recorded dictation. xx Move the slide switch to the “e” position. xx Select the desired dictation by using the up-down navigation buttons. EN xx Move the slide switch to the “f” position, in order to listen to the dictation. xx Press the » « button (skip to the end). Skip mark aim The cursor skips to ( ) the next mark when dictation infos or indices exist (see the comprehensive manual, chapter “Info/ Index function”). Skip until the dictation end is reached. xx Move the slide switch to the “e” position. xx Start the recording by (I) pressing the recording button and then moving the slide switch to the “g” position. Dictate the text which you like to add. (II) moving the slide switch to the “g” position. Dictate the text which you like to add. 33 Operating xx Accomplish the attachment by (I) pressing the recording button or by moving the slide EN switch either to the “h” or “i” position. (II) moving the slide switch to the “e” position. Dictation features The dictation features are only available in the Menu Mode. xx Move the slide switch to the “e” position. You can also preset the attaching function for all following recordings. xx Select the desired dictation from the list by using the updown navigation buttons. xx Press the “RecMode” button. xx Press the “Details” button. A list of possible recording modes appears on the display. xx Use the up/down buttons to navigate to the “Append” recording mode and confirm by pressing “OK”. xx End your selection with the “Save” button. Changing of dictation features The dictation features of stored dictations can be adapted subsequently. 34 The menu for changing the dictation features appears on the display. The cursor is placed on the feature chosen last. Menu “Details” The selected features which imply different operating procedures are opened according to the menu item selected. In the help function (lower function button) you will find a short description of the dictation features. Operating Info/Index function Additionally you can include specific information* and index markings for the typist to specified dictation parts. Deletable elements The deletable elements list is only available in the Menu Mode. Menu Mode The info/index function is only available in Menu Mode during recording and play-back. An audible signal is generated during play-back of the infos and indices. The infos and indices are transfered to the PC together with the dictation. Delete dictation xx Move the slide switch to the “e” position. xx Press the “Delete” button. A list featuring all elements which you can delete appears (dictation, index or info, dictation part, folder). xx Control if “Delete dictation” has been selected and confirm it by pressing the “OK” button. A security question promt appears, to prevent deleting dictation parts by mistake. xx Confirm the question by pressing the “OK” button to delete the entire dictation. xx Press the “Escape” button in case you do not want to delete the dictation. 35 EN Technical data Technical data EN The storage capacity for recording: 10 minutes DSS Standard Play (SP): DSS Pro Quality Play (QP): WAV Mono* (depending on sample rate): WAV Stereo* (depending on sample rate): Response area DSS Standard Play (SP): DSS Pro Quality Play (QP): WAV Mono* / WAV Stereo*: approx. 1 MB approx. 2 MB 9.6 MB (8 kHz sample rate) up to 57.6 MB (48 kHz sample rate) 19.2 MB (8 kHz sample rate) up to 115.2 MB (48 kHz sample rate) 200 - 5 500 Hz 200 - 7 500 Hz 200 - 20 000 Hz, depending on the sample rate selected Microphone socket 3.5 mm jack; stereo Earphone jack 3.5 mm jack; stereo (mono earphone can be used) Connections USB 1.1, USB 2.0 High Speed Batteries 2 x 1.5 V; type Micro/AAA Rechargeable battery Rechargeable battery pack 962 (Li-polymer rechargeable battery, 3.7 V/ 1000 mAh) 36 Battery operation up to 25 hours Dimensions (W x H x D, without protruding operating elements) approx. 130 x 52 x 22 mm / 5.12 x 2.05 x 0.87 inch Weight incl. rechargeable battery pack 962 approx. 122 g / 4.303 oz Trouble shooting Trouble shooting Electrical devices can bring along malfunctions. These malfunctions cannot necessarily be referred to the device. You can check if you can remedy the errors by means of the following table. Malfunctions Possible reasons Removal of defect The devices cannot be switched on. The battery is empty. The current supply is interrupted. Charge the batteries or exchange them. (see chapter “Charging of rechargeable batteries”) The device is unresponding to slide switch- and button operations. The keylock is activated. Press the lower function button until the keylock is deactivated. There is no sound or too quiet. The microphone sensitivity or the play-back volume are not set correctly. Set the microphone sensitivity in the menu “recording” to “conference” or hold the device closer to your mouth during recording. Set up the play-back volume. (see chapter “Setting the volume”) The sound is distorted or too loud. The microphone sensitivity or the play-back volume are not set correctly. Set the microphone sensitivity in the menu “recording” to “dictation” or increase the distance between the device and your mouth during recording. Turn down the play-back volume. (see chapter “Setting the volume”) No menu function available. The device is running in the Easy Mode. Switch over to the Menu Mode. (see chapter “Change of profile”) 37 EN Garantie /Guarantee DE Die Bestimmungen der Grundig Business Systems Herstellergarantie finden Sie im Internet unter www.grundig-gbs.com. IT Die Konformität mit den für das Gerät relevanten EU-Richtlinien wird durch das CE-Zeichen bestätigt. EN Find out more details on the regulations of the Grundig Business Systems’ manufacturer guarantee on the internet: www.grundig-gbs.com La conformità con le direttive EU rilevanti per questo dispositivo sono confermate con il simbolo CE. DA The CE mark confirms that the device corresponds to the relevant guidelines of the European Union. FR Pour plus d’informations sur la garantie du fabricant de Grundig Business Systems visitez notre site Web: www.grundig-gbs.com De bepalingen van de fabrieksgarantie voor Grundig Business Systems vindt u op www.grundig-gbs.com. Het voldoen aan de voor het apparaat relevante EU richtlijnen wordt door het CE teken bevestigd. ES En contrará las condiciones de la garantía de fabricante de Grundig Business Systems en la página de Internet www.grundig-gbs.com. La conformidad con los parámetros de la UE relevantes para el equipo se confirma con el signo CE. Bestemmelserne i forbindelse med producentgarantien for Grundig Business Systems findes på internettet hos www.grundig-gbs.com. CE-mærket er vores tilkendegivelse om, at apparatet er i overensstemmelse med de relevante EU-retningslinjer. NO Le marque CE indique que l´appareil est en conformité avec les normes applicables de l´Union européenne. NL Le prescrizioni della garanzia del produttore per il Grundig Business Systems sono riportate in Internet nel sito www.grundig-gbs.com. Bestemmelsene til Grundig Business Systems produsentgaranti finner du på Internett under www.grundig-gbs.com. CE-merkingen stadfester samsvar med relevante EU-retningslinjer for apparatet. SV Grundig Business Systems garantivillkor finns på Internet på www.grundig-gbs.com. CE-märket innebär att apparaten uppfyller kraven i relevanta EU-riktlinjer. For USA/Canada: Note: Grundig Business Systems GmbH This equipment has been tested and found to comply with the limits for a Class B digital device, pursuant to part 15 of the FCC Rules. These limits are desi10 This equipment generates, uses and can radiate radio fregned to provide reasonable protection against harmful interferenceWeiherstraße in a residential installation. quency energy and, if not installed and used in accordance with the instructions, may cause harmful interference to radio communications. However, there is D-95448 Bayreuth no guarantee that interference will not occur in a particular installation. Germany If this equipment does cause harmful interference to radio or television reception, which can be determined by turning the equipment off and on, the user is encouraged to try to correct the interference by one or more of the following measures: • Reorient or relocate the receiving antenna. [email protected] • Increase the separation between the equipment and receiver. • Connect the equipment into an outlet on a circuit different from that to which the receiver is connected. • Consult the dealer or an experienced radio/TV technician for help. Changes or modifications not expressly approved by the party responsible for compliance could void the user’s authority to operate the equipment. www.grundig-gbs.com Grundig Business Systems GmbH, Weiherstraße 10, D-95448 Bayreuth, Germany Email: [email protected], Internet: www.grundig-gbs.com 36178 941 0200 0203 10/2011 02/2015 36178942 FCC