1
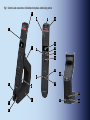
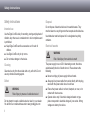
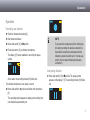
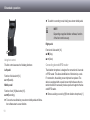
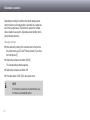
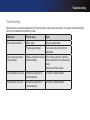
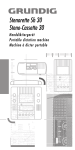
CordEx
>> Operating instructions
English
Symbols used in this manual
Introduction
Important information concerning your safety is specifically marked.
Follow these instructions closely to prevent accidents and damage
to the device:
Your Digta CordEx is a wireless dictating microphone that allows
you to record your dictations directly on a PC.
a
b
d
WARNING
Warns of health hazards and identifies possible
risks of injury.
CAUTION
Warns of possible risks to the device and loss of
dictation
INFORMATION
Refers to useful tips and operating instructions.
The fold-out pages at the beginning of the instructions show the
dictating microphone and its controls.
References to the controls are indicated in the text in [square
brackets].
Please read all of these instructions before using the device. We
do not accept any liability for damages resulting from non-observance of these operating instructions.
Always keep these operating instructions in a safe place. If you
pass Digta CordEx on to a third party, please also include these
operating instructions.
Scope of delivery:
■ Dictation microphone
■ USB cable for docking station
Digta CordEx, including
battery
■ Docking station
■ Cover strip barcode/RFID reader
connection channel
■ Power supply
■ USB cable for power supply of
dictation microphone without
battery
CE information
The CE mark confirms that the device corresponds
to the relevant guidelines of the European Union.
Fig. 1: Controls and connections of dictation microphone and docking station
8
9
19
18
1
17
7
10
16
15
14
13
11
2
6
20
12
23
3
4
5
21
22
Explanation of controls and connections
No. Designation
1 Dictation microphone
2
Docking station
3
Green LED
4
Orange LED
5
Paging button
6
7
Battery
USB adapter
8
On/Off button
9 Speaker/microphone
10 Blue button
Description
Portable hand-held unit to record and
playback dictations
Wireless station with charging possibility for dictation microphone and spare
battery
Blinking: USB connection to PC established, no connection to dictation microphone
Illuminated: USB connection to PC
established, connection to dictation
microphone established
Dictation microphone battery or spare
battery is charging
First-time connection to dictation microphone in reception area
Establish USB connection for firmware
update
Power supply
USB adapter to use dictation microphone without battery on PC
Switching device on/off
Access system menu
Range of audio and sound
Start recording, next work section (function depends on software settings)
No.
11
12
13
14
Designation
F1 button
F2 button
F3 button
Slide switch
15 Yellow button
16 Red button
17 Display
18 Recording display
19 Cover strip
20 Receiver for spare batteries/USB adapter
21 Power supply
connection
22 PC-USB connection
23 Foot control connection
Description
Configurable function button 1
Configurablee function button 2
Configurable function button 3
f: Start
e: Stop
h/i: Fast forward/rewind
Insert dictation recording
Start/stop recording
Display of system menu, position of slide
switch, wireless connection, buffer, battery charging/power supply mode
Blinking: Pause mode
Illuminated: Recording mode
Blue: Record dictation information
Red: Record dictation
Yellow: Insert dictation section
Protects channel for RFID/barcode readers (removable)
To attach USB adapter or charge a spare
battery
Connection for enclosed power supply
Connection for data transfer to PC
Connection for a foot control to control
the slide switch function
Contents
Contents
Safety instructions..................................... 6
Intended use................................................. 6
Cleaning....................................................... 6
Defect........................................................... 6
Disposal........................................................ 6
Electrical hazards......................................... 6
Handling batteries........................................ 7
Accessories.................................................. 7
Start-up........................................................ 8
System requirements................................... 8
Connecting docking station.......................... 8
Installing software......................................... 9
Charging battery........................................... 9
Switching on dictation microphone............... 9
Setting language........................................ 10
Operation....................................................11
Recording new dictation..............................11
Interrupting dictation....................................11
Continuing dictation.................................... 12
Playing back dictation................................. 12
Overwrite dictation...................................... 12
Adding to dictation...................................... 12
Inserting recording...................................... 13
Finishing dictation....................................... 13
Switching off dictation microphone............. 14
Extended operation.................................. 14
How to deal with interrupted wireless
connection.................................................. 14
Connecting dictation microphone
directly to PC.............................................. 15
Changing battery........................................ 16
Setting up function buttons......................... 17
Controlling dictation microphone via
foot control.................................................. 17
Connecting foot control........................... 17
Using foot control.................................... 18
Connecting barcode/RFID reader.............. 18
Operating several dictation microphones/
docking stations.......................................... 19
Registering at different
docking stations...................................... 19
Permanent registration at a
docking station........................................ 20
Installing firmware update.......................... 20
Settings in system menu............................ 21
Accessing system menu......................... 21
Changing settings.................................... 22
Safety instructions
Safety instructions
Intended use
Use the Digta CordEx solely for recording, storing and playback of
dictation. Any other use is considered not to be in compliance and
is prohibited.
■ Keep Digta CordEx and its accessories out of reach of
children.
■ Use Digta CordEx only in dry rooms.
■ Do not make changes to the device.
Cleaning
Clean device only from the outside with a dry, soft cloth. Do not
use any chemical cleaning agents.
Defect
a
WARNING
Risk of injury by means of a defective device!
Do not attempt to repair a defective device; take it to your dealer.
You will find our contact address under: www.grundig-gbs.com
Disposal
Do not dispose of electrical devices in household waste. They
must be taken to a recycling center that accepts electrical devices.
Used batteries must be disposed of in a designated recycling
container.
Electrical hazards
a
WARNING
Risk of fatal injury from electrical current!
The power supply runs on 230 V alternating current; thus there
exists basically the risk of electric shock. Please observe the
following:
■ Never touch plug of power supply with wet hands.
■ Always pull out power cable from socket directly with the plug,
never with the power cable since it could tear.
■ Ensure that power cable is not bent, clamped, run over, or in
contact with heat sources.
■ Operate device only if electrical voltage indicated on type
plate corresponds to electrical voltage of your socket. Wrong
voltage can destroy the device.
Safety instructions
Handling batteries
a
WARNING
Risk of injury due to wrong handling of batteries!
The device runs on batteries. Please observe the following:
■ Do not dispose of the batteries in fire. Do not short-circuit contacts. Risk of explosion.
■ Do not store batteries loosely in pockets, do not take apart or
modify. Risk of burns due to leaks.
■ Charge batteries only via docking station or in dictation microphone. Risk of explosion if battery is charged with excessive
voltage or excessive current.
The performance features described by Grundig Business
Systems only apply to genuine Grundig Business Systems
accessories.
Please make sure to choose only genuine accessories from
Grundig Business Systems. Product liability and warranty service
are provided only in this case. The use of non-Grundig Business
Systems accessories or those which are not recommended and
approved by Grundig Business Systems automatically void any
warranty claims towards Grundig Business Systems.
Accessories
b
CAUTION
Damage of device by unapproved accessories.
You will find original accessories approved by the manufacturer for
Digta CordEx under: www.grundig-gbs.com
Start-up
Start-up
System requirements
■ DigtaSoft/DigtaSoft Pro, as of V4.2.0 by Grundig Business
Systems or compatible dictation software by other
manufacturers.
■ Processor (500 MHz or higher)
■ Windows 2000 SP4 (Rollup 1), Windows XP SP2,
Windows Vista
■ USB 1.1 or USB 2.0
■ MAPI compatible e-mail program for e-mail connection (e.g.
Microsoft Outlook)
Connecting docking station
► Place docking station [2] near the PC.
► Connect plug of power supply (as seen from the back) to left
jack on docking station.
► Connect power plug to a 230 V power socket.
The orange LED [4] on docking station briefly illuminates when
current supply is available.
► Connect USB cable to PC and docking station. For this purpose, plug USB cable (as seen from the back) into right jack
of docking station and the other end into USB connection of
the PC.
Start-up
Charging battery
Prior to initial use, the battery of the dictation microphone must be
charged. Optionally, the dictation microphone can be supplied with
power by means of USB adapter (see section "Connecting dictation microphone directly to PC").
► Place dictation microphone [1] into docking station [2].
The green LED [3] on docking station blinks as soon as docking station of Digta CordEx is properly recognized by the PC.
Installing software
d
NOTE
Recording and playback of dictations with Digta
CordEx requires dictation software to be installed
on the PC, e.g. DigtaSoft or DigtaSoft Pro by
Grundig Business Systems. For additional installing information, see operation instructions of dictation software.
The orange LED [4] indicates that battery is being charged.
When LED goes out, the battery is completely charged.
d
NOTE
The charging process does not start immediately,
rather after several minutes.
Switching on dictation microphone
► Press On/Off button [8] on right side of dictation microphone
[1] and hold until company logo appears in display [17] .
On docking station [2] the green LED [3] signals the successful
registration of the dictation microphone at docking station by
continuous illumination.
Start-up
d
NOTE
To conserve the battery, the device switches to
sleep mode if no button is pressed on the dictation
microphone for an extended time. By pressing any
button, the device becomes operational again.
If device is not used for an extended time, it switches off completely.
Setting language
The dictation microphone features a system menu for internal
settings.
During initial start-up, it is practical to set the display language.
Additional configuration options via system menu are described in
section „Settings in system menu“ .
► Briefly press On/Off button [8] on dictation microphone [1] until
the text Menu appears at bottom left of display text.
► Press blue button Menu [10].
► Move selection (marker) from one menu item to the next via
the yellow button (up) [15] and F3 button (down) [13] on dictation microphone .
10
► Select entry Language and press red button OK [16].
The corresponding submenu appears.
► Select desired language and press red button OK.
► Press blue button CANC to exit system menu.
Operation
Operation
Recording new dictation
► Switch on dictation microphone [1].
► Start dictation software.
► Move slide switch [14] to e position.
► Press blue button [10] on dictation microphone.
The display [17] shows readiness to record by the pause
symbol.
d
NOTE
If you leave the reception area of the docking station during recording, the wireless connection to
the dictation microphone is interrupted and the
dictation is placed in a buffer up to 1 minute (see
section „How to deal with interrupted wireless
connection“).
Interrupting dictation
At the same, the recording indicator [18] blinks red.
The dictation microphone is now ready to record.
► Move slide switch [14] to e position. The pause symbol
appears on the display [17]. The recording indicator [18] blinks
red.
► Move slide switch to f position and dictate into microphone
[9].
The recording symbol appears on display, and recording indicator illuminates permanently red.
11
Operation
Continuing dictation
► Move slide switch [14] on dictation microphone [1] to f position and dictate into microphone [9].
Playing back dictation
► Move slide switch [14] on dictation microphone [1] to i position (rewind) or h (fast forward) to reach desired text passage.
During fast forward/rewind, the according symbols appear on
the display [17].
The stop symbol appears on the display [17].
► Press red button g [16].
The recording indicator [18] blinks red.
► Move slide switch to f position and dictate the change into
microphone [9].
Starting at preselected position, the dictation will be
overwritten.
► Move slide switch to f position.
The dictation is played back at the current position.
Adding to dictation
► Move slide switch [14] on dictation microphone [1] to h position (fast forward) and search for end of dictation.
Overwrite dictation
► Move slide switch to e position.
► Move slide switch [14] on dictation microphone [1] to i position (rewind) or h (fast forward) and search for passage in dictation to be overwritten.
► Move slide switch to f position and dictate the addition into
microphone [9].
► Move slide switch to e position.
12
► Press red button g [16].
The dictation addition will be at the end.
Operation
Inserting recording.
Additional recordings can be inserted into an existing dictation
without overwriting the old dictation.
► Move slide switch [14] on dictation microphone [1] to i position (rewind) or h (fast forward) and search for dictation passage where text is to be inserted.
d
NOTE
The function can vary, depending on applied dictation software.
► Move slide switch to e position.
► Press yellow button Insert [15].
► Move slide switch to f position and dictate text to be inserted
into microphone [9].
Starting at preselected position, new text is integrated into
existing dictation.
► Press yellow button Insert .
The inserted recording is finished.
d
NOTE
Depending on applied dictation software, it is possible to insert additional information text (info) into
dictations.
For additional information, see operating instructions of dictation software.
Finishing dictation
► Finishing recording:
Move slide switch [14] on dictation microphone [1] briefly to i
position (rewind) or h (fast forward).
► To finish dictation:
Press blue button [10].
► Move slide switch to e position.
Recording is interrupted. To continue, move slide switch to f
position.
13
Extended operation
d
NOTE
Depending on applied dictation software, function
of the blue button can vary.
For additional information, see operating instructions of dictation software.
Switching off dictation microphone
► Keep On/Off button [8] on dictation microphone [1] pressed
until indication in display [17] goes out.
Extended operation
How to deal with interrupted wireless connection
In case the wireless connection between dictation microphone and
docking station becomes interrupted, a bar appears in the upper
part of the display that turns orange with increasing talk time. The
text is then stored in the dictation microphone. A signal sounds in
intervals of a few seconds, warning of a buffer overflow.
14
b
Caution
Maximum talk time without wireless connection to
docking station is 1 minute. If wireless interruption lasts longer, recording is interrupted and two
short signals are issued. To continue dictation without interruptions, re-enter the reception area of the
docking station with the dictation microphone within one minute.
As soon as the dictation microphone is in the reception area of the
docking station again and slide switch is moved to e position, the
content of the buffer is transferred to the docking station.
A blue bar appears on the display, whose fill level corresponds to
the buffer content to be transferred. At the same time, the recording indicator blinks red.
Extended operation
b
CAUTION!
To prevent data loss, wait until transfer from buffer
has been completed.
Dictation has been completely transferred to PC as soon as both
bars have disappeared from display.
Connecting dictation microphone directly to PC
The dictation microphone can be connected directly to PC by
means of a special USB adapter for operation without battery. At
time of delivery, the USB adapter is located in the docking station
at the receiver for spare battery.
b
CAUTION!
Carefully lift cover plate of adapter by means of a
ball-pen tip or screw driver.
► Pull USB adapter [7] in direction of the arrow from docking station [2] .
► Connect USB plug to jack.
15
Extended operation
► Close cover plate. Ensure that the nibs of the cover plate properly fit into the grooves of the adapter housing.
► Remove battery [6] on back of dictation microphone in direction of arrow.
► Push USB adapter on back of dictation microphone [1] in
direction of arrow into battery holder.
► Insert replacement battery into receiver of dictation microphone in reverse direction of arrow.
The dictation microphone is now ready.
Changing battery
The useful life of Digta CordEx can be expanded by means of a
replacement battery, without causing longer pauses by battery
charging times.
A replacement battery is available as accessory and not included
in the scope of delivery.
► Switch off dictation microphone [1] .
16
The dictation microphone is now ready.
An empty battery can be charged during operation at the docking station.
► Remove already existing battery or USB adapter from docking station.
Extended operation
Setting up function buttons
Function buttons F1 to F3 [11-13] can be assigned with special functions. Set-up is performed via software AdapterServer.
Depending on applied dictation software, assignment of function
buttons can vary.
d
► Insert battery to be charged completely into receiver of docking
station in reverse direction of arrow.
The orange LED indicates that battery is being charged. When
LED goes out, the battery is completely charged.
d
NOTE
The battery on the docking station is only charged
if dictation microphone is not located in docking
station. Otherwise the battery in dictation microphone is charged first.
The charging process does not start immediately,
rather after several minutes.
NOTE
For additional set-up information, see operating
instructions of dictation software.
Controlling dictation microphone via foot control
The dictation microphone can be operated by means of a foot
control (optionally available). This allows the control of dictation
microphone functions without the use of hands.
Connecting foot control
► Plug connection cable of foot control into the provided connection jack [23] on back of docking station.
17
Extended operation
► To switch to recording mode, briefly press down middle pedal.
d
NOTE
Depending on applied dictation software, function
of the foot control can vary.
Right pedal
Using foot control
Function of slide switch [14].
■ e (Stop)
■ f (Start)
The foot control assumes the following functions:
Connecting barcode/RFID reader
Left pedal
The dictation microphone is designed for connection of a barcode
or RFID reader. This allows identification of dictations by a code.
For connection, the existing cover strip must be replaced. The
device is equipped with a special cover strip that leaves the connection channel for accessory devices open and supports the barcode/RFID reader.
Function of slide switch [14].
■ i (Rewind)
Middle pedal
Function of red [16]/blue button [10].
■ g (Recording)
► To record a new dictation, press down middle pedal until dictation software starts a new dictation.
18
► Remove existing cover strip [19] from dictation microphone [1].
Extended operation
Registering at different docking stations
Presetting
► Switch on dictation microphone [1].
► Attach new cover strip to dictation microphone.
► Connect barcode/RFID reader to dictation microphone. See
operating instructions of accessory devices.
d
► In system menu, set option Station allocation to Dynamic pair.
(see section "Settings in system menu“).
d
NOTE
The setting Dynamic pair. is a factory setting.
NOTE
► Switch off dictation microphone.
For details on use of barcode/RFID reader see
operating instructions of reader and dictation
software.
Registering
Operating several dictation microphones/docking
stations
To be able to record with one dictation microphone in different
rooms with separate docking stations, a dictation microphone can
be operated on different docking stations.
► Approach docking station [2] with which connection is to be
established, closely with dictation microphone [1].
► Switch on dictation microphone.
The green LED [3] of docking station blinks fast when dictation
microphone registers for the first time at the station.
► Press paging button [5] on docking station.
The dictation microphone is now connected to docking station.
Repeat the registration process for each docking station with
which the dictation microphone is to be connected.
19
Extended operation
d
NOTE
Renewed registration is only required if dictation
microphone has been disconnected from docking station for an extended time. Otherwise it is
sufficient to switch on the dictation microphone
in reception area of docking station to establish
connection.
Permanent registration at a docking station
If several docking station are in close proximity (e.g. in one room),
the dictation microphone may only be connected to one selected
station when switched on.
► Switch on dictation microphone [1] near the permanently
assigned docking station [2].
The dictation microphone registers in variable mode at the
docking station.
► In system menu, set option Station allocation to Static pair.
(see section „Settings in system menu“).
20
The dictation microphone is now permanently linked to the
docking station and connects with it every time it is switched
on.
d
NOTE
The setting can only be reversed by means of the
permanently assigned dictation microphone.
Installing firmware update
Firmware updates contain important manufacturer changes to the
functions of Digta CordEx. New firmware is offered online at www.
grundig-gbs.com. Downloads require an internet connection.
b
CAUTION!
Prior to an update check if a firmware with a higher
version number is available.
Do not interrupt the update process! Incomplete
firmware could make the device inoperative.
► Switch on dictation microphone [1] .
► Check firmware version in dictation microphone (see section
„Settings in system menu“).
► If a new firmware version for Digta CordEx is available online,
download the corresponding file onto the PC.
Extended operation
► Keep paging button [5] on docking station [2] pressed down for
several seconds.
Now the Digta CordEx registers itself for data transfer at the
PC and is assigned with a separate drive letter.
■ Connection
Start pairing
Stop pairing
The dictation microphone shows the progress of the update in
display [17] .
Connects the dictation microphone to a docking station or disconnects an existing connection. This function is required for multiple
device operation (see section „Operating several dictation microphone/docking stations“).
■ Version/Info
After successful transfer, the dictation microphone is rebooted.
Serial no.
FW/Urloader
► Copy the new firmware file „CordEx.hex“ to the Digta CordEx
drive.
Installation of firmware update is now complete and dictation
microphone is ready.
Settings in system menu
The dictation microphone features a system menu for internal
settings.
Accessing system menu
► Briefly press On/Off button [8] on dictation microphone [1] until
the text Menu appears at bottom left of display text.
► Press blue button Menu [10].
Display of serial number and firmware version. This function is
required for firmware update (see section „Installing firmware
update“).
■ Language
Selecting display language.
■ Station allocation
Static pair.
Dynamic pair.
The system menu consists of the following menu items:
21
Extended operation
Depending on setting, the dictation microphone always permanently connects to a docking station or searches for a nearby station in the reception area. This function is required for multiple
device operation (see section „Operating several dictation microphones/docking stations“).
Changing settings
► Move selection (marker) from one menu item to the next via
the yellow button (up) [15] and F3 button (down) [13] on dictation microphone [1].
► Select entry and press red button OK [16].
The corresponding submenu appears.
► Select entry and press red button OK.
► Press blue button CANC [10] to exit system menu.
d
22
NOTE
If no button is pressed for an extended time, system menu is automatically exited.
Troubleshooting
Troubleshooting
Electrical devices can experience malfunctions. This must not always concern a fault on the device. Thus, based on the following table,
check if you can eliminate the malfunction yourself.
Malfunction
Possible cause
Repair
Device does not switch on.
Battery empty.
Charge or replace battery.
Power supply interrupted.
Check power cable for correct fit and
cable breaks.
Device does not respond to
input commands.
Wireless connection to docking Check wireless connection. Symbol for
station interrupted.
wireless connection must continuously illuminate.
Switch device off and on again.
No sound audible, or too low.
Microphone or playback volume incorrectly set.
Set volume in dictation software.
Sound distorted or too loud.
Microphone or playback volume incorrectly set.
Set volume in dictation software.
[email protected]
www.grundig-gbs.com
37322 941 1100 08/2008
Grundig Business Systems GmbH
Weiherstraße 10
D-95448 Bayreuth
Germany