1
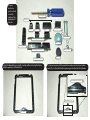
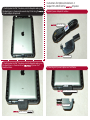
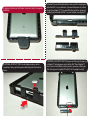
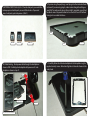
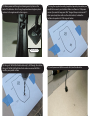
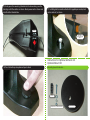
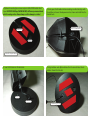
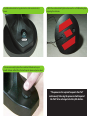
Assembly Instructions
for Archelon v1.2
Additional items you may need to assemble your Archelon (not provided):
a) Tape – Scotch or Other optional for use with a charging cable
b) Drill
c) ¾” drill bit
d) ¼” drill bit
1) Open
enclosure
parts and tool
assembly
package. The
package will
include…
Security Driver
Plug Covers
Power “A”
Audio “B”
Volume “C”
(8) Security Screws
Lag Bolt
Machined Bolt
Cord Management Adapter “D”
Pan Washer
Mounting Thimble
Nut & Lock Washer
Cord Management Adapter “E”
Home Button Cover “F”
2) Lay the faceplate on a smooth, no-slip surface ensuring the home
button opening is at the bottom.
Bolt Cap
3) If you are covering the home button, make sure the home button
cover (F) is in the home button opening on the front of the Archelon.
Home Button Cover in Place
Home Button Cover
Home Button
Home Button Opening
4) Carefully place the iPad®, face down, onto the faceplate making sure
the Apple logo is as shown, continue onto step 5 if not using the
iDynamo Adapter Kit (optional).
Instructions for Optional Archelon 1.2
Swipe P.O.S. 30-Pin kit for
iDynamo
Magtek iDynamo Adapter Kit includes…
iDynamo USB cord
iDynamo Adapter
2) Carefully place the iPad®, face down, onto the faceplate making sure
the Apple logo is as shown and insert
iDynamo Card
Reader as shown.
3) Place Magtek iDynamo Adapter over Card Reader
iDynamo Card Reader not included
iDynamo Adapter
iDynamo Card Reader not included
4) Adapter Installed over Card Reader. Continue to Step 8 to complete
installation
6) OPTIONAL ADAPTER “D” ONLY: Insert adapter making sure the
square key is facing up. Route power cable through the Archelon as
shown.
5) Decide if you would like to be able to remove out the charging cord
while the iPad® is in your Archelon. If you would like access to pull out
the cord, use adapter “D” . If you would like the cord to be secure and
unable to pull out while the iPad® is in your Archelon, use adapter “E” .
7) OPTIONAL ADAPTER “E” ONLY: Pull power cord through the opening
in Adapter “E” and plug power cord into the iPad®. Place Adapter “E”
into its spot on the Archelon making sure the square key is facing up.
Note: You may need to slightly lift the iPad® to fit the adapter securely.
Square Key
Square Key
8) OPTIONAL PORT PLUGS (A, B & C) Decide what ports you would like
to keep open and what ports you would like to close. If you want
access to all ports, put aside pieces A, B & C).
9) If you are using the port plugs, insert plugs into their intended holes
as shown. If you are using plug A, make sure to change the setting on
your iPad® to continuously be on. Once install is complete, you will not
be able to access the power button to turn the iPad® on or off without
having to disassemble the frame.
Audio
Power “A”
Audio “B”
Volume ”C”
Volume
Power
10) Cable Routing : Route power cable through the back plate as
shown in RED. Carefully place backplate with power cord* onto
faceplate as shown in step 11.
11) Carefully fasten the Archelon backplate to the faceplate using the
supplied security screws. Note: Hand tighten in the order shown in the
inset photo.
Top
1
5
3
7
8
Magtek Layout
Bottom
Note How Cable fits in Notches
4
2
6
12) Weave power cord through cord management system on the
back of the Archelon. Note: If using the optional mounting base please
continue to the supplemental section in green
13) Using the supplied mounting template, tape into place where you
would like to mount your Archelon. Make sure there is a 110v power
source if you want to keep your iPad® charged. Keep a minimum of 4”
clear space (away from walls or other obstructions) to allow the
Archelon to operate in its’ full range of motion.
Note the Amount of
Slack in the Cord
14) Using a ¾” drill bit (for thimble hole only!), drill through the surface.
Using a ¼” drill bit, drill bolt hole. Note: make sure correct drill bit is
used for your specific surface.
15) Insert power cord (USB connector first) into thimble hole.
16) Firmly press the mounting thimble into the base making sure the
slot aligns with the notches as shown. Route power cord as shown and
install into the thimble hole.
17) Install lag bolt (or machined bolt with supplied pan washer, lock
washer and nut) as shown.
Thimble
Viewed from
under mounting
surface
Instructions for Optional Archelon 1.2
Optional Mount Kit
18) Press the bolt cap into place and you’re done!
Mounting base kit includes…
Thimble
Bolt, Washer, Lock Washer & Nut
Optional Mount
1) Optional mounting base comes w/pre installed VHB double sided
tape. CAUTION! VHB Tape (SHOWN IN RED) will form a permanent bond
with it’s mating surface. Removal may result in damage to surface!
2) Firmly press the thimble into base making sure the slot aligns with
the notches as shown. Route power cord as shown and install into the
thimble hole.
Thimble Pressed Into Base
W/usb Cord Routed Thru
Thimble Hole
Bolt Hole
Underside Of Optional Mount
4) Align Archelon onto Optional base thru the correct holes. Route
cable as shown thru the slot.
3) Insert USB Cable into Thimble Hole
Bolt Hole
Thimble Hole
Cable Running Thru Slot
5) Install machined bolt w/supplied washer, lock washer & nut as
shown.
6) With the machined bolt tightened remove the red VHB backing tape
exposing the adhesive.
BOLT HOLE
7) You are now ready to place the assembled Archelon onto your
smooth & clean surface! Press the bolt cap into place and you’re done!
*The power cord is required to operate the iPad®
continuously. Not using the power cord will required
the iPad® to be recharged as battery life declines.