1
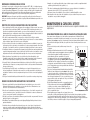
Connecting the Charger Base
1. Remove the wall adapter and charger from the carton.
2. Note the charger comes standard with a universal AC voltage wall adapter and accessory plugs for the
United States and worldwide use. Make sure the proper input plug is attached to the wall adapter.
3. Connect the power cord to the back of the charger and then insert the transformer into an AC outlet.
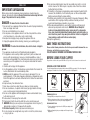
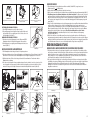
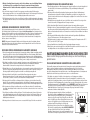
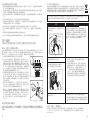
4. Two or more chargers can be positioned together by sliding the oval shaped tab on one side of a charger
into the matching slot on the side of another, locking them together. This minimizes the counter space
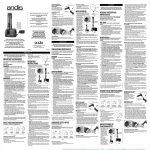
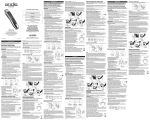
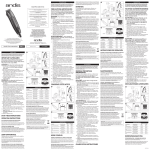
required to accommodate multiple chargers and helps keep the work station orderly (Diagram D).
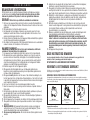
Charging the Battery
1. This battery charger is intended for use with Andis model RBC lithium-ion battery with a rated capacity
of 4.2V
8.4 Wh.
2. Remove the clipper and lithium-ion battery pack from the carton.
3. To remove a battery pack from the clipper, squeeze latches on either side of clipper to release and pull
out battery (Diagram E).
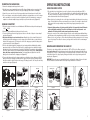
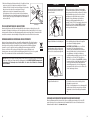
4. Fully charge the battery for one hour before first use. Align the ribs on the front and left back side of
the battery pack with the matching grooves in the charger pocket. Push the battery, contact side down,
firmly into the charging pocket. The button on the front of the charger pops up when the battery pack is
securely inserted in the pocket (Diagram F).
5. The three white lights alongside the charging pocket are charging indicators that display the battery’s
approximate charge level. When all three lights are lit, the charging system has completed fast charge
and switched to a reduced charging rate to completely fill the battery. This maximizes safety and battery
life. All three lights remain on for a few additional minutes during this finishing charge. A fully depleted
battery will charge completely in about one hour. The charging indicator lights turn off when the
battery pack is removed from the charging pocket (Diagram G).
6. To remove the battery pack from the charger, push down on the button to release battery pack. Pull the
battery pack from the charging pocket and insert into clipper, noting the ribs on the battery pack align
with grooves inside the clipper (similar to the charger). The battery pack will “click” into place when fully
inserted into the clipper (Diagram H).
RIBS
SQUEEZE
SLOTS
SQUEEZE
Diagram D
Diagram C
CHARGING
INDICATOR
LIGHTS
SLOT
BUTTON
Diagram F
4
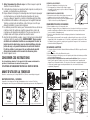
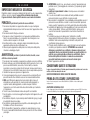
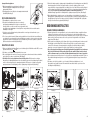
1. The start switch has a locking feature to prevent the clipper from being accidentally turned “ON” or
“OFF.” To turn the clipper “ON,” press the small red button on the start switch and slide switch forward.
The switch is textured for a sure grip even with sweaty or oily hands. To turn the clipper “OFF,” press the
small red button and slide the switch back (Diagram I).
2. When switched on, the glowing blue lens on the clipper housing indicates the battery pack has a strong
charge. The blue light turns off when several minutes of power remain. This is simply a caution that the
battery may not have enough remaining charge to finish a large clipping job and may need to be
recharged.
3. If extended clipping continues, the battery pack will shut itself off to prevent the internal lithium-ion
cell from discharging completely. This protects the lithium-ion cell and is entirely normal – not a
malfunction. The battery pack will resume normal operation when recharged.
4. For greater convenience when continuous clipping is desired, consider purchasing an additional battery
pack. Exchange a fully charged battery pack with one in the low battery condition for extended operation.
5. When not in use, rest your clipper – with or without the lithium-ion battery pack attached – in the storage
pocket of the charger. This reduces the chances your clipper will be knocked to the floor and damaged
(Diagram J).
Mounting and Dismounting the Blade Set
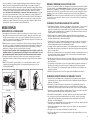
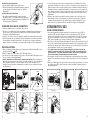
The blade set can be attached with the start switch in the “OFF” or “ON” position. When removing the
blade, turn the clipper off. Push the blade away from the clipper with your thumb, and the blade will pop
off (Diagram K). To replace or change the blade set, fit the black plastic tab on the blade set into the notch
located at the bottom of the clipper opening. Firmly push the blade onto the clipper housing, and it will
snap into place (Diagram L).
IMPORTANT: Frequently remove accumulated hair from the cavity under the blade set. Remove the blade
set as described above and brush hair from the cavity using a small brush or toothbrush.
SWITCH LOCK
BATTERY
INDICATOR
LIGHT
Diagram I
RIB
RIB
Using your Andis Clipper
Diagram E
RIB
SLOT
OPERATING INSTRUCTIONS
RIB
SLOT
LINE UP
PIN
Diagram J
Diagram K
SLOT
SLOT
BATTERY
RELEASE BUTTON
Diagram G
Diagram H
Diagram L
5