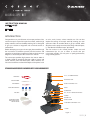
1
FOCUSING & CHANGING POWER (MAGNIFICATION)
ILLUMINATION
Now that the specimen slide (or object) is placed directly
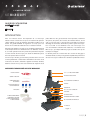
under the objective lens, use the focus knob Fig. 1 (9) to
focus on the specimen. Note that for very small objects, you
should set them on the clear slide with a recessed hold in
the center.
To get the sharpest and best views, the illumination (lighting)
will have to be adjusted.
1.The top illuminator Fig. 1 (3) is used only for solid objects
(not specimen slides) so that light shines down onto the
object. Push the button on the top of the illuminator to turn
it on/off. After some usage, you can determine the best way
of adjusting the light to provide the most pleasant views.
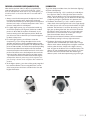
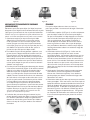
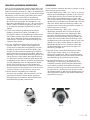
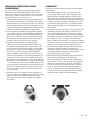
2.The bottom illuminator Fig. 1 (10) is used for specimen
slides which shine up through the hole in the stage through
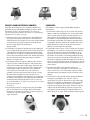
the slide. You can see a close up of the illuminator in Figure
6a below. The illuminator is turned on by rotating it so the
light goes up through the hole. You turn off the illuminator
by rotating it down so that the mirror is on the upper part
(the mirror is not useful with this microscope since you
have the much better electric illuminator).
3.The light from the bottom illuminator can be increased or
decreased by rotating it with very slight movements.
4.The bottom illumination may be too bright with some
specimen slides. Included with your microscope is a light
diffuser which reduces the brightness and glare somewhat
and can make the views sharper with a higher contrast
level. In Figure 6a the diffuser is the small black piece. The
diffuser fits over the bulb area by press fitting it on. Figure
6b shows what the illuminator looks like with the light
diffuser in place. It will take experimenting to get this right.
1.Always start with the lowest power (4x objective lens) and
have the zoom eyepiece at the 10x position, all the way
counterclockwise (when you are facing the microscope from
the front) until it stops, so that the total power is 40x – this is
the most useful power for solid objects.
2.For slightly higher power, you can rotate the knurled ring
on the zoom eyepiece (see Figure 5) clockwise to obtain
powers of 40x to 80x (or anywhere in between) as you
continue rotating to the 20x eyepiece position. Note that
you will have to refocus whenever you rotate the eyepiece
to obtain a sharp focus.
3.For much higher powers, you will have to rotate the
nosepiece Fig. 1 (5) to change the objective lens to 15x
(provides total power of 150x to 300x depending on what
position you have the zoom eyepiece in or 30x provides total
power of 300x to 600x). You rotate the nosepiece by holding
the microscope above the nosepiece with one hand and
rotate the nosepiece with the other hand until it clicks at the
position. Be cautious not to let the objective lens touch the
specimen slide or object when changing to higher powers
– you should turn the focus knob first to lower the stage to
a low position. Note the power range of the objective lens
you are using is shown on the nosepiece after it clicks into
position.
4.At the highest powers, your views will be greatly magnified
but somewhat darker. The most enjoyable views can be
at the lower powers which have a wider field of view and
brighter illumination.
Figure 6a
Figure 6b
ENGLISH | 3