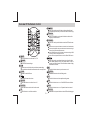
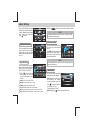
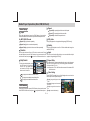
1
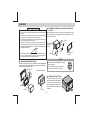
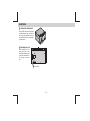
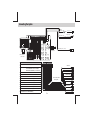
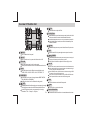
Warnings
When Driving
CAUTION
Keep the volume level Iow enough to aware of the road and traffic
conditions.
When Car Washing
Do not expose the product to water or excessive moisture. This could
cause electrical shorts, fire or other damage.
CAUTION
In order to avoid any accident, the driver must not watch video
while driving. This unit is designed to not allow watching video
while driving. Park your car in a safe place and engage the
'parking brake' before watching video.
When Parked
Parking in direct sunlight can produce very high temperatures inside your
vehicle. Give the interior a chance to cool down before starting playback.
Use the Proper Power Supply
THIS MOBILE DVD PLAYER IS A CLASS I LASER PRODUCT. THIS
UNIT USES A VISIBLE/INVISIBLE LASER BEAM WHICH COULD
CAUSE HAZARDOUS RADIATION IF EXPOSED DIRECTLY. BE
SURE TO OPERATE THE MOBILE DVD PLAYER CORRECTLY AS
INSTRUCTED.
USE OF CONTROLS OR ADJUSTMENTS OR PERFORMANCE OR
PROCEDURES OTHER THAN THOSE SPECIFIED HEREIN MAY
RESULT IN HAZARDOUS RADIATION EXPOSURE.
DO NOT OPEN COVERS AND DO NOT REPAIR BY YOURSELF
PLEASE REFER SERVICING TO A QUALIFIED TECHNICIAN.
NOTE
To reduce the risk of fire or electric shock, do not expose this equipment
to rain or moisture.
To reduce the risk of fire or electric shock, and annoying interference,
use only the recommended accessories.
This device is intended for continuous operation.
This product is designed to operate with a 12 volt DC, negative ground This product incorporates copyright protection technology that is
battery system (the regular system in a North American car).
protected by method claims of certain U.S. Patents and other intellectual
property rights owned by Macrovision Corporation and other rights
owners. Use of this copyright protection technology must be authorized
Protect the Disc Mechanism
by Macrovision Corporation, and is intended for home and other limited
Avoid inserting any foreign objects into the slot of this player. Failure to viewing uses only unless
follow this may cause malfunction or permanent damage due to the
otherwise authorized by Macrovision Corporation. Reverse engineering
precise mechanism of this unit.
or disassembly is prohibited.
E-2
Installation
Installation using the screw holes on the side of
the unit
INSTALLATION CAUTION
1. Before finally installing the unit, connect the wiring temporarily and
make sure it is all connected up properly and the unit and system work
properly.
2. Use only the parts included with the unit to ensure proper installation.
The use of un-authorized parts can cause mal functions.
3. Consult with your nearest dealer if install-ation requires the drilling of
holes or other modifications of the vehicle.
4. Install the unit where it does not get in the driver's way and cannot
injure the passenger if there is a sudden stop, like an emergency stop.
5. If installation angle exceeds 30° from horizontal, the unit might not give
its optimum performance.
Select a position where the screw holes of the bracket and the screw
holes of the main unit become aligned (are fitted) and tighten the screws
at 2 places on each side.
Screw
Factory radio
mounting
bracket
Hook
6. Avoid installing the unit where it would be subject to high temperature,
such as from direct sunlight, or from hot air, from heater, or where it
would be subject to dust dirt or excessive vibration.
Hook
NOTE
Installation with the half sleeve
The outer trim ring, and half-sleeve are not used
for this installation.
The mounting box, metal half-sleeve, hook &
screws are not included in the packing.
After inserting the half sleeve into the dashboard, select the appropriate
tab according to the thickness of the dashboard material and bend them
inwards to secure the holder in place.
Dashboard
Dashboard or
console
Screw
Attach the trim ring
182
Attached the Front Panel
111
Half Sleeve
Screw
Trim ring
To attach the front panel back to the
unit chassis, please insert the right side
of the panel in the chassis until it is
correctly engaged. Press the left side
of the panel until the mechanism locks
it into place.
E-3
2
1
Installation
Detach the Front Panel
Press the REL button on the front panel
to release the panel, and push the left
side of the panel rightward, then pull
the panel towards you to disengage it
from the chassis.
1
2
Resetting the unit
After releasing the front
panel, use a stick or any
non-metalic object to press
& hold the reset button for
five seconds to reset the
unit.
Reset Button
E-3
Connecting the System
Back Up
Camera Wire
(Orange)
Gearbox
switch
Reverse gear signal
Back Lamp Lead +
Brake Switch
P arking Wire (Pink)
3
4
5
6
7
8
5
7
8
4
A
FUSE
1
2
FUS E
Ground
B
ISO Male Connector
(not included)
PIN
WIRE COL OR
A4 YELLOW
A5 BLUE
Audio
In R
Video
out 1
Sub-W
Audio
In L
Front
RCA L
Rear
RCA L
Video
In
Front
RCA R
Rear
RCA R
Antenna
Extender Cable
Extrenal Microphone
(B lac k)
Camera
In
FUNCTION/LABEL
BATTERY(+)
Camera In
CONNECT TO SYSTEM CONTROL TERMINAL
OF THE POWER AMP OR AUTO ANTENNA
RELACONTROL TERMINAL (max 150mA 12VDC)
A7
RED
IGNITION (ACC)
A8
BLACK
GROUND
B1
VIOLET
RIGHT REAR SPEAKER (+)
B2
VIOLET/BLACK RIGHT REAR SPEAKER (-)
B3
GREY
RIGHT FRONT SPEAKER (+)
B4
B5
GREY/BLACK
WHITE
RIGHT FRONT SPEAKER (-)
LEFT FRONT SPEAKER (+)
B6
WHITE/BLACK LEFT FRONT SPEAKER (-)
B7
GREEN
B8
GREEN/BLACK LEFT REAR SPEAKER (-)
Rear Line Out R-CH
Rear Line Out L-CH
Subwoofer Out
RCA TO RCA CABLE
(Notsupplied)
Front Line Out R-CH
Front Line Out L-CH
Video out 1
Audio In R-CH
Audio In L-CH
LEFT REAR SPEAKER (+)
Video In
E-4
Overview Of The Main Unit
1
2
3
4
5
6
7
7
8
FU
NC
XB
S
BAND
SOURCE
SUB-W
IN FO
LI S
T
EQ
DN
DN
SETUP
15 14 13 12
UP
9
CLOCK
PUSH
1
PUSH
11 10
9 8
Release
Press to detach the front panel.
2
Power
Press to turn the unit on, press and hold turn the unit off.
3
FUNC/XBS
Press this button enter into the function mode.
Hold & press this button to turn on or off the Bass booster function
4
Source
Press this button to select different source playback mode:
TUNER / DISC / USB / SD CARD / AV1-IN / BT AUDIO / TV
5
BAND/SUB-W
Under Radio mode, press to change between BAND FM1,FM2,
FM3, AM1(MW1) or AM2 (MW2).
Hold & press to enter into the Subwoofer setting mode.
6
Under Media playback mode, turn and hold momentarily to fast
forward /backward.
MER
TRACK
UP
Track Up/Down
Under Radio mode, turn these buttons to enter into the Auto Seek
mode, turn and hold to enter into the Manual Seek mode.
Under Media playback mode, turn to skip a chapter/track/scene/file.
DIM
VOLUME
Eject
Press this button to eject the Disc.
Pause
Under Media playback mode, press to Pause/ Resume Play the music.
10 Clock
Press to view the Clock, press again to return to previous mode.
11
DIMMER
Under the Bluetooth Handfree mode, press to end or reject an incoming call.
Press to quick return previous menu or mode.
Hold & press this button to adjust the Dimmer High or Low.
12 List / EQ
Under tuner mode, press this button to show the List of stored station.
Under media playback mode, press this button to list the searching of
tracks or files on the media playback mode.
Under DVD/MP4 mode, press this button to list the searching of DVD
root menu or files on the playback mode.
Under VCD mode, press this button to turn On/Off the PCB function.
Hold & press this button to enter into the EQ setting mode.
13 Setup
Press this button to enter into the Setup mode.
INFO
14
Mute
Under the Bluetooth Handfree mode, press to answer an incoming
Press to Mute or restore the volume.
call. Hold & press to enter into call Tansfer back to Mobile Phone.
15 Encoder Volume Knob
Under DVD playback mode, press repeatedly to view play
information: Title--->Chapter--->Play time
Rotate the Encoder Volume Knob to increase/decrease the volume.
E-5
Overview Of The Remote Control
9
1
6
2
12
DIMMER
7
FUNCTION
FUNC
LIST
3
VO LUME
4
5
14
13
15
OK
SETTING
9
10
BAND
XBS
EQ
DVD
TITLE
DBSS
16
Under Media playback mode, press this button to Pause or Resume play.
10 DVD AUDIO
Under DVD playback mode, press this button to select audio
language or audio channel.
11 DVD MENU
Under DVD mode, press this button access into DVD main menu.
12 LIST
Under tuner mode, press this button to show the List of stored station.
Under media playback mode, press this button to list the searching of
tracks or files on the media playback mode.
Under DVD/MP4 mode, press this button to list the searching of DVD
root menu or files on the playback mode.
Under VCD mode, press this button to turn On/Off the PCB function.
17
DVD
AUDIO
DVD
MENU
11
18
19
8
1
MUTE
Press this button to turn the mute On / Off.
2
DIMMER
Access into dimmer settings.
/
14
Under tuner mode, skip to the previous/next preset station.
Or under other modes use these button to move cursor Up/Down.
HOME
15
3
4
Access into the HOME menu.
5
6
/
Increase/Decrease the volume.
/POWER
Press this button to turn the unit on or off.
7 FUNCTION
Press this button enter into the function mode.
8 OK
Use this button to confirm the selection.
/ BAND
Under Tuner mode, press this button to change the radio band.
13
/
Under Tuner mode, press these buttons to tune for radio station.
Under Media playback mode, press these buttons to skip to
previous / next track / chapter. Press & hold these buttons to play
fast backward / forward.
Press this button to return to previous menu or exit.
SETTING
Press this button enter into the Setting mode.
16 EQ
Press this button access into equalizer setting menu.
17 XBS
Press this button to turn on or off the iX-BASS booster function.
18 DBSS
Press this button to turn on or off dynamic bass boost sound.
19 DVD TITLE
Under DVD mode, press this button to select DVD subtitle language.
E-6
Adjust Settings
Press the SETUP button on the front
panel to access into the setup mode.
User can rotate the Encoder Volume
Knob to select the options, then
press
to confirm.
2. Press
RESET
button to restore the above settings into default
NOTE
Hold & press LIST button on the front panel is to quick get into the
Preset Equalizer Setting menu.
Subwoofer Setting
Adjust Speaker Setting
User can rotate the Encoder Volume
Knob to adjust the Front and Rear
speaker fader, the Left and Right
speaker balance settings value from 12 to +12.
User can rotate the Encoder Volume
Knob to turn on or off the subwoofer
function.
Press
to select the settings, and
rotate Encoder Volume Knob to
adjust value of subwoofer level and
subwoofer low pass filter.
NOTE
Adjust EQ Setting
Hold & press BAND button on the front panel is to quick get into the
Subwoofer Setting menu.
User can rotate the Encoder Volume
Knob to select the Preset Equalizer:
USER / VOCAL / JAZZ / CLASSIC /
ROCK / TECHNO / POP / EQ OFF.
1. Press
button to select the
below settings, and rotate the
Encoder Volume Knob to adjust
the level.
Tuner Setting
User can rotate the Encoder Volume
Knob to select the below settings:
[Tuner Area]: This option allows
the selection of the frequency
spacing appropriate for your area.
[BASS]:bass level range -15dB to +15dB.
[MIDDLE]:middle level range -15dB to +15dB.
[TREBLE]:treble level range -15dB to +15dB.
Press
to select the Tuner Area:
U.S.A, Europe, Oirt, Latin.
This unit is default to “Europe”.
[LPF]:low pass filter as 60Hz, 80Hz, 100Hz or 200Hz.
[MPF]:middle pass filter level range 500Hz, 1KHz, 1.5KHz or 2.5KHz.
[HPF]:high pass filter level range 10KHz, 12.5KHz, 15KHz or17.5KHz.
[RDS On/Off]: Press
E-7
to turn On or Off the RDS function.
Adjust Settings
Adjust System Setting
Adjust Dimmer Setting
User can rotate the Encoder Volume
Knob to select the System Settings,
then press
to enter into adjust
the below options:
Press
button to adjust the TFT
backlight level between High or Low.
[Sound]: User can rotate the
Encoder Volume Knob to select the
Sound mode, and press
to
turn on or off the selection.
[Date/Time]: Rotate the Encoder Volume Knob to adjust the Date /
Time, and then press
to confirm.
E-8
Tuner Operations
Tune To Preset Station
Adjust Tuner Function
Press the FUNC button on front panel
under Tuner playback mode access
into the Tuner Function menu. User
can rotate the Encoder Volume Knob
to select the below options:
Press the LIST button on front panel under Tuner playback mode to get
into the preset stations list, and user can use the Encoder Volume Knob
to select which preset station he would listen to, and press
to
confirm the selection.
OFF
[Manual Store]: Use this function to saved the current frequency to
Manual Seek
memory stations. User can press
to enter into the manual store
memory stations.
Turn and hold the Track Up / Down button on fron panel under Tuner
[Auto Store]: After Auto Stored & saved the 6 strongest stations, the playback mode to access into the Manual Seek mode.
unit will automatically enter present scan one time.
[Local Seek]: To receive more radio stations or only stations with
strong signal, you can adjust the tuner sensitivity. User can press
Auto Seek
to turn On/Off the Local Seek mode.
Turn the Track Up / Down button on front panel under Tuner playback
Local Seek On: Only stations with strong signal can be broadcast.
Local Seek Off: Stations with strong and weak signals can be broadcast. mode to access into the Auto Seek mode, and the unit will auto search
[PTY Seek]: User can press
button get into the PTY List to select for the next radio station.
the desired PTY mode.
[AF On/Off]: User can press
button to turn the AF On or Off.
[TA On/Off]: User can press
button to turn the TA On or Off.
Tune To Radio Station
Press BAND button on front panel under Tuner playback mode to change
between FM bands and AM(MW) bands.
E-9
About RDS
The RDS (Radio Data System) function operates only in areas with FM
AF (Alternate Frequencies)
stations broadcasting RDS signals. If you tune to an RDS station, an RDS
icon and information about the presenter, station or program is displayed If the radio signal come from the current station is poor, you can turn on
the AF (Alternate Frequency) function to let the unit searches for another
This unit support below RDS features:
station with stronger signal but with the same program identification as
the current station automatically.
PTY (Program Type)
Before tuning to RDS stations, you can select program type and let the
unit search only for programs of the selected category.
MUSIC GROUP
SPEECH GROUP
POP M , ROCK M
NEWS, AFFAIRS, INFO
EASY M, LIGHT M
SPORT, EDUCATE, DRAMA
CLASSICS, OTHER M
CULTURE, SCIENCE, VARIED
JAZZ M, COUNTRY
WEATHER,FINANCE, CHILDREN
NATION M, OLDIES M
SOCIAL, RELIGION, PHONE IN
FOLK M, A-TEST, ALARM
TRAVEL, LEISURE, DOCUMENT
TA (Receive Traffic Announcement )
If you do not want to miss traffic announcement during enjoying music,
you can turn on the TA (Traffic Announcement) function.
TA On
When there is traffic announcement, the unit switches to
the tuner mode (regardless of the current mode) and
begins to broadcast the announcement on traffic
conditions. When the traffic announcement is over, it
returns to the previous mode.
TA Off
Traffic announcement does not cut in.
CT (Clock Time)
The RDS signal broadcast together with the clock time to the unit
automatically.
E - 10
Media Player Operations (Disc/USB/SD Card)
This unit can play various video / audio stored into Disc / USB or SD Card
on Media Player.
USB Device Operation
Insert the USB Device
You can play commercially available audio CDs and these Discs:
Open the cover marked
on the
front panel, insert the USB device into
the USB socket. The unit starts playing
from the USB device automatically.
Digital Versatile Discs (DVDs)
Video Cds (VCDs)
Digital Versatile Discs Recordable (DVD+/-R)
Digital Versatile Discs Rewritable (DVD+/-RW)
Compact Discs (CDs)
CD Recordable (CD-R)
CD Rewritable (CD-RW)
NOTE
Ensure that the USB device contains
playable music.
NOTE
Please ensure that the disc contains playable content.
Memory Card Operation
Insert the Memory Card
1. Insert
2.
the disc into the Disc Slot with label side facing up, the unit will Detach the front panel first, the SD card
play starts automatically.
slot is located on the main body of this
unit, insert the card into the card slot in
Press
on front panel to take out the CD. When the disc is ejected, the correct direction until a “ CLICK”
the unit switches to the previous source, if connected. Otherwise, the sound is heard, then the unit starts
unit switches to radio mode automatically.
playing from the card automatically.
Press the
button on front panel to pause the music play.
Press this button again to resume music play.
Turn the Track Up / Down button on front panel to skip forward to
the beginning of the next or previous chapter.
NOTE
Ensure that the memory card contains
playable music.
Turn and hold Track Up / Down button on front panel to fast
Remove the Memory Card
forward or fast rewind through the disc. Turn the button again to
Detach the front panel first, press the card until you hear a click
resume normal playback.
sound, the card is now disengaged. then remove the card.
E - 11
Media Player Operations (Disc/USB/SD Card)
Repeat
Media Playing
[Repeat CH]: repeat playback the current the chapter.
Repeat
[Repeat TT]: repeat playback the current title.
During the media playback, press the FUNC button on front panel to
access into Media Function menu to adjust the different Repeat mode.
[Repeat Off]: cancel all the repeat function.
For MP3/WMA/CD mode
DVD Audio
[Repeat All]: play all tracks repeatedly
During DVD playback to change the audio language (DVD/Divx only).
[Repeat One]: play the current track repeatedly
Subtitle
[Repeat Folder]: play all tracks in the current folder repeatedly
During the DVD playback to turn On or Off the subtitles and change the
subtitles (DVD only).
Random
Angle
User can play audio tracks/files or VCD videos in random order. During
the media playback, press the FUNC button on front panel enter into the User can tap on Aangle while playing a scene recorded with multiple
media function menu, and press
to turn On or Off the random function. angles to change the angle (DVD only).
Aspect Ratio
Skip/Search
User Selecting the TV Aspect setting allows the user to select the aspect
ratio of the TV (DVD and VCD only). The following options are available:
4:3=Aspect ratio of TV is 4:3
16:9=Aspect ratio of TV is 16:9. Both wide screen and 4:3 contents will fill
the entire screen.
1. Under the media playback, press
the LIST button on front panel to
access into the playlist menu,
and rotate the Encoder Volume
Knob to select folder / file:
Video Setting
: to display all available audio folders / track.
Under DVD/VCD playback, tap on Video Setting mode access into the
below Setup menu to adjust the options:
: to display all available pictures folders / files
: to display all available video folders / files.
DVD Function
During the DVD playback, press the FUNC button on front panel to enter
into the DVD Function menu, and press
to adjust the below options:
[Bright]: change the Bright level from
0 to 8.
[Contrast]: change the Contrast level
from 0 to 8.
[Color]: change the Color level from 0
to 8.
[Reset]: reset to default setting.
E - 12
AV-In Mode
Select the AV Mode
About the Parking Wire
You can connect up to 2 optional devices. Press the SOURCE button on
front panel to enter into the Source menu to select the AV-In mode.
AV1- IN=Front panel AV-In
AV2-IN=RCA back of unit
AV1-IN
CAUTION
In order to avoid any accident, the driver must not watch video while
driving. This unit is designed to not allow watching video while driving.
Park your car in a safe place and engage the 'parking brake' before
watching video.
This unit is allowed to connect with external Audio / Video system such
like Digital Camera or Game Console. User can connect the external A / V
system thru the A / V in jack on front panel.
NOTE
The Video Blocking system under Parking Brake NOT ENGAGED
only control this unit's display. This system will not affect the Video
Output thru the rear RCA Video Out put.
NOTE
If there is no any external AV System input, then the TFT will be show
“No Video Signal”.
If watch moving video from Disc or AV
In source but Parking Brakeis NOT
PROPERLY CONNECTED, the video
signal will be blocked by the system
and the display will be show:
The Reverse Wire For Back Up Camera System
If user connected a backup camera system to this unit, the vehicle is in
reverse Gear (Back Up mode), the front indash TFT display will
automatically switch to Back Up Camera Video signal regardless what
ever mode is currently displayed on the front indashTFT.
E - 13
Bluetooth Operations
13. When in telephone mode, during talking, it is highly recommended to set
the volume to below “30” in order to achieve the best sound quality. As if
the volume is too high, it may create unwanted echo inside the car, and
1. When user use our Bluetooth HEAD UNIT, please make sure the mobile
this unwanted echo may feedback into the microphone.
phone you use must/does support Bluetooth functions (Headset or
Handsfree profiles or both)
14. If the Bluetooth related operation is not performing normally, like cannot
2. Before you start to use our Bluetooth HEAD UNIT, please make sure
make pairing, cannot making an outgoing call, User can try to make a
complete pairing with your mobile phone first. Please refer to the user
SOFT-RESET of the Bluetooth module by removing / detaching the panel
manual, section “PAIRING” for detail “PAIRING” instruction. To ensure the
from the main unit and waiting for about 1 min. Then re-attach the panel to
best reception for Pairing or Re-connection, please make sure the Phone
the unit & retry the Bluetooth operation again. Or user can RESET the
Battery is fully charged when making the Pairing or Re-connection.
whole unit by pressing the RESET button behind the panel.
3. Please always try pairing the Mobile Phone with Head unit after a few minutes
By pressing the RESET button all the stored memory will resume to
of the Mobile Phone was Switched On to ensure the best pairing result.
factory default.
4. “ Caliber ” is this unit device model number which is displayed on the mobile
phone.
Frequency Asking Questions
5. To achieve the best performance, please always keep the Mobile Phone
within 3 meters of the Head unit.
Q: Under phone conversation, if the voice output from the car's speakers
6. Please always keep a clear path between the Mobile Phone & the Head unit.
is not loud enough.
7. Never put any metal object or any obstacle between the path of the Mobile A: Try increase the volume level of the head unit to a suitable sound level
Phone & the Head unit.
Q: Under phone conversation, the “Listener” cannot hearing my voice loud
8. Some brand of Mobile Phone like Sony Ericsson may have "Power Saving
enough
Mode" selection when Bluetooth mode is switched on. PLEASE DO NOT
Switches ON Power saving Mode when operating with this Head Unit, as A: First, try asking the 'Listener” increase the volume level on his/her mobile
phone, if still not loud enough, try to increase your mobile phone's volume.
some abnormal communication behavior will happen occasionally if Power
Saving Mode is switched on.
Q: Under Phone conversation, the “Listener' can hear echo feedback.
9. Before user make Outgoing call or Incoming call, make sure the mobile A: Your unit's speaker volume level is too loud which cause the voice
phone's “Bluetooth function” was switched “ON”.
feedback into the built-in microphone, this can be corrected by decreasing
the volume level.
10. To ensure the best conversation quality / performance, please always
keep talking within 1 meter of the Head Unit.
Q: Under Phone conversation, the “Listener' complain the background is
11. If user want to Dis-connect the Head unit with the Mobile Phone, please too noisy
switch “OFF" Bluetooth connectivity on the Mobile Phone,or go to the A: May be you are in a noisy environment. Try close the car's window to shield
system menu, "dis-connect" to disconnect the bluetooth connectivity
the environment / background noise under phone conversation.
manually. ( please refer to the user manual, section "dis-connection of the
bluetooth system for details instruction. )
Q: If the Mobile Phone already paired with the headunit, but after several
12. Some Mobile Phones can support “IN BAND RING TONE”, such as Nokia. calls, the incoming calls cannot access thru the headunit.
In such case, the Incoming Ringing Tone will be same as the original Ring- A: May be the paired Mobile Phone lost the Bluetooth connection with the
headunit. in this case, please go to the "MENU" & select "re-connect" to
tone of the Mobile Phone. But some Mobile Phones like Sony Ericsson do
not support this feature. The Ring-tone will be using the standard Ringreconnect the headunit with the paired Mobile Phone. For details, please
tone of the Head unit.
refer to the MENU operation "re-connection”.
User Guide For Bluetooth
E - 14
Bluetooth Operations
Answering An Incoming Call
Handfree Operations
When there is an incoming call, the display will show the Phone
Number. If the incoming call has no caller I.D. number, the LCD will
display “ Phone In ”, user can press the
button on front panel
to answer / accept the call.
P airing The Bluetooth System Between Mobile
Phone & The Unit
Open your Mobile Phone and switch Bluetooth to on, and search
Bluetooth device.
User can use the Encoder Volume Knob to adjust the volume level.
“Caliber” should appear in the pairing list on the Mobile Phone. User
need to select “ Caliber ” and then input the password “1234” .
If the pairing is successful, the
below display will show on TFT for
a while, and the unit will switch
back to the previous mode
automatically.
To end the conversation, press the
button on fron panel. The unit
will switch back to the previous mode automatically and release the
mute of the previous mode at the same time.
NOTE
An Incoming call under stand by mode (Ignition on & Power Off), the
system will automatically switch on the head unit.
Rejecting An Incoming Call
Disconnecting of the Bluetooth System
User can press the
Open your Mobile Phone and disconnect the Bluetooth System with the call.
unit.
If the Disconnection is successful,
the below display will show on
TFT, and the unit will switch back
to the previous mode
automatically.
button on front panel to reject the incoming
NOTE
P3
The audio output of the present mode will be muted and the ringing
tones will be heard if an incoming call is not being answered. After
pressing the
button, the mute of the present mode will be
released.
E - 15
Bluetooth Operations
Making A Call
Bluetooth Audio Streaming A2DP
User can use his / her Mobile
Phone to dial and make an
outgoing call. Once the user has
completed the dialing, the below
display will show on TFT:
If the connected Bluetooth device supports Advanced Audio Distribution
Profile (A2DP), you can listen to the music stored on the device through
the unit. If the device also supports Audio Video Remote Control Profile
(AVRCP) profile, you can use the control on the unit or its remote control
to play music stored on the device.
User can use the Encoder Volume Knob to adjust the volume level.
To end the conversation, press the
button on fron panel. The unit
will switch back to the previous mode automatically and release the
mute of the previous mode at the same time.
Call Transfer
During the talking mode, hold & press the
button on front panel to
transfer the audio from the unit back to the Mobile Phone for privacy
reason.
1.
Pair the phone with the unit.
2.
Press the SOURCE button on front panel to return to SOURCE menu.
3.
Rotate the Encoder Volume Knob to select
, then press the
to access into the Bluetooth mode, the music via device start to play.
4.
NOTE
After the pressed the
, the present mode will be muted at
the same time, user can press the
button to release the
Mute.
E - 16
If the device support Audio Video Remote Control Profile (AVRCP), press
the
, and then press the
to start playing.
Product Information
Radio
General
Power Supply
12 V DC (11-14 V), Negative Ground
Fuse
15A
Suitable Speaker
Impedance
4-8
Power output
Mosfet 75W x 4 channels
Pre-AMP output
voltage
2.0 V (USB play mode; 1KHZ, 0dB,
10k load)
Aux-In level
Subwoofer output
voltage
-FM
Frequency Range
300mV
-AM(MW)
Frequency Range
522 -1620KHz
Usable Sensitivity
Better than 45dB
USB devices
2.0 V (USB play mode; 120HZ, 0dB,
10k load)
USB flash memory
TFT Screen Section
USB 1.1, & 2.0 compatible
Bluetooth
Screen Size
4.3 inches
Display Resolution
800 x 480 dots
Screen Type
TFT Liquid Crystal Display active matrix
Disc Player
System
DVD/CD audio/MP3 system
Frequency Response
20Hz to 20KHz +/-3dB
Signal to Nosie Ratio
Usable Sensitivity
87.5 - 108MHz (100KHz
per step in auto search and 50KHz per
step in manual search)
Better than 15dB at S/N 30dB
90dB
Channel Separation
2 Channel(Stereo)>60dB@1KHz
Video signal format
NTSC only
Video Output
1+/- 0.2V
E - 17
Output power
0dBm (Class II)
Frequency band
2.4000GHz-2.4835GHz ISM Band
Range
3 meters (free space)
Standard
Bluetooth 2.1 specification
Product Information
Supported MP3 disc format
Supports Formats
•
•
•
•
•
•
•
•
•
•
•
•
MP3/WMA bit rate (data rate): 32-320 Kbps & VBR
WMA Version V9 or earlier
Directory nesting up to a maximum of 8 levels
Number of albums/ folders:maximum 99
Number of tracks/titles: maximum 999
Supported sampling frequencies: 32 kHz, 44.1kHz, 48 kHz
Supported Bit-rates: 32-320 Kbps and variable bit rate
•
•
DVD
Xvid
NOTE
Empty albums: an empty album is an album that does not contain
Unsupported fle formats are skipped. For example, Word,
documents (.doc) or MP3 fles with extension.dlf are ignored and
not played.
•
•
•
Maximum album number: 255
Supported video formats
File name in Unicode UTF8 (maximum length: 128 bytes)
MP3/WMA files, and is not be shown in the display.
•
Maximum title number: 512 (depending on fle name length)
ID3 tag V1.0/1.1/2.0/2.3 (Max 32 Byte)
Unsupported formats
•
ISO9660, Joliet
AAC, WAV, PCM audio fles
DRM protected WMA fles (.wav,.m4a, .m4p, .mp4, .aac)
WMA fles in Lossless format
E - 18
Product information is subject to change without prior notice.
Troubleshooting
Before going through the check list, check wiring connection. If any of
the problems persist after check list has been made, consult your
nearest service dealer.
No power or no sound
Car engine is not on. Turn the car engine on.
Cable is not correctly connected. Check connections.
Fuse is burnt. Replace fuse.
Volume is in minimum. Adjust volume to a desired level.
If the above solutions cannot help, press the RESET button.
Ensure that the track played is of a compatible format.
The CD Skips tracks
Ensure that the CD is not damaged or dirty.
Ensure that random mode is deactivated.
Disc cannot be ejected.
Press and hold
.
Preset stations lost
Battery cable is not correctly connected. Connect the battery cable
to the terminal that is always live.
Display show ERR-1
Noise in broadcasts
Signals are too weak. Select other stations with stronger signals.
Check the connection of the car antenna.
Change broadcast from Stereo to mono.
The disc, USB or SD device cannot be red in two minutes
Display show ERR-3
USB/SD data error.
Disc is upside down. Ensure the printed side is facing up.
Cannot play disc
Disc is upside down. Ensure the printed side is upwards.
Disc is dirty. Clean the disc with a clean,soft,lint-freecloth.Wipe
the disc outwards from the center.
Disc is defective. Try another disc.
Incompatible disc is used. Try another disc.
Disc rating exceeds the restrict setting. Change the rating settings
to lower one.
Disc region code is not compatible with the unit. Use disc with
proper region code.
Display show ERR-5
E - 19
Communication error or component is damged.