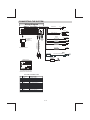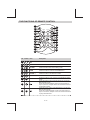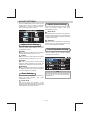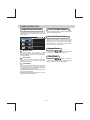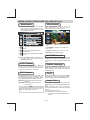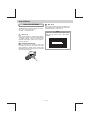
1
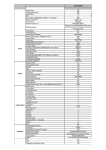
P9689
3.2
4
4
4 10 R - 02 1011
AUX Input
To ensure safety while driving
and to comply with laws,
drivers should not watch video or
operate the video device while driving.
WARNINGS
When Driving
Keep the volume level Iow enough to aware of
the road and traffic conditions.
CAUTION
In some countries, it's unlawful to operate a
vehicle while video is displayed in the
driver's viewing area. Please always switch
the unit's display to "Font Type Display"
mode by pressing the DISP button while
driving.
For safety reason, the driver should only
enjoy / watch the video while the car is in
parking mode.
When Car Washing
Do not expose the product to water or
excessive moisture. This could cause electrical
shorts, fire or other damage.
CAUTION
In order to avoid any accident, the driver
must not watch video while driving. This unit
is designed to not allow watching moving
video while driving. Park your car in a safe
place and engage the ‘PARKING BRAKE
WIRE' before watching moving video.
When Parked
Parking in direct sunlight can produce very
high temperatures inside your vehicle. Give the
interior a chance to cool down before starting
playback.
CAUTION
THIS MOBILE MULTIMEDIA PLAYER IS A
CLASS I LASER PRODUCT. THIS UNIT USES
A VISIBLE/INVISIBLE LASER BEAM WHICH
COULD CAUSE HAZARDOUS RADIATION IF
EXPOSED DIRECTLY. BE SURE TO
OPERATE THE MOBILE MULTIMEDIA
PLAYER CORRECTLY AS INSTRUCTED.
USE OF CONTROLS OR ADJUSTMENTS OR
PERFORMANCE OR PROCEDURES OTHER
THAN THOSE SPECIFIED HEREIN MAY
RESULT IN HAZARDOUS RADIATION
EXPOSURE.
DO NOT OPEN COVERS AND DO NOT
REPAIR BY YOURSELF PLEASE REFER
SERVICING TO A
QUALIFIED
TECHNICIAN.
NOTE:
1. TO REDUCE THE RISK OF FIRE OR
ELECTRIC SHOCK, DO NOT EXPOSE
THIS EQUIPMENT TO RAIN OR
MOISTURE.
2. TO REDUCE THE RISK OF FIRE OR
ELECTRIC SHOCK, AND ANNOYING
I N T E R F E R E N C E , U S E O N LY T H E
RECOMMENDED ACCESSORIES.
3. THIS DEVICE IS INTENDED FOR
CONTINUOUS OPERATION.
Use the Proper Power Supply
This product is designed to operate with a 12
volt DC, negative ground battery system (the
regular system in a North American car).
Protect the Disc Mechanism
Avoid inserting any foreign objects into the slot
of this player. Failure to follow this may cause
malfunction or permanent damage due to the
precise mechanism of this unit.
E-1
DISC AND FORMAT SUPPORTS
This unit can play various video/audio format
which stored into Disc/USB or SD card on
Media Player.
The following chart helps you to check if a
disc is supported by this unit, as well as what
functions are available for a given disc type.
Disc format
Digital Versatile Discs (MultiMedias)
Unsupported Discs
8 cm Disc
CDV, CDI, CDG,
LD
MultiMedia RAM
Note on Region Code
MultiMedia players and MultiMedia Video discs
Have their own Region Code numbers. This unit
Can playthe disc of all
regioncode numbers.
ALL
Video CDs (VCDs)
Digital VersatileDiscs Recordable
(MultiMedia+/-R)
Digital VersatileDiscs Rewritable
(MultiMedia+/-RW)
Compact Discs (CDs)
Disc Maintenance
Before playing, wipe the disc using a clean
cloth, working from the center hole towards the
outside edge.
Never use benzene, thinners, cleaning fluids or
anti-static liquids or
any other solvent.
CD Recordable (CD-R)
NOTE
CD Rewritable (CD-RW)
Audio Format
Playback CD-DA and MP3 or WMA digital
music file on CD-ROM or MultiMedia- ROM or
USB or Memory Card.
Note of MP3 and WMA:
Support Maximum 2000 files
Maximum 30 characters display
Supported Sampling frequencies; 32kHz,
44.1kHz, 48kHz.
Supported Bit-Rates: 64-256 kbps variable bit
rate
A disc may become somewhat scratched
(although not enough to make it unusable)
depending on you handle it and conditions
in the usage environment. Note these
scratches are not an indication of any
problem with the player.
Label side
Up
Do not bend
Video Format
Playback IMAGE JPEG, DVD Video, MPEG4 .
On CD-ROM or Multimedia - ROM or USB or
Memory Card.
Never touch
the under side
of a disc
Noted of MPEG4
Supported decoding MPEG-4 video defined by
ISO 14496-2 Standard:
1. Simple Profile (SP) and
2. Advance Simple Profile (ASP)
Supported file format: MP4 and .M4a (audio
only)
E-2
Wipe the disc surface
from the
center to the edge.
INSTALLATION
The following illustration shows a typical installation. If you have any questions or require
information regarding installation kits, consult your customer car audio dealer or a company
suppling kits.
If you are not sure how to install this unit correctly, have it installed by a qualified technician.
1
3
To attach the front panel back to the unit
chassis, firstly join the right guide block
hole to the right cylinder (Step 1 ), then
join the left guide block hole and the left
cylinder
(Step 2 ).
Trim Plate
Step 2
Step 1
18
2
2m
m
53
1
Disassembly
tool
mm
Screw
2
Dashboard
Sleeve
3
4
Bend the appropriate tabs
to hold the sleeve firmly
in place.
Tr i m
Plate
Sleeve
When you stand the unit, be careful
not to damage the fuse on the rear.
Control
Panel
Removing the unit
Before removing the unit, release the rear section.
2
1
3
Step
2
Step
1
Disassembly
tools
Release
To remove the front panel:
1. Press the Panel Release Button.
.
2. After flipping down the front panel, push rightwards
( Step 1), then draw the left of the panel ( Step 2).
Trim Plate
Insert the two disassembly tools, then pull
them as illuatrated so that the unit can be
removed.
When installing the unit without
using the sleeve
When using the optional stay
Stay(option)
Screw
Washer
Nut
Dashboard
Screw
Screw(4x12mm)
Sleeve
Screw
Bracket
30°
Install the unit at an angle
of less than 30°.
Installation using the screw holes on the sides of the unit.
Fastening the unit to the factory radio mounting bracket.
E-3
CONNECTING THE SYSTEM
About The Reverse Wire For
Back Up Camera System
About Parking Wire
CAUTION
In order to avoid any accident, the driver must
not watch video while driving. This unit is
designed to not allow watching moving video
while driving. Park your car in a safe place and
engage the parking brake before watching
moving video.
If user connected a back up camera system
to this unit, when the vehicle is in reverse
Gear (Back Up mode), the front in-dash TFT
display will automatically switch to Back Up
Camera Video signal regardless whatever
mode is currently displayed on the front indash TFT.
NOTE
Tips
The Video Blocking system under Parking
Brake NOT ENGAGED only control this
unit's display, This system will not affect the
Video Output thru the rear RCA Video
Output.
Be sure to connect Reverse wire properly.
(please see more details on “ Wiring
Diagram.”)
TIPS
Be sure to connect Parking Brake connection
lead. ( please see more details on “ Wiring
Diagram.”)
NOTE
If watch moving video from Disc or AV In
source but Parking Brake is NOT
PROPERLY CONNECTED, the video signal
will be blocked by the system and the below
display will be show on TFT:
E-4
CONNECTING THE SYSTEM
Wiring Diagram
SUBWOOFER
BLUE
L
WHITE
HC-L
R
FRONT LINE OUT
REAR
HC-R
BLACK
RED
VIDEO IN
ANTENNA
JACK
AUDIO IN (RIGHT)
AUDIO IN (LEFT)
VIDEO OUT
VIDEO OUT
YELLOW
WHITE
RED
PARKING
BRAKE ( )
Brake
Switch
Connect to Parking Brake.
2.5m extension wire
VIOLET/WHITE
REVERSE(+)
OVERRIDE
WIRE
CONNECTOR B
1
2
3
4
A
5
6
7
8
5
7
8
4
CONNECTOR A
Figure 1
ISO CONNECTOR 4PIN+8PIN
FEMALE WITH MALE TERMINAL
ISO CONNECTOR WIRING CHART
PIN
WIRE COLOR
FUNCTION/LABEL
A4
YELLOW
CONSTANT POWER(+)
A5
BLUE/WHITE
REMOTE AMP WIRE(+)
A7
RED
ACCESSORY POWER(+)
A8
BLACK
GROUND(-)
B1
VIOLET
RIGHT REAR SPEAKER (+)
B2
VIOLET/BLACK
RIGHT REAR SPEAKER (-)
B3
GREY
RIGHT FRONT SPEAKER (+)
B4
GREY/BLACK
RIGHT FRONT SPEAKER (-)
B5
WHITE
LEFT FRONT SPEAKER (+)
B6
WHITE/BLACK
LEFT FRONT SPEAKER (-)
B7
GREEN
LEFT REAR SPEAKER (+)
B8
GREEN/BLACK
LEFT REAR SPEAKER (-)
WHITE
AUDIO IN L
LIGHT GREEN
B
RED
AUDIO IN R
REAR LINE OUT
RCA TO RCA CABLE
(NOT INCLUDED)
ISO MALE CONNECTOR
YELLOW
VIDEO IN
ISO CONNECTO
SOCKET
(See Figure 1)
E-5
Ground
THE FUNCTIONS OF MAIN UNIT
6
1
3
4
5
P9689
BAND /
EQ
ESC
DIM
10
9 11 8
XBS
SRC
FUNC
LIST
SUB-W
INFO
MENU
2
AUX
IN
1
2
3
Item
(RELEASE)
15
14
12
Decriptions
Press this button to open the control panel.
MENU
Press this button to access into the SystemMenu mode.
INFO
Under DVD playback mode, press repeatedly to view play
information: Title--->Chapter--->Play time
ENCODER
VOLUME
Rotate the Encoder Volume Knob to increase and decrease the
volume. ( The Maximum volume level is “46”.)
BAND /
Under Tuner mode, short press this button to change between
BAND FM1, FM2, FM3, AM1(MW1) (or AM2 (MM2) if available).
Under Media playback mode, short press this button to Pause/
Resume Play the music.
SUB-W
Press and hold this button to turn On/Off the subwoofer function.
FUNC
(FUNCTION)
Press this button to enter into the Function mode.
XBS
Hold & press this button to turn On/Off the Bass booster function.
4
5
16
7 17
13
No.
MUTE
E-6
THE FUNCTIONS OF MAIN UNIT
6
7
8
9
10
11
CLOCK
Press this button to view the Clock, press this button again
to return to previous mode.
MUTE
Short press this button to turn Mute or restore volume.
POWER
Press this button or any other button on the front panel
(except Release button) to turn the unit on. Hold & press this
button again to turn the unit off.
LIST
Under tuner mode,press this button to Show The List of stored
station.
Under the Media playback mode, press this button to list the
searching of Tracks or Files on the Media playback mode.
Under the DVD/MP4 mode, press this button to list the
searching of DVD Root Menu or Files on the playback mode.
Under the VCD mode, press this button to turn On/Off the
PCB function.
EQ
Hold & press this button to select the Preset Equalizer setting.
TUNE UP/DOWN
Under tuner mode, press and hold this button momentarily to
enter into the Auto Seek/ Manual Seek mode.
Under media playback mode, press these buttons to skip a
chapter / track / scene / file.
FILE UP/DOWN
FAST BACKWARD
/ FORWARD
SOURCE
Under media playback mode, press and hold momentarily to
fast forward / backward the Disc.
ESC
Press this button to quick return previous menu or mode.
DIM
Hold & press this button to adjust the TFT dimmer High or Low.
Press this button to select different source playback mode:
TUNER / DISC / USB / SD CARD / BT AUDIO / AUX-IN
12
EJECT
13
DISC SLOT
Insert the disc into CD slot.The CD will begin to play.
14
RESET
User can reset the unit to its default setting. Press this button
by using a ball-point pen or sharp object.
15
SD CARD
SLOT
This unit can support playback MP3/WMA/JPEG/MPEG4/
DIVX format which are stored on the SD Card.
USB SLOT
This unit can support playback MP3/WMA/JPEG/MPEG4/
DIVX format which are stored on the USB memory stick.
AUX-IN JACK
This unit is allowed to connect with external Audio system
such like MP3 Player or hand phone. User can connect the
external Audio system thru the Aux-In jack on front panel.
16
17
Press this button to eject the Disc.
E-7
THE FUNCTIONS OF REMOTE CONTROL
2
1
21
13
DIMMER
20
FUNCTION
FUNC
LIST
10
5
VOLUME
6
4
14
9
OK
3
SETTING
8
12
16
BAND
XBS
EQ
DVD
TITLE
SUB
TITLE
7
15
DVD
AUDIO
DVD
MENU
17
18
19
11
No.
Button
Item
Decriptions
1
POWER ON
OFF
Press this button to turn On / Off the unit.
2
MUTE
Press this button to turn the Mute On / Off.
3
SETTING
Press this button enter into the Setting mode.
4
HOME
Press this button to enter into the HOME menu.
5
VOLUME +
Press this button to increase the volume.
6
VOLUME -
Press this button to decrease the volume.
EQ
Press this button to enter into the preset Equalizer setting
mode.
Under the tuner mode, press this button to access the
Manual Seek mode.
Under the media playback mode, press this button to
skip to previous / chapter. Press and hold these buttons
to play fast forward.
7
8
9
EQ
Under the tuner mode, press this button to access the
Manual Seek mode.
Under the media playback mode, press this button to
skip to next track / chapter. Press and hold these button
to play fast backward.
E-8
THE FUNCTIONS OF REMOTE CONTROL
10
11
12
13
OK
UP/DOWN
Use these buttons to move cursor up/down.
OK
Use this button to confirm the selection.
BAND
BAND
L
LIST
14
Under the tuner mode, press this button to change the radio
Band.
Press this button to Pause / Resume Play the music under
media playback mode.
LIST
Under tuner mode,press this button to Show The List of
stored station.
Under the Media playback mode, press this button to list the
searching of Tracks or Files on the Media playback mode.
Under the DVD/MP4 mode, press this button to list the
searching of DVD Root Menu or Files on the playback mode.
Under the VCD mode, press this button to turn On/Off thePCB
function.
RETURN
Press this button to quick return previous menu or mode.
15
XBS
XBAS
Press this button to turn On/Off the iX-BASS booster function.
16
DVD
AUDIO
DVD AUDIO
Under DVD mode, press this button during playback to
change the audio language, if available on the disc.
17
DVD
MENU
DVD MENU
Under DVD mode, press this button access into the DVD
main menu.
18
SUB
TITLE
SUBTITLE
Under DVD mode, press this button during playback to turn
on/off subtitles and change the subtitles.
TITLE
TITLE
Under DVD mode, press this button to bring up the Title Menu.
19
FUNCTION
20
FUNC
FUNCTION
Press this button enter into the function mode.
DIMMER
21
DIMMER
Access into dimmer settings.
E-9
ADJUST SETTINGS
Press the MENU/INFO button access into the
System Menu. User can rotate the Encoder
Volume Knob to select the below options,
then press Power/Mute to confirm.
Adjust System Setting
User can rotate the Encoder Volume Knob to
select the System Settings, then press
Power/Mute to confirm.
Beep Tone
To adjust the Beep Tone On/Off. The beep tone
feature allows the selection of an audible beep
tone to be heard each time a button is pressed
on the face of the radio.
Time Set
Adjust Audio Setting
User can rotate the Encoder Volume Knob to
select the below Audio Settings, then press
Power/Mute to confirm.
Bass
User can use the Encoder Volume knob to adjust
the desired Bass level range from -6 to +6.
Treble
The time on the clock will be set to 12:00 as the
default. User can rotate the Encoder Volume
Konb to adjust the HOUR / MINUTE.
Preset Equalizer Setting
Under the Preset EQ Setting, there are the
below 8 different types of preset equalizer
available for user selection.
User can use the Encoder Volume knob to adjust
the desired Treble level range from -6 to +6.
Fader
User can use the Encoder Volume knob to
adjust the Fader between the front and rear
speakers from 12R (full rear) to 12F (full front).
Balance
User can use the Encoder Volume knob to adjust
the Balance between the right and left speakers
from 12R (full right) to 12L (full left).
TIPS
Tuner Setting
User can rotate the Encoder Volume Knob to
adjust the Tuner Settings, then press
Power/Mute to confirm.
Press and hold LIST button on the front panel
is to quick get into the Preset Equalizer
Setting menu.
Tuner Area
This option allows the selection of the
frequency spacing appropriate for your area.
Rotate the Encoder Volume Konb to select the
Tuner Area: U.S.A, Europe, Oirt, Latin.
E - 10
TUNER OPERATIONS
Tune To Radio Station
Adjust Tuner Function
Press the FUNC button under Tuner mode
access into the Tuner Function menu. User can
rotate the Encoder Volume Knob to select the
below options:
Press the BAND button to change between FM
bands and AM(MW) bands.
Tune To Preset Station
Press the LIST button to get into the preset
stations list, and user can use the Encoder
Volume Knob to select which preset station
he would listen to, and press the Power/Mute
button to confirm the selection.
OFF
Manual Seek
Manual Store
Use this function to saved the current
frequency to memory stations. User can press
the Power/Mute to enter into the manual store
memory stations.
Auto Store
After Auto Stored & saved the 6 strongest
stations, the unit will automatically enter
present scan one time.
Press and hold
/ buttons on front panel
to access into the Manual Seek mode.
Auto Seek
Press and hold
/ buttons on front panel
to access into the Auto Seek mode, and the unit
will auto search for the next radio station.
Local Seek
To receive more radio stations or only stations
with strong signal, you can adjust the tuner
sensitivity. User can press the Power/Mute to
turn On/Off the Local Seek mode.
[Local Seek On]: Only stations with strong
signal can be broadcast.
[Local Seek Off]: Stations with strong and
weak signals can be broadcast.
E - 11
MEDIA PLAYER OPERATIONS (Disc/USB/SD Card)
This unit can play various video / audio stored
into Disc / USB or SD Card on media player.
You can play commercially available audio CDs
and these Discs:
Digital Versatile Discs (MultiMedias)
Video Cds (VCDs)
Digital Versatile Discs Recordable
(MultiMedia+/-R)
Digital Versatile Discs Rewritable
(MultiMedia+/-RW)
Compact Discs (CDs)
CD Recordable (CD-R)
CD Rewritable (CD-RW)
Memory Card Operation
Insert The Memory Card
1.
Press
panel.
2.
After flipping down the front panel, push
rightwards, then draw the left of the panel.
Insert the Memory Card into the card slot,
then close the panel, the unit will play starts
automatically.
3.
on the front panel to release the
NOTE
Please ensure that the disc contains playable
content.
1.
2.
3.
Press
on the front panel to release the
panel.
Insert a CD with the printed side facing up,
then close the panel, the unit will play starts
automatically.
Press the BAND/
to pause the music
play. Press this button again to resume
music play.
Press the
to skip forward to the
/
beginning of the next or previous chapter.
Press and hold the
to fast
/
forward or fast rewind through the disc.
Press these buttons again to resume
normal playback.
Press
to take out the CD.
NOTE
Ensure that the memory card contains playable
music.
Remove The Memory Card
press the card until you hear a click sound, the
card is now disengaged. then remove the card.
Media Playing
Repeat
During the media playback, press the FUNC
button to adjust the different Repeat mode.
For MULTIMEDIA/VCD mode
USB Device Operation
[Repeat CH]: repeat playback the current the
chapter.
[Repeat TT]: repeat playback the current title.
[Repeat Off]: cancel all the repeat function.
For MP3/WMA/CD mode
[Repeat Off]:
play all tracks repeatedly
[Repeat One]:play the current track
repeatedly
[Repeat Folder]: play all tracks in the current
folder repeatedly
Flip open the USB plastic cover, insert the USB
device into the USB socket. The unit starts
playing from the USB device automatically.
NOTE
Random
User can play audio tracks/files or VCD videos
in random order. During the playback, press
the FUNC button to turn On/Off the random
function.
Ensure that the USB device contains playable
music.
E - 12
MEDIA PLAYER OPERATIONS (Disc/USB/SD Card)
Skip/Search
1.
Under the Media playback, press the LIST
button access into the playlist menu. User
can rotate the Encoder Volume Knob to
select the below options:
: to display all available audio folders
/ track.
: to display all available pictures
folders / files.
: to display all available video folders
/ files.
2. Under the MultiMedia playback mode, press
the LIST button can access into the
MultiMedia Root Menu.
Audio Channel
During the VCD playback, press the FUNC button
access into the Channel mode. Press the
Power/Mute to select the available audio channels
provided by the disc(Stereo, Left, Right ).
PBC Playback
PBC playback allows you to play Video CDs
interactively. During the VCD playback, press
the FUNC button access into the Pbc mode,
press the Power/Mute to turn PBC On or Off.
[PBC On]: it will switch to OFF and continue
playback.
[PBC Off]: it will switch to ON and return to
menu screen.
TIPS
Press the LIST button on the front panel is
quick to turn the PBC On or OFF.
Video Setting
Under MultiMedia/VCD playback, press the
FUNC button access into the Video Setting
mode,the below Setup menu will appear:
[BRIGHT]: change the Bright level from 0
to 7.
[CONTRAST]: change the Contrast level
from 0 to 7.
[COLOR]: change the Color level from 0 to 7.
[Reset]: reset to default setting.
MULTIMEDIA Audio
During the MultiMedia playback, press the
FUNC button access into the MultiMedia Audio
to change the audio language (MultiMedia
only).
Subtitle Language
During the MultiMedia playback, press the
FUNC button access into the Subtitle to turn
On/Off subtitles and change the subtitles
(MultiMedia only).
Angle
Under the FUNC menu, user can press Aangle
while playing a scene recorded with multiple
angles to change the angle (MultiMedia only).
Aspect Ratio
The TV Aspect setting allows the user to select
the aspect ratio of the TV (MultiMedia and VCD
only).
Under the FUNC menu, user can use the
Encoder Volume Knob to select the following
options:
4:3=Aspect ratio of TV is 4:3
16:8=Aspect ratio of TV is 16:9. Both wide
screen and 4:3 contents will fill the entire
screen.
E - 13
Aux-In Mode
AV - 2 In
Select the AV Mode
Your can connect up to 1 AV device, press the
SOURCE button to enter into the Aux-In mode:
Aux - 1 IN = Front panel Aux in
AV - 2 IN = RCA back of unit
Aux -1 In
This unit is allowed to connect with external
Audio/Video system such like Digital Camera
or Game Console. User can connect the
external Audio/Video system thru the Aux-In
jack on front panel.
Connect the external signal to the RCA line in
jack located at the rear of the unit , then press
SOURCE button to select AV -2 In.
TIPS
If there is no any external AV System input,
then the TFT will be show “ NO VIDEO
SIGNAL”.
Connect the Aux-In
Connect the external signal to Aux-In jack
located at the front of the panel, then press
Source button to select Aux-In mode. Press
Mode Button again to cancel Aux-In mode and
retrun to previous mode.
Left Track
Right Track
Ground
E - 14
SPECIFICATIONS
TFT Screen Section
Screen Size: 3.2"(Measured Diagonally)
Screen Type: TFT Liquid Crystal Display active matrix
Resolution: 320 x 240
MultiMedia / CD Section
Compatible Disc/Format
Signal to Noise Ratio
Dynamic Range
Frequency Response
Channel Separation
See “ Disc Note” for more details description
> 90 dB
> 90 dB
20Hz to 20Khz +/-3dB
2 Channel (Stereo) >60dB @1khz
Video Section
Color System
Video Output
Video Input
NTSC / PAL/SCEAM
Composite 1.0 Vp-p (+/- 0.2) 75 - ohm
Composite 1.0 Vp-p (+/- 0.2) 75 - ohm
Audio Section
Max Output Power
Load Impedance (speakers)
Line out level / load
Line out Impedance
80W x 4 channels
4 ohms
400mV / 10k ohm load
200 ohm
Auxiliary Input Section
Frequency response
Input Maximum Voltage
Input Impedance
Radio Section
FM
Frequency Range
Usable Sensitivity
Stereo Separation
S/N Ratio
20Hz to 20KHz -3dB
1200 mV
4.7k ohm
87.5-107.9 MHz (U.S.A)
87.5-108.0 MHz (Europe)
< 15dB at S/N 30 dB
25 dB at 1KHz
50 dB
AM or MW
Frequency Range
Usable Sensitivity
S/N Ratio
General
Operating Voltage
Grounding System
Fuse:
Operating Temperature:
Unit Mounting Angle
530-1720 (U.S.A)
522-1620 Khz (Europe)
< 40dB at S/N 20dB
40 dB
DC 11 -14.4V
Negative Ground
15-Amp Mini ATM Type
0°
C to 50 °
C
32 °
F to 122 °
F
< 30°
E - 15
TROUBLESHOOTING
Before going through the check list, check wiring connection. If any of the problems persist after
check list has been made, consult your nearest service dealer.
Symptom
Cause
Solution
The car ignition is not on.
No power
Disc cannot be
loaded or ejected
If the power supply is properly connected to
the car accessory terminal, switch the ignition
key to “ACC”
The fuse is blown.
Replace the fuse.
Presence of CD disc inside
the player.
Remove the disc in the player, then
put a new one.
Inserting the disc in reverse
direction.
Insert the compact disc with the
label facing upward.
Compact disc is extremely
dirty or defective disc.
Clean the disc or try to play a new one.
Temperature inside the car is
too high.
Cool off or until the ambient temperature
returns to normal.
Condensation.
Leave the player to off for an hour or so,
then try again.
Volume is in minimum.
Adjust volume to a desired level.
Wiring is not properly
connected.
Check wiring connection.
The operation keys
do not work
The built-in microcomputer is
not operating properly due to
noise.
Press the RESET button.
Front panel is not properly fixed into
its place
Sound skips.
The installation angle is
more than 30 degrees.
Adjust the installation angle to less
than 30 degrees.
The disc is extremely dirt or
defective disc.
Clean the compact disc. Then try to play a
new one.
The radio does not
work.
The radio station
automatic selection
does not work.
The antenna cable is not
connected.
Insert the antenna cable firmly.
The signals are too weak.
Select a station manually.
ERROR
Mechanism Error
Press the eject button to correct the problem.
If the error code does not disappear, consult
your nearest service dealer.
Disc Error
Maybe disc dirty / disc scratched
/disc upside down.
Replace the disc.
No sound
If at any time in the future you should need to dispose of this product please
note that Waste electrical products should not be disposed of with household
waste. Please recycle where facilities exist. Check with your Local Authority
or retailer for recycling advice.(Waste Electrical and Electronic Equipment
Directive)
E -16