1
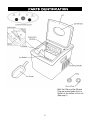
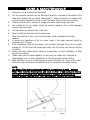
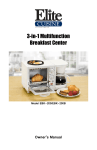
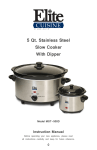
PORTABLE
AUTOMATIC ICE MACHINE
Model MIM-5802
Instruction Manual
Before operating your new appliance, please read all instructions carefully and keep for future
reference
TABLE OF CONTENTS
IMPORTANT SAFEGUARDS______________________________________ 2
PARTS IDENTIFICATION ________________________________________ 3
BEFORE FIRST USE____________________________________________ 5
OPERATING INSTRUCTIONS______________________________________ 6
CARE & MAINTENANCE_________________________________________ 7
TROUBLESHOOTING___________________________________________ 8
WARRANTY & CUSTOMER SERVICE________________________________ 9-10
1
IMPORTANT SAFEGUARDS
When using electrical appliances, basic safety precautions should be followed to reduce the
risk of fire, electric shock, and injury to persons or property. Read all instructions before
using any appliance.
1.
2.
This ice maker must be properly installed and located in accordance with the
Installation Instructions before it is used.
Unplug the ice maker before cleaning and/or making repairs
3.
We strongly recommend that any servicing be performed by a qualified individual.
4.
Do not leave ice maker in extreme cold or warm temperatures.
5.
Do not place ice maker near heat sources or open flames.
6.
Clean the ice maker with a soft, damp cloth. Remove stains with a mild soap. Do
not clean the unit with industrial grade solvents or abrasive chemicals.
7.
Do not place heavy items on top of the ice maker.
8.
Never install the ice maker where there is a lot of moisture and water can splash.
9.
Exercise caution and use reasonable supervision when appliance is used near
children.
10. Do not tip over.
11. Do not operate with side or back panels removed.
12. If the ice maker is brought in from outside in wintertime, give it a few hours to warm
up to room temperature before plugging in.
CAUTION: DO NOT IMMERSE IN WATER.
SAVE THESE INSTRUCTIONS
THIS PRODUCT IS FOR HOUSEHOLD USE ONLY!
2
…
PARTS IDENTIFICATION
Both the Filter and the Silicone
Plug are located below the Ice
Basket on the bottom of the unit
(See page 7).
3
….
GROUNDING INSTRUCTIONS
This appliance must be grounded. In the event of an electrical short circuit, grounding
reduces the risk of electric shock by providing an escape wire for the electric current. This
appliance is equipped with a cord having a grounding wire with a grounding plug. The plug
must be inserted into an outlet that is properly installed and grounded.
WARNING:
Improper use of the grounding plug can result in a risk of electric shock. Consult a
qualified electrician or service person if the grounding instructions are not completely
understood or if doubt exists as to whether the appliance is properly grounded.
If it is necessary to use an extension cord, use only a three-wire extension cord that has a
three blade grounding plug and a three-slot receptacle that will accept the plug on the
appliance. The marked rating of the extension cord should be equal to or greater than the
electrical rating of the appliance.
.
1)
2)
3)
-
….
SHORT CORD PURPOSE
A short power-supply cord is provided to reduce risks of injuring yourself from
becoming entangled in or tripping over a longer cord.
Longer extension cords are available and may be used if you exercise caution during
use.
If a longer cord is used please note the following:
The marked electrical rating of the extension cord should be at least as great as the
electrical rating of the appliance.
The longer cord should be arranged so that it will not drape over the counter top
where it can be pulled on by children or tripped over unintentionally.
POLARIZED PLUG
If this appliance has a polarized plug (meaning one blade is wider than the other one),
please follow the below instructions:
To reduce the risk of electric shock, this plug is intended to fit into a polarized outlet only in
one direction. If the plug does not fit fully into the outlet, reverse the plug. If it still does
not fit, contact a qualified electrician. Do not attempt to modify the plug in any way.
4
….
1.
2.
3.
4.
…
INSTALLATION
Ventilation: Do not block air vents. It is necessary to have adequate ventilation space
around the ice maker in order to sustain proper performance, dissipation of heat,
maintain efficiency and keep power consumption low. There should be a 5 inch
minimum clearance maintained at the rear and sides of the unit and 8 on the top of
the unit.
Cleaning: It is highly recommended to thoroughly clean the ice maker before first use.
Wait One Hour: When plugging in for the first time, wait one hour for refrigerant fluid
to settle before turning the unit on.
Power Supply:
The ice maker should always be plugged into its own individual electrical outlet which
has a voltage rating that matches the rating label.
BEFORE FIRST USE
1.
Remove all exterior and interior packaging. Check that ice basket and ice scoop are
included. If any part or accessory is missing, please contact customer service.
2.
Clean the interior with lukewarm water and a soft cloth. Remove the ice basket and
wash in warm water.
3.
Find a location for your ice maker that is protected from direct sunlight and other
sources of heat (i.e.: stove, furnace, and radiator). Place the ice maker on a flat, level
surface. Make sure that there is at least 5 inches of space between the back and
sides of your ice maker and the wall.
4.
Make sure the Silicone Plug is inserted properly into the bottom of the water tank
beneath the ice basket.
5.
Allow one hour for the refrigerant fluid to settle before plugging in the unit.
6.
The appliance must be positioned so that the plug is accessible.
5
…
1.
2.
3.
4.
5.
6.
7.
8.
9.
OPERATING INSTRUCTIONS
Open the lid, remove the Ice Basket and pour water
into the water reservoir. Do not exceed the maximum
water level line or fill less than the minimum water
level line (See Figure 1).
Place the Ice Basket back into the ice maker. Make
sure the water level in the water reservoir is not higher
than the bottom of the Ice Basket.
Plug in the unit.
Press "SELECT" to choose the desired ice cube size
“SMALL” or "LARGE.” When you choose large ice
cubes, the "LARGE" indicator light will illuminate. When
Figure 1.
you choose small ice cubes, the "SMALL" indicator
light will illuminate.
Press the “START” button to start machine (See
Figure 2), the ice making process will last
approximately 1 hour for the first batch and 30
minutes thereafter depending on size chosen, ambient
temperature and how long the unit has been in
operation.
The ice maker will automatically stop making ice when
the ice basket is full and the "ICE FULL" indicator light
will illuminate.
Press the “STOP” button at any time to stop making ice.
Figure 2.
Change the water in the tank every 24 hours to maintain
a reasonable hygiene level. Please drain water if the ice
maker is not in use.
If "ADD WATER" indicator light is illuminated, the water level has reached the
minimum water level.
- Refill the tank with fresh water. Do not exceed the maximum water level.
- Press “START” to restart the ice making process.
**The ice maker will not automatically re-start the ice making process after the add water light has
turned on. Upon adding more water, you must push “START” to restart the ice making process.
**If the ice in the basket melts and the water in the tank rises, you must STILL push “START” to
restart the ice making process.
WARNING:
Only fresh, clean water should be used to make ice. Other liquids such milk, juice, and soda will
damage the machine!
NOTE:
When the ambient temperature is lower than 70°F, the SMALL setting is recommended.
When the ambient temperature is higher than 77°F, the LARGE setting is recommended.
This unit has the unique ability to make CLEAR ice. An insufficient amount of water in the
water tank may lead to white, cloudy ice. Add more water to the water tank for CLEAR ice,
which is the desired effect.
6
….
1.
CARE & MAINTENANCE
Unplug the unit and remove the ice basket.
2.
Pull out (upwards towards you) the Silicone Plug which is located at the bottom of the
water tank beneath the ice basket. (See figure 3). Make sure there is a large bucket
or bowl placed underneath the unit to catch the water draining from the ice maker.
3. Clean the interior with a solution of vinegar and warm water using a soft cloth.
4. The outside of the ice maker should be cleaned regularly with a mild detergent
solution and warm water.
5. Dry the interior and exterior with a soft cloth.
6. Place the Silicone Plug back into the drain area.
7. When the machine is not in use, be sure to drain water completely from water
reservoir.
8. To ensure the cleanliness of the ice cubes, water in the water reservoir should be
replaced every 24 hours.
9. If the compressor stops for any reason such as water shortage, too much Ice, power
outage, etc, DO NOT start the system right away, wait 3 minutes, and then re-start the
ice maker.
10. Always add fresh water before starting ice production, at initial installation, or after
long shut off periods.
11. Please clean your Ice maker regularly. Do not spray Ice maker with chemicals or
diluted agents such as acids, gasoline or oil. Rinse thoroughly before starting.
12. Mold formation can occur if moisture gets trapped inside the unit. Drain unit of water
after every use and ensure the inside of the unit is completely dry before storing.
NOTE:
The Water Filter must be cleaned frequently; at least once a week. Remove
Water Filter from the Draining Hole and clean the filter of any residue by rinsing
with water. If the water filter becomes dirty or clogged, water cannot be
properly drained from the tank. The "ADD WATER" indicator will be illuminated.
Sensor
Figure 3.
7
TROUBLESHOOTITROUBLESHOOTING
Problem
Possible Cause
Suggested Solutions
The compressor works
abnormally with a
buzzing noise
The ADD WATER light is
on
The voltage is lower than
recommended
Stop the Ice maker and do not
restart until the voltage is
normal.
1. Press the “STOP” button, fill
with water, wait 3 minutes and
press the “START” button again
to restart.
2. Remove water filter and rinse
filter with water to clean any
residue buildup
1. There is no water
2. The water filter is
clogged with residue
**The ice maker will not
automatically re-start the ice making
process after the add water light has
turned on. Upon adding more water,
you must push “START” to restart
the ice making process.
**If the ice in the basket melts and
the water in the tank rises, you must
STILL push “START” to restart the
ice making process.
Indicator light on the
display is not on
The Ice is too large
and forms into one large
block onto the evaporator
module.
Broken fuse/No power
The temperature of
water in the water
reservoir is too low or
the ambient
temperature is below
77° F
Conditions For ice
making cycle are right
but no ice is made.
The lights of ICE FULL
and ADD WATER come
on in the same time.
Water tray is blocked by
ice cube
The ice is not clear and
appears white in color.
There is an insufficient
amount of water in the
water tank.
Replace fuse / Check the power
cord and socket
Stop the machine and reset the
ice size. Choose the small size,
then Restart the machine. If
problem persists, machine may
need to be relocated to a warmer
location.
Call for service
Clear the ice cube under the ice
shovel then press ”START”
button, wait two minutes for the
machines to restart automatically
Add more water.
This appliance is intended for Household Use Only.
8
LIMITED WARRANTY* ONE (1) YEAR
WARRANTY IS ONLY VALID WITH A DATED PROOF OF PURCHASE
1. Your small kitchen appliance is built with precision, inspected and tested before
leaving our factory.
2. It is warranted, to the original purchaser to be free from any manufacturing defects
under normal use and conditions for one (1) year, cord excluded. This Warranty
applies only to the original purchaser of this product.
3. If you need to exchange the unit, please return it in its original carton, with a sales
receipt, to the store where you purchased it. If you are past the stores allowed return
policy period, please see the enclosed Warranty.
4. If you use your appliance for household use and according to instructions, it should
give you years of satisfactory service.
5. During the one-year warranty period, a product with a defect will be either repaired
or replaced with a new or reconditioned comparable model (at our option) when the
product is returned to our Service Center. (See the “Returns” section below).
6. The repaired or replacement product will be in warranty for the remaining balance
of the one-year warranty period and an additional one-month period.
7. This limited warranty covers appliances purchased and used within the 50
contiguous states plus the District of Columbia and does NOT cover:
- Damages caused by unreasonable use, neglect, normal wear and tear, commercial
use, improper assembly or installation of product.
- Damages caused in shipping.
- Damages caused by replacement or resetting of house fuses or circuit breakers.
- Defects other than manufacturing defects.
- Breakage caused by misuse, abuse, accident, alteration, lack of proper care and
maintenance, or incorrect current or voltage.
- Lost or missing parts of the product. Parts will need to be purchased separately.
- Damages of parts that are not electrical; for example: cracked or broken plastic or
glass.
- Damage from service or repair by unauthorized personnel.
- Extended warranties purchased via a separate company or reseller.
- Consumer’s remorse is not an acceptable reason to return a product to our Service
Center.
*One Year Limited Warranty valid only in the 50 contiguous states plus the District
of Columbia, excluding Puerto Rico and the Virgin Islands.
This warranty is effective only if the product is purchased and operated in the USA;
product usage which is in violation of the written instructions provided with the unit will
void this warranty.
For international warranty, please contact the local distributor.
**Any instruction or policy included in this manual may be subject to change at any
time.
MAXI-MATIC, USA
18401 E. Arenth Ave. City of Industry, CA 91748
Customer Service Dept: (626) 912-9877 Ext: 120/107 MON-FRI 8am-5pm PST
Website: www.maxi-matic.com email: [email protected]
9
RETURN INSTRUCTIONS
RETURNS:
A. Any return of defective merchandise to the manufacturer must be processed
accordingly by first contacting customer service (contact information shown below) to
obtain an RA # (Return Authorization Number). We will not accept any returns of
merchandise without an applicable RA #.
B. IMPORTANT RETURN INSTRUCTIONS. Your Warranty depends on your
following these instructions if you are returning the unit to Maxi-Matic USA:
1. Carefully pack the item in its original carton or other suitable box to avoid
damage in shipping.
2. Before packing your unit for return, be sure to enclose:
a) Your name, full address with zip code, daytime telephone
number, and RA#,
b) A dated sales receipt or PROOF OF PURCHASE,
c) The model number of the unit and the problem you are having
(Enclose in an envelope and tape directly to the unit before the box
is sealed,) and
d) Any parts or accessories related to the problem.
3. Maxi-Matic USA recommends you ship the package U.P.S ground service
for tracking purposes. We cannot assume responsibility for lost or damaged
products returned to us during incoming shipment. For your protection,
always carefully package the product for shipment and insure it with the
carrier. C.O.D shipments cannot be accepted.
4. All return shipping charges must be prepaid by you.
5. Mark the outside of your package:
MAXI-MATIC USA
18401 E. ARENTH AVE.
CITY OF INDUSTRY, CA 91748
6. Once your return has been received by our warehouse, Maxi-Matic USA
will repair or replace the product if it is defective in material or workmanship,
subject to the conditions in paragraph B.
7. Maxi-Matic will pay the shipping charges to ship the repaired or
replacement product back to you.
10