1
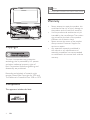
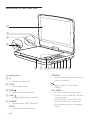
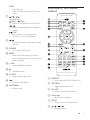
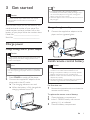
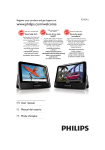
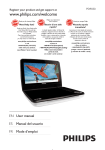
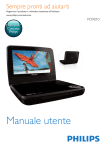
Always there to help you
Register your product and get support at
www.philips.com/support
Question?
Contact
Philips
User manual
PD9025
Contents
1Important
2
Safety and notice
2
Safety2
Notice3
Copyright4
Compliance4
Warranty4
2 Your portable DVD player
What's in the box
Overview of the main unit
Overview of the remote control
7 Mount the player on the headrest
of your car
15
8 Specifications
16
9Troubleshooting
17
5
5
6
7
3 Get started
9
Charge power
9
Install remote control battery
9
Switch the player on or off
10
Select the language for onscreen
instructions10
4 Play music or movies
Play from discs
Play options
Play from USB
Connect additional equipment
10
10
10
12
12
5 Watch TV
13
Connect TV antenna
13
Tune in to TV channels
13
Manage channel
13
View program information (DTV)
13
Access teletext
14
Use the electronic program guide (DTV)14
6 Adjust settings
General settings
Display settings
14
14
15
EN
1
1Important
Safety and notice
Read and understand all instructions before you
use this product. If damage is caused by failure
to follow the instructions, the warranty does
not apply.
•
compartment is completely secure after
you replace the battery.
If the battery compartment cannot be
completely secured, discontinue use of the
product. Keep out of reach of children and
contact the manufacturer. Modification of the product could result in
hazardous radiation of EMC or other unsafe
operation.
Warning
•• Where the MAINS plug or an appliance coupler is used
Safety
•
•
•
•
•
•
Only use attachments/accessories specified
by the manufacturer.
Use only power supplies listed in the user
manual.
The product shall not be exposed to
dripping or splashing.
Do not place any sources of danger on the
product (e.g. liquid filled objects, lighted
candles).
Batteries (battery pack or batteries
installed) shall not be exposed to excessive
heat such as sunshine, fire or the like.
Danger of explosion if battery is incorrectly
replaced. Replace only with the same or
equivalent type.
Risk of swallowing batteries!
• The product or remote control may
contain a button cell battery, which is
possible to be swallowed. Keep the battery
out of reach of children at all times! If
swallowed, the battery can cause serious
injury or death. Severe internal burns can
occur within two hours of ingestion.
• If you suspect that a battery has been
swallowed or placed inside any part of the
body, seek immediate medical attention.
• When you change the batteries, always
keep all new and used batteries out of
reach of children. Ensure that the battery
2
EN
as the disconnect device, the disconnect device shall
remain readily operable.
Warning
•• Never remove the casing of this product.
•• Never lubricate any part of this product.
•• Never place this product on other electrical equipment.
•• Keep this product away from direct sunlight, naked
flames or heat.
•• Never look into the laser beam inside this product.
•• Ensure that you always have easy access to the power
cord, plug or adaptor to disconnect the product from
the power.
Hearing safety
Listen at a moderate volume.
• Using headphones at a high volume can
impair your hearing. This product can
produce sounds in decibel ranges that may
cause hearing loss for a normal person,
even for exposure less than a minute. The
higher decibel ranges are offered for those
that may have already experienced some
hearing loss.
• Sound can be deceiving. Over time your
hearing 'comfort level' adapts to higher
volumes of sound. So after prolonged
listening, what sounds 'normal' can actually
be loud and harmful to your hearing. To
guard against this, set your volume to a safe
level before your hearing adapts and leave
it there.
To establish a safe volume level:
• Set your volume control at a low setting.
• Slowly increase the sound until you can
hear it comfortably and clearly, without
distortion.
Listen for reasonable periods of time:
• Prolonged exposure to sound, even
at normally 'safe' levels, can also cause
hearing loss.
• Be sure to use your equipment reasonably
and take appropriate breaks.
Be sure to observe the following guidelines
when using your headphones.
• Listen at reasonable volumes for
reasonable periods of time.
• Be careful not to adjust the volume as your
hearing adapts.
• Do not turn up the volume so high that
you can't hear what's around you.
• You should use caution or temporarily
discontinue use in potentially hazardous
situations. Do not use headphones while
operating a motorized vehicle, cycling,
skateboarding, etc.; it may create a traffic
hazard and is illegal in many areas.
Notice
This product complies with the radio
interference requirements of the European
Community.
Disposal of your old product and battery
Your product is designed and manufactured
with high quality materials and components,
which can be recycled and reused.
This symbol on a product means that the
product is covered by European Directive
2012/19/EU.
This symbol means that the product contains
a built-in rechargeable battery covered by
European Directive 2013/56/EU which cannot
be disposed of with normal household waste.
We strongly advise you to take your product to
an official collection point or a Philips service
centre to have a professional remove the
rechargeable battery.
Inform yourself about the local separate
collection system for electrical and electronic
products and rechargeable batteries. Follow
local rules and never dispose of the product
and rechargeable batteries with normal
household waste. Correct disposal of old
products and rechargeable batteries helps
prevent negative consequences for the
environment and human health.
Environmental information
All unnecessary packaging has been omitted.
We have tried to make the packaging easy to
separate into three materials: cardboard (box),
polystyrene foam (buffer) and polyethylene
(bags, protective foam sheet.)
Your system consists of materials which can
be recycled and reused if disassembled by
a specialized company. Please observe the
local regulations regarding the disposal of
packaging materials, exhausted batteries and old
equipment.
Always bring your product to a professional to
remove the built-in battery.
EN
3
Note
•• The type plate is located on the bottom of the product.
Warranty
•
•
•
Copyright
This item incorporates copy protection
technology that is protected by U.S. patents
and other intellectual property rights of
Rovi Corporation. Reverse engineering and
disassembly are prohibited.
Recording and playback of material might
require consent. See Copyright Act 1956 and
The Performer’s Protection Acts 1958 to 1972.
Compliance
This apparatus includes this label:
4
EN
•
Never attempt to repair the product, this
could lead to the risk of injury, damage to
the product and will void your warranty.
Use the product and accessories only as
intended by the manufacturer. The caution
sign printed on the back of the product
indicates risk of electric shock.
Never remove the cover of the product.
Always contact Customer Support for
service or repairs.
Any operation expressly prohibited in
this manual, or any adjustments and
assembly procedures not recommended
or authorized in this manual shall void the
warranty.
2 Your portable
DVD player
Congratulations on your purchase, and
welcome to Philips! To fully benefit from the
support that Philips offers, register your product
at www.philips.com/welcome.
What's in the box
Check and identify the contents of your
package:
• Portable DVD player
• Remote control with battery
• AC power adaptor - AY5808/12 (Philips)
• Car adaptor
• 3.5mm RCA adaptor cable
• Antenna
• Mounting bag
• Printing materials
EN
5
Overview of the main unit
a
b
c
d
e
a Display panel
b IR
• Remote control sensor.
c DC IN
• Power supply socket.
d OPEN
• Open the disc compartment.
e CHR /
• Charging indicator/Power indicator.
f SOURCE
• Switch between DVD, USB and TV.
SETUP
• Access or exit the setup menu.
6
EN
f
ghi j k l m n o
OPTIONS
• Access options relating to the current
activity or selection.
• Adjust brightness of the screen
backlight.
DISC MENU
• For DVD, access or exit disc menu.
• For VCD, turn on or off PBC (Playback
Control) mode.
• For VCD version 2.0 or SVCD with
PBC turned on, return to the menu.
• For data discs, go to the file manager
screen.
STOP
• Stop disc play.
• Press and hold to exit the TV search
menu.
g
/ / /
Navigate menu.
(CH+) / (CH-)
• Switch to the next/previous channel.
/
• Search backward/forward at different
speeds.
/ OK
• Start, pause or resume disc play.
• Confirm an entry or selection.
h
/
• Skip to the previous/next title, chapter,
or track.
Overview of the remote
control
i POWER
• Turn on/off DVD player.
j RESET
• When the player hangs up, press it
with a ball-point pen or similar tool to
reset the player.
k + VOL • Increase/decrease volume.
l
• Headphone jack.
m AV OUT
• Audio/video output jack.
n
• Connect USB device.
o ANTENNA
• Antenna jack.
a SOURCE
• Switch between DVD, USB and TV.
b TELETEXT
• Toggle teletext on or off.
c FAV LIST
• Access or exit the favorite list.
d Color keys
• Select tasks or options.
e SETUP
• Access or exit the setup menu.
f
/ /
/
• Navigate menu.
EN
7
/
• Search backward/forward at different
speeds.
• Start, pause or resume disc play.
g DISPLAY
• Adjust display settings.
h
i
• Stop disc play.
• Press and hold to exit the TV search
menu.
/
• Skip to the previous/next title, chapter,
or track.
j MUTE
• Mute or restore volume.
k 0-9
• Input numbers.
l GOTO
• Skip to a chapter/track/title or a play
time.
m REPEAT
• Repeat a chapter/track/title.
n
• Adjust screen aspect ratio.
o ANGLE
• Select a different viewing angle of a
DVD.
p AUDIO
• For DVD, select an audio language.
• For VCD, select an audio mode.
q SUBTITLE
• Select a DVD subtitle language.
r CH+/• Switch to next/previous channel.
s OPTIONS
• Access options relating to the current
activity or selection.
t DISC MENU
• For DVD, access or exit disc menu.
8
EN
• For VCD, turn on or off PBC (Playback
Control) mode.
• For VCD version 2.0 or SVCD with
PBC turned on, return to the menu.
• For a data disc, go to the file manager
screen.
u INFO
• Display program information, if
available.
v EPG GUIDE
• Toggle the Electronic Program Guide
(EPG) on or off. Enabled on digital
channels only.
3 Get started
Caution
•• Use the controls only as stated in this user manual.
•• Always follow the instructions in this chapter in
Tip
•• To maximize battery life, recharge the battery
immediately once the battery is fully discharged. If you
do not use the player for a long time, recharge the
battery once every two months.
•• When the player is not in use, it takes about 8 hours to
fully charge it.
sequence.
If you contact Philips, you will be asked for the
model and serial number of your player. The
model number and serial number are on the
bottom of your player. Write the numbers here:
Model No. __________________________
Serial No. ___________________________
Charge through car adaptor
1
Connect the supplied car adaptor to the
player and car cigarette lighter.
Charge power
Charge through the AC power adaptor
Caution
•• Risk of product damage! Ensure that the power supply
voltage corresponds to the voltage printed on the
bottom of the player.
Install remote control battery
Caution
Note
•• The type plate is located on the bottom of the player.
•• You can only charge the player when it is in power-off
mode.
1
2
Press POWER to switch off the player.
Connect the supplied AC adaptor to the
player and to the AC outlet.
»» The charging indicator turns red.
»» When the battery is fully charged, the
charging indicator turns off.
•• Risk of explosion! Keep batteries away from heat,
sunshine or fire. Never discard batteries in fire.
•• Danger of explosion if battery is incorrectly replaced.
Replace only with the same or equivalent type.
•• Batteries contain chemical substances, they should be
disposed of properly.
•• Perchlorate Material - special handling may apply. See
www.dtsc.ca.gov/hazardouswaste/perchlorate.
For first-time use:
1
Remove the protective tab to activate the
remote control battery.
To replace the remote control battery:
1
2
3
Open the battery compartment.
Insert 1 CR2025 battery with correct
polarity (+/-) as indicated.
Close the battery compartment.
EN
9
4 Play music or
movies
Play from discs
Switch the player on or off
1
2
To switch on the player, press POWER.
»» The indicator turns green.
To switch off the player, press and hold
POWER for at least two seconds.
1
2
3
4
You can choose a different language for the
onscreen display text.
2
3
4
5
Press SETUP.
»» The setup menu appears.
Select [General] > [Language].
Press navigation keys to select an option.
Press
/ OK to confirm.
Press SETUP to exit.
Slide OPEN on the main unit to open
the disc compartment.
Insert a disc with the label side facing up.
Push down to close the disc compartment.
»» Play starts automatically.
• If a menu appears, select an item, then
press
/ OK to start play.
• To pause, press
/ OK. Press again
to resume play.
• To stop, press STOP or twice.
• To select the previous/next item, press
/ .
• To start search within video/audio,
press
/
once or more.
Select the language for
onscreen instructions
1
Press SOURCE repeatedly to switch to
the disc mode.
Play options
Select audio language
You can select an audio language on DVDs or
DivX discs.
1
2
3
Press OPTIONS.
»» The option menu is displayed.
Select [Audio language] and press
navigation keys to select an audio language.
Press
/ OK to confirm.
Alternatively,
• During disc play, press AUDIO repeatedly
on the remote control to select a language.
10
EN
Select subtitle language
For DVDs that contain two or more subtitle
languages.
1
2
3
Press OPTIONS.
»» The option menu is displayed.
Select [Subtitles] and press navigation keys
to select a subtitle.
Press
/ OK to confirm.
Alternatively,
• During disc play, press SUBTITLE
repeatedly on the remote control to select
a language.
During play, you can select different repeat
options.
2
3
4
Press OPTIONS.
»» The option menu is displayed.
Select [Repeat] and press navigation keys
to select a repeat option.
For DVD
• [Repeat Chapter]: repeat the current
chapter.
• [Repeat Title]: repeat the current title
or track.
• [Repeat All]: repeat all titles on the
disc.
• [Repeat Off]: switch off the repeat
mode.
For VCD/MP3/CD/DivX
• [Repeat One]: repeat the current
track.
• [Repeat Folder]: repeat all the tracks in
current folder.
• [Off]: switch off the repeat mode.
Press
Search by time or title/chapter/track
number
1
2
3
Repeat
1
Tip
•• For VCDs, if PBC is on, you cannot repeat items.
/ OK to confirm.
Press OPTIONS to exit.
Alternatively,
• During disc play, press REPEAT repeatedly
on the remote control to select a repeat
option.
During video/audio play, press GOTO.
Enter the selected time or number.
• In the title/chapter/track field, enter the
title/chapter/track number.
• In the time field, enter the play position
in sequence of hour, minute, and
second.
Press
/ OK.
»» Play starts automatically at the selected
point.
To skip to any title/chapter/track directly,
• During play, enter the corresponding
number of the title/chapter/track with the
numerical keys (0-9).
• Press
/ OK to confirm if needed.
Select a view angle
To select a view angle for DVD,
• During play, press ANGLE repeatedly on
the remote control.
Zoom
For DVDs, VCDs and JPEG CDs, you can zoom
in and out for video images or pictures.
1
2
3
Press OPTIONS.
»» The option menu is displayed.
Select [Zoom & Pan] and press navigation
keys to zoom in and out.
When the video image or picture is
enlarged, press navigation keys to pan
through it.
EN
11
2
Rotate pictures
For JPEG CDs only. While the JPEG is displayed:
• Press
to rotate counter-clockwise.
• Press
to rotate clockwise.
• Press to flip up/down.
• Press to flip left/right.
Adjust brightness of screen backlight
Note
•• You can adjusts brightness of the screen backlight to
match lighting conditions.
During play, press
option.
• High
• Normal
• Dim
repeatedly to select an
Tip
•• For the longest playtime, select Dim.
•• For the best view, select High.
Play from USB
3
4
Press SOURCE repeatedly to switch to
USB mode.
Select a file, then press
»» Play starts.
/ OK.
To stop play, press STOP or .
Connect additional
equipment
You can connect the player to a TV or an
amplifier to enjoy DVDs.
Caution
•• Switch off your player before connecting to any
additional equipment.
Match the color of the AV cables (the AV cable
connected to the TV is not supplied) with the
jacks:
• the yellow cable is for the yellow video
jack.
• the red/white cable is for the red/white
audio jacks.
R
L
You can play DivX, VOB, MP3, or JPEG files that
are stored on a USB mass storage device.
1
12
Connect the USB device to the player.
»» The content menu is displayed.
EN
VIDEO IN
5 Watch TV
bSelect a country and press navigation
keys to select [Auto search].
Note
•• Before you start, ensure that you have connected the
antenna to the player.
•• Make sure that you are in an area with sufficient DVB-T
3
signal coverage. You can check the signal coverage with
the TV broadcast authority of your country.
cPress
/ OK to confirm.
»» The player searches for and stores
available TV channels.
Press CH+/- to select TV channels.
Tip
•• When you move to a new place (such as a new city or
country), restart auto search for better reception.
Connect TV antenna
Manual search
To watch analog TV programs on the player,
connect one of the TV antennas to the player:
• the supplied antenna, or
• your home antenna.
You can search TV channels manually.
1
2
3
4
Press SETUP.
Select [DTTV] > [Manual search].
Press / to select a channel number,
or enter the channel number with the
numerical keys.
Press
/ OK to confirm.
Cable
1
Connect the antenna to the ANTENNA
jack.
Tip
•• For better reception, connect the player to home
antenna.
Tune in to TV channels
1
2
Manage channel
Select the channel, and then follow the
onscreen instructions.
• To skip the channel, press the green button.
• To lock the channel, press the yellow
button.
• To delete the channel, press the blue
button. Press
/ OK to confirm.
• Press FAV LIST to add the channel to the
favorite list. To delete from your favorite list,
press FAV LIST again.
Press SOURCE repeatedly to select the
TV mode.
The first time you switch to the TV mode,
start auto search to search for available TV
channels:
aPress SETUP.
»» A pop-up screen is displayed.
EN
13
View program information
(DTV)
To view brief information of the current
program, press INFO; to view detail information,
press INFO twice.
• To exit the program information page,
press STOP or .
Access teletext
If the current channel has teletext, press
TELETEXT to access.
Tip
•• The program may request using color keys to access or
control the viewing features. Follow the instructions on
the teletext screen.
Use the electronic program
guide (DTV)
EPG is an on-screen guide available for digital
TV programs. You can navigate, select, and view
programs by time or title.
1
2
3
4
5
14
Select a channel in the digital TV mode.
Press EPG GUIDE.
»» The Electronic Program Guide menu
is displayed.
Press
/
to select a program.
Press
.
»» The brief information of this program
is displayed.
To exit the EPG menu, press EPG GUIDE.
EN
6 Adjust settings
Note
•• If the setup option is grayed out, it means that the
setting cannot be changed at the current state.
General settings
To maximize your play experience, press SETUP
to fine-tune your settings.
1
2
Press SETUP.
»» The setup menu is displayed.
Use navigation keys to select an option and
press
/ OK to confirm.
[General]
[Language]
[PBC settings]
[Power save]
[DivX (VOD)]
[DivX subtitles]
[Parental(DVD)]
[Set password]
[Factory settings]
[Video]
[TV display]
[TV standard]
[ Audio]
[Dolby]
[DTTV]
[Auto search]
Select on-screen display
language.
Set playback control
function on/off.
Set power saving mode
on/off.
Get DivX registration
code.
Select DivX subtitle
language.
Select parental level.
Change password.
Restore factory settings.
Set screen display aspect
ratio.
Set video output format
to TV system.
Set Dolby output.
Search channels
automatically.
[Manual search]
[DTTV Parental]
[Country]
[Time settings]
[Version]
3
4
Press
Search channels manually.
Select parental options.
Select specific country.
Set time.
Check the version
information.
to go back to the previous menu.
Press SETUP to exit.
Display settings
1
2
Press DISPLAY.
»» The display menu is displayed.
4
1
2
3
4
Fit the fixing strap to the mounting bag.
Adjust the position of the bag, and then
fasten the buckles.
Pull the straps to secure the bag to the
headrest.
Put the player into the bag. Use navigation keys to select an option and
press
/ OK to confirm.
[Brightness]
[Contrast]
[Colour]
[Turn off Display]
3
7 Mount the player
on the headrest
of your car
Press
level.
Adjust screen brightness.
Adjust screen contrast.
Adjust screen colour.
Turn off display.
to go back to the previous menu
Press DISPLAY to exit.
EN
15
8Specifications
Note
•• Specifications are subject to change without notice
Dimensions
(W x H x D)
Weight
Power supply
Power consumption
Operating
temperature range
Laser wavelength
Video output
Format
Output level
Load impedance
Audio line out
Audio out (analog
audio)
Load impedance
Audio distortion +
noise
Frequency response
Signal/noise ratio
Channel separation
Dynamic range
Playable media
Disc
16
EN
239 x 39 x 178 mm
1.02 kg
Model:
AY5808/12 (Philips)
Input: 100-240V~,
50/60Hz
Output: 9V , 1A
9W
0-45°C
650 nm
PAL & NTSC
1Vp - p ± 20%
75
Output level:
2V ± 10%
10 K
-80 (1KHz)
20Hz-20KHz ± 3dB
75 dB
75 dB
75 dB
DVD, DVD-Video,
VCD/SVCD, Audio
CD
DVD+R/+RW,
DVD-R/-RW,
DVD+R/-R DL (Dual
Layer)
CD-R/CD-RW, MP3
media, JPEG files
File format
Video
Audio
Picture
TV syestem
Digital video broadcasting
USB
Compatibility
Class support
File system
Maximum number of
albums/folders
Maximum number of
tracks/titles
Support USB HDD
(Hard Disc Drive)
.avi, .divx, .mp4, xvid
.mp3
.jpg, .jpeg
Terrestrial
Hi-Speed USB (2.0)
USB Mass Storage
Class (UMS)
FAT16, FAT32
131
648
an external power
source may be
needed
9Troubleshooting
Warning
•• Never remove the casing of this apparatus.
To keep the warranty valid, never try to repair
the system yourself.
If you encounter problems when using
this apparatus, check the following points
before requesting service. If the problem
remains unsolved, go to the Philips web site
(www.philips.com/support). When you contact
Philips, ensure that the apparatus is nearby
and the model number and serial number are
available.
No power
•• Ensure that both plugs of the mains cord
are properly connected.
•• Ensure that there is power at the AC
outlet.
•• Check if the built-in battery is drained.
No sound
• Ensure that the AV cable is connected
correctly.
No response to the remote control
• Ensure that the path between the remote
control and the player is clear from
obstacles.
•• From a close distance, point the remote
control directly at the player.
•• Replace the remote control batteries.
•• The function does not work for this disc.
Refer to the disc instructions.
Distorted picture
•• Clean the disc. With a clean, soft, lint-free
cloth, wipe the disc outwards from the
center.
•• Make sure that the video output format of
the disc is compatible with the TV.
•• Change the video output format to match
your TV or program.
••
The LCD is manufactured using high
precision technology. You may, however, see
tiny black points and/or bright points(red,
blue, green) that continuously appear
on the LCD. This is a normal result of
the manufacturing process and does not
indicate a malfunction.
Cannot play disc
•• Ensure the disc label is upwards.
•• Clean the disc. With a clean, soft, lint-free
cloth, wipe the disc outwards from the
center.
•• Check if the disc is defective by trying
another disc.
No response to operating commands
• The operation is not permitted by the disc.
The player feels warm
• When the player is in use for a long period
of time, its surface will be heated. This is
normal.
No/weak signal displayed on the screen
•• TV signal is too weak or out of TV signal
covering area.
•• Make sure you are in an area with sufficient
coverage.
•• Connect to your home TV antenna socket.
•• Receiving TV in a driving car may cause
signal problems.
TV reception with Black and White picture or
no sound
•• Ensure that you set the TV type and TV
system correctly according to local TV
broadcast specifications. If you do not
know the information, contact local TV
broadcast authorities for help.
EN
17
Manufactured under license from Dolby
Laboratories. Dolby and the double-D symbol
are trademarks of Dolby Laboratories.
This DivX Certified® device has passed
rigorous testing to ensure it plays DivX®
video. To play purchased DivX movies, first
register your device at vod.divx.com. Find your
registration code in the DivX VOD section of
your device setup menu.
DivX Certified® to play DivX® video, including
premium content.
DivX®, DivX Certified® and associated logos
are trademarks of DivX, LLC and are used
under license.
Covered by one or more of the following
U.S. patents: 7,295,673; 7,460,668; 7,515,710;
7,519,274.
DivX Certified® devices have been tested for
high-quality DivX® (.divx, .avi) video playback.
When you see the DivX logo, you know you
have the freedom to play your favorite DivX
movies.
18
Specifications are subject to change without notice
© 2014 Koninklijke Philips N.V. All rights reserved.
Trademarks are the property of Koninklijke Philips N.V. or their respective owners.
PD9025_12_UM_V1.0