1
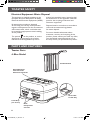
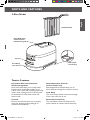
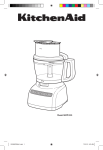
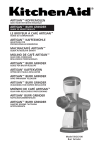
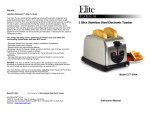
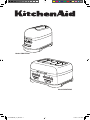
Model 5KMT2204
Model 5KMT4205
W10506838A_01_EN.indd 1
11/8/12 2:01 PM
Toaster Instructions
English
Table of Contents
TOASTER SAFETY
Important Safeguards.................................................................................................6
Electrical Requirements..............................................................................................7
Electrical Equipment Waste Disposal.........................................................................8
PARTS AND FEATURES
Toaster Parts...............................................................................................................8
Toaster Features.........................................................................................................9
Controls...................................................................................................................10
Using YOUR TOASTER
Before First Use.......................................................................................................11
Making Toast.............................................................................................................11
SPECIAL TOASTING FUNCTIONS
Keep Warm..............................................................................................................12
Toasting Bagels..........................................................................................................12
Toasting Frozen Items...............................................................................................12
Toasting Sandwiches.................................................................................................13
CARE AND CLEANING................................................................................................14
Troubleshooting..................................................................................................15
SERVICE AND WARRANTY........................................................................................15
5
W10506838A_01_EN.indd 5
11/8/12 2:01 PM
Toaster Safety
IMPORTANT SAFEGUARDS
When using electrical appliances, basic safety cautions should always be followed,
including the following:
1.Read all instructions.
2.Do not touch hot surfaces. Use handles or knobs.
3.To protect against electrical shock, do not immerse cord, plugs, or toaster in water
or other liquid.
4.This appliance is not intended for use by persons (including children) with reduced
physical sensory or mental capabilities, or lack of experience and knowledge, unless
they have been given supervision or instruction concerning use of the appliance by
a person responsible for their safety.
5.Children should be supervised to ensure that they do not play with the appliance.
6.Unplug toaster from outlet when not in use and before cleaning. Allow to cool
before putting on or taking off parts.
7.Do not operate any appliance with a damaged cord or plug or after the appliance
malfunctions or has been damaged in any manner. Return appliance to the nearest
Authorized Service Facility for examination, repair or adjustment.
8.The use of accessory attachments not recommended by the appliance manufacturer
may cause injuries.
9.Do not use outdoors.
10.Do not let cord hang over edge of table or counter, or touch hot surfaces.
11.Do not place on or near a hot gas or electric burner, or in a heated oven.
12.To disconnect, turn any control to “OFF,” then remove plug from outlet.
13.Do not use toaster for other than intended use.
Save These Instructions
6
W10506838A_01_EN.indd 6
11/8/12 2:01 PM
Toaster Safety
IMPORTANT SAFEGUARDS
English
14.Oversize foods, metal foil packages, or utensils must not be inserted in toaster
as they may involve a risk of fire or electric shock.
15.A fire may occur if toaster is covered with or touching flammable material,
including curtains, draperies, walls and the like, when in operation.
16.Do not attempt to dislodge food when toaster is plugged in.
17.This product is designed for household use only.
Save These Instructions
Electrical Requirements
Voltage: 220-240 Volts
Frequency: 50/60 Hertz
Wattage: 1250 Watts for the 2-slice model
5KMT2204
2500 Watts for the 4-slice model
5KMT4205
NOTE: If the power cord is damaged, it
must be replaced by the manufacturer or its
service agent in order to avoid a hazard.
Do not use an extension cord. If the power
supply cord is too short, have a qualified
electrician or serviceman install an outlet
near the appliance.
7
W10506838A_01_EN.indd 7
11/8/12 2:01 PM
Toaster Safety
Electrical Equipment Waste Disposal
This appliance is marked according to the
European directive 2002/96/EC on Waste
Electrical and Electronic Equipment (WEEE).
By ensuring this product is disposed
of correctly, you will help avoid potential
negative consequences for the environment
and human health, which could otherwise
be caused by inappropriate waste handling
of this product.
The symbol
on the product, or on the
documents accompanying the product,
indicates that this appliance may not be
treated as household waste. Instead it shall
be handed over to the applicable collection
point for the recycling of electrical and
electronic equipment.
Disposal must be carried out in accordance
with local environmental regulations
for waste disposal.
For more detailed information about
treatment, recovery and recycling of this
product, please contact your local city office,
your household waste disposal service or
the shop where you purchased the product.
Parts and Features
Toaster Parts
4-Slice Model
Sandwich Rack
Extra-Wide Slots
with Automatic
Self-Centering Racks
Removable
Crumb Tray
Cord Wrap
(not shown)
DualIndependent
Controls
8
W10506838A_01_EN.indd 8
11/8/12 2:01 PM
Parts and Features
English
2-Slice Model
Sandwich Rack
Extra-Wide Slots
with Automatic
Self-Centering Racks
Controls
Cord Wrap
(not shown)
Removable
Crumb Tray
Toaster Features
Extra-Wide Slots with Automatic
Self-Centering Racks
Extra-wide slots allow you to easily toast
bread, bagels, and English muffins up to
2.8 cm (11/8") thick. Self-centering racks help
ensure even heating of thin or thick breads.
An automatic lift mechanism raises and
lowers racks.
Dual Independent Controls
(4-slice models only)
Dual independent controls allow you to
select different settings for each pair of slots.
Controls
Easy-to-use controls allow you to quickly
select the desired settings and light to
provide visual feedback.
Removable Crumb Tray
The removable crumb tray slides out for
quick removal of crumbs. Hand-wash only.
Cord Wrap
The cord wrap provides convenient storage
of the cord when not in use.
9
W10506838A_01_EN.indd 9
11/8/12 2:01 PM
Parts and Features
Controls
Bagel
Function
Frozen
Function
Keep Warm
Indicator
Sandwich
Function
Toast/Cancel
Function
Shade Indicator Lights/
Countdown Timer
Shade
Control
Toast/Cancel Function
This is an automatic toaster.
As soon as bread is placed
in either slot it will begin
to lower and toasting will begin using the
selected settings. Some food may be too
light to trigger automatic toasting. If the
food does not begin to drop after 3 seconds
press TOAST/CANCEL to start the cycle
manually. Press again to cancel a toasting
cycle already in process, or to end a Keep
Warm cycle.
Shade Control & Shade Indidcator
Lights/Countdown Timer
Precisely sets the desired brownness level.
Indicator lights show the setting at a glance.
During toasting, lights on the shade setting
bar will blink to indicate time left in the
toasting cycle.
Keep Warm Indicator
If the food is not removed
within 45 seconds of the end
of a cycle, the toaster will
automatically lower the food and activate a
“Keep Warm” cycle using low heat for up to
3 minutes. The KEEP WARM indicator will
light while this cycle is active. You can cancel
this cycle at any time by pressing TOAST/
CANCEL.
Bagel Function
Your toaster features a special
setting for toasting bagels,
crumpets, muffins, buns or
any other round breads that you wish to
cut in half and toast only one side. The
heating elements will adjust to nicely toast
the inside of a cut bagel (or other round
bread) without burning the outside surface.
Frozen Function
Your toaster features a
Frozen mode that gently
defrosts and toasts frozen
bread. Use Frozen for frozen
foods only.
Sandwich Function
Your toaster features a
special “Sandwich” setting
to be used exclusively with
the KitchenAid Sandwich Rack to toast
sandwiches made with thinly sliced meats
and cheese. See “Toasting Sandwiches” for
more information.
10
W10506838A_01_EN.indd 10
11/8/12 2:01 PM
Before First Use
Before using your toaster, check the
extra-wide slots and remove any packing
or printed material that might have fallen
inside during shipping or handling. Do not
probe inside the toaster with a metal object.
You may see light smoke the first time you
use the toaster. This is normal. The smoke is
harmless and will soon disappear.
NOTE: Different types of bread and their
moisture levels may require different
shade settings. For example, dry bread
will brown more rapidly than moist bread
and will require a lighter setting.
4. Insert bread or other food to be toasted
in slot(s).
English
Using Your Toaster
Making Toast
1. Shorten cord, if necessary, by wrapping
cord under the base. The toaster’s feet
are tall enough to allow the cord to exit
from under any side of the toaster.
2. Plug into a grounded outlet.
3. Move the Shade Control to select the
degree of brownness you want. Move
the Shade Control to the right for darker
toast or to the left for lighter. The
indicator lights will display the shade
level, from 1 (light) to 7 (dark).
NOTE: For even toasting on 2-slot models,
toast only one bread type and thickness at
a time. If toasting two different types or
thicknesses of bread with 4-slot models with
Dual Independent Controls, be sure to toast
only one bread type in each pair of slots.
5. As soon as bread is placed in either slot
it will automatically begin to lower and
toasting will begin. Some food may be too
light to trigger automatic
toasting. If the food does
not begin to drop after
3 seconds press TOAST/
CANCEL to start the
cycle manually.
6. (Optional) Press desired special toasting
function button within 5 seconds. See the
“Special Toasting Functions” section for
more information.
7. When the toaster is finished, it will
automatically raise the food and a signal
will sound. If food is not removed within
45 seconds, the toaster will enter Keep
Warm mode.
8. To cancel toasting at any time, press
TOAST/CANCEL. The toaster will raise
the toast and turn off.
11
W10506838A_01_EN.indd 11
11/8/12 2:01 PM
Special Toasting Functions
Keep Warm
Toasting Frozen Items
If the food is not removed
within 45 seconds of the end
of a cycle, the toaster will
automatically lower the food
and activate a “Keep Warm”
cycle using low heat for up to 3 minutes.
The KEEP WARM indicator will light while
this cycle is active.
To cancel Keep Warm mode
and remove toast:
Press the TOAST/CANCEL
button once. The toast will
come up and the toaster
will turn off.
If toast is not removed
within 3 minutes, the toast
will come up and the toaster will
automatically turn off.
Your toaster features a Frozen mode that
gently defrosts and toasts frozen bread. Use
Frozen for frozen foods only.
For regular bread and similar foods:
1. With the desired
brownness level selected,
press the FROZEN button.
2. Insert frozen bread into
the toaster slots.
3. The toaster will automatically lower
the bread, run a defrosting cycle to
thaw the bread, then toast it to the
desired brownness setting.
For frozen bagels (or other frozen
round breads cut in half):
1. With the desired brownness level
selected, press the BAGEL button
then the FROZEN button.
2. Insert frozen bagel (or other round
bread) into the toaster slots.
3. The toaster will automatically lower,
run a defrosting cycle to thaw, then
toast to the desired brownness setting.
Toasting Bagels
Your toaster features a special setting for
toasting bagels, crumpets, muffins, buns or
any other round breads that you wish to cut
in half and toast only one side. The heating
elements will adjust to nicely toast the inside
of a cut bagel (or other round bread) without
burning the outside surface.
1. With the Shade Control
set to the desired level
of brownness, press
the BAGEL button.
2. Insert halves of bagel,
or other round breads,
with the cut sides facing in, as shown.
The toaster will automatically lower
the bagel and start toasting.
3. When the bagel is ready, the toaster will
raise it and a signal will beep. If bagel
is not removed within 45 seconds, the
toaster will enter Keep Warm mode.
12
W10506838A_01_EN.indd 12
11/8/12 2:01 PM
Toasting Sandwiches
Your toaster features an accessory and a
special setting to toast sandwiches made
with thinly sliced meats and cheese.
The hinged design of the Sandwich Rack
accessory opens flat to make inserting and
removing sandwiches easy.
Preparing your sandwich:
1. Lightly butter the outside of the sandwich
bread – do not butter the side that will
face the filling. Buttering the outside of
the bread will slow browning and help
warm the filling.
2. Fill the sandwich with desired ingredients,
but do not overfill it! Thinly sliced
ingredients – like ham, turkey, and
cheese – work best.
3. Open the rack by spreading the handles
apart. Then, place an edge of your
sandwich flush with the bottom channel
of the rack, as shown.
4. Press the sandwich rack handles together
to grip the sandwich. Close the clip to
keep grids together.
NOTE: Do NOT toast sandwiches without
the Sandwich Rack, because cheese or other
food could melt and stick to the interior of
the toaster.
Do NOT store your Sandwich Rack in the
toaster, or place it back in the toaster once
sandwich is toasted and unloaded. This
would start a new toasting cycle and prevent
toaster from working properly.
English
Special Toasting Functions
Toasting your sandwich:
1. Set the Shade Control
to the desired level of
brownness, then press
the SANDWICH button.
2. Insert the Sandwich Rack into the toaster
slot, with your sandwich inside, as shown.
The toaster will automatically lower the
Sandwich Rack and start toasting.
3. When the sandwich is ready, a signal will
beep 3 times, and the Sandwich button
light will blink.
4. Remove Sandwich Rack and press either
the SANDWICH button or the TOAST/
CANCEL button to return the carriage
to its proper position.
If Sandwich Rack is not removed, a signal
will beep every 30 seconds for 2 minutes
and the Sandwich button light will blink
to remind you to remove it. If Sandwich
Rack is not removed within 2 minutes,
the toaster will automatically turn off.
In any case, the Sandwich Rack must be
removed to operate toaster again.
13
W10506838A_01_EN.indd 13
11/8/12 2:01 PM
Care and Cleaning
Unplug the toaster
and let it cool
before cleaning.
Grasp the center
of the crumb tray
then slide it out. Shake the crumbs into a
waste container. It is recommended that
the crumb tray be emptied after each use.
Crumb tray is hand-wash only.
IMPORTANT: The tray will be hot
immediately following a toasting cycle.
Wipe toaster with a soft, damp cotton cloth.
Do not use paper towels, abrasive cleansers
or liquid cleaning products. Do not immerse
toaster in water.
NOTE: If grease or oil splatters on the
toaster, wipe splatters away immediately
using a clean, damp cotton cloth.
Return crumb tray to toaster. Press it in
firmly until it clicks into position. Do not
use the toaster without the crumb tray
in proper position.
NOTE: KitchenAid does not recommend
the use of a toaster cover.
Wash the the Sandwich Rack by hand,
avoiding the use of abrasive cleansers or
scouring pads. Dry thoroughly after washing.
You can also wash the Sandwich Rack in the
top rack of your dishwasher.
14
W10506838A_01_EN.indd 14
11/8/12 2:01 PM
NOTE: You may see light smoke the first
time you use the toaster. This is normal. The
smoke is harmless and will soon disappear.
If your toaster should fail to operate,
check the following:
1. If the toaster does not begin to drop
and toast after 3 seconds, it might be
that the food inserted is too light to
trigger automatic toasting. Press TOAST/
CANCEL to start the cycle manually.
2. If the toaster fails to operate and the
Sandwich light blinks, it means that a
heavy item is preventing the toaster from
working properly. Remove the Sandwich
Rack or any other heavy items from the
toaster, then press the “Sandwich” button
or the “Toast/Cancel” button to allow the
carriage to return to its proper position.
3. Check that the toaster is plugged into
a grounded electrical outlet.
4. If the toaster is plugged in, unplug it,
then plug in the toaster again.
5. If the toaster still does not work, check
the household fuse or circuit breaker.
If the problem cannot be corrected, contact
an authorized service center (see the
KitchenAid Warranty and Service sections).
English
Troubleshooting
Service and Warranty
Household KitchenAid Toaster Warranty
Length of
Warranty:
KitchenAid Will Pay For:
KitchenAid Will Not
Pay For:
Europe, Australia
and New
Zealand:
The replacement parts and
repair labor costs to correct
defects in materials or
workmanship. Service must
be provided by an Authorized
KitchenAid Service Center.
A.Repairs when Toaster is used for
operations other than normal
household food preparation.
B.Damage resulting from accident,
alterations, misuse, abuse, or
installation/operation
not in accordance with
local electrical codes.
For Models
5KMT2204, and
5KMT4205:
Five years Full
Warranty from
date of purchase.
KITCHENAID DOES NOT ASSUME ANY RESPONSIBILITY FOR INDIRECT DAMAGES.
15
W10506838A_01_EN.indd 15
11/8/12 2:01 PM
Service and Warranty
Service Centers
All service should be handled locally by
an Authorized KitchenAid Service Center.
Contact the dealer from whom the unit was
purchased to obtain the name of the nearest
Authorized KitchenAid Service Center.
In the U.K.:
Call: 0845 6011 287
In Ireland:
M.X. ELECTRIC
Service Department
25 Alymer Crescent
Kilcock, Co. KILDARE
Call: 87 2581574
Fax: 1 628 4368
In Australia:
Call: 1800 990 990
In New Zealand:
Call: 0800 881 200
Customer Service
In U.K. & Ireland:
Tollfree number 0800 988 1266
(Calls from mobile phones are charged
standard network rate)
Address:
KitchenAid Europa, Inc.
PO BOX 19
B-2018 ANTWERP 11
BELGIUM
For Southern Ireland:
Tollfree number +44 (0) 20 8616 5148
www.KitchenAid.co.uk
www.KitchenAid.eu
W10506838A
© 2012. All rights reserved.
Specifications subject to change without notice.
11/12
16
W10506838A_01_EN.indd 16
11/8/12 2:01 PM
www.KitchenAid.co.uk
www.KitchenAid.eu
W10506838A
© 2012. All rights reserved.
Specifications subject to change without notice.
W10506838A_18_BkCov.indd 212
11/12
11/2/12 11:40 AM