1
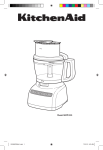
Model 5KHB2571
W10506678A_01_EN.indd 1
7/11/12 1:44 PM
Hand Blender Instructions
Table of Contents
HAND BLENDER SAFETY
Important Safeguards.................................................................................................5
Electrical Requirements..............................................................................................6
Electrical Equipment Waste Disposal.........................................................................6
PARTS AND FEATURES
Hand Blender Parts....................................................................................................7
Hand Blender Features...............................................................................................8
Attachment Guide......................................................................................................9
OPERATING YOUR HAND BLENDER
Assembling Hand Bender.........................................................................................10
Using the Blending Arm............................................................................................11
Using the Whisk Attachment....................................................................................12
Using the Chopper Attachment...............................................................................13
Operating Tips..........................................................................................................14
CARE AND CLEANING................................................................................................15
SERVICE AND WARRANTY........................................................................................15
4
W10506678A_01_EN.indd 4
7/11/12 1:44 PM
English
Hand Blender Safety
IMPORTANT SAFEGUARDS
When using electrical appliances, basic safety precautions should always be followed,
including the following:
1.Read all instructions.
2.To protect against risk of electrical shock do not put motor body, cord, or electrical plug
of this Hand Blender in water or other liquid.
3.This appliance is not intended for use by persons (including children) with reduced
physical sensory or mental capabilities, or lack of experience and knowledge, unless they
have been given supervision or instruction concerning use of the appliance by a person
responsible for their safety.
4.Children should be supervised to ensure that they do not play with the appliance.
5.Unplug from outlet when not in use, before putting on or taking off parts, and before
cleaning.
6.Avoid contact with moving parts.
7.Do not operate any appliance with a damaged cord or plug or after the appliance
malfunctions, or is dropped or damaged in any manner. Return appliance to the nearest
Authorized Service Facility for examination, repair, or electrical or mechanical adjustment.
8.The use of attachments not recommended or sold by the manufacturer may cause fire,
electric shock or injury.
9.Be certain Chopper Adapter is securely locked in place before operating appliance.
10.Do not use outdoors.
11.Do not let cord hang over edge of table or counter.
12.Do not let cord contact hot surfaces, including the stove.
13.When mixing liquids, especially hot liquids, use a tall container or make small quantities
at a time to reduce spillage.
14.Keep hands and utensils out of the container while blending to prevent the possibility of
severe injury to persons or damage to the unit. A scraper may be used, but must be used
only when the unit is not running.
15.Blades are sharp. Handle carefully.
16.This product is designed for household use only.
SAVE THESE INSTRUCTIONS
W10506678A_01_EN.indd 5
5
7/11/12 1:44 PM
Hand Blender Safety
Electrical Requirements
Voltage: 220-240 Volts
Frequency: 50/60 Hertz
Wattage: 180 Watts
NOTE: If the plug does not fit in the outlet,
contact a qualified electrician. Do not modify
the plug in any way.
Electrical Equipment Waste Disposal
This appliance is marked according to the
European directive 2002/96/EC on Waste
Electrical and Electronic Equipment (WEEE).
By ensuring this product is disposed
of correctly, you will help avoid potential
negative consequences for the environment
and human health, which could otherwise
be caused by inappropriate waste handling
of this product.
The symbol
on the product, or on the
documents accompanying the product,
indicates that this appliance may not be
treated as household waste. Instead it shall
be handed over to the applicable collection
point for the recycling of electrical and
electronic equipment.
Disposal must be carried out in accordance
with local environmental regulations
for waste disposal.
For more detailed information about
treatment, recovery and recycling of this
product, please contact your local city office,
your household waste disposal service or
the shop where you purchased the product.
6
W10506678A_01_EN.indd 6
7/11/12 1:44 PM
Parts and Features
Speed Control Dial
One-Touch
Power Button
Bell Blades
English
Hand Blender Parts
Motor
Body
S-Blade
1.5 m (5 ft.)
Power Cord
Star Blade
Whisk Attachment
20 cm (8") Stainless
Steel
Blending Arm*
Frother/Beater
* Shown with
S-Blade attached
33 cm (13")
Blending Arm
4 Cup
p
3 1/2 Cu
3 Cup
p
2 1/2 Cu
2 Cup
1 1/2 Cu
p
1 Cup
Pan Guard
Bell Guard
1/2 Cu
p
Blending Pitcher
Storage Case
W10506678A_01_EN.indd 7
Chopper Attachment
7
7/11/12 1:45 PM
Parts and Features
Hand Blender Features
Speed Control
Variable speeds provide greater processing
control that adjusts to handle a variety of
foods, beverages and soups.
One-Touch Power Button
Activate the Hand Blender by pressing
and holding the POWER button during
blending. To stop blending, simply release
the power button.
Motor Body
Designed for a comfortable, non-slip grip.
Powerful DC Motor (not shown)
Provides a powerful blending action and
is designed for quiet, long-life operation.
1.5 m (5 ft.) Power Cord
Long enough to take the Hand Blender
to the cooktop or work area, the Power
Cord is rounded with no grooves for easy
clean up. A silicone cord strap is included
for convenient cord storage.
Twist-Lock Stainless Steel
Blending Arm
Attaches onto the Motor Body with a simple
twist and rotates to lock into place. The
sharp stainless steel blade is covered to help
prevent splashing while blending.
Whisk Attachment
Optimized for whipping egg whites and
whipping cream.
Chopper Attachment
Perfect for small chopping jobs like herbs,
nuts, and vegetables. Chopper includes
a bowl, blade, and chopper adapter. The
Chopper bowl has a non-slip base to prevent
movement during the chopping process.
Blending Pitcher
1 Liter BPA Free Pitcher with convenient
handle and no-splash lid.
Bell Blades
With the three interchangeable Bell Blades,
you will always have the right tool for a
multitude of tasks. From crushing ice, to
chopping cooked meats, and frothing milk,
the KitchenAid Hand Blender has you
covered.
Pan Guard
Snap the Pan Guard onto the
interchangeable Bell Blades to protect
your cookware during use.
Bell Guard
Snap the Bell Guard onto the
interchangeable Bell Blade to protect
from damage when not in use.
Storage Case
Keeps accessories organized and protected.
8
W10506678A_01_EN.indd 8
7/11/12 1:45 PM
Parts and Features
English
Attachment Guide
Attachment
Best used to
S-Blade
Star Blade
Shred, Mince
Cooked Meats, Beef Gravy,
Liquidize Fruits, Minces
Frother/Beater
Froth, Mix
Milk (for Latte, Cappuccino...), Cake Batter,
Pancake Batter, Muffin Batter
Whisk
Whip, Emulsify, Aerate
Egg Whites, Whipped Cream, Mayonnaise,
Vinaigrette, Mousse, Hollandaise Sauce,
Pudding
Chopper
Blend, Crush, Puree
Smoothies, Milk Shakes, Cooked Veggies,
Soups, Sauces, Ice, Baby Food, Frosting,
Crushed Ice
Chop
Vegetables, Parmesan Cheese, Peanuts,
Salsa, Hard Boiled Eggs, Bread Crumbs,
Herbs, Cooked Meats, Beef Gravy,
Liquidize Fruits, Minces
9
W10506678A_01_EN.indd 9
7/11/12 1:45 PM
Operating Your Hand Blender
Assembling Hand Blender
Before using the KitchenAid Hand Blender
for the first time, wipe the motor body and
attachment adapters with a clean, damp
cloth to remove any dirt or dust. Mild dish
soap may be used, but do not use abrasive
cleansers.
NOTE: Do not immerse the motor body
or the adapters in water.
Dry with a soft cloth. Wash all the
attachments and accessories by hand
or in the top rack of the dishwasher. Dry
thoroughly.
NOTE: Always be sure to unplug the
power cord from the wall socket before
installing or removing attachments.
Blending Arm
Attachment
Chopper Adapter
Whisk Adapter
For information on attaching or removing
the Chopper adaptor, see “Using the
Chopper Attachment” section.
Bell Guard
Easily snaps onto Bell Blade and provides
protection to blades while the Hand Blender
is not in use.
Port
NOTE: Ensure Bell Guard is installed with
the mounting clips positioned between
the ports on the Bell Blades.
Pan Guard
The Pan Guard snaps onto any of the
included Bell Blades and provides protection
to the Hand Blender and your cookware.
Port
NOTE: Ensure Pan Guard is installed with
the mounting clips positioned between
the ports on the Bell Blades.
10
W10506678A_01_EN.indd 10
7/11/12 1:45 PM
Operating Your Hand Blender
Use the Blending Arm attachment for
smoothies, milk shakes, soup, cooked
vegetables, frosting, or baby food.
1. Insert Blending Arm into Bell Blade (see
“Attachment Guide”) and twist to lock
until it clicks.
Insert Hand Blender with Blending
Arm attached into the Blending Pitcher
containing ingredients at an angle. Use
your free hand to cover the top of the
Blending Pitcher for better stability and
avoid splattering. Remember to stop the
Hand Blender before removing it from the
pitcher to avoid splashing.
English
Using the Blending Arm
Blending
2. Insert Blending Arm into Motor Body
and twist to lock until it clicks.
3. Plug the electrical cord into an electrical
wall socket.
4. Set Hand Blender on Speed 1. Adjust the
speed by turning the Speed Control Dial
on top of the Hand Blender.
5. Insert the Hand Blender into the mixture.
NOTE: Hand Blender should only be
immersed in liquids the length of the
attachment. Do not submerge beyond
the seam of the blending attachment.
Do not immerse the motor body into
liquids or other mixtures.
6. Press the POWER button to activate
the Hand Blender.
7. When blending is complete, release
the power button before removing
Hand Blender from the mixture.
8. Unplug immediately after use, before
removing or changing attachments.
Rest the Hand Blender on the bottom of the
Blending Pitcher momentarily then hold at
an angle and slowly draw it upwards against
the side of the Pitcher. As the Hand Blender
is drawn up you will notice the ingredients
from the bottom of the Pitcher being drawn
up. When the ingredients are no longer
being drawn up from the bottom, return the
Hand Blender to the bottom of the Pitcher
and repeat the process until the ingredients
are at the desired consistency.
Drawing up
Using a light circular motion from your
wrist, draw the Hand Blender up slightly
and let it fall again into the ingredients.
Allow your wrist motion and the weight
of the Hand Blender to do the work.
Wrist
movement
11
W10506678A_01_EN.indd 11
7/11/12 1:45 PM
Operating Your Hand Blender
Using the Whisk Attachment
Use the Whisk to whip cream, beat egg
whites, mix instant puddings, vinaigrettes,
mousse, or for making mayonnaise.
5. Insert the Hand Blender into the
mixture.
The stainless steel Whisk may scratch or
mark non-stick coatings; avoid using the
Whisk in non-stick cookware.
NOTE: Hand Blender should only be
immersed in liquids the length of the
attachment. Do not submerge beyond
the seam of the whisk adapter. Do not
immerse the motor body into liquids or
other mixtures.
To prevent splattering and splash-out, use
the Whisk Attachment in deep containers
or pans.
6. Press the Power button to activate
the Hand Blender.
7. When whisking process is complete,
release the Power button before
removing Hand Blender from the
mixture.
8. Unplug immediately after use, before
removing or changing attachments.
1. Insert the Whisk into the Whisk Adapter.
2. Insert the Whisk Adapter into the
motor body and twist to lock until it
clicks. Adapter automatically adjusts the
whisk to the proper range of speeds
appropriate for whipping.
3. Plug the electrical cord into an electrical
wall socket.
4. Start Hand Blender on Speed 1. Adjust
the speed by rotating the Speed Control
Dial on top of the Hand Blender.
12
W10506678A_01_EN.indd 12
7/11/12 1:45 PM
Operating Your Hand Blender
4. Align the Chopper bowl with the motor
body and press together.
5. Hold the motor body with one hand and
the Chopper bowl with the other while
processing.
English
Using the Chopper Attachment
Use the Chopper attachment to chop small
amounts of food such as cooked meat,
cheese, vegetables, herbs, crackers, bread,
and nuts.
1. Insert the Chopper blade into the
Chopper bowl.
2. Add small pieces of foods to the bowl.
3. Attach the Chopper adaptor to the
Chopper bowl.
NOTE: To attach Chopper adaptor to
Chopper bowl, place it straight down.
Do not try to twist Chopper adaptor
into place.
Motor
Body
6. Press the POWER button to activate
Hand Blender. For best results, “pulse”
the power by pressing and releasing
the Power button until ingredients reach
the desired consistency.
7. When chopping is complete, release
the Power button.
8. Remove Motor Body from Chopper
adaptor.
Chopper
Adaptor
Chopper
Blade
Chopper
Bowl
NOTE: To remove Chopper adaptor
from Chopper bowl, lift it straight up.
Do not try to twist Chopper adaptor
to remove.
9. Unplug immediately after use, before
removing or changing attachments.
13
W10506678A_01_EN.indd 13
7/11/12 1:45 PM
Operating Your Hand Blender
Chopper Processing Guide
Food
Quantity
Preparation
SpeedTime*
Meats 200 g (7 oz)
Cut into 2 cm (3/4") Cubes
5
15 Seconds
Almonds/Nuts 200 g (7 oz)
Place in Whole Nuts
3
25 Seconds
Garlic10–12 Cloves Place in Whole Cloves
3
15 Seconds
Onions100 g (3.5 oz) Cut into Quarters
3
15 Seconds
Cheese100 g (3.5 oz) Cut into 1 cm ( 3/8") Cubes
5
30 Seconds
Hard Boiled Eggs
Place in Whole Eggs
4
3 Pulses
Carrots 200 g (7 oz)
Cut Average Carrot
into Quarters
3
15 Seconds
Herbs 50 g (2 oz)
Remove Stalks
4
15 Seconds
2
* Processing times and speeds are approximate.
Actual usage may vary depending on quality of food and desired chop size.
Operating Tips
• Cut solid foods into small pieces for
easier blending or chopping.
• The Hand Blender is equipped with
thermal protection from high operating
temperatures. Should the Hand Blender
suddenly stop during use, unplug it and
allow 10 minutes to automatically reset.
• To avoid splashing, insert the Hand
Blender into the mixture before
pressing the power button, and release
the power button before pulling the
Hand Blender out of the mixture.
• When blending in a saucepan on a
cooktop, remove the pan from the heating
element to protect the Hand Blender
from overheating.
• For best blending, hold the Hand Blender
at an angle and gently move up and down
within the container. Do not pound down
on the mixture with the Hand Blender.
• To prevent overflow, allow room in the
container for the mixture to rise when
using the Hand Blender.
• Be sure the extra long cord of the
Hand Blender is not extending
over a hot heating element.
• Do not let the Hand Blender sit in a hot
pan on the cooktop while not in use.
• Remove hard items, such as fruit pits
or bones, from the mixture before
blending or chopping to help prevent
damage to the blades.
• Do not use your Hand Blender to process
coffee beans or hard spices such as
nutmegs. Processing these foods could
damage the blades of the Hand Blender.
• Do not use the pitcher or the chopper
bowl in the microwave oven.
• The stainless steel whisk may scratch or
mark non-stick coatings; avoid using the
whisk in non-stick cookware.
• To prevent splattering, use the whisk
attachment in deep containers or pans.
14
W10506678A_01_EN.indd 14
7/11/12 1:45 PM
1. Unplug Hand Blender before cleaning.
2. Remove the Adapters and Attachments
by twisting (see “Operating Your Hand
Blender” section).
3. Wipe the Motor Body and Adapters with
a damp cloth. Mild dish soap may be
used, but do not use abrasive cleansers.
4. Wipe power cord with warm, sudsy
cloth, then wipe clean with damp cloth.
Dry with soft cloth.
5. Wash Chopper Adapter and Whisk
Adapter by hand in hot, soapy water.
6. Dry Blending Arm and Bell Blades with
soft cloth.
Hand Blender Accessories
and Attachments
Wash Blending Arms, Pitcher and Lid,
Whisk, Chopper Bowl, Blades, and Pan
Guard in hot, soapy water, or in the top
rack of the dishwasher. Dry thoroughly.
English
Care and Cleaning
NOTE: Do not put Whisk or Chopper
Adapters in dishwasher.
NOTE: Do not immerse the Motor Body
or the adapters in water.
Service and Warranty
Household KitchenAid Hand Blender Warranty
Length of
Warranty:
KitchenAid Will Pay For:
KitchenAid Will Not
Pay For:
Europe,
Australia and
New Zealand:
The replacement parts
and repair labor costs to
correct defects in materials
or workmanship. Service
must be provided by an
Authorized KitchenAid
Service Center.
A.Repairs when Hand Blender
is used for operations other
than normal household
food preparation.
B.Damage resulting from
accident, alterations,
misuse, abuse, or
installation/operation
not in accordance with
local electrical codes.
For Model
5KHB2571:
Two years Full
Warranty from
date of purchase.
KITCHENAID DOES NOT ASSUME ANY RESPONSIBILITY FOR INDIRECT DAMAGES.
15
W10506678A_01_EN.indd 15
7/11/12 1:45 PM
Service and Warranty
Service Centers
All service should be handled locally by
an Authorized KitchenAid Service Center.
Contact the dealer from whom the unit was
purchased to obtain the name of the nearest
Authorized KitchenAid Service Center.
In the U.K.:
Call: 0845 6011 287
In Ireland:
M.X. ELECTRIC
Service Department
25 Alymer Crescent
Kilcock, Co. KILDARE
Call: 87 2581574
Fax: 1 628 4368
In Australia:
Call: 1800 990 990
In New Zealand:
Call: 0800 881 200
Customer Service
In U.K. & Ireland:
Tollfree number 0800 988 1266
(Calls from mobile phones are charged
standard network rate)
Address:
KitchenAid Europa, Inc.
PO BOX 19
B-2018 ANTWERP 11
BELGIUM
For Southern Ireland:
Tollfree number +44 (0) 20 8616 5148
www.KitchenAid.co.uk
www.KitchenAid.eu
W10506678A
© 2012. All rights reserved.
Specifications subject to change without notice.
W10506678A_01_EN.indd 16
07/12
7/11/12 1:45 PM
W10506678A
© 2012. All rights reserved.
Specifications subject to change without notice.
W10506678A_18_BkCov.indd 1
07/12
7/11/12 2:28 PM