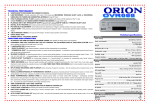
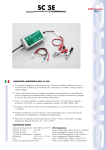
1
SPECIFICATION
MAX POWER OUTPUT............................................... 160W
CROSSOVER .............................................................. 30-160Hz (-12dB/oct)
PHASE ......................................................................... 0°,180°
INPUT SENSITIVITY
80mV-0.5V (Line Input)
0.9V-6V
(Speaker Input)
OPERATIONAL VOLTAGE .......................................... DC 14.4V (Operational between: 11~16V)
DIMENSIONS .............................................................. 342mmX238mmX80mm
8 INCH SUPER COMPACT ACTIVE SUBWOOFER
WEIGHT....................................................................... 5 Kg
SUBWOOFER INSTALLATION
Subwoofer Installation Place
1. Mount the installation bracket onto the bottom of the subwoofer (4 brackets, 4 screws).
2. Fix the brackets on the body of the vehicle (4 brackets, 4 screws).
PWE-V80
Subwoofer PWE-V80
Instruction Manual
Under the seat
Under the seat
In the trunk
Brackets and screws
Caution: Subwoofer warms up during continuous usage. Please make sure
that it is not covered and the installation place provides free space to the unit.
Installation place and method must not damage electrical wirings, gasoline
tank and other objects which might cause short circuit, fire, etc.
ACCESSORIES
Line controller
Remote start wire
10P connection couple
(Power line, remote start wire,
speaker input wire, ground wire)
Mounting bracket
5M power extension coupler (12AWG)
Fixed screw (locking vehicle)
Speaker output wire
Fixed screw (locking body)
1. CONNECTION
2. ADJUSTMENT
This product cannot be used in cars fitted with a common negative speaker system.
To prevent external noise from entering the audio system:
Your Alpine Dealer knows best about noise prevention measures so consult your dealer
for further information.
Ensure secure connections.
Any unused connections should be insulated with electrical insulation tape.
If the on-board computer or similar device, such as the ECU, contains security code,
you may loose the memory when connecting the negative lead.
Locate the unit and route the leads at least 10 cm away from the car harness.
Keep the power lines as far away from other leads as possible.
Connect the ground lead securely and safely to a bare metal spot (remove the coating if
necessary) of the car chassis.
If you add an optional noise suppressor, connect it as far away from the unit as possible. Your
Alpine Dealer can provide various noise suppressor solutions, contact them for further information.
CAUTION If there is distortion or you hear a popping sound from the subwoofer,
the input level is too high.
If the subwoofer has prolonged use in this condition, this may result
in deterioration of performance or may cause damage to the
subwoofer.
1 Disconnect the cable from the negative terminal of the car battery.
CONNECTIONS FOR SPEAKER LEVEL INPUT
2 Connect
CONNECTIONS FOR RCA INPUT
Head Unit
If your head unit does not have this lead, then please
connect to the the ACC lead of the vehicle.
The lead that supplies power when the key is at the
ACC position.
Remote start (blank without)
RCA lead
(sold separately)
R
R
Red
Pre-out
Left Speaker Output
RCA lead (L TYPE)
Left Speaker Output
White
Right Speaker Output
Right Speaker Output
L
Please connect to either the rear or
front speaker output leads.
- Caution
The output of the subwoofer will be
affected by the head unit fader settings.
Head Unit
White
L
White/black
Blue/White
Remote start
Remote start
Ash
Connect to the ACC line if the head
unit has no remote start lead.
Ground connection
Black
FUSE
Yellow
Connect the ground lead securely
and safely to a bare metal point
on the vehicle chassis.
Black
Ground connection
Connect the ground lead
securely and safely to a
bare metal point on the
vehicle chassis.
Ash/black
Battery extension lead
Yellow
POWER INDICATOR
Yellow
FUSE (10A)
Always use the extension
cable supplied for
connecting the +VE battery
terminal.
DO NOT connect this lead
to the head unit.
DO NOT modify this cable.
It may cause malfunction
and damage to the product
Left Speaker
Yellow
Battery extension lead
(10V)
Always use the extension
cable supplied for connecting
the +VE battery terminal.
DO NOT connect this lead to
the head unit.
DO NOT modify this cable.
It may cause malfunction and
damage to the product
Failure to do so may result in fire, accident or electrical shock.
Right Speaker
POWER SUPPLY &
SPEAKER LEVEL INPUT
POWER SUPPLY & SPEAKER LEVEL INPUT
Remote on
Bolts or nuts used for the brake or steering systems (or any other safety related system), or tanks should NEVER be used
for installations or ground connections. Using such parts could disable control of the vehicle and cause fire, etc.
Type of Lead
Remote turn on lead
Ground lead
Power line
Additional Information
Connect to the remote start lead of the head unit.
• If your head unit does not have this lead, then please connect to the the ACC lead of the vehicle. The lead supplies
power when the key is in the ACC position.
Attach securely and safely to a bare metal spot on the car's chassis.
Connect directly to the positive terminal of the car's battery.
Right speaker
input
Left speaker
input
Ground
wire
Power
supply
INPUT GAIN ADJUSTMENT
LOW PASS FILTER ADJUSTMENT
PHASE SELECTOR
1. Set the gain to MIN, Phase to NORM.LPF to CENTER before
swithing on the system.
2. Set the Bass/Treble adjustment to zero on the head unit. Set
the volume to your average listening level. lt may help to use a
music source that is familiar.
3. Next, gradually increase the gain level and system volume to a
point where system balance is achieved. If the gain level is set
too high, the subwoofer may begin to distort. Distortion may
also occur if the volume is set too high on the head unit. Check
that the other speakers have not begun to distort before
proceeding with the adjustment. If the entire speaker system in
the car is distorting, reduce the volume of the head unit.
4. Once the gain has been set, adjust the L.P.F (Low Pass Filter)
at afrequency which compliments your speaker system.
(We recommend using CENTER as a starting point.)
5. Adjusting the L.P.F will change the output volume of the
subwoofer. Repeat procedures 3 and 4 until the ideal setting is
found.
6. The final adjustment is the PHASE of the subwoofer. While
sitting in the driver's seat and with music playing, switch to a
better setting between NORM and REV - The ideal PHASE
setting varies from car to car, depending on the location of the
subwoofer and the interior acoustic characteristics of the car.